Chart created with Ammoguide’s Visual Comparison Tool. Visit Ammoguide.com to learn more.
One of our forum members was looking for a very accurate, mid-sized 6.5mm cartridge for target working and coyote hunting. There are many great options including the 6.5 Grendel, 6.5×47 Lapua, 6.5 Creedmoor, and Remington .260 (a 6.5-08). If you are considering the 6.5×47 you should read our 6.5×47 Cartridge Guide authored by the 6.5 Guys. This and other 6.5mm cartridges are covered in this introduction to 6.5 mm cartridges prepared by Eben Brown, President of Eabco.com.
Quick Guide to 6.5mm Cartridges
by Eben Brown, EABCO.com, (E. Arthur Brown Co. Inc.)
The current popularity of 6.5mm cartridges in the USA has been a long time in coming. I won’t go into my opinions on why it took so long to catch on. The important thing is that it finally HAS caught on and we’re now so fortunate to have a wide selection of 6.5mm cartridges to choose from!
6.5mm Grendel – Developed by Alexander Arms for the AR15 and military M4 family of rifles. The Grendel fits the dimensional and functional requirements of these rifles while delivering better lethality and downrange performance. [Editor: The little 6.5 Grendel delivers a lot of performance from a small package. This is one of the most accurate cartridge options for the AR15 platform.]
6.5mm BRM – Developed by E. Arthur Brown Company to give “Big Game Performance to Small Framed Rifles” — namely our Model 97D Rifle, TC Contender, and TC Encore. Velocities of 2400-2500 fps with 140gr bullets puts it just under the original 6.5×55 Swede performance.
6.5mm x 47 Lapua – Developed by Lapua specifically for international 300m shooting competitions (with some interest in long-range benchrest as well). Case capacity, body taper, shoulder angle, and small rifle primer are all features requested by top international shooters. You can expect velocities of 2500-2600+ with 140 gr bullets.
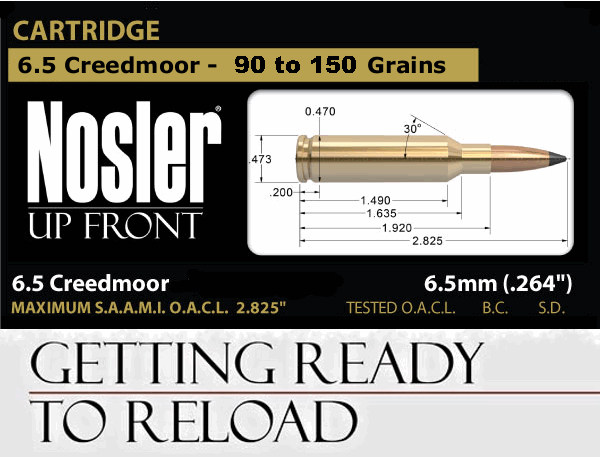
6.5mm Creedmoor – Developed by Hornady and Creedmoor Sports, the 6.5mm Creedmoor is designed for efficiency and function. Its shape reaches high velocities while maintaining standard .308 Winchester pressures and its overall length fits well with .308 Win length magazines. You can expect velocities of 2600-2700+ fps with 140gr bullets. [Editor: Yep, we know some PRS guys are loading hotter than that in bolt guns. We recommend you try the 120-130 grain bullets also with this cartridge. That may put you in a better accuracy node.]
This video reviews 6.5 Creedmoor Cartridge Brass options:
.260 Remington – Developed by Remington to compete with the 6.5mmx55 Swedish Mauser that was (finally) gaining popularity in 1996. By necking down the 7mm-08 Remington to 6.5mm (.264 cal), the .260 Remington was created. It fit the same short-action [receivers] that fit .308 Win, .243 Win, 7mm-08 Rem, etc. You can expect velocities of 2600-2700 fps with 140gr bullets in the 260 .Remington.
[Editor’s Note: In the .260 Rem, try the Lapua 120gr Scenar-Ls and/or Berger 130gr VLDs for great accuracy and impressive speeds over 2950 fps.]
6.5mm x 55 Swedish Mauser – This was the cartridge that started the 6.5mm craze in the USA. It is famous for having mild recoil, deadly lethality on even the biggest game animals, and superb accuracy potential. Original ballistics were in the 2500 fps range with 140gr bullets. Nowadays handloaders get 2600-2700+ fps.
[Editor’s Note: Tor from Scandinavia offers this bit of 6.5x55mm history: “Contrary to common belief, the 6.5×55 was not developed by Mauser, but was constructed by a joint Norwegian and Swedish military commission in 1891 and introduced as the standard military cartridge in both countries in 1894. Sweden chose to use the cartridge in a Mauser-based rifle, while Norway used the cartridge in the Krag rifles. This led to two different cartridges the 6.5×55 Krag and 6.5×55 Mauser — the only real difference being safe operating pressure.”]
6.5-284 Norma — This comes from necking the .284 Winchester down to .264 caliber. Norma standardized it for commercial ammo sales. The 6.5mm-284 was very popular for F-Class competition and High Power at 1,000 yards. However, many F-Class competitors have switched to the straight .284 Win for improved barrel life. 6.5-284 velocities run 3000-3100+ fps with 140gr bullets.
.264 Winchester Magnum – Developed by Winchester back in 1959, the .264 Win Mag never really caught on and may have delayed the ultimate acceptance of 6.5mm cartridges by US shooters (in my opinion). It missed the whole point and original advantage of 6.5 mm cartridges.
The Original 6.5mm Advantage
The special needs of long-range competition have skewed things a little. However the original advantages of 6.5mm cartridges — how deadly the 6.5mms are on game animals, how little recoil they produce, and how easy they are to shoot well — still hold true today.
We’re told the 6.5 Creedmoor is now the best-selling chambering in new bolt-action rifles sold in the USA. Accurate, versatile, with moderate recoil, the 6.5 Creedmoor cartridge serves hunters, paper punchers, and PRS/NRL shooters equally well.
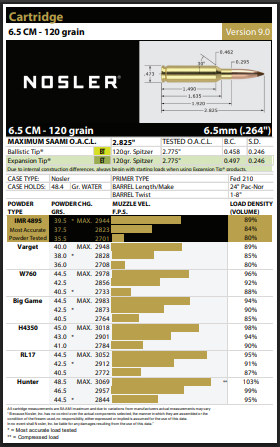
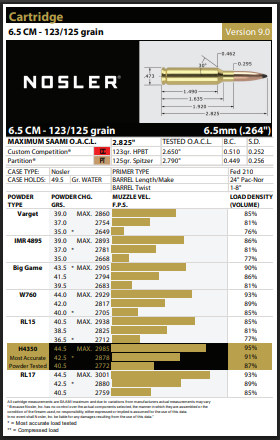
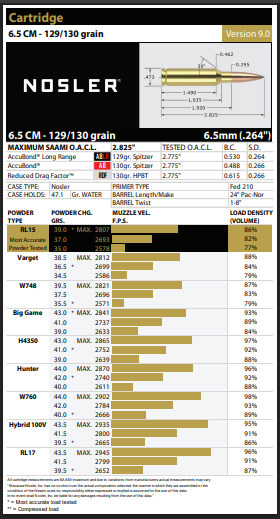
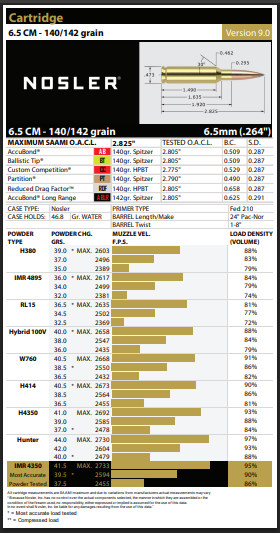
As part of its online Load Data Center, Nosler offers very complete load data for the popular 6.5 Creedmoor cartridge. This medium-sized cartridge combines excellent accuracy, good mag-feeding, good barrel life, moderate recoil, and reasonable component cost. That’s why this cartridge has become very popular for multiple shooting disciplines. GET ALL 6.5 Creedmoor Load Data.
How does barrel length affect 6.5 Creedmoor Muzzle Velocity? CLICK HERE for RifleShooter.com barrel cut-down velocity test.
According to the Sierra Load Manual: “Developed in 2007 by Dennis DeMille and Dave Emary, the 6.5 Creedmoor is a shortened and improved 30 TC cartridge case that was inspired by the .308 Winchester design. This short action design was created to maximize case capacity and a wide range of loading lengths, while still fitting in standard short action magazines. With the correct twist barrel, the versatile 6.5 Creedmoor can take advantage of the wide range of bullet weights available in 6.5 mm (i.e. .264 caliber). Reloaders should keep in mind that the 6.5 Creedmoor works best with medium to medium-slow powders such as H4350, Varget, Win 760, and RE-17.”
Click Each Image to Load PDF File for Listed Bullet Weights
Here’s something you’ve probably never seen before — a single-shot, bolt-action pistol chambered for the 6mmBR Norma cartridge (aka 6BR). Featured as one of our Guns of the Week a while back, this Green Machine is a Savage Striker upgraded by Chuck G. from Arizona, a self-described “Savage Maniac”. This impressive bolt-action pistol has shown exceptional accuracy.
Chuck transformed this Savage Striker single-shot from a ho-hum .308 into a reliable half-MOA precision 6BR that can run with accurized rifles all the way out to impressively long ranges. Here we provide highlights from our original article. Click the link below to read our full Savage Striker article, which is three times longer than this story, and has more photos, plus videos and a detailed load development section.
The Striker Project — Pursuit of Precision, by Chuck G.
I didn’t even know Savage Strikers existed until I saw one for sale on Gunbroker.com. I snagged it with a $400 bid. My idea was to build an accurate, long-range pistol on a pauper’s budget. As purchased, the Striker had a .308 barrel with an unknown round count, the standard center-grip, black synthetic stock, an odd two-piece custom brake, and an old Burris 4X pistol scope in a Conetrol 2-piece ring set. The trigger was very heavy, 6-8 lbs I’d estimate, with a lot of take-up and over-travel.
Initial Disappointments — Too Much Recoil, Poor Accuracy
My initial attempts to get the Striker to shoot well at even 100 yards were disappointing. I was never able to get better than a 3″, 5-shot group at 100. Not what I was looking for. Being used to benchrest triggers, the pull on this one was hard for me to manage. The gun would roll around on any type of front rest I had, and from a cement bench on a bipod it would jump about 18 inches up and sideways with every round. Not being used to this type of gun, I found the recoil and muzzle blast to be unsettling. It was hard not to flinch. I started off using my 1K .308 rifle load, 175 SMKs over 44 grains of Varget. That probably would have knocked the hell out of a deer, but it wasn’t much fun to shoot from the bench.
New Caliber, New Barrel — Way Better Accuracy!
I decided to rebuild the Striker in a caliber that would be more fun to shoot. 6mmBR was an obvious choice for all the usual reasons–good brass, wide choice of match bullets, easy to load, low recoil, very accurate, and relatively cheap to shoot. As part of a SavageShooters.com group buy, I ordered a 15″, SS match grade, 3-groove, heavy varmint contour, 10-twist barrel from Pac-Nor. To set the freebore, I provided Pac-Nor with a dummy case with an 88gr LD Berger bullet seated to use as a guide. Total delivered price was $340 chambered and threaded for a muzzle brake from JP Rifles.
This image below features a target created by the founder of AccurateShooter.com and 6mmBR.com. You can CLICK HERE to visit our target page with this and many other free targets.
When I bought it, the Striker, with factory .308 barrel, shot 3″ groups at 100. Now, with a Pac-Nor 6BR Match barrel, 3″ fore-arm plate, upgraded trigger, 24X scope, and match bullets, the gun consistently groups 1/2″ or better at 100 yards. What a transformation!”
Striker Project — Mission Accomplished
With further load development and bench practice, the gun is showing even more accuracy potential. Using a 24X target scope, the Striker has delivered 5-shot groups in the 3s and 4s during recent range visits. All in all, I’m very satisfied with the project. I ended up with an accurate, fun-to-shoot gun for under $1,000 including scope, paint, and bedding materials.
Stock Modifications
While waiting for the barrel I started working on the stock. As virtually no aftermarket stocks were readily available for the center-grip Striker, I decided to rebuild the standard black synthetic stock. The grip fit my hand poorly so I worked it over with a Dremel tool and sandpaper, built up the grip with Bondo, filled in some holes and bedded the action using Devcon Plastic Steel. This was my very first attempt at these tasks so progress was slow. Once I had re-shaped the stock, I sprayed five coats of “John Deere” green topped by several coats of auto clear. It came out surprisingly well considering I had never painted a stock before. I had originally planned to build up the fore-end to 3″ wide using Bondo but later decided to just use a Sinclair Benchrest Adapter that I had on hand.
Chuck notes: “I’m really pleased with the C & J one-piece Rest. It’s solid, heavy, and well-designed. There is no real need for a windage top; small adjustments are easily made by slightly shifting the pistol butt. Elevation adjustments are positive and once the pistol is set up on this rest NOTHING moves.”
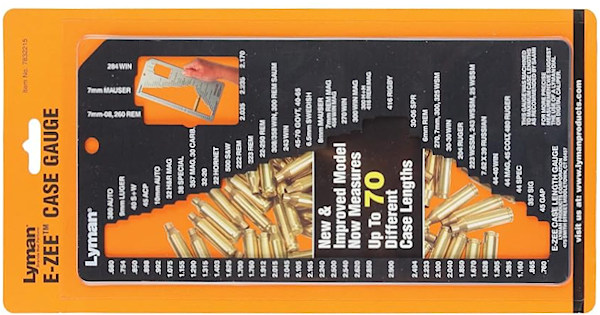
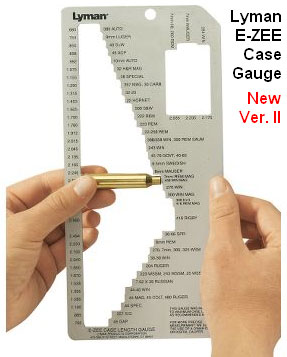
Lyman’s popular E-Zee Case Length Gauge II is now bigger and better. The latest version of Lyman’s Case Gauge is much larger than the original version. The Case Gauge II now measures more than 70 cartridge types — way more than before. This tool is a metal template with SAAMI-max-length slots for various cartridge types, including modern cartridges such as the Winchester Short Magnums. This tool allows you to quickly sort brass or check the dimensions. If you have a bucketful of mixed pistol brass this can save you hours of tedious work with calipers. You can also quickly check case lengths to see if it’s time to trim your fired brass.
If you load a wide variety of calibers, or do a lot of pistol shooting, we think you should pick up one of these Lyman Case Gauge templates. They are currently available for $24.99 at Brownells, $25.99 at MidwayUSA, and $30.53 on Amazon. The E-Zee Case Gauge has long been a popular item for hand-loaders.
NOTE: For years the E-Zee Case Gauge had a silver finish with black lettering, as shown above. Some of the most recent production of E-Zee gauges have a new “high contrast” look, with white lettering on a black frame. You may get either version when you order online — Brownells and MidwayUSA show silver, while Amazon shows black. We actually prefer the older silver version. Below is the black and white variant.
Lyman Case Gauge Should Last a Lifetime
Easily measure the case length of over 70 popular rifle and pistol cases with Lyman’s E-Zee Case Length Gauge. This really is a “must-have” piece of kit for any gun owner who hand-loads numerous pistol and rifle calibers.
This precisely-made metal gauge makes sorting or identifying cases fast and accurate. The template is machined with SAAMI max recommended case lengths. Made from metal, with no moving parts, the E-Zee Case Gauge should last a lifetime. The Lyman E-Zee Gauges offered by Brownells are silver with black lettering, while other Case Gauge models are black with white lettering.
Bryan Litz and The Science of Accuracy Academy have released a Podcast with vital information for all handloaders. This Podcast examines the effects of humidity variances on powder. Bryan notes: “If you want to know how much this can matter, we’re talking up to 200 fps difference for the same load of H4350 in 6.5 Creedmoor” at opposite extremes of humidity.
Bryan adds that “Most shooters don’t realize what a big deal this can be — it overshadows many of our efforts to make consistent velocity and hit targets. This can happen in loaded rounds not just for hand loading where you expose powder to ambient humidity. This is especially important for hunters considering the range of environments hunting ammo goes through.”
Subscriptions for Applied Ballistics The Science of Accuracy Academy Podcasts
If you like this podcast, and want to learn more from Brian Litz and his Applied Ballistics team, you can order a subscription to the Academy. Priced at $9.95/mo, this subscription will allow you to access all podcasts, exclusive videos, learning resources, and bullet data sheets.
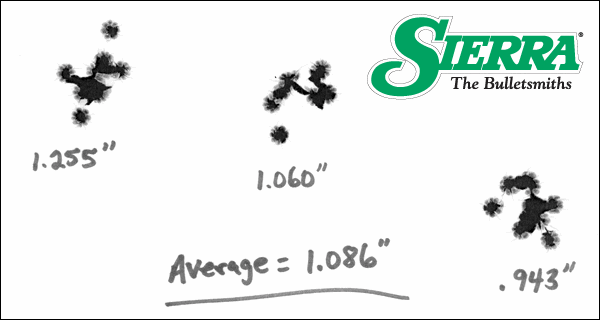
by Sierra Bullets Ballistic Technician Gary Prisendorf
Occasionally someone will ask, “Why did I get a flyer that didn’t go in with the rest of my group?” If I had an answer that would stop flyers from happening, I would be rich.
There are many reasons why this can happen. Everything from gripping a forearm differently to variations in the brass casing, the list goes on and on. Most of the time the flyer is usually shooter induced and sometimes what you may think is a flyer, is just part of your group. There are a lot of shooters, that go out and test a load and they may shoot a 3/8” group at 100 yards and think that load is good. But I have seen far too many times that you can shoot another group, same load, same rifle and the next time you may get a 1 ¼” group.
The total opposite can also occur. You may shoot a 1 ¼” group and turn around and follow it with a 1/2″ group without changing anything. If you only shot the one group, you might decide that load wasn’t any good and move on to something else without really knowing what that load was capable of.
To really determine how a particular load is performing we need to shoot multiple groups and take an average of the group sizes to really see what that rifle/load combination is really capable of.
I suggest shooting a minimum of three 5-shot groups and averaging the group sizes before deciding if the load is acceptable or not. Obviously the more rounds you shoot for a group and the more groups that you shoot, you will get a much better representation of what that particular combination can do.
Now I’m not saying to go out and shoot 30 groups with 50 rounds in each group to determine how well your load is shooting. That would be a bit pointless, in some cases it would be time to re-barrel your rifle before your load development was finished.
In most cases, I feel that three to five, 5-shot groups will give you a pretty good representation of how a load will perform in that specific firearm.
Here is a simple, low-cost way to get reliable readings of case headspace when you “bump” the shoulder back on your 6BR, .243 Win, or .308 Win brass. Credit Boyd Allen for this tip. First, you’ll need one .45 ACP case (.40 SW works too), with primer removed. Make sure the pistol case is trimmed square and that it is round. We recommend you first size it, trim it and chamfer. Next, take the .45 ACP (or .40 SW) case and slip it over the neck of a fired, unsized rifle case with the primer removed. Align the two cases between the jaws of your calipers and note the length from rim to rim (See photo below, with striped case).
OK, now you have the length for a fired rifle case BEFORE sizing. Next, take a full-length sized rifle case (without primer) and do the same thing, placing the pistol case over the neck of the FL-sized case (Bottom Photo). The difference between the two numbers is the amount of “bump” or set-back you are applying to the shoulder. Here the difference is .0015″. The amount of bump you need varies with your chamber and your load, but .0015-.002″ is a good initial setting. By using this simple tool, you can avoid bumping the shoulder too much. This will also help you set-up the depth of your full-length die to get the proper amount of bump each time.
Other Pistol Brass Types Work Too: Some folks have used this method but they prefer to work with 10mm or .40 SW brass rather than a .45 ACP, because slightly smaller-diameter pistol cases may conform to the shoulders of their sized rifle cases a bit better. That works fine — use whatever pistol brass case works best for your rifle brass. We got very repeatable results with .45 ACP brass but the method also works with 10mm or .40 SW brass. Just be sure the pistol brass has been sized, trimmed, chamfered, and de-burred.
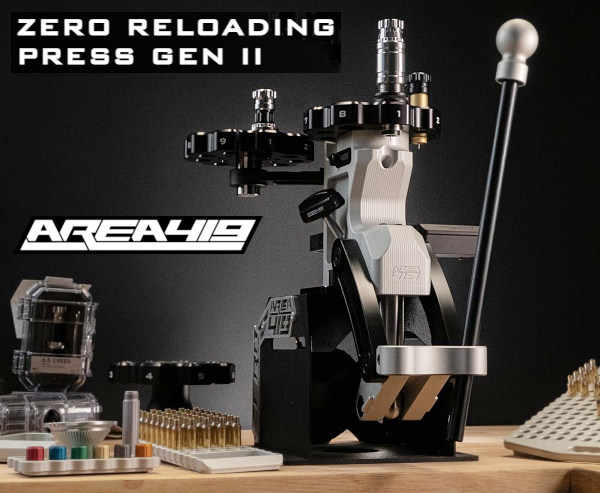
Every handloader can benefit from a turret press. This type of press features an upper rotating disk that has multiple threaded placements for dies or other tools (such as powder dispensers). There are a variety of turret presses on the market today with the remarkable Area 419 9-Station Zero Press at the top end, and the inexpensive Lee turret presses at the other end of the spectrum. In between are Lyman’s 8-station All-American turret, the Redding 7-station T-7 press, and the RCBS 6-station turret.
Today’s Saturday video showcase features notable turret presses from Area 419, Lyman, Redding, and RCBS. We lead off with a feature on the advanced Area 419 ZERO 9-station turret.
Area 419 ZERO 9-Station Turret Reloading Press — Without Peer
Area 419’s impressive ZERO reloading press is a 9-station turret press with some very unique features. This press was designed to be the most precise turret ever created. As tested by Gavin Gear of UltimateReloader.com, the ZERO turret press delivered very impressive shoulder-bump consistency and ultra-low seated bullet run-out (about +/- 0.0005″). The numbers were as good as you can get from a quality single-stage press, so Area 419 did some impressive engineering. We would expect that, as this represents a big investment — the current ZERO Gen 2 model $1400.00 at Area419.com. SEE FULL Gen 1 REVIEW on UltimateReloader.com.
The ZERO turret press lets you install up to nine (9) different reloading dies in the large top turret, which revolves around a central axis. But unlike most turret presses, the ZERO doesn’t have flex or wobble when you’re loading. This is because Area 419 includes a clever system for locking the turret in position after you’ve selected the die from your array.
Lyman Brass Smith All-American 8-Station Turret Press
The 8-station Lyman Brass-Smith All-American Turret Press is an impressive product. Since its introduction in 2018, Lyman’s All-American 8 has become popular with handloaders. With a $275.99 street price at MidwayUSA, the 8-station Lyman is $119 cheaper than the $394.99 7-station Redding T-7 (current Amazon price). No question, that’s a significant price advantage, which has helped Lyman grab turret press sales from Redding.
More Stations Provide More Reloading Options
Gavin liked having 8 stations, because this offers more flexibility. With eight stations, you can have four two-die sets, or three two-die sets plus a dedicated decapping die and a powder measure. Gavin notes: “I’ve owned many reloading presses, including 3-station, 4-station, 5-station, and 7-station variants, but I’ve never owned an 8-station press until the Brass-Smith All-American 8 came to the shop. I’ll have to say… you can’’t get too many stations, especially on a manually-indexed turret. I love the idea that you can leave dies on the press, and load multiple calibers/chamberings using the same turret setup.”
Quick Comparison Videos — Lyman, Lee, Redding
Below we’ve included a couple quick vertical-format video “shorts” which show the Lyman 8-station Turret Press and the Lee Classic 4-Hole Turret Press in action. If you are just loading one or two pistol cartridge types, the inexpensive ($184.99) Lee Class turret press may suffice.
Redding T-7 Turret Press Overview
The Redding T-7 has long been a leading turret press for precision handloaders. It offers one more station than the other “green” turret press offered by RCBS. It has a reliable optional priming system and plenty of leverage. We like the build quality of the Redding T-7, but at $394.99 on Amazon, it is now significantly more expensive than the Lyman turret, which has one more station. See a comparison of the Redding T-7 and Lyman 8-station turret press in a video below.
Redding T-7 with Creedmoor Sports Enhanced Turret Head
Creedmoor Sports offers an upgraded Enhanced Press Head for the Redding T-7. This $219.95 turret top allows greater precision in case sizing and bullet seating. This UltimateReloader video covers the advantages of the new precision turret head.
8 vs. 7 Stations — Lyman Turret and Redding T-7 Comparison
If you’re considering acquiring a turret press, it helps to compare products side by side. Here is an interesting comparison video showcasing the Redding T-7 and the Lyman 8-station turret press. This video offers a side-by-side comparison of the Redding turret and the Lyman turret, showing how each performs key functions.
RCBS Six-Station Turret Press
This Editor has used an RCBS Turret Press for over 20 years. It does not have the most stations or the most sophisticated features, but it has proven very reliable over the years. I use it primarily to load with pistol sizing and seating dies. Having six stations allows me to load multiple cartridge types: 9x19mm, .357 Magnum, and .45 ACP. READ FULL REVIEW on UltimateReloader.com. The RCBS Turret press is currently $389.99 on Amazon.
Creedmoor Enhanced Turret Heads for Redding and Lyman
Creedmoor Sports offers enhanced precision press heads for the Redding 7-station Turret Press and the Lyman 8-station Turret Press. The Creedmoor Enhanced Press Head is a direct drop-in upgrade to the factory OEM press head and can be installed in a matter of minutes. This press head is precision-crafted from stainless steel bar stock. Priced at $219.95, these enhanced heads are featured in the video below. (NOTE: There are also 1″ series turret heads for Lyman and Redding turrets priced at $154.95. These will only work with 1″ dies).
NOTE: Creedmoor Sports no longer lists an enhanced top for the 6-station RCBS Turret Press.
The $219.95 Creedmoor Sports turret top allows greater precision in case sizing and bullet seating. A recent UltimateReloader video covers the advantages of the new precision turret head for the Redding T-7. READ Full Report on UltimateReloader.com.
The USAMU has published a “how-to” article about bullet sorting. While many of us may sort bullets by base-to-ogive length (and/or weight), the USAMU story explores the “how and why” of sorting bullets by Overall Length (OAL). Read the article highlights below, and make your own decision as to whether OAL sorting is worth the time and effort. Bryan Litz of Applied Ballistics says that sorting by OAL is not a bad idea, but base-to-ogive bullet sorting probably represents a better investment of your time.
Bullet Sorting by Overall Length
We’d like to share a specialized handloading technique which we’ve long found beneficial to our long-range (600 yards and beyond) accuracy. Sorting of bullets for extreme long range (LR) accuracy is not difficult to do, but some background in theory is needed.
Here at USAMU’s Handloading Shop, we only sort individual bullets for the most demanding Long-Range applications and important competitions. Only the most accurate rifles and shooters can fully exploit the benefits of this technique. The basic sorting process involves measuring the Overall Length (OAL) of the bullets, and grouping them in 0.001″ increments. It’s not unusual to find lots of match bullets that vary as much as 0.015″-0.020″ in length throughout the lot, although lots with much less variation are seen as well. Even in bullet lots with 0.015″ OAL variation, the bullet base-to-ogive length will show much less variation. Hence, our basic sort is by bullet OAL. One obvious benefit of sorting is easily seen in the attached photo. The few bullets that are VERY different from the average are culled out, reducing probable fliers.
How does one know what OAL increments to use when sorting? The answer is simple. As each lot of bullets is unique in its OAL distribution, it’s best to sample your bullet lot and see how they are distributed. In the attached photo, you will see a set of loading trays with a strip of masking tape running along the bottom. Each vertical row of holes is numbered in 0.001″ increments corresponding to the bullets’ OAL. A digital caliper makes this task much easier. As each bullet is measured, it is placed in the line of holes for its’ OAL, and gradually, a roughly bell-shaped curve begins to form.
Note that near the center, bullets are much more plentiful than near the edges. At the extreme edges, there are a few that differ markedly from the average, and these make great chronograph or sighting-in fodder. We recommend using a sample of 200 bullets from your lot, and 300 is even better. Some bullet lots are very consistent, with a tall, narrow band of highly-uniform bullets clustered together over just a few thousandths spread. Other lots will show a long, relatively flat curve (less uniform), and you may also see curves with 2 or more “spikes” separated by several 0.001″ OAL increments.
Bullet Sorting — OAL vs. Base-to-Ogive vs. Weight
Expert advice from Bryan Litz, Applied Ballistics
I’m often asked what is a the best measure to sort bullets by, and the answer (to this and many other questions in ballistics) is: it depends.
Choosing to sort by overall length (OAL), base to ogive (BTO), bearing surface, weight, etc. can get overwhelming. Shooters typically look for something they can measure, which shows a variation and sort by that. It’s common for dimensional variations to correlate. For example, bullets which are longer in OAL are typically also shorter in BTO, and have longer noses. All these are symptoms of a bullet that was pushed a little further into the pointing die, or possibly had more than average lube while being swaged. So in essence, if you sort by BTO, you’re measuring one symptom which can indicate a pattern in the bullets shape.
So, the question still stands — what should you measure? You’ll always see more variation in OAL than BTO, so it’s easier to sort by OAL. But sometimes the bullet tips can be jagged and have small burrs which can be misleading. Measuring BTO will result in a lower spread, but is a more direct measure of bullet uniformity.
Then there’s the question of; how much variation is too much, or, how many bins should you sort into? Shooters who see 0.025” variation in BTO may choose to sort into 5 bins of 0.005”. But if you have only 0.005” variation in the box, you’ll still sort into 5 bins of 0.001”. What’s correct? You have to shoot to know. Live fire testing will answer more questions, and answer them more decisively than any amount of discussion on the subject. The test I recommend is to identify bullets on the extreme short end of the spectrum, and some on the extreme long end. Load at least 10 rounds of each, and take turns shooting 5-shot groups with them. If there is a difference, it will be evident. The results of the testing will answer your question of: should I sort based on X, Y, or Z?”
You can read more discussions on this and other similar subjects in our Accurateshooter.com Shooters’ Forum. Here’s a link to a thread discussing bullet sorting: Bullet Sorting Thread
At the request of our readers, we provide select “Deals of the Week”. Every Sunday afternoon or Monday morning we offer our Best Bargain selections. Here are some of the best deals on firearms, hardware, reloading components, optics, and shooting accessories. Be aware that sale prices are subject to change, and once clearance inventory is sold, it’s gone for good. You snooze you lose.
NOTE: All listed products are for sale to persons 18 years of age or older. No products are intended for use by minors.
1. Graf & Sons — Peterson Brass Sale
⏺️ » High-quality American-made cartridge brass with discounts
Peterson Cartridge produces very high-quality, competition-ready brass. And Peterson offers dozens of cartridge types — one of the widest selections of cartridge brass available. We’ve found Peterson brass to deliver good accuracy with excellent brass life. NOTE: As a bonus this week, if you order more than $150 worth of in-stock Peterson brass at Grafs.com, you get FREE ground shipping.
2. EuroOptic — Major Multi-Brand Optics Sale
⏺️ » Fantastic Deals on major brand optics
EuroOptic.com is running a major clearance sale this week on big name optics. You can save hundreds on quality scopes from Vortex, Leupold, Burris, Althon, Schmidt & Bender, and many other brands. This Limited Time Sale at EuroOptic offers huge savings up to 60% with specials and close-out deals. Click these links for sale listings by manufacturers: Vortex | Leupold | Burris | Athlon | Schmidt & Bender | Pulsar.
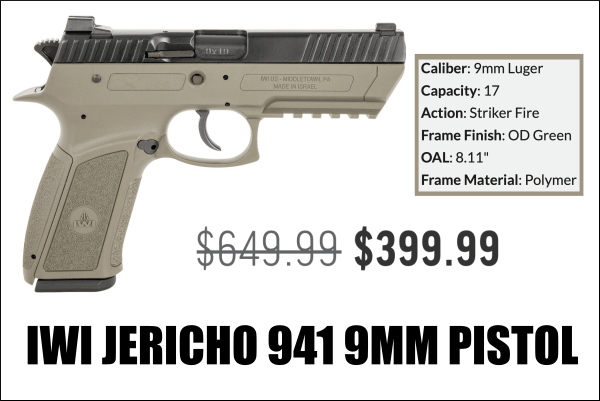
3. Palmetto State Armory — IWI Jericho 9mm Pistol, $399.99
⏺️ » High quality Israeli Weapons Industry (IWI) 9mm pistol
If you’re looking for a good, reliable 9mm handgun, consider the IWI Jericho 941 9mm pistol. This striker-fired pistol features a 4.4″ barrel and adjustable sights. The OD green polymer frame boasts interchangeable backstraps for good ergonomics. As part of PSA’s Veteran’s Day sale, this pistol is now just $399.99 — $250.00 off MSRP. The Jericho 941 combines notable CZ75-type features with IWI’s high standards for reliability, accuracy, and quality. User reviews have been very positive — 87% five-star.
4. MidwayUSA — Garmin Xero C1 Pro Chronograph, $499.99
⏺️ » Superb, ultra-reliable compact radar chrono with $100 savings
Right now MidwayUSA has the excellent Garmin Xero C1 Pro Chronograph for $499.99, $100 off MSRP. These Garmin Radar chronos measure velocities from 100 to 5000 FPS, are easy to set up, and have up to 6 hours of battery life. In addition, if you want more savings, MidwayUSA has some newly overhauled (NOH) Garmin Xero C1 Pro Chronographs at $479.99, $120 off the normal price. All these Garmin Xero C1 Pro Chronos come boxed with all accessories, manuals, and a 1-Year Manufacturer Warranty.
5. Palmetto SA — Veterans Day Sale, UP to $500 off MSRP
⏺️ » Huge savings on wide variety of products including ARs and optics
This week Palmetto State Armory is running a major Veteran’s Day Sale through Friday. Popular products (with big discounts) include: Rifles, Pistols, Optics, Triggers, Ammunition, AR Uppers/Lowers, Magazines, Rifle Cases, knives and more. There are some incredible deals. For example the PSA PA-15 M4 Carbine is just $469.99 — that’s $480.00 off the regular price, a 50.5% discount.
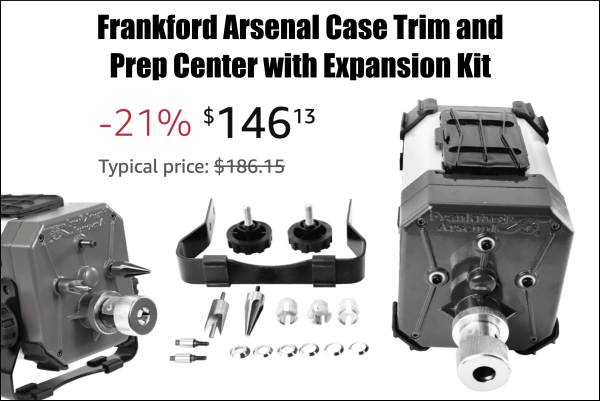
6. Amazon — Frankford Arsenal Case Prep & Trim Center, $146.13
⏺️ » Versatile powered tool center with good user reviews
The Frankford Arsenal Case Prep and Trim Center (#ad) can trim, chamfer, and deburr cartridge brass as well as clean primer pockets. The Case Prep Center boasts four power stations with case holder, VLD chamfering tool, outside chamfer tool, and primer pocket uniformers. The case holder features Adjustable Collet System (with bushing) for cases from .17 Rem to .460 Weatherby. This indexes the case shoulder and can be set to precisely trim brass to an exact length. This Frankford Case Prep Center is crafted from aluminum with a strong steel frame.
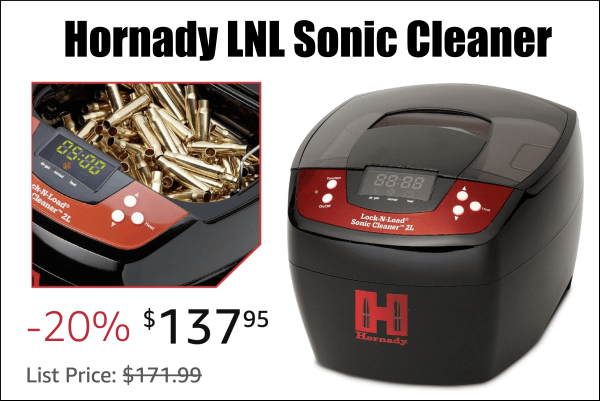
7. Amazon — Hornady LNL Sonic Cleaner, $137.95
⏺️ » Good, reliable, efficient unit for cleaning brass
Unlike traditional vibratory tumblers, Hornady’s LNL Sonic Cleaner (#ad) uses ultrasonic waves (with a ceramic heater) to quickly clean the inside and outise of cartridge brass. This can also help clean primer pockets. The large, 2-liter stainless steel tank holds up to 300 .223 Rem cases or 150 .308 Win cases. This Hornady machine is reliable and has good user reviews. For best results, use with Hornady One Shot Sonic Clean Solution (not included). The machine can also remove carbon residue from small metal equipment.
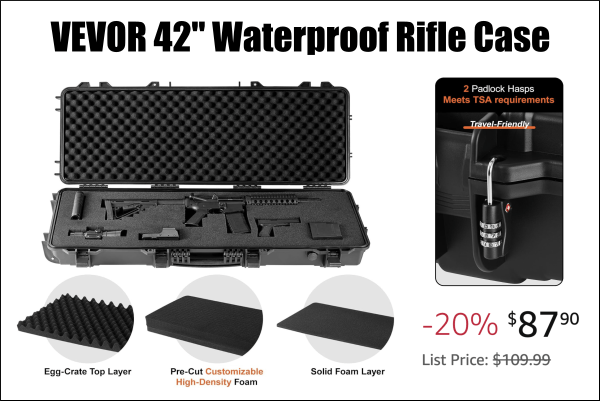
⏺️ » Major savings on rugged waterproof case; 50″ and 52″ models also
Protecting your firearms requires a good, tough transport case. The VEVOR 42″ Rifle Case (#ad) features three layers of protective foam, solid locking points, wheels, and a IP67 waterproof case. This VEVOR gun case meets TSA requirements, making it a good choice for rifle owners who travel by air. At just $87.90 this is a great deal — much cheaper than other wheeled rifle cases of similar size. NOTE: This design VEVOR case is available in larger sizes: 50″ long version for $108.99 and 52″ version for $132.99.
9. MidwayUSA — BOG Tripod Plus E-Max Pro Earmuffs, $149.99
⏺️ » Good combo set for Hunters and Varminters
Here’s a great combo for PRS/NRL shooters and/or hunters. You get the excellent BOG Deathgrip Tripod AND Caldwell E-Max Electronic Muffs for just $149.99 total at MidwayUSA (28% Off). And, for a few more days, this combo is just $129.99 at Palmetto SA during the PSA Veterans Day Sale. The BOG DeathGrip Tripod has rugged aluminum legs and a patented hands-free clamp that can quickly secure any rifle. The bipod head pans 360 degrees with cant adjustment. The 3-position leg angle lock allows bipod use in standing, kneeling, and prone positions. The comfortable, low-profile E-Max Pro electronic muffs have a 23dB noise reduction rating (NRR). NOTE: For a few days this week, this combo
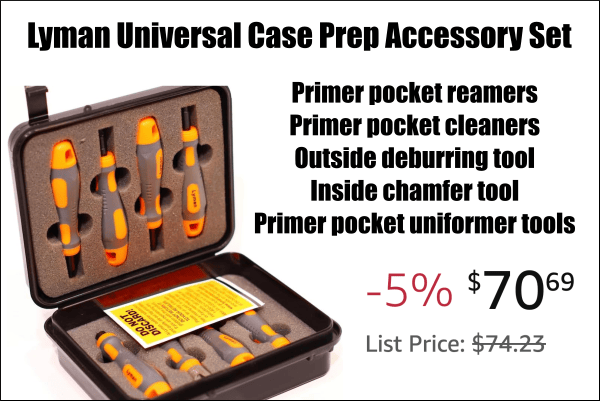
10. Amazon — Lyman Case Prep Tool Kit, $70.69
⏺️ » Handy kit with 11 tools — all you need to prep cases
If you prefer to do your case prep by hand, we like the Lyman Universal Case Prep Accessory Set (#ad) which has ll good tools all in one handy case with fitted foam interior. The set includes both large and small primer pocket reamers, primer pocket cleaners, outside deburring tool, inside (VLD) chamfer tool and large and small primer pocket uniformer tools. All individual items have their own molded handle with rubber insert for sure grip. Includes custom zippered case for storage.
As an Amazon affiliate, this site can earn revenues through sales commissions.


 .260 Remington – Developed by Remington to compete with the 6.5mmx55 Swedish Mauser that was (finally) gaining popularity in 1996. By necking down the 7mm-08 Remington to 6.5mm (.264 cal), the .260 Remington was created. It fit the same short-action [receivers] that fit .308 Win, .243 Win, 7mm-08 Rem, etc. You can expect velocities of 2600-2700 fps with 140gr bullets in the 260 .Remington.


 Here’s something you’ve probably never seen before — a single-shot, bolt-action pistol chambered for the 6mmBR Norma cartridge (aka 6BR). Featured as one of our


 Lyman’s popular