For some applications, we prefer a non-bushing FL die over a bushing die. Shown here are three Forster full-length sizing dies, with necks honed to three different dimensions: 0.265″, 0.266″, and 0.267″.
The Honed Full-Length Sizing Die Option
There are many good options in full-length (FL) sizing dies. Most precision hand-loaders prefer FL dies with neck bushings. These let you adjust the “grip” on your bullet by using larger or smaller bushings. FL bushing dies are available from Whidden Gunworks, Forster, Redding and other makers.
Conventional, non-bushing full-length sizing dies can create ultra-accurate ammo with very low run-out. But many conventional non-bushing FL dies have an undersized neck diameter so you end up with excess neck tension, and you work the brass excessively.
There is another effective option, one that promises extremely low run-out. The honed FL die is a full-length sizing die that has the necked honed to provide a precise fit to the case-neck. When done right, honed FL dies produce extremely straight ammo — as there are no issues with bushing alignment (or bushings that are not perfectly concentric). This Editor owns honed dies from Forster, Redding, and Whidden. They all perform extremely well, delivering match ammunition with extremely low run-out measured with a 21st Century Concentricity Gauge.
In one of the most popular articles we’ve ever published, Bugholes from Bipod, California shooter “Froggy” explained why he prefers honed dies for his tactical ammo.
Q: Do you FL size every time? Do you use custom dies?
Absolutely, I full length resize all of my brass every time I reload. And guess what? I’ve never had a feeding problem.
I do use a modified sizing die, without bushings. My FL resizing die has been custom-honed in the neck area to give .0015″ press fit on the bullet. I also put a slightly larger radius at the neck shoulder junction. I feel that this helps to seal the chamber. With this die, I get consistent neck tension every time–without bushings. Bushings are useful when you’re fishing around for a good load. But once you find the right amount of sizing for ideal neck tension, you can do this better with a customized FL die.
6.5 Guys Review Forster Honed Full-length Dies
The 6.5 Guys have reviewed honed FL sizing dies from Forster, explaining the pros and cons of this type of reloading die. They explained that, if you load a wide variety of bullets from different manufacturers, you many want to stick with a Bushing FL die. However, if you have settled on a particular bullet and found the “ideal” neck tension, then a honed die may make sense.
In this Gear Update, the 6.5 Guys discuss a service offered by Forster Products to custom hone the neck diameter of its full-length sizing dies to the customer’s specifications (to the thousandth). Whidden Gunworks also offers custom-honed FL dies.
Blue, Red, Green — There are many Progressive Press options on the market…
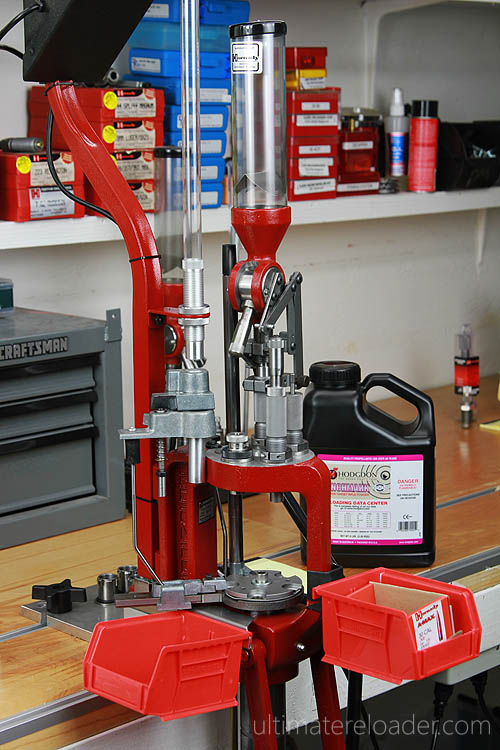
When you need ammo fast — lots of ammo, it’s hard to beat a progressive reloading press for output. We use progressive presses to load handgun ammo and .223 Rem cartridges for varmint safaris. With good dies, and proper press set-up, today’s progressive presses can produce surprisingly uniform and accurate ammo. No, you won’t see Benchrest Hall-of-Famers loading PPC cartridges on progressives. However, if you need 1000 rounds for your next prairie dog adventure, you should consider getting a progressive. Below you can see a Hornady Lock-N-Load AP configured to load .308 Winchester in bulk.
UltimateReloader.com has published helpful Tips to Optimize Progressive Rifle Loading. No matter whether you have a Red (Hornady), Green (RCBS), or Blue (Dillon) progressive, this article can help you load more efficiently and produce better results. Here are some highlights:
Proper Brass Prep
Just like a good paint job requires good prep work, great rifle ammo requires good brass prep. In order to make sure your rifle loading goes smoothly, make sure to perform the following brass prep steps:
Clean the brass (tumble, ultrasonic, etc.)
Inspect brass for cracks, deep dents, etc.
For military brass: de-prime, ream/swage primer pockets, size with small-base sizer die (small base usually optional).
Measure brass length — if too long, size and then trim.
Final inspection before loading.
Cleaning primer pockets may be something you’ll consider (I don’t clean primer pockets except for rare cases or match ammo).
Smooth and Steady Pace
Since you’re loading rifle ammunition on a progressive, you’re already saving a load of time, so there’s no need to rush things! Attention to detail is super-important for safety and for good results. Always keep an eye on powder level (goes down FAST) and what’s happening at each station.
The Right Press and Press Setup
Look for a heavy-duty, well-built press that will stand up to rifle loading. You’ll also want to make sure your powder measure will have the proper capacity (~25 grains for .223, ~50 grains for 308). If you are bulk reloading, ensure you have enough stations for sizing, charging, powder check, bullet feed, bullet seating, and (optional) bullet crimp. Compare the powder measuring systems, and give careful consideration to the priming process. You want case priming to be 100% reliable. This video reviews the differences between the Dillon XL-650 and the new XL-750 Progressive presses.
More Ultimate Reloader Resources for Users of Progressive Presses:
Everyone should have a 9mm Luger (9x19mm) pistol. The 9mm Luger round feeds/cycles great, recoil is moderate, and a vast array of excellent 9mm handguns are available. And, perhaps most importantly, quality factory ammo is affordable. In fact because 9x19mm ammo is produced in such quantity, it is some of the cheapest centerfire pistol ammo you can buy. Today we’ve found some great 9mm Luger ammo deals for you, with big-name factory stuff for under 18 cents per round.
At that price, it may not be worth reloading. Consider this — typical 9mm component costs easily approach fifteen cents per round even with free brass: Bullet ($0.08 – $0.10), Powder ($0.02), and Primer ($0.04). Given the costs of bullets, powder, and primers, it may not be worth reloading 9mm Luger, especially if you value your precious time!
Should You Reload 9mm Ammo? Run the Numbers, Then Decide…
While this Editor reloads almost all his .45 ACP and .44 Magnum ammo, I generally shoot factory ammo in my 9mm Luger pistols. Why? When you give some reasonable value to the time you spend setting-up and operating your reloading press, it is hard to beat factory ammo at around $10 per 50-count box (i.e. $0.20/round). While once-fired 9mm brass is plentiful (and cheap), you can easily spend 15-16 cents per round just on bullet, powder, and primer. So reloading may only save you 4 or 5 cents per round. Hence if you load 200 rounds per hour (including set-up time), you only recoup $8 to $10 per hour (at best) for all your effort. You may decide, as I did, that my time was worth more than that.
Great Deals on 9mm Luger (9x19mm) Factory Ammunition
Creedmoor Sports has released a series of helpful “how-to” videos in its new InfoZone web page. In the latest InfoZone video Bill Gravatt shows how to seat bullets using L.E. Wilson Hand Dies and an Arbor Press. The basic process is simple, particularly with a micrometer-top seating die. That makes it easy to adjust and set seating depth. Before you start seating bullets, you want to adjust the height of the arbor so the stroke is appropriate to the height of your die.
Bill Gravatt Shows How to Use Hand Seating Dies — Creedmoor INFOZONE
ARBOR PRESS TECHNIQUE: When using an arbor press, smooth is good. You don’t want to slam the handle down quickly. Try to repeat the same motion each time. You can also experiment by seating the bullet part way, then rotate the cartridge (in the die) and do the final seating with a second stroke. If your arbor press has a force gauge, note both the max value of the gauge needle and how it moves as you seat the bullet. If the needle spikes too rapidly, or bounces back and forth irregularly, set that cartridge aside and/or mark it. You could have neck tension issue with that case or some other fault. You might even have a bad bullet. That’s rare, but can happen. The key to success is moving the press arm in a smooth motion every time, maintaining the same down-pressure with each cartridge.
Here Bill Gravatt Offers a Simple Tip for Adjusting Wilson Seating Dies
One of our Forum readers asked “How can I get a custom in-line seater for my new rifle?”. First, we would say that, if you are not shooting an unusual Wildcat, check first to see if L.E. Wilson makes a stainless Micrometer Seater Die for your rifle. These dies are a joy to use, and we’ve found the fit to be exceptionally good with many calibers. Typically priced from $90-$100, Wilson stainless micrometer-top seaters are available for dozens of cartridge types: .204 Ruger, 20 BR, .222 Rem, .223 Rem, 22 PPC, 22 BR, .22-250, .223 WSSM, 6 PPC, 6mmBR, 6XC, 243 Win, .243 WSSM, 25 WSSM, 6.5×47 Lapua, 6.5 Creedmoor, 6.5-284, 26 Nosler, .270 WSM, 7mm-08, .284 Win, 28 Nosler, 7mm RUM, 30 BR, 30 IHMSA, .308 Win, .300 WinMag, .338 Edge (and MORE).
If you do want a custom seater die, the process is relatively simple. Purchase a die blank from Wilson and have your gunsmith run the chambering reamer in. Forum member Gunamonth explains: “I start with a Wilson seating die blank. They’re available from Sinclair and other vendors. Just run the reamer in. For some of my rifles, where I wanted the stainless die with the micrometer adjustment, I bought a smaller die and had the smith ream it with the chamber reamer. That’s how I had my 6 Dasher and 6mm AI seaters made. With the Dasher I stared with a 6mmBR Micrometer die.”
SEATER STEM TIP: If, on your seated bullets, you are seeing a sharp line around the jacket near the ogive, you may want to smooth out the leading edge of the Wilson seater stem (see above left). Do this by putting a little lapping compound on one bullet and manually spin this around in the stem. Without much effort you’ll have a smooth bullet/stem interface.
Micrometer Top Add-on
We really like micrometer tops on a seating die. But what if Wilson doesn’t make a micrometer top seater for your chambering? Don’t despair, Sinclair Int’l sells a $39.99 micrometer top that can be added to Wilson standard seaters or to a custom seater die made from a Wilson die blank.
Last fall, Shooting Times released an article entitled “Ten Most Common Reloading Mistakes”. Listed below are the Top Ten mistakes hand-loaders can make, at least according to Shooting Times. What do you think of this list — does it overlook some important items?
Top Ten Reloading Mistakes According to Shooting Times:
1. Cracked Cases — Reloaders need to inspect brass and cull cases with cracks.
2. Dented Cases — Dents or divets can be caused by excess case lube.
3. Excessive Powder Charge — Overcharges (even with the correct powder) can be very dangerous.
4. Primers Not Seated Deep Enough — “High” primers can cause functioning issues.
5. Crushed Primers — Some priming devices can deform primers when seating.
6. Excess Brass Length — Over time, cases stretch. Cases need to be trimmed and sized.
7. Bullets Seated Too Far Out — If the bullet is seated too long you may not even be able to chamber the round. Also, with hunting rounds, bullets should not engage the rifling.
8. Burrs on Case Mouths — Ragged edges on case mouths can actually shave bullet jackets.
9. Excess Crimp — This is a common problem with pistol rounds loaded on progressives. If case lengths are not uniform some cases will get too much crimp, others too little.
10. Inadequate Crimp — This can be an issue with magnum pistol cartridges in revolvers.
Do you agree with this list? We think some important things are missing, such as not adjusting full-length sizing dies properly. This can cause the shoulder to be pushed back too far (or not far enough). Another common mistake is using brass that is worn out, i.e. stretched in the case-head area from multiple cycles of hot loads. We also think the #1 error a reloader can make is using the wrong powder altogether. That can be a fatal mistake. See what happens when you load pistol powder in a rifle.
It’s 2020! Welcome the new year and a new decade. We know many of our readers will be spending the winter day indoors. If you need a break from the bowl games on TV, here are eight interesting and informative videos that are worth watching. The subject matter runs the gamut from benchrest gunsmithing to long-range varmint silhouette competition. There are also reviews of some of the best precision rifle options for PRS and NRL22 disciplines. Enjoy our New Year 2020 Video Fest.
Epic Reloading Hardware Test — 14 Single-Stage Presses. In this remarkable video, Gavin Gear of UltimateReloader.com reviews fourteen (14) single-stage reloading presses. This is the most comprehensive reloading press comparison test ever done by anyone, anywhere. The presses range from compact units to large-frame exotics from Europe. If you are in the market for a single-stage press in 2020 this is a MUST-watch video. Brands include Forster, Hornady, Lyman, MEC, RCBS, Redding, Turban (Prazipress).
2. Precision Riflesmith — Profile of Benchrest Smith Mike Bryant
Texas gunsmith Mike Bryant is a talented benchrest shooter and a highly respected builder of competition and hunting rifles. In this wide-ranging interview, Mike talks about benchrest competition, the key factors that contribute to rifle accuracy, and about his career as a gunsmith.
3. Erik Cortina — Mag-Feed Testing Borden Action with 6BR
Click the Speaker Icon (lower right) to HEAR AUDIO
Our friend Erik Cortina has built a new PRS/NRL rifle based on the new Borden Super Short 6 Action. This video show Erik’s first mag-feeding test with ten 6BR loaded rounds. You’ll see there is NO problem speed-feeding the short 6BR case. Erik tells us: “I removed the firing pin from bolt for safety. The magazine has not been modified in any way. I would say there is no need to do anything to it, she’s ready to run!” Impressive indeed.
4. Shooting USA — Texas Varmint Benchrest Match
This episode of Shooting USA TV features long-range varmint silhouette competition in Texas. This discipline combine the pure accuracy of benchrest competition with the fun of knocking down critter targets. These are smaller than standard silhouettes, so it’s quite a challenge to hit them at 300 yards and beyond.
In this episode, host John Scoutten competes with his 6.5 Creedmoor PRS rifle. Most shooters use benchrest-grade rifles with premium front rests. NOTE: This video shows some top-flight benchrest rifles, and also covers the origins of benchrest varmint silhouette in Pennsylvania. There are even some AccurateShooter Forum members on screen.
5. Vickers Tactical — .308 Win Bolt Gun Vs. .308 Win Gas Gun
This interesting video from Vickers tactical compares and contrasts two tactical style rifles both chambered for the .308 Winchester. The test team compares functionality, accuracy, ergonomics, and versatility. Each platform has its advantages, as the video reveals.
6. Outdoor Life — The Best New Affordable Precision Rifles
This video showcases three modern tactical-style rifles suitable for the PRS Production (Factory) Class which is limited to $2000 for rifle alone, not counting optics (Rule 2.3.1). Outdoor Life Shooting Editor John Snow puts three capable rifles through their paces: Patriot Valley Arms John Hancock, BadRock Precision SouthFork, and Seekins Precision Havoc Bravo.
7. Aerial View of Deep Creek Shooting Range in Montana
The Deep Creek Range near Missoula, Montana, is one of the best 1000-yard ranges in the country. Many long-range benchrest records have been set in this scenic, tree-lined facility. Now, thanks to Forum member David Gosnell (aka “Zilla”), you can see Deep Creek from the air. David flew a camera drone over the Deep Creek Range, soaring from firing line to the target bay and back again. This video gives you a “birds-eye view” of one of America’s elite ranges.
8. Nat’l Rifle League — Intro to NRL22 Rimfire Tactical Matches
NRL22 is a great way to get into competition shooting with minimal expense. There are Five (5) classes: Open, Base, Ladies, Young Guns (8-16), and Air Rifle. Base Class is for the budget-minded shooter — the combined MSRP of Rifle and Optic may not exceed $1050.00 (so you could spend $550 on a rifle and $500 on a scope for example). That keeps the sport affordable. Open, Youth, and Ladies Classes have no price limits on Rifle and Optic. Visit NRL22.org to find an NRL22 match near you.
Folks who load at the range need to bring a lot of gear — reloading presses, powder dispensers, scales, funnels, sizing/seating dies, brass prep tools and more. And there may be other important items to transport — such as ammo caddies, LabRadar mounts, over-size rest feet, and even barrel fans.
A rifle case works fine for carrying your scoped rifle, but you still need to organize all your reloading tools and other gear, and transport them safely from home to range and back again. Some guys have built their own loading tool-boxes from wood. Other may stuff gear in a couple of plastic range boxes. But clever Chris Covell came up with an even better solution.
Chris sourced a handsome, sturdy metal Horse Grooming Box from eBay. Chris reports the multi-feature metal box “works perfectly for reloading. My ChargeMaster is now out of the wind.”
Bullets, Trickler, and Priming Tool on Top
On top, below the hinged metal lid, is a large compartment that holds Covell’s funnels, scales, priming tool, trickler and other vital gear (photo on right). This top compartment is deep enough to handle wide-mouth funnels with no problem.
Slide-Out Drawer with Dividers
Below the top level is a handy sliding drawer with multiple dividers. This is perfect for holding Covell’s inline seating dies, case-neck deburring and chamfering tools, among many other smaller bits and pieces.
In the bottom of the Horse Grooming box is a large compartment that holds bigger gear. In the bottom section, Covell places his RCBS Chargemaster Lite, along with a case-trimming tool, an arbor press, and various other bulky tools. Check it out:
Chris Covell’s Range Box was featured on the Benchrest Shooting and Gunsmithing Private Group Facebook Page. You may want to sign up for this Group — with membership you can access a wealth of information for accuracy-oriented shooters.
Tumblers and walnut/corncob media are old school. These days many shooters prefer processing brass rapidly with an ultrasonic cleaning machine. When used with the proper solution, a good ultrasonic cleaning machine can quickly remove remove dust, carbon, oil, and powder residue from your cartridge brass. The ultrasonic process will clean the inside of the cases, and even the primer pockets. Tumbling works well too, but for really dirty brass, ultrasonic cleaning may be a wise choice.
Our friend Gavin Gear recently put an RCBS Ultrasonic cleaning machine through its paces using RCBS Ultrasonic Case Cleaning Solution (RCBS #87058). To provide a real challenge, Gavin used some very dull and greasy milsurp brass: “I bought a huge lot of military once-fired 7.52x51mm brass (fired in a machine gun) that I’ve been slowly prepping for my DPMS LR-308B AR-10 style rifle. Some of this brass was fully prepped (sized/de-primed, trimmed, case mouths chamfered, primer pockets reamed) but it was gunked up with lube and looking dingy.”
UltimateReloader.com Case Cleaning Video (7.5 minutes):
Gavin describes the cleaning exercise step-by-step on UltimateReloader.com. Read Gavin’s Cartridge Cleaning Article to learn how he mixed the solution, activated the heater, and cycled the machine for 30 minutes. As you can see in the video above, the results were impressive. If you have never cleaned brass with ultrasound before, you should definitely watch Gavin’s 7.5-minute video — it provides many useful tips and shows the cleaning operation in progress from start to finish.
Ultra Dry Necks After Ultrasonic Cleaning — Some Suggestions
The Ultrasonic cleaning process gets cartridge brass so “squeaky clean” that increased force may be required to seat your bullets, or they may “grab” as they go in the necks. To reduce bullet-seating effort, you may benefit from adding a little dry case lube inside the case-neck before loading (use a nylon brush). Another trick is adding a teaspoon of Ballistol lube to the cleaning solution. That provides a trace lubricant inside the necks, but does not interfere with powder ignition in any way.
The latest Gen2 RCBS ultrasonic cleaning machine has a large 6.3-quart capacity. That’s nearly 100 percent larger than the first generation machine in Gavin’s video. The Gen2 machine, $322.02 on Amazon, features a second ceramic heater and transducer to better clean brass cases and firearm parts. The LED is easily programmable, and the timer can be set for up to 30 minutes of cleaning. The original 3.2 quart capacity RCBS ultrasonic machine, as shown in Gavin’s video, is still available for $166.56 at Midsouth Shooters.
Shown is the Redding Model 15-P Competition Piloted Inside Chamfering Tool with pilot rod that centers in the case flash hole. Also shown is a Forster 45° Rocket Tool.
There are a wide variety of reloading tools designed to cut a slight chamfer in case necks and deburr the edge of the case mouth. You don’t need to spend a lot of money for an effective tool. A basic “rocket-style” 45° chamfering tool, such as the Forster, actually does a pretty good job taking the sharp edge off case mouths, particularly if you use a little scotch-pad (or steel wool) to smooth the edge of the cut. The Forster chamfer tool, shown below, is a nicely-made product, with sharper cutting blades than you’ll find on most other 45° chamferers. It costs $20.99 at Brownells.com.
Redding sells a handy piloted chamfering tool with a 15° inside cutting angle and removable accessory handle. This Redding Model 15-P chamferer works really well, so long as you have consistent case OALs. The pilot rod (which indexes in the flash hole) is adjustable for different cartridge types (from very short to very long). This ensures the concentricity of the inside neck chamfer to the case mouth. This quality tool ($35.99 at Brownells) works with cases from .22 to .45 Caliber.
Sinclair International offers a 28° carbide chamferer with many handy features (and sharp blades). The $29.99 Sinclair Carbide VLD Case Mouth Chamfering Tool will chamfer cases from .14 through .45 caliber. This tool features a removable 28° carbide cutter mounted in the green plastic Sinclair handle. It is on sale right now for $24.99 at Brownells. NOTE: A hex-shaft cutter head power adapter can be purchased separately for $14.99 (Sinclair item 749-002-488WS). This can be chucked in a power screwdriver or used with the Sinclair Case Prep Power Center.
Many folks feel they can get smoother bullet seating by using a tool that cuts at a steeper angle. We like the 22° cutter sold by Lyman. It has a comfortable handle, and costs just $11.54 at Midsouth Shooters. The Lyman tool is an excellent value, though we’ve seen examples that needed sharpening even when new. Blade-sharpening is easily done, however.
K&M makes a depth-adjustable, inside-neck chamferer (“Controlled Depth Tapered Reaper”) with ultra-sharp cutting flutes. The latest version, which costs $51.70 at KMShooting.com, features a central pin that indexes via the flash hole to keep the cutter centered. In addition, the tool has a newly-designed handle, improved depth-stop fingers, plus a new set-screw adjustment for precise cutter depth control. We caution, even with all the depth-control features, if you are not careful, it is easy to over-cut, slicing away too much brass and basically ruining your neck. We think that most reloaders will get better results using a more conventional chamfer tool, such as the Forster or Redding 15-P.
One last thing to note — tools like the K&M and the Sinclair chamferer are often described as VLD chamferers. That is really a misnomer, as bullets with long boat-tails actually seat easily with very minimal chamfering. In reality, these high-angle chamferers may be most valuable when preparing brass for flat-base bullets and bullets with pressure rings. Using a 22° or 28° chamferer can reduce the risk of cutting a jacket when using VLD bullets though — so long as you make a smooth cut.
We are re-publishing this article at the request of Forum members who found the information very valuable. If you haven’t read this Safety Tip before, take a moment to learn how you can inspect your fired brass to determine if there may be a potential for case separation. A case separation can be dangerous, potentially causing serious injury.
On the respected Riflemans’ Journal blog there was an excellent article about Cartridge Case-Head Separation. In this important article, Journal Editor GS Arizona examined the causes of this serious problem and explained the ways you can inspect your brass to minimize the risk of a case-head separation. As cases get fired multiple times and then resized during reloading, the cases can stretch. Typically, there is a point in the lower section of the case where the case-walls thin out. This is your “danger zone” and you need to watch for tell-tale signs of weakening.
The photo below shows a case sectioned so that you can see where the case wall becomes thinner near the web. You can see a little arrow into the soot inside the case pointing to the thinned area. This case hadn’t split yet, but it most likely would do so after one or two more firings.
Paper Clip Hack for Detecting Problems
The article provided a great, easy tip for detecting potential problems. You can use a bent paper clip to detect potential case wall problems. Slide the paper clip inside your case to check for thin spots. GS Arizona explains: “This simple little tool (bent paper clip) will let you check the inside of cases before you reload them. The thin spot will be immediately apparent as you run the clip up the inside of the case. If you’re seeing a shiny line on the outside and the clip is really hitting a thin spot inside, it’s time to retire the case. If you do this every time you reload, on at least 15% of your cases, you’ll develop a good feel for what the thin spot feels like and how it gets worse as the case is reloaded more times. And if you’re loading the night before a match and feel pressured for time — don’t skip this step!”


 One of our Forum readers asked “How can I get a custom in-line seater for my new rifle?”. First, we would say that, if you are not shooting an unusual Wildcat, check first to see if


 This episode of Shooting USA TV features long-range varmint silhouette competition in Texas. This discipline combine the pure accuracy of benchrest competition with the fun of knocking down critter targets. These are smaller than standard silhouettes, so it’s quite a challenge to hit them at 300 yards and beyond.

 Bullets, Trickler, and Priming Tool on Top


 On the respected Riflemans’ Journal blog there was an excellent article about Cartridge Case-Head Separation. In this important article, Journal Editor GS Arizona examined the causes of this serious problem and explained the ways you can inspect your brass to minimize the risk of a case-head separation. As cases get fired multiple times and then resized during reloading, the cases can stretch. Typically, there is a point in the lower section of the case where the case-walls thin out. This is your “danger zone” and you need to watch for tell-tale signs of weakening.


