During shooting season, there are probably 400 or more club “fun matches” conducted around the country. One of the good things about these club shoots is that you don’t have to spend a fortune on equipment to have fun. But we’ve seen that many club shooters handicap themselves with a few common equipment oversights or lack of attention to detail while reloading. Here are SIX TIPS that can help you avoid these common mistakes, and build more accurate ammo for your club matches.
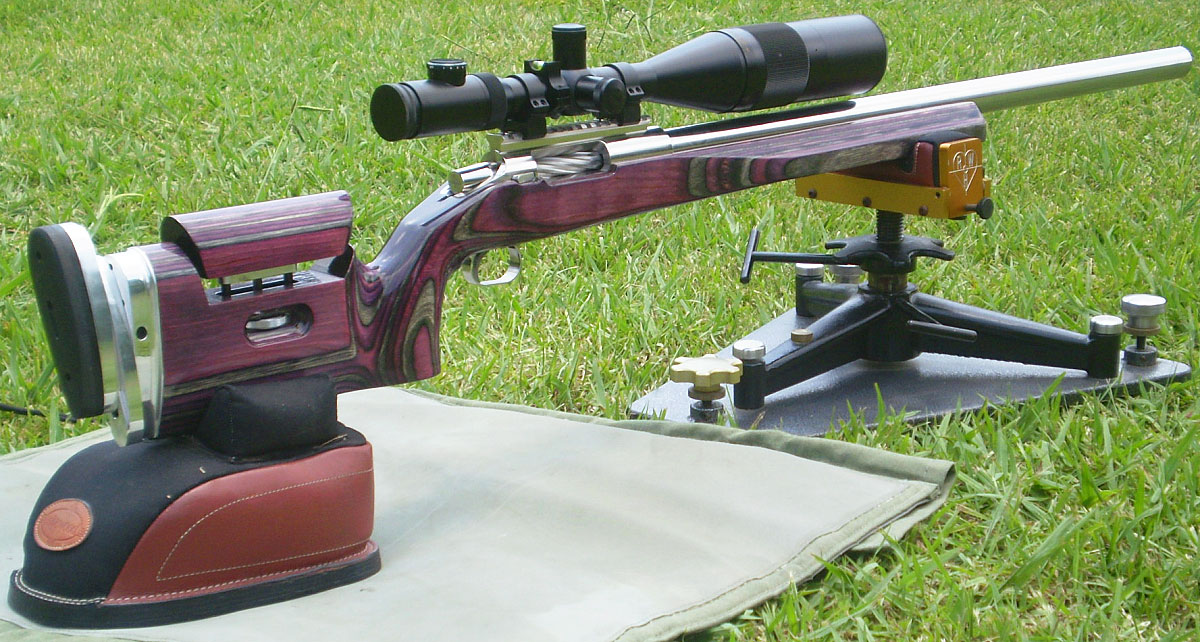
1. Align Front Rest and Rear Bags. We see many shooters whose rear bag is angled left or right relative to the bore axis. This can happen when you rush your set-up. But even if you set the gun up carefully, the rear bag can twist due to recoil or the way your arm contacts the bag. After every shot, make sure your rear bag is aligned properly (this is especially important for bag squeezers who may actually pull the bag out of alignment as they squeeze).
Forum member ArtB adds: “To align my front rest and rear bag with the target, I use an old golf club shaft. I run it from my front rest stop through a line that crosses over my speed screw and into the slot between the two ears. I stand behind that set-up and make sure I see a straight line pointing at the target. I also tape a spot on the golf shaft that indicates how far the back end of the rear bag should be placed from the front rest stop. If you don’t have a golf shaft, use a wood dowel.
2. Avoid Contact Interference. We see three common kinds of contact or mechanical interference that can really hurt accuracy. First, if your stock has front and/or rear sling swivels make sure these do NOT contact the front or rear bags at any point of the gun’s travel. When a sling swivel digs into the front bag that can cause a shot to pop high or low. To avoid this, reposition the rifle so the swivels don’t contact the bags or simply remove the swivels before your match. Second, watch out for the rear of the stock grip area. Make sure this is not resting on the bag as you fire and that it can’t come back to contact the bag during recoil. That lip or edge at the bottom of the grip can cause problems when it contacts the rear bag. Third, watch out for the stud or arm on the front rest that limits forward stock travel. With some rests this is high enough that it can actually contact the barrel. We encountered one shooter recently who was complaining about “vertical flyers” during his match. It turns out his barrel was actually hitting the front stop! With most front rests you can either lower the stop or twist the arm to the left or right so it won’t contact the barrel.
3. Weigh Your Charges — Every One. This may sound obvious, but many folks still rely on a powder measure. Yes we know that most short-range BR shooters throw their charges without weighing, but if you’re going to pre-load for a club match there is no reason NOT to weigh your charges. You may be surprised at how inconsistent your powder measure actually is. One of our testers was recently throwing H4198 charges from a Harrell’s measure for his 30BR. Each charge was then weighed twice with a Denver Instrument lab scale. Our tester found that thrown charges varied by up to 0.7 grains! And that’s with a premium measure.
4. Measure Your Loaded Ammo — After Bullet Seating. Even if you’ve checked your brass and bullets prior to assembling your ammo, we recommend that you weigh your loaded rounds and measure them from base of case to bullet ogive using a comparator. If you find a round that is “way off” in weight or more than .005″ off your intended base to ogive length, set it aside and use that round for a fouler. (Note: if the weight is off by more than 6 or 7 grains you may want to disassemble the round and check your powder charge.) With premium, pre-sorted bullets, we’ve found that we can keep 95% of loaded rounds within a range of .002″, measuring from base (of case) to ogive. Now, with some lots of bullets, you just can’t keep things within .002″, but you should still measure each loaded match round to ensure you don’t have some cases that are way too short or way too long.
5. Check Your Fasteners. Before a match you need to double-check your scope rings or iron sight mounts to ensure everything is tight. Likewise, you should check the tension on the screws/bolts that hold the action in place. Even on a low-recoiling rimfire rifle, action screws or scope rings can come loose during normal firing.
6. Make a Checklist and Pack the Night Before. Ever drive 50 miles to a match then discover you have the wrong ammo or that you forgot your bolt? Well, mistakes like that happen to the best of us. You can avoid these oversights (and reduce stress at matches) by making a checklist of all the stuff you need. Organize your firearms, range kit, ammo box, and shooting accessories the night before the match. And, like a good Boy Scout, “be prepared”. Bring a jacket and hat if it might be cold. If you have windflags, bring them (even if you’re not sure the rules allow them). Bring spare batteries, and it’s wise to bring a spare rifle and ammo for it. If you have just one gun, a simple mechanical breakdown (such as a broken firing pin) can ruin your whole weekend.
The Tactical Rifle Shooters Facebook Group recently showcased tools used to measure case headspace before and after “bumping” the shoulder. After a case is fired, hand-loaders who full-length size their cases will typically bump the shoulders back anywhere from .001″ to .0035″, depending on the rifle and application. With our 6mmBR and Dasher cases we like about .0015″ bump.
You want the amount of case sizing and bump to be the same for all your brass. To ensure uniformity, it makes sense to measure your cases before and after the FL sizing process. When we have time, we check every case. Other folks will simply check the first 3-4 cases coming out of the FL sizing die to ensure the FL die setting is correct and delivering desired headspace/bump.
1. Whidden Gunworks Shoulder Bump Gauge
There are a variety of tools that can be used to measure shoulder bump. Our favorite is a special cartridge-specific bushing made by Whidden Gunworks. The Whidden Shoulder Bump Gauge enables you to adjust your sizing die to the desired measurement. The bump gauge is attached to your calipers with a set screw and determines the measurement from the base to the shoulder of the case. The photo below, from Tactical Rifle Shooters, shows the Whidden Bump Gauge for the .375 CheyTac cartridge.
2. Dave Manson Vertical Comparator with Dial Read-Out
Dave Manson states: “This tool was designed to make life easier for the advanced shooter and re-loader by allowing precise measurement of ammunition, case, and chamber headspace. With this information, the re-loader will be able to fine-tune clearances and fits between his ammunition and chamber, with resultant improvements in accuracy and case life.” The functions of the Comparator are:
1. Measure headspace of factory or reloaded ammunition
2. Quantify chamber headspace by measuring headspace of a fired case
3. Ensure minimal shoulder set-back when setting up re-loading dies
4. Compare base-to-ogive length to ensure consistent bullet-to-rifling relationship.
In addition to the Dial Indicator and Stand, the $130.00 Vertical Comparator is supplied with multiple Datum Blocks of precise length and inside diameter (.3300″/.3750″/.4000″/.4375″). MORE INFO HERE.
3. Hornady L-N-L Headspace Comparator System
Hornady makes comparator gauges matched to the red comparator holder that mounts on your caliper. These Lock-N-Load Headspace Gauges are inexpensive. You can get a set of five gauges for $31.99. Hornady explains: “The Lock-N-Load® Headspace Comparator… gauge measures variations in brass before and after firing or re-sizing. It allows for headspace comparison between fire-formed brass and re-sized brass.” IMPORTANT: Hornady states: “To determine the proper bushing diameter for your cartridge, simply add the neck diameter and the shoulder diameter and divide that number by two. Use the bushing closest to that number.” Hornady offers five: .330″, .350″, .375″, .400″, and .420″.
One tip — We have found the Hornady gauges may vary a little from unit to unit even with the same nominal size. If you have more than one gauge for the same cartridge, test each on your brass — you may then note a slight difference in your bump measurements.
4. Pistol Brass Case DIY Bump Gauge
Last is a “field expedient” set-up if you do not have any of the comparator tools shown above. A sized .45 ACP case (or other suitable pistol case) can be used to measure shoulder bump. The mouth of the pistol case sits on the shoulder of your rifle cartridge brass.
Make sure the .45 ACP case is trimmed square and that it is round. We recommend you first run it through an expander, then size it, trim it and chamfer. Next, take the .45 ACP case and slip it over the neck of a fired, unsized rifle case with the primer removed. Align the two cases between the jaws of your calipers and note the length from rim to rim (See left photo below).
OK, now you have the length for a fired rifle case BEFORE sizing. Next, take a full-length sized rifle case (without primer) and do the same thing, placing the .45 ACP case over the neck of the FL-sized case (Right Photo). The difference between the two numbers is the amount of “bump” or set-back you are applying to the shoulder. Here the difference is .0015″. The amount of bump you need varies with your chamber and your load, but .0015-.002″ is a good initial setting.
Gavin Gear of UltimateReloader.com has been testing the AutoTrickler V3, a microprocessor-controlled powder-dispensing system that works with super-precise force restoration scales. Combining an automated powder measure with a motorized trickler, the AutoTrickler can deliver a full powder charge, with single-kernel precision, in a few seconds.
AutoTrickler inventor Adam MacDonald has developed numerous enhancements to his powder-dispensing system, which will be incorporated into the latest AutoTrickler V3 production version. Gavin Gear reviews all these important new features in a new video released on October 6, 2019. Check it out:
Key Enhancements for AutoTrickler V3 Production Version:
1. Improved, Larger-Capacity Clear Powder Hopper
The new clear plastic powder hopper is much larger than the old Lee red-colored hopper it replaces. That’s good news for folks loading large magnum cartridges.
2. Taller Glass Powder Cup and Improved Diffuser
When the main powder charge comes down from the hopper, it passes through a plastic “diffuser” into a glass cup. Both these products have been enhanced.
3. New Simple V-Shaped Stop for Powder Cup
With the V3, it is easier to center the powder cup on the scale unit. Gavin explains: “Instead of a ramp and ‘landing pad’, the cup stop is now a super-simple angled back stop. If you push the cup back towards the center of the pan, it will guide itself into the centered position every time.”
Here is the original AutoTrickler V3 Video Report from UltimateReloader.com:
Here’a useful article by Sierra Bullets Media Relations Manager Carroll Pilant. This story, which originally appeared in the Sierra Blog, covers some of the more common ammo problems that afflict hand-loaders. Some of those issues are: excessive OAL, high primers, and improperly sized cases. Here Mr. Pilant explains how to avoid these common problems that lead to “headaches at the range.
I had some gentlemen at my house last fall getting rifle zeros for an upcoming elk hunt. One was using one of the .300 short mags and every 3rd or 4th round would not chamber. Examination of the case showed a bulge right at the body/shoulder junction. These were new cases he had loaded for this trip. The seating die had been screwed down until it just touched the shoulder and then backed up just slightly. Some of the cases were apparently slightly longer from the base to the datum line and the shoulder was hitting inside the seating die and putting the bulge on the shoulder. I got to thinking about all the gun malfunctions that I see each week at matches and the biggest percentage stem from improper handloading techniques.
One: Check Your Cases with a Chamber Gage
Since I shoot a lot of 3-gun matches, I see a lot of AR problems which result in the shooter banging the butt stock on the ground or nearest solid object while pulling on the charging handle at the same time. I like my rifles too well to treat them that way (I cringe every time I see someone doing that). When I ask them if they ran the ammo through a chamber gage, I usually get the answer, “No, but I need to get one” or “I didn’t have time to do it” or other excuses. The few minutes it takes to check your ammo can mean the difference between a nightmare and a smooth running firearm.
A Chamber Gauge Quickly Reveals Long or Short Cases
Size Your Cases Properly
Another problem is caused sizing the case itself. If you will lube the inside of the neck, the expander ball will come out a lot easier. If you hear a squeak as the expander ball comes out of a case neck, that expander ball is trying to pull the case neck/shoulder up (sometimes several thousandths). That is enough that if you don’t put a bulge on the shoulder when seating the bullet … it can still jam into the chamber like a big cork. If the rifle is set up correctly, the gun will not go into battery and won’t fire but the round is jammed into the chamber where it won’t extract and they are back to banging it on the ground again (with a loaded round stuck in the chamber). A chamber gage would have caught this also.
Oversizing cases also causes problems because the firing pin doesn’t have the length to reach the primer solid enough to ignite it 100% of the time. When you have one that is oversized, you usually have a bunch, since you usually do several cases at a time on that die setting. If the die isn’t readjusted, the problem will continue on the next batch of cases also. They will either not fire at all or you will have a lot of misfires. In a bolt action, a lot of time the extractor will hold the case against the face of the breech enough that it will fire. The case gets driven forward and the thinner part of the brass expands, holding to the chamber wall and the thicker part of the case doesn’t expand as much and stretches back to the bolt face. If it doesn’t separate that time, it will the next time. When it does separate, it leaves the front portion of the case in the chamber and pulls the case head off. Then when it tries to chamber the next round, you have a nasty jam. Quite often range brass is the culprit of this because you never know how many times it has been fired/sized and in what firearm.’Back to beating it on the ground again till you figure out that you have to get the forward part of the case out.
Just a quick tip — To extract the partial case, an oversized brush on a cleaning rod [inserted] and then pulled backward will often remove the case. The bristles when pushed forward and then pulled back act like barbs inside the case. If you have a bunch of oversized case that have been fired, I would dispose of them to keep from having future problems. There are a few tricks you can use to salvage them if they haven’t been fired though. Once again, a case gage would have helped.
Two: Double Check Your Primers
Another thing I see fairly often is a high primer, backwards primer, or no primer at all. The high primers are bad because you can have either a slam fire or a misfire from the firing pin seating the primer but using up its energy doing so. So, as a precaution to make sure my rifle ammo will work 100% of the time, I check it in a case gage, then put it in an ammo box with the primer up and when the box is full, I run my finger across all the primers to make sure they are all seated to the correct depth and you can visually check to make sure none are in backwards or missing.
Three: Check Your Overall Cartridge Length
Trying to load the ammo as long as possible can cause problems also. Be sure to leave yourself enough clearance between the tip of the bullet and the front of the magazine where the rounds will feed up 100%. Several times over the years, I have heard of hunters getting their rifle ready for a hunt. When they would go to the range to sight in, they loaded each round single shot without putting any ammo in the magazine. On getting to elk or deer camp, they find out the ammo is to long to fit in the magazine. At least they have a single shot, it could be worse. I have had hunters that their buddies loaded the ammo for them and then met them in hunting camp only to find out the ammo wouldn’t chamber from either the bullet seated to long or the case sized improperly, then they just have a club.
Four: Confirm All Cases Contain Powder
No powder in the case doesn’t seem to happen as much in rifle cartridges as in handgun cartridges. This is probably due to more handgun ammo being loaded on progressive presses and usually in larger quantities. There are probably more rifle cartridges that don’t have powder in them than you realize though. Since the pistol case is so much smaller internal capacity, when you try to fire it without powder, it usually dislodges the bullet just enough to stick in the barrel. On a rifle, you have more internal capacity and usually a better grip on the bullet, since it is smaller diameter and longer bearing surface. Like on a .223, often a case without powder won’t dislodge the bullet out of the case and just gets ejected from the rifle, thinking it was a bad primer or some little quirk.
For rifle cases loaded on a single stage press, I put them in a reloading block and always dump my powder in a certain order. Then I do a visual inspection and any case that the powder doesn’t look the same level as the rest, I pull it and the one I charged before and the one I charged after it. I inspect the one case to see if there is anything visual inside. Then I recharge all 3 cases. That way if a case had powder hang up and dump in the next case, you have corrected the problem.
On progressive presses, I try to use a powder that fills the case up to about the base of the bullet. That way you can usually see the powder as the shell rotates and if you might have dumped a partial or double charge, you will notice as you start to seat the bullet if not before. On a progressive, if I don’t load a cartridge in one smooth stroke (say a bullet tipped over sideways and I raised the ram slightly to reset it) Some presses actually back the charge back adding more powder if it has already dumped some so you have a full charge plus a partial charge. When I don’t complete the procedure with one stroke, I pull the case that just had powder dumped into it and check the powder charge or just dump the powder back into the measure and run the case thru later.
One of our Forum members complained that he wasn’t able to set his primers flush to the rim. He tried a variety of primer tools, yet no matter what he used, the primers still didn’t seat deep enough. He measured his primers, and they were the right thickness, but it seemed like his primer pockets just weren’t deep enough. He was mystified as to the cause of the problem.
Well, our friend Boyd Allen diagnosed the problem. It was the decapping rod. If the rod is adjusted too low (screwed in too far), the base of the full-diameter rod shaft (just above the pin) will contact the inside of the case. That shaft is steel whereas your case is brass, a softer, weaker metal. So, when you run the case up into the die, the shaft can actually stretch the base of the primer pocket outward. Most presses have enough leverage to do this. If you bell the base of the primer pocket outwards, you’ve essentially ruined your case, and there is no way a primer can seat correctly.
The fix is simple. Just make sure to adjust the decapping rod so that the base of the rod shaft does NOT bottom out on the inside of the case. The pin only needs to extend through the flash hole far enough to knock the primer out. The photo shows a Lyman Universal decapping die. But the same thing can happen with any die that has a decapping rod, such as bushing neck-sizing dies, and full-length sizing dies.
Whenever you use a die with a decapping pin for the first time, OR when you move the die to a different press, make sure to check the decapping rod length. And it’s a good idea, with full-length sizing dies, to always re-check the height setting when changing presses.
Lee Universal Decapping Die on SALE for $10.96
Speaking of decapping tools, Midsouth Shooters Supply sells the Lee Universal Decapping Die for just $10.96 (item 006-90292), a very good deal. There are many situations when you may want to remove primers from fired brass as a separate operation (prior to case sizing). For example, if your rifle brass is dirty, you may want to de-cap before sizing. Or, if you load on a progressive press, things will run much more smoothly if you decap you brass first, in a separate operation.
NOTE: Some Euro Small Flash Holes are 1.5mm or 0.059″.
The low-cost Lee Universal Decapping Die will work with cartridges from 17 Fireball all the way up to big Magnums. However, NOTE that the decapping pin supplied with this Lee die is TOO LARGE for LAPUA 220 Russian, 6mmBR, 6.5×47, 6.5 Creedmoor, .308 Win (Palma) and Norma 6 PPC flash holes. Because the pin diameter is too large for these brass types, you must either turn down the pin, or decap with a different tool for cases with .059″ flash-holes. Otherwise, the Lee Decapping Die works well and it’s a bargain.
It’s summer time. That means many of our readers are on the road (attending major shooting matches or enjoying summer vacations). How do you do your reloading chores while living like a gypsy for a few weeks? Here’s a solution from Forum member Dave Gray (U.S. Army Retired).
Dave is a self-declared “full-time RVer” who spends most of his time on the road. Behind his Ram 3500 pickup, Dave tows a huge 41-foot Heartland Cyclone toy hauler featuring a 12X8 foot garage in the rear. In the rear garage area, which holds a Smart Car, Dave has set up a removable reloading bench complete with RCBS Rockchucker single stage press and Dillon progressive press.
Reloading Bench Mounts to RV Wall with Brackets
Dave explains: “I used a 2″X6″X5′ board for the bench. It’s perfect for my needs, and is easy to disassemble. I made it this small so that I can park my Smart Car in the garage during travel to my destinations. The bench, attached to the wall frames, is very solid. The presses’ centers are 3″ and 6.5″ from the brackets. [There are] four bolts on the wall into aluminum wall frame and 3 bolts in the bench. If I ever have to replace the current board, I’ll do so with oak or birch or hickory. When I’m not reloading, I remove the presses and store them in a protected space. I can easily attach other equipment to the bench by using C-Clamps.” Dave’s “rolling reloading room” looks very well thought-out. We commend Dave for his inventiveness.
With the U.S. F-Class National Championship running this week in Raton, NM, we thought we’d highlight a very important .284 Win rifle. This is the .284 Winchester rig that Charles Ballard used to win back-to-back F-Open titles in 2008 and 2009. Ballard’s huge success with the .284 Winchester cartridge helped make the .284 Win (and .284 Win Improveds) the dominant cartridge in F-Open competition worldwide. Enjoy this trip back in time to when the .284 Win was the “new kid on the block”.
Ballard Wins Back-to-Back F-Open Championships
In a very short span, Ballard and this rifle racked up an impressive string of performances. Ballard won the NRA Long-Range Regional, setting a new National Record in the process — 200-23X at 1000 yards. He also won the North Carolina F-Class Championship with the gun, and then captured the 2008 F-Open National Championship, followed by a second F-Open title in 2009. At the 2008 Nationals in Lodi, Wisconsin, Charles shot a 1337-65X with Berger 180gr bullets. At the 2009 F-Class Nationals, held at Camp Butner, NC, Ballard shot a 1328-62X to win his second straight National title.
Ballard’s “Purple Haze” rifle features superb components, including a BAT MB action, Nightforce 12-42 BR Scope, and a wickedly accurate 32″ Broughton barrel.
Charles Ballard always used eye and ear protection. For these photos, he removed safety glasses.
Building a Championship-Winning F-Classer
by Charles Ballard
This rifle project began several years ago. My purpose was to find a cartridge that would launch the high-BC, 180gr 7mm bullets at competitive velocities for F-Class competition. I also sought barrel life that would be far superior to that of a 7mm WSM or 6.5-284. I read the article on 6mmBR.com about Jerry Tierney’s .284 Winchester and the cogs began to turn. After speaking with Mr. Tierney at the 2006 US F-Class Nationals, I decided the .284 Win would be the chambering for the new gun, despite several shooters telling me I would not be able to obtain the desired velocities. Jerry said “go for it” and, as it turned out, the rifle delivered the velocity I wanted, plus extraordinary accuracy to boot. This gun has more than exceeded my expectations, winning matches and setting a new 1000-yard, single-target F-Class National Record (200-13X).
Rifle Specifications–All the Hardware
My action of choice was a beefy 1.55″-diameter, round BAT MB, Left Bolt, Right Port. I chose this action based on BAT Machine’s impeccable reputation. I also liked the fact that the MB (medium long front) action offered an extended front end. This would provide better support for a very long barrel and give more bedding surface. The action is topped with a stainless BAT tapered (+20 MOA) Picatinny scope rail. Housed in a polished, stainless BAT trigger guard is a Jewel trigger set at 5 ounces.
The barrel is a 32″ Broughton 5C. The chamber was cut with a reamer made for Lapua 6.5-284 brass necked up to 7mm. It’s throated for the 180gr Bergers. I selected a Broughton 5C because, as my gunsmith says, “They just shoot”. This is a 1:9″ twist, 1.250″ straight contour for 32″. Yes, that’s a long, heavy barrel, but I think the length gives me a velocity advantage. On other guns, a 32″ tube could cause the rifle to be front-heavy and out-of-balance. The stock by Precision Rifle & Tool has a 3″-longer fore-end which solves the problem. The purple .284 balances very well and tracks great.
Speaking of the stock, there was only one choice, a “Purple Haze” laminated F-class model from Precision Rifle & Tool. This stock features a fully-adjustable buttplate plus a removable cheek-piece with thumb-wheel adjustment. Most importantly, the stock features an extra-long, super-stiff, low profile fore-end. This design rides the bags better than any stock I have ever shot. The action area of this stock has been beefed up to house the large BAT MB action. The final component on this rifle is a 12-42×56 Nightforce BR with DD-1 reticle set in Leupold Quick Release rings.
The Ultimate F-Open Rig
To start this project, I contacted Ray Bowman of Precision Rifle & Tool, PrecisionRifleSales.com. The first order of business was to get the action ordered, knowing how long it would take to get a BAT left bolt, right port action, plus scope rail, and trigger guard. We knew we wanted a Broughton 5C, but what twist rate? Based on the success I had shooting 210s in my 300 WSM with a “slower” 1:11″ twist we opted to go with a 1:9″ twist 7mm to shoot the 180gr Bergers. A dummy round was sent to Pacific Tool and Gauge to have a reamer ground to our specs.
Not shooting free recoil, I needed a stock that would fit me like a prone stock but track like a benchrest stock. Precision Rifle & Tool’s F-Class stock fit this bill to perfection. Ray keeps Jewell triggers in stock so the only piece left to acquire was the scope. On the old F-Class targets I would have been content with a Leupold 8-25 LRT, but on the new target a scope with 1/8-MOA adjustments and high magnification is a must. I considered the Leupold competition scopes but ultimately decided on the Nightforce BR. The variable power and unobstructed DD-1 reticle of the NF were deciding factors.
NOTE: Charles Ballard always employs eye and ear protection when shooting. For these posed photos, he removed his safety glasses.
Ballard’s Tips for F-Class Competition
In this section, Charles Ballard explains the basics of shooting an F-Class match, from the initial prep period to end of match. He covers sighter strategies and techniques for record fire, and he also explains, in detail, how he dopes the wind and judges hold-offs based on mirage.
Three-Minute Prep Period
I spend the first part of my 3-minute prep period making sure my front rest and rear bag are in-line. This insures the gun returns to the same spot after recoil. After I am happy with my set-up, I take a position similar to that of a conventional prone shooter. My face rests on the stock and my shoulder is placed firmly into the buttplate. With the Right Bolt, Left Port action, I can shoot the entire match with minimal movement. The last segment of prep time is spent trying to dope the wind.
Sighter Strategies
In a match with only two sighters, I’ll make a wind call and try to hit the center with my first shot. In matches with unlimited sighters, I generally hold dead center with a no-wind zero and use the point of impact as feedback. If I feel there is a constant condition, I will click for the wind. This allows me to use the center as my primary hold. After I get the feedback I need from my sighters it’s time to go for record.
Record Fire
After record fire begins I shoot very fast, holding off for the wind. I’ll make my wind call while the target is in the pits; if my previous shot went where I thought it would I will take my next shot as soon as the target stops. I predominantly shoot and adjust my aim based on mirage. If I have switching conditions, I will remove all wind from the scope, slow down, use the flags and mirage, still holding off. I do this because I have never had success waiting on a condition to come back.
Cleaning Procedures
I do not clean until the match is over. This means I typically shoot 120 to 150 rounds on average between barrel cleanings. I quit cleaning every relay after reading Mr. Tierney’s article, but I would still clean on Saturday night after I got home. After getting in late one Saturday night, I forgot to clean my rifle. I remembered this as I was preparing to shoot the first relay Sunday morning. At the time I was shooting a 300 WSM. Well, guess what… that relay I shot a 200-19x, and the next relay I shot a 200-17x (these scores were on the old, larger F-Class target). I found that the 300 WSM’s vertical really tightened up after about 50 rounds. The same has proven true of my .284 Winchester–vertical improves once 50 rounds are through the bore.
When I do clean, it’s simple. I use Bore Tech Eliminator on three patches, then follow with a wet nylon brush. These steps are repeated until the bore is spotless. I then push one wet patch of Eliminator through the bore and leave it.
Load Development and Accuracy Testing
My philosophy on load development differs from many shooters. I don’t primarily shoot for groups. The only goal I have is to obtain the lowest ES and SD I possibly can. Holding elevation in F-Class is crucial. Uniform velocity gives me more consistent vertical point of impact.
As we commenced load development, Jerry Tierney’s .284 Win load data posted on this 6mmBR.com gave us a good starting point. We loaded 53.0 grains of Hodgdon H4831sc and shot one round, cleaned, shot three rounds, cleaned, then shot 10 rounds and cleaned. From this point we worked up in half-grain increments until pressure signs developed at 2950 fps. Then we backed the powder charge down until the bolt lift was smooth and the primers were nice and round. [Editor’s Note: Jerry Tierney is no longer with us. We mourn his passing.]
Success: 2910 FPS with Ten-Shot ES of 7 and SD of 3
At this point I began working with different primers, neck tension and seating depth. After trying Federal 210m primers, CCI BR-2 primers, light tension, heavy tension, jamming, jumping, we settled on 56.0+ grains of H4831sc with CCI BR-2 primers. We ran about .002 neck tension with the 180s seated just touching the lands. This load gave us 2910 fps velocity with an Extreme Spread (ES) of 7 fps and a Standard Deviation (SD) of 3 fps over ten (10) shots.
NOTE: If you’re skeptical of those single-digit chron readings, click on the Video Playback screen below to view Ballard test-firing a load that delivers an ES of 5 and SD of 2 for five shots. At the end he holds the Oehler Chrono up to the camera so you can view the readout yourself. Seeing is believing!
Houston–We Have a Problem
I thought we had a load dialed-in, so I was fairly confident going to the North Carolina Long-Range State Championships. Let’s just say it didn’t go as planned. I encountered vertical, vertical, and more vertical. Turns out this was my fault. I had committed a big reloading “No-No”. I had used the ball expander in the die to neck the cases up from 6.5 to 7mm. Big Mistake! The cases we had previously used for load development were first necked-up with Ray’s expander mandrel and then run through the Redding bushing dies. Lesson learned: use an expander when necking-up the brass! This step was performed on the cases for the next match and it corrected the problem, as I lost no points to elevation.
Surprise–Velocities Rise, So Load Must Be Tweaked
After the NC State Champs, the gun went into hibernation for the winter. In February of 2008, NSSC held its annual winter Palma match. On Saturday my .284 was absolutely hammering, but Sunday I started noticing a hard bolt lift. Eventually, at the end of my last string, the gun blew a few primers. Luckily, however, it was still shooting very well. On the following Monday, we went back to the test bench and chrono. To my surprise 57.0 grains of H4831 was now shooting 2975 fps! That’s way too hot. At this point the barrel had 439 rounds through it. I started calling anyone I could thing of to see if they had any idea what could be causing this problem. Nobody I spoke with had ever experienced this problem until I spoke with a very knowledgeable F-Class shooter named Andy Amber.
Andy informed me that this had happened to him with several rifles. For whatever reason, between 100 to 300 rounds, as the barrel gets broken-in, the velocity climbs significantly.. Andy told me if I loaded back to the previous velocity, in his experience, it would stay there. Andy was spot on. My load came back together with 54.5 grains of H4831sc. The Oehler consistently gave me readings of 2892 fps to 2902 fps with an SD of 4 fps using once-fired brass. New brass gave slightly slower velocity but better numbers: ES of 7 to 9 fps, and SD of 2 to 3 fps. All this data was duplicated on several occasions. This rifle now has 554 rounds through it, but only .003″ throat erosion. The bullet was moved out .003″ to maintain position relative to the lands.
I’m very exacting in my loading procedures. I think that’s why I’ve been able to build loads that consistently deliver single-digit Extreme Spreads with ultra-low SDs. Here’s my loading method.
Case Prep: I start with Lapua 6.5×284 brass necked up to .284 with an expander mandrel. Next I sort the cases into one-grain lots, for example 194.0 to 194.9 grains, then 195.0 to 195.9 grains, and so on. After the brass is sorted, I chamfer the case mouths with an RCBS VLD tool. Any residual lube from case expansion is then cleaned out of the case mouth with alcohol on a bronze brush. Finally all the cases are run through a Redding Type ‘S’ FL sizing die with .312″ neck bushing.
Loading Procedure: My CCI BR-2 primers are seated with a RCBS hand priming tool. Powder charges are dispensed and weighed with an RCBS ChargeMaster Electronic Dispenser, which is regularly calibrated with check-weights to assure accuracy. Then the 180gr bullets are seated using a Redding Competition Seating Die.
Processing Fired Cases: My fired cases are tumbled in walnut shell media, then cleaned off. Cases are full-length resized, but I bump the shoulders only .0005″ (one-half thousandth). After sizing, the case mouths are cleaned with a spinning bronze brush.
IMPORTANT TIP: After 3 firings I will uniform the primer pockets and anneal the case necks. I found this very important in holding good elevation (minimal vertical dispersion).
CALIBER CHOICE: The Case for the .284 Win
Comparison: 6.5-284, .284 Win, and 300 WSM
For shooters who are not sold on the .284 Winchester, I give you a real-world ballistics shoot-off. We comparison-tested a 6.5-284 rifle launching 142 SMKs at 2975 fps, a 300 WSM rifle firing 210 Bergers at 2850 fps, and my .284 Winchester shooting 180 Bergers at 2900 fps. We had three shooters and each rifle was fired simultaneously with no-wind zeros on three separate targets set at 1000 yards. The shooters then exchanged rifles and we repeated the test a couple times. The 6.5 and 300 stayed consistently within an inch of each other. But my .284, with its high-BC Berger 180s, shot inside both the 6.5 and 300 by at least 3″ every time. BC rules in the wind. I was sold!
Cost Comparison: .284 Win vs. 6.5-284
The cost of reloading the .284 Win is roughly $.07 more per round than that of the 6.5-284. The .284 uses a grain or two more powder than the 6.5-284, and 7mm bullets cost about $6.00 more per 100-count box. However, to truly compare the cost of shooting the two calibers you must figure in barrel life. My 6.5-284 barrel went south at 900 rounds. My .284 barrel now has 1,036 rounds, and by all indications it will shoot well to 3,000+ rounds. For cost comparisons sake, let’s use 1,200 rounds for the 6.5-284 and 3,000 rounds for the .284 Win. The average cost of a barrel, chambered and fitted, is $500.00. Using these figures, the barrel cost of a .284 Win is $.17 per round vs. $.42 per round for the 6.5-284. That’s a $.25 per round difference, equivalent to a 60% savings for the .284.
OK, if we now net the barrel cost savings (-$.25) for the .284 with the higher cost of 7mm reloading components (+$.07), I figure the .284 Win costs $.18 per round LESS to shoot than the 6.5-284. Over the span of 3,000 rounds, that’s a $540.00 savings.
Editor’s NOTE: These numbers are 10 years old. But the key fact is the extended barrel life of the .284 Win overcomes the increased bullet cost.
Gun Handling and Recoil
If there is a down-side to the .284 it would be recoil. Now don’t get me wrong, at 22 pounds with a decelerator recoil pad, the .284 is comfortable to shoot. The recoil difference between the 6.5-284 and the .284 is about the same as the difference between a 6x250AI and a 6.5-284. In the versatility section I will elaborate more on this subject.
Ease of Load Tuning
Despite the issues I explained in the load development section with low initial velocities on new barrels, I would say the .284 is fairly easy to tune. The barrel with which I shot my record was removed after that match so I don’t put too many rounds on it before the Nationals. The new barrel on this rifle was tested using the same load. As with the first barrel, the second barrel yielded 2775 fps with a “starter load” of 53.0 grains of H4831sc. With only 11 rounds through the new tube, I shot a 600-yard match on June 22, 2008. I loaded 44 rounds using 55.0 grains of H4831sc. This load ran at 2825 fps. After my first string this load started hammering. I shot a 200-7X with no elevation change on my last string.
Multi-Discipline Versatility
The .284 is my hands-down choice for shooting F-Class. I recently shot my first 600-yard benchrest match. I shot the .284 Win in heavy gun. In this match I found the first weakness in my beloved .284. On a bench you do notice the recoil. The 6mmBR pilots could run off five shots before I could shoot two. My groups were respectable: a four-group, 3.055″ Agg. But, the added recoil of the .284, even with front and rear rests aligned, took me off target. All this being said, if a man wanted just one caliber for F-Class, long-range benchrest, and hunting, I would still suggest the .284 Win.
WARNING: The loads stated in this article may be TOO HOT for many .284 Win rifles. Always START LOW and work up gradually in small increments, looking for pressure signs. With 7mm Sierra 175s, Hodgdon’s starting load is 52.0 grains of H4831sc.
Each Wednesday the USAMU offers tips for handloaders on the USAMU Facebook page. This article from the “Handloading Hump-Day” archives should interest pistol competitors, an any shooter who enjoys getting the best possible accuracy from their fine pistols. In this article, the USAMU’s experts share key tips that can help optimize your pistol ammo. Follow this tips to produce more consistent ammo, that can shoot higher scores.
Optimize the Taper Crimp
One often-overlooked aspect of handloading highly-accurate pistol ammunition is the amount of crimp and its effect on accuracy. Different amounts of taper crimp are used with various handloads to obtain best accuracy. The amount is based on bullet weight, powder burn rate and charge, plus other factors. It is not unusual for our Shop to vary a load’s crimp in degrees of 0.001″ and re-test for finest accuracy.
Use Consistent Brass
Brass is also important to pistol accuracy. While accurate ammunition can be loaded using brass of mixed parentage, that is not conducive to finest results, particularly at 50 yards. It is important for the serious competitor/handloader to use brass of the same headstamp and ideally one lot number, to maximize uniformity. Given the volumes of ammunition consumed by active pistol competitors, using inexpensive, mixed surplus brass for practice, particularly at the “short line” (25 yards), is understandable. However, for the “long line” (50 yards), purchasing and segregating a lot of high-quality brass to be used strictly for slow-fire is a wise idea.
Importance of Uniform COAL
Uniformity of the Case Overall Length (COAL) as it comes from the factory is also important to achieving utmost accuracy. More uniform case lengths (best measured after sizing) contribute to greater consistency of crimp, neck tension, ignition/burn of powder charge, and so on. Cartridge case-length consistency varies from lot to lot, as well as by maker. Some manufacturers are more consistent in this dimension than others. [Editor’s note: It is easy to trim pistol brass to uniform length. Doing this will make your taper crimps much more consistent.]
Primers and Powders — Comparison Test for Accuracy
Pay attention to primer brands, powder types and charges. Evaluating accuracy with a Ransom or other machine rest at 50 yards can quickly reveal the effect of changes made to handload recipes.
Bullet Selection — FMJ vs. JHP
Bullets are another vital issue. First, there is the question of FMJ vs. JHP. A friend of this writer spent decades making and accuracy-testing rifle and pistol bullets during QC for a major bullet manufacturer. In his experience, making highly-accurate FMJ bullets is much more difficult than making highly-accurate JHPs, in large part due to the way the jackets are formed. Small die changes could affect accuracy of FMJ lots dramatically.
The CMP now allows “safe, jacketed ammunition” in Excellence-in-Competition (EIC) Service Pistol matches, although wadcutter ammunition is prohibited. Thus, the option to use very accurate JHP designs simplifies the life of CMP Service Pistol shooters in pursuit of the prestigious Distinguished Pistol Shot badge.
Hopefully, these tips will be helpful to any pistol shooters interested in accurate handloads, not just “Bullseye” shooters. Small tweaks to one’s normal routine can pay big dividends in improved accuracy and make practice and competition more rewarding.
Over the past 12 months, this article was one of the TOP TEN most-read Daily Bulletin features. We’re reprising it today for those who may have missed it the first time. The above diagram comes from a TiborasurasRex YouTube Video comparing G1 and G7 BC models. CLICK HERE to watch the video.
The better, up-to-date ballistics programs let you select either G1 or G7 Ballistic Coefficient (BC) values when calculating a trajectory. The ballistic coefficient (BC) of a body is a measure of its ability to overcome air resistance in flight. You’ve probably seen that G7 values are numerically lower than G1 values for the same bullet (typically). But that doesn’t mean you should select a G1 value simply because it is higher.
Some readers are not quite sure about the difference between G1 and G7 models. One forum member wrote us: “I went on the JBM Ballistics website to use the web-based Trajectory Calculator and when I got to the part that gives you a choice to choose between G1 and G7 BC, I was stumped. What determines how, or which one to use?”
The simple answer is the G1 value normally works better for shorter flat-based bullets, while the G7 value should work better for longer, boat-tailed bullets.
G1 vs. G7 Ballistic Coefficients — Which Is Right for You?
G1 and G7 refer both refer to aerodynamic drag models based on particular “standard projectile” shapes. The G1 shape looks like a flat-based bullet. The G7 shape is quite different, and better approximates the geometry of a modern long-range bullet. So, when choosing your drag model, G1 is preferrable for flat-based bullets, while G7 is ordinarily a “better fit” for longer, boat-tailed bullets.
Drag Models — G7 is better than G1 for Long-Range Bullets
Many ballistics programs still offer only the default G1 drag model. Bryan Litz, author of Applied Ballistics for Long Range Shooting, believes the G7 standard is preferrable for long-range, low-drag bullets: “Part of the reason there is so much ‘slop’ in advertised BCs is because they’re referenced to the G1 standard which is very speed sensitive. The G7 standard is more appropriate for long range bullets. Here’s the results of my testing on two low-drag, long-range boat-tail bullets, so you can see how the G1 and G7 Ballistic coefficients compare:
G1 BCs, averaged between 1500 fps and 3000 fps:
Berger 180 VLD: 0.659 lb/in²
JLK 180: 0.645 lb/in²
The reason the BC for the JLK is less is mostly because the meplat was significantly larger on the particular lot that I tested (0.075″ vs 0.059″; see attached drawings).
For bullets like these, it’s much better to use the G7 standard. The following BCs are referenced to the G7 standard, and are constant for all speeds.
Many modern ballistics programs, including the free online JBM Ballistics Program, are able to use BCs referenced to G7 standards. When available, these BCs are more appropriate for long range bullets, according to Bryan.
[Editor’s NOTE: BCs are normally reported simply as an 0.XXX number. The lb/in² tag applies to all BCs, but is commonly left off for simplicity.]
At the request of our readers, we provide select “Deals of the Week”. Every Monday morning we offer our Best Bargain selections. Here are some of the best deals on firearms, hardware, reloading components, optics, and shooting accessories. Be aware that sale prices are subject to change, and once clearance inventory is sold, it’s gone for good. You snooze you lose.
1. Stocky’s Stocks — End of Summer Sale, Stocks $188.88 and up
Need a stock for a gun project, or want to re-stock a factory rifle? Now is a great time to get a hunting, tactical, or competition stock from Stocky’s Stocks. During Stocky’s End of Summer sale you can buy a very high-quality Long Range Composite (LRC) stock with Accublock for Rem 700 actions for just $188.88, or $198.88 with deluxe Camo finish. Stocky’s nice Thumbhole Composite stock is $219.99. And if you have a Ruger 10/22, Stocky’s sells fine laminated wood EuroStocks for just $188.88.
2. LockedLoaded.com — Howa Flag Chassis Rifle, $999.99
What better way to celebrate Labor Day than with a Stars and Stripes rifle? Legacy Sports offers a special American Flag Chassis Rifle with a USA flag-theme red, white, and blue Cerakote finish and 3-chamber muzzle brake. Components include APC modular chassis and Luth-AR adjustable butt-stock. This special edition INCLUDES Optic — a Nikko 4-16x50mm scope. The 6.5 Creedmoor version is on sale now for just $999.99 at LockedLoaded.com! Note: You need to act soon — these special American-flag editions with scope are almost sold out!
3. Primary Arms — $20-$60 OFF Walker’s Ear Protection
As part of its Labor Day Weekend Sale, Primary Arms has discounted all its Walker Ear Muffs. Get a great deal on quality ear protection. Save up to $60.00 on earmuff products. For example the Razor Slim Muffs are marked down from $69.99 to $33.99, a $33 savings. Primary has also slashed prices on Glock parts, AR parts, tactical packs, and scopes. Plus you can get FREE Shipping on the entire order when you buy a riflescope or Red Dot optic.
Here is a very nice .22 LR pistol with a fine trigger for under $200.00. Everyone should own a rimfire handgun, and here’s one that’s an exceptional value. As a Labor Day Special, Palmetto State Armory is selling the TX 22 for $249.99. Fill out the paperwork for the Taurus factory rebate, and you get $50.00 Cash Back. That lowers your net cost to just $199.99 — a great price for a fine .22 LR handgun.
Taurus advises: “Engineered to deliver best-in-class accuracy and reliability, the Taurus TX 22 rimfire polymer sporting pistol shoots and feels every bit like a custom-tuned competition model — without any costly upgrades[.]” To qualify for the rebate, the TX 22 must be purchased between July 1 and September 30, 2019.”
5. Midsouth — Rock Chucker Supreme Reloading Kit, $299.99
Everything you see above can be yours for just $299.99. Great Deal. Right now, Midsouth is selling the Rock Chucker Supreme Master Reloading Kit for $299.99, a fine price considering all the hardware you get: Press, Primer Tool, Scale, Powder Measure, Loading Tray, Reloading Manual and more. Heck, the Rock Chucker press alone is worth $165.00+. This is good starter kit for any reloader with sturdy items (such as the Rock Chucker press), that will last a lifetime.
6. Walmart — EZShoot Rifle Case with Shoulder Straps, $28.99
We like this versatile bag for hunting and varmint trips. The 47.2″ EZshoot gun case provides good protection for scoped rifles with up to about 27″ barrels. The large pockets will hold binoculars, laser rangefinder, windmeter, ammunition, and other gear. The big bonus is this inexpensive carry case includes comfortable, adjustable shoulder straps. That makes it easy to carry everything from your vehicle to your shooting area. You get all this functionality for under twenty-five bucks. Walmart currently offers this 47.2″ case for just $24.99 with FREE shipping to your residence.
7. Cabela’s — Hunting “Kick-Off” Sale — Save Up to 40%
Now through September 8, 2019, you’ll find some great bargains at Cabelas.com. This major sporting goods dealer is running a Hunting Season “Kick-Off Sale” through September 8, 2019. There are big savings on shotguns, hunting boots, ammo, game cameras, GPS units, and more. Some items are 40% off.
8. Brownells — CCI .22 LR Ammo, $24.99/500 or $90.89 for 2000
Here’s a great deal on big-name, rimfire ammo. Right now you can get a 500-round pack of CCI Standard Velocity 40gr LRN ammo for just $24.99. That works out to just five cents ($0.05) per round. But it gets even better. If you purchase at least four 500-rd packs (2000 rounds total), and add a small item to get the order over $100.00 you also get FREE shipping and a $10.00 discount with CODE MDX. With that “MDX” discount code, your total price is just $90.89 for 2000 rounds delivered, or 4.5 cents per round! That’s a great deal on reliable CCI ammo.
9. Powder Valley — FREE HazMat with $149+ Powder Purchase
Powder Valley Inc. is one of the best sources for reloading components. And today, Labor Day, you can get FREE HazMat if you purchase at least $149.00 of Hodgdon, IMR, and/or Winchester powders. If you want to take advantage of this deal, don’t dawdle. FREE Hazmat offer expires Monday 9/2/2019 at 11:59 pm CST.
10. Amazon — MTM Cleaning Rod Case, $22.89
Good cleaning rods are expensive and can be easily damaged if you’re not careful. To protect those valuable cleaning rods, we recommend the MTM cleaning rod case which holds four rods as well as cleaning supplies. This case protects your rods both at home and while traveling. With this handy, durable case you can stop worrying about bending or breaking those important cleaning rods.
11. Amazon — Two Rolls of 3″ Neon Target Stickers, $12.99
We like these bright, Neon EasyShot 3″ target stickers. They are big enough to see easily at 600 yards, giving you a 1/2 MOA target center at that distance. For $12.99 at Amazon.com, you get 250 3″-diameter self-adhesive centers (125 targets per roll) that stick to almost any surface The high-contrast fluorescent red/orange color provides an excellent HI-VIZ aiming point, along with good contrast for bullet holes that fall within the 3″ circle. To help line up your reticle cross-hairs, the target centers feature black markers at 3, 6, 9, and 12 0’Clock. NOTE: These stickers qualify for FREE Shipping.


 1. Align Front Rest and Rear Bags. We see many shooters whose rear bag is angled left or right relative to the bore axis. This can happen when you rush your set-up. But even if you set the gun up carefully, the rear bag can twist due to recoil or the way your arm contacts the bag. After every shot, make sure your rear bag is aligned properly (this is especially important for bag squeezers who may actually pull the bag out of alignment as they squeeze).
 3. Weigh Your Charges — Every One. This may sound obvious, but many folks still rely on a powder measure. Yes we know that most short-range BR shooters throw their charges without weighing, but if you’re going to pre-load for a club match there is no reason NOT to weigh your charges. You may be surprised at how inconsistent your powder measure actually is. One of our testers was recently throwing H4198 charges from a Harrell’s measure for his 30BR. Each charge was then weighed twice with a Denver Instrument lab scale. Our tester found that thrown charges varied by up to 0.7 grains! And that’s with a premium measure.
 5. Check Your Fasteners. Before a match you need to double-check your scope rings or iron sight mounts to ensure everything is tight. Likewise, you should check the tension on the screws/bolts that hold the action in place. Even on a low-recoiling rimfire rifle, action screws or scope rings can come loose during normal firing.


 Oversizing cases also causes problems because the firing pin doesn’t have the length to reach the primer solid enough to ignite it 100% of the time. When you have one that is oversized, you usually have a bunch, since you usually do several cases at a time on that die setting. If the die isn’t readjusted, the problem will continue on the next batch of cases also. They will either not fire at all or you will have a lot of misfires. In a bolt action, a lot of time the extractor will hold the case against the face of the breech enough that it will fire. The case gets driven forward and the thinner part of the brass expands, holding to the chamber wall and the thicker part of the case doesn’t expand as much and stretches back to the bolt face. If it doesn’t separate that time, it will the next time. When it does separate, it leaves the front portion of the case in the chamber and pulls the case head off. Then when it tries to chamber the next round, you have a nasty jam. Quite often range brass is the culprit of this because you never know how many times it has been fired/sized and in what firearm.’Back to beating it on the ground again till you figure out that you have to get the forward part of the case out.


 Reloading Bench Mounts to RV Wall with Brackets


 This rifle project began several years ago. My purpose was to find a cartridge that would launch the high-BC, 180gr 7mm bullets at competitive velocities for F-Class competition. I also sought barrel life that would be far superior to that of a 7mm WSM or 6.5-284. I read the article on


 The Ultimate F-Open Rig
 NOTE: Charles Ballard always employs eye and ear protection when shooting. For these posed photos, he removed his safety glasses.
 Three-Minute Prep Period
 Surprise–Velocities Rise, So Load Must Be Tweaked
 Andy informed me that this had happened to him with several rifles. For whatever reason, between 100 to 300 rounds, as the barrel gets broken-in, the velocity climbs significantly.. Andy told me if I loaded back to the previous velocity, in his experience, it would stay there. Andy was spot on. My load came back together with 54.5 grains of H4831sc. The Oehler consistently gave me readings of 2892 fps to 2902 fps with an SD of 4 fps using once-fired brass. New brass gave slightly slower velocity but better numbers: ES of 7 to 9 fps, and SD of 2 to 3 fps. All this data was duplicated on several occasions. This rifle now has 554 rounds through it, but only .003″ throat erosion. The bullet was moved out .003″ to maintain position relative to the lands.
 CALIBER CHOICE: The Case for the .284 Win
 Gun Handling and Recoil
 Use Consistent Brass

 The better, up-to-date ballistics programs let you select either G1 or G7 Ballistic Coefficient (BC) values when calculating a trajectory. The ballistic coefficient (BC) of a body is a measure of its ability to overcome air resistance in flight. You’ve probably seen that G7 values are numerically lower than G1 values for the same bullet (typically). But that doesn’t mean you should select a G1 value simply because it is higher.
 Drag Models — G7 is better than G1 for Long-Range Bullets


 Here is a very nice .22 LR pistol with a fine trigger for under $200.00. Everyone should own a rimfire handgun, and here’s one that’s an exceptional value. As a Labor Day Special, Palmetto State Armory is selling the


