How fast can you shoot a bolt-action rifle? We doubt you can out-pace the ace “Stangskyting” shooters from Scandinavia. Some of these guys can run more than two rounds per second, including mag changes! That’s impressive. Bulletin reader C. Lemmermann from Denmark told us: “In Scandinavia we have this competition called ‘Stangskyting’. It’s similar to the ‘Mad Minute’ but we only have 25 seconds to hit the target [at] 200-300m distance with a 6.5×55 [target rifle].” In the Stangskyting video below a shooter named Børklop puts 16 rounds on target in just 25 seconds. (He starts with a round in the chamber and cycles through three, 5-round magazines).
Børklop’s performance, with just a sling and iron sights, is impressive. He’s shooting a Sauer 200 STR target rifle with 5-round magazine. Note that Børklop manipulates the Sauer’s bolt with his thumb and index finger, while pulling the trigger with his middle finger. As good as Børklop is, some Stangskyting competitors are even better. Roy Arne Syversrud from Oslo, Norway tells us: “The best shooters in Norway can do 21 shots in 25 seconds, changing the mag three times.”
Here’s another Stangskyting video. Check out the speed with which John Olav Ågotnes works that action — simply amazing!
This Guy Could Break the “Mad Minute” Record
Børklop’s rate of fire, 16 rounds in 25 seconds, is the equivalent of 38.4 rounds in 60 seconds. That’s a notable number because the record for the “Mad Minute”, a British Army marksmanship drill, is 38 rounds in one minute. That record was set in 1914 by Sergeant Instructor Alfred Snoxall, and still stands. So as you watch Børklop, keep in mind that Snoxall shot that fast for a full minute with a Lee-Enfield nearly 100 years ago!
Børklop has an average cycling time of 1.56 seconds per shot, starting with a round in the chamber. To beat the record of 38 rounds, he would need to make seven mag changes in sixty seconds. All those mag swaps could reduce his average time per shot, making it difficult to achieve 38 hits in a minute. But, if Børklop could use 10-round mags with his Sauer STR, this guy has the skills to break the record.
To emphasize the capabilities of the WWI-era British shooter who set the record, Snoxall shot as fast as Børklop does, but Snoxall reloaded with stripper clips. Snoxall’s SMLE (Lee-Enfield) rifle also had relatively crude open sights and the stock was far less ergonomic than Børklop’s Sauer STR stock.
Here’s another Stangskyting video showing John Ågotnes shooting rapidfire with his Sauer 200 STR (Scandinavian Target Rifle) chambered in 6.5×55. By our count, Ågotnes manages 17 shots within the 25-second time period. That rate of fire (17 in 25 seconds) equates to 40.8 rounds in one minute!
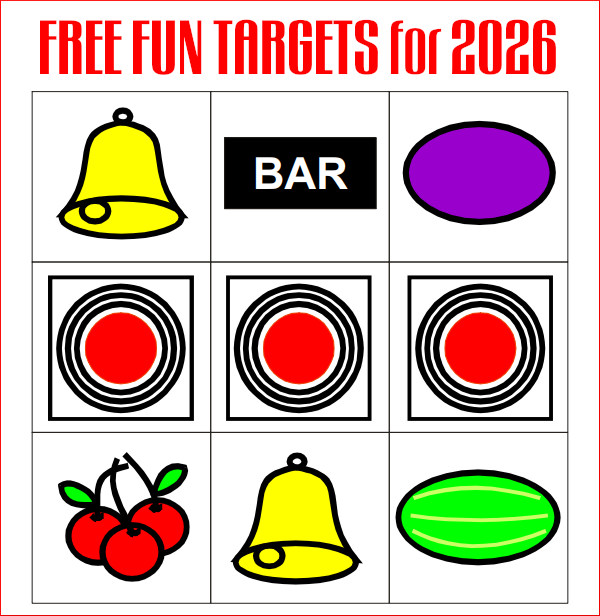
The Vernal Equinox (March 20, 2026) is the official start of Spring. With spring commencing in just 10 days, here’s your chance to prepare for some springtime fun shooting. Here are six “fun and games” targets that can provide some fun springtime shooting opportunities, both indoors and outdoors. While each requires good conventional marksmanship skills — hitting a small aiming point — there are other strategies involved, such as playing darts or hitting the right combination of poker cards. Most of us started shooting as kids, just plinking for fun. Here’s an opportunity to be like a kid again — to spend a day at the range just having fun with friends and family members.
Dartboard Target with Colored Rings
This printable Dartboard Shooting Target has the numbers inside the outer dartboard ring to allow a larger target. With this target you can shoot for the center bull, or actually play pub-style dart games, aiming for numbers and particular rings. If you don’t know how to play traditional dart games, visit NiceDarts.com for complete darts rules. One popular game is “Around The World”. The object is to hit the numbered zones, starting with number 1. Then you try for 2, 3, and so on. After hitting all the numbers 1 through 20, then hit the bullseye to win. CLICK HERE for Other Dart Board Color combinations.
Atomic Target — Aim for Protons, Neutrons, and Electrons
The Atomic Target was originally created as a contest for our readers. The design is by Michael Forester of Auckland, New Zealand. First aim for the bigger green and red neutrons and protons, then try your luck with the smaller, more challenging blue electrons. You can also use the four black and yellow Atomic warning symbols as bullseye targets.
Slot Machine Jackpot Target
Enjoy a little Las Vegas-style fun on your next trip to the range. This cool Slot Machine Target has four sets of slot machine patterns each with three rows of three symbols. Connect three in a row to win — and hit the Jackpot! This is one of many colorful, free targets available from Targetz.com.
Poker Target — Get the Best Hand
Poker players will enjoy this target. With this playing card-themed poker cards target, each shooter takes five shots and the one with the highest hand wins. You can also shoot for four-of-a-kind, against the clock, fastest four (without a mistake) wins.
Flies in Circles Target
Now you can boast to your buddies that you hit a fly on your target — 16 times. On this target, 16 flies with bright red eyes are arranged in a inside circles, 16 to a page. There are various ways to use the fly targets. Some shoot to hit the head only — so aim for those red eyes. There are 11 other variations of this Fly Target available on the Targets.WS website.
And here three FREE fun targets, courtesy the NRA Blog. Right-Click for printable PDFs.
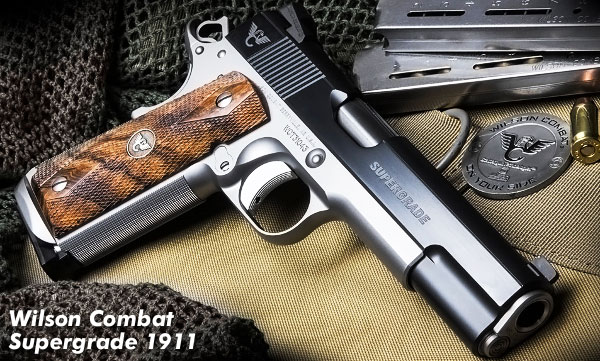
Todd Jarrett is one of the world’s best handgun shooters. A multi-time World Champion, Todd knows a thing or two about semi-auto pistols, particularly 1911s and 1911-based raceguns. Jarrett has been IPSC Open Division World Champion, has won the Steel Challenge World title four times (Limited Division), and has won than 100 Area championships, as well as many other action shooting events. Jarrett is the only USPSA Triple Crown Winner and he holds four USPSA National titles: Open, Limited, Production, and Limited-10. Jarrett revealed in an interview that between 1988 and 2001 he shot about 1.7 million rounds during practice: “I had a gun in my hand for two hours every day for 10 years to develop my skill level”.
In the video below, Todd explains how to get the proper grip on your handgun, and how to employ a proper stance. We’ve watched many videos on pistol shooting. This is one of the best handgun instructional videos we’ve seen. Todd explains, in easy-to-understand terms, the key elements of grip and stance. One very important point he demonstrates is how to align the grip in your hand so that the gun points naturally — something very important when rapid aiming is required. If you watch this video, you’ll learn valuable lessons — whether you shoot competitively or just want to have better control and accuracy when using your handgun defensively.
Recommended Thumbs-Forward Shooting Grip for 1911s
“Shooting semiautomatic pistols using the thumbs-forward method really becomes useful … where speed and accuracy are both needed. By positioning the thumbs-forward along the slide (or slightly off of the slide) you are in essence creating a second sighting device: wherever your shooting thumb is pointing is where the pistol is pointing. This makes it incredibly fast to draw the pistol, get your proper grip, and press forward to the target without needing to hunt around for the front sight.” — Cheaper Than Dirt Blog.
Rimfire tactical-style matches are now one of the fastest-growing types of rifle competition in the country. The USA has seen a big growth in rimfire tactical matches over the last six years. NRL22 and PRS Rimfire matches are held throughout the country. Right now there are probably ten times as many rimfire tactical matches as sanctioned PRS and NRL centerfire matches. The reason is simple — rimfire ammo is much less costly, and clubs can run challenging rimfire tactical matches at nearly any outdoor gun range that allows shooting out to 200+ yards.
The National Rifle League (NRL) started off sponsoring major centerfire tactical matches, similar to PRS competitions. That proved successful so the NRL added a .22 LR Rimfire series, called NRL22. The NRL22 rimfire discipline has been a major success, as rimfire guns are fun to shoot and ammo is very affordable. The most popular NRL22 matches have drawn up to 200 rimfire competitors. And now PRS has its own PRS .22 Rimfire series.
Precision Rimfire Match with Through-the-Lens Video
Here’s an interesting video featuring a top-tier .22 LR MDT-chassis rifle. The host, Pieter “Piet” Malan from South Africa, runs the excellent Impact Shooting YouTube Channel, which now has 320+ videos on target shooting and hunting. This video features a TriggerCam unit attached to the scope, so you can see hits on the targets, just as the shooter does.
NRL22 — Affordable, Challenging Rimfire Competition Series
NRL22 is a great way to get into competition shooting with minimal expense. There are currently eight (8) classes: Open, Base, Young Guns, Ladies, Air Rifle, Old Guns, Semi-Auto, and Adaptive. Base Class is for the budget-minded shooter — the combined MSRP of Rifle and Optic may not exceed $1650.00 (for example spend $800 on a rifle and $850 on a scope). That keeps the sport affordable. The other classes have no price limits on Rifle and Optic. The “Young Guns” division is for competitors 17 years or younger. Visit NRL22.com to find an NRL22 match near you. CLICK HERE for full NRL22 rules with 2026 updates.
Precision Rimfire Competition Match Report
This excellent video covers a big rimfire precision match, the King of 0.28 Miles event, held at the Rush Lake Range in MN. The video shows multiple stages with targets out to 300 yards, followed by a 465-yard challenge. Host Dave shot the match with a Vudoo Gunworks V22 rifle in a Grayboe Ridgeback stock, with a Trijicon Accupower 4.5-30x56mm FFP scope. The ammo was Lapua Center-X, a top-tier choice.
Rimfire Ammo Selection — Why Comparison Testing Is Important
Every gun and barrel is different, so you should test various ammo types in YOUR rifle. Additionally, you can benefit from lot testing with particular ammo types to optimize your ammo choice even more. If you’re serious about rimfire accuracy, lot testing can be very helpful, whether at your own rage or a testing center. There is no replacement for starting with a good lot of ammunition your rifle likes.
First Rimfire Precision Match — Lessons Learned
Here’s a helpful video for folks getting started in the Precision Rimfire game. Our buddy F-Class John, a top F-Open competitor (and YouTube video creator), is getting starting in the .22 LR precision discipline. Here he provides lessons learned from his first .22 LR precision match.
Tripod Review — Options for Precision Rimfire Shooters
The NRL22 match format is a great shooting discipline. NRL22 offers a high fun factor at relatively low cost. You don’t have to reload match ammo. A couple of 50-round boxes of .22 LR ammo will get you through the match. While some people bring lots of gear to matches, that’s by choice and not by necessity. You can keep it simple and still be competitive (and win).
Tips for NRL22 Competitors by Jonathan Ocab
I am a match director at my gun club and run our local NRL22 matches. People often ask me for tips for competing in NRL22. First, I recommend getting the course of fire for the month in advance and practicing those stages at the range. Here are other specific tips that should help NRL22 competitors improve their gun-handling and match results.
1. Dry Fire Practice — If you are not able to do live fire practice at the range, I encourage shooters to practice their shooting positions at home via dry fire. Setup props or barricades with pasters or other faux targets on a wall in the garage or inside the house and run through each stage.
2. Scope Magnification Level — The most common issue I see with newer shooters in NRL22 is the tendency to maximize their scope magnification. The timer will start, and the shooter gets into position on a target, but the scope is set to 15x or higher and the shooter can’t find the target. The shooter lowers the magnification, locates the target, and then increases the magnification again, takes the shot, transitions to another target, and repeats the process of decreasing magnification, locating target, etc. Novice NRL22 shooters should try using the mid-range magnification. Try shooting 7x-12x and learn to balance field of view and target image.
Emil Praslick III is widely recognized as one of the greatest wind wizards on the planet — a master at identifying wind value and direction, and predicting wind cycles. As coach of the USAMU and top civilian teams, Emil has helped win many high-level championships. In the three videos we feature today, Emil, who works with Capstone Precision Group (Berger, Lapua, SK, Vihtavuori) and Team Applied Ballistics, explains how to determine wind direction and velocity using a variety of indicators. Praslick, now retired from the U.S. Army, was an 18-time National and 2-time World Champion coach with the USAMU.
Video ONE: Wind Theory Basics — Understanding “Wind Values”
In this video from UltimateReloader.com, Emil explains the basics of modern wind theory. To properly understand the effect of the wind you need to know both the velocity of the wind and its angle. The combination of those variables translates to the wind value. Emil also explains that the wind value may not be constant — it can cycle both in speed and velocity. Emil also explains some of the environmental conditions such as mirage that can reveal wind conditions.
Video TWO: Determining the Direction of the Wind
Key Point in Video — Find the Boil
Emil explains how to determine wind direction using optic. The method is to use spotting scope, riflescope, or binoculars to look for the “Boil” — the condition in mirage when the light waves rising straight up. The wind will generate that straight-up, vertical boil in your optics when it is blowing directly at you, or directly from your rear. To identify this, traverse your scope or optics until you see the boil running straight up. When you see that vertical boil, the direction your optic is pointing is aligned with the wind flow (either blowing towards you or from directly behind you).
Video THREE: The No Wind Zero Setting
In this second video, Emil defines the “No-Wind Zero”, and explains why competitive shooters must understand the no-wind zero and have their sights or optics set for a no-wind zero starting point before heading to a match. In order to hit your target, after determining wind speed and direction, says Emil, “you have to have your scope setting dialed to ‘no wind zero’ first.”
Coach of Champions — Emil Praslick III
SFC Emil Praslick III, (U.S. Army, retired) works with Berger Bullets and Applied Ballistics. Emil served as the Head Coach of the U.S. National Long Range Rifle Team and Head Coach of the USAMU for several years. Teams coached by Emil have won 33 Inter-Service Rifle Championships. On top of that, teams he coached set 18 National records and 2 World Records. Overall, in the role of coach, Praslick can be credited with the most team wins of any coach in U.S. Military history.
Registration is now open for the Civilian Marksmanship Program (CMP) 2026 National Smallbore and Air Rifle events. These will be part of the 2026 CMP National Matches held at the Camp Perry National Guard Training Base in Clinton, Ohio. Review the 2026 National Matches schedule and event info on the CMP website. CLICK HERE for 14–page Smallbore and Air Gun Championships summary, and CLICK HERE for National Matches 2026 Event Calendar.
Smallbore (Rimfire) Events at Petrarca Range
The National Smallbore lineup includes iron sights and any sights prone events as well as 3×20 (three-position) individual and team matches. Smallbore events are fired on the covered outdoor electronic target line of Camp Perry’s Petrarca Range.
This video covers the Smallbore competition at the 2021 CMP National Matches at Camp Perry.
National Air Gun Matches at Gary Anderson Competition Center
Air rifle and/or air pistol competitors can participate in the National Air Gun Matches, held on the electronic target range at the Gary Anderson CMP Competition Center. The CMP Air Pistol Matches will take place at the Gary Anderson CMP Competition Center located on Camp Perry in Port Clinton, Ohio.
Schedule Allows Competitors to Shoot Both Smallbore AND Air Rifle Events
The National Smallbore and National Air Gun phases have been arranged in tandem to allow athletes the option of competing in both disciplines, with an aggregate event included for those firing in air rifle and three-position smallbore competitions.
About the National Matches:
The National Matches event is comprised of the CMP National Trophy Pistol and Rifle Matches, National Games Matches, National Smallbore Matches, National Air Gun Championships, and the National Mid-Range and Long Range Matches. The month-long series also includes a variety of educational clinics for all experience levels. All events are open to the public, with spectators welcome.
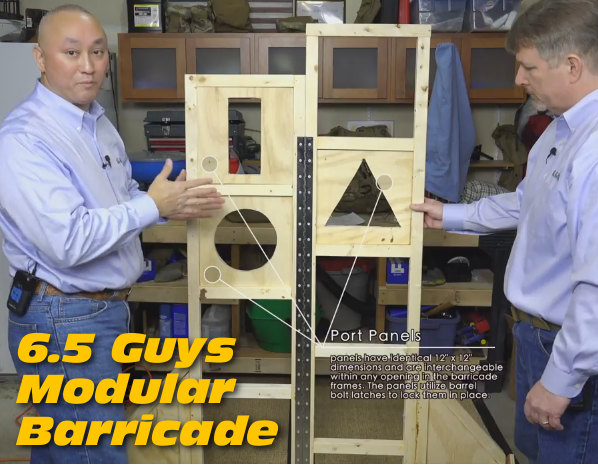
Here’s a great Do-It-Yourself project for tactical shooters. Ed and Steve of 65Guys.com have created a versatile wooden barricade designed for easy transport. The goal with this design was to create a stable barricade that offers a variety of shooting positions, but can also fit in the bed of a pick-up or the back of an SUV. The 69″ tall barricade is hinged in the middle, so it’s just 27″ wide. To deploy the Barricade you simply fold it open and then nest the lower wings in ground-level stands.
We call this the BYOB Project — Build Your Own Barricade. Anyone with basic wood-working skills should find the Barricade pretty easy to make. The only tricky part is cutting the side Dado joints for the left and right lower wings. But when you’ve got it completed, you have a low-cost unit that is versatile and sturdy yet easy to pack in a truck and carry out on the range. In the video below the 6.5 Guys showcase their Gen 2 barricade and explain how to build one just like it.
Looking at the 6.5 Guys Modular Barricade
The Modular Barricade was drawn up by Steve in PowerPoint and then dimensions added. Once the entire plan was created, Steve cut components to size and then used ordinary wood screws and wood glue to assemble the barricade frame. This was done to ensure maximum rigidity due to the light weight construction using 2″ x 2″ frame members. A long piano hinge was used to allow the Barricade to fold in half, while still having high torsional rigidity. Each of the Barricade openings are 12″ x 12″ square. This consistent ‘window’ spacing allows interchangeable panels with different cut-out shapes to be placed at varies heights/locations in the Barricade.
Modular Barricade Key Features
— Lightweight construction using low-cost 2×2 wood beams.
— Collapsible frame with center hinges for easy transport and deployment.
— Multiple Support levels at 6″ vertical intervals (6″ variance R to L).
— Modular port design allows ports to be changed and moved as desired.
6.5 Guys’ Modular Barricade — Construction Tips
The Modular Barricade can be constructed over a weekend with the proper materials and basic shop tools such as a power saw and electric screwdriver. Steve used a router for the side panel dado joints but a table saw could also be used for that task. Steve’s only real issue with the build involved the port panels — getting them to fit right. The 2″ x 2″ frame wood wasn’t always straight; even a small variation in the wood could cause a port panel to be too tight or too loose. Steve had to do a lot of extra sanding and planing to get the port panels to fit just right.
Where and How to Use the Barricade for Training
Because the 6.5 Guys’ Modular Barricade is so easy to move, you can simply pack it up and deploy it at your local range for practice. (Do ensure club/range rules allow shooting from barricades.) While the Barricade is designed to sit on the natural ground, the base stands can also be placed on concrete if your range does not allow deployment forward of the normal firing line. While you can use the Barricade for training on your own, Ed and Steve say novice shooters can benefit from a formal clinic.
In the video below, the 6.5 Guys discuss precision rifle training with Scott Satterlee, an instructor with Core Shooting Solutions. This video explains why new shooters should consider enrolling in a formal training clinic. Topics covered are: typical course format and “curriculum”, the gear needed to participate in a precision rifle clinic, and skills shooters should practice before attending the clinic.
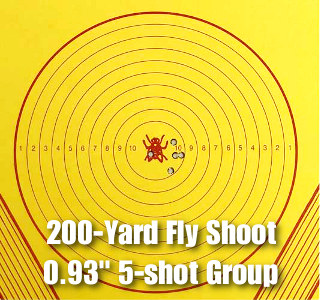
What kind of accuracy do you think is possible from a rimfire benchrest rifle? If we said 0.44 MOA you might not be surprised, thinking this was at 50 yards. But how about 0.44 MOA accuracy at TWO HUNDRED yards. Now that’s impressive. Consider this — at 200 yards, a 10 mph crosswind will push that little 40gr bullet 15.3 inches. Here’s the story, which comes from the Land Down-Under, Australia.
A few seasons back, Australian John Lavaring shot a group at 200 yards that would make most centerfire shooters proud. The five-shot group, with all shots in the center 10-Ring, measured just 0.93 inches. That works out to 0.44 MOA at 200 — mighty impressive for a .22 LR. Recorded at a Rimfire Fly Shoot benchrest event in Canberra, Australia, this 200-yard target set two new Australian SSAA National records! John was using ELEY Tenex ammunition.
Congratulations to John Lavaring for a spectacular demonstration of how well a rimfire rig can shoot — even at 200 yards. We rarely shoot our .22 LR rifles past 50 meters. Maybe it’s time to start a Rimfire ELR series, with targets at 200 or even 300 yards. What do you think of the Rimfire ELR idea? Leave comments below.
Anschutz 54 Benchrest Rig
The rifle was a Anschutz model 54 Match in a custom benchrest stock. John’s record-setting rig features a barrel block, which you can see forward of the action. Scope is a Bausch & Lomb BR model. We don’t have the round count on Lavaring’s barrel, but good rimfire benchrest rifles can often get 10,000 rounds (or more) of accurate life.
Rimfire Ballistics at 200 Yards
Some folks may be wondering about .22 LR ballistics at 200 yards. Well, with a 25-yard zero, the 200-yard drop for John’s 40gr Tenex ammo is 54 inches, assuming 0.145 G1 BC and 1085 fps muzzle velocity per ELEY website. And at 200 yards, a 10 mph crosswind will push that little bullet 15.3 inches! We’re told the winds were pretty tricky when Lavary shot his record group. This makes his achievement all the more impressive — we have to admire John’s wind-reading ability.
This ELEY ammo has proven to be exceptionally accurate. Here is a short video showing TEN rounds of Tenex shot from a machine rest with target at 50 meters.
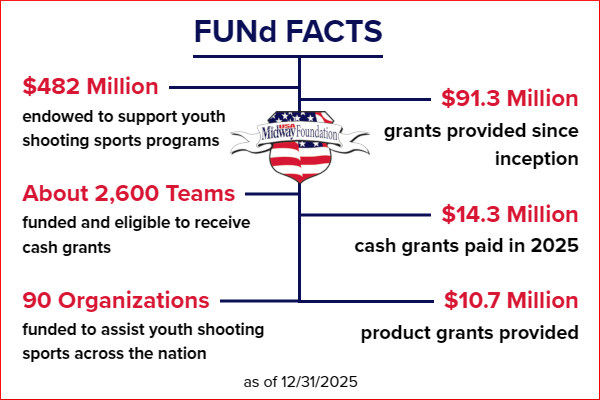
In its latest funding cycle, the MidwayUSA Foundation paid over $7.5 million to youth shooting sports teams and organizations. This record-breaking late 2025 grant cycle provided over $5.7 million to 970+ youth shooting teams and over $1.6 million to organizations that work with youth shooting programs. Since 2008, the MidwayUSA Foundation has paid nearly $80 million in cash grants to support youth shooting sports over the years. Foundation grants assist with costs for ammunition, targets, entry fees, and travel. Grants also help cover coach certification costss.
In total, this latest funding cycle provided over $7.5 million to the youth shooting sports community. This payout includes funds to youth shooting teams, organizations, and grants were provided to certain donor-advised endowments. A shout-out to the states of Minnesota, Iowa, Missouri, and Wisconsin for being at the top of the list in cash grant recipients and dollars paid to teams. In addition to youth shooting teams, the MidwayUSA Foundation provides funds to key state, regional, and national organizations that support youth shooting sports.
Rachel Augustine of Missouri 4-H Foundation stated: “The grants we receive from the MidwayUSA Foundation play a crucial role in the success of Missouri 4-H shooting sports. They help us provide essential funding for equipment, volunteer training, and state and national contests, as well as events. Through 4-H shooting sports, youth gain confidence, leadership, and responsibility, while developing a lifelong appreciation for shooting, hunting, and the outdoors.”
Donations Are Tax-Deductible
Donations made to MidwayUSA Foundation are tax-deductible and 100% of each donation goes to the endowment of the donor’s choice — nothing is removed for operations.
The MidwayUSA Foundation is a 501(c)(3) public charity working to sustain and grow youth shooting sports by providing long-term funding to youth shooting teams. For more information please visit MidwayUSAFoundation.org or call 1-877-375-4570.
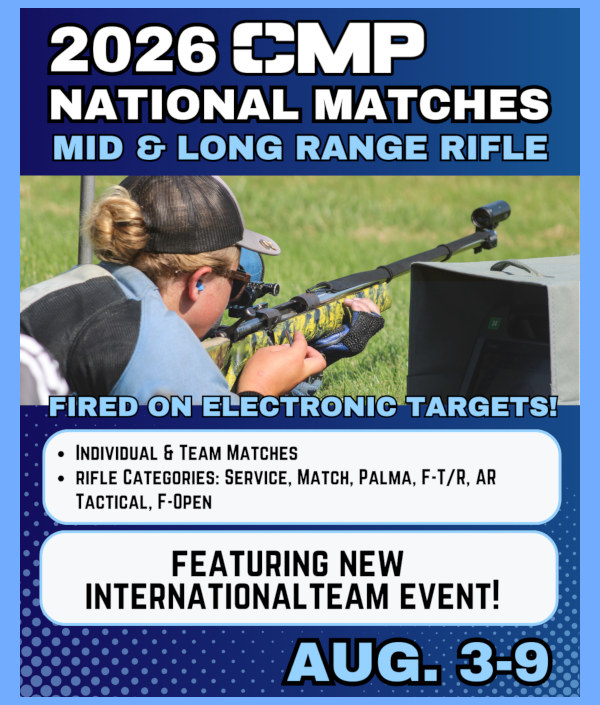
CMP Introduces International Team Event for 2026
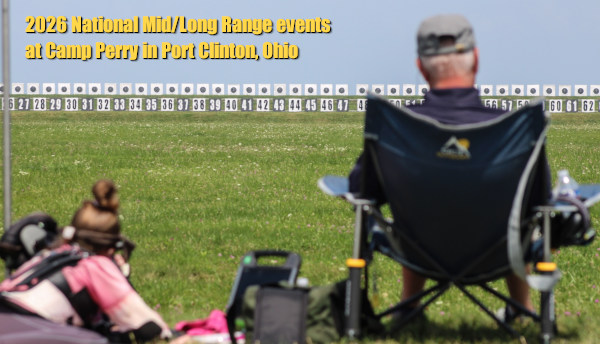
The Civilian Marksmanship Program (CMP) has added a new International Team Match during the 2026 National Mid/Long Range events at Camp Perry in Port Clinton, Ohio. The International 12-Person Team Match will be held Sunday, August 9, featuring a Palma team course of fire with record shots at 800, 900, and 1000 yards. The event is set to include competitors from the United States, Great Britain, and Canada. After the Camp Perry events conclude, the teams will travel to Ontario, Canada for the Canadian Fullbore Championships.
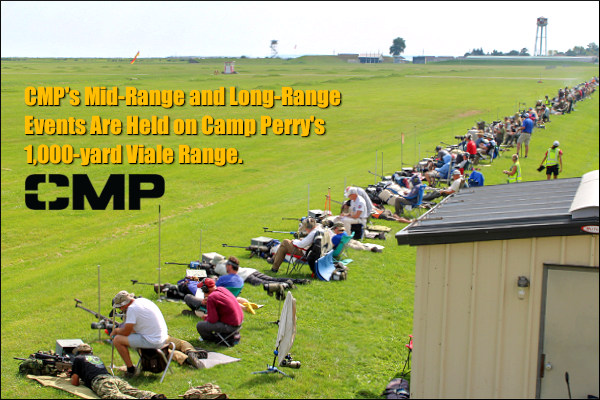
The National Mid/Long Range rifle events run August 3-9, 2026, as part of the CMP’s annual National Matches. Open to competitors of any experience level, these events feature individual and team competitions on Camp Perry’s Viale Range, fired completely on outdoor eTargets from 600 to 1000 yards. The National Long Range series will also include a 4-person Palma team match.
REGISTRATION Opens March 1, 2026
Registration for the 2026 National Matches opens March 1st, a week from now. Go to TheCMP.org/cmp-matches/national-long-range-matches to get complete information on the CMP’s National Long Range Matches, including programs, target info, and match schedules. On that page, you will find a registration link that activates 3/1/2026.
“We’re excited to host teams from Canada and Great Britain for the first time at a CMP Long Range event,” said Sara Rozanski, CMP Highpower Rifle Coordinator. “It offers us an opportunity to showcase our targets and facilities to top international competitors while making our own mark in the global Long Range community.”
CMP National Mid/Long Range Matches — Events and Course of Fire:
Matches include Match Rifle, Service Rifle, Palma, F-Open, F-TR, F-Practical, and/or AR Tactical.
Mid-Range 3×600 – three 20-shot strings slow prone at 600 yards in 22-minute time blocks 600-Yard Two-Person Team Match – 20 shots per team member at 600 yards Camp Perry Palma Match – 15 record shots at 800, 900, and 1000 yards, at each firing line in 22-minute time blocks Viale, Critchfield, Henry, Kerr, McMaken & Speaks, Baesel Memorial individual matches – 20 record slow prone shots in 30 minutes at 1000 yards Bataan Memorial 4-Man Team Match – 20 shots slow prone by each member at 1000 yards Winder Memorial Iron 4 Man Team Match – 20 record shots per team member in 47 minutes at 1000 yards Willis Lee, Jr. Memorial Two-Person Team Match – 20 record shots per team member in 47 minutes at 1000 yards Gen. Edward S. Bryant Memorial Two-Person Team Match – 20 record shots per team member in 47 minutes from 1,000 yards
About the Camp Perry National Matches:
Held at the Camp Perry National Guard Training Facility in Ohio since 1907, the Annual National Trophy Pistol and Rifle Matches represent some of the biggest and most popular shooting competitions in the Western Hemisphere. The 2026 National Matches schedule includes CMP National Air Gun Matches, National Rifle Matches, National Pistol Matches, National Smallbore Matches, and the National Mid/Long Range Matches. The CMP will also run popular Small Arms Firing Schools covering on safety and fundamentals for Pistol, Rifle and Smallbore Rifle disciplines.
The National Matches are conducted by a partnership between the CMP and Ohio National Guard. Learn more by visiting the CMP website at TheCMP.org/cmp-national-matches.


 Anschutz 54 Benchrest Rig