The U.S. Army Marksmanship Unit (USAMU) has produced an excellent series of videos, which collectively cover the Basic Rifleman’s Course. If you are getting started in high power shooting, or want to improve your position shooting skills, this series is well worth watching. And these videos are not just for service rifle shooters — even bench shooters can benefit from these videos, particularly Part 5, which explains how to estimate wind speed and direction. The lead instructor for these videos is SFC Brandon Green, the 2015 National High Power Champion, and Service Rifle Champion at the 2017 CMP Trophy Matches. When SFC Green talks, you should listen. This man is one of the greatest marksmen in the nation’s history.
Part 5 — Wind and Weather Estimation (Very Useful for All Shooters)
Note: This video includes a hit location “target analysis” in the first 6 minutes.
Part 4 — Minute of Angle Explained
Part 3 — Ballistics and Zeroing
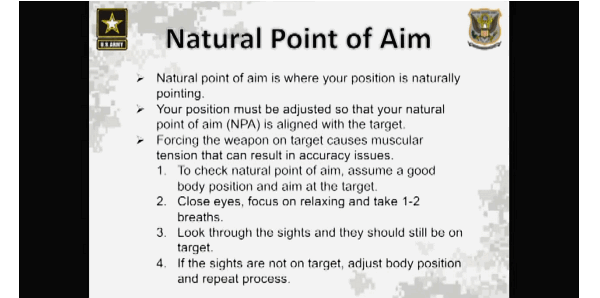
Part 2 — Positions, Sight Alignment, and Natural Point of Aim (Very Useful)
Part 1 — Aiming and Sight Picture
SFC Brandon Green (left above) set four new National Records at Camp Perry this year.
Story tip from Precision Shooting Journal on Facebook.
For many riflemen, reading the wind is the toughest challenge in long-range shooting. Wind speeds and directions can change rapidly, mirage can be misleading, and terrain features can cause hard-to-predict effects. To become a competent wind reader, you need range-time and expert mentoring. In the latter department, Frank Galli, founder of Sniper’s Hide, offers a detailed digital resource: Wind Reading Basics for the Tactical Shooter.
Wind Reading Basics is much more than a 47-page eBook — it has charts, instructions for ballistic calculators, and even embedded videos. Galli explains: “We break down the formulas, walk you through using a ballistic computer, and give you all the information in one place. From videos, to useful charts, we make it simple to get started. It’s all about having a plan, and we give you that plan.”
Galli’s Wind Reading Basics, priced at $7.99, can be downloaded from iTunes for iPads, iPhones and iOS compatible devices. Here are sample sections from the eBook (which includes videos):
Bushnell has released a FREE new Ballistics App powered by the Applied Ballistics Ultralite Engine. The new Bushnell Ballistics App easily calculates ballistic solutions for any popular cartridge type once you input velocity, BC, and atmospherics. The App features trusty Applied Ballistics bullet data, and it can even pull in atmospheric data from web weather sources. This allows you to calculate hold-overs and make precise wind corrections. The App is offered in both iOS and Android OS versions.
“The new Bushnell Ballistics App is powered by the Applied Ballistics Ultralite engine, the most trusted ballistics data-cruncher in the industry,” said Bushnell Marketing Manager Matt Rice. “This App allows users to easily build and modify gun profiles and build range cards to calculate firing solutions based on their specific scope and ammunition choices. All of our Bushnell scopes and reticles have been pre-loaded [in the App].”
The Bushnell App features AB Connect, a live library of G1/G7 data, plus the Applied Ballistics Bullet Library with 740+ pre-loaded bullet profiles. The Bushnell scope library features 150+ scopes and 30 reticle options. Atmospheric data can be updated manually or directly from the internet (when connected). Angle range compensation is also calculated. Gun profile management provides up to five saved profiles with reticle-based firing solutions. A multiple target feature saves up to five targets. Range cards can be shared or printed using the Email Range Card Function.
The FREE App works on both Android and iOS operating systems, and is available on Google Play and the App Store. It is optimized for Bushnell riflescopes and reticles, but is compatible with all optics. Once downloaded, the App functions off the grid — no cell service required.
“The new Bushnell Ballistic App puts the power of long-range, first-shot accuracy into the hands of any shooter,” Rice said. “it was designed to perform in any condition and to offer our consumers true value, with features that far exceed the price — which, in this case, is free!”
Want to see the best semi-auto pistol and revolver shooters on the planet in action? Then check out Shooting USA TV later today. Today’s broadcast features in-depth coverage of the 2017 Bianchi Cup. Shooting USA’s John Scoutten and Julie Golob report from the NRA Action Pistol Championship, better known as the Bianchi Cup, after one of its founders, John Bianchi.
ShootingUSA AIR TIMES FOR 2018 (Outdoor Channel)
Wednesday 9:00 PM Eastern and Pacific, 8:00 PM Central
NOTE: Shooting USA is listed as a one-hour show in your cable menu.
In the past 30 years the Bianchi Cup has become the richest handgun event in the world, with cash and prizes for the best scores on four stages of fire. Shooting USA will spotlight top male and female Bianchi Cup competitors in both wheelgun and and semi-auto pistol divisions. Along with North American shooters, the Bianchi Cup draws top handgun competitors from around the globe.
In 2017 shooters from as far away as Australia, New Zealand, and Japan traveled to Columbia, Missouri in search of the perfect 1920 match score. Each round is the aggregate of the four (4) fired events: Practical, Barricade, Falling Plate, and Moving Target Events. Each of the four events requires 48 shots to complete. 480 points possible on each event. Three of the four are scored on the NRA tombstone P1 target. You must hit in the 10-ring or inner X-Ring on EVERY shot to shoot a “clean” 1920.
27 Years ago Doug Koening set the standard with a 1920. Since then, every Open shooter knows that he or she must “clean” this match (i.e. score a “1920”) to have a chance to take the title of “Champion”. The X-Count is the tie-breaker.
In this video, 18-Time Bianchi Cup Winner Doug Koenig demonstrates Fast Follow-up Shots
Here are the top four women shooting the Practical Event during the Colt Championship Final. From top: 2017 Bianchi Women’s Champion Cherie Blake, third place SFC Katie Bahten, second place Anita Mackiewicz, and fourth place Jessie Duff. Shooting Sports USA Photo
This Bianchi Cup Preview offers the perspective of newcomers to the game…
Two-Time National F-TR Champion James Crofts uses this Rem 40X for rimfire cross-training.
Bullets.com is having a huge consolidation clearance sale this month. This company, headed by Shiraz Balolia, a top F-Class shooter, stocks many great products for benchrest, precision, and tactical shooters. We always recommend that centerfire shooters practice regularly with an accurate rimfire rifle to maintain their skill set — practice your breathing, trigger control, and the way you hold the rifle. Weekly sessions with a good rimfire rig will translate directly into more consistent results with your centerfire match rifles.
To get the best results from rimfire cross-training, you need ammo that is accurate, and affordable enough that you train often. Norma Tac-22 and Match-22 ammo fits the bill perfectly. This ammo has shot remarkably well considering the price with Bullets.com’s current liquidation pricing. This Editor plans to purchase 1000 rounds of Tac-22 from Bullets.com. You may want to do the same.
Here are targets actually shot with Norma Tac-22 at FIFTY yards with an Anschutz rifle. Pretty impressive wouldn’t you say? Target photo courtesy Champion Shooters Supply.
Rimfire Cross-Training Drills
1. Keep ‘Em Touching — Five by Five at 15 Yards
For this drill, shoot five-shot groups. The goal is to have all five shots (of each group) touching — that means no flyers or outliers! Put your target at 15 yards. Concentrate on doing the exact same thing every time. With a good rifle, you should be able to have each shot touch the rest of the group. At this distance, if a shot goes out of the group, it’s probably you, not the gun. Analyze each “out” shot. Did you yank the trigger? Did you change your head or shoulder position? Did you flinch? If you are honest about your mistakes, and work to correct them, you should see dramatic improvement in your shooting. For more challenge move the target out farther.
This “in or out” drill provides immediate feedback. You WILL see positive results as you improve hold, breathing, and trigger control. Our centerfire shooting improved significantly after doing this drill each week for a month. You can use a variety of targets for this drill — we often use 1/2″ orange stickers. But we’ve provided a simple grid with five, 1″ red circles. CLICK HERE for Printable PDF Target.
2. Shot the Suit with Playing Cards at 25 yards
Here’s a fun game you can do with a set of playing cards. Put up four or five cards on a cardboard target backer and try hit each one of the suit symbols. Do one suit at a time. For example, start by shooting at all the heart symbols, then move on to the clubs, then the spades, and finally the diamonds. You can start with face cards, then progress to numbered cards for more challenge. For example, put up a ten of diamonds and try to hit all ten diamonds.
This target was designed for prone shooting, but you can also use it from the bench. The game is simple. Start with the largest circle and work your way to the smallest. You can shoot at all the circles including the final 40-point dot for fun. Or compete with a friend under the tougher “know your limits” rules. You still go from big to small, BUT if you miss you score a ZERO. You have to know when to stop — you have to know your limits. Have fun!
The Coriolis Effect comes into play with extreme long-range shots like this (2100 yards at Raton, NM). The rotation of the earth actually moves the target a small distance (in space) during the long duration of the bullet’s flight.
When you’re out at the range, the Earth seems very stable. But it is actually a big sphere zooming through space while spinning around its axis, one complete turn every 24 hours. The rotation of the earth can create problems for extreme long-range shooters. During extended bullet flight times, the rotation of the planet causes an apparent deflection of the bullet path over very long distances. This is the ballistics manifestation of the Coriolis Effect.
Bryan Litz of Applied Ballistics discusses explains the Coriolis Effect in his Ballistics Books and Seminars. Bryan notes that Coriolis is “a very subtle effect. People like to make more of it than it is because it seems mysterious.” In most common shooting situations inside 1K, Coriolis is not important. At 1000 yards, the Effect represents less than one click (for most cartridge types). Even well past 1000 yards, in windy conditions, the Coriolis Effect may well be “lost in the noise”. But in very calm conditions, when shooting at extreme ranges, Bryan says you can benefit from adjusting your ballistics solution for Coriolis.
Bryan explains: “The Coriolis Effect… has to do with the spin of the earth. You are basically shooting from one point to another on a rotating sphere, in an inertial reference frame. The consequence of that is that, if the flight time of the bullet gets significantly long, the bullet can have an apparent drift from its intended target. The amount [of apparent drift] is very small — it depends on your latitude and azimuth of fire on the planet.”
Coriolis is a very subtle effect. With typical bullet BCs and velocities, you must get to at least 1000 yards before Coriolis amounts to even one click. Accordingly, Bryan advises: “Coriolis Effect is NOT something to think about on moving targets, it is NOT something to think about in high, uncertain wind environments because there are variables that are dominating your uncertainty picture, and the Coriolis will distract you more than the correction is worth.”
“Where you could think about Coriolis, and have it be a major impact on your hit percentage, is if you are shooting at extended range, at relatively small targets, in low-wind conditions. Where you know your muzzle velocity and BC very well, [and there are] pristine conditions, that’s where you’re going to see Coriolis creep in. You’ll receive more refinement and accuracy in your ballistics solutions if you account for Coriolis on those types of shots. But in most practical long-range shooting situations, Coriolis is NOT important. What IS important is to understand is when you should think about it and when you shouldn’t, i.e. when applying it will matter and when it won’t.”
The Coriolis Effect — General Physics
The Coriolis Effect is the apparent deflection of moving objects when the motion is described relative to a rotating reference frame. The Coriolis force acts in a direction perpendicular to the rotation axis and to the velocity of the body in the rotating frame and is proportional to the object’s speed in the rotating frame.
A commonly encountered rotating reference frame is the Earth. The Coriolis effect is caused by the rotation of the Earth and the inertia of the mass experiencing the effect. Because the Earth completes only one rotation per day, the Coriolis force is quite small, and its effects generally become noticeable only for motions occurring over large distances and long periods of time. This force causes moving objects on the surface of the Earth to be deflected to the right (with respect to the direction of travel) in the Northern Hemisphere and to the left in the Southern Hemisphere. The horizontal deflection effect is greater near the poles and smallest at the equator, since the rate of change in the diameter of the circles of latitude when travelling north or south, increases the closer the object is to the poles. (Source: Wikipedia)
Most bolt-action rifle shooters work the bolt with their trigger-pulling hand. This is because most rifles sold to right-handed shooters come with right-side bolts, while “lefty” rifles come with left-side bolts. This “standard” configuration requires the shooter to take his dominant, trigger-pulling hand off the stock to cycle the bolt, then re-position his hand on the stock, and “re-claim” the trigger. Often the shooter must lift or move his head to work the bolt, and that also requires him to re-establish his cheek weld after each and every shot. Not good.
This really doesn’t make much sense for precision shooting with fore-end support*. There is a better way. If you leave your trigger hand in position and work the bolt (and feed rounds) with the opposite hand, then you don’t need to shift grip and head position with each shot. All this requires is a weakside-placed bolt, i.e. a left bolt for a right-handed shooter or a right bolt for a left-handed shooter. The video below shows a “Lefty” working a right bolt. Note how efficient this is:
As our friend Boyd Allen explains: “If you think about it, if you are going to work with a factory action where your options are left bolt and left port or right bolt and right port, and you are building a rifle that will only be shot from a rest, using the left/left for a RH shooter or using a right/right for a LH shooter works better than the conventional configuration”.
Shoot Like a Champ and Work the Bolt with Your Weakside Hand
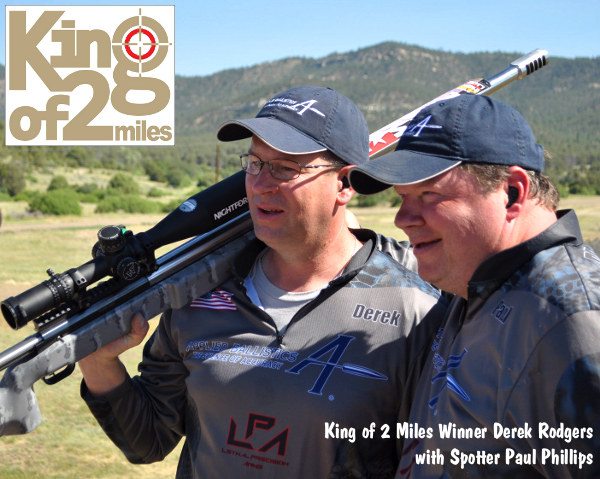
Derek Rodgers, the current F-TR World Champion, the reigning King of 2 Miles, and the only person to have won BOTH F-Open and F-TR U.S. National Championships, runs this kind of “opposite” bolt set-up. Yep, Derek shoots right-handed with a left bolt. Though Derek is a right-hander, he shoots with a Left Bolt/Left Port (LBLP) action. He pulls the trigger with his right index finger, while working the left-side bolt with his left (weakside) hand. This allows him to stay in position, and maintain his cheekweld. He places his right hand on the grip, while manipulating the bolt (and feeding rounds) with his non-trigger-pulling hand.
Current King of 2 Miles (and F-TR World Champion) Derek Rodgers
This is the rifle with which Derek won the 2013 F-TR National Championship.
*For true standing, off-hand shooting (whether in competition or on a hunt), a conventional strongside bolt placement makes sense, since the non-dominant arm must support the front of the rifle all the time. When shooting from bipod or rest, it’s a different story.
This story is about safety — how you must be extra careful when shooting on public lands. Don’t assume that other people will hear your firearms or respect the posted boundaries of a shooting range. To drive this point home, we feature a video that should send chills up and down your spine. This scarey movie about two-legged creatures that appear out of nowhere… while you’re shooting. Watch this video carefully. Something happens at 0.38″ that will make your heart race. Warning: Adult language — Not suitable for playback at work.
Why You Must Always, Always Be Careful When Shooting on Public Lands…
LESSON Learned: Always be aware of your backstop and beyond. If there is any possibility of someone venturing into the “danger zone”, mark off the target area, and designate a person to watch the area around the target. That designated spotter should instantly call a halt to shooting if any person or vehicle appears. It is also a good idea to place warning signs, but don’t count on these to be headed.
This video was filmed on BLM land out in the Nevada desert. In such public areas, one must be very careful about shooting. There may be hikers, bikers, explorers, and horse-riders nearby. An offroad motorcyclist might be moving at 65 miles an hour. At that speed he’ll cover 32 yards in just one second! With that possibility, you really have to be ultra-careful. To be forewarned of potential risks, you need to watch way out to the left and right, not just focus on the backstop and the bullet’s flight path.
The shooting area shown above is located on BLM land. All BLM rules and regulations apply. Remember it is everyone’s desert so always think “safety first”. The video-maker, JFComfort (aka “Joe”), explains: “We do the majority of our shooting on BLM land surrounding the Las Vegas Valley. We have found shooting in small groups in the desert works well for us. We have spent a lot of time out there in the past. I advise you not to shoot alone and be very mindful of off-road enthusiasts. Guys on quads, dirt bikes, and Rhinos seem to pop out of nowhere. Also keep a close eye out for other shooters, not everyone is safe, respectful and courteous.”
Safety Risks Can Occur Anywhere
This kind of safety risk can appear at any shooting venue. Robert Whitley, reports a similar incident on the East Coast: “Had a situation like that happen years ago. I was shooting at 400 yards on a 500 meter range that was completely fenced. Unbeknownst to me some guys on ATVs broke through the fence so they could get across the range to a path on the other side. Heard some engine noise and held up firing and about a second later a guy on an ATV went by right in front of my target — very unnerving. The guy on the ATV was … completely oblivious to the peril he placed himself into by breaking through the fence.”
Our friend, ace S&W pro shooter Julie Golob, stars in a series of handgun instructional videos for Shooting USA. While Julie uses pistols mostly for competition, this U.S. Army veteran also values handguns for self-defense. In this video series, Julie first talks about important gun safety rules, then she offers training advice for persons who carry concealed handguns. The third video covers options for carry a weapon “off-body”, i.e. not in a normal holster on concealment rig on one’s person.
1. GUN SAFETY — Whether you own 1 gun or 100, gun safety must always be your main priority. Here Smith & Wesson Team Captain Julie Golob covers the basics of gun safety.
2. PRACTICE for CONCEALED CARRY — Engaging a threat from concealment could be the most important skill of your life and it takes practice to be proficient. In this video, S&W’s Julie Golob demonstrates some practice drills for concealed carry.
3. OFF-BODY CONCEALED CARRY OPTIONS — There are instances where carrying a concealed weapon on your body in a holster (or deep cover pouch) is not always practical. Here Julie explains various techniques to carrying a concealed handgun “Off Body”.
Julie — pistol champion, Army veteran, wife and mother, is also an accomplished author, who has written about the shooting sports in many shooting publications, newswires, and internet blogs. Her book, Shoot: Your Guide to Shooting and Competition, serves as both an introduction to firearms for novices and a primer to help experienced shooters improve their skills.
Over the past year, this was one of the TOP TEN most-read Daily Bulletin articles. We are reprising it today for readers who may have missed it the first time around…
When shooting pistols do your shots normally land smack dab in the middle of the target? If not, you may have some technique problems that are causing your shots to move off center. Top Shot Champion Chris Cheng has produced a good video for the National Shooting Sports Foundation (NSSF) that helps handgunners diagnose accuracy issues. By shooting 3-shot groups and looking at the pattern and location of the shots, you can see what you’re doing wrong (or right). Here are some examples. Note, this process works best for shooters whose shots fall typically in one target zone. If your shots are all over the target, your form is inconsistent and problems will be harder to diagnose.
1. Low Left — Jerking Trigger: Here we see three (3) shots at the 7 O’clock position. This shows that the shooter is jerking the trigger, meaning that the shooter is pulling the trigger too quickly and therefore forcing the barrel to drop when breaking the shot. This is a very common problem, particularly with novices who are reacting to the noise/recoil of the pistol.
2. 9 O’Clock — Too Little Trigger Finger: If we see three (3) shots at the 9 O’clock position, what this can be indicative of too little trigger finger on the trigger. And therefore with every shot, the shots are getting pushed to the left. Try moving your trigger finger on to the pad of your index finger. Also try dry firing drills.
3. High Left — Anticipating Recoil: In this next example, we see three shots around the 11 O’clock position. What could be happening here is that the shooter is anticipating the recoil, and is actually lifting the gun up when he shoots. We recommend slowing down, working on your breathing, and, again, do dry-firing drills.
4. 3 O’Clock — Too Much Trigger Finger: Finally, if you see three (3) shots at the 3 O’clock position, this can indicate that there is too much trigger finger on the trigger. Therefore when the shot breaks the shooter is pulling each shot to the right. Note: Each of these descriptions is for a RIGHT-handed shooter. If you are a left-handed shooter you’ll want to reverse those descriptions.




 Here’s a fun game you can do with a set of playing cards. Put up four or five cards on a cardboard target backer and try hit each one of the suit symbols. Do one suit at a time. For example, start by shooting at all the heart symbols, then move on to the clubs, then the spades, and finally the diamonds. You can start with face cards, then progress to numbered cards for more challenge. For example, put up a ten of diamonds and try to hit all ten diamonds.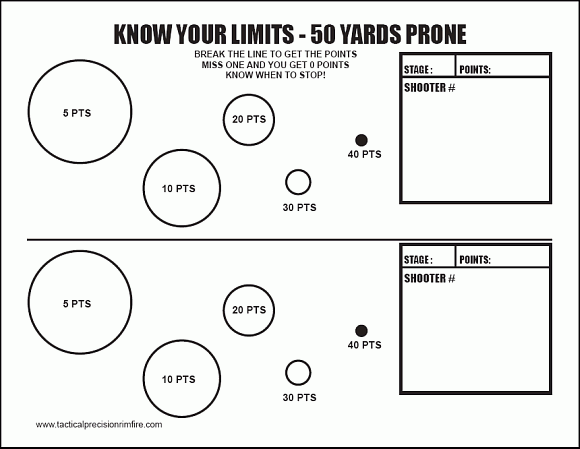

 When you’re out at the range, the Earth seems very stable. But it is actually a big sphere zooming through space while spinning around its axis, one complete turn every 24 hours. The rotation of the earth can create problems for extreme long-range shooters. During extended bullet flight times, the rotation of the planet causes an apparent deflection of the bullet path over very long distances. This is the ballistics manifestation of the