|
|
March 26th, 2010
 Team SIG shooter Max Michel won the IPSC Double Tap Championship for a fifth time this past week in Wichita Falls, Texas. This 6th Annual Double Tap Championship drew nearly 350 contestants, making it the second largest IPSC match of the year. A dominant force in IPSC competition, Max previously won the Double Tap in 2008, 2007, 2006 and 2005. (In 2009 Max had a scheduling conflict with the US Steel National Championship.) Team SIG shooter Max Michel won the IPSC Double Tap Championship for a fifth time this past week in Wichita Falls, Texas. This 6th Annual Double Tap Championship drew nearly 350 contestants, making it the second largest IPSC match of the year. A dominant force in IPSC competition, Max previously won the Double Tap in 2008, 2007, 2006 and 2005. (In 2009 Max had a scheduling conflict with the US Steel National Championship.)
“Winning the Double Tap Championship this year after missing the 2009 match is great,” Max declared. “The competition is first-class and this event draws the best in talent, as proven by the large number of competitors this year.” To see “top gun” Max Michel in action, watch the video below. Max demonstrates his speed shooting techniques and provides valuable tips on shooting fundamentals: Gun Grip and Shooting Stance.

Max Michel — From the USAMU to Team SIG — 10 years of Excellence
Max Michel first gained prominence in the competitive shooting arena with five USPSA® National Championships beginning in 2004 and three World Speed Shooting Championships in 2005, 2007 and 2009. As a representative of the United States, Max has competed in the last three International Practical Shooting Confederation (IPSC) World Shoots, returning home with team gold medals. Max was a top recruit for the U.S. Army Marksmanship Unit (USAMU) from 1999 to 2009 and served as the military Coach of the Action Pistol Team. Max Michel is currently the SIG SAUER Manager of Competitive Shooting Activities. Max will be competing this weekend, March 24-29 at the US Steel National Championship in Titusville, Florida. To follow Max Michel and Team SIG, visit the Sig Sauer Website, or log on to www.MaxMichel.com.
March 26th, 2010
This weekend, March 27-28, the Arizona Game and Fish Department hosts its Outdoor Expo 2010 at the largest public shooting complex in the nation — the Ben Avery Shooting Facility, located just west of Interstate 17 on Carefree Highway. At the Expo, you can try out many different shooting disciplines. Plus there will be archery classes, mounted (horseback) shooting demos, wildlife info sessions, and many other outdoor activities. This is a very popular event — the 2009 Expo drew over 35,000 visitors. Both Admission and parking are FREE.

Outdoor Expo visitors will be able to test the latest firearms from companies like Glock, Smith & Wesson, and Ruger. Visitors can also try a variety of specialty shooting disciplines, such as cowboy action shooting, black powder, tactical pistol, and silhouette shooting.
 
 Shotgun fans can shoot skeet, trap or sporting clays at Ben Avery’s enhanced Clay Target Center. Kids can shoot .22s and air guns while learning more about firearm safety. Guests (of all ages) can take an archery class or try out “3D Archery” on a walking course through the desert. There will be many exciting demonstrations at the 2009 Outdoor Expo. Visitors can witness a Dillon Aero mini-gun demonstration or even shoot a vintage Gatling Gun. Shotgun fans can shoot skeet, trap or sporting clays at Ben Avery’s enhanced Clay Target Center. Kids can shoot .22s and air guns while learning more about firearm safety. Guests (of all ages) can take an archery class or try out “3D Archery” on a walking course through the desert. There will be many exciting demonstrations at the 2009 Outdoor Expo. Visitors can witness a Dillon Aero mini-gun demonstration or even shoot a vintage Gatling Gun.
For more information, visit the Outdoor Expo website, www.azgfd.gov/expo, or CLICK HERE to view the 2010 Outdoor Expo promo video.
March 18th, 2010
Experienced marksmen know they should keep their rifles level when shooting. But they may not understand exactly what happens if they allow their rifle to be canted (tilted left or right), even a few degrees. While the physics are complicated to explain, here’s what you need to know: if you cant your rifle to the left, your shots will impact to the left, and lower, than your point of aim. Likewise, if you cant your rifle to the right, your bullets will impact low and right.
Effects of Rifle Canting
The effects of rifle canting are explained in great detail on the Long Shot Products Ltd. website. There, you’ll find a technical discussion of the Physics of Rifle Canting, plus a page with Sample Targets shot with canted rifles.

Referring to the above illustration, the Long Shot Products article explains: “Notice how the trajectory of the vertical hold stays within the vertical plane, so when the projectile drops, it drops into the line of sight and down to the center of the target. The trajectory of the cant hold does not achieve the same height as the trajectory of the vertical hold and the projectile diverges from the line of sight, thereby missing the target.”
The Long-Shot article makes two other important points. First, cant error increases with distance, and second, cant-induced windage errors are worsened by mounting your scope high above the bore axis:
“This component of cant error becomes more significant at more distant targets due to the increased original included angle between the line of sight axis and the bore axis (more elevation compensation) at the vertical hold.”
“Use of large-diameter objective scopes, mounted high off the barrel, exacerbates the cant error problem. To keep the scope elevation knobs centered for maximum adjustment, precision shooters sometimes use elevation-compensated scope mounting rings or bases. Although this solves the adjustment problem, it greatly exaggerates cant error because the distance between the bore axis and the line of sight axis increases and the included angle between the sight axis and the bore is larger, producing more windage error when canting.”
Test Targets Reveal Cant Errors
The Long Shot Products Ltd. website also displays actual Test Targets showing the effects of canting error. These targets were shot with air rifles and rimfire rifles, but the same effects can and will occur with centerfire rifles. Shown below is a target shot at 50 yards with a Feinwerkbau .22LR match rifle using RWS Match ammo (1012 fps MV). As you can see, canting the rifle 20 degrees to the left produced a huge movement of the point of impact. The shots from the canted rifle impacted 1.81″ Left, and 0.6″ below the point of aim.

CLICK HERE to view more Canted Rifle TARGETS.
March 1st, 2010
IBS 600-yard National Champion and recent 600-yard Shooter of the Year Sam Hall has been hard to beat when he’s got his 6BR or his Dasher dialed in. Sam recently told us that he’s been experimenting with the 6.5×47 Lapua cartridge, thinking that a larger, higher-BC bullet might perform better in the wind.


Sam’s competitors are probably hoping we’ll report that Sam is struggling with the new cartridge, and can’t get his new 6.5×47 to shoot. Well, guys… no such luck. Sam recently took his 6.5×47 Heavy Gun out in some fairly windy conditions, but still returned a spectacular four-shot group at 600 yards. Sam measured the group at 0.357 inches. We measured it at 0.371″ with OnTarget software, but that was going off a photograph, which can be less precise. Either way, 4 shots in well under 0.4 inches at 600 yards is spectacular.
As Sam told us, however, “I just wish I’d shot that in competition… with a fifth shot of course.” Even though Sam’s group was shot in practice, it’s still an amazingly small group — one that suggests that the 6.5×47 Lapua may have great potential as a Benchrest cartridge. The group size, in MOA, is 0.059!

Sam’s load was 37.0 grains of Reloder 15 with 130gr Berger VLDs and CCI BR4 primers. The gun is a Bat-actioned, 47-lb “true heavy” built by Leonard Baity using a McMillan 50BMG stock. The barrel is a 29.5″ Brux, 1.25″ straight contour, with a 1:8.5″ twist. Sam reports:
The gun has a BAT MB 1.55″ round action. The reamer was a Kiff (PTG) .290 neck with .160 freebore. The loaded round is .288 at the neck. I made a mistake labeling the target. The primers were CCI BR4s, not 450s. The 130gr Bergers VLDs are lot 0225 (the early ones). They are in the rifling as far as I can get them (jam). I use a .287 Redding bushing in my Redding “type S” FL dies. I seat with a Wilson seater. The stock is a McMillian Light 50 BMG stock full of lead from McMillian. With the 40x Leupold it weighs 47 pounds. The fore-end is 3.5 inches wide. Leonard Baity did the complete rifle. I had him to put a rail (3 inches wide) on the back so I could use my adjustable rest Leonard made me a few years ago for my Shehane Maxi-Tracker stock. Even though this rifle is only 14 pounds lighter than the 61-pound aluminum stock Maxi-Tracker 6mm Dasher I shot last year, it feels like it is 25 pounds lighter. It is much, and I mean MUCH more manageable carrying this rifle around than the Maxi-Tracker. I can actually use my Farley, joy-stick rest with the rifle. I just replace the 3 inch bag with a 3.5 inch wide bag. I can make adjustments much faster with the Farley than I can twisting knobs.
The reason I built the 6.5×47 Lapua is to try to beat the wind we have here in NC in the spring. Plus, the fact I love to shoot and experiment. The 6.5 bullets are not affected as much by the wind as the 6mms. I started shooting 600-yard competiton with a 6.5-284. I could predict where the bullet was going to hit much better with it than the 6mms I shoot now. In windy conditions, the 6mms seem to “dance around” when sighting in. The heavy 6.5 seems to say on track and Point of Impact is more predictable. In 600-yard competition, score is half the game. I figured if I could get a 6.5 shooting somewhere close to a 6BR or 6BR Improved, I would be ahead of the game in the wind. So far this rifle is agging at 600 yards pretty close to my Dasher and BRX, but not better. After I found this load that shot the 0.357 inch 4-shot group, I went out and shot four more, 4-shot groups in some wind of 10-20 mph and the rifle agged 2.08 inches.
I am still haunted by a “flier” in each group. I am still trying to work that out. The 0.357 group I will say was a fluke because it is the only group I have shot that did not have a flier. The rifle sure won’t group like that every time, but that one time sure was pretty! You may ask why I shoot 4-shot groups during load development and practice. Three is not enough, but four will tell you what the rifle will do, plus I can shoot more groups before the barrel gets too warm.
Our first match is next month at Piedmont. I am going to give this rifle a try. Time will tell if I will stick with this round for serious 600-yard competition or back to the 6mms. — Samuel Hall
February 14th, 2010
 Bryan Litz, Ballistician for Berger Bullets, is the author of the book Applied Ballistics for Long-Range Shooting. Before joining Berger, Bryan was a missile design engineer working with the U.S. Air Force. An NRA High Master, Bryan also happens to be one of the country’s top long-range shooters. Bryan (aka “bsl135″ in our Forum) has written many ballistics programs and technical papers dealing with long-range flight dynamics of projectiles. Bryan has recorded some very impressive match performances recently. At the 2008 NRA National Championships at Camp Perry, Bryan beat 258 other competitors to win the Palma Individual Trophy Match. Bryan shot a remarkable 450/26x, not dropping a single point. Bryan Litz, Ballistician for Berger Bullets, is the author of the book Applied Ballistics for Long-Range Shooting. Before joining Berger, Bryan was a missile design engineer working with the U.S. Air Force. An NRA High Master, Bryan also happens to be one of the country’s top long-range shooters. Bryan (aka “bsl135″ in our Forum) has written many ballistics programs and technical papers dealing with long-range flight dynamics of projectiles. Bryan has recorded some very impressive match performances recently. At the 2008 NRA National Championships at Camp Perry, Bryan beat 258 other competitors to win the Palma Individual Trophy Match. Bryan shot a remarkable 450/26x, not dropping a single point.
Palma Match — Caught on Video
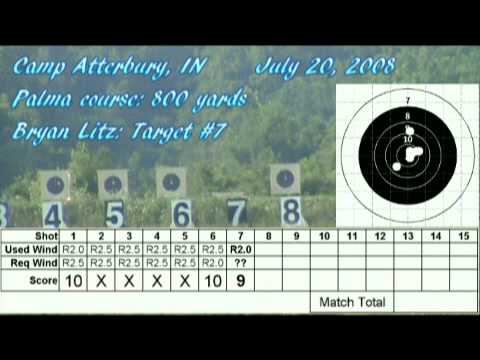
Bryan has crafted a cool video that puts the viewer “in the driver’s seat” as Bryan shoots an 800-yard match with his .308 Winchester, iron-sights Palma rifle. Watch as each shot is marked and scored. Bryan explains: “The inset target at upper right displays each shot location in sequence. The score card shows the windage used for each shot, as well as the windage that was ‘Required’ for that shot to be centered. Wind wasn’t very challenging in this string, only requiring between 2 and 3 MOA right. This particular match is the 800-yard phase of a Palma course fired in the summer of 2008 at Camp Atterbury, IN. NOTE: I’ve had to cut out some ‘pauses’, and speed up the film in order to meet YouTube’s size requirements, so that’s why we sound like chipmunks.”
CLICK SCREEN to WATCH VIDEO. Click Menu Button for High Quality (HQ) Option
Bryan also has his own website with a number of authoritative articles. Topics include: Bullet Design, Meplat Trimming, Gyroscopic and Coreolis Drift, Palma Bullet Analysis, How Ballistics Programs Work, and Ballistic Coefficient Testing. CLICK HERE to visit BRYAN LITZ Website.
February 11th, 2010

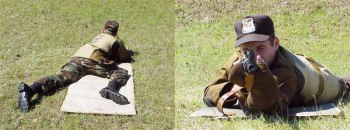
The First Shot, the CMP’s online magazine, features a well-written article on Prone Shooting Technique by SPC Matthew Sigrist of the U.S. Army Marksmanship Unit (USAMU). The article covers all the major points of gun hold and body position: hand position, elbow position, stock weld, buttstock placement, and sling position/tension.

SPC Matt Sigrist of the USAMU breaks down the prone position into “fundamentals” and explains how you put each element together to create a stable body position: “The fundamentals are the building blocks of a position. Much like the framework of a house, a correct application of the fundamentals ensures a solid and stable structure. Since each person’s position will depend on their particular body build and shape, there is no ‘perfect position’ that applies to everyone. Experience, practice and knowledge of the correct fundamentals will dictate the best position for you.”
SPC Sigrist also demonstrates the two basic variations of the leg position when shooting prone: open/spread legged, and bent-legged.

For any service rifle, highpower, cross-course, or prone shooter, this helpful article can improve your performance in the prone position.
January 14th, 2010
 If you’re planning on purchasing a tactical rifle soon, consider this FREE Training promotion from McMillan Firearms. Those who place an order for any McMillan TAC-series rifle will receive a FREE 2-day Marksmanship Training Course. The course is taught on McMillan’s own ranges in Arizona and covers firearms operation, maintenance, application of fire, and a basic tactical overview for civilians. If you’re planning on purchasing a tactical rifle soon, consider this FREE Training promotion from McMillan Firearms. Those who place an order for any McMillan TAC-series rifle will receive a FREE 2-day Marksmanship Training Course. The course is taught on McMillan’s own ranges in Arizona and covers firearms operation, maintenance, application of fire, and a basic tactical overview for civilians.
Each class is taught by McMillan instructors, experienced military and/or law enforcement operators with impressive credentials. The course is split between classroom and range time. This promo applies to all rifles in McMillan’s TAC series: Tac-308, Tac-300, Tac-338, and the mighty Tac-50.
For more information or to place an order, visit McMillanusa.com or call (623) 582-0536, M-F 7:00 am – 3:30 pm MST.

January 2nd, 2010
Here’s a simple procedure that lets you get a solid zero for a hunting rifle in just four shots. Of course you probably want to fire a few more rounds to confirm your zero before you head off to your hunting grounds, but this will let you get on-target with a minimum amount of time and ammo expended. (This assumes your scope is securely mounted, and the bases are not drastically out of alignment.)
1. First, remove the bolt and boresight the rifle. Adjust the position of the rifle so that, looking through the bore, you can see the center of the target with your eyes. Secure the rifle in the rests to maintain its position as boresighted. Then, without moving the rifle, center the reticle. That should get you on paper. With the rifle solidly secured in front and rear rests or sandbags, aim at the center of a target placed at your zeroing distance (50 or 100 yards). Confirm there are no obstructions in the barrel! Then load and fire one shot. Then, return the gun to the exact position it was when you pulled the trigger, with the cross-hair centered on the target as before.
2. Locate, in the scope, where your first bullet landed on the target. Now, while you grip the rifle firmly so it doesn’t move, have a friend adjust the turrets on your scope. While you look through the scope, have your friend turn the windage and elevation turrets until the cross-hairs, as viewed through the scope, bisect the first bullet hole on the target. In other words, you use the turrets to move the center of the reticle to the actual position of shot number one. Dial the crosshairs to the hole — don’t move the rifle.
3. After you’ve adjusted the turrets, now re-aim the rifle so the cross-hairs are, once again, positioned on the target center. Keep the rifle firmly supported by your rest or sandbag. Take the second shot. You should find that the bullet now strikes in the center of the target.

4. Take a third shot with the cross-hairs aligned in the center of the target to confirm your zero. Make minor modifications to the windage and elevation as necessary.
5. Now shoot the rifle from a field rest (shooting sticks, bipod, or rucksack) as you would use when actually hunting. Confirm that your zero is unchanged. You may need to make slight adjustments. Some rifles, particularly those with flexy fore-arms, exhibit a different POI (point of impact) when fired from a bipod or ruck vs. a sandbag rest.
If you recently cleaned your rifle, you may want to fire two or three fouling shots before you start this procedure. But keep in mind that you want to duplicate the typical cold bore conditions that you’ll experience during the hunt. If you set your zero after three fouling shots, then make sure the bore is in a similar condition when you actually go out hunting.
November 3rd, 2009
 Donna Vandermolen, the NRA’s 2009 Woman of Distinction award recipient, is featured at KBTX.com in both a video and a written article. Donna is a respected firearms instructor in Conroe, Texas. CLICK HERE to view the KBTX video report and story featuring Donna. Donna Vandermolen, the NRA’s 2009 Woman of Distinction award recipient, is featured at KBTX.com in both a video and a written article. Donna is a respected firearms instructor in Conroe, Texas. CLICK HERE to view the KBTX video report and story featuring Donna.
“If you’re going to shoot, you need to be able to handle your firearm safely,” Donna says to the KBTX camera. Vandermolen earned the NRA’s Marion P. Hammer Woman of Distinction award in honor of her many years of service as a firearms instructor, and in recognition of her efforts to promote firearms safety. Donna has a strong interest in teaching women about firearms and correct safety and firearm-handling skills. Donna successfully pioneered “ladies-only” entry-level handgun classes that have introduced hundreds of women to safe firearm use.
Vandermolen became the first woman Five-Gun Expert with the International Defensive Pistol Association (IDPA), where she serves as a certified Safety Officer. Donna is an NRA Certified Pistol Instructor, a Personal Protection In the Home Instructor, and a Range Safety Officer. Donna is a fixture at Lone Star College’s Second Amendment Academy, which educates students and constituents on Second Amendment freedoms, political and legal issues, and firearms licensing.
Donna says: “I am committed to empowering women to take responsibility for their personal protection, develop their skills in firearms as a tool for defense, and understand that the protection of the Second Amendment is critical for their ability to remain empowered. Let’s support the Second Amendment and keep our freedoms intact.”
October 6th, 2009
 We have many Canadian readers. Unfortunately, in our neighbor nation to the north, the process for obtaining firearms permits is fairly complicated. Thankfully, Noah, a Canadian firearms enthusiast, has created a helpful website with step-by-step instructions. We have many Canadian readers. Unfortunately, in our neighbor nation to the north, the process for obtaining firearms permits is fairly complicated. Thankfully, Noah, a Canadian firearms enthusiast, has created a helpful website with step-by-step instructions.
Howtogetagun.ca explains the procedure for acquiring a firearm license — the forms you need to fill out, the tests you need to take, and the fees you need to pay. Here are the basic steps, as explained by the website:
1. Take and pass the Canadian Firearms Safety Courses (CFSC) test.
2. Get an appropriate photo and three references.
3. Fill out a form asking about your financial history and romantic life.
4. Mail in the form and wait to receive Possession and Acquisition License (PAL).
The website further explains: “With the exception of some antique guns you need to get a Possession and Acquisition License to buy guns and ammunition, (a slightly more expensive ‘restricted’ license is required for handguns and some other firearms). A word of advice — get the restricted license! It’s going to cost a bit more (about $95 more and then $20 more every 5 years after that), but it’s well worth it if you want to target shoot or collect guns[.]”

We recommend Howtogetagun.ca to any Canadian wanting to obtain a gun permit. As the website’s author explains: “You’re going to have to wade knee deep into Canada’s nearly two-billion-dollar firearms registry boondoggle. But it’s not as bad as it sounds; and you’re already paying for it with your tax dollars, so why not get something out of it?”
Hat’s off to Steve at The Firearm Blog for finding this useful website for Canadian shooters. Photos courtesy Howtogetagun.ca.
|


