Can you guess what your next barrel will weigh? In many competition disciplines, “making weight” is a serious concern when putting together a new match rifle. A Light Varmint short-range Benchrest rifle cannot exceed 10.5 pounds including scope. An F-TR rifle is limited to 18 pounds, 2 oz. (8.25 kg) with bipod.
One of the heaviest items on most rifles is the barrel. If your barrel comes in much heavier than expected, it can boost the overall weight of the gun significantly. Then you may have to resort to cutting the barrel, or worse yet, re-barreling, to make weight for your class. In some cases, you can remove material from the stock to save weight, but if that’s not practical, the barrel will need to go on a diet. (As a last resort, you can try fitting a lighter scope.)
Is there a reliable way to predict, in advance, how much a finished barrel will weigh? The answer is “yes”. PAC-NOR Barreling of Brookings, Oregon has created a handy, web-based Barrel Weight Calculator. Just log on to Pac-Nor’s website and the calculator is free to use. Pac-Nor’s Barrel Weight Calculator is pretty sophisticated, with separate data fields for Shank Diameter, Barrel Length, Bore Diameter — even length and number of flutes. Punch in your numbers, and the Barrel Weight Calculator then automatically generates the weight for 16 different “standard” contours.
Calculator Handles Custom Contours
What about custom contours? Well the Pac-Nor Barrel Weight Calculator can handle those as well. The program allows input of eight different dimensional measurements taken along the barrel’s finished length, from breech to muzzle. You can use this “custom contour” feature when calculating the weight of another manufacturer’s barrel that doesn’t match any of Pac-Nor’s “standard” contours.
Caution: Same-Name Contours from Different Makers May Not be Exactly the Same
One key thing to remember when using the Barrel Weight Calculator is that not all “standard” contours are exactly the same, as sold by different barrel-makers. A Medium Palma contour from Pac-Nor may be slightly different dimensionally from a Krieger Medium Palma barrel. When using the Pac-Nor Barrel Weight Calculator to find the weight of a barrel from a different manufacturer, we recommend you get the exact dimensions from your barrel-maker. If these are different that Pac-Nor’s default dimensions, use the “custom contour” calculator fields to enter the true dimensions for your brand of barrel.
Smart Advice — Give Yourself Some Leeway
While Pac-Nor’s Barrel Weight Calculator is very precise (because barrel steel is quite uniform by volume), you will see some small variances in finished weight based on the final chambering process. The length of the threaded section (tenon) will vary from one action type to another. In addition, the size and shape of the chamber can make a difference in barrel weight, even with two barrels of the same nominal caliber. Even the type of crown can make a slight difference in overall weight. This means that the barrel your smith puts on your gun may end up slightly heavier or lighter than the Pac-Nor calculation. That’s not a fault of the program — it’s simply because the program isn’t set up to account for chamber volume or tenon length.
What does this mean? In practical terms — you should give yourself some “wiggle room” in your planned rifle build. Unless you’re able to shave weight from your stock, do NOT spec your gun at one or two ounces under max based on the Pac-Nor calculator output. That said, the Pac-Nor Barrel Weight Calculator is still a very helpful, important tool. When laying out the specs for a rifle in any weight-restricted class, you should always “run the numbers” through a weight calculator such as the one provided by Pac-Nor. This can avoid costly and frustrating problems down the road.
When we first ran this story a while back, it generated great interest among readers. By popular request, we’re reprinting this story, in case you missed it the first time around. — Editor
Precision Benchrest and F-Class shooters favor premium brass from Lapua, Norma, Peterson, or RWS. (Lake City also makes quality brass in military calibers.) Premium brass delivers better accuracy, more consistent velocities, and longer life. Shooters understand the importance of good brass, but many of us have no idea how cartridge cases are actually made. Here’s how it’s done.
The process starts with a brass disk stamped from strips of metal. Then, through a series of stages, the brass is extruded or drawn into a cylindrical shape. In the extrusion process the brass is squeezed through a die under tremendous pressure. This is repeated two or three times typically. In the more traditional “draw” process, the case is progressively stretched longer, in 3 to 5 stages, using a series of high-pressure rams forcing the brass into a form die. While extrusion may be more common today, RWS, which makes some of the most uniform brass in the world, still uses the draw process: “It starts with cup drawing after the bands have been punched out. RWS cases are drawn in three ‘stages’ and after each draw they are annealed, pickled, rinsed and subjected to further quality improvement measures. This achieves specific hardening of the brass cases and increases their resistance to extraordinary stresses.” FYI, Lapua also uses a traditional draw process to manufacture most of its cartridge brass (although Lapua employs some proprietary steps that are different from RWS’s methods).
After the cases are extruded or drawn to max length, the cases are trimmed and the neck/shoulder are formed. Then the extractor groove (on rimless cases) is formed or machined, and the primer pocket is created in the base. One way to form the primer pocket is to use a hardened steel plug called a “bunter”. In the photos below you see the stages for forming a 20mm cannon case (courtesy OldAmmo.com), along with bunters used for Lake City rifle brass. This illustrates the draw process (as opposed to extrusion). The process of draw-forming rifle brass is that same as for this 20mm shell, just on a smaller scale.
River Valley Ordnance explains: “When a case is being made, it is drawn to its final draw length, with the diameter being slightly smaller than needed. At this point in its life, the head of the draw is slightly rounded, and there are no provisions for a primer. So the final drawn cases are trimmed to length, then run into the head bunter. A punch, ground to the intended contours for the inside of the case, pushes the draw into a cylindrical die and holds it in place while another punch rams into the case from the other end, mashing the bottom flat. That secondary ram holds the headstamp bunter punch.
The headstamp bunter punch has a protrusion on the end to make the primer pocket, and has raised lettering around the face to form the headstamp writing. This is, of course, all a mirror image of the finished case head. Small cases, such as 5.56×45, can be headed with a single strike. Larger cases, like 7.62×51 and 50 BMG, need to be struck once to form a dent for the primer pocket, then a second strike to finish the pocket, flatten the head, and imprint the writing. This second strike works the brass to harden it so it will support the pressure of firing.”
Thanks to Guy Hildebrand, of the Cartridge Collectors’ Exchange, OldAmmo.com, for providing this 20mm Draw Set photo. Bunter photo from River Valley Ordnance.
Here’s a smart new product that monitors the temperature and humidity inside your gun safe — with a convenient LCD display unit located on the outside of the safe. You don’t need to string wires or cut a small hole in your safe — there are two separate components, one inside and one outside. The sensor unit (on the inside) communicates wirelessly with the display unit (on the outside).
The new GoldenRod Wireless Hygrometer was designed to display the temp/humidity in your safe without the need to open the safe. NOTE: the wireless LCD display can show BOTH in-vault AND in-room humidity and temperature levels. You can attach the display to the vault door with its built-in magnet, or simply place the display unit on top of the safe using the handy flip-out kickstand. The unit costs just $26.98 at Amazon.com.
GoldenRod Wireless Hygrometer Specifications and Features:
Measures In-Vault and In-Room humidity from 20% to 95%.
Measures In-Vault temperature range from 14°F to 122°F.
Measures In-Room temperature range from -4°F to 158°F.
Records Min/Max temperature and humidity history.
Another Important Accessory — GoldenRod for Inside the Safe
The GoldenRod, marketed as a dehumidifier, is a small, low-wattage electric heating element you place in the safe. Running 24/7 at 140° F, the GoldenRod warms the air in your safe. This changes relative humidity and raises the dew point in the safe so water vapor does not condense on your arms and valuable accessories. When combined with Desiccant packs that absorb moisture, the GoldenRod is extremely effective at keeping your guns rust-free during long-term storage. We do recommend wiping down your guns with Boeshield, Eezox, or Corrosion-X before putting them in storage. These are three of the best corrosion-inhibiting metal coatings you can buy.
You can get the 12″ GoldenRod heating unit for $31.99 on Amazon. There is also an 18″ model for $48.75 and a long 36″ GoldenRod for $39.99 on Amazon, just $8 more than the “foot-long”. The 36″ GoldenRod works well for cold climates and large safes. All GoldenRods come with a detachable plugs for easy installation. The 12″ is rated for 100 cubic foot safes, the 18″ for 200 cubic foot safes, while the 36″ model protects up to 500 cubic feet.
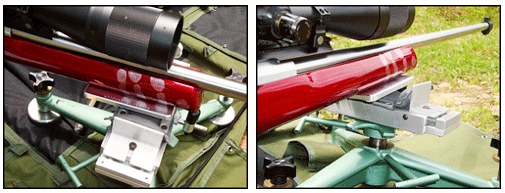
ARs and Narrow-Forearm Sporters Benefit from Front Bag-Rider Blocks
Whidden Gunworks offers a smart product that will enhance the bench-rested accuracy of any rifle with an accessory rail on the forearm. The Whidden Track Plate fits securely in the forearm accessory rail on prone, cross-the-course, tactical, and Palma rifles. These guns typically have a narrow and/or rounded fore-end so they rock and wobble when used with a front pedestal rest. The TrackPlate cures that. Once installed it provides a rock-solid, 2.9″-wide platform that mates perfectly with a benchrest-type front sandbag. This gives sling-shooters maximum stability when testing loads or zeroing their sights or scope. Plus you can now shoot F-Class competitively with a prone gun. (The 2.9″ width is 100% legal for F-Open).
The Track Plate is light-weight, has catamaran-style runners to aid tracking and prevent rocking, and can be easily stowed in a range bag. The Track Plate fits BOTH Anschutz and American style forends and is made in the USA of machined aluminum. The Track Plate is available from Whidden Gunworks for $49.50.
Plate designer (and 5-Time Nat’l LR Rifle Champion) John Whidden says: “The Plate is great for any rifle with a rail whether it ís smallbore, centerfire, or an air gun. Now you can try F-Class with your favorite prone rifle: the Plate has a perfect low-drag finish for riding a rest or sandbags and is competition legal.”
Bag-Riders for AR-Platform Rifles from EGW
AR owners should check out the 3″-wide Delrin bag-rider from Evolution Gun Works (EGW). There are two versions, one for front Picatinny Rails, and another that mounts via sling swivel studs. These EGW Bag-Riders were developed expressly to fit the fore-ends of ARs. The front bag-riders are contoured to match the handguard profile so they fits securely with no wobble.
The $49.99 EGW Picatinny Rail front Bag-Rider simply slides on your under-forearm rail and there is a a tension bolt. Attachment is quick and easy. Or, if your AR has no rail get the original $39.99 EGW front Bag-Rider that attaches to a front sling swivel stud anchor. That allows it to mount as easily as a Harris bipod — no rail needed! Just unscrew the swivel stud, put the front bag-rider in place and attach one hex-head machine screw.
Also with the two front Bag-Riders, EGW offers a Rear Bag-Rider for ARs that attaches via the sling swivel anchor. Overall, it is a slick system. Front and rear bag-riders can be attached in a couple of minutes. The Delrin blocks slide easily in the bags and make the gun ultra-stable. The gun tracks straight back.
AR-platform rifles can be maintenance-intensive beasts. They need regular inspection, cleaning, and lubrication. But some AR owners make the situation worse by not regularly cleaning important small parts, or by using too MUCH oily/greasy lubricants in the wrong places. A properly maintained and lubricated AR15 can shoot hundreds of rounds (between cleanings) without a problem. If you learn where (and where not) to apply lubricant, you’ll find that your AR will run more reliably and the task of cleaning the bolt, bolt carrier, and upper receiver internals will be less of a burden.
Here we showcase videos that show how to field-strip an AR-15, inspect the key parts, clean components, and lubricate internal parts as needed. Along with these videos, we recommend you read a comprehensive AR-15 Gun Cleaning Clinic article on the Brownells website. This explains in detail important procedures that the videos might only cover in a few seconds.
If you want to keep your black rifle running smoothly and reliably, you must clean it regularly and follow the correct maintenance procedures. Here are five videos that explain how to properly disassemble and clean AR-platform rifles.
1. How To Clean Your AR-15 | Cleaning and Maintenance Tips
This is a quick 90-second starter video that may help new AR owners. Ricky Lehnhardt of OTIS Technology demonstrates the basics of cleaning and maintaining your AR-15. Lehnhardt does a good job identifying the points that need cleaning on the inside of ARs. However he works very quickly in the video. You may want to pause the video at some points. Also, Lehnhardt employs a cable for pulling patches and brushes through the barrel. Yes this is fast and easy. However, for match AR rifles, we recommend that you instead use a cleaning ROD with fitted bore guide.
2. Take-Down and Full Cleaning of AR-15 by Jerry Miculek
Here ace shooter Jerry Miculek takes down and cleans an AR-platform rifle belonging to his daughter Lena. This is a good video because Lena’s rifle was “run hard and packed up dirty” so you can see where carbon and grease build up. This 35-minute video is very thorough. Jerry is one of the nation’s top action carbine shooters, so listen carefully to his advice on cleaning and lubrication.
3. AR-15 Maintenance: Field-strip, Clean and Lubricate an AR-15
Gunsite Academy instructor and gunsmith Cory Trapp demonstrates the proper way to field-strip, clean, and lubricate an AR-15 carbine. In this 30-minute video, Trapp offers several important technical tips and hints. For example, at 11:05 Trap demonstrates how to determine if your bolt needs new gas rings. Along with cleaning procedures, this video explains how to inspect key components and how to function-test your AR before each shooting session.
4. AR-15 Dissassembly and Cleaning Guide
This video does a good job, with close-ups, showing how to remove the bolt carrier and clean the inside of the upper receiver. Then you can see how to work with various tools to clean the bolt, bolt carrier, and inside of chamber. We also recommend that you inspect the ejector recess and extractor recess. When we’ve inspected ARs that failed to cycle properly, we have often found nasty gunk (mixture of carbon, greasy lube, and brass particles) in these areas.
5. Basic AR-15 Quick and Easy Field Maintenance
In this NSSF-sponsored video, pro shooter Ryan Muller demonstrates basic, quick field maintenance of his AR-15. This would be for a quick cleaning and lubrication of the reciprocating parts. This covers rapid maintenance in the field. For full field-stripping and thorough cleaning, watch the previous videos.
Handy Mat for Cleaning AR Rifles
When working on an AR-15, it’s smart to have a pad that can absorb solvents and cushion your upper and lower. The $24.99 Real Avid Smart Mat is a good choice. This features printed take-down instructions and it has a handy parts tray on the right side. The mat rolls up for convenient storage. Click HERE to learn more.
Vital Inspections You Should Do After Disassembly
Last but not least, here are recommended inspections you should do every time you do a full field-strip and cleaning of your black rifle:
Accurate, modular, and supremely versatile, the AR15 is America’s favorite semi-auto rifle. But let’s face it, the AR is a maintenance hog. The AR’s gas tube blows carbon and soot right into the middle of the bolt assembly where it cakes on to the metal. The AR bolt also has many tiny parts, and small recesses, which must be cleaned regularly. This author has seen numerous ARs fail simply because there was gunk (dried lube, carbon, brass shavings) in the ejector slot or extractor spring recess.
A Clean AR is a Happy AR — Whether You Run ‘Wet’ or ‘Dry’
There are various schools of thought when it comes to maintaining an AR. Some folks prefer to run their AR “dry” with minimal lube on the lugs and friction surfaces. Other shooters prefer to run their ARs “wet”, with lots of lube. But whatever your preference, you need to clean your AR regularly. And nothing is more important than the AR’s bolt/carrier assembly. Because it is involved in feeding, firing, and extracting, the AR-15 bolt/carrier assembly can be considered the most critical portion of the AR-15 from a maintenance standpoint.
Bolt Take-Down Guide on Top Quark Blog
The editor of the Top Quark Blog has created an excellent illustrated AR15 Bolt Take-Down Guide that shows how to disassemble an AR15 bolt and carrier for regular cleaning. Even if you’re an experienced AR15 shooter, you can learn something from this page (sample at right), and you may want to bookmark it for future reference. The photos are large and clear and there are helpful hints for each step of the process.
The author knows his stuff and offers some important insights. For example, he notes that “Extractor springs in most AR15 bolt assemblies are fairly weak, and this can lead to various extraction-related failures. One of the few high points about Colt assemblies is their usage of higher-strength extractor springs. You can tell the difference by looking at the inner plastic insert. ‘Normal’ springs feature a blue plastic insert, Colt strong springs have a black insert.”
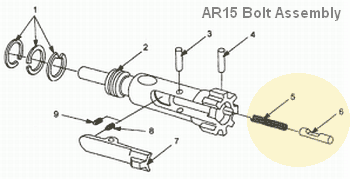
There is one notable oversight on this page — the author doesn’t cover disassembly and cleaning of the ejector assembly. This is actually quite important. A few small brass shavings, combined with carbon and lube in the ejector slot, WILL cause malfunctions. In fact, when this editor is called to diagnose problem ARs, the first things I look at (after swapping magazines) are the ejector recess and the slot for the extractor. Clogged ejectors are responsible for fail-to-ejects and other jams. It is essential that you keep the ejector hole clean. Old, gooey lube residues mixed with carbon and tiny brass shavings in the ejector recess will create all sorts of problems. As shown in the diagram below, it is simple to remove the ejector (#6) and ejector spring (#5), by drifting the ejector retaining pin (#4).
NOTE: The original Quark Blog Article appears to be offline (See Quark LINK.) However, this excellent article has been preserved via the WayBack Machine Internet Archives. CLICK HERE to access the Full Quark Blog Article via WayBack Machine Archive.
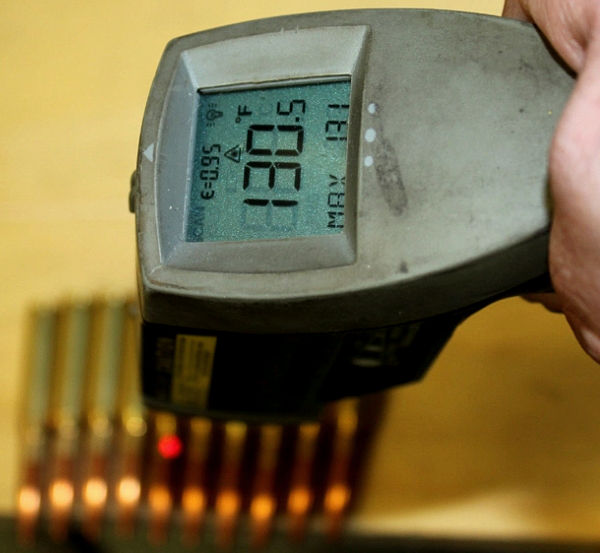
In this .308 Win test, 70° F ammo shot 96 FPS slower than ammo heated to 130.5° F. And the 130.5° ammunition was 145 fps faster than ammo taken right out of the freezer (at 25.5° F). That’s a huge difference…
Today is the first day of August. That means most parts of the country will soon be encountering peak summer heat. Some ranges in the Western states have already recorded temperatures well over 100 degrees F during matches. When dealing with extreme summer heat, you should make a serious effort to keep your ammo at reasonable temperatures. When possible, keep ammo in a cooler in the shade.
Never leave boxes of ammo out in the hot sun. Even with powders advertised as “temp stable” you can see significant velocity increases when ambient temps reach 90 degrees and above. This article explains how temperature extremes (both hot and cold) can alter bullet velocities. The velocity differences between very cold ammo and very hot ammo can be very large, as this article explains.
EDITOR’s NOTE: The Sierra tester does not reveal the brand of powder tested here. Some powders are much more temp sensitive than others. Accordingly, you cannot extrapolate test results from one propellant to another. Nonetheless, it is interesting to see the actual recorded velocity shift with ammo temperature variations in a .308 Win.
Written by Sierra Chief Ballistician Tommy Todd This story originally appeared in theSierra Bullets Blog
A few weeks ago I was attending the Missouri State F-Class Match. This was a two-day event during the summer and temperatures were hot one day and hotter the next. I shot next to a gentleman who was relatively new to the sport. He was shooting a basically factory rifle and was enjoying himself with the exception that his scores were not as good as he hoped they would be and he was experiencing pressure issues with his ammunition. I noticed that he was having to force the bolt open on a couple of rounds. During a break, I visited with him and offered a couple of suggestions which helped his situation somewhat and he was able to finish the match without major issues.
He was shooting factory ammunition, which is normally loaded to upper levels of allowable pressures. While this ammunition showed no problems during “normal” testing, it was definitely showing issues during a 20-round string of fire in the temperatures we were competing in. My first suggestion was that he keep his ammunition out of the direct sun and shade it as much as possible. My second suggestion was to not close the bolt on a cartridge until he was ready to fire. He had his ammo in the direct sunlight and was chambering a round while waiting on the target to be pulled and scored which can take from a few seconds to almost a minute sometimes.
This time frame allowed the bullet and powder to absorb chamber [heat] and build pressure/velocity above normal conditions. Making my recommended changes lowered the pressures enough for the rifle and cartridge to function normally.
Testing Effects of Ammunition Temperature on Velocity and POI
After thinking about this situation, I decided to perform a test in the Sierra Bullets underground range to see what temperature changes will do to a rifle/cartridge combination. I acquired thirty consecutive .30 caliber 175 grain MatchKing bullets #2275 right off one of our bullet assembly presses and loaded them into .308 Winchester ammunition. I utilized an unnamed powder manufacturer’s product that is appropriate for the .308 Winchester cartridge. This load is not at the maximum for this cartridge, but it gives consistent velocities and accuracy for testing.
I took ten of the cartridges and placed them in a freezer to condition.
I set ten of them on my loading bench, and since it was cool and cloudy the day I performed this test I utilized a floodlight and stand to simulate ammunition being heated in the sun.
I kept track of the temperatures of the three ammunition samples with a non-contact laser thermometer.
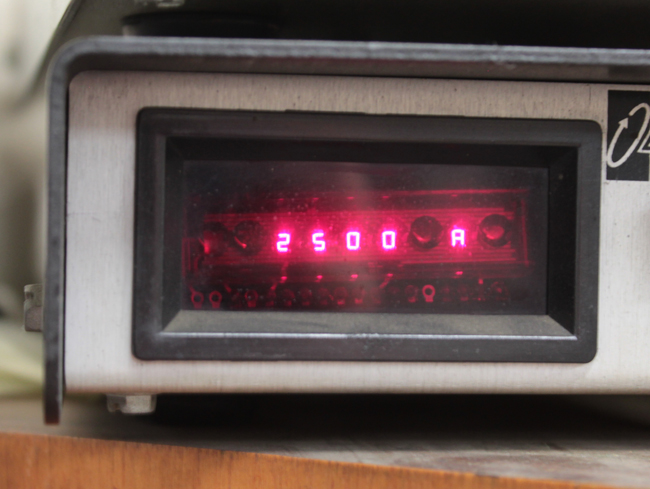
The rifle was fired at room temperature (70 degrees) with all three sets of ammunition. I fired this test at 200 yards out of a return-to-battery machine rest. The aiming point was a leveled line drawn on a sheet of paper. I fired one group with the scope aimed at the line and then moved the aiming point across the paper from left to right for the subsequent groups.
NOTE that the velocity increased as the temperature of the ammunition did.
The ammunition from the freezer shot at 2451 fps.
The room temperature ammunition shot at 2500 fps.
The heated ammunition shot at 2596 fps.
The tune window of the particular rifle is fairly wide as is shown by the accuracy of the three pressure/velocity levels and good accuracy was achieved across the board. However, notice the point of impact shift with the third group? There is enough shift at 200 yards to cause a miss if you were shooting a target or animal at longer ranges. While the pressure and velocities changed this load was far enough from maximum that perceived over pressure issues such as flattened primer, ejector marks on the case head, or sticky extraction did not appear. If you load to maximum and then subject your ammunition to this test your results will probably be magnified in comparison.
This test showed that pressures, velocities, and point-of-impact can be affected by temperatures of your ammunition at the time of firing. It’s really not a bad idea to test in the conditions that you plan on utilizing the ammo/firearm in if at all possible. It wouldn’t be a bad idea to also test to see what condition changes do to your particular gun and ammunition combination so that you can make allowances as needed. Any personal testing along these lines should be done with caution as some powder and cartridge combination could become unsafe with relatively small changes in conditions.
In the video below, Shiraz Balolia takes you through the essentials of fire-forming brass with his custom-made, water-cooled benchrest railgun. Shiraz is a current Team member (and former Team Captain) of the U.S. F-Class Open Rifle Team. Shiraz has competed on the National and World level for more than two decades, and has won multiple major International championships in 1000-yard shooting. In this video he will walk you through fire-forming cartridges in .284 Shiraz, a wildcat based on the .284 Winchester.
Fire-forming properly is a pre-requisite for accuracy in a match rifle. Done right, fire-forming can improve cartridge consistency shot to shot. Creating a fire-forming fixture like this, or even a more basic design, can save you time and potential frustration on the range, Shiraz explains. The key is getting the initial case expansion to match your competition chamber quickly but without generating excessive heat. Follow along as Shiraz takes you through the methodology of fire-forming both in his work shop and on the range.
Here Shiraz Balolia takes you through the essentials of fire-forming brass with his custom-made, water-cooled benchrest railgun.
Along with running the successful Grizzly Industrial enterprise, Shiraz is a top competitor and member of the U.S. F-Open team. He has competed in three world championships. In recent years he captured three straight Canadian National F-Class Championships (READ 3-Peat STORY). So, this guy knows his stuff.
Shiraz shows fellow shooters how to fire-form cases efficiently without burning precious match barrel life. In the video above he uses a custom-designed railgun that employs water cooling for the barrel. This is done with hoses running from a sink, so that cool water is constantly flowing through the barrel jacket.
Shiraz says the fired cartridge are actually cool to the touch because the water-jacketed barrel keeps everything at a moderate temperature. (See video at 8:00)
With barrels, one wonders “Can a little more length provide a meaningful velocity gain?” To answer that question, Rifleshooter.com performed an interesting test, cutting a .308 Win barrel from 28″ all the way down to 16.5″. The cuts were made in one-inch intervals with a rotary saw. At each cut length, velocity was measured with a Magnetospeed chronograph. To make the test even more interesting, four different types of .308 Win factory ammunition were chronographed at each barrel length.
This is a very useful test is you’re thinking about building a .308 Win hunting rifle, or perhaps thinking of going shorter for your F-TR rifle to save weight.
Test Barrel Lost 22.7 FPS Per Inch (.308 Win Chambering)
How much velocity do you think was lost, on average, for each 1″ reduction in barrel length? The answer may surprise you. With a barrel reduction from 28″ to 16.5″, the average speed loss of the four types of .308 ammo was 261 fps total. That works out to an average loss of 22.7 fps per inch. This chart shows velocity changes for all four ammo varieties:
Summary of Findings:
The average velocity loss per inch, for all four ammo types combined, was 22.7 FPS. By ammo type, the average FPS loss per inch was: 24.6 (Win 147 FMJ), 22.8 (IMI 150 FMJ), 20.9 (Fed GMM 168gr), and 22.5 (Win 180PP).
Interestingly, these numbers jive pretty well with estimates found in reloading manuals. The testers observed: “The Berger Reloading manual says for the 308 Winchester, ‘muzzle velocity will increase (or decrease) by approximately 20 fps per inch from a standard 24″ barrel’.”
How the Test Was Done
The testers described their procedure as follows: “Ballistic data was gathered using a Magnetospeed barrel mounted ballistic chronograph. At each barrel length, the rifle was fired from a front rest with rear bags, with five rounds of each type of ammunition. Average velocity and standard deviation were logged for each round. Since we would be gathering data on 52 different barrel length and ammunition combinations and would not be crowning the barrel after each cut, we decided to eliminate gathering data on group sizes. Once data was gathered for each cartridge at a given barrel length, the rifle was cleared and the bolt was removed. The barrel was cut off using a cold saw. The test protocol was repeated for the next length. Temperature was 47° F.”
CLICK HERE to Read the Rifleshooter.com Test. This includes detailed charts with inch-by-inch velocity numbers, multiple line charts, and complete data sets for each type of ammo. Rifleshooter.com also offers ballistics graphs showing trajectories with different barrel lengths. All in all, this was a very thorough test by the folks at RifleShooter.com.
Much Different Results with 6mmBR and a Longer Barrel
The results from Rifleshooter.com’s .308 barrel cut-down test are quite different than the results we recorded some years ago with a barrel chambered for the 6mmBR cartridge. When we cut our 6mmBR barrel down from 33″ to 28″, we only lost about 8 FPS per inch. Obviously this is a different cartridge type, but also our 6mmBR barrel end length was 5″ longer than Rifleshooter.com’s .308 Win start length. Velocity loss can be more extreme with shorter barrel lengths (and bigger cartridges). Powder burn rates can also make a difference.
The 2021 NRA F-Class National Championships are underway right now at Camp Atterbury, Indiana. The Mid-Range Nationals concluded yesterday with the Team Match, and the Long-Range F-Class Nationals commence today, July 27, 2021 and run through Friday, July 30th. For F-Class competitors, making the right wind call is a vital skill. Many shooters and team wind coaches will be using Kestrel Wind Meters, widely regarded as the best on the market.
This article reviews the advanced Kestrel 5700 Elite Wind Meter with sophisticated ballistics capabilities. Our review features three videos by F-Class John that show how the Kestrel 5700 Elite works with Applied Ballistics APP software and LiNK connection.
This Part I Video starts with a basic Kestrel Anemometer (blue case, 00:00-00:40) wind meter. Then reviewer F-Class John looks at the “smart” Kestrel 5700 Elite with Applied Ballistics functionality and LiNK Bluetooth connectivity. John explains the many features of the Kestrel 5700 and how it holds a powerful ballistics calculator in the convenient, easy-to-tote Kestrel package. With the Kestrel 5700 Elite, once you enter data about your bullets, velocity, zero, and rifle, the Kestrel can calculate come-ups and wind corrections. If you don’t yet own a Kestrel, we highly recommend you watch this series of videos that explains advanced Kestrel features in detail.
This Part II Video shows the key features of the advanced software APP used by the Kestrel 5700 Elite unit with Applied Ballistics. The Kestrel 5700 can “talk” to a mobile device that runs the Applied Ballistics software APP that contains bullet databases and allows you to enter key information such as muzzle velocity, bullet BC, zero distance, velocity, wind, and environmental factors (altitude, temperature etc.). There are also gun-specific factors such as scope height over bore and barrel twist rate. The video also explains how “range cards” are created and how to view them with your Elite Ballistics-enabled Kestrel. John notes: “The APP is great because you don’t have to fiddle with the Kestrel’s buttons. It’s much easier to enter data and change settings with the APP.”
This Part III video shows how to determine true wind direction by aligning the SIDE of the unit into the wind. You essentially want to set the unit 90 degrees to the wind direction so the impeller runs as slowly as possible. Then, after you set your target distance (See 3:03), the unit can give you precise come-ups for your intended target (10.28 MOA for 559 yards here). The Kestrel then calculates the cross-wind correction as well (See 3:12).
DISCLAIMER: This video and description contains affiliate links, which means that if you click on one of the product links, the video author may receive a small commission. This helps support F-Class John’s YouTube channel and allows him to continue to make videos like this.


 Can you guess what your next barrel will weigh? In many competition disciplines, “making weight” is a serious concern when putting together a new match rifle. A Light Varmint short-range Benchrest rifle cannot exceed 10.5 pounds including scope. An F-TR rifle is limited to 18 pounds, 2 oz. (8.25 kg) with bipod.

 Precision Benchrest and F-Class shooters favor premium brass from


 The headstamp bunter punch has a protrusion on the end to make the primer pocket, and has raised lettering around the face to form the headstamp writing. This is, of course, all a mirror image of the finished case head. Small cases, such as 5.56×45, can be headed with a single strike. Larger cases, like 7.62×51 and 50 BMG, need to be struck once to form a dent for the primer pocket, then a second strike to finish the pocket, flatten the head, and imprint the writing. This second strike works the brass to harden it so it will support the pressure of firing.”
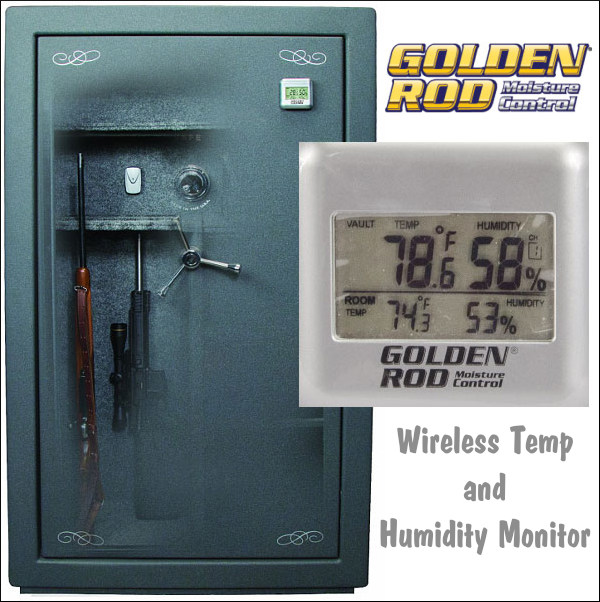
 Here’s a smart new product that monitors the temperature and humidity inside your gun safe — with a convenient LCD display unit located on the outside of the safe. You don’t need to string wires or cut a small hole in your safe — there are two separate components, one inside and one outside. The sensor unit (on the inside) communicates wirelessly with the display unit (on the outside).


 Today is the first day of August. That means most parts of the country will soon be encountering peak summer heat. Some ranges in the Western states have already recorded temperatures well over 100 degrees F during matches. When dealing with extreme summer heat, you should make a serious effort to keep your ammo at reasonable temperatures. When possible, keep ammo in a cooler in the shade.