Dual-Lock Technology: Cannon offers an innovative combined digital/mechanical lock system. This dual-access lock provides the rapid access of an electronic lock backed up by the assurance of a manual (rotary dial) combination lock.
Electronic (Keypad) Lock vs. Manual (Rotary) Lock
Smart gun owners know they need a good, solid gun safe. But when choosing a gun safe, what kind of lock should you select — electronic or mechanical? Both types have their advantages and disadvantages. This article will help you make the right choice for your needs and also get the most reliable performance from either type.
Gunsafes can be fitted with either an electronic keypad-style lock, or a conventional dial lock. In our Gunsafe Buyer’s Guide, we explain the important features of both dial and electronic lock systems. Many safe-makers will tell you that consumers prefer electronic locks for convenience. On the other hand, most of the locksmiths we’ve polled believe that the “old-fashioned” dial locks, such as the Sargent & Greenleaf model 6730, will be more reliable in the long run.
Here is the opinion of RFB from Michigan. He is a professional locksmith with over two decades of experience servicing locks and safes of all brands and types:
What a Professional Locksmith Says:
For the convenience of quick opening, the electronic locks can’t be beat. However, for endurance and years of trouble-free use, the electronics can’t compare with the dial lock.
I’ve earned my living, the past 22 years, servicing locks of all types. This includes opening safes that can’t otherwise be opened. I do warranty work for several safe manufacturers (including Liberty). What I’ve learned in all those years is that manual dial locks have very few problems. The most common is a loose dial ring which can shift either left or right, which will result in the index point being in the wrong place for proper tumbler alignment. This is simple to fix.
Electronic locks, however, can have all kinds of issues, and none (except bad key-pad) are easy to fix, and when one goes bad, it must be drilled into to open it. IMO, it’s not a matter of ‘if’ an electronic lock will ultimately fail, but a matter of ‘when’ it will fail. Over the past 10 years or so, since electronics have become more and more prevalent, I’ve had to drill open bad electronic locks vs. bad manual dial locks on a ratio of about 20-1.
My professional opinion is to get the manual dial lock, unless you’ve got a good friend who is a locksmith/safecracker.
How Secure is Your Lock?
RFB tells us that both dial and electronic locks offer good security, provided it’s a good quality lock made by LaGard, Sargent & Greenleaf, Amsec, or Kaba/Ilco. However, RFB warns that “Some of the ‘cheaper’ locks (both manual and electronic) however, are very simple to bypass.
An electronic lock that’s glued or ‘stuck’ to the door with double-sided tape, and has its ‘brain’ on the outside of the lock in the same housing as the keypad, and merely sends power to an inner solenoid via a pair of wires through the door, is a thief’s best friend. The good ones have the brain inside the safe, inaccessible from the outside.
No amateur can ‘manipulate’ either a good manual or electronic lock. Both give you a theoretical one million possible combinations. I say ‘theoretical’ because there are many combinations that cannot, or should not, be used. You wouldn’t set your combo on a dial lock to 01-01-01 etc., nor would you set an electronic to 1-1-1-1-1-1, or 1-2-3-4-5-6.”
Tips for Dial Locks
RFB notes that “The speed, and ease of use, of a manual dial lock can be improved upon, simply by having your combo reset using certain guidelines. Avoid high numbers above 50. Having a 1st number in the 40s, 2nd number anywhere from 0-25, and 3rd number between 25 and 35 will cut dialing time in half, without compromising security. (For mechanical reasons I won’t get into here, the 3rd number of a good manual dial lock cannot — or should not — be set to any number between 95 & 20).”
Tips for Electronic Locks
Electronic locks can have the combination changed by the user much more easily than dial locks. That should be a good thing. However, RFB explains: “That can be a double-edged sword. More than a few times I’ve had to drill open a safe with an electronic lock that has had the combo changed incorrectly by the user, resulting in an unknown number that nobody can determine. Also, don’t forget that electronic locks have a ‘wrong-number lock-out’. I would NOT rely on the normal quickness of an electronic 6-number combo in an emergency situation. If for any reason (panic etc.) you punch in the wrong number several times, the lock will shut down for a 5-minute ‘penalty’.
Replace Electronic Lock Batteries Every Year
To get the most life out of any electronic (keypad Lock), you should change the battery at least once a year, whether it needs it or not. Low voltage won’t necessarily shut down the lock, but using it in a low voltage situation is bad for the electronics, and eventually will cause lock failure. So, If you do nothing else to maintain your digital-lock safe, replace the battery every year. And get a fresh battery (with a release date) from the store — don’t just pull a battery out of a storage bin, even if it’s never been used. Old batteries can degrade, even when in storage.
Monitor Barrel Heat with Pocket Infrared Gauges
You never want to run the barrel of a precision rifle too hot. Excessive barrel heat kills accuracy, increases copper fouling, and can cause rapid barrel throat wear. Over the years people have devised various means to cool their barrels — from electric fans to dunking in tubs of ice water.
But how do you know if your barrel is too hot? Consider a “non-contact” thermometer that reads your barrel’s “infrared signature”. The small pocket-sized, non-contact Infrared (IR) thermometers are ideal for shooters at the range or in the prairie dog fields. Such thermometers are handy and inexpensive. You can buy these mini IR pen thermometers for under $15.00 from Amazon, Walmart, and other vendors.
Pen-Sized Thermometers
Just 3.2″ long, and weighing an ounce, these handy IR pen thermometers are small enough to carry in your pocket, and will easily stow in any range bag/box. The Yidexin unit, sold by both Amazon and Walmart, can measure from -58 to 428 °F (-50 to 220 °C). You can also find considerably larger hand-held IR thermometers for industrial applications. These can measure up to 716 °F. But for quick measurement of barrel temps, we prefer the small pen IR thermometers that fit in a pocket. A little IR thermometer like this is a gadget that every serious shooter should have. Given the cost of replacing barrels these days (up to $700 for barrel, chambering and fitting), can you afford NOT to have a temp gauge for your match or varmint barrel?
TECH TIP — How to Get More Consistent Readings
When using IR Thermometers on shiny steel barrels, sometimes the polished surface throws off the beam, causing inconsistent readings. You can solve this problem by simply putting a piece of masking tape on the area where you take your reading. Some other folks use a grease pencil to create a non-reflective spot to read. Forum Member Jon B. says: “I used an Exergen infrared in the HVAC industry. Without the grease crayon they sold, you couldn’t get an accurate reading with shiny metals.”
In this interesting video, Brownells Gun Tech Caleb Savant covers the topic of linear compensators, aka “blast diffusers” or “linear blast devices”. These are quite different in function from a typical muzzle brake and they are NOT a sound suppressor. Unlike a traditional muzzle brake, a linear compensator directs the muzzle blast forward, AWAY from the shooter. This is not only good for the shooter but also for folks next to the shooter, either at the range or in a CQB law enforcement or military situation.
A “Linear Compensator”, also known as “blast diffuser”, my look similar to a muzzle brake. But it works differently. A typical muzzle brake shoots blast out the side, and can be pretty annoying for someone positioned next to the shooter. By contract, the Linear Compensator direct blast force more forward. This helps reduce perceived recoil, and importantly doesn’t send hot gasses left and ring to nearby shooters or observes. Muzzle brake output can be very annoying. This Editor once was shooting next to a .338 Lapua Magnum with a brake, just a couple feet away. With each .338 LM shot I could feel heat on arms/hands and actually feel the bones in my forearm vibrate.
Attachment Methods — Direct Thread Mounting vs. Quick-Attach Mounting
Linear compensators have become much more popular in recent years as AR-15 pistols and SBRs have proliferated. Some linear comps, such as popular models from Midwest Industries and the Troy Claymore, attach directly to the muzzle, just like a traditional flash hider or muzzle brake.
Other Linear Compensators are slip-on, quick-attach components that mount OVER another muzzle device. For example, the VG6 Precision CAGE Device (Concussion Altering Gas Expansion) attaches directly over one of their standard muzzle devices. Almost every company that makes a sound suppressor also offers a linear compensator, which typically attaches to the muzzle the same way as the silencer.
Video find by Boyd Allen. We welcome reader submissions.
The U.S. Army Marksmanship Unit regularly publishes a reloading “how-to” article on the USAMU Facebook page. One excellent “Handloading Hump Day” post covered preparation of once-fired 5.56x45mm brass. This article, the first in a 3-part series, has many useful tips. If you shoot a rifle chambered in .223 Rem or 5.56x45mm, this article is worth reading.
This week, Handloading Hump-Day will answer a special request from several competitive shooters who asked about procedures for morphing once-fired GI 5.56mm brass into accurate match brass for NRA High Power Rifle use. The USAMU has used virgin Lake City (LC) 5.56 brass to win National Championships and set National Records for many years. In this 3-part series, we’ll share techniques proven to wring match-winning accuracy from combat-grade brass.
GI brass has an excellent attribute, worth noting — it is virtually indestructible. Due to its NATO-spec hardness, the primer pockets last much longer than most commercial brass when using loads at appropriate pressures.
Preparing Once-Fired GI 5.56 Brass for Reloading (Part 1 of 3)
Assuming our readers will be getting brass once-fired as received from surplus dealers, the following steps can help process the low-cost raw material into reliably accurate components.
1. Clean the Brass
First, clean the brass of any dirt/mud/debris, if applicable. Depending on the brass’s condition, washing it in a soap solution followed by a thorough rinsing may help. [This step also extends the life of the tumbling media.] Approaches range from low-tech, using gallon jugs 1/2 full of water/dish soap plus brass and shaking vigorously, to more high-tech, expensive and time-consuming methods.
2. Wet-Tumbling Options (Be Sure to Dry the Brass)
When applying the final cleaning/polish, some use tumblers with liquid cleaning media and stainless steel pins for a brilliant shine inside and out, while others take the traditional vibratory tumbler/ground media approach. Degree of case shine is purely personal preference, but the key issue is simple cleanliness to avoid scratching ones’ dies.
If a liquid cleaner is used, be SURE to dry the cases thoroughly to preclude corrosion inside. One method is to dump the wet brass into an old pillow case, then tilt it left/right so the cases re-orient themselves while shifting from corner to corner. Several repetitions, pausing at each corner until water stops draining, will remove most water. They can then be left to air-dry on a towel, or can be dried in a warm (150° F-200° F max) oven for a few minutes to speed evaporation.
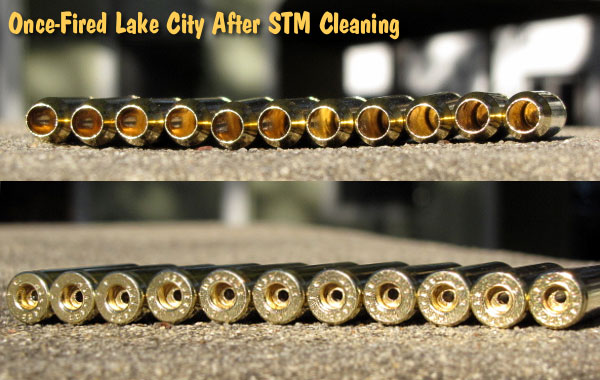
Shown below are Lake City cases after cleaning with Stainless Media (STM). Note: STM Case cleaning was done by a third party, not the USAMU, which does not endorse any particular cleaning method.
3. Inspect Every Case
Once dry, inspect each case for significant deformation (i.e., someone stepped on it), damaged mouths/necks and case head/rim damage. Some rifles’ ejectors actually dig small chunks of brass out of the case head — obviously, not ideal for precision shooting. Similarly, some extractors can bend the case rims so badly that distortion is visible when spinning them in one’s fingers. These can be used for plinking, but our match brass should have straight, undamaged rims.
Dented case mouths are common, and these can easily be rounded using a conical, tapered tool, [such as a .223 expander mandrel. A dummy 7.62 or .30-06 cartridge with a FMJ spitzer can also work.] If most of your brass is of one headstamp, this is a good time to cull out any odd cases.
4. Check the Primers Before Decapping
Your clean, dry and inspected brass is now ready for full-length sizing, decapping and re-priming. Historically, primer crimps on GI brass have caused some head-scratching (and vile language) among handloaders. Our next installment will detail efficient, easy and practical methods to remove primer crimp, plus other useful handloading tips. Until next week, Good Shooting!
NOTE: The USAMU Handloading (HL) Shop does not RE-load fired 5.56 brass. We use virgin LC brass with our chosen primer already staked in place. However, our staff has extensive personal experience reloading GI brass for competition, which will supplement the Shop’s customary steps. In handloading, as in life, there are many ways to accomplish any given task. Our suggestions are note presented as the “only way,” by any means. Time for loading/practicing is always at a premium. Readers who have more efficient, alternative methods that maintain top accuracy are invited to share them here.
Accuracy Potential of Mil-Surp 5.56×45 Brass
So, how accurate can previously-fired GI surplus brass be in a good National Match AR-15? Well, here’s a data point from many years ago that might be of interest. A High Power shooter who wrote for the late Precision Shooting magazine took a Bill Wylde-built AR match rifle to a registered Benchrest match. His first 5-round group ever fired in a BR match was officially measured at 0.231″ at 200 hundred yards. This was fired in front of witnesses, while using a moving target backer that confirmed all five rounds were fired.
He recounted that his ammo was loaded progressively with factory 52gr match bullets and a spherical powder using mixed years of LC brass with no special preparation whatsoever. Obviously, this was “exceptional”. However, he had no difficulty obtaining consistent 0.5-0.6 MOA accuracy at 200 yards using LC brass and a generic “practice” load that was not tuned to his rifle.
Saving Money by Using GI Brass
So, with good commercial brass readily available, why would one go to all the extra steps necessary to process fired GI brass? [Editor: It’s about saving money.]
Economically, it makes great sense. When the author was actively practicing and competing with the service rifle, he had ~3,000 rounds of 5.56mm brass, which allowed him to load during winter and spend most time in the summer practicing. If one were wealthy and wanted to shoot nothing but the finest imported brass, the current cost of 3,000 is ~$1920 (plus shipping.)
Dropping down to good, but less-expensive new, U.S. commercial brass brings the price to a much more realistic ~$720. However, at current rates, the same amount of surplus GI once-fired brass costs between $120 — $150, leaving lots of room in the budget for other expenses. [Editor: that’s less than 10% of the cost of the best imported brass.]
Small patches are not very efficient at distributing bore cleaning liquids inside your bore. The problem with a tight-fitting patch is that the solvent gets squeezed off in the first few inches. You can switch to a smaller jag, or a bore mop, but there is an even better way to get an ample amount of solvent in your bore. Just spray directly into the bore with a wash bottle, an inexpensive plastic bottle with an L-shaped dispensing neck, tapered at the end.
When using the wash bottle, you can either just plug the breech and spray from the muzzle end (where most copper fouling is), or, alternately, put the wash bottle neck directly in the chamber and spray forward. When spraying from the chamber forward, you may need to use a rubber O-Ring to seal off the action… depending on the bore size and the particular wash bottle’s neck spout diameter. We prefer to plug the breech and squirt from the muzzle.
Bottle Solvent Application Great for Smaller Bores
Using wet patches or wet brushes is an inefficient way to really saturate the tight bores of 17s, 20s, and 22s. Even with a cotton bore mop, most of the solvent will be squeezed out before it gets to the end of the bore, where most copper fouling occurs. For these smaller 17, 20, and 22-caliber bores, you can just take the wash bottle and stick the tapered nozzle right in the chamber. The tapered end will press fit in the throat, sealing off the chamber. With the barrel slightly nose-down, give the bottle a couple good squirts until the solvent mists out the muzzle. In just a few seconds, this will put more solvent in the bore than a half-dozen wet patches.
A solvent-filled wash bottle is also handy for wetting your brushes. It’s much easier to saturate a bore brush (without spilling solvent on your stock), by using the wash bottle. You can get wash bottles from USPlastic.com, Amazon.com, or lab supply stores.
Figure 1. When the bullet is seated farther out of the case, there is more volume available for powder. This enables the cartridge to generate higher muzzle velocity with the same pressure.
Effects Of Cartridge Over All Length (COAL) And Cartridge Base To Ogive (CBTO) – Part 1 by Bryan Litz forBerger Bullets.
Many shooters are not aware of the dramatic effects that bullet seating depth can have on the pressure and velocity generated by a rifle cartridge. Cartridge Overall Length (COAL) is also a variable that can be used to fine-tune accuracy. It’s also an important consideration for rifles that need to feed rounds through a magazine. In this article, we’ll explore the various effects of COAL, and what choices a shooter can make to maximize the effectiveness of their hand loads.
Sporting Arms and Ammunition Manufacturers’ Institute (SAAMI)
Most loading manuals (including the Berger Manual), present loading data according to SAAMI (Sporting Arms and Ammunition Manufacturers’ Institute) standards. SAAMI provides max pressure, COAL and many other specifications for commercial cartridges so that rifle makers, ammo makers, and hand loaders can standardize their products so they all work together. As we’ll see later in this article, these SAAMI standards are in many cases outdated and can dramatically restrict the performance potential of a cartridge.
Bullet seating depth is an important variable in the accuracy equation. In many cases, the SAAMI-specified COAL is shorter than what a hand loader wants to load their rounds to for accuracy purposes. In the case where a hand loader seats the bullets longer than SAAMI specified COAL, there are some internal ballistic effects that take place which are important to understand.
Effects of Seating Depth / COAL on Pressure and Velocity
The primary effect of loading a cartridge long is that it leaves more internal volume inside the cartridge. This extra internal volume has a well known effect; for a given powder charge, there will be less pressure and less velocity produced because of the extra empty space. Another way to look at this is you have to use more powder to achieve the same pressure and velocity when the bullet is seated out long. In fact, the extra powder you can add to a cartridge with the bullet seated long will allow you to achieve greater velocity at the same pressure than a cartridge with a bullet seated short.
When you think about it, it makes good sense. After all, when you seat the bullet out longer and leave more internal case volume for powder, you’re effectively making the cartridge into a bigger cartridge by increasing the size of the combustion chamber. Figure 1 illustrates the extra volume that’s available for powder when the bullet is seated out long.
Before concluding that it’s a good idea to start seating your bullets longer than SAAMI spec length, there are a few things to consider.
Geometry of a Chamber Throat
The chamber in a rifle will have a certain throat length which will dictate how long a bullet can be loaded. The throat is the forward portion of the chamber that has no rifling. The portion of the bullet’s bearing surface that projects out of the case occupies the throat (see Figure 2).
The length of the throat determines how much of the bullet can stick out of the case. When a cartridge is chambered and the bullet encounters the beginning of the rifling, known as the lands, it’s met with hard resistance. This COAL marks the maximum length that a bullet can be seated. When a bullet is seated out to contact the lands, its initial forward motion during ignition is immediately resisted by an engraving force.
Seating a bullet against the lands causes pressures to be elevated noticeably higher than if the bullet were seated just a few thousandths of an inch off the lands.
A very common practice in precision reloading is to establish the COAL for a bullet that’s seated to touch the lands. This is a reference length that the hand loader works from when searching for the optimal seating depth for precision. Many times, the best seating depth is with the bullet touching or very near the lands. However, in some rifles, the best seating depth might be 0.100″ or more off the lands. This is simply a variable the hand loader uses to tune the precision of a rifle.
Lapua now offers a FREE Ballistics App. This was the first mobile ballistics App utilizing the 6DOF calculation model, making it one of most accurate ballistics Apps on the market. With this free mobile App you can calculate trajectories, range, bullet drop, turret adjustments and more.
Lapua’s sophisticated FREE Ballistics App has many great features — much more than you’d expect for a free App. If you do much shooting past 300 yards, or use a wide variety of bullets and/or cartridge types, definitely download the App and give it a try. For more details, read the Lapua Ballistics App User Manual. This handy PDF file explains how to set up the App and utilize all its powerful features.
June is National Safety Month. In summer, when children are home from school and more likely to be unattended, it’s especially important to store firearms securely. The No. 1 way to help prevent accidents is to securely store your firearms when they’re not in use. The NSSF says: “Whether you own a gun or not, firearm safety is your responsibility. Take a moment to watch the videos below on how to safely handle and store firearms.” Along with these videos, the NSSF’s Project ChildSafe program offers a host of gun safety materials on its resources webpage.
Firearm Safety: First, Last, Always
There are Ten Key Rules for Firearm Safety and the first four are the big ones. Remember, while at the shooting range or anywhere you handle a firearm, safety always comes first.
This is a Good Video that Covers the Key Principles of Gun Safety. Worth Watching:
Storing a Gun Safely and Securely
For those who have guns in the home, this video reviews a variety of gun storage options. To learn more about storing firearms safely and securely, visit ProjectChildSafe.org.
Message from the National Shooting Sports Foundation
The last thing any gun owner wants is for their firearms to fall into the hands of an unsupervised child, a thief or someone going through a difficult period in their life. That’s why we urge individuals to store firearms responsibly when they’re not in use. [That is] the number one way to help prevent accidents, thefts and misuse –including suicides. The vast majority of gun owners are safe and responsible, which is why fatal firearms accidents are at historic lows. We’re proud that our safety programs, including Project ChildSafe® have contributed to that decline.
… We provide gun safety resources for all ages through our award-winning Project ChildSafe program and our new suicide prevention program. We remind gun owners there’s a storage option that will fit into their lifestyle, such as a fast-opening lock box for those who keep a firearm for home security.
Photo from Gunwerks Sheep Mountain L3 Mountain Shooting Course in July 2021. Register Here.
This story is not directly about firearms, or reloading gear, or any of the little details of our sport. It, instead, is about life… and, sadly, about death. The recent passing of a friend (and fellow shooter) got me to thinking, “I’m nearly sixty-six — what if I only had ten more years to live — how would I want to live my life? What really counts the most? What things would I do differently? What dreams would I pursue?”
AccurateShooter.com has many thousands of readers in their 50s, 60s, and 70s. Hopefully we will all live long, happy, and fruitful lives. But it’s wise to remember that we are all mortal, and the clock is ticking. Consider this — in the United States, the average male life expectancy is 76.3 years.*
Using that number as a rough benchmark, I may have just 10 and a half more years to enjoy life and to do the things I love — shooting, traveling, sailing, camping, listening to music, being with friends and family. Only 10.5 years left — that’s a real number my brain can comprehend all too well, particularly after the last 14 months have been so restricted due to COVID.
There is some good news — the actuarial tables predict that, since I’ve almost made it to 66 years already, I should live well past age 76. The predicted life-span of a 66-year-old American male is 17.2 years, which works out to 206 more months, and 896 more weekends. That’s less scary, but the message still rings true — time is running out. Live your dreams while you can.
Living a Life with More Good Times, and Fewer Regrets
Recently, a group of men, very near the end of their lives, were surveyed. They were asked if they would do things differently if they could live their lives over again. The vast majority of these men gave surprisingly similar responses, which fit into five “Life Lessons”. These “Top 5 Regrets of the Dying” were reported in a story by Bronnie Ware, writing for the AARP online magazine. Ware writes: “When questioned about any regrets they had or anything they would do differently, common themes surfaced.” Here are the five regrets most often mentioned by older men:
1. I wish I’d had the courage to live a life true to myself, not the life others expected of me.
“This was the most common regret of all. When people realize that their life is almost over and look back clearly on it, it is easy to see how many dreams have gone unfulfilled. ”
Lesson: Don’t wait to follow your dreams. Be true to yourself.
2. I wish I didn’t work so hard.
“This came from every male patient [surveyed]. All of the men… deeply regretted spending so much of their lives on the treadmill of a work existence.”
Lesson: Don’t let your work crowd out other important aspects of life.
3. I wish I’d had the courage to express my feelings.
“Many people suppressed their feelings in order to keep peace with others. As a result, they settled for a mediocre existence and never became who they were truly capable of becoming.”
Lesson: Express yourself truthfully. Don’t suppress your feelings for decades.
4. I wish I had stayed in touch with my friends.
“There were many deep regrets about not giving friendships the time and effort they deserved. Many [were] so caught up in their own lives that they had let golden friendships slip by over the years.”
Lesson: Take an interest your friends’ lives; keep bonds of friendship strong.
5. I wish that I had let myself be happier.
“This is a surprisingly common [regret]. Many did not realize until the end that happiness is a choice.”
Lesson: Affirmatively pursue the things that bring you happiness. Don’t just stick to old habits.
Turn Off the Computer, and Do Something Memorable with Your Friends Today
How does this all apply to our shooting hobby? Well, if (like me) you are middle-aged (or older), go have some fun this weekend! Load up your rifle and get to the range. Don’t put off doing the things that make you happy. Call those old buddies you may not have seen in a long time. Renew friendships. Get out into nature. And start figuring out how you can live your dreams. As the saying goes, “Time waits for no man”.
*This is based on 2020 World Health Organization Data for all males. One of our readers pointed out that the numbers actually work out better than this, because once a man survives to later life, men of his surviving age cohort enjoy a projected lifespan longer than the average projected lifespan from birth. For example, using Social Security Administration (SSA) data, an American man born exactly 60 years ago, has a calculated average life expectancy of 23 years… meaning he would live to age 83, on average. CLICK HERE to see SSA-predicted longevity based on your birthdate.
Practicing What I Preach…
Next week this Editor will NOT be sitting in front of a computer. Instead I will be taking a trip up California Highway One, one of the most scenic roads in America. I’ll be aboard my 20-year-old Honda ST1100, a machine that has carried me to many memorable places. I honestly don’t know how many more years I can still ride. But while I can, I will — and appreciate every minute of the adventure.
Brownells’ Do-It-Yourself (DIY) video series provides logical, step-by-step installation help for triggers, stocks, and springs. Nine separate videos cover Brownells various DIY Kits. Not sure if you’re up to the project? Just watch each video to see what’s involved. The nine DIY kits are:
This video shows Remington 700 after-market trigger installation:
In the Do-It-Yourself videos, Brownells’ Gun Techs proceed step-by-step, showing you exactly how to install the parts on your gun. Each kit also comes with complete, illustrated instructions you can take to the bench. To learn more, click the links above, or CLICK HERE to visit Brownells’ DIY Kit online page.


 Gunsafes can be fitted with either an electronic keypad-style lock, or a conventional dial lock. In our Gunsafe Buyer’s Guide, we explain the important features of both dial and electronic lock systems. Many safe-makers will tell you that consumers prefer electronic locks for convenience. On the other hand, most of the locksmiths we’ve polled believe that the “old-fashioned” dial locks, such as the Sargent & Greenleaf model 6730, will be more reliable in the long run.
 Tips for Dial Locks
Replace Electronic Lock Batteries Every Year


 Effects Of Cartridge Over All Length (COAL) And Cartridge Base To Ogive (CBTO) – Part 1


