Q: What’s more important — wind speed, or direction?
A: Obviously they both matter, but they do trade dominance based on direction. For example, a 10 mph wind between 2:30 and 3:30 is only changing its value from 9.7 to 10 to 9.7 mph (bracket of 0.3 mph). However a 10 mph wind between 11:30 and 12:30 is changing its cross wind component value from 2.6 mph left to zero to 2.6 mph right (bracket of 5.2 mph). There is the same 30° change in direction, but this results in a massively different bracket.
Point being, in this case, a direction change is far more critical if it’s near 6 or 12 o’clock. A small direction change when it’s close to 3 or 9 o’clock is negligible.
On the contrary, a change in wind SPEED when it’s near 3 or 9 affects your crosswind component directly. But for a near head or tail wind, a fluctuation in wind speed only causes a small fraction of a change to the crosswind component.
SUMMARY: If you’re in a near full-value wind, pay more attention to wind SPEED. If you’re closer to a head- or tail-wind, nailing the exact DIRECTION will be more important.
Get More Tips on Bryan Litz Ballistics Facebook Page
This post is from the new Bryan Litz Ballistics Facebook Page. FB users should check that page regularly for more tips from Bryan, American’s leading ballistics expert and founder of Applied Ballistics LLC.
Here are some really smart tips for hand-loaders compiled by Sierra Bullets. These suggestions were submitted by Sierra’s Facebook fans — and some are very valuable indeed. Some of these tips will help you load more accurate ammo. Other selections will help you stay SAFE — which should always be your #1 priority. For example, we concur with the advice to “Check and Double Check. Everything. Every Time”. Also definitely keep “One powder on the bench at a time” — that could be a life-saver. You may want to print these “words of wisdom” and place them on a wall in your loading room.
Reloading Safety Tips — Sound Advice
ALWAYS START LOW: “Just because a load manual says X grains of X powder with X bullet is max, your rifle could reach max pressure a grain or two before what the book says. Start low and work up.” — Walter Coats
BE SAFE and CAREFUL: “Check and double check. Everything. Every time. Only one type of powder on the bench at a time.” — Glen Lundgren
DON’T RUSH: “Be patient, don’t be in a hurry, have fun and find your rhythm. Just tell your family you’re putting yourself in ‘time-out’. They will understand.” — Erik Dyal
POWDER RULE #1: “One powder on the bench at one time, it might save your life.” — James A. Kimery
STAY FOCUSED: “Relaxed but concentrated attention. Have fun enjoying a great hobby and pastime but stay focused.” — Jim Caldwell
POLICE LOADING AREA: “Keep your reloading bench area clean and put items away ASAP.” — Eric J. Ford
BE PATIENT: “Focus, Focus, Focus — be patient — it AIN’T a race.” — William Stanley
RECORD YOUR LOADS: “Write down on a small card what you’re loading – bullet weight, powder weight, type of powder, and primer. And put it in the powder hopper. I am unloading .45 FMJ because I forgot what type powder was in the hopper.” — Michael Conniff
HAVE a PROCEDURE for INTERRUPTIONS: “If, for any reason, you have to leave the bench while in the process of dropping powder charges, turn the next case to be charged upside down in the loading block so you know where you left off.” — Bill Tinsley
LABEL EVERYTHING: “OCD is a good habit to have with your loading bench. CLEARLY label everything!” — Andy Pynckel
HAVE a GOAL: “Never start reloading or developing a load without a specific goal in mind. Second keep meticulous records.” — Peter Eick
RESEARCH THE JOB: “Read all you can about it before you start!” — Keith Shively
KEEP TRACK of the Brass: “I put all my primed brass upside down (primer up) and as I charge the casing, I (of course) flip it primer down.” — Mark Ewing
Ever wish you could look inside your rifle, to see how the trigger and fire-control system work? Well now that is possible with the magic of 3D computer graphics. Modern software allows detailed “cutaway” side-views (see below), as well as 3D views with 360° rotation. The software can also provide X-Ray-type views into the gun’s internals — as you can see above. And computer animation can show the complete firing process from trigger pull to chambering of the next round.
Rem 700 Cutaway View from Right Side
This article provides some very cool 3-D “Cutaway View” animations of the popular Remington 700 action, probably the most successful American bolt-action ever created.
READERS — Take the time to watch the video! The Rem 700 animation is really outstanding! EVERY bolt-action shooter should watch this video all the way through.
Cutaway 3D Animation of Rem 700 Action — Watch Video
The Model 700 series of bolt-action rifles have been manufactured by Remington Arms since 1962. All are based on basically the same centerfire bolt action. They are typically sold with an internal magazine depending on caliber, some of which have a floor-plate for quick-unloading, and some of which are “blind” (no floor-plate). The rifle can also be ordered with a detachable box magazine. The Model 700 is a development of the Remington 721 and 722 series of rifles, which were introduced in 1948.
The Remington 700 is a manually-operated bolt action with forward, dual opposed lugs. It features “Cock On Opening”, meaning the upward rotation of the bolt when the rifle is opened cocks the firing pin. A cam mechanism pushes the firing pin’s cocking piece backward. The bolt face is recessed, fully enclosing the base of the cartridge. The extractor is a C-clip sitting within the bolt face. The ejector is a plunger on the bolt face actuated by a coil spring. The bolt is of 3-piece construction, brazed together (head, body. and bolt handle). The receiver is milled from round cross-section steel.
This video was made with the help of the World of Guns: Gun Disassembly interactive encyclopedia with 3D rendering. This remarkable web-based software allows users to view the inner workings of hundreds of different rifles and pistols — everything from a .22 LR Ruger to a .55-caliber Boys Anti-Tank rifle. There are also 25,000+ parts diagrams. This is a remarkable technical resource. SEE MORE HERE.
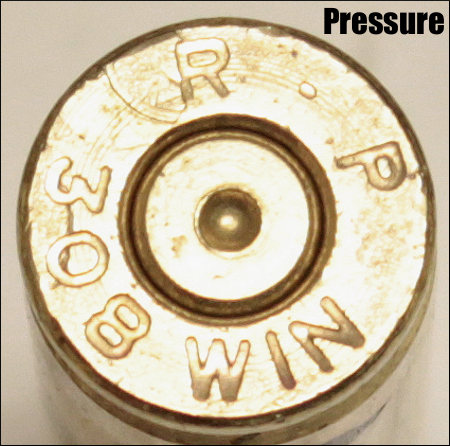
Ever wondered what caused a particular bulge or marking on a case? And more importantly, does the issue make the case unsafe for further use? Sierra Bullets Ballistic Technician Duane Siercks offers some insight into various issues and their causes in two Case Diagnostic articles from the Sierra Blog.
Incipient Case-Head Separation
This is a Winchester .308 Win case that has a real issue. This case has a very obvious incipient case head separation in the process of becoming a complete failure.
This is most commonly caused by over-sizing the case causing there to be excess headspace on the case. After a few firings and subsequent re-sizing, this case is just about ready to come completely apart. Proper die adjustment is certainly a requirement here. Of course this case is not safe to reuse.
Excessive Pressure (Load Too Hot)
If you will notice in the picture of the case rim, there are two pressure signs to notice. First, look at the primer. It is basically flattened to about the max of what could be considered safe. If this was the only pressure sign noted, I would probably be fine with this load, but would constantly keep an eye on it especially if I was going to use this load in warmer temperatures. This load could easily cross into the “excess pressure” realm very quickly.
There is another sign of pressure that we cannot ignore. If you’ll notice, there is an ejector mark apparent that is located over the “R” of the R-P headstamp. This absolutely tells us that this load would not have been in the safe pressure range. If there were any of these rounds loaded, they should not be fired and should be dis-assembled. This case should not be reloaded.
Split Case-Neck
Here we have an R-P .22-250 case that has died the death. Everything looks fine with this case except the neck is split. This case must be tossed.
A split neck is a normal occurrence that you must watch for. It is caused by work-hardening of the brass. Brass cases get harder with age and use. Brand new cases that are stored for a period of time can become hard enough that they will split like this case within one to two firings. I have had new factory loads do the same thing. Then as we resize and fire these cases repeatedly, they tend to get harder and harder. Eventually they will split. The life of the case can be extended by careful annealing practices. This is an issue that would need to be addressed in an article by itself. Of course this case is no longer usable.
In the classes that I teach, I try to use examples like this to let the students see what they should be looking for. As always, if we can assist you, whether you are new to reloading or very experienced, contact us here at Sierra Bullets by phone at 1-800-223-8799 or by email at sierra@sierrabullets.com.
Dented Case Body
Here we have a Lake City 7.62×51 (.308 Win.) case with two heavy marks/dents in the case body.
This one may be a bit of a mystery. It appears as if this case may have been caught in the action of a semi-auto rifle when the firearm jammed or the case failed to clear during the cycling process. I probably would not reload this case just to prevent any feeding problems. This also appeared to be a factory loaded round and I don’t really see any pressure issues or damage to the case.
Multiple Problems — Lake City 5.56×45 unknown year.
This case has suffered multiple failures and cannot be re-used. First its has have a very rounded shoulder that is split. Upon first look it was obvious that this round had been a victim of excess pressure. The firearm (perhaps an AR?) was apparently not in full battery, or there was possibly a headspace issue also. While taking a closer look, the primer was very flat and the outside radius of the primer cup had been lost. High pressure! Then I also noticed that there was an ejector mark on the case rim. This is most certainly an incident of excessive pressure. This case is ruined and should be discarded.
It is very important to observe and inspect your cases before each reloading. After awhile it becomes second nature to notice the little things. Never get complacent as you become more familiar with the reloading process. If ever in doubt, call Sierra’s Techs at 1-800-223-8799.
One of our Forum members complained that he wasn’t able to set his primers flush to the rim. He tried a variety of primer tools, yet no matter what he used, the primers still didn’t seat deep enough. He measured his primers, and they were the right thickness, but it seemed like his primer pockets just weren’t deep enough. He was mystified as to the cause of the problem.
Well, our friend Boyd Allen diagnosed the problem. It was the decapping rod. If the rod is adjusted too low (screwed in too far), the base of the full-diameter rod shaft (just above the pin) will contact the inside of the case. That shaft is steel whereas your case is brass, a softer, weaker metal. So, when you run the case up into the die, the shaft can actually stretch the base of the primer pocket outward. Most presses have enough leverage to do this. If you bell the base of the primer pocket outwards, you’ve essentially ruined your case, and there is no way a primer can seat correctly.
The fix is simple. Just make sure to adjust the decapping rod so that the base of the rod shaft does NOT bottom out on the inside of the case. The pin only needs to extend through the flash hole far enough to knock the primer out. The photo shows a Lyman Universal decapping die. But the same thing can happen with any die that has a decapping rod, such as bushing neck-sizing dies, and full-length sizing dies.
Whenever you use a die with a decapping pin for the first time, OR when you move the die to a different press, make sure to check the decapping rod length. And it’s a good idea, with full-length sizing dies, to always re-check the height setting when changing presses.
There are a variety of decapping dies currently on the market, with models available from LEE, Lyman, Hornady, RCBS, Redding, and Area 419 (at Brownells).
LEE Universal Decapping Die Costs Just $11.99
Speaking of decapping tools, Midsouth Shooters Supply sells the LEE Universal Decapping Die for just $11.99 (item 006-90292), a very good deal. There are many situations when you may want to remove primers from fired brass as a separate operation (prior to case sizing). For example, if your rifle brass is dirty, you may want to de-cap before sizing. Or, if you load on a progressive press, things will run much more smoothly if you decap your brass first, in a separate operation.
Decapping Dies for Cases with Smaller Flashholes
TAKE NOTE: Some Euro Small Flash Holes are spec’d at 1.5mm or 0.059″, and max out at about .062″, so these need a smaller die pin.
The low-cost LEE Universal Decapping Die will work with cartridges from 17 Fireball all the way up to big Magnums. However, NOTE that the decapping pin supplied with this Lee die is TOO LARGE for LAPUA 220 Russian, 6mmBR, 6.5×47, 6.5 Creedmoor, .308 Win (Palma) and Norma 6 PPC flash holes. Because the pin diameter is too large for these brass types, you must either turn down the pin, or decap with a different tool for cases with .059-.062″ flash-holes.
Brownells sells the impressive Area 419 Zero Universal Decapping Die. This features a spring-loaded decapping pin, with replaceable heads. The $50.00 die works with cases up to and including .338 Lapua length/diameter with no need for different inserts.
Redding makes a Universal Decapping Die with an optional smaller-diameter decapping rod for the smaller .059-.062″ flash holes found on the BR and PPC cases. The use of this die is explained in the video below:
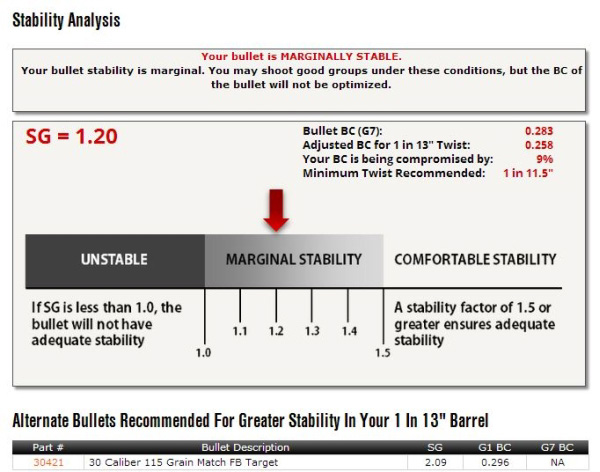
Berger Twist-Rate Stability Calculator
On the Berger Bullets website you’ll find a handy Twist-Rate Stability Calculator that predicts your gyroscopic stability factor (SG) based on mulitiple variables: velocity, bullet length, bullet weight, barrel twist rate, ambient temperature, and altitude. This cool tool tells you if your chosen bullet will really stabilize in your barrel.
How to Use Berger’s Twist Rate Calculator
Using the Twist Rate Calculator is simple. Just enter the bullet DIAMETER (e.g. .264), bullet WEIGHT (in grains), and bullet overall LENGTH (in inches). On its website, Berger conveniently provides this info for all its bullet types. For other brands, we suggest you weigh three examples of your chosen bullet, and also measure the length on three samples. Then use the average weight and length of the three. To calculate bullet stability, simply enter your bullet data (along with observed Muzzle Velocity, outside Temperature, and Altitude) and click “Calculate SG”. Try different twist rate numbers (and recalculate) until you get an SG value of 1.4 (or higher).
Gyroscopic Stability (SG) and Twist Rate
Berger’s Twist Rate Calculator provides a predicted stability value called “SG” (for “Gyroscopic Stability”). This indicates the Gyroscopic Stability applied to the bullet by spin. This number is derived from the basic equation: SG = (rigidity of the spinning mass)/(overturning aerodynamic torque).
If you have an SG under 1.0, your bullet is predicted not to stabilize. If you have between 1.0 and 1.1 SG, your bullet may or may not stabilize. If you have an SG greater than 1.1, your bullet should stabilize under optimal conditions, but stabilization might not be adequate when temperature, altitude, or other variables are less-than-optimal. That’s why Berger normally recommends at least 1.5 SG to get out of the “Marginal Stability” zone.
In his book Applied Ballistics For Long-Range Shooting, 3rd Ed., Bryan Litz (Berger Ballistician) recommends at least a 1.4 SG rating when selecting a barrel twist for a particular bullet. This gives you a safety margin for shooting under various conditions, such as higher or lower altitudes or temperatures.
Story idea from EdLongrange. We welcome reader submissions.
When he measures his loads or sorts bullets by weight, Forum Member Boyd Allen often employs his trusty RCBS 10-10 balance beam scale (although he does have handy digital scales as well). He finds that the balance beam scale works predictably, time after time, and it doesn’t suffer from the drift and calibration issues that plague some of the less expensive electronic scales on the market.
To make it easier to see the balance point, Boyd has adapted a magnifying glass with a mirror. This makes the end of his balance beam easier to view from his normal position on the bench. Boyd explains: “This set-up uses a cheap magnifier with positioning arms that was probably designed to hold and magnify small objects while soldering them. I think that it came from Harbor Freight many years ago. The mirror lets you look at the scale as if is was at eye level, and of course the magnifier makes the image easier to see.”
If you have a balance beam scale, we suggest you try this simple enhancement. We predict you’ll find the magnifier speeds up the process with enhanced assurance of your load weight.
If you don’t match your ammo to your chamber, bad things can happen, that’s for sure. A while back, Forum member BigBlack had an experience at the gun range that reminds us of the importance of safety when shooting. He encountered evidence that someone had fired the wrong cartridge in a 7mm WSM rifle. The problem is more common than you may think. This Editor has personally seen novices try to shoot 9mm ammo in 40sw pistols. BigBlack’s story is along those lines, though the results were much more dramatic. It’s too bad a knowledgeable shooter was not nearby to “intervene” before this fellow chambered the wrong ammo.
7mm-08 is Not the Same as a 7mm WSM
BigBlack writes: “I know this has probably been replayed a thousand times but I feel we can never be reminded enough about safety. This weekend at the range I found a ruptured case on the ground. My immediate thoughts were that it was a hot load, but the neck area was begging for me to take a closer look, so I did. I took home the exploded case and rummaged through my old cases until I found a close match. From my investigative work it appears someone shot a 7mm-08 in a 7mm WSM. Take a look. In the above photo I’ve put together a 7mm WSM case (top), the ruptured case (middle), and a 7mm-08 case (bottom).”
The photo reveals what probably happened to the 7mm-08 case. The shoulder moved forward to match the 7mm WSM profile. The sidewalls of the case expanded outward in the much larger 7mm WSM chamber until they lacked the strength to contain the charge, and then the case sides ruptured catastrophically. A blow-out of this kind can be very dangerous, as the expanding gasses may not be completely contained within the action.
Can’t Happen to You? Think Again.
This kind of mistake — chambering the wrong cartridge — can happen to any shooter who is distracted, who places even a single wrong round in an ammo box, or who has two types of ammo on the bench. One of our Forum members was testing two different rifles recently and he picked up the wrong cartridge from the bench. As a result, he fired a .30-06 round in a .300 Win Mag chamber, and the case blew out. Here is his story:
“I took two of my hunting rifles I have not used for over 25 years to the range yesterday to get new scopes on paper, a .30-06 and .300 Win Mag. I had four boxes of old Winchester factory ammo (two of each cartridge), which had near identical appearances. I accidentally chambered a .30-06 round in the Sako .300 Win Mag rifle. It sprayed powder on my face and cracked the stock at the pistol grip. If I had not been wearing safety glasses I might be blind right now.
You should always wear protective eyewear, EVERY time you shoot.
“I feel lucky and am very thankful for being OK — other than my face looks funny right now. I am also grateful for learning a valuable lesson. I will never put two different cartridges on the bench at the same time again.”
Are you planning to purchase or sell a gun? Or perhaps you want to give one to a family member. Maybe you want to transfer a gun to a friend out of state. These are all situations that demand you understand the law before you buy, sell, or transfer a gun. Thankfully the NRA Blog has a series of helpful articles that can guide you through firearms transfers and transactions.
Do note that laws on private transfers vary from state to state. Also, some of these articles are a few years old. Laws do change, typically becoming more restrictive. You should carefully review current laws in your state before buying/selling any firearm. For a summary of state gun laws, we recommend Legal Heat’s 50 State Guide to Firearms Laws and Regulations reference book. Even this reference was released in 2023, so you should still check for recent changes in state laws.
Here are five articles providing key facts you need to know.
Click each title to read the specific article.
IMPORTANT: All five of these articles reference general rules that apply nationally and in MOST states. However, some states, such as California, New Jersey, and New York (and others) have very special rules and regulations on gun transfers. If you have ANY questions about gun transfers in your state/region, you should consult an attorney familiar the laws of YOUR state and municipality.
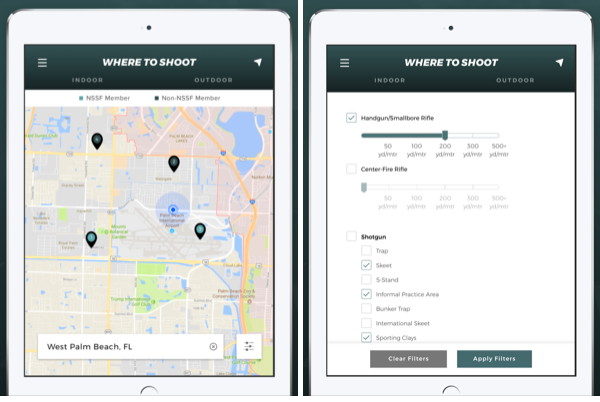
The Where To Shoot Mobile App quickly locates shooting ranges near you, drawing on North America’s most comprehensive directory of shooting ranges. Users can search by current location, state, or zip code. Once you locate a range, you can view activities offered along with a summary of range facilities. You can even get driving directions. If you don’t want to install an App, you can also access the NSSF shooting range database and maps via the NSSF WheretoShoot webpage.
The app is modeled after NSSF’s popular WhereToShoot.org® website and is updated frequently with range information for every U.S. state and Canadian province. Once you’ve located a place to shoot, the App can provide directions to the range. The App also includes video tips for shooters, news, and firearm-safety information.


 This video was made with the help of the