Every serious, long-range shooter needs a modern, accurate wind meter. And the higher-level Kestrel Wind Meters include a sophisticated ballistics engine that can calculate drops and wind-holds at any distance. These “smart” Kestrels can communicate (via Bluetooth) with a powerful App on your mobile device(s). For this exclusive review, our Editor F-Class John field tests the Kestrel 5700 Elite Weather Meter with Applied Ballistics, and explains its many impressive features. This unit offers great functionality for a $699.00 MSRP. Shop at KestrelBallistics.com or Amazon.com. For this article, F-Class John has created THREE (3) videos which are well worth watching.
Kestrel 5700 Elite Ballistics Review, Video Part 1
Kestrel 5700 Elite — Field Test and Evaluation
by F-Class John
In order to make accurate shots at long range, whether in the desert knocking down steel at a mile or shooting paper at 1000 yards, you need to know and understand the effects of your environment (wind, temperature etc.), along with your bullet’s ballistics. Traditionally, shooters gauge wind speed/angle with a wind meter and then input the data into a ballistic program on a mobile device. That program then produces a firing solution after calculating bullet drop and wind drift. While this method works, it can be time-consuming and cumbersome, and there’s always the potential for error when transposing the information from wind meter to mobile device.
Enter the Kestrel 5700 Elite Applied Ballistics with Kestrel LiNK. This all-in-one unit allows for incredibly accurate firing solutions by using a variety of measurements such as average, head, and cross winds as well as other atmospheric conditions which are then analyzed by built-in Applied Ballistics software. This yields ultra-accurate results from a handheld unit that easily fits in your pocket. Describing the 5700 Elite can be a little difficult. Yes, it is an anemometer at its core, but it is also a complete weather station, a ballistic calculator, and a target card creator.
The Kestrel 5700 Elite’s own menu has three Mode options: Weather, Easy, and Ballistics. The Weather Mode option (great on its own) features the ability to measure altitude, barometric pressure, crosswind, density altitude, dew point temperature, headwind/tailwind, heat stress index, relative humidity, station pressure, temperature, wet bulb temperature, wind chill, wind direction and wind speed/air speed. These readings are available both on the screen by themselves or grouped three at a time. Access is quick and easy with readings updating constantly so you always have the most accurate information at hand.
In addition to Weather Mode, the Kestrel 5700 Elite Ballistics boasts two other Modes, EASY and BALLISTICS. NOTE — before using Easy Mode or Ballistic Mode I recommend creating gun profiles and bullet profiles in the Kestrel directly or through the Kestrel App. This is easy, as the Kestrel Ballistics App connects directly to any LiNK-enabled Kestrel unit. After the initial startup you’ll want to begin with Gun Profile Management tab. This tab allows you to enter both your gun information as well as your loads. The Elite allows up to 30 gun profiles to be created. Notably, the Elite’s included Applied Ballistics software constantly updates bullet profiles. In fact, during my testing, new bullet profiles were added twice. So I was assured I had the most up-to-date bullet choices when creating load profiles.
Kestrel 5700 Elite Ballitics Review, Video Part 2
Along with gun profiles, the Kestrel 5700 Elite Ballistics allows you to create 10 separate Target Profiles. This can be done a couple different ways. The first is Easy Mode — a great option for those want to get a firing solution but don’t need or want to enter a lot of information. It allows you to set up your target range (distance), target data (wind, direction, etc), and choose your rifle profile. Other variables are muzzle velocity, compass, and latitude. Easy Mode allows you to enter the most vital information without feeling overwhelmed, yet Easy Mode still provides for a very accurate solution.
Kestrel 5700 Elite Ballistics Review, Video Part 3
Switching from Easy Mode to Ballistics Mode provides even more options. These include setting up your target (target angle, target speed, wind direction, and more), wind input, gun profile, environment (temp, barometric pressure, altimeter humidity, etc.), target cards, and range cards (with fixed distances). You also get full access to the Applied Ballistics calculator as well as your ability to manage gun profiles. The target card is a really great feature for multi-target disciplines such as PRS where you may be able to range targets ahead of time. The target card allows you to enter any 10 exact distances and the Applied Ballistics software will calculate solutions for all of them in an easy-to-access chart. This is a great feature that can save you time and improve scores.
The Kestrel 5700 Elite’s associated Applied Ballistics software offers additional advanced functionality. For example you can calculate the actual BC of your bullet and adjust for transonic bullet flight. Once you get the hang of how to use these additional features, they really make you realize how powerful this tiny unit is. The App is configured for easy data entry and it even has the classic Snake game as a fun hidden feature in the “About” section of the menu.
SUMMARY — Outstanding Handheld Device with Full Ballistics Functionality
The Kestrel 5700 Elite with Applied Ballistics demonstrated that it is truly the most feature-packed handheld weather meter/ballistic calculator available on the market today. In fact, after several weeks of testing I feel there were still more minor features that I could have used to get even more information about my ammo, firing solutions, and environment. If you’re a technology-driven shooter looking for the ultimate Weather/Ballistics tool at the range, the Kestrel 5700 Elite is for you. This is an outstanding product.
We are often asked “Can I get more velocity by switching primer types?” The answer is “maybe”. The important thing to know is that changing primer types can alter your load’s performance in many ways — velocity average, velocity variance (ES/SD), accuracy, and pressure. Because there are so many variables involved you can’t really predict whether one primer type is going to be better or worse than another. This will depend on your cartridge, your powder, your barrel, and even the mechanics of your firing pin system.
BE SAFE: Glen Zediker recommends decreasing your load ONE FULL GRAIN when changing to a different primer type, one that you haven’t used before.
Interestingly, however, a shooter on another forum did a test with his .308 Win semi-auto. Using Hodgdon Varget powder and Sierra 155gr Palma MatchKing (item 2156) bullets, he found that Wolf Large Rifle primers gave slightly higher velocities than did CCI-BR2s. Interestingly, the amount of extra speed (provided by the Wolfs) increased as charge weight went up, though the middle value had the largest speed variance. The shooter observed: “The Wolf primers seemed to be obviously hotter and they had about the same or possibly better ES average.” See table:
Varget .308 load
45.5 grains
46.0 grains
46.5 grains
CCI BR2 Primers
2751 fps
2761 fps
2783 fps
Wolf LR Primers
2757 fps
2780 fps
2798 fps
Speed Delta
6 fps
19 fps
15 fps
You can’t extrapolate too much from the table above. This describes just one gun, one powder, and one bullet. Your Mileage May Vary (YMMV) as they say. However, this illustration does show that by substituting one component you may see significant changes. Provided it can be repeated in multiple chrono runs, an increase of 19 fps (with the 46.0 grain powder load) is meaningful. An extra 20 fps or so may yield a more optimal accuracy node or “sweet spot” that produces better groups. (Though faster is certainly NOT always better for accuracy — you have to test to find out.)
WARNING: When switching primers, you should exercise caution. More speed may be attractive, but you have to consider that the “speedier” primer choice may also produce more pressure. Therefore, you must carefully monitor pressure signs whenever changing ANY component in a load. Glen Zediker recommends decreasing your load ONE FULL GRAIN when changing to a different primer type, one that you haven’t used before.
Do you use factory ammo in your hunting rifles? Perhaps you buy bulk centerfire ammo for your AR15 or varmint rifle. Then this book is for you.
If you ever shoot factory ammo, you should consider getting Ammo & Ballistics 6. This resource book lists over 2,600 different loads for 200+ cartridge types from .17 Mach 2 up to .700 Nitro Express, including the most popular centerfire and rimfire cartridges (both rifle and handgun). In this updated-for-2020 Sixth Edition, there are over 3,000 tables covering virtually every caliber and every load for all commercially-loaded hunting ammunition sold in the USA. Tables include velocity, energy, wind drift, bullet drop, and ballistic coefficients up to 1,000 yards.
Ammo & Ballistics 6 helps you select ammo for a hunt — quickly compare the velocity and knock-down power of various commercial ammo. This book can help you choose a caliber/chambering for your next hunting rig.
Verified Book Purchaser Reviews
“Outstanding reference guide for shooters and ballistic enthusiasts alike. Has data on velocity, energy delivered, Taylor KO index, windage and elevation on numerous loadings for hundreds of [cartridge types]. Each cartridge has all dimensions labeled (i.e rim, case length, neck, etc.), and has an informative description of the cartridges history/relevance.” — S. Step, 2017
“Great heaps of data! This volume has pages and pages of new data for .22LR like the hot Velocitor, and also on the .22 WMR from 30 grains up into the 50s. Most importantly there is lots of range data, drop, windage, kinetic energy, etc. — Terrific reference guide….” — E. Svanoe
Ammo & Ballistics 6 contains data and illustrations on virtually every sporting cartridge sold in the USA. This 2020 Edition covers 200-plus cartridge types from .17 Mach 2 up to .700 Nitro Express.
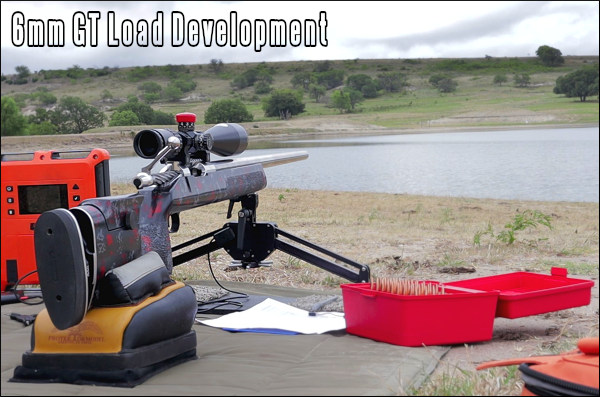
The 6mm GT (aka 6GT) cartridge was conceived as a “bigger Dasher” for PRS and NRL competition. The 6mm GT’s creators wanted 6mm Dasher accuracy and moderate recoil delivered via a cartridge with a slightly longer case body for better mag-feeding, longer neck for seating flexibility, and more moderate pressures. So far the 6GT has performed very well in PRS competition. Today’s story is a bit different — this is about an experiment — running a 6mm GT in an F-TR type rifle. Understand that, under current NRA rules, you may only shoot .223 Rem (5.56×45) or .308 Win (7.62×51), in official, sanctioned F-TR competition, but the 6GT is fine for F-Open. Mike McCasland wanted to see the potential of the cartridge for long-range target shooting, so he put a 6mm GT-chambered Bartlein barrel on a nice custom rifle with McMillan XIT stock and Kelbly F-Class Panda action. The results were impressive.
6mm GT — New Cartridge with Multi-Discipline Potential
Story by Mike McCasland, Texas Precision
The 6mm GT began garnering attention within PRS circles in early 2019. It promised to shoot 105-110gr 6mm bullets at 2950-3000 FPS, yet not suffer from mag-feed issues sometimes found with 6mmBR variants such as the 6 Dasher, 6BRX, and 6BRA. Moreover, since it burned less powder, the 6mm GT promised increased barrel life compared to the 6mm Creedmoor or 6XC. The 6mm GT case size should still work with the accurate powders in the Varget burn-range. I found the 6GT also worked great with H4350.
As someone who aspired to building a repeater and jumping into the PRS game, and had a spare F-TR rifle sitting around, I thought it would be fun to build up a 6mm GT to see if there was any merit to the hype. My smith, Wes Ripley of RIP Precision in Texas, builds a lot of PRS rigs, and already had the reamer on hand (a 0.120″ freebore variant).
Whidden Gunworks had some 6mm GT FL bushing die kits in stock, so I figured why not see what all the fuss was about? At the very least I could play around with the 6mm GT in F-Open Class at local club matches to see how it compared to the 6BRA, 6 Dasher, and other popular 6mm cartridges.
How the Project Got Started with Backup F-TR Rig
My 6mm GT build really started as a project spawned purely from COVID-19 Isolation boredom. This rifle primarily serves as a backup F-TR gun, and it had been relegated to performing some load development on .308 barrels, so I could spin new ones on my main match rifle. The only problem was, I had run out of .308 barrels that needed load development. So, I basically had an ideal test platform just collecting dust in the safe. All I needed was a 6mm GT-chambered barrel, since (like the 6mmBR) the 6mm GT works in a short action with a .308 Win-sized bolt-face.
6mm GT Rifle Specifications:
Action: Kelbly Panda F-Class SA RB/RP
Stock: McMillan XIT with RAD 2A
Barrel: 30″ 5R Bartlein 1:7.5″-Twist, HV Contour
Scope: Vortex Golden Eagle 15-60x52mm
Trigger: Jewell Benchrest, about 2 ounces
Bipod: Phoenix Precision
About the 6mm GT Cartridge
BRASS — The first thing you’ll find is cartridge brass choices for the 6mmGT are rather limited currently. At present, the only commercial options are Hornady and Alpha Munitions. For the die-hard Lapua fans, you can technically make 6mm GT brass from 6.5×47 Lapua, however that process is very labor-intensive.
I have used both Hornady and Alpha brass in this rifle and haven’t noticed much difference between the two. I will say that my batch of Alpha brass was slightly softer than Alpha brass I’ve used in other calibers; you could feel a difference when neck turning cases. I’m unsure if that’s a batch issue, or something specific to their 6mm GT brass as a whole. As far as performance, there was little discernable difference. Oddly enough, the Hornady brass seemed to have slightly less case capacity than the Alpha; with most other cartridges it’s the other way around.
POWDERS — The 6mm GT was designed with Hodgdon Varget in mind, and that popular powder works exceedingly well in this platform. That said, the 6mm GT can work with a wide variety of powders, some yielding better performance than Varget.
I’ve tried a multitude of powders during my initial 6mm GT load development: Varget, Shooters World Precision, RL16, VV N140, H4350, and RL-15 to name a few. In my barrel, Hodgdon H4350 seems to deliver the best velocity/accuracy combination. SD and ES also seemed to be the lowest with H4350.
Load Development for the 6mm GT — Many Powders Tested
BULLETS — The most common 0.120″ freebore chamber allows for the majority of high-BC 6mm projectiles found in both F-Class and PRS. I had good luck with the pointed 107gr Sierra Match Kings (SMK), as well as the 110gr Hornady A-Tips in my rifle. For those looking to run the heavier 112-115 grain 6mm offerings, I believe GAP designed a 0.160″ freebore reamer that gets those bullets out of the neck/shoulder junction. Shown below is the 0.120″ freebore JGS reamer print:
SUMMARY — Good Cartridge with Much Potential
Generally speaking, I think the 6mm GT is a good little round. Some may not subscribe to this theory, but I believe some cartridges are inherently easier to tune than others. I’m not sure the 6mm GT is as easy-to-tune as a 6mmBR, 6 Dasher, or 6 BRA, but I don’t think it lags that far behind.
With relatively little trouble, I was able to find loads with both Varget and H4350 that would consistently shoot very well — 0.2 to 0.3 MOA. Moreover, I found the 6GT cartridge lives up to the velocity claims made by G.A. Precision. I was easily able to push the 110gr A-Tips to 2950 FPS, and the 107gr SMKs to low 3000 FPS range without any pressure signs, or unnecessary wear and tear on the brass.
As a fun test, I ran my 6mm GT rifle in a local 1000-yard F-Class match with the 110gr A-Tips, just to see just how well they would perform. Although wind conditions of the day and some E-Target issues prevented my 6mm GT rig from getting the better of the larger 7mm and .30-Cal rifles, the 6mm GT proved itself an accurate little round at distance. Here is a 1000-yard ShotMarker target:
After putting several hundred rounds through my 6mm GT rifle, I anticipate building another 6GT on a repeater action to give PRS a try. I think if you are looking for a dual-purpose rifle that can run tactical matches (with 100% feeding reliability), and can also be used for mid-range, F-Open Class competition, the 6mm GT would be a very good option.
About the author, Mike McCasland:
Mike McCasland is an avid shooter who competes regularly in F-Class matches. Based in Texas, Mike is the creator of the Texas Precision YouTube Channel. There you’ll find many videos covering reloading, gun projects, and marksmanship. Mike has done some notable product reviews including a comparison test of Micrometer Competition Seating Dies. To access Mike’s YouTube Channel, CLICK HERE.
Check out that bolt assembly. It features a fluted stainless bolt body, laser-engraved Titanium shroud, and Titanium dragon-scale bolt knob with polished stainless handle.
You haven’t seen a Ruger Precision Rifle (RPR) like this before. Forum member TerryH has customized his Second-Gen 6.5 Creedmoor RPR with a wicked purple finish, snazzy stainless/titanium bolt, and slick HDPE (polymer) bag-riders front and rear. The mods on this Hot Rod Ruger don’t stop there. Terry added a Seekins hand rail, Timney trigger, ergonomic grip, and more…
For his Hot Rod Ruger, Terry has the right skill set, learned on the job: “I work in a body shop and have pretty much custom-painted all my stuff for many years. For this 6.5 CM RPR, colors of choice are House of Kolor PBC-65 Passion Purple and black covered with Cerakote MC-161 matte clear.” Terry even painted his Bald Eagle rest purple to match his Hot Rod RPR.
Terry reports: “I’m shooting an RPR in 6.5 CM. It has a Patriot Valley Arms 26″ barrel. Josh at PVA is making a thread protector for me so I can remove the Mad Scientist brake. The butt stock has a V-Tab adjustable butt plate and Wiebad check rest pad. Glass is a currently a Vortex Gen I PST 6-24x50mm but I have a Golden Eagle on layaway”. To learn more about this rifle or ask TerryH questions about the build, visit this Shooters’ FORUM THREAD.
Ruger Precision Rifle Modifications: Chassis and Handguards Painted Passion Purple
Patriot Valley Arms 26″ Barrel with Brake
Timney Trigger with Ambi Safety
Custom HDPE (Polymer) Bag-Riders front and Rear
V-Tab adjustable butt plate and Wiebad cheek-pad
Seekins Rail
Good Accuracy with Factory Ammunition
Terry reports: “The RPR is shooting .3 MOA @ 100 with factory Fed American Eagle 140s.” Terry plans to start handloading for the rifle with the goal of shooting F-Class matches next year: “I’ve successfully shot steel out to 1140 yards on the range but [I don’t know] if that will actually translate well in a match. I’m committed to practicing as much as I can and starting to shoot some matches in 2018.”
Front and Rear Bag-Riders with Protektor Rear Bag and Upgraded Bald Eagle Rest
Terry has engineered a slick set-up for F-Open competition and load testing. Up front is a Bald Eagle rest upgraded with windage knob mod, stainless F-Class feet, and longer adjusters. Terry also “changed the hardware to all stainless and added a couple of levels”. In the rear, Terry runs a Protektor Doctor rear bag with 1″ ear spacing.
Impressive additions are the custom HDPE bag-riders Terry crafted himself: “I realized that the butt stock wasn’t going to cut it on the rear bag and even though I got the 2 1/4″ front bag and the Seekins rail is 2″ wide and flat that it wasn’t as stable or smooth as I’d like.” So Terry made his own front and rear bag-riders from HDPE, a material similar to Delrin. Currently the front unit is 2.25″ wide, but Terry will be changing that to a 3″-wide front sled: “I decided that I’d get a 3″-wide front bag and mill a new front bag-rider. I’m going to recess the center to fit around the hand guard and I’ll mill a recess on the bottom of that one.”
Shown below is the Hot Rod Ruger before Terry added the HPDE Bag-Riders front and rear. Terry says the rifle now handles much better with the bag riders, and he plans to upsize the front sled to 3″ width.
Bling’s the Thing. Below is the Hot Rod Ruger’s bolt assembly. It features a custom flat-fluted bolt shaft, laser-engraved Titanium shroud and Titanium dragon-scale knob with polished stainless handle. Terry confesses: “I simply can’t resist anything shiny!”
NOAA photo of flooding after Hurricane Floyd in 1999. The Colt Python Revolver once belonged to Elvis Presley (Rock Island Auction).
This past week, Tropical Storm Isaias has hammered the East Coast of the USA. The BBC reported: “From North Carolina up to New York, Isaias left more than 3.4 million residents without power. It spawned tornadoes, uprooted trees, damaged homes and caused floods and fires.” This article explains what to do if you have experienced flooding.
Firearms owners who have seen their guns and stored ammunition submerged by flood waters in storm-wracked areas are probably wondering if their firearms and ammunition can be salvaged and safely used. To answer these questions, the NSSF and the Sporting Arms and Ammunition Manufacturers’ Institute (SAAMI®) created two documents outlining the proper response to submersion of guns and ammo. If you’ve got wet guns and/or ammo, download these two PDF files and read them carefully.
The SAAMI document “Guidance on Firearms That Have Been Submerged or Exposed to Extensive Amounts of Water” points out two major concerns about firearms that have been exposed to water: parts susceptible to moisture and rust damage such as metal parts, wood stocks and grips, and optics; and, secondly, infiltration of the action, barrel and safety systems by grit, silt and other foreign debris.
#1 Always unload firearms before beginning any treatment process.
It’s important to limit moisture and corrosion damage to the component parts of the firearm. This can be accomplished by disassembling the component parts and using up to two coats of a moisture-displacing lubricant such as Hoppes #9 MDL or WD-40 to clean and stabilize the parts while, importantly, following the product’s directions so as not to damage, for instance, plastic or synthetic parts. Another tip is to allow wood stocks and grips to air-dry and not be force dried by exposure to heat.
The document emphasizes that once the firearm has been thoroughly dried, consideration must be given to having the firearm inspected and serviced by the manufacturer, an authorized service center, or a qualified gunsmith before putting the firearm back in service.
Dealing with Ammunition That Was Submerged
Bottom Line, if your ammo has been submerged — DON’T USE IT. SAAMI explains why…
To help firearms owners determine what to do with ammunition that has been affected by water and moisture, SAAMI offers another helpful document, “Guidance on Ammunition That Has Been Submerged in Water.” This document covers differences in moisture resistance between centerfire, rimfire and shotshell ammunition, and potential hazards associated with “drying out” cartridges, including possible deterioration and damage to cartridges due to drying methods.
Another serious hazard that could result from using compromised ammunition is the potential for a bore obstruction due to partial ignition of either the priming compound or the propellant powder charge, or both. Firing a subsequent round through an obstructed barrel can result in bodily injury, death and property damage.
SAAMI provides the following cautionary conclusion: “It would be impossible to ascertain for certain the extent of the deteriorating affect, if any, the water may have had on each individual cartridge. Therefore, the safe answer is that no attempt be made to salvage or use submerged ammunition. The ammunition should be disposed of in a safe and responsible manner. Contact your local law enforcement agency for disposal instructions in your area.”
Here is an article Glen Zediker wrote for the Midsouth Blog. In this article Glen gives important advice on selecting, handling, seating, and testing primers. The right primer choice can and will affect your load’s performance and accuracy. And proper primer handling is essential for safety.
by Glen Zediker
The primer is one component in the collection that might not get all the attention it warrants. That’s because it is the one thing, above all other components, that you don’t want to just swap and switch around. We’ve all heard cautions about testing new lots of every component, especially propellant, but primers not only change lot to lot, they vary greatly in their influence on any one load, brand to brand.
The difference in one brand to the next can equal a good deal more or less pressure, for instance. While there are “general” tendencies respecting the “power” of various-brand primers, always (always) reduce the load (propellant quantity) when switching primers.
This has become more of an issue over the past few years as we’ve faced component shortages. I can tell you without a doubt that going from a WW to a CCI, or from a Remington to a Federal, can have a major influence on a load. I establish that from chronograph readings. No doubt, it’s best to have a good supply of one primer brand and lot that produces good results, and when that’s not possible, it’s a hard sell to convince someone to stop loading ammo and get back to testing. But. It is important. I can tell you that from (bad) experience. How I, and we all, learn most things…
When I switch primers, whether as a test or a necessity, I reduce my load ONE FULL GRAIN. There can be that much effect.
The Elements of a Primer
A primer is made up of a brass cup filled with explosive compound (lead styphate). Lead styphate detonates on impact. Primers don’t burn – they explode! In the manufacturing process, this compound starts as a liquid. After it’s laid into the cup, and while it’s still wet, a triangular piece or metal (the “anvil”) is set in. When the cup surface is struck by the firing pin, the center collapses, squeezing the explosive compound between the interior of the cup and the anvil. That ignites the compound and sends a flame through the case flash hole, which in turn lights up the propellant.
Primers Can be Dangerous — Particularly When Stacked
Don’t underestimate that. I’ve had one experience that fortunately only created a huge start, but I know others who have had bigger more startling mishaps. These (almost always) come from primer reservoirs, such fill-tubes. Pay close attention when charging up a tube and make sure all the primers are facing the right way, and that you’re not trying to put in “one more” when it’s full! That’s when “it” usually happens. What will happen, by the way, is akin to a small grenade. Static electricity has also been blamed, so keep that in mind.
Sizes and Types of Primers
Primers come in two sizes and four types. “Large” and “small”: for example, .223 Rem. takes small, .308 Win. takes large. Then there are pistol and rifle in each size.
Rifle primers and pistol primers are not the same, even though they share common diameters! Rifle primers [normally] have a tougher cup, and, usually, a hotter flash. Never swap rifle for pistol. Now, some practical-style competitive pistol shooters using their very high-pressure loads (like .38 Super Comp) sometimes substitute rifle primers because they’ll “handle” more pressure, but they’ve also tricked up striker power. That’s a specialized need.
Further, some primer brands are available with a “magnum” option. Some aren’t. My experience has been that depends on the “level” of their standard primer. A magnum primer, as you might guess, has a more intense, stouter flash that travels more “deeply” to ignite the larger and more dense powder column. It reaches further, faster.
Flash Consistency Counts Flash Consistency is very important, shot to shot. The consistency of every component is important: bullet weights, diameters, case wall thicknesses, and all the way down the list. We’re hoping to get more consistent behavior from a “match” or “benchrest” primer, and we’re paying more for it. I can tell you that some brands that aren’t touted as “match” are already consistent. That all comes from experience: try different primers, just respect the need to initially reduce the load for each test.
Primer Dimensional Differences and Primer Tools
One last thing — there are small variations in primer dimensions (heights, diameters) among various brands. These variations are not influential to performance. However — small diameter variations can influence feeding through priming tools. This can be a hitch especially in some progressive loading machines. Manufacturers usually offer insight (aka: “warnings”) as to which are or aren’t compatible, so find out.
This article is adapted from Glen’s books, Handloading For Competition and Top-Grade Ammo, available at Midsouth HERE. Learn more about Glen’s books at ZedikerPublishing.com.
The NSSF has posted a video featuring Bryan Litz of Applied Ballistics. Bryan also serves as Chief Ballistician for Berger Bullets and ABM Ammo. In this short video, Bryan explains the importance of ballistics for precision shooting at long range. Bryan covers key elements — drop, wind drift, angle correction and more. And Bryan also explains the key difference between Accuracy and Precision.
The principles Bryan discusses are covered (in greater detail) in the Putting Rounds on Target instructional DVD set. This 3-Disc collection boasts a total run-time of 3 hours and 37 minutes. The three DVDs, with many graphics and video segments, deliver as much information as a weekend shooting seminar… at a fraction of the cost. The 3-DVD set sells for $44.95.
Disc 1
• Accuracy & Precision
• Tall Target Test
• Chronographs & Statistics
• Ballistic Coefficient
• Trajectory Terms
• Run Time: 1 hour, 4 min
Disc 2
• Primary Elevation (Wind)
• Secondary Effects
• Using Ballistics Solvers
• Short & LR Equipment
• Run Time: 1 hour, 11 min
Disc 3
• On The Range: .308 Win
• On The Range: .284 Win
• On The Range: .338 LM
• Extended Range Shooting
• One Mile Shooting
• Run Time: 1 hour, 22 min
Brownells is a well-known retailer of guns, gun parts, tools, accessories, ammo, and pretty much everything gun related. What you may not know is that Brownells has a very active video production department that releases new “how-to” and product information videos every week. These videos offer helpful advice on gun cleaning/maintenance, reloading, as well as selecting/assembling components for various kinds of rifles. And every week Brownells serves up a new products video. There now over 1000 videos on the Brownells YouTube Channel, this really is a remarkable resource.
Here are six of our favorite recent videos from Brownells. AR owners will find some good advice on spare parts, new reloaders can learn how to use the OAL tool, and all gun owners should watch the video on ammunition storage.
Introduction to PRS Competition
In this video, Tom Beckstrand, former Special Forces Sniper Team Leader and Guns & Ammo magazine staffer, looks at the Precision Rifle Series (PRS). Tom covers the types of stages in a typical PRS match using unconventional, real-world shooting rests. He also discusses the equipment you’ll need including bag supports, bipods, tripods, and optics. As most ranges aren’t set up for PRS, Tom offers tips on how to train at your local range.
How to Use Hornady OAL Tool and Hornady Bullet Comparator
Gun Tech Steve Ostrem explains how to properly use Hornady’s Overall Length Gauge to determine length-to-land precisely. The OAL Gauge uses a “Modified Case” that theads onto the tool and holds a bullet. Push on the back of the gauge until you feel the bullet just touch the rifling. (We do this gently at first, tapping the rod a couple time to ensure the bullet is aligned correctly). Once you’ve got the length, then use the tool with a comparator on your calipers to get the lenght-to-lands. NOTE: We recommend taking the measurement 3-4 times in a row to get a reliable number. With a little practice your should be able to get repeatable measurements within .0015″.
New Bog Pod Tripod and Caldwell Electronic Muffs
Brownells staffer Paul Levy showcases the impressive new DeathGrip Tripod from Bog Gear. The DeathGrip’s adjustable jaws clamp firmly to the rifle’s forearm. This is a useful device for both PRS shooters and hunters. The head assembly has 25-deg front/rear tilt and 360-deg swivel. And the jaws’ non-slip, rubberized padding won’t scratch that stock. The legs snap open to three pre-set hard stops, and there’s plenty of length extension. Easily switch between rubber feet and steel spikes without removing a single part from the trippod. This video also features Caldwell’s E-Max™ Pro noise-cancelling electronic muffs. These affordable 23 dB NRR units boast dual microphones and digital volume controls, and two sizes are offered — Youth and Adult.
How to Store Ammunition Safely and Securely
Notably, this is the single most popular Brownells video this year, with 494,000 views since March 2020. Here’s the deal — ammunition WILL keep for a long time if you store it properaly. DO store ammunition in a cool, dry place that doesn’t have wide temperature swings. Temperature cycling will also degrade primers and powder. Put it in airtight ammo cans to keep out the moisture. Tupperware containers will work too. Brownells also recommends putting moisture-absorbing silica packs in your ammo containers. DON’T just keep ammo in factory cardboard factory boxes stacked in the basement, attic, or garage — especially not on the floor! The ammunition boxes will absorb moisture which will degrade primers and powder and corrode the brass cases. Yes, sealed military ammo will usually handle this kind of storage for quite a while, but it’s still not wise.
Must-Have Spare Parts for AR-Platform Rifles
This is one of Brownells most popular recent videos, with 154,000 views in just four months. Two gun technicians answer the question: “What spare parts should I keep on hand for my AR-15?” On the list are: Gas Rings, Buffer Spring, Extractor Spring and Pin. NOTE: You may want to try the one-piece spiral gas ring rather than the standard rings which require alignment. The cotter pin and cam pin can also easily get lost when the Bolt Carrier Group is disassembled for cleaning. On the lower receiver you’ll want spare springs and detents for the pivot/takedown pins. If you’re using lighter-power springs, keep standard-power spares on hand. If your rifle stops working, swap in the factory-spec springs to find out if the problem is the gun or your ammo. Also, if you have upgraded your trigger, always keep the original trigger as a backup.
Cleaning Advice for .22 LR Rimfire Rifles
Gun Techs Steve Ostrem and Caleb Savant debunk some myths about cleaning .22 LR barrels. One myth is that cleaning will harm the accuracy of a .22 LR barrel. Caleb thinks this myth is the result of people cleaning a barrel from the muzzle and damaging the muzzle crown, which CAN diminish accuracy. If it’s done right, cleaning won’t damage the bore. However, you certainly do NOT have to clean your 22 LR’s bore every time you go to the range. But DO clean the action every time you shoot the rifle, especially on a semi-auto. What about shooting a lot of lead bullets? Won’t that lead up the bore? The guys give us the straight skinny on lead fouling, too. When you see your .22 LR rifle’s groups opening up, you may want to consider cleaning.
Do you shoot long, pointy Hybrid Ogive bullets? If so, you may need to modify the Hornady L-N-L Bullet Comparator tool commonly used to measure the distance from bullet base to bullet ogive.
With modern, high-BC match bullets, so much of the bullet may extend forward of the ogive that the bullet tip actually contacts the inside of the red comparator body BEFORE the bullet’s ogive contacts the gray caliber-specific insert ring attached to the red body. When this happens you will NOT get an accurate Base-to-Ogive (BTO) measure. And likewise you will not get a proper Cartridge-Base-to-Ogive (CBTO) measurement with loaded rounds.
Watch this video — it shows exactly how this measurement “fail” can happen with a .338-caliber Berger Elite hunter bullet. The tester was getting a false bullet Base-to-Ogive reading of 1.175 (0:25 timemark) before modifying his tool. The true BTO measurement, with the bullet actually contacting the gray comparator ring, is 1.121 (1:25 timemark):
How to Fix the Problem
What’s the fix? With a drill, you must relieve the back “wall” inside the red comparator holder bore. This will provide more clearance for the bullet tip. With more clearance the bullet ogive will seat properly on the gray, caliber-specific insert. The tip will no longer bottom out on the red clamping half of the tool.
The maker of this helpful video, EuLRH explains: “As we all know the CBTO (Cartridge Base to Ogive) measurement is [more useful than] COAL (Cartridge Overall Length). There are lots of products that can do this. One of them is Hornady L-N-L bullet comparator. Attention! With modern long range bullets it is possible that the bullet tip is touching the comparator body instead of the bullet ogive touching the gauge.” In this example, EuLRH worked with the 300gr Berger elite hunter bullet in .338 Caliber.
Why You Need to Check with Your Own Loads
If your bullets have this “tip touching” issue, when you measure your loaded rounds you will be seeing COAL instead of the Cartridge Base to Ogive (CBTO) length. Take a moment, test with your own bullets and your comparator to determine if you have this measurement problem. If you do, try the drilling solution shown in the video.


 As someone who aspired to building a repeater and jumping into the PRS game, and had a spare F-TR rifle sitting around, I thought it would be fun to build up a 6mm GT to see if there was any merit to the hype. My smith, Wes Ripley of
 BRASS — The first thing you’ll find is cartridge brass choices for the 6mmGT are rather limited currently. At present, the only commercial options are Hornady and

 SUMMARY — Good Cartridge with Much Potential




 Flash Consistency is very important, shot to shot. The consistency of every component is important: bullet weights, diameters, case wall thicknesses, and all the way down the list. We’re hoping to get more consistent behavior from a “match” or “benchrest” primer, and we’re paying more for it. I can tell you that some brands that aren’t touted as “match” are already consistent. That all comes from experience: try different primers, just respect the need to initially reduce the load for each test.
 Get Midsouth products


 Do you shoot long, pointy Hybrid Ogive bullets? If so, you may need to modify the Hornady L-N-L Bullet Comparator tool commonly used to measure the distance from bullet base to bullet ogive.


