by Sierra Bullets Ballistic Technician Paul Box
All of us who have been in reloading and shooting for any period of time have read how sectional density has been regarded as a bullet’s ability to penetrate. Back before high velocity came along and modern bullet design, the easiest way to get more “power” and penetration was by increasing the diameter and mass. After all, a bowling ball will hurt more than a golf ball, right?
Let’s take a closer look at sectional density.
The formula for calculating sectional density is pretty simple and straight forward. Take the bullet weight and divide by 7000. This number is then divided by the bullet diameter squared Two bullets of equal weight and the same diameter will have equal sectional sectional density. No regard is given to the bullet construction. This is where the fly hits the soup in considering sectional density as far as penetration is concerned.
Section Density Formula: (Bullet Weight divided by 7000) divided by Bullet Diameter squared.
Bullet construction is the biggest factor in how it is able to penetrate. The best example I can think of here is to look at the Sierra .224 55 Gr. FMJBT GameKing #1355 compared to the 55 Gr. BlitzKing #1455. Both are .224 and weigh 55 grs. Both have a sectional density of .157. But there is a huge difference in their construction. The FMJ has a thick jacket and is designed to penetrate. The BlitzKing is designed for fast and rapid expansion with little concern for how deep they will penetrate.
The next time you’re choosing a bullet, look at the construction and less at the sectional density number. It’s all about the construction anyway. If you have any questions or would like to discuss sectional density or bullet penetration further, please give us a call at 800-223-8799 or shoot us an email at sierra@sierrabullets.com.
If the battery on your safe’s electronic lock is more than a year old, or if it is not giving you the right voltage, replace it today!
This time of year, many readers are putting their guns away in a safe for the winter. It’s easy to just tuck the guns away and forget about them. But there’s something you should do before you shut the safe door.
If you have a safe with an electronic keypad, you should replace the battery every year as a precautionary measure. Trust us, you don’t want to come back in a few months and find that the keypad memory is kaput, and you’re locked out. That can lead to an expensive locksmith visit.
NOTE: Some lock systems use more power and you may need to change your batteries TWICE a year. Batteries aren’t that expensive — you may want to replace batteries TWICE a year if you open and close your safes very frequently.
Low Voltage Battery? You May Be Locked Out…
Here’s a true story. I have one safe with a Sargent & Greenleaf (S&G) keypad. A couple years back, in early December, I went to get into the safe. I punched in the correct combination, but all I got was a rapid “beep, beep, beep, beep” after I finished the last combination entry. I tried again to ensure I entered the combination correctly (I did). But again, the locking system responded with multiple rapid beeps indicating something was wrong. And the safe would not open. Now I was worried….
I popped out the battery holder (which slides in from the bottom of the keypad housing on the door). I removed the battery and tested it with a volt-meter. The 12-month-old Duracell 9-volt battery only registered 6.1 volts.
Low voltage was the problem. I went down to the store and got a couple new 9V batteries. I tested the new batteries and both measured 9.4 volts output. I slipped one of the new 9V batteries into the keypad housing, punched in the combination and everything worked OK again. Eureka.
Most electronic locks for safes WILL “remember” the combination for a period of time even when the battery is low (and the keypad’s “brain” should retain the combination when you remove the battery for replacement). However, a dead battery, or extended periods of low voltage can give you problems. Don’t rely on wishful thinking…
In this interesting video, Brownells Gun Tech Caleb Savant covers the topic of linear compensators, aka “blast diffusers” or “linear blast devices”. These are quite different in function from a typical muzzle brake and they are NOT a sound suppressor. Unlike a traditional muzzle brake, a linear compensator directs the muzzle blast forward, AWAY from the shooter. This is not only good for the shooter but also for folks next to the shooter, either at the range or in a CQB law enforcement or military situation.
A “Linear Compensator”, also known as “blast diffuser”, my look similar to a muzzle brake. But it works differently. A typical muzzle brake shoots blast out the side, and can be pretty annoying for someone positioned next to the shooter. By contract, the Linear Compensator direct blast force more forward. This helps reduce perceived recoil, and importantly doesn’t send hot gasses left and ring to nearby shooters or observes. Muzzle brake output can be very annoying. This Editor once was shooting next to a .338 Lapua Magnum with a brake, just a couple feet away. With each .338 LM shot I could feel heat on arms/hands and actually feel the bones in my forearm vibrate.
Attachment Methods — Direct Thread Mounting vs. Quick-Attach Mounting
Linear compensators have become much more popular in recent years as AR-15 pistols and SBRs have proliferated. Some linear comps, such as popular models from Midwest Industries and the Troy Claymore, attach directly to the muzzle, just like a traditional flash hider or muzzle brake.
Other Linear Compensators are slip-on, quick-attach components that mount OVER another muzzle device. For example, the VG6 Precision CAGE Device (Concussion Altering Gas Expansion) attaches directly over one of their standard muzzle devices. Almost every company that makes a sound suppressor also offers a linear compensator, which typically attaches to the muzzle the same way as the silencer.
Video find by Boyd Allen. We welcome reader submissions.
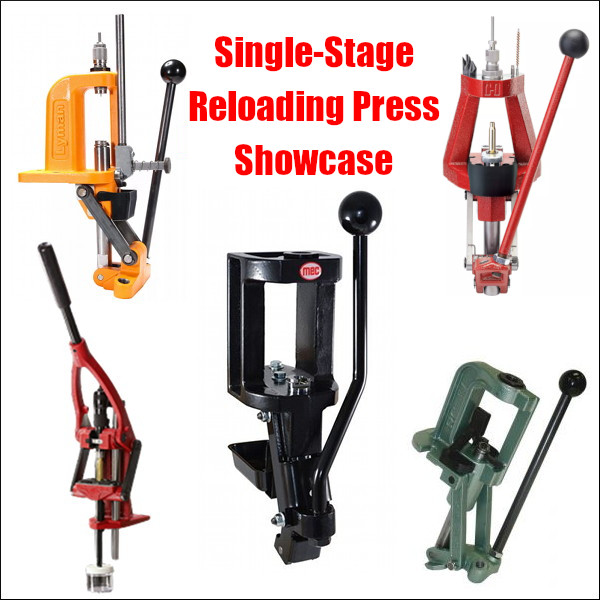
Hand-loaders have never had so many great choices in single-stage presses, with many different configurations and features. There are classic O-Frame presses, Coax-style presses, Open-front presses, Pyramid presses, and compact C-Frame presses. Here is our 2019 Single Stage Press Showcase with products from Forster, Hornady, Lee, Lyman, MEC, and RCBS. We’ve included short videos showing the features of these reloading presses.
If you are shopping for a new press you should look at the various features of each. You may prefer something classic like a Rock Chucker, or the innovative open-front MEC. If you are looking for a compact press to use at the range, the Lyman C-Frame is very impressive for the price. And the Forster Co-Ax remains a great addition to any loading room.
MEC Marksman Single-Stage Press
If you are looking for a new, full-size single-stage reloading press, definitely consider the MEC Marksman. Created by the makers of the popular MEC shotshell reloading systems, the MEC Marksman combines a sturdy cast-iron frame with a modern open-front design. If you are looking for a new, full-size single-stage reloading press, definitely consider the MEC Marksman. Created by the makers of the popular MEC shotshell reloading systems, the MEC Marksman combines a sturdy cast-iron frame with a modern open-front design. With a $245.49 street price, the MEC Marksman press now costs more than an RCBS Rock Chucker Supreme press, but the MEC offers some distinct advantages — such as an open front plus a floating shell-holder system.
Our friend Gavin Gear of UltimateReloader.com got his hands on a MEC Marksman press and put it through its paces. He came away impressed with the product, saying it delivers excellent performance, and has many impressive features. Gavin tells us: “Cast iron tools and machines are a lifetime investment. The made-in-USA MEC Marksman features ductile cast-iron construction, an open-front frame design for easy cartridge access, a new floating shell-holder design with a unique retention system, and ambidextrous handle setup.” MEC also offers a wide selection of accessories for the Marksman press, including a press riser/mount, shell-holder caddy, and die trays.
Forster Co-Ax Press
If you are not yet familiar with the many unique features of the Forster Co-Ax, we recommend you watch the video above, a very thorough video review by Rex Roach. This shows how the press operates and highlights the design elements which set the Co-Ax apart from every other reloading press on the market. This 14-minute video shows the key Co-Ax features, explaining how the floating case-holder jaws work (3:30 time-mark), how the dies are held in place (4:40 time-mark), how spent primers are captured (6:10 time-mark), and how to set the primer seating depth (10:00 time-mark). We’ve used a Co-Ax for years and we still learned a few new things by watching this detailed video. If you are considering purchasing a Co-Ax, definitely watch this video start to finish.
In recent years, Forster Co-Ax® presses have been somewhat hard to find, as demand has out-stripped supply. The Co-Ax has many dedicated fans, given its unique features, such as the floating case-holder jaws, and easy, rapid slide-in/slide-out die placement. We’ve also found that Co-Ax presses load very straight ammo and we like the ability to switch between short handle (good for bullet seating) and long handle (ideal for heavy case-sizing tasks). We also think the Forster Co-Ax has one of the best spent primer capture systems on the market — a straight drop into a removable plastic cup. Simple and it works.
Lyman Brass Smith Victory Single-Stage Press
Lyman’s sturdy Victory Single-stage Press is a full-size unit that competes with the RCBS Rock Chucker Press. With beefy cast iron construction, the Victory’s strength and leverage rivals the Rock Chucker. The press operates smoothly and the handle can be mounted on either side.
If you like to prime cases using a press, this Victory press has a priming system that’s much easier to use than the RCBS Rock Chucker system. The priming tube is right up front, with multiple primers loaded vertically in a tube. Simply push the shuttle at the button of the tube to advance the primer into place.
For convenience, the entire primer-loading system can also be removed so it doesn’t interfere with case and bullet-handling operations. We generally prefer to prime cases separately using a dedicated hand- or bench-mounted tool, but the Victory press does the job nicely.
Overall, the Victory is a great value in a full-size “O-Frame” press with sturdy construction and a solid Lyman warranty. It is available now for $219.99 on Amazon.
RCBS Rock Chucker Supreme Single-Stage Press
Nearly every serious hand-loader has owned or used the RCBS Rock Chucker press. This Editor still uses a Rock Chucker passed down by his brother 20 years ago. And yes, it is still going strong. The latest Rock Chucker Supreme single-stage press features an improved “upside-down Y-path” dual-bin spent primer catcher. Otherwise the Rock Chucker Supreme remains big, strong, versatile and sturdy. It has very strong linkages, with a compound leverage system providing plenty of power — FL-sizing is a breeze even with large, magnum cases. The 1″-diameter ram has 12.5 sq. inches of ram-bearing surface.
The Rock Chucker offers a secondary 1 1/4″ x 12 thread for shotshell reloading dies and Piggyback 3 upgrade. The Rock Chucker Supreme retails for $234.99 now at Midsouth. The Rock Chucker Supreme combines easy operation, ambidextrous handle, and outstanding strength. It has a big 4.25″ loading window that works even for big magnum cases. The long handle and central pivot design provide outstanding leverage. The RCBS Rock Chucker is definitely a quality product that can last a lifetime. For heavy-duty sizing chores this remains one of the best choices in single-stage presses.
Lyman Brass Smith Ideal C-Frame Compact Press
The Lyman Brass Smith Ideal Press is a very affordable, cast iron C-Frame reloading press. We think it is the new “class leader” in compact presses. This works great as a secondary press for your reloading room or a small press you can take to the range. The large front opening allows you to access the shell holder without hitting the support bar on other types of presses. Unlike other compact presses made from aluminum, Lyman’s Ideal press is cast iron so it is rigid and strong. The high-quality steel ram is one inch in diameter. The Brass Smith is a true ambidextrous press that can be accessed from either side and mounted the same. This is a great choice for a second, auxiliary press for depriming and bullet seating. It is now just $134.99 at MidwayUSA.
Hornady Iron Single Stage (Open-front) Press
In this “Reloading with Rosie” video, the attractive female host loads some ammo using the Hornady Iron Press. With a beefy, pyramid-style cast-iron frame with an open front, this press offers some advantages over a traditional “O-Frame” type press. Access is considerably easier, for one thing. And the top of the press includes slots to hold dies and tools — that’s really a very nice feature that saves time. Also an optional “automatic” priming system shuttles primers from a vertical tube in the back to the shell-holder in the front. That’s clever. Over all the Iron Press is a nice piece of engineering — good job Hornady. It is offered for $289.99 at Midsouth.
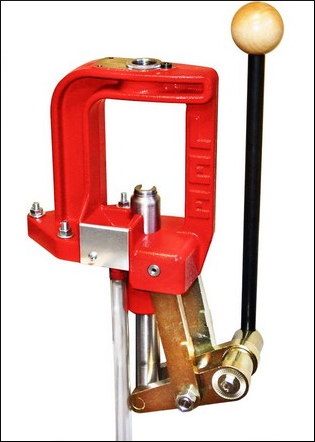
Lee Classic Cast (Iron) Breech Lock Press
The Lee Classic Cast Breech Lock Press offers excellent value for the money ($190.99 at Midsouth). Based on the proven design of the Classic Cast press, the updated Breech Lock series adds the quick-change die bushing and an improved primer drop system. This press is strong, with cast iron frame, all-steel linkage, and 12 square inches of ram bearing surface.
Lee says this press has the “largest opening and the longest stroke in the industry” among O-frame type presses. The handle can be mounted on either side. We love the fact that the handle ANGLE can be adjusted, as well as the lever arm length — that allows you to adjust travel and leverage to suit your preference. Smart engineering.
The new spent primer drop features a large-diameter hollow ram with clear hose that drops primers straight to a bin — that’s simple and effective. The press is very rigid and the base is wide enough for good stability. We have one of these Classic Cast Breech Lock Presses in our reloading room and it works well.
This is a grim tale. A man almost lost the use of his right hand, and did suffer terrible injuries to his fingers. All because he picked the wrong bottle of powder off the shelf. We have run this story before, and we will continue to run it every year, as a caution to our readers. This mistake is easy to make, but the consequences can be dire. Always, always double-check your powder labels before you start the hand-loading process. If you don’t, you may not have a hand to load with next time…
Similar Labels, Disasterous Consequences
The shooter, Denny K., was assembling some rounds for his brand new 7mm-08 Savage hunting rifle. He thought he was loading with Hodgdon Varget. Instead he had filled his powder measure with Hodgdon TiteGroup, a fast-burning pistol powder. The labels are similar, so the mistake is understandable. But the results were devastating. Here’s what 41 grains of TiteGroup can do in a 7mm-08:
Posting on the Firing Line, in a thread entitled “Lucky to Be Alive”, Denny writes:
“This is the hardest post to post. I know if I had read it a week ago my comment would have been: ‘You have no business reloading’. I had everything perfect, except pouring the wrong powder in the powder measure. I type this slowly with my left hand, embarrassed but … possibly saving someone else a tragedy or, like me, a long drive to the Emergency Room and surgery to save my finger.”
The Still-Sealed Bottle of Varget
Denny did not initially comprehend exactly why the kaboom happened. He thought maybe his new Savage rifle was at fault. Then, on his return home, he discovered something…
Denny wrote: “The seven-hour period it took to go to ER, transport to Trauma Center and surgery made me think it was a Savage rifle issue. Brand new rifle, new brass, triple-checked loading data. The next day I was humbled when I realized the Varget powder was still sealed.
I knew what powder to use. I thought [Varget] was what I used. Not until the following day did I realize the Varget was still sealed.”
At that point, Denny realized what caused the accident — “operator error”. He knew he had to warn others about using the wrong powder: “I knew I needed to share my mistake, even though it is embarrassing, just to remind people. I’ve been reloading for 30 years…”
Editor’s Comment: Denny was not a novice reloader. His experience demonstrates that this kind of mistake can be made by any hand-loader, even one with decades of experience. Be safe guys, take your time when you load your ammo. Remove powders from measures after your loading sessions (pistol powders can look very similar to rifle powders). And by all means CHECK the LABEL on the jug. As the TiteGroup label says: “A little goes a long way.”
It’s not a bad idea to separate your pistol powders from your rifle powders, or perhaps even load for pistol in a separate part of your workshop.
Sinclair Internationalhas released an interesting article about Case Concentricity* and bullet “run-out”. This instructional article by Bob Kohl explains the reasons brass can exhibit poor concentricity, and why high bullet run-out can be detrimental to accuracy.
Concentricity, Bullet Alignment, and Accuracyby Bob Kohl
The purpose of loading your own ammo is to minimize all the variables that can affect accuracy and can be controlled with proper and conscientious handloading. Concentricity and bullet run-out are important when you’re loading for accuracy. Ideally, it’s important to strive to make each round the same as the one before it and the one after it. It’s a simple issue of uniformity.
The reason shooters work with tools and gauges to measure and control concentricity is simple: to make sure the bullet starts down the bore consistently in line with the bore. If the case isn’t properly concentric and the bullet isn’t properly aligned down the center of the bore, the bullet will enter the rifling inconsistently. While the bore might force the bullet to align itself with the bore (but normally it doesn’t), the bullet may be damaged or overstressed in the process – if it even it corrects itself in transit. These are issues we strive to remedy by handloading, to maintain the best standard possible for accurate ammunition.
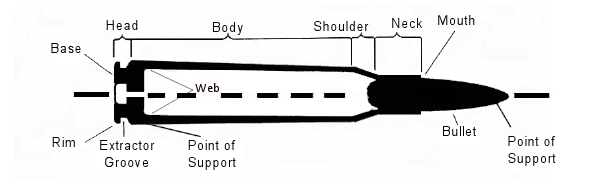
The term “concentricity” is derived from “concentric circle”. In simple terms it’s the issue of having the outside of the cartridge in a concentric circle around the center. That goes from case head and center of the flash hole, to the tip of the bullet.
Factors Affecting Concentricity
The point of using this term is to identify a series of issues that affect accurate ammunition. Ideally this would work best with a straight-walled case; but since most rifle cartridge cases are tapered, it equates to the smallest cross section that can be measured point by point to verify the concentric circle around the center. For the examples below, I’m working with .308 Winchester ammo.
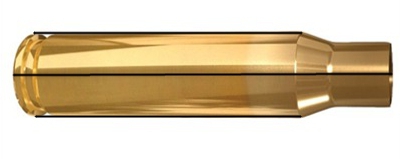
Figure 1: The cartridge.
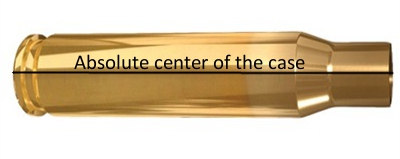
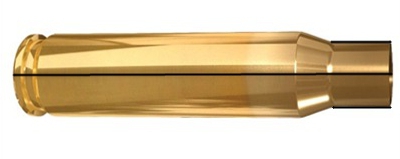
Figure 2: Centerline axis of the case, extending from flash hole to case mouth.
The case walls have to be in perfect alignment with the center, or axis, of that case, even if it’s measured at a thousandth of an inch per segment (in a tapered case).
Figure 3: Case body in alignment with its axis, or centerline, even in a tapered case.
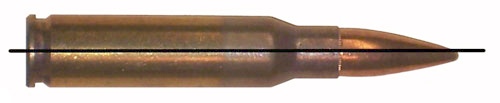
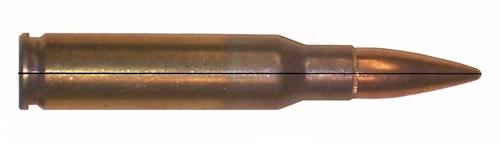
The case neck must also be in alignment with its axis. By not doing so you can have erratic bullet entry into the bore. The case neck wall itself should be as uniform as possible in alignment and in thickness (see the M80 7.62x51mm NATO cartridge in Figure 5) and brass can change its alignment and shape. It’s why we expand the case neck or while some folks ream the inside of the neck and then turn the outside for consistent thickness, which affects the tension on the bullet when seated.
Figure 4: Neck in alignment with center of the case axis.
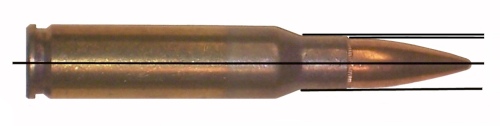
Figure 5: Variations in case neck wall thickness, especially on some military brass, can cause an offset of the bullet in its alignment. This is an M80 ball round. Note the distinct difference of the neck walls.
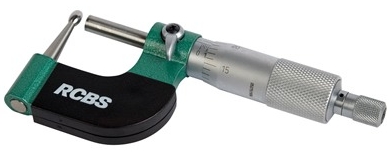
Having a ball micrometer on hand helps, especially with military brass like 7.62x51mm in a semi-auto rifle, where there are limits as to how thin you want the neck walls to be. In the case of 7.62 ball brass you want to keep the wall to .0145″.
Figure 6: A ball micrometer like this RCBS tool (#100-010-268) can measure case neck thickness.
Turning the outside of the neck wall is important with .308 military cases regardless of whether you expand or ream the neck walls. There are several outside neck turning tools from Forster, Hornady, Sinclair, and others. I’ve been using classic Forster case trimming (#100-203-301) and neck turning (#749-012-890) tools for 40 years.
Bullet Run-Out
The cartridge, after being loaded, still needs to be in alignment with the center of the case axis. Figure 7 shows a bad example of this, a round of M80 ball. A tilted bullet is measured for what’s known as bullet “run-out”.
Figure 7: An M80 round with the bullet tilted and not aligned with the axis. This will be a flyer!
Run-out can be affected by several things: (1) improperly indexing your case while sizing, which includes not using the proper shell holder, especially while using a normal expander ball on the sizing die (it also can stretch the brass). (2) The head of a turret press can flex; and (3) improper or sloppy bullet seating. This is also relevant when it comes to using a progressive press when trying to load accuracy ammo.
Mid Tompkins came up with a simple solution for better bullet seating years ago. Seat your bullet half way into the case, back off the seater die and rotate the case 180 degrees before you finish seating the bullet. It cuts down on run-out problems, especially with military brass. You also want to gently ream the inside of the neck mouth to keep from having any brass mar the surface of the bullet jacket and make proper seating easier. A tilted bullet often means a flyer.
Figure 8: Proper alignment from the center of the case head to the tip of the bullet.
(NOTE: This links to a Web Archive version of the original Sinclair Int’l article.)
*Actually some folks would say that if we are talking about things being off-center or out-of-round, we are actually talking about “eccentricity”. But the tools we use are called “Concentricity Gauges” and Concentricity is the term most commonly used when discussing this subject.
Fire-Form with Foulers
Here’s a tip for guys who shoot the 6 PPC, 6 Dasher, 6 BRA, .284 Shehane, or other wildcat cartridges that require fire-forming. Use your fouler shots to fire-form new cases. That way your fouler shots do “double-duty” and you get your brass fire-formed without putting extra rounds through your expensive barrel.
This procedure is recommended by Joel Kendrick, the 2004 IBS 600-yard Shooter of the Year. After he cleans his barrel, Joel knows it takes two or three shots to foul in the bore before accuracy returns. (YMMV — some barrels may need five or six foulers.) When shooting his PPC, Joel uses those fouler shots to fire-form his new brass. Joel explains: “I like to have relatively new brass always ready. By fire-forming a couple cases after each barrel-cleaning during a match, by the end of the weekend I’ve got a dozen or more freshly fire-formed cases to put into the rotation. If you do this with your fouler shots you get your fire-forming accomplished without using up any extra barrel life.”
This not only saves barrel wear, but it saves you trips to the range for the purpose of fire-forming. We thank Joel for this smart suggestion. For those who do not have a dedicated barrel for fire-forming, this should help keep your round-count down. Note: With this fouler fire-forming routine, you should ALWAYS do the fire-forming with the SAME POWDER you load for your match ammo. Joel currently works as the Supplier Quality Process Engineer for Parker TruTec — MMI Inc., a company that offers barrel surface coatings that can further extend your barrel life.
Rifleshooter.com does some great original research — providing “hard data” you can’t find anywhere else. Here are the eye-opening results of Rifleshooter.com’s 6.5 Creedmoor barrel cut-down test. You may be surprised at the results. Read on…
What do you get when you cut a 6.5 Creedmoor-chambered barrel down to just over 16 inches? A lot more velocity than you might think. Our friends at Rifleshooter.com performed a barrel cut-down test with 6.5 Creedmoor test rifle, shortening the barrel from 27 to 16.1 inches in one-inch increments. Surprisingly, with a 142gr Sierra MK, the total velocity loss (as measured with a Magnetospeed) was just 158 FPS, an average of 14.4 FPS per inch of barrel length. With the lighter 120gr A-Max bullet, the total velocity loss was 233 FPS, or 21.8 FPS average loss per inch of barrel.
Test Procedure
Five (5) rounds of each type of cartridge were fired at each barrel length and the velocity data was recorded with a MagnetoSpeed V3 barrel-mounted chronograph. The rifle was then cleared and the barrel was cut back one inch at a time from 27″ to just over 16″. NOTE: During this winter test, the air temperature was a very chilly 23° F. One would expect higher velocities across the board had the outside temperature been higher.
The photo below shows how the barrel was cut down, inch-by-inch, using a rotary saw. The barrel was pre-scored at inch intervals. As the main purpose of the test was to measure velocity (not accuracy) the testers did not attempt to create perfect crowns.
6.5 Creedmoor vs. Other Mid-Sized 6.5mm Cartridges
The 6.5 Creedmoor is a very popular cartridge with the tactical and PRS crowd. This mid-size cartridge offers good ballistics, with less recoil than a .308 Winchester. There’s an excellent selection of 6.5mm bullets, and many good powder choices for this cartridge. When compared to the very accurate 6.5×47 Lapua cartridge, the 6.5 Creedmoor offers similar performance with less expensive brass. For a tactical shooter who must sometimes leave brass on the ground, brass cost is a factor to consider. Here’s a selection of various 6.5mm mid-sized cartridges. Left to right are: 6.5 Grendel, 6.5×47 Lapua, 6.5 Creedmoor with 120gr A-Max, 6.5 Creedmoor with 142gr Sierra MK, and .260 Remington.
When asked to compare the 6.5 Creedmoor to the 6.5×47 Lapua, Rifleshooter.com’s editor stated: “If you don’t hand load, or are new to precision rifle shooting, get a 6.5 Creedmoor. If you shoot a lot, reload, have more disposable income, and like more esoteric cartridges, get a 6.5×47 Lapua. I am a big fan of the 6.5×47 Lapua. In my personal experience, the 6.5×47 Lapua seems to be slightly more accurate than the 6.5 Creedmoor. I attribute this to the quality of Lapua brass.” Now that Lapua offers 6.5 Creedmoor brass with small primer pockets, the 6.5 Creedmoor is even more attractive.
The creator of Rifleshooter.com also operates a Custom Rifle Building enterprise and gun shop in Long Island, New York: 782 Custom Guns Ltd.. He tells us: “We offer an unparalleled level of gunsmith machine shop services in the Long Island region. From precision rifles (USMC M40A3/A5/A6 XM3 clones) to customized Remington 870 and Mossberg 590 shotguns, and customized 1911s, chances are if you can dream it, we can build it!”
Halloween (originally “All Hallows Eve”) is just two days away. Throughout the country, there will be youngsters (and parents) making the rounds on October 31st, trick-or-treating. U.S. LawShield has provided Halloween safety tips for homeowners and families with kids. These tips are designed to keep kids safe/secure and to help adults supervise the young ones and avoid potential liabilities as homeowners. READ Full Article HERE.
Halloween Safety Tips for Adults (Parents and Homeowners) Drive Carefully – Drive slowly and watch for people crossing the street. Avoid distractions like phones or food so you can be ready to stop quickly. (But it’s best to just avoid driving after dark on Halloween[.]) Clear the Way – Clear your front steps, driveway, and lawn of any potential safety hazards. If any injuries happen on your property, you could be held liable! Leave a Light On – If you leave the house, keep a few visible lights on inside to discourage criminals. However, leave your porch light off to let trick-or-treaters know you aren’t giving out candy! Verify Insurance – Are you turning your home into a neighborhood haunted house? Are you charging admission? Make sure to check your local laws and verify your homeowners insurance coverage! Something like this could be considered a business activity, and accidents or injuries typically are not covered. (You should also verify your self-defense insurance coverage!) Go Flameless – Use electric lights in your jack-o-lanterns and other décor. House fires are one of the more common accidents reported by homeowners on Halloween.
Halloween Safety Tips for Kids Adult Supervision – All children aged 13 and under should be accompanied by an adult when trick-or-treating. Older kids without an adult should be in groups of three or more. Create a Route – Only trick-or-treat in familiar neighborhoods and at houses with porch lights on. Be aware of and avoid the addresses of local sex offenders. Street Smart – Walk only on sidewalks, and cross streets only at crosswalks or corners. Make eye contact with drivers before crossing to help prevent accidents. Take extra caution with costume masks, as they greatly reduce a child’s ability to see their surroundings. High Visibility – Carry glow sticks or flashlights when out after dark, and avoid wearing costumes that are dark-colored or aren’t reflective. Treat Smart – Check your kids’ candy! The CDC Halloween Safety Guide highly recommends throwing away any unwrapped or unsealed pieces.
U.S. LawShield also strongly recommends not having toy guns — even Nerf guns or squirt guns — as part of costumes. At night toy guns can cause confusion, with potential bad reactions.
About U.S. LawShield
Founded in 2009, U.S. LawShield now has 700,000+ members and 6,000+ industry partners. The goals are to help members handle critical, life-threatening situations and prevent potential injustices in the legal system after acts of self-defense. For more information on U.S. LawShield visit USLawshield.com.
In years past, the U.S. Army Marksmanship Unit published weekly reloading “how-to” article on the USAMU Facebook page. Here is a very informative USAMU article the subject of case lubrication. Tasked with producing thousands of rounds of ammo for team members, the USAMU’s reloading staff has developed very efficient procedures for lubricating large quantities of cases. This article reveals the USAMU’s clever “big-batch” lube methods. For other helpful hand-loading tips, visit the USAMU Facebook page on upcoming Wednesdays.
Rapid, High-Volume Case Lubrication
Today’s topic covers methods for quickly applying spray lube to cartridge cases prior to sizing. A typical order for this shop may be 25,000 rounds, so [speeding up] the lubrication process can be a real time-saver. While your ammunition lots probably aren’t this large, the efficient methods discussed here may help save a considerable amount of time over your handloading career. Our case lubrication rates range from 1500-1600 cases per hour, to 2400-2500 cases per hour, depending on caliber.
This shop uses virgin brass, whereas most home handloaders use fired brass, which necessitates some small changes at times. These will be discussed as they arise. Begin with fired brass that has been tumbled clean.
Ensure as much tumbling media as possible is removed from the brass, as when it gets into a size die, it can dent cases significantly. This is a good time to round out dents in the case mouths using a tapered tool to prevent damage from the decapping stem.
First, dump the clean cases into a large box or reloading bin. Shake the bin back and forth so that many cases are oriented with the mouths up. Next, pick up as many cases as is convenient with the mouths “up”, from natural clusters of correctly-oriented cases. With 7.62mm-size cases, this is usually 3-4, and with 5.56mm cases, this can be up to 8-10. Place the cases into the rack slots, mouth-up. Doing this in groups rather than singly saves considerable time. Once these clusters have been depleted, it will be time to re-shake the bin to orient more cases “up.”.
This photo shows a case lubrication rack made by a USAMU staffer.
Naturally, adjust the spacing to best fit the calibers you reload. We have found this size … convenient for handling through the various phases of case lubrication/transfer to progressive case feeders for processing. Note that the 1/2-inch angle does not cover much of the critical case area at the base, just forward of the extractor groove, where most re-sizing force will be exerted. As the USAMU uses virgin brass, less lubrication is required for our brass than would be needed for Full Length (FL) sizing of previously-fired brass.
NOTE: The amount applied using our rack is easily enough for our purpose. If using fired brass, be sure to adequately lube this base area to avoid having cases stick in the full-length sizing die.
Using a spray lube, coat the cases adequately, but not excessively, from all sides. Be sure to get some lube into the case mouths/necks, in order to reduce expander ball drag and case stretching/headspace changes. The spray lube this shop uses does not harm primers or powder, and does not require tumbling to remove after lubing.*
Take a close look at the photo above. The USAMU shop uses a common kitchen turntable, which allows the rack to be rotated easily. We place this in a custom-made box which prevents over-spray on to floors and walls.
Angled Box Method for Smaller Cases to be Neck-Sized
A refinement of the above method which especially speeds processing of 5.56x45mm cases is as follows. A small cardboard box which holds about 100 cases is fitted with an angled “floor” secured by tape. With the smaller 5.56mm cases, usually about 8-10 cases per handful can be picked up, already correctly-oriented, and placed into the box together. This prevents having to place them into the rack slots, saving time.
HOWEVER, note that this does not allow nearly as much lube access to the case bodies as does the rack. For our purposes — neck-sizing and setting neck tension on new brass, this works well. If using this procedure with fired brass, take steps to ensure adequate lube to prevent stuck cases.
As always, we hope this will help our fellow handloaders. Good luck, and good shooting!
*A two-part test performed here involved spraying primed cases heavily, while getting more lube into the case mouth/body than even a careless handloader would likely apply. The second part of the test involved literally spraying considerable quantities of the lube directly into the cases, drenching the primers. After a several-day wait to allow the lube to penetrate the primers, they were then fired in a test barrel. All fired normally; no unusual reports were noted. This bolstered confidence that normal amounts of the lube would not adversely affect our ammunition, and we have been pleased with the results over several years.


 This time of year, many readers are putting their guns away in a safe for the winter. It’s easy to just tuck the guns away and forget about them. But there’s something you should do before you shut the safe door.

 If you are not yet familiar with the many unique features of the Forster Co-Ax, we recommend you watch the video above, a very thorough video review by Rex Roach. This shows how the press operates and highlights the design elements which set the Co-Ax apart from every other reloading press on the market. This 14-minute video shows the key Co-Ax features, explaining how the floating case-holder jaws work (3:30 time-mark), how the dies are held in place (4:40 time-mark), how spent primers are captured (6:10 time-mark), and how to set the primer seating depth (10:00 time-mark). We’ve used a Co-Ax for years and we still learned a few new things by watching this detailed video. If you are considering purchasing a Co-Ax, definitely watch this video start to finish.
 Lyman’s sturdy Victory Single-stage Press is a full-size unit that competes with the RCBS Rock Chucker Press. With beefy cast iron construction, the Victory’s strength and leverage rivals the Rock Chucker. The press operates smoothly and the handle can be mounted on either side.
 Nearly every serious hand-loader has owned or used the RCBS Rock Chucker press. This Editor still uses a Rock Chucker passed down by his brother 20 years ago. And yes, it is still going strong. The latest Rock Chucker Supreme single-stage press features an improved “upside-down Y-path” dual-bin spent primer catcher. Otherwise the Rock Chucker Supreme remains big, strong, versatile and sturdy. It has very strong linkages, with a compound leverage system providing plenty of power — FL-sizing is a breeze even with large, magnum cases. The 1″-diameter ram has 12.5 sq. inches of ram-bearing surface.

 The Lee Classic Cast Breech Lock Press offers excellent value for the money (


 Fire-Form with Foulers


