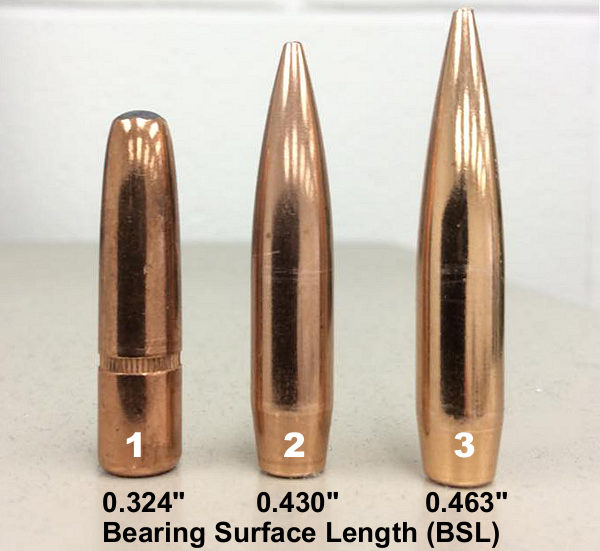
Photo 1: Three Near-Equal-Weight 7mm Bullets with Different Shapes
TECH TIP: Bullets of the same weight (and caliber) can generate very different pressure levels due to variances in Bearing Surface Length (BSL).
This article, from the USAMU Facebook Page, concerns reloading safety. In the relentless quest for more speed and flatter ballistics, some hand-loaders load way too hot, running charges that exceed safe pressure levels. Hint: If you need a mallet to open your bolt, chances are your load is too hot. Stay within safe margins — your equipment will last longer, and you won’t risk an injury caused by over-pressure. In this article, the USAMU explains that you need to account for bullet shape, diameter, and bearing surface when working up a load. Don’t assume that a load which is safe for one bullet will be safe for another even if both bullets are exactly the same weight.
How Bullet Profile and Bearing Surface Affect Pressure Levels
Today, we continue our handloading safety theme, focusing on not inadvertently exceeding the boundaries of known, safe data. Bullet manufacturers’ loading manuals often display three, four, or more similar-weight bullets grouped together with one set of load recipes. The manufacturer has tested these bullets and developed safe data for that group. However, seeing data in this format can tempt loaders — especially new ones — to think that ALL bullets of a given weight and caliber can interchangeably use the same load data. Actually, not so much.
The researchers ensure their data is safe with the bullet yielding the highest pressure. Thus, all others in that group should produce equal or less pressure, and they are safe using this data.
However, bullet designs include many variables such as different bearing surface lengths, hardness, and even slight variations in diameter. In fact, diameters can occasionally range up to 0.001″ by design. Thus, choosing untested bullets of the same weight and caliber, and using them with data not developed for them can yield excess pressures.
This is only one of the countless reasons not to begin at or very near the highest pressure loads during load development. Always begin at the starting load and look for pressure signs as one increases powder charges.
Bullet Bearing Surface and Pressure
Bullet bearing surface length (BSL) is often overlooked when considering maximum safe powder charges and pressures. In Photo 1, note the differences in the bullets’ appearance. All three are 7 mm, and their maximum weight difference is just five grains. Yet, the traditional round nose, flat base design on the left appears to have much more BSL than the sleeker match bullets. All things being equal, based on appearance, the RN/FB bullet seems likely to reach maximum pressure with significantly less powder than the other two designs.
TECH TIP: Bullets of the same weight (and caliber) can generate very different pressure levels due to variances in Bearing Surface Length (BSL).
Bullet 1 (L-R), the RN/FB, has a very slight taper and only reaches its full diameter (0.284 inch) very near the cannelure. This taper is often seen on similar bullets; it helps reduce pressures with good accuracy. The calculated BSL of Bullet 1 was ~0.324″. The BSL of Bullet 2, in the center, was ~0.430″, and Bullet 3’s was ~ 0.463″. Obviously, bullets can be visually deceiving as to BSL!
Some might be tempted to use a bullet ogive comparator (or two) to measure bullets’ true BSL for comparison’s sake. Unfortunately, comparators don’t typically measure maximum bullet diameter and this approach can be deluding.
Note: Due to time constraints, the writer used an approximate, direct measurement approach to assess the bullets’ different BSLs. While fairly repeatable, the results were far from ballistics engineer-grade. Still, they are adequate for this example.
Photo 2: The Perils of Measuring Bearing Surface Length with Comparators
In Photo 2, two 7mm comparators have been installed on a dial caliper in an attempt to measure BSL. Using this approach, the BSLs differed sharply from the original [measurements]. The comparator-measured Bullet 1 BSL was 0.694” vs. 0.324” (original), Bullet 2 was 0.601” (comparator) vs. 0.430” (original), and Bullet 3 (shown in Photo 2) was 0.602” (comparator) vs. 0.463” (original). [Editor’s comment — Note the very large difference for Bullet 1, masking the fact that the true full diameter on this bullet starts very far back. You can use comparators on calipers, but be aware that this method may give you deceptive reading — we’ve seen variances just by reversing the comparators on the calipers, because the comparators, typically, are not perfectly round, nor are they machined to precision tolerances.]
Thanks to the U.S. Army Marksmanship Unit for allowing the reprint of this article.
Tumblers and walnut/corncob media are old school. These days many shooters prefer processing brass rapidly with an ultrasonic cleaning machine. When used with the proper solution, a good ultrasonic cleaning machine can quickly remove remove dust, carbon, oil, and powder residue from your cartridge brass. The ultrasonic process will clean the inside of the cases, and even the primer pockets. Tumbling works well too, but for really dirty brass, ultrasonic cleaning may be a wise choice.
Our friend Gavin Gear has evaluated an RCBS Ultrasonic cleaning machine using RCBS Ultrasonic Case Cleaning Solution (RCBS #87058). To provide a real challenge, Gavin used some very dull and greasy milsurp brass: “I bought a huge lot of military once-fired 7.52x51mm brass (fired in a machine gun) that I’ve been slowly prepping for my DPMS LR-308B AR-10 style rifle. Some of this brass was fully prepped (sized/de-primed, trimmed, case mouths chamfered, primer pockets reamed) but it was gunked up with lube and looking dingy.”
UltimateReloader.com Case Cleaning Video (7.5 minutes):
Gavin describes the cleaning exercise step-by-step on UltimateReloader.com. Read Gavin’s Cartridge Cleaning Article to learn how he mixed the solution, activated the heater, and cycled the machine for 30 minutes. As you can see in the video above, the results were impressive. If you have never cleaned brass with ultrasound before, you should definitely watch Gavin’s 7.5-minute video — it provides many useful tips and shows the cleaning operation in progress from start to finish.
Ultra Dry Necks After Ultrasonic Cleaning — Some Suggestions
The Ultrasonic cleaning process gets cartridge brass so “squeaky clean” that increased force may be required to seat your bullets, or they may “grab” as they go in the necks. To reduce bullet-seating effort, you may benefit from adding a little dry case lube inside the case-neck before loading (use a nylon brush). Another trick is adding a teaspoon of Ballistol lube to the cleaning solution. That provides a trace lubricant inside the necks, but does not interfere with powder ignition in any way.
The latest Gen2 RCBS ultrasonic cleaning machine has a large 6.3-quart capacity. That’s nearly 100% larger than the first generation machine in Gavin’s video. The bigger Gen2 machine, $419.99 at Precision Reloading (with FREE shipping), features a second ceramic heater and transducer to better clean brass cases and firearm parts. The LED is easily programmable, and the timer can be set for up to 30 minutes of cleaning. The original 3.2 quart-capacity RCBS ultrasonic machine, as shown in Gavin’s video, is still available for $197.99 at Midsouth Shooters. There is also another good 6-liter multi-mode ultrasonic cleaning machine, with stainless steel tank, available for $199.99 on Amazon.
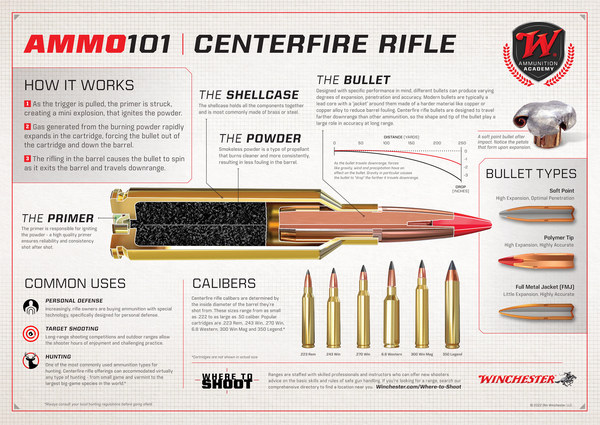
Winchester’s new “Introduction to Ammunition — Ammo 101” is a four-part series including custom illustrations and information for four major ammunition categories: rifle, pistol, rimfire, and shotshell. The Ammo 101 series provides a detailed overview of centerfire rifle, centerfire pistol, rimfire, and shotshell ammunition, showcasing ammunition construction, components, calibers, and common usage. The Ammo 101 resource is free to download from Winchesters.mediaassets.com. Or, simply click one or more diagrams below. Each image will launch a large PDF which you can print or download.
TIP: Click Each Image for Full-Screen Printable PDF
Shown below are the first four ammunition information sheets prepared by Winchester. These show all the key components of cartridges and shotshells, and explain the functions. These diagrams are useful for training, and for persons getting started in reloading.
Ammo 101 Centerfire Rifle Cartridge Diagram (click for PDF)
Ammo 101 Rimfire Cartridge Diagram (click for printable PDF)
Ammo 101 Pistol Cartridge Diagram (click for printable PDF)
Ammo101 Shotshell Diagram (click for printable PDF)
About the Ammo 101 Series
The FREE Ammo 101 resources can help instructors nationwide who introduce new entrants to the shooting sports and hunting. Instructors can incorporate these resources into their training presentations, use them as handouts, or have them printed locally.
“The basics of ammunition… is what we want to deliver with the Ammo 101 series,” said Matt Campbell, Winchester V.P. of Sales & Marketing. “With millions of people across the United States starting their journey in the shooting sports as new firearm owners, providing easy-to-understand information on ammunition types is one way we can help educate our customers.”
Did you know you can damage your hearing even if you are wearing the best hearing protection available? Well, have you ever heard of concussion (or concussive) hearing loss? There is no amount of anything you can put in or over your ears to protect you from concussion loss. My audiologist explained to me the concussion comes through the facial bone structure and damages the ear’s tiny bones.
Editor’s NOTE: This a very important article that explains how you can suffer inner ear damage and hearing loss even if you use quality earplugs and/or muffs. Read that again — hearing loss can happen even with typical hearing protection. This kind of concussive hearing loss can result from shooting with muzzle brakes in confined spaces. Using a suppressor (aka sound moderator) can reduce the risk of concussive hearing loss. You may not have the ability to use a suppressor, but this article explains how you should be more mindful of your hearing.
Why I Use a Suppressor (Preventing Concussive Hearing Loss)
It must have been the road noise. I thought I was having a hard time hearing my five-year-old daughter speaking to me on my cell phone because of the road noise. That old SUV was kind of loud inside. Until I switched the phone to my left ear and suddenly I could hear her just fine. Wait, what just happened? I moved the phone back to the right ear and there was that muffled voice again. That’s when I knew I had a problem.
“What?” Lots of us in the shooting community have lost some hearing along the way due to our time on the range or in the field. Those of us who hunt have certainly discharged a firearm or three without ear protection and without concern for our hearing. After all, it’s just one shot, right? How much can it hurt?
Actually, that one shot DOES hurt your hearing. Any sound over 140 dB is immediate hearing loss. It just happens to be killing a small amount of our hearing so most of us continued the practice without a care. Living with hearing loss now makes me wish I could go back 20 years and better protect my hearing. I can’t change what I did in the past, but going forward I can certainly do the most to protect the hearing I still have.
I decided to shoot about a year’s worth of matches with just braked rifles. That year is when I lost significant hearing in my right ear and some in the left. I’ve gone back to shooting only suppressed rifles whenever possible.
I shot my first suppressed firearm, a .22 LR pistol, in 2003. After a few rounds I wondered why everyone (who can do so legally) didn’t shoot suppressed? No one drives without a muffler. Why would you? Point is I immediately appreciated the hearing protection benefits of suppressors. That passion got me into the business of selling suppressors and it wasn’t long before I was one of the biggest retailers for companies like AAC, SWR, SilencerCo, Ops Inc. and others. [Editor: The author’s business, Accurate Ordnance, no longer sells suppressors. So this article is NOT a sales pitch. Mark just wanted to share his experience so others might protect their hearing.]
Did you know you can damage your hearing even if you are wearing the best hearing protection available? You’ve heard guys say, “I’ll wear plugs and muffs, so I’ll be just fine shooting that .50 BMG!” Well, ever heard of concussion (or concussive) hearing loss? Yeah, I hadn’t either. I’ll sum it up the way the last audiologist I spoke with about my hearing loss did – there is no amount of anything you can put in or over your ears to protect you from concussion loss.
A hand grenade went off right next to a buddy of mine. He lost some hearing as a result of the blast. No one is really surprised by that. I mean it is an EXPLOSION. It’s loud. Duh. But I had no idea the blast from a muzzle brake could basically hurt my hearing the same way. The doctor explained to me the concussion comes through the facial bone structure and damages the ear’s tiny bones. Same thing as what can happen through any TBI (traumatic brain injury).
I’ve owned quite a few different suppressors over the years and have shot just about everything out there. I’m still as big a fan as ever. However, I wanted to see if using a suppressor in PRS (Precision Rifle Series) and similar matches was actually a hindrance. Some people feel the added length and weight of a suppressor can make getting into some shooting positions slower or problematic. So I decided to shoot about a year with a muzzle brake instead of a suppressor. I sure regret that decision…
Getting Headaches at PRS Matches Was Warning Sign
It is fairly common in PRS matches to shoot through pipes, vehicles, inside “shoot houses” and around other obstacles that echo a rifle’s blast. I noticed I was starting to get headaches about halfway through a day of PRS match shooting. I knew the issue wasn’t hydration. I mean look, if you are peeing every other stage down at the amazing CORE range facility in mid-summer you are NOT dehydrated. So, what was causing the headaches? It wasn’t until I went back to shooting suppressed in those same environments that it became clear the little mini concussions from that muzzle brake was causing my headaches. And of course the doctors confirmed that.
Let me stop here and say I am NOT anti-brake. Muzzle brakes are useful tools and for some situations are the best tools. An aggressive brake can be more effective at reducing recoil than a good suppressor. A suppressor does add some recoil reduction, just not as much as most quality brakes. Don’t forget to factor other variables, such as caliber and rifle weight, into the equation though. For example, a 15-lb 6mm Creedmoor rifle doesn’t need much recoil reduction in the first place.
So, I started shooting matches long before the PRS even existed and always shot suppressed in those days. The suppressors made communication with a partner or RO easier and it was just a more pleasant shooting experience. On the recommendations of a few people I decided to shoot about a year’s worth of matches with just braked rifles. That year is when I lost significant hearing in my right ear and some in the left. I’ve gone back to shooting only suppressed rifles whenever possible and especially at matches. I’ve only once or twice found the extra length of the suppressor made it a little more inconvenient to run a stage, but not by much. Trust me, the points I missed were not because I took two extra seconds getting the muzzle in a port or window.
My hearing is something I value and will do everything to protect from this point forward. You’ll never again see me on a match field with an un-suppressed rifle. To me the minimal gains of running a braked rifle aren’t worth losing more hearing.
Choosing a Suppressor — What to Consider
Okay, so I have hearing loss that I can’t get back and realize I need to go back to shooting matches with a suppressor. But which one? I’ll still be shooting matches with custom fit plugs so I just need something to add a little recoil reduction and kill that concussion.
At our shop, Accurate Ordnance, we generally recommend direct-thread suppressor solutions to our customers. The main reason for that is all the problems we’ve seen with other fast-attach muzzle devices. It doesn’t take much tolerance stacking to result in accuracy issues. There are a few exceptions for us and the Rugged Suppressors products top the list. Since the Razor 762 uses a muzzle brake adapter on the rifle to attach the suppressor, I can use the same suppressor on my .223 Rem training rifle. My primary match rifles are chambered in 6mm Creedmoor and 6.5 Creedmoor and the muzzle threads on those is a standard 5/8×24. My .223 Rem training rifle has .5×28 threads on the muzzle, which is standard for that caliber. Thus, the muzzle adapter interface lets me share the suppressors between all the rifles. And on that .223 Rem training rifle I have the option of switching the end cap on any of the Rugged products to a .223 aperture size, which makes the suppressors slightly more sound efficient (meaning quieter).
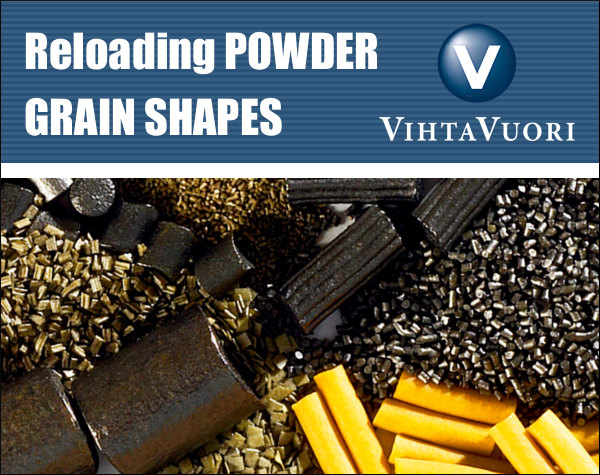
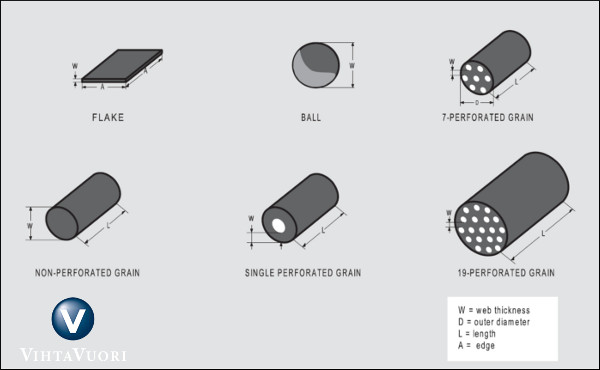
The shape of powder grains has a profound effect on the performance of the powder charge, as it concerns both pressure and velocity. There are multiple powder shapes including flake, ball, and extruded or “stick” (both solid and perforated).
So how does powder grain shape affect pressure and muzzle velocity?
In general, it can be said that powder that burns progressively achieves a desired muzzle velocity at lower maximum pressure than a powder that burns neutrally, not to mention a degressive powder. As grain size increases, the maximum pressure moves towards the muzzle, also increasing muzzle blast. Muzzle velocity and pressure can be adjusted by means of the amount of powder or loading density, i.e. the relationship between the powder mass and the volume available to it. As the loading density increases, maximum pressure grows.
All Vihtavuori reloading powders are of the cylindrical, single-perforated extruded stick type. The differences in burning rate between the powders depend on the size of the grain, the wall thickness of the cylinder, the surface coating and the composition. Cylindrical extruded powders can also have multi-perforated grains. The most common types are the 7- and 19-perforated varieties. A multi-perforated powder grain is naturally of a much larger size than one with a single perforation, and is typically used for large caliber ammunition.
Other types of powder grain shapes include sphere or ball, and flake. The ball grains are typically used in automatic firearms but also in rifles and handguns. The ball grain is less costly to produce, as it is not pressed into shape like cylindrical grains. Flake shaped grains are typically used in shotgun loadings.
Web thickness in gunpowder terminology means the minimum distance that the combustion zones can travel within the powder grain without encountering each other. In spherical powders, this distance is the diameter of the “ball”; in flake powder it is the thickness of the flake; and in multi-perforated extruded powders it is the minimum distance (i.e. wall thickness) between the perforations.
The burning rate of powder composed of grains without any perforations or surface treatment is related to the surface area of the grain available for burning at any given pressure level. The change in the surface area that is burning during combustion is described by a so-called form function. If the surface area increases, the form function does likewise and its behavior is termed progressive. If the form function decreases, its behavior is said to be degressive. If the flame area remains constant throughout the combustion process, we describe it as “neutral” behavior.
The cylindrical, perforated powders are progressive; the burning rate increases as the surface area increases, and the pressure builds up slower, increasing until it reaches its peak and then collapses. Flake and ball grains are degressive; the total powder surface area and pressure are at their peak at ignition, decreasing as the combustion progresses.
Above is a sectioned barrel showing an 80gr Sierra that was fired in a .223 bolt action with a cleaning rod in the bore. Both the bullet and the rod are still in the bore.
A Negligent Shooter Gets Lucky
“Here we have a story so filled with negligent acts that I can only marvel that the shooter survived the experience. The photo and narrative were provided by the gunsmith who took in the repair job, my comments are in italics. It’s worth reading, we can’t get enough safety warnings in our hobby.” — GS Arizona, Rifleman’s Journal
Description of Incident (with Commentary)
The shooter had a stuck case in his .223 chamber. The stuck case was actually a loaded round that didn’t fire. It wouldn’t extract because it was a .222 case that got mixed in with his .223 brass. [He had loaded the wrong brass.] I saw the loaded round with an 80gr bullet in it and a light primer strike. Negligent Act #1: Wrong brass was mixed in with the brass being reloaded.
The shooter removed the stuck case with a 3-piece aluminum rod. Negligent Act #2: Hammering out a loaded round with a cleaning rod. People have been killed doing this as the round can fire and drive the cleaning rod right into you. I remember one such incident about 5 years ago, the shooter was pounding out a stuck round, the cleaning rod went right through him, he didn’t survive.
The shooter didn’t notice only two segments of the cleaning rod came out when he removed it. Negligent Act #3: If you put anything at all down the barrel of a rifle you’d better make darn sure you got it all out before doing anything else!
He then chambered another round and fired it. Negligent act #4: If you’ve had a barrel obstruction of any kind, and if you’ve put something in the barrel, look through the barrel before proceeding! Within the past two years I know of an incident in which a benchrest shooter was killed in exactly this manner. The pressure built up and the rifle bolt came out of the receiver and into his chest.
The shooter is ‘OK’, but did not escape unscathed. He said there was a huge explosion and after regaining his senses found he was bleeding heavily from his forehead. The blood was thick enough that it ran in his eyes and he couldn’t see. In his words “I thought I was going to die”.
He has what looks like a pretty deep cut about an inch long on the side of his head, right in line with his right eye starting where the eye socket turns out to the side of the skull. And no telling what he’s got in the way of brass particles embedded in his forehead.
He was shooting on private property, and was alone when this happened. Negligent Act #5: Don’t shoot alone! Accidents happen, this is just one more example. If we could predict accidents, we wouldn’t have them. Always shoot with at least one other person.
He managed to get the bleeding stopped, or at least under control, packed his car and drove himself home without seeking immediate medical attention. Negligent Act #6: This one could have cost him his life after being lucky enough to survive the incident. There’s no way to know what’s happened just after an incident like this. He should have been at a hospital getting checked for shrapnel in the head.
The rod and slug could not be driven out. Since the barrel had a high round count there was no point in trying to salvage it. Note that the aluminum rod is expanded to a tight fit in the bore for the first couple inches. The base of the bullet is a little over 2″ from the mouth of the chamber.
What we’ve seen here is negligence and an absolute indifference to the established rules of safe reloading and gun handling, from start to finish, capped off with the shooter’s foolish avoidance of medical treatment. This shooter is lucky to be alive, but he’s surely used up all his luck. Don’t assume you’ll be so fortunate.
This article originally appeared in the Rifleman’s Journal website, which is no longer available. The Rifleman’s Journal site was created by German Salazar, who, sadly, passed in 2022. He was a great shooter who helped this website in many ways. RIP German.
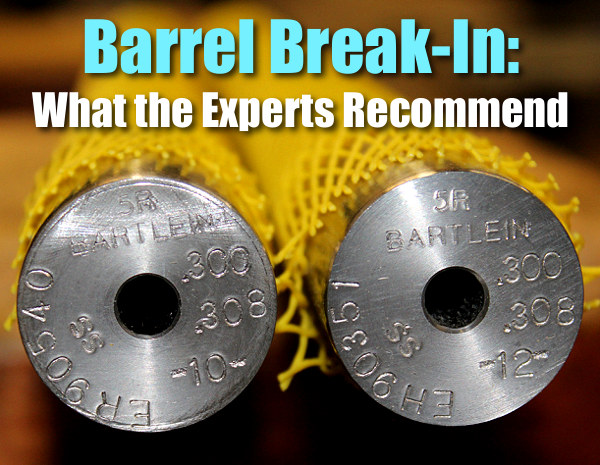
The question of barrel break-in is controversial. Some folks advocate an elaborate, lengthy cycle of shooting and brushing, repeated many times — one shot and clean, two shots and clean and so on. This, it is argued, helps barrels foul less and shoot more accurately. Others say minimal break-in, with patching and brushing after 10-15 rounds, is all you need. Still others contend that break-in procedures are a total waste of time and ammo — you should just load and shoot, and clean as you would normally.
We doubt if there will ever be real agreement among shooters concerning barrel break-in procedures. And one must remember that the appropriate break-in procedure might be quite different for a factory barrel vs. a custom hand-lapped barrel. This Editor has found that his very best custom barrels shot great right from the start, with no special break-in, other than wet patches at 5, 10, and 15 rounds. That said, I’ve seen some factory barrels that seemed to benefit from more elaborate break-in rituals.
What’s the best barrel break-in procedure? Well our friend Eric Mayer of Varminter.com decided to ask the experts. A while back Eric interviewed representatives of three leading barrel manufacturers: Krieger, Lothar-Walther, and Shilen. He recorded their responses on video. In order of appearance in the video, the three experts are:
Do I Need to Break-In a New Rifle Barrel?
Eric Mayer of Varminter.com says: “That is a simple question, [but it] does not necessarily have a simple answer. Instead of me repeating my own beliefs, and practices, on breaking-in a new rifle barrel, I decided to answer this one a bit differently. While we were at the 2016 SHOT Show, we tracked down three of the biggest, and most popular, custom barrel makers in the world, and asked them what they recommend to anyone buying their barrels, and why they recommend those procedures. We asked the question, and let the camera run!” Launch the video above to hear the answers — some of which may surprise you.
Long-Term Barrel Care — More Experts Offer Opinions
Apart from the debate about barrel break-in, there is the bigger question of how should you clean and maintain a barrel during its useful life. Some folks like aggressive brushing, other shooters have had success with less invasive methods, using bore foam and wet patches for the most part. Different strokes for different folks, as they say. In reality, there may not be one solution for every barrel. Different fouling problems demand different solutions. For example, solvents that work well for copper may not be the best for hard carbon (and vice-versa).
“Why worry about a little barrel fouling when the throat is subjected to a brutal 5,600° F volcano at 55,000 PSI? To investigate these and other questions about taking care of a match barrel, we spoke with a dozen experts and share their knowledge in this first of a series of articles.
After listening to folks who shoot, build barrels or manufacture cleaning solvents for a living, we concluded that even the experts each have their own unique recommendations on how to care for a match barrel. But they all agree on one thing — the gun will tell you what it likes best. Because the life expectancy of a match barrel is about 1,500 to 2,500 rounds, the objectives of cleaning one should include: preserve accuracy, slow the erosion, and remove fouling — all without damaging the gun. This article doesn’t claim that one cleaning method is better than the next. Rather, we set out to interject a little science into the discussion and to share some lessons learned from experts in the field.” — Chip Lohman
“The press is the heart of the handloading operation, also traditionally the most expensive single tool employed…” — Laurie Holland
British competitive shooter Laurie Holland has reviewed three popular, single-stage reloading presses for Target Shooter Magazine (targetshooter.co.uk). Laurie bolted up a Forster Co-Ax, RCBS Rock Chucker Supreme, and RCBS Summit to his reloading bench and put the three presses through their paces. These three machines are very different in design and operation. The venerable Rock Chucker is a classic heavy, cast-iron “O”- type press that offers lots of leverage for tough jobs. The smaller RCBS Summit press is an innovative “upside-down” design with a large center column and open front. It offers a small footprint and easy case access from the front. The Co-Ax is unique in many respects — dies slide in and out of the upper section which allows them to “float”. The cartridge case is held in the lower section by spring-loaded jaws rather than a conventional shell-holder.
If you are considering purchasing any one of these three presses, you should read Laurie’s article start to finish. He reviews the pros and cons of each press, after processing three different brands of brass on each machine. He discusses ergonomics, easy of use, press leverage, smoothness, priming function, and (most importantly), the ability to produce straight ammo with low run-out. The review includes interesting data on case-neck run-out (TIR) for RWS, Federal, and Norma 7x57mm brass.
Review Quick Highlights:
RCBS Rock Chucker Supreme
“My expectations of the antediluvian RCBS Rock Chucker Supreme’s performance weren’t over high to be honest as I mounted it in the place of the Summit. As soon as I sized the first of the stretched RWS cases though, I saw why this press has been such a long-running favorite. The workload was considerably reduced compared to the other two presses and doing 40-odd cases took no time at all with little sweat — it just eats hard-to-size brass.”
RCBS Summit Press
“Despite its massive build and long-stroke operating handle, [the Summit] took more sweat than I’d expected, even if it was somewhat less work than with the Co-Ax. Although the Summit is apparently massive, I noticed that the die platform would tilt fractionally under the heaviest strains[.] It is nevertheless a very pleasant press in use and bullet seating was a doddle — the few examples tried proving very concentric on checking them afterwards. The optional short handle would be valuable for this task.”
Forster Co-Ax
“[On the Co-Ax], the operating handle is above the machine, located centrally here [with] twin steel links at the top end of the press dropping down to the moving parts. The Co-Ax incorporates a number of novel features, principally its automatic and multi-case compatible shell-holder assembly with spring-loaded sliding jaws, very neat spent primer arrangements that allow hardly any gritty residues to escape and foul the moving parts and, the snap-in/out die fitment that allows rapid changes and also sees the die ‘float’ in relation to the case giving very concentric results. I own this press and it meets my handloading needs very well.”
Editor: Many new barrels will deliver higher velocities with the same load after 100-150 rounds through the bore. The exact reasons for this speed-up are not 100% certain, and velocity increases (if any) will vary from one barrel to the next. But this “speeding up” phenomenon is common, so be prepared if this happens with your next barrel. If you do experience a significant velocity increase you should probably re-tune your load AFTER the velocity stabilizes at the higher level.
From the Sierra Bullets Blog Article by Mark Walker, Sierra New Product Development Director
In a previous post, I discussed a couple of methods to tune a load to your barrel to help achieve the best accuracy possible. People most often work on load tuning if they get a new rifle or have a different barrel installed. In both instances, the barrel is new and has not been fired very much. According to most competitive shooters, this is the most accurate your barrel will ever be, so getting it tuned and shooting accurately is a priority.
The Speed Up Phenomenon After 100-150 Rounds
Even though after you work up a load and your new barrel is shooting great, a lot of shooters notice that at around 100 to 150 rounds their rifle may stop shooting as accurately. I had this happen to a rifle and I was confused as to why something that worked so well to begin with would all of a sudden quit shooting. I decided to break out the chronograph to do another load work up to see what was going on. To my surprise, the velocity had increased around 80 fps over the original velocity! After performing another ladder test and adjusting the seating depth, the rifle was once again shooting well.
There are several thoughts on why this may happen, however, you can rest assured that it does happen. One thought is that as the barrel breaks in, the tooling marks in the throat of the chamber smooth out and allow less resistance to the bullet as it exits the bore thereby increasing speed. Another idea is that the throat area starts to get a little rough which in turn causes more resistance which increases pressure and therefore more velocity. I’m sure there are some out there who have a better understanding as to why this happens, but it can definitely affect the accuracy of your rifle. So be aware and never be afraid to rework a load to keep your rifle in tune.
Experts Confirm That Barrel Speed-Up Is Common Two respected shooters have observed an increase in velocity with new barrels, typically after 100 rounds. Gunsmith and Hall-of-Fame benchrest shooter Thomas “Speedy” Gonzalez has documented barrel speed-up with testing. Moreover, Speedy’s bore-scope barrel inspections revealed a smoothing of the barrel lands. Jim See, a top PRS competitor, has encountered barrel speed-up many times. Accordingly, he re-tunes his load at 150 rounds.
“Alex Lipworth and I documented this phenomenon about four years ago and I have told all my customers about this. My son Mikee would shoot 100 rounds through all new barrels we planned on shooting before we would begin to do load development. We had a shooting snail that caught all the bullets set up in front of an indoor bench. We called it a wear-in process because upon careful examination of the bore when the ‘Speed Up’ takes place the cut-rifled bore resembles that more of a button-rifled barrels with the lands taking on more the softer look of a buttoned bore.” — Speedy Gonzalez
“Seen it [barrel velocity increase] too many times to count. All my match barrels get a ‘generic round’ loaded for them, which has worked well in barrels historically. After I hit 150 rounds I fine-tune the load and never look back, until the tube starts to slow down at it’s life end.” — Jim See
It’s October, the fall season, and that means rainy, wet weather is on the way in many areas of the country. With rain comes increased moisture in the air, i.e. increased humidity. And that, in turn, can affect how your powders perform by altering their burn rates.
Most shooters realize that significant changes in temperature will alter how powders perform. That’s why you want to keep your loaded ammo out of the hot sun, and keep rounds out of a hot chamber until you’re ready to fire. But there are other factors to be considered — HUMIDITY for one. This article explains why and how humidity can affect powder burn rates and performance.
We’ve all heard the old adage: “Keep your powder dry”. Well, tests by Norma have demonstrated that even normal environmental differences in humidity can affect the way powders burn, at least over the long term. In the Norma Reloading Manual, Sven-Eric Johansson, head of ballistics at Nexplo/Bofors, presents a very important discussion of water vapor absorption by powder. Johansson demonstrates that the same powder will burn at different rates depending on water content.
Powders Leave the Factory with 0.5 to 1.0% Water Content
Johansson explains that, as manufactured, most powders contain 0.5 to 1% of water by weight. (The relative humidity is “equilibrated” at 40-50% during the manufacturing process to maintain this 0.5-1% moisture content). Importantly, Johansson notes that powder exposed to moist air for a long time will absorb water, causing it to burn at a slower rate. On the other hand, long-term storage in a very dry environment reduces powder moisture content, so the powder burns at a faster rate. In addition, Johansson found that single-base powders are MORE sensitive to relative humidity than are double-base powders (which contain nitroglycerine).
Tests Show Burn Rates Vary with Water Content
In his review of the Norma Manual, Fred Barker notes: “Johansson gives twelve (eye-opening) plots of the velocities and pressures obtained on firing several popular cartridges with dehydrated, normal and hydrated Norma powders (from #200 to MRP). He also gives results on loaded .30-06 and .38 Special cartridges stored for 663 to 683 days in relative humidities of 20% and 86%. So Johansson’s advice is to keep powders tightly capped in their factory containers, and to minimize their exposure to dry or humid air.”
Confirming Johansson’s findings that storage conditions can alter burn rates, Barker observes: “I have about 10 pounds of WWII 4831 powder that has been stored in dry (about 20% RH) Colorado air for more than 60 years. It now burns about like IMR 3031.”
What does this teach us? First, all powders start out with a small, but chemically important, amount of water content. Second, a powder’s water content can change over time, depending on where and how the powder is stored. Third, the water content of your powder DOES make a difference in how it burns, particularly for single-base powders. For example, over a period of time, a powder used (and then recapped) in the hot, dry Southwest will probably behave differently than the same powder used in the humid Southeast.
Reloaders are advised to keep these things in mind. If you want to maintain your powders’ “as manufactured” burn rate, it is wise to head Johannson’s recommendation to keep your powders tightly capped when you’re not actually dispensing charges and avoid exposing your powder to very dry or very humid conditions.
Real-World Example — “Dry” H4831sc Runs Hotter
Robert Whitley agrees that the burn rate of the powder varies with the humidity it absorbs. Robert writes: “I had an 8-lb. jug of H4831SC I kept in my detached garage (it can be humid there). 43.5-44.0 gr of this was superbly accurate with the 115 Bergers out of my 6mm Super X. I got tired of bringing it in and out of the garage to my house for reloading so I brought and kept the jug in my reloading room (a dehumidified room in my house) and after a few weeks I loaded up 43.5 gr, went to a match and it shot awful. I could not figure out what was going on until I put that load back over the chronograph and figured out it was going a good bit faster than before and the load was out of the “sweet spot” (42.5 – 43.0 gr was the max I could load and keep it accurate when it was stored in less humid air). I put the jug back in the garage for a few weeks and I now am back to loading 43.5 – 44.0 gr and it shoots great again. I have seen this with other powders too.”
If you have two jugs of the same powder, one kept in a room in your house and one somewhere else where it is drier or more humid, don’t expect the two jugs of the same lot of powder to chrono the same with the same charge weights unless and until they are both stored long enough in the same place to equalize again.




 Bullet 1 (L-R), the RN/FB, has a very slight taper and only reaches its full diameter (0.284 inch) very near the cannelure. This taper is often seen on similar bullets; it helps reduce pressures with good accuracy. The calculated BSL of Bullet 1 was ~0.324″. The BSL of Bullet 2, in the center, was ~0.430″, and Bullet 3’s was ~ 0.463″. Obviously, bullets can be visually deceiving as to BSL!






 Do I Need to Break-In a New Rifle Barrel?

 Review Quick Highlights:
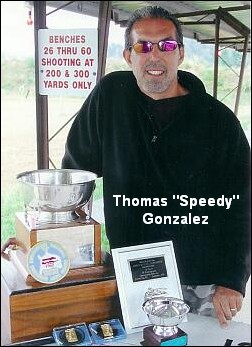 Two respected shooters have observed an increase in velocity with new barrels, typically after 100 rounds. Gunsmith and Hall-of-Fame benchrest shooter Thomas “Speedy” Gonzalez has documented barrel speed-up with testing. Moreover, Speedy’s bore-scope barrel inspections revealed a smoothing of the barrel lands. Jim See, a top PRS competitor, has encountered barrel speed-up many times. Accordingly, he re-tunes his load at 150 rounds.

 Tests Show Burn Rates Vary with Water Content


