This article is part of Sinclair Int’l Step-By-Step Reloading Series. Most of the products mentioned in this article are sold through Brownells.com.
by Roy Hill, Brownells/Sinclair Copywriter
Making your own precision handloads is a meticulous journey with many steps, many important matters to consider, and many sets of measurements to calculate. For those who pursue the perfect group, the highest score, the really long accurate shot, the rewards more than outweigh the effort. Choosing the right cases, deburring the flash holes, making the primer pockets uniform, trimming the cases, and lubricating them are all familiar – and critical – steps along the journey. And now that your brass preparation is complete, you are at last ready to start running the cases through your press and fill them with primers, powder, and bullets. The very first die the brass encounters is the sizing die. You insert the case, work the press’s lever to return the case to its correct pre-fired dimensions – and the journey continues.
There are three types of sizing dies to think about: neck, full-length, and small base. All three have specific benefits and potential drawbacks, and you should choose the type of die you use by thinking very carefully about what kind of shooting you plan to do with your handloads. No matter which type you select, most sizing dies will also punch out the old spent primer with some sort of decapper assembly that uses a hardened steel rod. Many types of sizing dies use an expander ball inside the die to make sure the neck of the case will accommodate a bullet after being sized. With some size dies, the expanders are easily removable and interchangeable, letting you get exactly the neck tension you want. If you are reloading for pistol cartridges, carbide sizing dies allow you to quickly resize without applying any lube to the case. But rifle cases always need lube.
Neck-Sizing Dies Neck-sizing dies resize only the neck of the case. The benefit of sizing only the neck is that the brass is “worked” very little, letting you reuse the same cases many times over. Also, cases that have already been fired in your rifle are perfectly fireformed to fit that rifle’s chamber, which can help accuracy. However, neck-sized cases will fit only the specific rifle they were originally fired in, and may still require a little extra force to chamber or extract.
Sinclair recommends that neck-sized-only cartridges should not be used any in other rifle besides the one they were originally fired from [unless they are also FL-sized], or in any action other than a bolt-action. Neck-sized-only rounds are great for the target range or the benchrest but should not be used in critical situations like military or police operations, or hunting. And if you fire them enough times, neck-sized cases will still need to be full-length sized periodically for you to keep using them.
Full-Length Sizing Dies Full-length sizing dies do exactly what their name says: resize the full length of the case, not just the neck. Full-length sizing helps create handloads that will function in any rifle, not just the one from which the cases were originally fired. The potential downside of full-length sizing is that it may shorten case life because it works the brass more than neck sizing. But it’s possible to “tune” today’s full-length sizing dies so they barely work the brass at all, as this article by Sinclair Reloading Tech Ron Dague shows.
Illustration Shows How a Full-Length Sizing Die Works
Another way to reap the benefits of full-length sizing is to use Redding’s full-length bushing dies, which size the full length of the case but use a system of interchangeable bushings that enable you give the case neck the bare minimum of resizing needed. To see how finely adjustable bushing dies are, and how they resize the case while fully supported, CLICK HERE for Video. The neck bushing helps you precisely control the neck tension to help increase the consistency and accuracy of your handloads.
Small Base Dies
A Small Base Die is just another type of full-length sizing die, but one that is typically used when reloading for semi-automatic rifles, like the AR-15, M14, or AR-style .308 rifles. (It may also work well for bolt guns that need extra sizing on the lower section of the case.) A small base die works exactly like a full-length sizing die, only it compresses the brass just a bit more, usually about .001″ more, and may even push the case shoulder back just a hair. Small base dies give that extra bit of compression to the brass to help make sure the case will properly extract from a semi-automatic firearm. The upside is that you get precision handloads that should work flawlessly in your semi-automatic. The downside is case life is really shortened, especially compared to brass used only in one bolt-action rifle, because the brass is worked more.
Shoulder Bump Gauges
A handy tool for setting up your full-length sizing dies as close as possible to your rifle’s chamber is the Sinclair bump gauge. The bump gauge lets you resize the case as little as possible, to extend case life and help your handloads fit your rifle almost like a neck-sized only die. You use deprimed cases fired in your rifle and bump gauge inserts to help you set up the die so it resizes the case only about .001″ to .004″, depending on what type of rifle you’re shooting.
Video shows how to use a shoulder bump gauge to set up your full-length dies
Article Find by EdLongrange. We welcome reader submissions
Scary stuff — AK-74 after firing corrosive ammo and not being cleaned for a week.
Image courtesy ADCOFirearms.com.
No doubt you’ve heard the term “corrosive” used with respect to ammunition. But what exactly is “corrosive ammunition” (and how does it different from non-corrosive ammo)? What is the chemistry that leads to corrosion, and what cleaning procedures should you follow if you shoot corrosive ammunition? Brownells has come up with answers to these and other questions in a helpful TECH TIP video about corrosive ammo.
In this informative video, Brownells gun tech Steve Ostrem explains the primer-related chemistry that makes some ammo corrosive. The video then reviews suggested cleaning procedures you should follow after you have fired corrosive ammo through any firearms.
What Is “Corrosive” Ammunition?
What makes ammo “corrosive”? Generally speaking, primers are the problem. When corrosive ammunition is fired, the ignited primers leave a residue of corrosive salts. Typically these primers contain potassium chlorate, or sodium petrochlorate which, when burned, change into potassium chloride or sodium chloride. Sodium chloride is also known as common table salt.
Potassium chloride and sodium chloride are both very hygroscopic (i.e. they attract water). Because of that, these alkalis are rust generators. When exposed to the hydrogen and oxygen in the air (and moisture) potassium chloride and sodium chloride can form an acid that quickly causes metal rifle parts to rust and pit.
Given a choice, you may wish to avoid corrosive ammo altogether. However, for some types of fire-arms, particularly older military-style rifles, the most affordable ammunition may be corrosive. If you choose to use corrosive ammo, it is important to clean the gun thoroughly after use. After firing, you want to use an element that will neutralize the primer salts. Brownells suggests a water soak (see video above). Alternatively, Windex with ammonia can help neutralize the salts, but that doesn’t finish the job. After the salts have been neutralized and flushed away, basic anti-corrosion protectant (such as Eezox or other gun oil) should be applied to all metal parts.
This video ahows the effects of Corrosive Ammo after one month without cleaning:
To learn more about the proper procedures for cleaning rifles exposed to corrosive ammo, we suggest an article by Paul Markel on Ammoland.com. Markel, host of the popular Student of the Gun TV series, states that: “Windex (with ammonia) is the Corrosive Ammo shooter’s best friend. After you are done shooting your corrosive ammunition for the day, squirt the window cleaner liberally from the chamber down the barrel. Pull the bolt / bolt carrier / op rod if there is one and douse them as well. A couple of old cotton t-shirts will come in handy. A cotton barrel swab is a nice accessory but you can make do with patches. Some folks will rinse all of the ammonia and loosened corrosive salts off with hot water. Others prefer to wipe it all down and let the ammonia evaporate. Either way, once the corrosive salts have been tackled with the window cleaner, it is time for an all-purpose brush (old toothbrush) and some gun oil.” READ Full Article by Paul Markel.
Video Tip from EdLongrange. We welcome reader submissions.
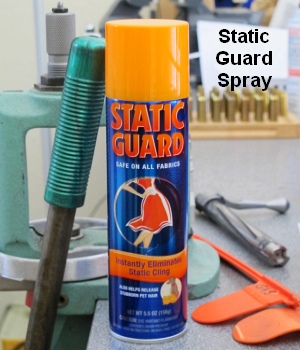
Apparently reducing static charges on and around electronic scales can reduce their propensity to drift, lessening the problem of “wandering zero”. Just how and why static charges interfere with scale performance is unclear, but many shooters have noticed that static electricity can cause electronic scales to behave strangely. So how do you reduce static charges around your digital balance? GS Arizona, creator of the Rifleman’s Journal Blog, has found a very simple solution — an anti-static aerosol spray — that, by all indications, actually works. When this “spray-can solution” was suggested to GS by a fellow shooter, GS was skeptical. However, he tried the stuff and he says that it really does help the scale maintain zero over time, with much less observed drift.
Static Guard Reduced Scale Drift
GS Arizona explains that the use of “Static Guard” spray helped mitigate the problem of a drifting zero on his Ohaus Navigator electronic scale. He writes: “My electronic scale… suffers from drifting zero (as they all seem to). I’ve read dozens of forum posts about drift and how to minimize its occurrence, so I know this problem isn’t limited to my scale or my workshop. Sometime last year, John Lowther mentioned the use of anti-static spray as a solution to the drift problem. John stated that the spray had virtually eliminated drift for him.”
GS Arizona found that the Static Guard actually worked: “The spray works great, just as John said it would. I spray all surfaces that I touch with my hands and arms as well as the pan (top and bottom), the metal tray on which the pan rests and the table under the scale. In six months or so of using the spray I’ve re-applied it about two or three times; it certainly isn’t something that you need to do each time you sit down to load. Before using the spray, it was not uncommon for me to re-zero the scale 10 times in the course of loading 72 rounds; now it might need it once during a session.”
For some applications, we prefer a non-bushing FL die over a bushing die. Shown here are three Forster full-length sizing dies, with necks honed to three different dimensions: 0.265″, 0.266″, and 0.267″.
The Honed Full-Length Sizing Die Option
There are many good options in full-length (FL) sizing dies. Most precision hand-loaders prefer FL dies with neck bushings. These let you adjust the “grip” on your bullet by using larger or smaller bushings. FL bushing dies are available from Whidden Gunworks, Forster, Redding and other makers.
Conventional, non-bushing full-length sizing dies can create ultra-accurate ammo with very low run-out. But many conventional non-bushing FL dies have an undersized neck diameter so you end up with excess neck tension, and you work the brass excessively.
There is another effective option, one that promises extremely low run-out. The honed FL die is a full-length sizing die that has the necked honed to provide a precise fit to the case-neck. When done right, honed FL dies produce extremely straight ammo — as there are no issues with bushing alignment (or bushings that are not perfectly concentric). This Editor owns honed dies from Forster, Redding, and Whidden. They all perform extremely well, delivering match ammunition with extremely low run-out measured with a 21st Century Concentricity Gauge.
In one of the most popular articles we’ve ever published, Bugholes from Bipod, California shooter “Froggy” explained why he prefers honed dies for his tactical ammo.
Q: Do you FL size every time? Do you use custom dies?
Absolutely, I full length resize all of my brass every time I reload. And guess what? I’ve never had a feeding problem.
I do use a modified sizing die, without bushings. My FL resizing die has been custom-honed in the neck area to give .0015″ press fit on the bullet. I also put a slightly larger radius at the neck shoulder junction. I feel that this helps to seal the chamber. With this die, I get consistent neck tension every time–without bushings. Bushings are useful when you’re fishing around for a good load. But once you find the right amount of sizing for ideal neck tension, you can do this better with a customized FL die.
6.5 Guys Review Forster Honed Full-length Dies
The 6.5 Guys have reviewed honed FL sizing dies from Forster, explaining the pros and cons of this type of reloading die. They explained that, if you load a wide variety of bullets from different manufacturers, you many want to stick with a Bushing FL die. However, if you have settled on a particular bullet and found the “ideal” neck tension, then a honed die may make sense.
In this Gear Update, the 6.5 Guys discuss a service offered by Forster Products to custom hone the neck diameter of its full-length sizing dies to the customer’s specifications (to the thousandth). Whidden Gunworks also offers custom-honed FL dies.
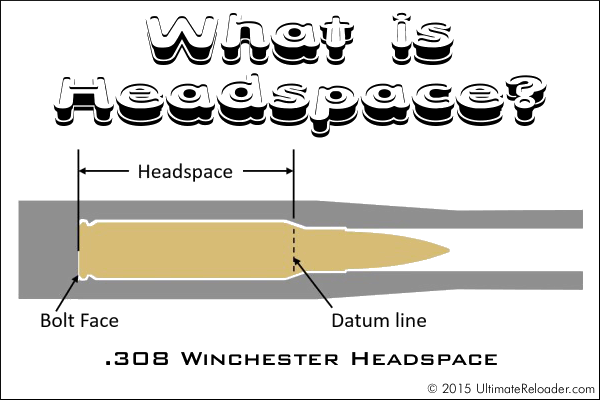
This illustration shows headspace measurement for the popular .308 Winchester cartridge, which headspaces on the shoulder. Image copyright 2015 Ultimate Reloader.
In this Brownells Tech Tip, Brownells gun tech Steve Ostrem explains what headspace is and why it’s one of the most critical measurements for nearly all firearms. Even if you’re an experienced rifle shooter, it’s worth watching this video to refresh your understanding of headspace measurements, and the correct use of “GO” and “NO-GO” gauges.
Headspace Definition
In firearms, headspace is the distance measured from the part of the chamber that stops forward motion of the cartridge (the datum reference) to the face of the bolt. Used as a verb, headspace refers to the interference created between this part of the chamber and the feature of the cartridge that achieves the correct positioning. Different cartridges have their datum lines in different positions in relation to the cartridge. For example, 5.56x45mm NATO ammunition headspaces off the shoulder of the cartridge, whereas .303 British headspaces off the forward rim of the cartridge.
If the headspace is too short, ammunition that is in specification may not chamber correctly. If headspace is too large, the ammunition may not fit as intended or designed and the cartridge case may rupture, possibly damaging the firearm and injuring the shooter. (Source: Wikipedia)
Headspace Gauges
Headspace is measured with a set of two headspace gauges: a “Go” gauge, and a “No-Go” gauge. Headspace gauges resemble the cartridges for the chambers they are designed to headspace, and are typically made of heat-treated tool steel. Both a “Go” and a “No-Go” gauge are required for a gunsmith to headspace a firearm properly. A third gauge, the “Field” gauge, is used (as the name implies) in the field to indicate the absolute maximum safe headspace. This gauge is used because, over time, the bolt and receiver will wear, the bolt and lugs compress, and the receiver may stretch, all causing the headspace to gradually increase from the “factory specs” measured by the “Go” and “No-Go” gauges. A bolt that closes on “No-Go” but not on “Field” is close to being unsafe to fire, and may malfunction on cartridges that are slightly out of spec. (Source: Wikipedia)
To learn more, read Brownell’s longer article Headspace Gauges and How to Use Them. Among other things, this explains the relative lengths of “Go”, “No-Go”, and “Field” gauges. The “Field” is actually the longest: “The GO gauge corresponds to the SAAMI (Sporting Arms & Ammunition Manufacturer’s Institute) minimum chamber length, while the FIELD gauge usually matches the maximum chamber depth, or slightly less. NO-GO gauges are an intermediate length between minimum and maximum, that, technically, is a voluntary dimension. A firearm that closes on a NO-GO gauge and does not close on a FIELD gauge may not give good accuracy and may have very short cartridge case life from the ammunition re-loader’s standpoint.”
A few years back, Our friend Grant Guess had a “close encounter” with a bad primer. An apparently defective primer caused part of the casehead on one of his rounds to blow out. This, in turn, allowed high pressure gas to vent through the damaged primer pocket. Take a good look, boys and girls. This is yet another very good reason to wear safety glasses. The cartridge was a 6.5-06, handloaded in necked-down Winchester-headstamp .270 Win brass. Grant reports:
“I had a blow through between the primer and the primer pocket today. The action was really smoking and I got a face full of gas. This was a reasonably light charge. Thank God for safety glasses.
I should also mention that it appears there is a 3/64 hole that is halfway between the primer and the primer pocket. Like it burned a small jet hole through both of them.”
Could this happen to you? It just might. On seeing this damaged case, one of Grant’s Facebook friends, Chris D., observed: “Search the internet, you will see a lot of these pin hole ‘in the corner’ failures. Obviously Winchester has some issues with the LR primers.”
Careful Examination Reveals Apparent Primer Defect
After this incident, Grant examined the damaged case: “I pinned the flash hole and it is not over-sized or under-sized. The primer clearly has an area where it had a defect. At [50,000 CUP], it doesn’t take much of a defect to cause issues. There was a slight bit of pucker-factor on the next shot….”
Everyone should have a 9mm Luger (9x19mm) pistol. The 9mm Luger round feeds/cycles great, recoil is moderate, and a vast array of excellent 9mm handguns are available. And, perhaps most importantly, quality factory ammo is affordable. In fact because 9x19mm ammo is produced in such quantity, it is some of the cheapest centerfire pistol ammo you can buy. Today we’ve found some great 9mm Luger ammo deals for you, with big-name factory stuff for under 18 cents per round.
At that price, it may not be worth reloading. Consider this — typical 9mm component costs easily approach fifteen cents per round even with free brass: Bullet ($0.08 – $0.10), Powder ($0.02), and Primer ($0.04). Given the costs of bullets, powder, and primers, it may not be worth reloading 9mm Luger, especially if you value your precious time!
Should You Reload 9mm Ammo? Run the Numbers, Then Decide…
While this Editor reloads almost all his .45 ACP and .44 Magnum ammo, I generally shoot factory ammo in my 9mm Luger pistols. Why? When you give some reasonable value to the time you spend setting-up and operating your reloading press, it is hard to beat factory ammo at around $10 per 50-count box (i.e. $0.20/round). While once-fired 9mm brass is plentiful (and cheap), you can easily spend 15-16 cents per round just on bullet, powder, and primer. So reloading may only save you 4 or 5 cents per round. Hence if you load 200 rounds per hour (including set-up time), you only recoup $8 to $10 per hour (at best) for all your effort. You may decide, as I did, that my time was worth more than that.
Great Deals on 9mm Luger (9x19mm) Factory Ammunition
Box to Bench Precision (B2B) has developed an oversize (23.5″ x 30″) precisely-scaled target designed for Load Development and Scope Testing. This waterproof target is very innovative. On the target you’ll find clusters of aim points for various tasks. Upper left are orange aiming spots for testing various powder charges. In the upper right quadrant are more red aim points to be used when testing bullet seating depth. Running down the center of the target is a vertical line with horizontal marks showing precise MOA and Mil heights at 100 yards — use this feature to verify your click values. ORDER HERE.
And there’s more. In the lower right quadrant (far right) are three black targets to be used for chrono work. With these you can record cold velocity, hot barrel velocity and a “Final Velocity”. Over in the lower left quadrant, in the left-most column, are three dot targets for zeroing and recording group size with load data. Finally, four more black/white targets can be used for a scope box test (aka “shooting the square”). With a box test, you move from target to target, clicking in sequence to each corner of the square in sequence, eventually returning to your original aim point. If your scope tracks correctly, the last box test shot should end up right on top of the first shot.
Record the Entire Load Development Process on One Target
For those used to shooting at conventional bulleyes or benchrest targets, this target may seem confusing, but it can really help organize and simplify the process of load development. We like the idea of having a single, durable target that performs double-duty — serving for load development as well as scope checking. And we like the fact that the target is pretty strong — the maker says: “The target is Tear-Resistant and Water-Proof”. We’d expect a maker based in the Pacific NW to design a target that can handle wet weather.
Previous version of target shown in photo. Current version has a larger and centered box test, and Tracking lines that are labeled in IPHY/MOA/MIL.
How to Order
So how much does all this target technology cost? A single, 23.5″ x 30″ target costs $5.00. A pack of three targets costs $14.25, while a five-target pack runs $22.50 (which works out to $4.50 per target). There is also a 100 meter version of this target for $4.25 each or $20 for five. Targets ship in a durable cardboard tube. To order these targets, visit the Box To Box Precision Online Store.
Folks who load at the range need to bring a lot of gear — reloading presses, powder dispensers, scales, funnels, sizing/seating dies, brass prep tools and more. And there may be other important items to transport — such as ammo caddies, LabRadar mounts, over-size rest feet, and even barrel fans.
A rifle case works fine for carrying your scoped rifle, but you still need to organize all your reloading tools and other gear, and transport them safely from home to range and back again. Some guys have built their own loading tool-boxes from wood. Other may stuff gear in a couple of plastic range boxes. But clever Chris Covell came up with an even better solution.
Chris sourced a handsome, sturdy metal Horse Grooming Box from eBay. Chris reports the multi-feature metal box “works perfectly for reloading. My ChargeMaster is now out of the wind.”
Bullets, Trickler, and Priming Tool on Top
On top, below the hinged metal lid, is a large compartment that holds Covell’s funnels, scales, priming tool, trickler and other vital gear (photo on right). This top compartment is deep enough to handle wide-mouth funnels with no problem.
Slide-Out Drawer with Dividers
Below the top level is a handy sliding drawer with multiple dividers. This is perfect for holding Covell’s inline seating dies, case-neck deburring and chamfering tools, among many other smaller bits and pieces.
In the bottom of the Horse Grooming box is a large compartment that holds bigger gear. In the bottom section, Covell places his RCBS Chargemaster Lite, along with a case-trimming tool, an arbor press, and various other bulky tools. Check it out:
Chris Covell’s Range Box was featured on the Benchrest Shooting and Gunsmithing Private Group Facebook Page. You may want to sign up for this Group — with membership you can access a wealth of information for accuracy-oriented shooters.
Shown is the Redding Model 15-P Competition Piloted Inside Chamfering Tool with pilot rod that centers in the case flash hole. Also shown is a Forster 45° Rocket Tool.
There are a wide variety of reloading tools designed to cut a slight chamfer in case necks and deburr the edge of the case mouth. You don’t need to spend a lot of money for an effective tool. A basic “rocket-style” 45° chamfering tool, such as the Forster, actually does a pretty good job taking the sharp edge off case mouths, particularly if you use a little scotch-pad (or steel wool) to smooth the edge of the cut. The Forster chamfer tool, shown below, is a nicely-made product, with sharper cutting blades than you’ll find on most other 45° chamferers. It costs $20.99 at Brownells.com.
Redding sells a handy piloted chamfering tool with a 15° inside cutting angle and removable accessory handle. This Redding Model 15-P chamferer works really well, so long as you have consistent case OALs. The pilot rod (which indexes in the flash hole) is adjustable for different cartridge types (from very short to very long). This ensures the concentricity of the inside neck chamfer to the case mouth. This quality tool ($35.99 at Brownells) works with cases from .22 to .45 Caliber.
Sinclair International offers a 28° carbide chamferer with many handy features (and sharp blades). The $29.99 Sinclair Carbide VLD Case Mouth Chamfering Tool will chamfer cases from .14 through .45 caliber. This tool features a removable 28° carbide cutter mounted in the green plastic Sinclair handle. It is on sale right now for $24.99 at Brownells. NOTE: A hex-shaft cutter head power adapter can be purchased separately for $14.99 (Sinclair item 749-002-488WS). This can be chucked in a power screwdriver or used with the Sinclair Case Prep Power Center.
Many folks feel they can get smoother bullet seating by using a tool that cuts at a steeper angle. We like the 22° cutter sold by Lyman. It has a comfortable handle, and costs just $11.54 at Midsouth Shooters. The Lyman tool is an excellent value, though we’ve seen examples that needed sharpening even when new. Blade-sharpening is easily done, however.
K&M makes a depth-adjustable, inside-neck chamferer (“Controlled Depth Tapered Reaper”) with ultra-sharp cutting flutes. The latest version, which costs $51.70 at KMShooting.com, features a central pin that indexes via the flash hole to keep the cutter centered. In addition, the tool has a newly-designed handle, improved depth-stop fingers, plus a new set-screw adjustment for precise cutter depth control. We caution, even with all the depth-control features, if you are not careful, it is easy to over-cut, slicing away too much brass and basically ruining your neck. We think that most reloaders will get better results using a more conventional chamfer tool, such as the Forster or Redding 15-P.
One last thing to note — tools like the K&M and the Sinclair chamferer are often described as VLD chamferers. That is really a misnomer, as bullets with long boat-tails actually seat easily with very minimal chamfering. In reality, these high-angle chamferers may be most valuable when preparing brass for flat-base bullets and bullets with pressure rings. Using a 22° or 28° chamferer can reduce the risk of cutting a jacket when using VLD bullets though — so long as you make a smooth cut.


 Neck-sizing dies resize only the neck of the case. The benefit of sizing only the neck is that the brass is “worked” very little, letting you reuse the same cases many times over. Also, cases that have already been fired in your rifle are perfectly fireformed to fit that rifle’s chamber, which can help accuracy. However, neck-sized cases will fit only the specific rifle they were originally fired in, and may still require a little extra force to chamber or extract.


 No doubt you’ve heard the term “corrosive” used with respect to ammunition. But what exactly is “corrosive ammunition” (and how does it different from non-corrosive ammo)? What is the chemistry that leads to corrosion, and what cleaning procedures should you follow if you shoot corrosive ammunition? Brownells has come up with answers to these and other questions in a helpful TECH TIP video about corrosive ammo.
 Apparently reducing static charges on and around electronic scales can reduce their propensity to drift, lessening the problem of “wandering zero”. Just how and why static charges interfere with scale performance is unclear, but many shooters have noticed that static electricity can cause electronic scales to behave strangely. So how do you reduce static charges around your digital balance? GS Arizona, creator of the Rifleman’s Journal Blog, has found a very simple solution — an anti-static aerosol spray — that, by all indications, actually works. When this “spray-can solution” was suggested to GS by a fellow shooter, GS was skeptical. However, he tried the stuff and he says that it really does help the scale maintain zero over time, with much less observed drift.

 Headspace Gauges


 Bullets, Trickler, and Priming Tool on Top


