Many shooters, particular those who shoot vintage military rifle matches, reload once-fired military cartridge brass. This brass may be high-quality and stout, but you may encounter a primer crimp* that interferes with the seating of a new primer. There are a variety of dedicated, military-crimp tools on the market, such as Dillon’s excellent Super Swage 600 tool that “rolls the crimp away”. But the Dillon tool costs $114.99 and takes quite a bit of room on your reloading bench. If you don’t want to drop a C-note and give up valuable bench space — here’s another (much cheaper) solution.
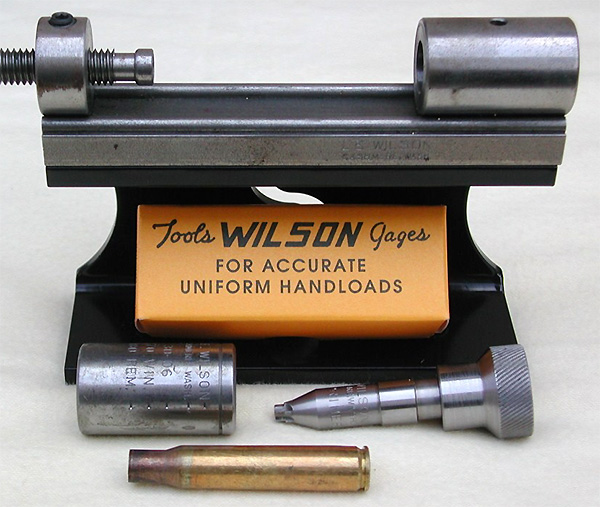
If you already have a Wilson case trimmer set-up, you can ream away those military crimps using an affordable Wilson accessory — the Primer Pocket Reamer (large #PPR210, small #PPR175). This $32.65 accessory is used in conjunction with a Wilson case trimmer and case-holder as shown above.
In the respected Riflemans Journal website, the Editor, “GS Arizona”, showed how to use the Wilson primer pocket reamer to remove military crimps on Lake City .30-06 cartridge brass. He explains: “The case goes into the Wilson case-holder, the same one used for case trimming, and the reamer replaces the trimmer head in the tool base. The threaded rod on the left side, which is normally used to regulate trim length has no use for this operation and it is simply backed out. Hold the case-holder as you turn the reamer into the primer pocket, it cuts easily and quickly. The reamer will stop cutting when the proper depth is reached.”
Do you really need to do this operation with military-crimped brass? Yes, and here’s why: “Any attempt to prime the case without removing the crimp will simply result in a mangled primer that cannot be expected to fire and certainly won’t fire reliably.”
Vintage Military Rifle shooters often utilize surplus military brass with primer pocket crimps.
*Why does military brass has a primer crimp? GS Arizona answers: “The crimp is nothing more than an intentional deformation of the case around the primer pocket, the purpose of which is to retain the primer in the case despite high pressure situations in machine guns and other automatic weapons where a loose primer may cause a malfunction. As reloaders, our task is to get rid of the remnants of the crimp in order to allow re-priming the case.”
Probably the most popular centerfire rifle round in the Western Hemisphere is the .223 Remington and its metric match, the 5.56x45mm. Though many folks use “.223 Rem” and “5.56×45″ interchangeably, there are some meaningful differences in specifications for the original .223 Rem and the 5.56x45mm cartridge, as adopted by the U.S. military and NATO armies. The default chamber throats are slightly different and the .223 Rem is rated at 55,000 PSI vs. 62,366 PSI for the 5.56x45mm.*
.223 Rem vs 5.56x45mm — Key Differences
There is a truly outstanding, very thorough article on the subject, published by LuckyGunner.com.** This involved extensive testing, with pressure monitors, of 5.56x45mm ammo in .223 Rem chambers. Those tests revealed the peak pressures. Here is one of the ammo test charts:
NOTE: “The observed chamber pressure for Federal XM855 5.56mm ammunition in a .223 Rem chamber exceeded .223 maximum pressures, but not by a massive amount. The ninth shot (the red line) was an underpowered cartridge which exhibited significantly lower velocity and pressure than the other rounds, so it was excluded from the average velocity and pressure numbers for this chamber.”
And if you’re curious, LuckyGunner also fired .223 Rem ammo in a 5.56x45mm NATO-chambered AR15 rifle. As you would expect, the peak pressures were significantly lower, but the .223 Rem ammo still cycled the semi-auto AR-platform rifle perfectly well:
UltimateReloader.com Explains .223 Rem vs. 5.56x45mm
To explain the key differences between the .223 Rem and 5.56x45mm cartridges our friend Gavin Gear of UltimateReloader.com has created a very thorough 12-minute video. This covers the cartridge specifications and explains key considerations for hand-loaders. Gavin also addresses the oft-asked question “Can I shoot 5.56x45mm ammo in my .223 Rem chamber?” Gavin’s video is definitely worth watching. In fact, this is one of the most popular videos Gavin has ever created — it has been watched over 300,000 times on YouTube.
What Exactly Is the 5.56x45mm NATO Cartridge?
The 5.56×45mm NATO is a rimless bottle-necked intermediate cartridge family standardized by NATO with development work by FN Herstal. It consists of the SS109, SS110, and SS111 cartridges. Under STANAG 4172, it is a standard cartridge for NATO forces as well as many non-NATO countries.
Bullet diameter: 5.70 mm (0.224 in)
Maximum pressure (EPVAT): 430.00 MPa (62,366 psi)
Maximum pressure (SCATP 5.56): 380.00 MPa (55,114 psi)
Case length: 44.70 mm (1.760 in)
Rifling twist: 178 mm or 229 mm (1 in 7 in)
Parent case: .223 Remington (M193)
Ammo-Maker Federal Premium Compares .223 Rem and 5.56x45mm
Here is a video from ammo-maker Federal Premium explaining the difference between .223 Remington and 5.56x45mm NATO. Federal states that you may experience excessive pressures when firing a 5.56x45mm in a standard .223 Remington chamber:
One leading gunwriter has addressed the question of shooting 5.56x45mm ammo in .223 Rem chambers. He advocates caution (for more info, SEE pressure tests by LuckyGunner.com):
“I have received a slew of questions — many from first time AR-type rifle buyers — about the .223 Rem and the 5.56×45 mm NATO cartridges. Can I shoot 5.56×45 mm NATO in my .223 and vice-versa? Are these the same cartridge?
Externally, the two cartridge cases are identical. The main differences are that 5.56×45 mm NATO operates at a higher chamber pressure (about 60,000 PSI versus 55,000 PSI on the .223 Rem.) and the 5.56’s chamber is slightly larger than that of the .223 Rem. Also, the throat or leade is longer in the 5.56×45 mm chamber. What does this mean? You should not shoot 5.56×45 mm NATO out of a rifle that is chambered in .223 Rem. And be aware that some .223 Rem. ammunition will not reliably cycle through some AR-style .223 Rem. rifles, but it usually does. As a matter of fact, I have not encountered any difficulty with current .223 Rem. loads cycling through a 5.56 mm AR-style rifle.” – Mark Keefe, Editor, American Rifleman
* According to the official NATO proofing guidelines, the 5.56×45mm NATO case can handle up to 430.0 MPa (62,366 psi) piezo service pressure. The U.S. SAAMI lists Maximum Average Pressure (MAP) for the .223 Remington cartridge as 55,000 psi (379.2 MPa) piezo pressure with deviation of up to 58,000 psi (399.9 MPa). The chamber for military 5.56×45mm NATO has a longer throat prior to the bullet contacting the rifling which results in lower pressures when firing 5.56×45mm NATO ammunition. If 5.56×45mm NATO is used in rifles chambered for .223 Remington the bullet will be engraving the rifling when chambered. which can increase pressures past SAAMI Max levels. NOTE: The C.I.P. standards for the C.I.P. civilian .223 Remington chamber are much closer to the military 5.56×45mm NATO chamber.
** The full-length LuckyGunner article is well worth reading. It even provides specifications for a number of .223 Rem reamer types, and compares the original .223 Rem, the 5.56x45mm NATO, and the modern .223 Wylde chamberings.
This popular video, viewed over 3.3 million times on YouTube, provides a clear explanation of Minute of Angle (MOA) and how that angular measurement is used. Among novice shooters, there is much confusion over this term. In this NSSF Video, Ryan Cleckner, a former Sniper Instructor for the 1st Ranger Battalion, defines the term, “Minute of Angle” (MOA) and explains how you can adjust for windage and elevation using 1/4 or 1/8 MOA clicks on your scope. This allows you to sight-in precisely and compensate for bullet drop at various distances.
For starters, Ryan explains that, when talking about angular degrees, a “minute” is simply 1/60th. So a “Minute of Angle” is simply 1/60th of one degree of a central angle, measured either up and down (for elevation) or side to side (for windage). At 100 yards, 1 MOA equals 1.047″ on the target. This is often rounded to one inch for simplicity. Say, for example, you click up 1 MOA. That is roughly 1 inch at 100 yards, or roughly 4 inches at 400 yards, since the target area measured by 1 MOA increases in linear fashion with the distance.
The new generation Berger LRHT Match bullets come with Meplat Reduction Technology™ (MRT) for more consistent BCs. Essentially they are “pointed” at the factory. Likewise, many of Sierra’s most popular MatchKing bullets are now factory-pointed in a final production stage. However, for most other bullet types, you can benefit from using a bullet pointing system to make the meplats more consistent.
Gear Review by GS Arizona
This article originally appeared in the Rifleman’s Journal website.
Many of you have doubtlessly read Bryan Litz’s articles in our Daily Bulletin and on his Applied Ballistics website about various current long-range bullets. Bryan’s work carries a great deal of weight in the world of ballistics, so his comments (and mathematical proofs) regarding the benefits of bullet pointing certainly caught my attention. Bullet pointing, like meplat trimming, is an effort to reduce the ballistic inconsistency created by the somewhat jagged tip of the jacket where the bullet forming dies bring it to a point in the manufacturing process. Of course, we could eliminate this problem altogether by shooting closed-tip, open-base bullets like the Lapua D46, but that merely shifts the jacket problem to the other end of the bullet.
In any event, hollow point bullets rule the accuracy world today, so John Whidden, multi-time National Long Range Champion and a talented gunsmith to boot, came up with a very handy tool to let us make those hollow points pointier. Let’s have a look at John’s tool and see how it works.
The Whidden Bullet Pointing Die System uses a Forster bullet seating die body as its basic structure and that’s a good choice given the quality machining Forster does on these. The real heart of the tool comes in two parts: the caliber sleeve and the pointing die that fits inside the sleeve. In fact, to point up different caliber bullets, you only need to change the caliber sleeve, everything else remains the same. The last item is the bullet base that slips into a standard .308 shellholder and supports the bullet as it goes into the die body.
It took me less than five minutes to get everything set up, including changing the caliber sleeve from 6mm to .30 caliber. John’s instruction sheets are well illustrated and clearly written; you should have no problem getting up and running.
Pointing the bullets is as easy as sizing a piece of brass. You can see in the second photo above the difference between a few pointed bullets and a few un-pointed ones. The innermost pointed bullet in the picture was my first attempt and I adjusted the die a little after that, you can see that the others are closed a little more. John even includes a couple of sample bullets so that you can see one done right and one done wrong. That is a nice addition that can help you achieve the desired results.
This YouTube Video Shows the Whidden Bullet Pointing Die in Action
I think Bryan’s work supports the validity of this concept and John’s tool puts it into practice in a simple-to-use manner that makes it just about impossible to do any damage to the bullet. I have shot pointed bullets in various calibers at many matches now. Pointing is not a “miracle cure”, but I believe that pointing bullet tips can produce long-range accuracy gains, through reduced vertical dispersion, for many popular types of match bullets. The Whidden Bullet Pointing Die System retails for $220.00 (with one insert). Additional die inserts are $42.00 each. Extra caliber sleeves are also $42.00. You can purchase directly from Whidden Gunworks, or from Sinclair International.
Today, AR-platform rifles are hugely popular. Dozens of manufacturers sell AR-type rifles, in a wide variety of configurations and calibers. But before there were M16s and AR-15s, ArmaLite produced a 7.62×51 caliber rifle, the AR-10. Yes before there were millions of 5.56 black rifles, there was a .30-caliber big brother with reddish-brown furniture. Invented by Eugene (‘Gene’) Stoner for the Armalite company in the late 1950s, this is the father of all of today’s AR-platform rifles. Way ahead of its time, this remarkable, select-fire battle rifle weighed just 7.25 pounds as first developed.
If you’re curious about the AR-10, in this video, Jerry Miculek puts an original 1957-vintage AR-10 through its paces on the range. This extremely rare, early-production rifle was provided by Mr. Reed Knight and the Institute of Military Technology. (The gun in the video was actually produced in the Netherlands under license, see video at 4:40.) This AR-10 is the direct ancestor of the AR-15, M16, and many of the modern sporting rifles that we use today.
The AR-10 was slim and light, weighing around 7 pounds. Some folks might argue that the original “old-school” AR-10 is actually better than some of today’s heavy, gadget-laden ARs. The AR-10’s charging “lever” was under the carry handle — that made it easier to manipulate with the gun raised in a firing position.
You’ll notice there is no “forward assist”. Inventor Gene Stoner did not believe a separate “bolt-pusher” was necessary. The forward assist was added to solve problems encountered in Viet Nam. Some critics say the forward assist “only takes a small problem and makes it a big problem.” For today’s competition ARs (that are never dragged through the mud) the forward assist probably is superfluous. It is rarely if ever needed.
Note also that the handguards are fairly slim and tapered. Today, six decades after the first AR-10 prototypes, we are now seeing these kind of slim handguards (made from aluminum or lightweight composites) used on “full race” ARs campaigned in 3-gun competition.
History of the AR-10
The AR-10 is a 7.62 mm battle rifle developed by Eugene Stoner in the late 1950s at ArmaLite, then a division of the Fairchild Aircraft Corporation. When first introduced in 1956, the AR-10 used an innovative straight-line barrel/stock design with phenolic composite and forged alloy parts resulting in a small arm significantly easier to control in automatic fire and over one pound lighter than other infantry rifles of the day. Over its production life, the original AR-10 was built in relatively small numbers, with fewer than 9,900 rifles assembled.
In 1957, the basic AR-10 design was substantially modified by ArmaLite to accommodate the .223 Remington cartridge, and given the designation AR-15. ArmaLite licensed the AR-10 and AR-15 designs to Colt Firearms. The AR-15 eventually became the M16 rifle.
AR-10 3D Model Shows Internal Parts
If you want to see more close-up details of the AR-10, computer artist Stefan Engdahl has created a very detailed 3D model of the AR-10 for use in computer simulations. This computer model features 18 separate objects so you can look at details of frame, barrel, trigger, sights and more.
Here are some additional images of early AR-10 models, with various configurations. Multiple handguard and muzzle options were employed during early development.
Color AR-10 photos from Arms Izarra, a Spanish company specializing in de-militarized, collectible firearms. Interestingly, this particular AR-10 was produced in the Netherlands under license.
Need a new barrel for your Rem-actioned hunting or tactical rifle? Here’s a great DIY option for riflemen. McRee’s Precision offers complete, no-gunsmithing re-barreling kits for Remington and Rem-clone actions. These feature a high-quality, pre-chambered “PRE-FIT” stainless barrel from Criterion, a Savage-style barrel nut, a recoil lug, and a special barrel-nut wrench. Most of the Pre-Fit barrels are 24″ long and threaded at the muzzle. CLICK Here for all Pre-Fit barrel specs.
With this system you can easily re-barrel your favorite Remington rifle yourself in less than an hour. You don’t need to pay gunsmithing fees, or wait weeks (or months) for a busy smith to do the job. And the price is under $500.00. Kits are currently available for these chamberings: 6.5 Creedmoor, 6mm Creedmoor, .243 Win, .308 Win, .308 Winchester Magnum. You can buy with confidence — McRee’s Precision offers a Half-MOA Accuracy Guarantee with its pre-fitted barrel kits.
The stainless steel Barrel Nut is set up for 1 1/16 x 16 barrel threads, while the stainless steel recoil lug has a 1/8 inch removable locator pin and is set up for 1.0625 dia barrel threads.
McRee’s Precision sells Rem-action Pre-Fit barrel packages (complete with barrel nut, recoil lug, and wrench) starting at $489.52. Choose from five chamberings: 6.5 Creedmoor, 6mm Creedmoor, .243 Win, .308 Win, and .300 Win Mag. These Pre-Fit barrel kits come ready-to-install. All you need to do is remove your current barrel, place the recoil lug, spin on the new tube, follow the instructions for setting head-space with standard go/no-go gauges, then torque the barrel nut against the lug. NOTE: You may require a barrel vise and action wrench to remove the original barrel. Chambering-specific headspace gauges required. Minor inletting changes may be needed forward of the action.
The folks at McRee’s Precision say their Pre-Fit system offers many advantages: “Remington Pre-Fitted Barrel Kits have become popular over the years. If Savage can do it, why not for our Remingtons? Our [Criterion-supplied] barrels are spec’d to the McRee standard of performance. There are several places to get the tools required to remove your factory barrel correctly. Once you have your barrel removed all you have to do is follow the normal Savage procedure to install your new barrel. We recommend that you contact your local gunsmith for the install. Feel free to call us with any questions.”
Product Tip from Ed LongRange. We welcome readers’ submissions.
Kestros ZR Stock — Impressive Design for Competition
Review by F-Class John
Walk the line at just about any rifle competition and you’ll see your share of McMillan stocks. Known for crafting high-quality fiberglass/composite stocks, McMillan has long been at top choice for competitive shooters, hunters, and tactical marksmen. Now McMillan is out to dominate F-Open with the Kestros ZR stock. The Kestros line features several models, but the ZR represents the pinnacle of craftmanship. Each one is finished off by a single craftsman and takes roughly four times longer to create than any other Kestros. So when McMillan offered me a chance to test one out, I jumped at the opportunity.
The aluminum Z-Rail extends nicely from the front of the stock and has a nice contrast of metal against the matte finish of the stock. I inspected the rails and noticed that they are very cleanly machined — all the corners and rails were precise and sharp. As a result, I grabbed some 1000-grit sandpaper and just lightly knocked the edges and corners down just to keep from accidentally scratching myself or my gear.
Lead time for a ZR is currently 6-9 months. I was like a kid on Christmas when mine arrived after seven months. Holding a Kestros ZR is definitely a unique experience compared to a traditional wood stock and you can’t help but feel like you’re holding something special. I chose three shades of blue that transitioned dark from the butt stock to lighter on the fore-end in a spectacular flame pattern. With McMillan, there are thousands of possible color and pattern combinations. These color/pattern options are outlined on McMillan’s Gallery Page.
The Kestros ZR comes fully inletted with pillars. I was able to bolt my Defiance action right into the stock “as is” without a bedding job. (McMillan states bedding is not required, though this is certainly something most Kestros owners will do). I threw in my action, fit a couple action screws and tightened it all down. I was amazed at how nicely it all fit together with even the little details like the port cutout being perfectly smooth with my action port. I loaded up some .284 Win rounds and headed to the range to test the new stock at 100 yards.
Here are examples of targets shot with the Kestros ZR at 100 yards.
During initial range testing (see above) I shot nine groups for vertical and all of them were under 0.40″ with the smallest being .08″ of vertical. I topped off the testing by shooting a 200-11X the next week at my club match. The thing that really stood out was how smoothly the stock tracked with its lower center of gravity while shooting free recoil and ultimately this translated to success on target.
Low-Rider — You may find that because of how low the Kestros rides as well as its additional length due to the Z rail, you may require an extension for your front rest.
CONCLUSION — Great Modern Low-Profile F-Class Stock
Overall the Kestros ZR exceeded my expectations. After a small learning curve, it was a joy to shoot and it performed great. As someone who believes in the power of muscle memory, I found each time I transitioned between the Kestros and my traditional wood stocks there was a slight adjustment period but not enough to impair accuracy in any way. Something to consider is that because every Kestros is made to the same dimensions, it makes owning multiples an easy process of switching between guns without any need for readjustment.
For those willing to put in the practice, your patience will be rewarded, and I think most shooters will find the Kestros ZR could become their new favorite stock. If you’re in the market for a new F-Open stock, the Kestros ZR is definitely one to consider.
Tips for Ordering a Kestros ZR
Ordering the Kestros ZR is a simple process thanks to McMillan’s online order form. While there are a number of options available, McMillan has a helpful guide that walks you through each one to ensure you get exactly what you need. While filling out my form I realized that because I have a custom-designed action, I needed some help, so I gave McMillan a call. The staffers were incredibly helpful and their knowledge of all the major actions out there made answering my questions a snap. I liked the fact that there is no set, fixed price on any of the stocks. The pricing system allows customers to get just what they want (within limits) and not have to pay for anything they do not want or need.
Readers who have just recently discovered the Daily Bulletin may not realize that AccurateShooter.com has hundreds of reference articles in our archives. These authoritative articles are divided into multiple categories, so you can easily view stories by topic (such as competition, tactical, rimfire, optics, shooting skills etc.). One of the most popular categories is our Technical Articles Collection. On a handy index page (with thumbnails for every story), you’ll find over 120 articles covering technical and gunsmithing topics. These articles can help you with major projects (such as stock painting), and they can also help you build more accurate ammo. Here are six popular selections from our Technical Articles archive.
Stress-Free Pillar Bedding. Richard Franklin explains how to do a top-quality bedding job, start to finish.
Gun Safe Buyers Guide. Our comprehensive Safe Buyers Guide examines the key features to consider in a safe — Wall Thickness, Volume, Shelving, Fire Rating, Lighting, Weight and more. We also explain the Pros/Cons of Dial vs. Digital (Keypad) locking systems.
Savage Action Tuning. Top F-TR shooter Stan Pate explains how to enhance the performance of your Savage rifle by optimizing the torque settings of the action screws.
Complete Precision Case Prep. Jake Gottfredson covers the complete case prep process, including brass weight sorting, case trimming, primer pocket uniforming, neck-sizing, and, case-neck turning.
Stock Painting Instructions. Step-by-step guide for stock painting by expert Mike Ricklefs. Mike shows both simple coverage and fancy effects.
Ultrasonic Case Cleaning. This article reviews the recommended process for cleaning cartridge brass with ultrasonic cleaning machine. We cover the right liquid solutions, processing times, and case drying options.
New to the PRS/NRL tactical game? Wouldn’t it be great to get hands-on training with Top 10 PRS master competitors. Well now that is possible with the Masterpiece Arms MPA BA Academy program at the Rockland Precision Range in Pennsylvania. These are intense 1- or 2-day training sessions taught by some of the best PRS shooters on the planet. Instructors will be David Preston and Ken Sanoski. Both men have won multiple PRS matches and qualified for the AG Cup, which is limited to the TOP 20 PRS/NRL shooters in the USA. Rockland Precision is a new 1,000+ yard rifle range and training facility in Kennerdell, Pennsylvania.
NOTE: Participants must provide Rifle and Ammo. For all classes, students must bring a complete, scope-equipped rifle that will hold 1 MOA or better accuracy, together with front bipod and rear sandbag. For all the classes, trainees must also supply their own ammo — 100 rounds for the 1-day classes, or 200 rounds for the 2-day sessions.
One-Day PRS Clinic
The 1-Day PRS Clinic suits shooters of all levels of experience and skill. The staff will lead students through a course of fire, evaluate, and make necessary changes to increase the shooter’s performance. This course will be offered on March 20, June 12, and July 17, 2020, and costs $225. For more information and/or to register CLICK HERE
Intro to Long Range 2-Day Course
This 2-day training course starts with shooting fundamentals and then trains students to successfully engage targets at distance in PRS/NRL style competitions. Focus will be on fundamentals of building a strong shooting position, understand and utilization of windage and elevation adjustments on the optic, and reading atmospheric conditions such as mirage and wind. In addition, trouble-shooting equipment and ammo will be covered. This 2-day course will be offered on June 28-29 and August 15-16, 2020. Cost is $575. For more information and/or register, CLICK HERE.
Intermediate/Advanced Precision Rifle Class
This 2-day course is designed for students who are looking for advanced long-range enhancements to their existing skill-set, with the focus of adapting these skills to practical/positional competitions. This 2-day course will be held July 25-26, 2020. Cost is $575. For more info and to register, CLICK HERE
March is just four days away. That means the spring shooting season will soon be starting. Before you head to the range for the first time, we recommend you do some basic tasks with your firearms. Here’s some good advice on readying your rifles for the 2020 shooting season.
by Ron Dague, Sinclair International I give my rifles a pre-season check before the shooting season starts. This starts with a general inspection starting with the butt-plate or recoil pad and making sure that all the screws and adjustable parts (on an adjustable butt-plate) move freely up or down and side to side. If you got caught in rain some of these screws and adjustable parts may not move when needed. I disassemble parts as needed and put rust preventative or a light oil and/or grease on threads and sliding parts. On rifles with recoil pads and fixed butt-plates, make sure the screws are tight and that holes in the stock aren’t stripped out. Make sure there are no cracks in the stock and around the butt-plate. If the recoil pad is glued-on, just make sure it hasn’t come loose.
Next I take the action out of the stock and check for cracks and wear marks. I look at the bedding to make sure that oils and cleaning solvents have not damaged the bedding. While the action is out of the stock, I look for any surface rust or dirt/dust in the recoil lug area and magazine well. Clean as needed and repair or re-bed if needed.
Trigger Assembly and Action With the barreled action out of the stock, it is a good time to spray out the trigger with cleaner. I use Ronson oil or lighter fluid. [Editor’s Note: Some trigger-makers advise against using any kind of lubricant, grease or oil — so plain lighter fluid is preferred.] After the trigger is cleaned you may want to check the trigger pull weight. If you don’t feel comfortable doing this, take it to a gun smith and have it checked. It is worth every penny to not have a trigger issue and/or a safety malfunction. I also take the bolt apart and clean the firing pin spring and bolt housing with Gun Scrubber or automotive brake cleaner. Then lube the firing pin-spring and firing pin with light oil. I use Kel Lube and/or Butch’s gun oil. Put a small dab of gun grease on the [bolt locking lugs] and cocking ramp.
I will also spray the outside of the action and barrel and give that a light coating of oil for rust prevention. I clean the action with Sinclair’s action cleaning tool. Don’t forget to clean the bore. Even though you didn’t fire the rifle, this makes sure nothing obstructs your barrel.
Checking Metal Fixtures and Fasteners Next I look at the trigger guard and hinged floor plate and make sure it works as designed. Make sure there are no cracks in the trigger guard from an accidental drop. Check guard screws and /or action screws for tightness and tighten to proper spec. There are torque specs for this, but on wood stocks the wood can crush and this should be checked throughout the year as weather change can affect this. My entire collection of rifles are bedded and I just tighten them just snug with screw driver or Allen wrench. The rimfire rifles have a spec of 55 to 74 inch/lbs and I think would carry over to center fire as well. I would caution you about torque wrenches as you need a good quality wrench, and read the directions on how to use it. You can over torque if not careful. Check the swivel studs and bipod to make sure there tight as well. You may want to take scope off and check the base screws and check the rings.
Test Fire the Rifle After Maintenance
After all cleaning and is done and everything is reassembled, take a few rounds out to the range and test fire to make sure everything works as it should. Don’t forget to run 3-5 rounds through the magazine at least two times for function. I look at this as preventive maintenance on the rifle. If you give it a look over you shouldn’t have any trouble during the rifle matches or hunting trip.
Ron Dague
Certified Reloading Instructor
Certified Range Safety Officer
Email: rond [at] sinclairintl.com
Phone: 800-717-8211
This Article Originally Appeared in Sinclair International’s The Reloading Press.



 In the respected Riflemans Journal website, the Editor, “GS Arizona”, showed how to use the Wilson primer pocket reamer to remove military crimps on Lake City .30-06 cartridge brass. He explains: “The case goes into the Wilson case-holder, the same one used for case trimming, and the reamer replaces the trimmer head in the tool base. The threaded rod on the left side, which is normally used to regulate trim length has no use for this operation and it is simply backed out. Hold the case-holder as you turn the reamer into the primer pocket, it cuts easily and quickly. The reamer will stop cutting when the proper depth is reached.”




 I give my rifles a pre-season check before the shooting season starts. This starts with a general inspection starting with the butt-plate or recoil pad and making sure that all the screws and adjustable parts (on an adjustable butt-plate) move freely up or down and side to side. If you got caught in rain some of these screws and adjustable parts may not move when needed. I disassemble parts as needed and put rust preventative or a light oil and/or grease on threads and sliding parts. On rifles with recoil pads and fixed butt-plates, make sure the screws are tight and that holes in the stock aren’t stripped out. Make sure there are no cracks in the stock and around the butt-plate. If the recoil pad is glued-on, just make sure it hasn’t come loose.
 With the barreled action out of the stock, it is a good time to spray out the trigger with cleaner. I use Ronson oil or lighter fluid. [Editor’s Note: Some trigger-makers advise against using any kind of lubricant, grease or oil — so plain lighter fluid is preferred.] After the trigger is cleaned you may want to check the trigger pull weight. If you don’t feel comfortable doing this, take it to a gun smith and have it checked. It is worth every penny to not have a trigger issue and/or a safety malfunction. I also take the bolt apart and clean the firing pin spring and bolt housing with Gun Scrubber or automotive brake cleaner. Then lube the firing pin-spring and firing pin with light oil. I use Kel Lube and/or Butch’s gun oil. Put a small dab of gun grease on the [bolt locking lugs] and cocking ramp.
 Next I look at the trigger guard and hinged floor plate and make sure it works as designed. Make sure there are no cracks in the trigger guard from an accidental drop. Check guard screws and /or action screws for tightness and tighten to proper spec. There are torque specs for this, but on wood stocks the wood can crush and this should be checked throughout the year as weather change can affect this. My entire collection of rifles are bedded and I just tighten them just snug with screw driver or Allen wrench. The rimfire rifles have a spec of 55 to 74 inch/lbs and I think would carry over to center fire as well. I would caution you about torque wrenches as you need a good quality wrench, and read the directions on how to use it. You can over torque if not careful. Check the swivel studs and bipod to make sure there tight as well. You may want to take scope off and check the base screws and check the rings.


