You may not realize it… but to get the optimum BC from your bullets (i.e. the lowest aerodynamic drag), you must spin the bullets fast enough. Bullet drag increases (as expressed by lower BC) if the bullet spins too slowly. Bryan Litz of Applied Ballistics explains how BC changes with twist rates…
More Spin, Less Drag
In this article, we look at how twist rate and stability affect the Ballistic Coefficient (BC) of a bullet. Again, this topic is covered in detail in the Modern Advancements book. Through our testing, we’ve learned that adequate spin-stabilization is important to achieving the best BC (and lowest drag). In other words, if you don’t spin your bullets fast enough (with sufficient twist rate), the BC of your bullets may be less than optimal. That means, in practical terms, that your bullets drop more quickly and deflect more in the wind (other factors being equal). Spin your bullets faster, and you can optimize your BC for best performance.
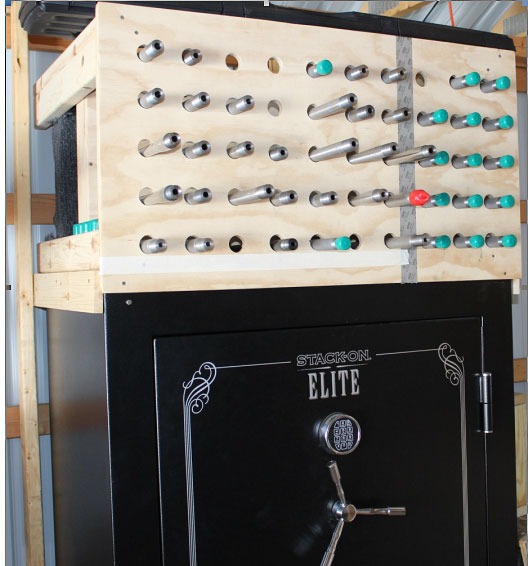
Any test that’s designed to study BC effects has to be carefully controlled in the sense that the variables are isolated. To this end, barrels were ordered from a single barrel smith, chambered and headspaced to the same rifle, with the only difference being the twist rate of the barrels. In this test, 3 pairs of barrels were used. In .224 caliber, 1:9” and 1:7” twist. In .243 caliber it was 1:10” and 1:8”, and in .30 caliber it was 1:12” and 1:10”. Other than the twist rates, each pair of barrels was identical in length, contour, and had similar round counts. Here is a barrel rack at the Applied Ballistics Lab:
Applied Ballistics used multiple barrels to study how twist rate affects BC.
“The Modern Advancements series is basically a journal of the ongoing R&D efforts of the Applied Ballistics Laboratory. The goal of the series is to share what we’re learning about ballistics so others can benefit.” –Bryan Litz
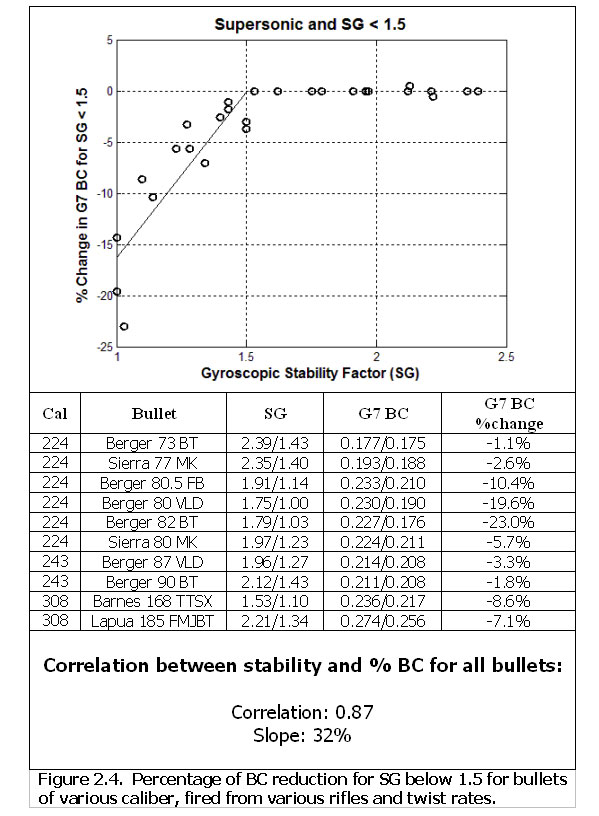
Barrel twist rate along with velocity, atmospherics, and bullet design all combine to result in a Gyroscopic Stability Factor (SG). It’s the SG that actually correlates to BC. The testing revealed that if you get SG above 1.5, the BC may improve slightly with faster twist (higher SG), but it’s very difficult to see. However, BC drops off very quickly for SGs below 1.5. This can be seen in the figure below from Modern Advancements in Long Range Shooting.
The chart shows that when the Gyroscopic Stability Factor (SG) is above 1.5, BC is mostly constant. But if SG falls below 1.5, BC drops off dramatically.
Note that the BC drops by about 3% for every 0.1 that SG falls below 1.5. The data supports a correlation coefficient of 0.87 for this relationship. That means the 3% per 0.1 unit of SG is an accurate trend, but isn’t necessarily exact for every scenario.
It’s a common assumption that if a shooter is seeing great groups and round holes, that he’s seeing the full potential BC of the bullets. These tests did not support that assumption. It’s quite common to shoot very tight groups and have round bullet holes while your BC is compromised by as much as 10% or more. This is probably the most practical and important take-away from this test.
To calculate the SG of your bullets in your rifle, visit the Berger Bullets online stability calculator. This FREE calculator will show you the SG of your bullets, as well as indicate if your BC will be compromised (and by how much) if the SG is below 1.5. With the stated twist rate of your barrel, if your selected bullet shows an SG of 1.5 (or less), the calculator will suggest alternate bullets that will fully stabilize in your rifle. This valuable online resource is based directly on live fire testing. You can use the SG Calculator for free on the web — you don’t need to download software.
You know that Zeiss riflescopes boast superb glass, excellent controls, and a rock-solid warranty. What you may not realize is how rugged Zeiss scopes are. Zeiss optics are designed for the toughest conditions that hunters may experience. Zeiss understands that hunting optics can be exposed to extreme temperatures, moisture, shock, and vibration.
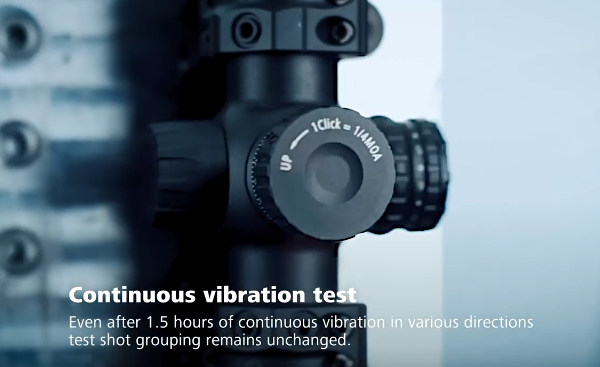
To ensure Zeiss scopes perform in the toughest conditions, Zeiss tests production-line optics with rigorous testing procedures unrivaled in the optics industry. Zeiss runs Impact Shock Tests with 800 impact cycles at high G-forces. In addition, Zeiss does a continuous vibration test for 1.5 hours. Scopes are also tested in a salt spray environment to confirm corrosion resistance. But there is more — test optics are immersed in water for two HOURS at depth and the scopes are also lab-tested at -40° F in a climate chamber and also subjected to “temperature shocks” from -13° to +122° F. Now that’s some serious testing.
Zeiss does all this elaborate scope testing to ensure its optics perform in all situations, in all environments. View all these tests in this Zeiss video. We think you’ll be VERY impressed:
Impact Shock Test — 800 Cycles
Continuous Vibration Test — 1.5 hours
Water Immersion Test — Validated Waterproof for 2 hours at 13 feet
Temperature Testing — Extreme Temp Shock Test and Sub-Zero Freeze Chamber
Corrosion Resistance Test — 24 Hours in Salt Spray Environment
This November, many readers will be traveling nationwide on holiday. It might be fun to visit shooting ranges near your holiday destination(s). Or perhaps you’ve recently relocated and want to join a shooting club near your new residence. Or maybe you’re just looking for a facility close to home that offers instruction or specialized programs for women or juniors. You can quickly find exactly what you want via the WhereToShoot.org website.
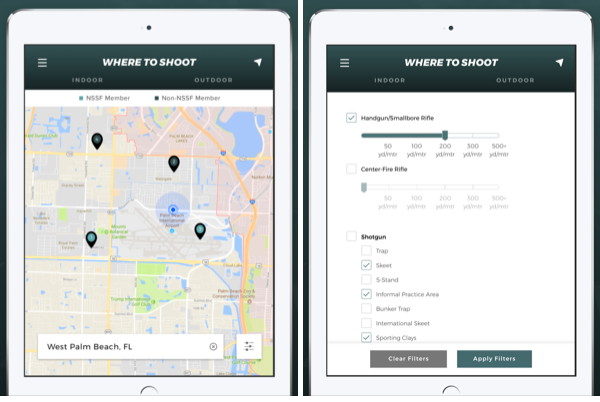
A service of the NSSF (Nat’l Shooting Sports Foundation), WhereToShoot.org offers a Searchable Database of pistol, rifle, and shotgun ranges around the country. You can search by state, or select a particular distance from any zip code. The database is very complete. The individual range pages also include web addresses, phone numbers, and map links. The example below shows the results of a search for shooting ranges near Boulder, Colorado:
Where to Shoot Mobile App
To complement Wheretoshoot.org, the NSSF also offers a Where To Shoot Mobile App. This App quickly locates shooting ranges near you, drawing on North America’s most comprehensive range directory. Users can search by current location, state, or zip code. Once you locate a range, you can view activities offered along with a summary of range facilities. You can even get driving directions.
The app is modeled after NSSF’s popular WhereToShoot.org® website and is updated frequently with range information for every U.S. state and Canadian province. Once you’ve located a place to shoot, the App can provide directions to the range. The App also includes video tips for shooters, news, and firearm-safety information.
Since its introduction in 2001, the .300 Winchester Short Magnum (.300 WSM), has proven very popular for hunting and long-range competition. The case has ample capacity to drive the heavy .30-caliber bullets, and with proper case prep and annealing, the WSM is capable of outstanding accuracy. When Nebraskan Greg Anderson decided to build his “ultimate long-range hunter”, he selected the .300 WSM for its accuracy and its ability to drop large game at long distances. Teaming up with Chris Matthews of LongShot Rifles, Greg developed an impressive long-range hunting rig, with high-tech components to reduce weight. The 26″ barrel is a carbon-wrapped composite over a Rock Creek stainless blank. The carbon technology saved about 3 pounds over an all-steel barrel of similar length/contour.
The Manners Composite stock also features carbon fiber construction for stiffness and reduced weight. Greg’s carbon/carbon rifle tips the scales at just 10.8 pounds, including scope and bipod. A conventional rig could easily weigh 15 pounds or more. Greg’s carbon hunter has proven accurate as well as innovative. With 175gr Sierra MKs, the gun shoots well under 1/2-MOA out to 600 yards and beyond.
The Ideal Spot and Stalk Rifle
by Greg Anderson
The purpose of this project was to create a hunting rifle that would be inherently accurate at long range and have an acceptable weight for hunting in rough country. I researched the question of overall weight with several gunsmiths. The smiths confirmed that while fat-contour barrels could deliver improved accuracy, there was a price to pay and a lot more weight. With a heavy barrel, the finished rifle would be most likely weigh about 15 pounds. That’s more than I wanted to haul around in the field. To reduce barrel weight, the suggested “traditional” solutions were fluting, which would reduce barrel weight by at least one-half pound, or going with a smaller diameter barrel.
The Quest for Reduced Weight without Accuracy Loss
Fluting didn’t promise enough weight savings, and a slim, sporter barrel probably wasn’t going to deliver the kind of consistent accuracy I wanted (particularly as the barrel heated up). Accordingly, I decided to “think outside the box”. My research on lightweight barrel options lead me to Advanced Barrel Systems, (ABS) a company in Lincoln, Nebraska that once produced custom carbon-wrapped barrels. ABS President Mike Degerness could wrap a barrel to virtually any shape and diameter, allowing great stiffness even with a huge reduction in barrel weight. As the “core” for his carbon-wrapped barrels, Mike recommends a cut-rifled blank made by any of the quality cut-barrel makers. [NOTE: ABS is not taking orders at this time. You cannow get excellent carbon-wrapped barrels from Proof Research].
Significant Weight Saving with Carbon
How much weight can you save with a carbon-wrapped barrel? Well a 24-inch, #7 contour ABS carbon-wrapped barrel will weigh about 2.5 pounds compared to about 5.5 pounds for a steel barrel of the same length and contour. So, this means that you can put a fat, stiff competition-contour barrel on your hunting rifle and save over half the barrel weight compared to an all-steel barrel. Saving three pounds is a blessing when you’re carrying the rifle all day long in the field. I placed an order for a 30-caliber Rock Creek barrel blank with an 1:11.25″ twist and a finished length of 26″. Mike wrapped the barrel and finished it to an M24 contour.
Carbon Can Also Improve Barrel Vibration Damping
One interesting benefit of carbon barrel-wrapping is that the carbon components have a vibration-dampening effect. According to ABS, the extreme rigidity of the finished composite barrel dampens the vibration nodes of the barrel making it shoot like a plain steel barrel of much greater mass. Carbon fiber has a high modulus of elasticity that has the effect of lowering the amplitude of the vibration of the barrel when fired. This is what makes the ABS barrels perform so well, according to Mike.
Impressive Accuracy For a Hunting Rifle
Looking at the targets below, one may ask, “Does the rifle always shoot this well?” The answer, not surprisingly, is: “it depends on the trigger-puller”. The rifle is capable of outstanding accuracy. But it took some time and effort for me to develop the skills required to shoot up to the rifle’s inherent accuracy. I nearly always practice prone from bipod. Initially, I was getting horizontal stringing until I changed my grip and learned to be more consistent from shot to shot. Shooting a heavy-recoiling .30-caliber rifle from the ground is not the same as shooting a .223 Rem from the bench.
3-Shot Group at 200 yards | 6-Shot Group at 500 Yards
Completing the Project Build
To smith the rifle, I selected Chris Matthews of LongShot Rifles, LLC because of his expertise with the WSM cartridges and long-range shooting equipment. Because cost was a factor, we decided to use a donor Remington long action that had been used on a Remington 7mm magnum. Chris trued the action and we had Dave Kiff from Pacific Tool & Gauge grind us a bolt to fit the action more perfectly. Chris chambered the Rock barrel and installed a .300 Badger recoil lug.
Carbon-reinforced Hunting Stock from Tom Manners
Being a fan of carbon fiber technology, I selected an MCS-T stock from Manners Composite Stocks. These stocks have an extremely high strength-to-weight ratio and the high comb of the MCS-T gave an almost perfect alignment with the scope. The finished rifle was topped off with a Leupold 4.5-14x40mm LR scope equipped with M1 windage and elevation turrets. A Harris bipod completed the package. All up, including scope, steel rings, and bipod, my .300 WSM rifle with 26″ barrel weighs 10.8 pounds.
Load Development for Accuracy
I developed a load using 63.0 grains of H4350, 175gr Sierra Match Kings with Federal 210M primers in Winchester-brand brass. This load gives 2960 FPS out of my rifle. The load would shoot sub-MOA from bipod from 100 yards to 600 yards and was adopted as the “go to” load. I have also tried the 208gr Hornady A-Max in this gun. The A-Maxs shot well but the Sierras work well for everything (paper punching and hunting) so the 175gr SMK is my bullet of choice.
Brass Prep and Annealing Are Very Important
The Winchester-brand brass is good, but you have to prep it thoroughly if you want good results. My brass prep consisted of turning the necks, de-burring the flash holes (inside and out), and chamfering the case necks. Using a Sinclair neck-turning tool, I turn the necks to .0135″ per side. That provides a complete clean-up of the necks, which run about .015″ neck-wall thickness out of the box.
One thing I’ve learned to do is anneal the brass every 3-4 firings. I started to do that after I noticed that the force required to seat bullets became inconsistent after just a few loading cycles. I also experienced flyers that were going out of the group for no apparent reason. Annealing the cases every 3-4 firings has eliminated most of the unexplained flyers and annealing has also made bullet seating much, much more consistent. I’ve also noticed a significant improvement in my groups at 500 and 600 yards now that I anneal regularly. Group sizes at 600 yards can be as much as 2″ smaller with annealed brass than with un-annealed, work-hardened brass.
Greg Anderson was successful with his .300 WSM on his very first hunt, dropping a nice buck at 364 yards. Chris reports: This was on some private land in Nebraska. As daylight faded… there were a couple of bucks, but one looked to be the best of the lot. The buck gave me a broadside shot ranged at 364 yards. I settled behind the scope and took one shot. It hit right where I aimed and the buck just folded.”
In this NSSF Video, Ryan Cleckner, a former Sniper Instructor for the 1st Ranger Battalion, explains how to gather and organize D.O.P.E. (Data On Previous Engagements) and how to organize this information to make it readily available in the field. As the term is used by Cleckner, D.O.P.E. includes observed bullet drop information at various distances, as well as the effects of wind, temperature changes, humidity and other environmental variables.
If you know your muzzle velocity, and bullet BC, a modern Ballistics App should be able to calculate bullet drop with great precision at distances from 100-1000 yards — often within a couple 1/4-MOA clicks. However, because a bullet’s BC is actually dynamic (changing with speed), and because ballistics solvers can’t perfectly account for all variables, it’s useful to collect actual, verified bullet drop data.
It’s smart to start with ballistics data from a solver app, but, as Cleckner explains: “Odds are, you’re going to have to fine-tune that data to your gun and your system. Every scope and every rifle and every bullet [type] act differently. Your scope may not track the same from rifle to rifle, so it’s important you get the data that’s unique to you.” Cleckner also explains that the ballistic data supplied with some factory ammo may only give you a crude approximation of how that ammo will actually shoot through your gun.
Keeping Your Drop Data with the Rifle
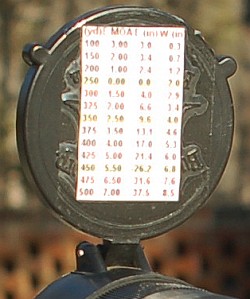
Cleckner also offers some good advice on how to record D.O.P.E. on simple index cards, and how to keep your ballistics data with your rifle. This can be done with a laminated drop chart or data transferred to a scope cover (photo right). CLICK HERE, to learn more about creating handy field data cards.
At the 4:15 mark on the video, Cleckner shows a calibrated tape he has fitted around the turret of his riflescope. The tape shows distance numbers (e.g. “4” for 400 yards, “5” for 500 yards etc.) that correspond with the number of clicks (rotation) required to be zeroed at that particular distance. With that system, you simply “dial your distance” and your point of impact should equal your point of aim. It takes some skill (and the right software) to create these tapes, but the concept is great.
Chances are that many of you have packed away your ammo and shooting supplies for the winter. Maybe you put your brass in a storage bin that might also contain solvents, old rags, or used bore swabs. Well, if you use any ammonia-based solvents, we suggest you separate the brass and ammo and keep it away from potential ammonia vapors. This is because long-term exposure to ammonia fumes can cause cracks to form in your brass. This can lead to case ruptures and possible injury.
This case-cracking phenomenon has been called Season Cracking, a form of stress-corrosion cracking of brass cartridge cases. Season cracking is characterized by deep brittle cracks which penetrate into affected components. If the cracks reach a critical size, the component can suddenly fracture, sometimes with disastrous results. If the concentration of ammonia is very high, then corrosion is much more severe, and damage over all exposed surfaces occurs. The brass cracking is caused by a reaction between ammonia and copper that forms the cuprammonium ion, Cu(NH3)4, a chemical complex which is water-soluble. The problem of cracking can also occur in copper and copper alloys such as bronze.
Season Cracking was originally observed by the British forces in India a century ago. During the monsoon season, military activity was reduced, and ammunition was stored in stables until the dry weather returned. Many brass cartridges were subsequently found to be cracked, especially where the case was crimped to the bullet. In 1921, in the Journal of the Institute of Metals, the phenomenon was explained by Moor, Beckinsale, and Mallinson. Apparently ammonia from horse urine, combined with the residual stress in the cold-drawn metal of the cartridges, was responsible for the cracking.
Don’t store ammunition (or brass) for long periods in a box or container holding ammoniated solvents:
The Australia Department of Defense (AUSDOD) has also explored the problem of brass cracking caused, at least in part, by exposure to ammonia. A study was done to see whether the amount of cracking (from ammonia exposure) varied according to the duration and temperature of the annealing process used on the brass. CLICK HERE to read AUSDOD Research Report.
Story idea from Boyd Allen. We welcome reader submissions.
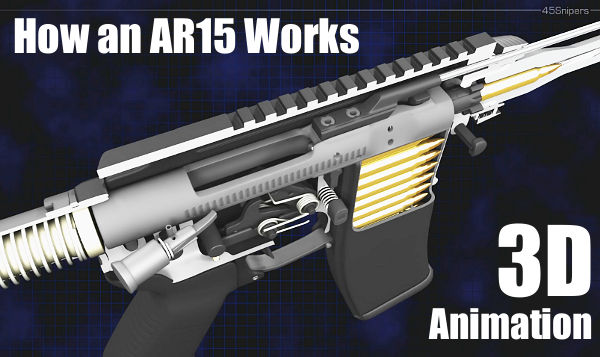
Ever wondered how the parts inside an AR15 work together? Just exactly how does the reciprocating bolt carrier feed rounds from the magazine? How do the elements in the trigger group work and reset after each shot? How does the gas system bleed gas from the barrel and operate the bolt carrier? These and other questions are answered in this eye-opening video from 45Snipers. Using “cutaway” 3D computer animation, this 5-minute video shows all features of an AR15 inside and out. This fascinating firearms animation allows the viewer to look inside the upper and lower receivers, into the bolt carrier, chamber, barrel, and magazine.
This video starts off slow and has annoying background music, but it is well worth watching if you own or shoot any AR-platform rifle. It illustrates all the key operations during the charging, loading, firing, and ejection processes. The cutaway animation shows how rounds are stripped from the magazine and then chambered. It then shows how every part of the trigger group works, and how the firing pin strikes the primer. You can even watch the bullet move down the barrel before the empty shell casing is removed from the chamber and tossed out the ejection port. Here are sample frames from the video:
Video find by Grant Ubl. We welcome reader submissions.
Coating bullets with a friction-reducing compound such as Molybdenum Disulfide (Moly) offers potential benefits, including reduced barrel heat, and being able to shoot longer strings of fire between bore cleanings. One of the effects of reduced friction can be the lessening of internal barrel pressures. This, in turn, means that coated bullets may run slower than naked bullets (with charges held equal).
To restore velocities, shooters running coated bullets are inclined to “bump up” the load — but you need to be cautious.
Be Careful When Increasing Loads for Coated Bullets
We caution shooters that when your start out with coated bullets in a “fresh barrel” you should NOT immediately raise the charge weight. It may take a couple dozen coated rounds before the anti-friction coating is distributed through the bore, and you really start to see the reduced pressures. Some guys will automatically add a grain or so to recommended “naked” bullet charge weights when they shoot coated bullets. That’s a risky undertaking.
We recommend that you use “naked” bullet loads for the first dozen coated rounds through a new barrel. Use a chronograph and monitor velocities. It may take up to 30 rounds before you see a reduction in velocity of 30-50 fps that indicates that your anti-friction coating is fully effective.
We have a friend who was recently testing moly-coated 6mm bullets in a 6-6.5×47. Moly had not been used in the barrel before. Our friend had added a grain to his “naked” bullet load, thinking that would compensate for the predicted lower pressures. What he found instead was that his loads were WAY too hot initially. It took 30+ moly-coated rounds through the bore before he saw his velocities drop — a sign that the pressure had lowered due to the moly. For the rounds fired before that point his pressures were too high, and he ended up tossing some expensive Lapua brass into the trash because the primer pockets had expanded excessively.
LESSON: Start low, even with coated bullets. Don’t increase your charge weights (over naked bullet loads) until you have clear evidence of lower pressure and reduced velocity.
Procedure After Barrel Cleaning
If you shoot Moly, and clean the barrel aggressively after a match, you may want to shoot a dozen coated “foulers” before starting your record string. Robert Whitley, who has used Moly in some of his rifles, tells us he liked to have 10-15 coated rounds through the bore before commencing record fire. In a “squeaky-clean” bore, you won’t get the full “benefits” of moly immediately.
To learn more about the properties of dry lubricants for bullets, read our Guide to Coating Bullets. This covers the three most popular bullet coatings: Molybdenum Disulfide (Moly), Tungsten Disulfide (WS2 or ‘Danzac’), and Hexagonal Boron Nitride (HBN). The article discusses the pros and cons of the different bullet coatings and offers step-by-step, illustrated instructions on how to coat your bullets using a tumbler.
Wouldn’t it be cool if you could shoot .22 LR rimfire ammo from your regular hunting or tactical rifle? That would be ideal for low-cost training right? Well, this IS possible, provided you have a rifle that was designed with a .22 LR conversion in mind. One such firearm is the remarkable Sauer 202 from Germany. This impressive centerfire rifle is available with a factory-engineered .22 LR rimfire conversion. Read on to learn how Sauer’s cool .22 LR conversion works.
Sauer 202 Rifle: .308 Win/6.5×55 with .22 LR Conversion
Forum member “Tooms” sent us a report on his very special Sauer 202 with a .22 LR conversion kit. Sauer 202 rifles feature a “Quick-change barrel system”. The barrel is clamped into the receiver with crossbolts providing tension. This allows barrels to be swapped in a few minutes with simple tools. NOTE: This conversion kit was originally designed for the Sauer 200 STR, but because the Sauer 202 shares virtually the same design for the action/bolt/magazine, the system works for the 202 as well.
Tooms, from Denmark, explains: “The rifle began as a Sauer 202 Avantgarde Gold in .308 Win. I have added a 6.5×55 match barrel, plus a wide flat-bottom match fore-arm with rail for handstop and bipod. The .22 LR system [originally] cost $1000.00 [including] barrel, bolt, magazine well assembly, and magazine. The barrel is attached by three cross-bolts and the magazine well assembly is attached by one screw that fits into the barrel.”
Using this “Quick-change system”, Tooms can easily remove his centerfire barrel and swap in a .22 LR barrel. Then he places the factory conversion kit into the magazine well. This kit provides a rimfire bolt, a fitted sleeve for the rimfire bolt, and a magazine housing. This is a full Sauer factory-designed system so it works flawlessly. With the bolt closed, you can see the “new” .22 LR chamber in the front section of the loading port. On the silver section of the bolt you can see the rimfire extractor on the side.
The .22 LR Conversion Really Works
The Sauer 202 Varmint rifle shoots very well with the .22 LR conversion, as the 50m target at right shows. Though quite expensive, the conversion kit essentially transforms your centerfire rifle into fully functional, mag-fed precision rimfire rifle. That makes the Sauer 202 much more versatile as a hunting platform. It also allows you to cross-train with inexpensive ammo. You don’t have to purchase another scope, trigger, or stock. And you enjoy the exact same stock fit and ergonomics whether you’re shooting centerfire or rimfire. In some countries where gun ownership is severely restricted, it may be easier, from a legal standpoint, to purchase a .22 LR conversion kit than to obtain a permit for a second rifle.
Comments from Readers about .22 LR Conversions:
“I had a Sauer 200 STR with the .22 LR conversion and a .308 Win barrel kit. I can attest to the accuracy of both systems. The .22 LR would easily hold 1/2 MOA or better out to 100 yards. I now have the .22 LR conversion in my Sig SSG 3000 (same action as the Sauer 200TR and the Sauer 202 listed here). The action and trigger are as good as any I have ever used to include custom actions, AIAW, AIAT, TRG22. I never had 1 malfunction from the .22 LR over many thousands of rounds. They are truly top shelf systems!” — Jesse Bell
“Blaser made a .22 LR conversion kit for the R93 for a few years. It was available in 17 HMR, .22 LR, and .22 Magnum. My 17 HMR version has fired well over 17,000 rounds at prairie dogs and has scored kills in excess of 250 yards on many occasions. Possibly the best thing ever for practicing with your big game/match rifles.” — Captain Dave Funk
The Sauer 202 rifle line-up has been replaced by the Sauer 404 series which has much in common. To learn more about the complete line of Sauer rifles visit the J.P. Sauer USA website. You’ll also find more information on the primary J.P. Sauer & Sohn German website, www.Sauer.de. Though out of production, some Sauer 202s are still for sale at EuroOptic.com.
PRODUCT SAFETY WARNING AND RECALL NOTICE FOR IMR 4007 SSC POWDER
Hodgdon and IMR are officially announcing a product safety warning and recall notice for IMR 4007 SSC smokeless powder. All lots of powder are included in the recall. IMR has received reports that this particular powder, sold in 1 pound and 8 pound containers, could become unstable due to possible rapid deterioration. Use of this product may result in combustion, fire damage and/or possible serious injury.
What to do if you have IMR 4007 SSC Powder
1. If you are in possession of IMR 4007 SSC, STOP USING THE PRODUCT IMMEDIATELY! Fill the powder container with water, which will render the product inert and safe for disposal.
2. Mail, email or fax a copy of the powder label with the lot number to the contact information below, and include your name, address, phone and email. Be sure to reference the IMR 4007 SSC recall.
EMAIL: help@imrpowder.com
CALL: 1-800-622-4366 or 913-362-9455
FAX: 913-362-1307
WRITE: Hodgdon Powder Company, Inc., 6430 Vista Drive. Shawnee, KS 66218
3. You may select a replacement IMR smokeless powder product of your choice, which will be shipped to you at no charge.
What to Do With Ammo Already Loaded with IMR 4007 SSC
If you have loaded the powder subject to this recall into ammunition, we recommend that you pull the bullets, remove the powder and wet the powder with water for safe disposal. IMR deeply regrets any inconvenience this may cause, but we believe in safety first.
Need More Recall Information?
You can get more information about this IMR 4007 SSC recall by emailing help@imrpowder.com. You can also call 1-800-622-4366 or 913-362-9455, or send a fax to 913-362-1307.


 One thing I’ve learned to do is anneal the brass every 3-4 firings. I started to do that after I noticed that the force required to seat bullets became inconsistent after just a few loading cycles. I also experienced flyers that were going out of the group for no apparent reason. Annealing the cases every 3-4 firings has eliminated most of the unexplained flyers and annealing has also made bullet seating much, much more consistent. I’ve also noticed a significant improvement in my groups at 500 and 600 yards now that I anneal regularly. Group sizes at 600 yards can be as much as 2″ smaller with annealed brass than with un-annealed, work-hardened brass.
 Keeping Your Drop Data with the Rifle


 The .22 LR Conversion Really Works


