Hydro Press and Arbor Press from 21st Century Shooting
Gear Review by F-Class John
Inline dies, used with arbor presses, continue to dominate the world of precision reloading. While arbor presses have remained mostly unchanged, 21st Century Shooting offers the Hydro Bullet Seating Press, a radical departure from your average arbor press. If you are looking for improved “feel” and feedback on bullet seating pressure, you should definitely check out the Hydro Press. This design has been around for a while now but has remained unchallenged since its inception. The 21st Century Hydro Press still remains a category leader (and the choice of many top competitors) for good reason.
Arbor presses have traditionally worked by using a gear-driven ram operated with a rotating handle. This allows for a compact design but often lacks the tactile feel and smooth operation that many reloaders want. The 21st Century Hydro Bullet Seater works by using simple mechanical leverage coupled with a hydraulic pressure gauge to seat bullets in a smooth motion all while helping you keep track of seating pressures.
Editor: Many top shooters believe they can seat bullets with greater precision using the 21st Century Hydro Press. I personally get more consistent seating, which seems to improve accuracy and even help a bit with lowering ES. The Hydro Press gives you excellent feedback when seating bullets. That has helped me detect a case with too much neck tension, or a case that may have doughnut issues. When the gauge does something odd or spikes, you are alerted to a possible issue.
In this video, John Perkins of 21st Century Shooting Shows how the Hydro Seater functions.
You might be asking why or how simple a simple mechanical lever gives you an advantage over gear driven systems and the answer is simple, leverage. The Hydro Seater is equipped with a long arm that comes straight up and out from the front and uses a set of hinges that connect to the ram. This elongated arm provides lots of leverage allowing easy force modulation. This smoothly applies pressure to the seating die in one fluid motion. This transfer of power helps seat bullets smoothly in even the tightest of necks without any jerky or stuttering movements.
Working at the same time is a hydraulic pressure gauge using internal oil. I found this gauge was incredibly sensitive, accurate, and repeatable compared to spring-driven gauges. The Hydro gauge read-out really gives the user the chance to sort ammo by seating pressure should they choose. In my particular case I only use it to cull out noticeably high or low ones as “blow off” rounds and am perfectly happy if the rest fall within a given pressure range. The nice thing is that the press allows you to be as picky as you want.
Compact 21st Century Standard Arbor Press
Not to be outdone by its big brother, 21st Century offers a Standard Arbor Press as well, in both right-hand and left-hand versions. Affordably priced at $108.99, this small arbor press in made to the same exacting standards as the Hydro Seater and has some nice features of its own compared to other small arbors.
The large, knurled adjustment knob is one of my favorite features. It tightens securely, yet it allows for easy raising or lowering of the head unit without the need for hex wrenches. 21st Century’s basic arbor press also has a slightly canted lever arm which allows the user to apply pressure more easily and consistently compared to some other arbor presses. While this press is small enough to fit many range bags, it can be disassembled quickly with a single Allen wrench.
While I own the 21st Century Hydro Press for use at home, the Standard Arbor Press goes with me to out-of-town events, so I can adjust bullet seating depth at the match. I love using it for this purpose since the little press is so easy to transport, and then set up and use on the road. The seating action is smooth, and there is plenty of leverage.
Seating my bullets long before I travel gives me the ability to set them to adjust for any throat erosion that may occur. This also ensures my bullets are seated correctly, by eliminating any potential bullet weld or problems from the bullets accidentally bouncing in your luggage. I like the confidence of knowing that my bullets are properly seated before a big match, especially when it has been days or weeks since I loaded them.
SUMMARY — 21st Century Makes Great Bullet Seating Presses
Whether you need a premium bullet-seating Press such as the Hydro Bullet Seater or a basic, easy-to-transport Arbor Press, 21st Century Shooting has a excellent option for you. The Hydro Press offers outstanding bullet seating “feel” and consistency, with an ultra-smooth operation. The basic Arbor Press is well-made, compact, and also yields excellent results. Both these presses are built for a lifetime of use, using high-quality materials.
This video shows the process of cut-rifled barrel-making by Krieger Barrels, one of the world’s best barrel manufacturers. Krieger cut-rifled barrels have set numerous world records and are favored by many top shooters. The video show the huge, complex machines used — bore-drilling equipment and hydraulic riflers. You can also see how barrels are contoured, polished, and inspected.
For anyone interested in accurate rifles, this is absolutely a “must-watch” video. Watch blanks being cryogenically treated, then drilled and lathe-turned. Next comes the big stuff — the massive rifling machines that single-point-cut the rifling in a precise, time-consuming process. Following that you can see barrels being contoured, polished, and inspected (with air gauge and bore-scope). There is even a sequence showing chambers being cut.
Click Arrow to Watch Krieger Barrels Video:
Here is a time-line of the important barrel-making processes shown in the video. You may want to use the “Pause” button, or repeat some segments to get a better look at particular operations. The numbers on the left represent playback minutes and seconds.
Krieger Barrel-Making Processes Shown in Video:
00:24 – Cryogenic treatment of steel blanks
00:38 – Pre-contour Barrels on CNC lathe
01:14 – Drilling Barrels
01:28 – Finish Turning on CNC lathe
01:40 – Reaming
01:50 – Cut Rifling
02:12 – Hand Lapping
02:25 – Cut Rifling
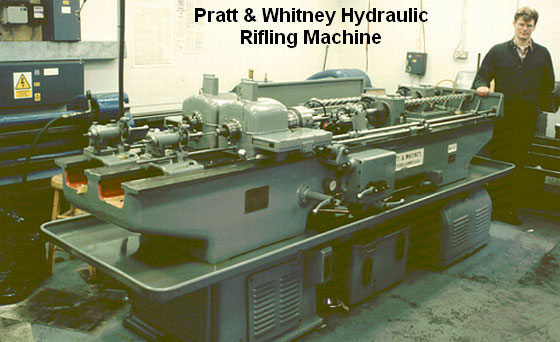
“At the start of World War Two, Pratt & Whitney developed a new, ‘B’ series of hydraulically-powered rifling machines, which were in fact two machines on the same bed. They weighed in at three tons and required the concrete floors now generally seen in workshops by this time. Very few of these hydraulic machines subsequently became available on the surplus market and now it is these machines which are sought after and used by barrel makers like John Krieger and ‘Boots’ Obermeyer. In fact, there are probably less of the ‘B’ series hydraulic riflers around today than of the older ‘Sine Bar’ universal riflers.” — Geoffrey Kolbe, Border Barrels.
The Tactical Rifle Shooters Facebook Group recently showcased tools used to measure case headspace before and after “bumping” the shoulder. After a case is fired, hand-loaders who full-length size their cases will typically bump the shoulders back anywhere from .001″ to .0035″, depending on the rifle and application. With our 6mmBR and Dasher cases we like about .0015″ bump.
You want the amount of case sizing and bump to be the same for all your brass. To ensure uniformity, it makes sense to measure your cases before and after the FL sizing process. When we have time, we check every case. Other folks will simply check the first 3-4 cases coming out of the FL sizing die to ensure the FL die setting is correct and delivering desired headspace/bump.
1. Whidden Gunworks Shoulder Bump Gauge
There are a variety of tools that can be used to measure shoulder bump. Our favorite is a special cartridge-specific bushing made by Whidden Gunworks. The Whidden Shoulder Bump Gauge enables you to adjust your sizing die to the desired measurement. The bump gauge is attached to your calipers with a set screw and determines the measurement from the base to the shoulder of the case. The photo below, from Tactical Rifle Shooters, shows the Whidden Bump Gauge for the .375 CheyTac cartridge.
2. Dave Manson Vertical Comparator with Dial Read-Out
Dave Manson states: “This tool was designed to make life easier for the advanced shooter and re-loader by allowing precise measurement of ammunition, case, and chamber headspace. With this information, the re-loader will be able to fine-tune clearances and fits between his ammunition and chamber, with resultant improvements in accuracy and case life.” The functions of the Comparator are:
1. Measure headspace of factory or reloaded ammunition
2. Quantify chamber headspace by measuring headspace of a fired case
3. Ensure minimal shoulder set-back when setting up re-loading dies
4. Compare base-to-ogive length to ensure consistent bullet-to-rifling relationship.
In addition to the Dial Indicator and Stand, the $130.00 Vertical Comparator is supplied with multiple Datum Blocks of precise length and inside diameter (.3300″/.3750″/.4000″/.4375″). MORE INFO HERE.
3. Hornady L-N-L Headspace Comparator System
Hornady makes comparator gauges matched to the red comparator holder that mounts on your caliper. These Lock-N-Load Headspace Gauges are inexpensive. You can get a set of five gauges for $31.99. Hornady explains: “The Lock-N-Load® Headspace Comparator… gauge measures variations in brass before and after firing or re-sizing. It allows for headspace comparison between fire-formed brass and re-sized brass.” IMPORTANT: Hornady states: “To determine the proper bushing diameter for your cartridge, simply add the neck diameter and the shoulder diameter and divide that number by two. Use the bushing closest to that number.” Hornady offers five: .330″, .350″, .375″, .400″, and .420″.
One tip — We have found the Hornady gauges may vary a little from unit to unit even with the same nominal size. If you have more than one gauge for the same cartridge, test each on your brass — you may then note a slight difference in your bump measurements.
4. Pistol Brass Case DIY Bump Gauge
Last is a “field expedient” set-up if you do not have any of the comparator tools shown above. A sized .45 ACP case (or other suitable pistol case) can be used to measure shoulder bump. The mouth of the pistol case sits on the shoulder of your rifle cartridge brass.
Make sure the .45 ACP case is trimmed square and that it is round. We recommend you first run it through an expander, then size it, trim it and chamfer. Next, take the .45 ACP case and slip it over the neck of a fired, unsized rifle case with the primer removed. Align the two cases between the jaws of your calipers and note the length from rim to rim (See left photo below).
OK, now you have the length for a fired rifle case BEFORE sizing. Next, take a full-length sized rifle case (without primer) and do the same thing, placing the .45 ACP case over the neck of the FL-sized case (Right Photo). The difference between the two numbers is the amount of “bump” or set-back you are applying to the shoulder. Here the difference is .0015″. The amount of bump you need varies with your chamber and your load, but .0015-.002″ is a good initial setting.
Were in prime hunting season now. Here’s an advanced product that can help you track down a prize buck. The Leupold Thermal Optics (LTO) Tracker 2 is a hand-held, heat-detection device designed as a hunting tool for game observation and game recovery. A high-performance 7X thermal spotter, the LTO Tracker 2 can detect heat sources out to 600 yards. The advanced thermal imaging engine fires up in less than five seconds and offers fast 30hz frame rates and 240×204 display resolution. The LTO Tracker 2 is compact and weighs just 7 ounces. It is listed as 100% waterproof, fogproof, and shockproof.
The hand-held unit features a 14-degree field of view and 7x digital zoom. Five different thermal filters provide multiple viewing options. The LTO’s CR123 lithium battery provides more than 10 hours of continuous use. A user-controlled reticle allow the user to quickly pinpoint a game animal or other thermal source. The latest LTO Tracker 2 is $526.14 on Amazon, while Leupold’s High-Definition (HD) LTO Tracker 2 HD unit retails for around $950.00.
Photo shows original model LTO Tracker. The newer Tracker 2 is 7X vs. 6X magnification.
Use LTO Tracker 2 Thermal to Track Animals and Guide your Hunt
From checking your ingress path to your stand, to helping track wounded animals, the LTO Thermal can perform many tasks. Hunters can use the LTO Tracker 2 to spot their quarry’s heat trail and efficiently recover the downed animal. Using the LTO Tracker 2, hunters can also plan their walk to their stand or blind with minimal risk of scaring off game. Where legal, varmint or feral hog hunters can use the LTO Tracker 2 to identify their quarry, leading to more successful hunts.
Verified Purchaser Field Test Review:
“I have a night vision scope I use for hunting hogs and it works well up to about 150 yards. I purchased the Leupold LTO Tracker 2 hand-held thermal monocular for scanning and identifying critters outside the range of the night vision scope. The first night I used the device, I was able to see rabbits playing at 200 yards, two deer eating in a soybean field 315 yards, and I was able to see hogs at 150 yards (5 yards inside the woods before they came out into the open field). Without this device, I would not have known the hogs were there and would have moved to another location. It is somewhat pricey, but good equipment is not cheap. This is a good product and you do not need a degree from MIT to use it.” — Wm. Thompson (Amazon Buyer).
“We see thermal as a vital tool in any hunter’s kit, just like binoculars or laser rangefinders,” said Tim Lesser, vice president of product development for Leupold & Stevens, Inc. “For observation and recovering downed game, the LTO Tracker will help hunters find success in the field.”
Lapua offers a sophisticated FREE Ballistics App for iOS and Android smartphones and mobile devices. This state-of-the-art App has many great features — much more than you’d expect for a free App. If you do much shooting past 300 yards, or use a wide variety of bullets and/or cartridge types, we recommend you download the App and give it a try. This article, written by a Lapua technician, explains how to use the App. This article is definitely worth reading — there are many important concepts and procedures discussed here that apply to all Ballistics calculators, not just the Lapua App. For more details, read the Lapua Ballistics App User Manual.
Watch Video for Explanation of Lapua Ballistics App Features
Lapua Ballistics App Basics — How to Get Started
Article by Matti Paananen
As smartphones and tablets are constantly developed, ballistic software and Apps are also improving, and with their help our ability to hit targets can improve significantly. This is a short introduction on why and how to use a ballistic calculator, namely the Lapua Ballistics App, and a few pointers that will help you use the App effectively.
Ballistics software and Apps are designed to help shooters and hunters make calculations to hit distant targets or take down game in the field by offering ballistic solutions. Lapua Ballistics is the first App utilizing the 6DOF calculation model.
Toying around with ballistics apps is always fun, but effective use of ballistic software requires general understanding of how they work. The App gets information from the user and by using mathematical formulas it provides the solution that will give the user a solid starting point to hit the target.
However, it is also important to remember that the App can’t think — it only calculates a solution based on your parameters. You will not know the error until you have already fired the shot.
1. SET UP YOUR SCOPE RETICLE AND RIFLE
Scope manufactures use different units per click, so it’s important that you use the correct unit in the App. For example, in your scope, one click can be 0.1 mil, 1/4 MOA, [or 1/8 MOA depending on the model]. You can find this information in your scope manual and also usually from the scope turrets. Setting your scope reticle is very important, partly because if you use the wrong unit in the App, the ballistic solution will not match your scope. To set up your scope reticle in Lapua Ballistics, go to Manage Rifle / Cartridge Data –> Add Rifle Cartridge Data (or choose to edit a Rifle/Cartridge combo you’ve already set up) –> Reticle –>.
Another thing to setup in Lapua Ballistics is your scope height, i.e. Line of Sight to Bore in the Manage Rifle / Cartridge Data window. This is the distance between the center of the scope and the center of the bore. The default height is 45mm but with tactical rifles, the height can be even 70mm. So check! The height is easy to measure with a ruler. Then there’s also the twist rate of your rifle to set up — look it up in the rifle manual, it can also be stamped on the rifle barrel. The rifle twist rate is needed to calculate spin drift and bullet stability. Spin drift should be taken into account with longer distances, and it can be enabled or disabled in Lapua Ballistics.
2. SET UP YOUR BULLET CHOICE
You can add your bullet of choice from the bullet library, where you find all Lapua bullets. It is also possible to add information manually. In this case, you will need bullet weight, the ballistic coefficient BC and muzzle velocity. The Ballistic coefficient can be given in G1 or G7 values. G7 is designed for low-drag bullets with a boat tail and G1 is used for more traditional flat base bullets. Lapua on the other hand uses Doppler radar-based data to calculate a more accurate ballistic trajectory for Lapua bullets by 6DOF model. Anyway, it is good to remember that the ballistic coefficient changes with velocity, so all changes in a flight path cannot be predicted.
The following thing you will need to set up is the bullet’s actual muzzle velocity. You can reverse engineer the number based on your drop or by using a chronograph. It is good to remember that more rounds you shoot, the better average velocity you will get.
Because temperature affects muzzle velocity, it would be good to shoot velocities in different temperatures and write them down. Those notes can be used with Lapua Ballistics as it is possible to set up the powder temperature variation in the App.
3. SET UP WEATHER CONDITIONS
Lapua Ballistics has settings for temperature, air pressure, and humidity. All these affect the ballistic solution and the chance to hit the target. In a nutshell, temperature affects the powder’s burn speed and in that way the bullet velocity. Air pressure and humidity also affect bullet drag.
If you are shooting approximately on sea level, you do not need to change air pressure values, but if you are shooting or hunting in mountain areas or where there is lot of elevation difference, you might want to check the air pressure. On sea level, the atmospheric pressure is 1013 hPa. The higher you go, the less air pressure you will have and thus less bullet drag. Some like to use handheld weather and wind meters that have a function to get actual air pressure and humidity, however the Get Current Weather function in Lapua Ballistics will give you the air pressure reading from your local and most close weather station, provided that your app is allowed to use your location data.
Temperature is an important variable. To understand how velocity change in different temperatures, only way is to shoot and keep notes. Some ballistic software and apps have values for muzzle velocity in different temperatures. The user needs to input muzzle velocity in different temperatures in order to software to calculate the effect. More velocities in different temperatures the user adds, the more accurate the calculation will be.
4. SET UP A BALLISTIC SOLUTION
After we have set up our own rifle / cartridge data, there are few things that need to be taken into account when shooting: the distance to the target, the wind and our shooting skills. Distance can be measured for example with a laser rangefinder and then put in. Wind can also be measured with a wind gauge but it is important to remember that the wind in the target area can be very different from that in the shooting position. Lapua Ballistics gives a ballistic solution based on stationary wind, so in the end, the shooter’s task is to estimate how much the wind factor will be.
It’s good to remember that Lapua Ballistics is a starting point and designed to assist the shooter. Software and apps have ways of helping us adjust the sight and predict the ballistic solution but they will not replace the shooter. We still have to pull the trigger and record our range data. By keeping good range notes and with the support of good ballistic software like Lapua Ballistics, we should be able hit in all environments.
Article Find by EdLongrange. We welcome reader submissions
One of our Forum members complained that he wasn’t able to set his primers flush to the rim. He tried a variety of primer tools, yet no matter what he used, the primers still didn’t seat deep enough. He measured his primers, and they were the right thickness, but it seemed like his primer pockets just weren’t deep enough. He was mystified as to the cause of the problem.
Well, our friend Boyd Allen diagnosed the problem. It was the decapping rod. If the rod is adjusted too low (screwed in too far), the base of the full-diameter rod shaft (just above the pin) will contact the inside of the case. That shaft is steel whereas your case is brass, a softer, weaker metal. So, when you run the case up into the die, the shaft can actually stretch the base of the primer pocket outward. Most presses have enough leverage to do this. If you bell the base of the primer pocket outwards, you’ve essentially ruined your case, and there is no way a primer can seat correctly.
The fix is simple. Just make sure to adjust the decapping rod so that the base of the rod shaft does NOT bottom out on the inside of the case. The pin only needs to extend through the flash hole far enough to knock the primer out. The photo shows a Lyman Universal decapping die. But the same thing can happen with any die that has a decapping rod, such as bushing neck-sizing dies, and full-length sizing dies.
Whenever you use a die with a decapping pin for the first time, OR when you move the die to a different press, make sure to check the decapping rod length. And it’s a good idea, with full-length sizing dies, to always re-check the height setting when changing presses.
Lee Universal Decapping Die on SALE for $10.96
Speaking of decapping tools, Midsouth Shooters Supply sells the Lee Universal Decapping Die for just $10.96 (item 006-90292), a very good deal. There are many situations when you may want to remove primers from fired brass as a separate operation (prior to case sizing). For example, if your rifle brass is dirty, you may want to de-cap before sizing. Or, if you load on a progressive press, things will run much more smoothly if you decap you brass first, in a separate operation.
NOTE: Some Euro Small Flash Holes are 1.5mm or 0.059″.
The low-cost Lee Universal Decapping Die will work with cartridges from 17 Fireball all the way up to big Magnums. However, NOTE that the decapping pin supplied with this Lee die is TOO LARGE for LAPUA 220 Russian, 6mmBR, 6.5×47, 6.5 Creedmoor, .308 Win (Palma) and Norma 6 PPC flash holes. Because the pin diameter is too large for these brass types, you must either turn down the pin, or decap with a different tool for cases with .059″ flash-holes. Otherwise, the Lee Decapping Die works well and it’s a bargain.
Airport photo by Politikaner under Creative Commons License.
With hundreds of readers traveling home this week from the 2019 F-Class Nationals in Raton, NM, and many others planning hunting trips out of state, we thought we’d repeat an article providing important information about air travel with firearms. If you will be flying with firearms this fall, you should read this article. You need to familiarize yourself with current Federal Regulations on gun transport before you get anywhere near an airport. Thankfully, the Transportation Security Administration (TSA) has a web page that states the important requirements for airline passengers traveling with firearms* and/or ammunition.
You’ll want to visit the TSA Firearms and Ammunition webpage, and read it carefully. In addition, before your trip, check the regulations of the airline(s) with which you will fly. Some airlines have special requirements, such as weight restrictions.
Here are the TSA’s key guidelines for travel with firearms:
More Airline Travel Tips from Tom McHale
Tom McHale has written an excellent article for the Beretta Blog, Ten Things You Need to Know about Flying with Guns. We suggest you visit the Beretta Blog to read this informative story. Here are two of Tom McHale’s Travel Tips:
Weigh your gun case and ammunition
Most airlines will allow up to 11 pounds of ammunition. And, like any luggage, you will be charged more for any baggage weighing more than 50 pounds. This sounds like a lot, but when traveling to the Crimson Trace Midnight 3 Gun competition last year, my case with shotgun, rifle, pistol and ammunition tipped the scale past the 50 pound mark.
Pack ammo in the same locking case
This is another area that’s misunderstood and full of internet myth. Your ammo just needs to be stored in some type of safe container and not loose. Technically, you can keep ammunition in magazines, but I wouldn’t recommend it. It meets the letter of the law storage requirement, but too many airline and TSA agents will give you grief. Use a plastic ammo box or original cardboard packaging and you’ll be fine carrying that in the same lockable case as your gun.
*SEE United States Code, Title 18, Part 1, Chapter 44. A “firearm” is defined as: any weapon (including a starter gun) which will, or is designed to, or may readily be converted to expel a projectile by the action of an explosive; the frame or receiver of any such weapon; any firearm muffler or firearm silencer; and any destructive device. As defined by 49 CFR 1540.5 a loaded firearm has a live round of ammunition, or any component thereof, in the chamber or cylinder or in a magazine inserted in the firearm.
If you are shopping for a new rimfire rifle, particularly a .22 LR, you may want to pick up a copy of Small-Bore Rifles: A Guide for Rimfire Users by C. Rodney James. This provides a detailed history of rimfire cartridges and provides a look at a variety of rimfire rifles for various applications — target, plinking, varminting. SSUSA.org explains this book covers “every aspect of rimfire shooting, from a detailed history of its calibers and platforms, to a discussion of proper maintenance and expected accuracy[.]” American Rifleman Editor-in-Chief, Mark Keefe, writes: “This little book is the most useful treatment of the [.22 Long Rifle] I have read, and it is highly recommended for anyone serious about being a rimfire rifleman.”
You can view a 40-page sample of this book, including the index, on Amazon. CLICK HERE, then, when the page opens on Amazon.com, click the “LOOK INSIDE” link above the book cover image.
This book focuses primarily on the .22 LR (Long Rifle) cartridge. However, it does include extensive information on other rimfire chamberings, including .17 PMC/Aguila, .17 HMR, and .22 WMR. Here’s part of the 22 WMR section:
Here are reviews by recent verified purchases of the book:
“Everything you could ever want to know about the development of the .22 round, the ballistics of the same and the history of early bolt-action .22 rifles are presented in an easy-read style by a very knowledgeable author. There are plenty of color photographs and a lot of useful maintenance information throughout the book. I do have one complaint… the book has almost no information on semi-automatics.” — K. Greene
“A must-read book for the rimfire enthusiast. Much accurate information presented in an enjoyable format. From the earliest rimfire rounds to the latest 17s [are] all are covered in this book. Bolt actions, semi-autos and single-shot rifles are covered with the pros and cons of each. What makes for accuracy from the rifle to the cartridge is well covered.” — Ken Cook
Today’s precision shooter is connected. He or she is likely to bring a number of electronic items to the range, such as a smartphone, tablet computer, Kestrel, LabRadar chronograph, and more. These digital devices all require electricity to operate. Unfortunately, most ranges don’t include convenient charging stations for your gadgets. Therefore you need to bring battery back-up. Here are three good options, with storage capacities from 10200 mAh to 42000 mAh. The first unit is fully weather-proof, so it is good for hunters and tactical shooters exposed to the elements. The largest power pack, with AC outlet, is quite versatile and works well on car-camping trips.
1. FosPower 10200 mAh Waterproof Charger, $29.99
When you’re at the range or on a hunt, it’s smart to have a USB-output battery pack for smart phone, target-cam monitor, even a LabRadar. There are many battery packs available, but most are fairly fragile, with exposed ports. This “ruggedized” FosPower 10200 mAh charger is different. It is waterproof, dust-proof, and shock-proof. (IP67 certified: dust and water resistance for up to 3ft/1m for 30 minutes under water.) It can handle all that a PRS competitor or hunter can dish out. It even has a handy LED light. Right now it’s priced at $29.99 with FREE Shipping (on orders over $25.00).
2. EasyAcc 20000 mAh Battery Pack with Fast Charging, $37.99
If you want to charge multiple devices, such as a tablet and a LabRadar, you need serious capacity. The EasyAcc 20000 mAh battery pack can charge up to four devices simultaneously. Notably, this $37.99 Battery Pack charges faster than most other 20K packs. It has two power input ports, allowing it to fully charge in 6-7 hours. (We have another 20000 mAh battery unit that takes over 16 hours to fully charge!). This unit will charge an iPhone 7 six times, a Samsung S8 four times or an iPad Mini two times. Note, 77% of Amazon purchasers rated this unit Five Stars (with 13% Four-Star reviews).
3. Webetop 42000 mAh USB, 12v DC, 110v AC Power Station, $108.99
Many folks have asked us “How can I use a laptop, chronograph, or electronic powder dispenser that requires 110 volt AC power when I’m at the range?” Sure you can take power from your car’s 12 volt cigarette lighter jack, but you’ll still need a very long cable and a 12 volt to 110 volt step-up transformer. If you run a cable from the parking lot to the bench or shooting bay you’ll have to leave a window open in your vehicle and fellow shooters can trip over the long cord.
A better solution is to get a portable, combo 12 volt + 110 volt power unit. This versatile 42000 mAh Webetop Power Station will drive a 110v device, plus charge a tablet and cellphone, all at the same time. You can run a LabRadar for days with this power-pack. It will also power CPAP machines and other 12V devices. One nice feature is rapid charging. Before your range session or camping trip, plug this into the wall. It will get fully charged in 7-8 hours. It’s a bargain right now for $108.99 on Amazon.
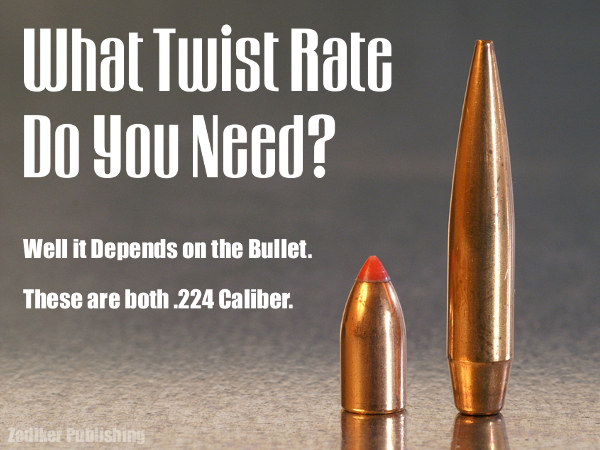
Here’s an extreme range of .224-Caliber bullets: 35gr varmint bullet and 90gr match bullet. Of course, along with bullet length/design, you need to consider MV when choosing twist rate.
Even with the same caliber (and same bullet weight), different bullet types may require different rates of spin to stabilize properly. The bullet’s initial spin rate (RPM) is a function of the bullet’s muzzle velocity and the spin imparted by the rifling in the barrel. You want to ensure your bullet is stable throughout flight. It is better to have too much spin than too little, according to many ballistics experts, including Bryan Litz of Applied Ballistics. Glen Zediker has some basic tips concerning barrel twist rates and bullet stability. These come from his latest book, Top Grade Ammo.
Choosing the Right Twist Rate
I’d always rather have a twist too fast than not fast enough. Generally… I recommend erring toward the faster side of a barrel twist decision. 1:8″ twist is becoming a “new standard” for .224 caliber, replacing 1:9″ in the process. The reason is that new bullets tend to be bigger rather than smaller. Don’t let a too-slow twist limit your capacity to [achieve] better long-range performance.
Base your next barrel twist rate decision on the longest, heaviest bullets you choose to use, and at the same time realize that the rate you choose will in turn limit your bullet choices. If the longest, heaviest bullet you’ll shoot (ever) is a 55-grain .224, then there’s honestly no reason not to use a 1:12″. Likewise true for .308-caliber: unless you’re going over 200-grain bullet weight, a 1:10″ will perform perfectly well.
Bullet Length is More Critical than Weight
Bullet length, not weight, [primarily] determines how much rotation is necessary for stability. Twist rate suggestions, though, are most usually given with respect to bullet weight, but that’s more of a generality for convenience’s sake, I think. The reason is that with the introduction of higher-ballistic-coefficient bullet designs, which are longer than conventional forms, it is easily possible to have two same-weight bullets that won’t both stabilize from the same twist rate.
Evidence of Instability
The tell-tale for an unstable (wobbling or tumbling) bullet is an oblong hole in the target paper, a “keyhole,” and that means the bullet contacted the target at some attitude other than nose-first.
Increasing Barrel Length Can Deliver More Velocity, But That May Still Not Provide Enough Stability if the Twist Rate Is Too Slow
Bullet speed and barrel length have an influence on bullet stability, and a higher muzzle velocity through a longer tube will bring on more effect from the twist, but it’s a little too edgy if a particular bullet stabilizes only when running maximum velocity.
My failed 90-grain .224 experiment is a good example of that: I could get them asleep in a 1:7″ twist, 25-inch barrel, which was chambered in .22 PPC, but could not get them stabilized in a 20-inch 1:7″ .223 Rem. The answer always is to get a twist that’s correct.
These tips were adapted from Glen’s newest book, Top-Grade Ammo, available at Midsouth. To learn more about this book and other Zediker titles, and read a host of downloadable articles, visit ZedikerPublishing.com.


 Compact 21st Century Standard Arbor Press


 Increasing Barrel Length Can Deliver More Velocity, But That May Still Not Provide Enough Stability if the Twist Rate Is Too Slow


