In this NSSF Video, Ryan Cleckner, a former Sniper Instructor for the 1st Ranger Battalion, explains how to gather and organize D.O.P.E. (Data On Previous Engagements) and how to organize this information to make it readily available in the field. As the term is used by Cleckner, D.O.P.E. includes observed bullet drop information at various distances, as well as the effects of wind, temperature changes, humidity and other environmental variables.
If you know your muzzle velocity, and bullet BC, a modern Ballistics App should be able to calculate bullet drop with great precision at distances from 100-1000 yards — often within a couple 1/4-MOA clicks. However, because a bullet’s BC is actually dynamic (changing with speed), and because ballistics solvers can’t perfectly account for all variables, it’s useful to collect actual, verified bullet drop data.
It’s smart to start with ballistics data from a solver app, but, as Cleckner explains: “Odds are, you’re going to have to fine-tune that data to your gun and your system. Every scope and every rifle and every bullet [type] act differently. Your scope may not track the same from rifle to rifle, so it’s important you get the data that’s unique to you.” Cleckner also explains that the ballistic data supplied with some factory ammo may only give you a crude approximation of how that ammo will actually shoot through your gun.
Keeping Your Drop Data with the Rifle
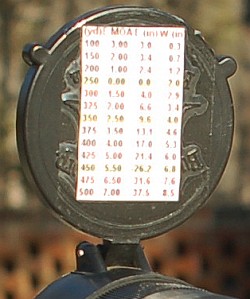
Cleckner also offers some good advice on how to record D.O.P.E. on simple index cards, and how to keep your ballistics data with your rifle. This can be done with a laminated drop chart or data transferred to a scope cover (photo right). CLICK HERE, to learn more about creating handy field data cards.
At the 4:15 mark on the video, Cleckner shows a calibrated tape he has fitted around the turret of his riflescope. The tape shows distance numbers (e.g. “4” for 400 yards, “5” for 500 yards etc.) that correspond with the number of clicks (rotation) required to be zeroed at that particular distance. With that system, you simply “dial your distance” and your point of impact should equal your point of aim. It takes some skill (and the right software) to create these tapes, but the concept is great.
Chances are that many of you have packed away your ammo and shooting supplies for the winter. Maybe you put your brass in a storage bin that might also contain solvents, old rags, or used bore swabs. Well, if you use any ammonia-based solvents, we suggest you separate the brass and ammo and keep it away from potential ammonia vapors. This is because long-term exposure to ammonia fumes can cause cracks to form in your brass. This can lead to case ruptures and possible injury.
This case-cracking phenomenon has been called Season Cracking, a form of stress-corrosion cracking of brass cartridge cases. Season cracking is characterized by deep brittle cracks which penetrate into affected components. If the cracks reach a critical size, the component can suddenly fracture, sometimes with disastrous results. If the concentration of ammonia is very high, then corrosion is much more severe, and damage over all exposed surfaces occurs. The brass cracking is caused by a reaction between ammonia and copper that forms the cuprammonium ion, Cu(NH3)4, a chemical complex which is water-soluble. The problem of cracking can also occur in copper and copper alloys such as bronze.
Season Cracking was originally observed by the British forces in India a century ago. During the monsoon season, military activity was reduced, and ammunition was stored in stables until the dry weather returned. Many brass cartridges were subsequently found to be cracked, especially where the case was crimped to the bullet. In 1921, in the Journal of the Institute of Metals, the phenomenon was explained by Moor, Beckinsale, and Mallinson. Apparently ammonia from horse urine, combined with the residual stress in the cold-drawn metal of the cartridges, was responsible for the cracking.
Don’t store ammunition (or brass) for long periods in a box or container holding ammoniated solvents:
The Australia Department of Defense (AUSDOD) has also explored the problem of brass cracking caused, at least in part, by exposure to ammonia. A study was done to see whether the amount of cracking (from ammonia exposure) varied according to the duration and temperature of the annealing process used on the brass. CLICK HERE to read AUSDOD Research Report.
Story idea from Boyd Allen. We welcome reader submissions.
Ever wondered how the parts inside an AR15 work together? Just exactly how does the reciprocating bolt carrier feed rounds from the magazine? How do the elements in the trigger group work and reset after each shot? How does the gas system bleed gas from the barrel and operate the bolt carrier? These and other questions are answered in this eye-opening video from 45Snipers. Using “cutaway” 3D computer animation, this 5-minute video shows all features of an AR15 inside and out. This fascinating firearms animation allows the viewer to look inside the upper and lower receivers, into the bolt carrier, chamber, barrel, and magazine.
This video starts off slow and has annoying background music, but it is well worth watching if you own or shoot any AR-platform rifle. It illustrates all the key operations during the charging, loading, firing, and ejection processes. The cutaway animation shows how rounds are stripped from the magazine and then chambered. It then shows how every part of the trigger group works, and how the firing pin strikes the primer. You can even watch the bullet move down the barrel before the empty shell casing is removed from the chamber and tossed out the ejection port. Here are sample frames from the video:
Video find by Grant Ubl. We welcome reader submissions.
Coating bullets with a friction-reducing compound such as Molybdenum Disulfide (Moly) offers potential benefits, including reduced barrel heat, and being able to shoot longer strings of fire between bore cleanings. One of the effects of reduced friction can be the lessening of internal barrel pressures. This, in turn, means that coated bullets may run slower than naked bullets (with charges held equal).
To restore velocities, shooters running coated bullets are inclined to “bump up” the load — but you need to be cautious.
Be Careful When Increasing Loads for Coated Bullets
We caution shooters that when your start out with coated bullets in a “fresh barrel” you should NOT immediately raise the charge weight. It may take a couple dozen coated rounds before the anti-friction coating is distributed through the bore, and you really start to see the reduced pressures. Some guys will automatically add a grain or so to recommended “naked” bullet charge weights when they shoot coated bullets. That’s a risky undertaking.
We recommend that you use “naked” bullet loads for the first dozen coated rounds through a new barrel. Use a chronograph and monitor velocities. It may take up to 30 rounds before you see a reduction in velocity of 30-50 fps that indicates that your anti-friction coating is fully effective.
We have a friend who was recently testing moly-coated 6mm bullets in a 6-6.5×47. Moly had not been used in the barrel before. Our friend had added a grain to his “naked” bullet load, thinking that would compensate for the predicted lower pressures. What he found instead was that his loads were WAY too hot initially. It took 30+ moly-coated rounds through the bore before he saw his velocities drop — a sign that the pressure had lowered due to the moly. For the rounds fired before that point his pressures were too high, and he ended up tossing some expensive Lapua brass into the trash because the primer pockets had expanded excessively.
LESSON: Start low, even with coated bullets. Don’t increase your charge weights (over naked bullet loads) until you have clear evidence of lower pressure and reduced velocity.
Procedure After Barrel Cleaning
If you shoot Moly, and clean the barrel aggressively after a match, you may want to shoot a dozen coated “foulers” before starting your record string. Robert Whitley, who has used Moly in some of his rifles, tells us he liked to have 10-15 coated rounds through the bore before commencing record fire. In a “squeaky-clean” bore, you won’t get the full “benefits” of moly immediately.
To learn more about the properties of dry lubricants for bullets, read our Guide to Coating Bullets. This covers the three most popular bullet coatings: Molybdenum Disulfide (Moly), Tungsten Disulfide (WS2 or ‘Danzac’), and Hexagonal Boron Nitride (HBN). The article discusses the pros and cons of the different bullet coatings and offers step-by-step, illustrated instructions on how to coat your bullets using a tumbler.
Wouldn’t it be cool if you could shoot .22 LR rimfire ammo from your regular hunting or tactical rifle? That would be ideal for low-cost training right? Well, this IS possible, provided you have a rifle that was designed with a .22 LR conversion in mind. One such firearm is the remarkable Sauer 202 from Germany. This impressive centerfire rifle is available with a factory-engineered .22 LR rimfire conversion. Read on to learn how Sauer’s cool .22 LR conversion works.
Sauer 202 Rifle: .308 Win/6.5×55 with .22 LR Conversion
Forum member “Tooms” sent us a report on his very special Sauer 202 with a .22 LR conversion kit. Sauer 202 rifles feature a “Quick-change barrel system”. The barrel is clamped into the receiver with crossbolts providing tension. This allows barrels to be swapped in a few minutes with simple tools. NOTE: This conversion kit was originally designed for the Sauer 200 STR, but because the Sauer 202 shares virtually the same design for the action/bolt/magazine, the system works for the 202 as well.
Tooms, from Denmark, explains: “The rifle began as a Sauer 202 Avantgarde Gold in .308 Win. I have added a 6.5×55 match barrel, plus a wide flat-bottom match fore-arm with rail for handstop and bipod. The .22 LR system [originally] cost $1000.00 [including] barrel, bolt, magazine well assembly, and magazine. The barrel is attached by three cross-bolts and the magazine well assembly is attached by one screw that fits into the barrel.”
Using this “Quick-change system”, Tooms can easily remove his centerfire barrel and swap in a .22 LR barrel. Then he places the factory conversion kit into the magazine well. This kit provides a rimfire bolt, a fitted sleeve for the rimfire bolt, and a magazine housing. This is a full Sauer factory-designed system so it works flawlessly. With the bolt closed, you can see the “new” .22 LR chamber in the front section of the loading port. On the silver section of the bolt you can see the rimfire extractor on the side.
The .22 LR Conversion Really Works
The Sauer 202 Varmint rifle shoots very well with the .22 LR conversion, as the 50m target at right shows. Though quite expensive, the conversion kit essentially transforms your centerfire rifle into fully functional, mag-fed precision rimfire rifle. That makes the Sauer 202 much more versatile as a hunting platform. It also allows you to cross-train with inexpensive ammo. You don’t have to purchase another scope, trigger, or stock. And you enjoy the exact same stock fit and ergonomics whether you’re shooting centerfire or rimfire. In some countries where gun ownership is severely restricted, it may be easier, from a legal standpoint, to purchase a .22 LR conversion kit than to obtain a permit for a second rifle.
Comments from Readers about .22 LR Conversions:
“I had a Sauer 200 STR with the .22 LR conversion and a .308 Win barrel kit. I can attest to the accuracy of both systems. The .22 LR would easily hold 1/2 MOA or better out to 100 yards. I now have the .22 LR conversion in my Sig SSG 3000 (same action as the Sauer 200TR and the Sauer 202 listed here). The action and trigger are as good as any I have ever used to include custom actions, AIAW, AIAT, TRG22. I never had 1 malfunction from the .22 LR over many thousands of rounds. They are truly top shelf systems!” — Jesse Bell
“Blaser made a .22 LR conversion kit for the R93 for a few years. It was available in 17 HMR, .22 LR, and .22 Magnum. My 17 HMR version has fired well over 17,000 rounds at prairie dogs and has scored kills in excess of 250 yards on many occasions. Possibly the best thing ever for practicing with your big game/match rifles.” — Captain Dave Funk
The Sauer 202 rifle line-up has been replaced by the Sauer 404 series which has much in common. To learn more about the complete line of Sauer rifles visit the J.P. Sauer USA website. You’ll also find more information on the primary J.P. Sauer & Sohn German website, www.Sauer.de. Though out of production, some Sauer 202s are still for sale at EuroOptic.com.
PRODUCT SAFETY WARNING AND RECALL NOTICE FOR IMR 4007 SSC POWDER
Hodgdon and IMR are officially announcing a product safety warning and recall notice for IMR 4007 SSC smokeless powder. All lots of powder are included in the recall. IMR has received reports that this particular powder, sold in 1 pound and 8 pound containers, could become unstable due to possible rapid deterioration. Use of this product may result in combustion, fire damage and/or possible serious injury.
What to do if you have IMR 4007 SSC Powder
1. If you are in possession of IMR 4007 SSC, STOP USING THE PRODUCT IMMEDIATELY! Fill the powder container with water, which will render the product inert and safe for disposal.
2. Mail, email or fax a copy of the powder label with the lot number to the contact information below, and include your name, address, phone and email. Be sure to reference the IMR 4007 SSC recall.
EMAIL: help@imrpowder.com
CALL: 1-800-622-4366 or 913-362-9455
FAX: 913-362-1307
WRITE: Hodgdon Powder Company, Inc., 6430 Vista Drive. Shawnee, KS 66218
3. You may select a replacement IMR smokeless powder product of your choice, which will be shipped to you at no charge.
What to Do With Ammo Already Loaded with IMR 4007 SSC
If you have loaded the powder subject to this recall into ammunition, we recommend that you pull the bullets, remove the powder and wet the powder with water for safe disposal. IMR deeply regrets any inconvenience this may cause, but we believe in safety first.
Need More Recall Information?
You can get more information about this IMR 4007 SSC recall by emailing help@imrpowder.com. You can also call 1-800-622-4366 or 913-362-9455, or send a fax to 913-362-1307.
Hydro Press and Arbor Press from 21st Century Shooting
Gear Review by F-Class John
Inline dies, used with arbor presses, continue to dominate the world of precision reloading. While arbor presses have remained mostly unchanged, 21st Century Shooting offers the Hydro Bullet Seating Press, a radical departure from your average arbor press. If you are looking for improved “feel” and feedback on bullet seating pressure, you should definitely check out the Hydro Press. This design has been around for a while now but has remained unchallenged since its inception. The 21st Century Hydro Press still remains a category leader (and the choice of many top competitors) for good reason.
Arbor presses have traditionally worked by using a gear-driven ram operated with a rotating handle. This allows for a compact design but often lacks the tactile feel and smooth operation that many reloaders want. The 21st Century Hydro Bullet Seater works by using simple mechanical leverage coupled with a hydraulic pressure gauge to seat bullets in a smooth motion all while helping you keep track of seating pressures.
Editor: Many top shooters believe they can seat bullets with greater precision using the 21st Century Hydro Press. I personally get more consistent seating, which seems to improve accuracy and even help a bit with lowering ES. The Hydro Press gives you excellent feedback when seating bullets. That has helped me detect a case with too much neck tension, or a case that may have doughnut issues. When the gauge does something odd or spikes, you are alerted to a possible issue.
In this video, John Perkins of 21st Century Shooting Shows how the Hydro Seater functions.
You might be asking why or how simple a simple mechanical lever gives you an advantage over gear driven systems and the answer is simple, leverage. The Hydro Seater is equipped with a long arm that comes straight up and out from the front and uses a set of hinges that connect to the ram. This elongated arm provides lots of leverage allowing easy force modulation. This smoothly applies pressure to the seating die in one fluid motion. This transfer of power helps seat bullets smoothly in even the tightest of necks without any jerky or stuttering movements.
Working at the same time is a hydraulic pressure gauge using internal oil. I found this gauge was incredibly sensitive, accurate, and repeatable compared to spring-driven gauges. The Hydro gauge read-out really gives the user the chance to sort ammo by seating pressure should they choose. In my particular case I only use it to cull out noticeably high or low ones as “blow off” rounds and am perfectly happy if the rest fall within a given pressure range. The nice thing is that the press allows you to be as picky as you want.
Compact 21st Century Standard Arbor Press
Not to be outdone by its big brother, 21st Century offers a Standard Arbor Press as well, in both right-hand and left-hand versions. Affordably priced at $108.99, this small arbor press in made to the same exacting standards as the Hydro Seater and has some nice features of its own compared to other small arbors.
The large, knurled adjustment knob is one of my favorite features. It tightens securely, yet it allows for easy raising or lowering of the head unit without the need for hex wrenches. 21st Century’s basic arbor press also has a slightly canted lever arm which allows the user to apply pressure more easily and consistently compared to some other arbor presses. While this press is small enough to fit many range bags, it can be disassembled quickly with a single Allen wrench.
While I own the 21st Century Hydro Press for use at home, the Standard Arbor Press goes with me to out-of-town events, so I can adjust bullet seating depth at the match. I love using it for this purpose since the little press is so easy to transport, and then set up and use on the road. The seating action is smooth, and there is plenty of leverage.
Seating my bullets long before I travel gives me the ability to set them to adjust for any throat erosion that may occur. This also ensures my bullets are seated correctly, by eliminating any potential bullet weld or problems from the bullets accidentally bouncing in your luggage. I like the confidence of knowing that my bullets are properly seated before a big match, especially when it has been days or weeks since I loaded them.
SUMMARY — 21st Century Makes Great Bullet Seating Presses
Whether you need a premium bullet-seating Press such as the Hydro Bullet Seater or a basic, easy-to-transport Arbor Press, 21st Century Shooting has a excellent option for you. The Hydro Press offers outstanding bullet seating “feel” and consistency, with an ultra-smooth operation. The basic Arbor Press is well-made, compact, and also yields excellent results. Both these presses are built for a lifetime of use, using high-quality materials.
This video shows the process of cut-rifled barrel-making by Krieger Barrels, one of the world’s best barrel manufacturers. Krieger cut-rifled barrels have set numerous world records and are favored by many top shooters. The video show the huge, complex machines used — bore-drilling equipment and hydraulic riflers. You can also see how barrels are contoured, polished, and inspected.
For anyone interested in accurate rifles, this is absolutely a “must-watch” video. Watch blanks being cryogenically treated, then drilled and lathe-turned. Next comes the big stuff — the massive rifling machines that single-point-cut the rifling in a precise, time-consuming process. Following that you can see barrels being contoured, polished, and inspected (with air gauge and bore-scope). There is even a sequence showing chambers being cut.
Click Arrow to Watch Krieger Barrels Video:
Here is a time-line of the important barrel-making processes shown in the video. You may want to use the “Pause” button, or repeat some segments to get a better look at particular operations. The numbers on the left represent playback minutes and seconds.
Krieger Barrel-Making Processes Shown in Video:
00:24 – Cryogenic treatment of steel blanks
00:38 – Pre-contour Barrels on CNC lathe
01:14 – Drilling Barrels
01:28 – Finish Turning on CNC lathe
01:40 – Reaming
01:50 – Cut Rifling
02:12 – Hand Lapping
02:25 – Cut Rifling
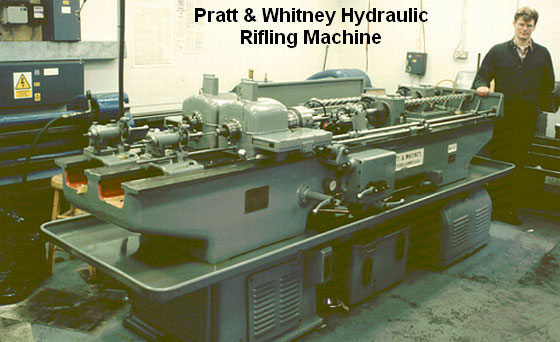
“At the start of World War Two, Pratt & Whitney developed a new, ‘B’ series of hydraulically-powered rifling machines, which were in fact two machines on the same bed. They weighed in at three tons and required the concrete floors now generally seen in workshops by this time. Very few of these hydraulic machines subsequently became available on the surplus market and now it is these machines which are sought after and used by barrel makers like John Krieger and ‘Boots’ Obermeyer. In fact, there are probably less of the ‘B’ series hydraulic riflers around today than of the older ‘Sine Bar’ universal riflers.” — Geoffrey Kolbe, Border Barrels.
The Tactical Rifle Shooters Facebook Group recently showcased tools used to measure case headspace before and after “bumping” the shoulder. After a case is fired, hand-loaders who full-length size their cases will typically bump the shoulders back anywhere from .001″ to .0035″, depending on the rifle and application. With our 6mmBR and Dasher cases we like about .0015″ bump.
You want the amount of case sizing and bump to be the same for all your brass. To ensure uniformity, it makes sense to measure your cases before and after the FL sizing process. When we have time, we check every case. Other folks will simply check the first 3-4 cases coming out of the FL sizing die to ensure the FL die setting is correct and delivering desired headspace/bump.
1. Whidden Gunworks Shoulder Bump Gauge
There are a variety of tools that can be used to measure shoulder bump. Our favorite is a special cartridge-specific bushing made by Whidden Gunworks. The Whidden Shoulder Bump Gauge enables you to adjust your sizing die to the desired measurement. The bump gauge is attached to your calipers with a set screw and determines the measurement from the base to the shoulder of the case. The photo below, from Tactical Rifle Shooters, shows the Whidden Bump Gauge for the .375 CheyTac cartridge.
2. Dave Manson Vertical Comparator with Dial Read-Out
Dave Manson states: “This tool was designed to make life easier for the advanced shooter and re-loader by allowing precise measurement of ammunition, case, and chamber headspace. With this information, the re-loader will be able to fine-tune clearances and fits between his ammunition and chamber, with resultant improvements in accuracy and case life.” The functions of the Comparator are:
1. Measure headspace of factory or reloaded ammunition
2. Quantify chamber headspace by measuring headspace of a fired case
3. Ensure minimal shoulder set-back when setting up re-loading dies
4. Compare base-to-ogive length to ensure consistent bullet-to-rifling relationship.
In addition to the Dial Indicator and Stand, the $130.00 Vertical Comparator is supplied with multiple Datum Blocks of precise length and inside diameter (.3300″/.3750″/.4000″/.4375″). MORE INFO HERE.
3. Hornady L-N-L Headspace Comparator System
Hornady makes comparator gauges matched to the red comparator holder that mounts on your caliper. These Lock-N-Load Headspace Gauges are inexpensive. You can get a set of five gauges for $31.99. Hornady explains: “The Lock-N-Load® Headspace Comparator… gauge measures variations in brass before and after firing or re-sizing. It allows for headspace comparison between fire-formed brass and re-sized brass.” IMPORTANT: Hornady states: “To determine the proper bushing diameter for your cartridge, simply add the neck diameter and the shoulder diameter and divide that number by two. Use the bushing closest to that number.” Hornady offers five: .330″, .350″, .375″, .400″, and .420″.
One tip — We have found the Hornady gauges may vary a little from unit to unit even with the same nominal size. If you have more than one gauge for the same cartridge, test each on your brass — you may then note a slight difference in your bump measurements.
4. Pistol Brass Case DIY Bump Gauge
Last is a “field expedient” set-up if you do not have any of the comparator tools shown above. A sized .45 ACP case (or other suitable pistol case) can be used to measure shoulder bump. The mouth of the pistol case sits on the shoulder of your rifle cartridge brass.
Make sure the .45 ACP case is trimmed square and that it is round. We recommend you first run it through an expander, then size it, trim it and chamfer. Next, take the .45 ACP case and slip it over the neck of a fired, unsized rifle case with the primer removed. Align the two cases between the jaws of your calipers and note the length from rim to rim (See left photo below).
OK, now you have the length for a fired rifle case BEFORE sizing. Next, take a full-length sized rifle case (without primer) and do the same thing, placing the .45 ACP case over the neck of the FL-sized case (Right Photo). The difference between the two numbers is the amount of “bump” or set-back you are applying to the shoulder. Here the difference is .0015″. The amount of bump you need varies with your chamber and your load, but .0015-.002″ is a good initial setting.
Were in prime hunting season now. Here’s an advanced product that can help you track down a prize buck. The Leupold Thermal Optics (LTO) Tracker 2 is a hand-held, heat-detection device designed as a hunting tool for game observation and game recovery. A high-performance 7X thermal spotter, the LTO Tracker 2 can detect heat sources out to 600 yards. The advanced thermal imaging engine fires up in less than five seconds and offers fast 30hz frame rates and 240×204 display resolution. The LTO Tracker 2 is compact and weighs just 7 ounces. It is listed as 100% waterproof, fogproof, and shockproof.
The hand-held unit features a 14-degree field of view and 7x digital zoom. Five different thermal filters provide multiple viewing options. The LTO’s CR123 lithium battery provides more than 10 hours of continuous use. A user-controlled reticle allow the user to quickly pinpoint a game animal or other thermal source. The latest LTO Tracker 2 is $526.14 on Amazon, while Leupold’s High-Definition (HD) LTO Tracker 2 HD unit retails for around $950.00.
Photo shows original model LTO Tracker. The newer Tracker 2 is 7X vs. 6X magnification.
Use LTO Tracker 2 Thermal to Track Animals and Guide your Hunt
From checking your ingress path to your stand, to helping track wounded animals, the LTO Thermal can perform many tasks. Hunters can use the LTO Tracker 2 to spot their quarry’s heat trail and efficiently recover the downed animal. Using the LTO Tracker 2, hunters can also plan their walk to their stand or blind with minimal risk of scaring off game. Where legal, varmint or feral hog hunters can use the LTO Tracker 2 to identify their quarry, leading to more successful hunts.
Verified Purchaser Field Test Review:
“I have a night vision scope I use for hunting hogs and it works well up to about 150 yards. I purchased the Leupold LTO Tracker 2 hand-held thermal monocular for scanning and identifying critters outside the range of the night vision scope. The first night I used the device, I was able to see rabbits playing at 200 yards, two deer eating in a soybean field 315 yards, and I was able to see hogs at 150 yards (5 yards inside the woods before they came out into the open field). Without this device, I would not have known the hogs were there and would have moved to another location. It is somewhat pricey, but good equipment is not cheap. This is a good product and you do not need a degree from MIT to use it.” — Wm. Thompson (Amazon Buyer).
“We see thermal as a vital tool in any hunter’s kit, just like binoculars or laser rangefinders,” said Tim Lesser, vice president of product development for Leupold & Stevens, Inc. “For observation and recovering downed game, the LTO Tracker will help hunters find success in the field.”


 Keeping Your Drop Data with the Rifle






 The .22 LR Conversion Really Works