Put the same load in a variety of barrels (with the same length and chamberings) and you’ll see a wide variance in muzzle velocity. In fact, it’s not unusual to see up to 100 fps difference from one barrel to the next. We demonstrated this with a comparison test of Lapua factory ammo.
Chron Testing Lapua Factory Ammo
At our Southern California test range some years ago, we chronographed Lapua 105gr 6mmBR factory ammo in three different 8-twist barrels of similar length. The results were fascinating. Lapua specs this ammo at 2790 fps, based on Lapua’s testing with its own 26″ test barrel. We observed a speed variance of 67 fps based on tests with three aftermarket barrels.
Barrel Velocity Variance
Brand ‘S’ and Brand ‘PN’ were pre-fit barrels shot on Savage actions. Brand ‘K’ was fitted to a custom action. All test barrels were throated for the 100-108 grain bullets, though there may have been some slight variances in barrel freebore. With a COAL of 2.330″, the rounds were “jumping” to the rifling in all barrels.
Among the four barrels, Brand ‘PN’ was the fastest at 2824 fps average — 67 fps faster than the slowest barrel. Roughly 10 fps can be attributed to the slightly longer length (27″ vs. 26″), but otherwise this particular barrel was simply faster than the rest. (Click Here for results of 6mmBR Barrel Length Velocity Test).
IMPORTANT: Results Are Barrel-Specific, Not Brand-Specific
These tests demonstrate that the exact same load can perform very differently in different barrels. We aren’t publishing the barrel-makers’ names, because it would be wrong to assume that ‘Brand X’ is always going to be faster than ‘Brand Y’ based on test results from a single barrel. In fact, velocities can vary up to 100 fps with two identical-spec barrels from the SAME manufacturer. That’s right, you can have two 8-twist, 26″ barrels, with the same land-groove configuration and contour, from the same manufacturer, and one can be much faster than another.
Don’t Demand More Than Your Barrel Can Deliver
We often hear guys lament, “I don’t get it… how can you guys get 2900 fps with your 6BRs and I can only get 2840?” The answer may simply be that the barrel is slower than average. If you have a slow barrel, you can try using more powder, but there is a good chance it may never run as fast as an inherently fast barrel. You shouldn’t knock yourself out (and over-stress your brass) trying to duplicate the velocities someone else may be getting. You need to work within the limits of your barrel.
Factory Ammo Provides a Benchmark
If you have a .223 Rem, 6mmBR, .243 Win, 6.5×47 Lapua, 6.5 Creedmoor, 6.5×55, .308 Win, 30-06, or .338 LM Rifle, we recommend you buy a box of Lapua factory-loaded ammo. This stuff will shoot great (typically around half-MOA), and it can give you a baseline to determine how your barrel stacks up speedwise. [Editor’s NOTE: The original test was conducted in 2008. The velocity of current-production Lapua factory ammo might be higher or lower, so your results may vary.]
When you complete a new 6mmBR rifle, it’s definitely smart to get a box of the factory ammo and chronograph it. That will immediately give you a good idea whether you have a slow, average, or fast barrel. Then you can set your velocity goals accordingly. For example, if the factory 6BR ammo runs about 2780-2790 fps in your gun, it has an average barrel. If it runs 2820+ in a 26″ barrel (or 2835 fps in a 28″), you’ve got a fast tube.
In our Shooters’ Forum, you’ll find a lengthy thread about accuracy problems with a Savage LRPV, chambered in 6mmBR. The gun would repeatedly split groups at 100 yards, and at 300 yards, the “flyers” would open up the groups to 1.5 MOA or larger. Interestingly, the factory test target (at right) showed a split group — not a good sign.
The gun’s owner, forum member LR_Shooter, tried a variety of tweaks: “I did this, done that… [changed] torque, tang floated, bedded action, recut chamber, and [adjusted firing pin]”. But nothing really helped. Frustrated, LR_Shooter asked his fellow Forum members for help. Much advice was proffered, including the novel idea of removing the middle action screw in the Savage 3-screw target action. Some of the advice proved helpful, but none of the suggested remedies produced a major improvement. This rifle, out of the box, tossed flyers and no amount of tweaking (or changes in shooting technique) really cured the basic problem. That is, until, the factory barrel got replaced…
New Criterion Pre-Fit Barrel Works Wonders
LR_Shooter acquired a Criterion pre-fit barrel from Jim Briggs at Northland Shooters Supply (NSS). These pre-fits are designed for easy installation with the standard Savage barrel nut. Wouldn’t you know it, with a new 30″ heavy-contour barrel on the LRPV, the gun started shooting way better. No more crazy fliers, no more split groups, no more excessive vertical. And the improvement came without any other major modifications.
LR_Shooter reports: “I got a replacement barrel from Jim at NSS. It is a 30″ bull Criterion barrel. So far, without playing with torque screws and having my old setup… I’m very satisfied with the barrel I got. Now I have no problem getting [groups] under 0.25 MOA. Finally this thing can shoot!”
Targets Shot with Savage LRPV Fitted with Criterion Barrel
The targets above, shot with the new Criterion barrel, speak for themselves. The left target was shot at 100 yards, while the target on the right was shot at 300 yards (very impressive).
Moral of the Story — Sometimes A New Barrel Really Is the Right Solution
All of us have struggled at times with a rifle that won’t live up to expectations. This Editor personally struggled for over a year with a .260 Rem Savage with a factory tube. The gun tended to split groups and the POI walked as the barrel heated. I tried one powder/primer combination after another, working through a variety of seating depths over many months. I was persistent. Out of stubbornness, I just believed that sooner or later I’d find the magic load.
Well folks, sometimes there’s really nothing you can do about a sub-par barrel. It is what it is. To really improve a gun’s accuracy (particularly a gun with a factory tube), you may need to open your wallet and get a quality aftermarket barrel. Spending months trying one recipe after another may simply be an overwhelming waste of powder, bullets, and your precious time.
Albert Einstein supposedly said: “Insanity is defined as doing the same thing over and over again, and expecting different results.” Well that sort of describes my efforts with my .260 Rem. Once I had enough evidence that my barrel split groups no matter what load combo (and seating depth) I tried, it was time to pony up for a new barrel. When I did finally screw on a nice PacNor 3-groove Supermatch, that Savage suddenly became a true tack-driver. As re-chambered in 6mmBR with the Pac-Nor, in calm conditions, my Savage will now consistently shoot in the twos with heavy bullets, and it can sometimes dip down into the ones with Berger 80gr flat-base bullets. The moral of the story here is simple — don’t waste weeks or months chasing your tail with a barrel that just won’t deliver (after a reasonable amount of testing). Save up for a custom barrel, get it chambered properly, and stop your cycle of frustration.
Contact Information for Northland Shooters Supply: Northland Shooters Supply
10720 Rose Drive
Bismarck, ND 58503
The Making of MatchKings — How Sierra Produces SMKs
All Sierra bullets begin life as a strip of gilding metal, an alloy consisting of 95% copper and 5% zinc. To meet Sierra’s strict quality requirements, the gilding metal requires three times more dimensional and quality control standards than is considered standard in the copper manufacturing industry.
A blanking press stamps out a uniform disc and forms the cup that will be drawn into the MatchKing jacket. The cup is then polished and sent to a draw press to be drawn into a jacket that is longer than needed for the future MatchKing, thus allowing for the trim process. Press operators constantly check concentricity to make sure we have only quality jackets. The jackets then go to a trimmer where they are visually inspected again.
After being polished a second time, the jacket travels to the bullet press. In the meantime, 80-pound lead billets are being extruded into lead wire for the cores where great care is taken so that the core wire is not stretched. The core wire is lightly oiled before continuing to the bullet press to be swaged.
The lead core wire and trimmed jacket meet at the bullet press where the first stage forms a boattail on the jacket. The lead core is then formed on top of the bullet press and fed down into the jacket. In one stroke of the press, the MatchKing is formed.
Quality control technicians pull samples from each lot of MatchKings to make sure they meet Sierra’s stringent standards. Samples are then sent to Sierra’s 300-meter underground test range (shown below) to be shot for accuracy on mechanical mounts referred to as “unrestricted return to battery rests” that Sierra designed and built in-house.
After inspection, the bullets are placed in the familiar green box along with reloading labels. They are then shrink-wrapped and shipped all over the world.
Here is a very interesting test for the 6 BRA (6mmBR Ackley) cartridge. Forum member James Phillips, a talented long-range benchrest shooter, tested SIX different primer types from three different manufacturers. To help determine vertical dispersion, James set his target out at 500 yards. He then proceeded to shoot 4-shot groups, in order, with each primer type. Velocities were recorded with a chrono. The photo above shows the results. James says: “I’ll retest the best two for accuracy and consistency with 10 shots each”. CLICK HERE for full-screen target photo.
As you can see, ALL the groups are pretty impressive. The smallest groups, 1.253″, was shot with CCI 400 primers. Next best (and very close) was CCI BR4, at 1.275″ for four shots. The “flat line” winner was the Remington 7.5, at upper left. There was almost no vertical. If you are intrigued by this interesting primer test, you can ask join the discussion in this Primer Test FORUM THREAD.
Primer Brand
Group Size
Velocity
Extreme Spread
Std Deviation
Remington 7.5
1.985″ 4 shot
2955 FPS
8 FPS
4.0 FPS
Federal 205M
2.200″ 4 shot
2951 FPS
11 FPS
4.8 FPS
Sellier Bellot SR
1.673″ 4 shot
2950 FPS
14 FPS
5.9 FPS
CCI 450M
2.341″ 4 shot
2947 FPS
14 FPS
6.6 FPS
CCI 400
1.253″ 4 shot
2950 FPS
3 FPS
1.3 FPS
CCI BR4
1.275″ 4 shot
2949 FPS
15 FPS
6.9 FPS
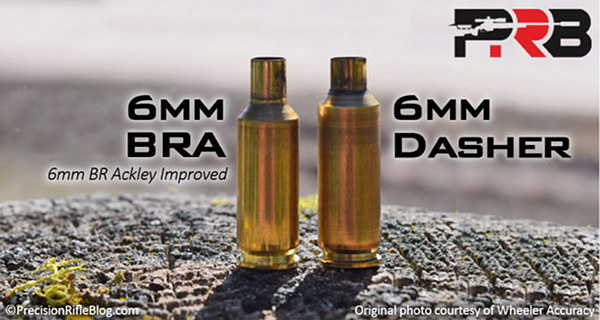
CARTRIDGE: 6mmBR Ackley, aka 6 BRA. Parent case is 6mmBR Norma. The 6 BRA is fire-formed to create a 40-degree shoulder and less body taper. Capacity is increased, but the neck is longer than a 6mm Dasher. The capacity is enough to get to the 2950+ FPS accuracy node. Some shooters say the 6 BRA is more forgiving than the 6mm Dasher. The 6 BRA is certainly easier to fire-form.
TEST REPORT — Conditions, Shooting Method, Loading Method
Tester James Phillips posted this report in ourShooters’ Forum:
Conditions: The testing was done in the morning over flags. The flags never moved or even twitched. I had as perfect conditions as I could have asked for. It was overcast so no mirage and no wind. There were no other shooters, just me.
Test Procedure: Each shot was precisely shot at my pace and centered the best possible using my Nightforce 15-55X scope. I did not use the round-robin method. Each four-shot group with the same was shot at one time. Then I moved onto the next primer. Everything felt right for each and every shot fired today. Of course I could repeat the test tomorrow and it could be exact opposite of today’s test. We can chase this forever. But [soon] I’m going to test the BR4 and 400 primer… for best accuracy and consistency for 10 shots each.
How Rounds Were Loaded: Each load was weighed to one (1) kernel of powder. So I know that’s as good as I can weigh them. Each bullet seating force was within 1# on my 21st Century hydraulic arbor press.
Previous Initial Load Testing: All groups were shot with 31.1 grains of H4895. During initial load testing I settled in on the Sellier & Bellot primer to finalize everything as it showed more promise over the CCI 450 Magnum I also tried. I was actually surprised to have seen the higher ES and SD from that primer today along with the vertical shown. [Editor: Look carefully — one shot from the CCI 450 is right in the center black diamond, stretching the vertical. By contrast the Rem 7.5 had almost no vertical.]
Velocity and NODE Considerations: I was about 5-6 FPS above what appeared to been my optimum velocity of 2943-2945 FPS, so I’ll test 5 shots of 31.0 and 5 of 31.1 and see what happens from there. I can only assume my velocities where higher due to the higher humidity and of course temps were 5 degrees warmer this morning as well. It wasn’t far off but I noticed it.
Close-up view of a sectioned case. This one here was “fixin’ to pop”, says Glen Zediker.
Here are highlights from an article Glen Zediker wrote for the Midsouth Blog. In this article Glen focuses on cartridge brass. Glen discusses the most common failures that appear with brass that has been shot multiple times, or which has been fired at excessive pressures. Glen explains some simple ways to check your cartridge brass to detect “early warning signs” of case failure, particularly case head separation, which can be dangerous.
How Cases Degrade with Multiple Firings By Glen Zediker
This article explains when, and then how, to check after the progress of changes commencing with the firing on a new case. It’s the “progress of degeneration,” in a way of looking at it because the concern is getting a handle on when enough change in the brass has come about to require attention. Or abandonment. As said then, for me that’s 4 firings. That, as said last time, is when I might see changes that need attention. Also as said, that figure didn’t come out of a hat, but from my own notes in running my competition NRA High Power Rifle loads. [Editor’s Note: With Lapua brass, using moderate loads, in bolt-action rifles, we typically get about 10 good (match-worthy) firings. But if you anneal your Lapua brass, and run modest pressures, Lapua brass can perform well for 20 or more load cycles.]
The areas most affected are the case neck and case head area. Case neck walls get thicker [but] the case head area body walls get thinner. Primer pockets get shallower and larger diameter.
This case shows a cracked neck AND a crack (separation) above the case head. Zediker says it is “rare to see one case with both of the most common failures. [This case] was attacked by an M14.”
Case Head — Causes of Separation and Cracking
When a case is under pressure during firing, the brass, like water, flows where it can, where it’s more free to move. Of course, the chamber steel limits the amount it can expand. The case shoulder blows fully forward and the case base is slammed back against the bolt face. There is, therefore and in effect, a tug on both ends — it gets stretched. The shoulder area is relatively free to expand to conform to the chamber, but the other end, the case head area, is not. Since that’s the area of the case with the thickest walls, it doesn’t expand “out” much at all. What it does is stretch. The “case head area,” as I refer to it here, is the portion of the case above the web, which is just above the taper that leads in to the extractor groove. The “area” extends approximately an eighth-inch up the case body.
Here’s a “pressure ring.” You’ll see this after firing, if you see it. And, if you see it, that case is done. The bright ring indicates excessive stretching, which indicates excessive thinning. If you see a ring circling the case, noticeable because it’s lighter color than the case body, and it’s in this area, I’d say that case is done. And that’s right where a “head separation” occurs. It can crack and also blow slap in two, and that’s the “separation” part of case head separation.
Photo courtesy GS Arizona.
This is a spot to keep close watch on as cases age. It is also the area that is more “protected” by sizing with less case shoulder set-back. That is, pretty much, where the freedom for the stretching movement in this area comes from (the case shoulder creates a gap). If you’re seeing a sign that a head separation [might happen with relatively few firings], chances are the shoulder set-back is excessive, and also… the load pressure level.
Bent Paper Clip Case-Wall Gauge
Editor: You can use a bent paper clip to detect potential case wall problems. Slide the paper clip inside your case to check for thin spots. GS Arizona explains: “This simple little tool (bent paper clip) will let you check the inside of cases before you reload them. The thin spot will be immediately apparent as you run the clip up the inside of the case. If you’re seeing a shiny line on the outside and the clip is really hitting a thin spot inside, it’s time to retire the case.” Photo by GS Arizona.
Monitor Primer Pocket Dimensional Changes
Another case-head-area and pressure-related check is the primer pocket. As said, the primer pocket will get larger in diameter and shallower in depth each firing. As with many such things, the questions are “when” and “how much,” and the main thing, “how much?”
If the pocket gets excessively shallow, and that’s judged by a primer that seats fully but isn’t at least a tick below flush with the case base, there could be function issues. There’s a risk of a “slam-fire” with a semi-auto that uses a floating firing pin, and, if there is actual protrusion, that has the same effect as insufficient headspace. A primer pocket uniformer can reset the depth of a shallowed primer pocket to what it should be, but the real test for me is how easily the next primer seats into it. If it’s significantly less resistance, I’ll say that case is done. Shallower can be refurbished. That’s a primary function of a primer pocket uniformer. Larger diameter, though, can’t be fixed. I’ve mentioned in another article or two that, any more at least, my main gauge of load pressure has become how much primer pocket expansion there’s been.
Glen’s books, Handloading For Competition and Top-Grade Ammo, are available at Midsouth HERE. For more information about other books by Glen, visit ZedikerPublishing.com
Smith & Wesson has issued a CONSUMER SAFETY ALERT for the M&P 15-22, a semi-auto .22LR rimfire rifle with ergonomics like the centerfire AR15. If you own an M&P 15-22, you need to inspect the bolt. A manufacturing problem with the bolt could allow the gun to fire when the bolt closes, even without pulling the trigger. This inspection process is described in this video.
Smith & Wesson states: “The bolt from your M&P 15-22 must be inspected to determine whether it exhibits the condition identified in this notice. To determine whether your firearm is affected by this condition, please inspect your firearm by following the inspection instructions provided here. We are asking consumers of all M&P 15-22 firearms manufactured before February 1, 2019 to inspect their bolt for this condition.”
Smith & Wesson Notice:
M&P 15-22 CONSUMER SAFETY ALERT
AND INSPECTION PROCEDURE
PRODUCT AFFECTED: ALL models of M&P15-22 rifles and pistols manufactured before February 1, 2019.
STOP USING YOUR M&P 15-22 UNTIL IT HAS BEEN INSPECTED AND YOUR BOLT REPLACED (IF NECESSARY).
Smith & Wesson has identified two M&P 15-22 firearms from recent production on which the breech face counter bore depth was not within manufacturing specification. In those firearms, the lack of depth may allow the bolt, upon closing, to crush the rim of the case, causing the round to fire, cycling the bolt, and potentially resulting in multiple discharges without depressing the trigger. This issue can occur in the following two scenarios:
1) With a loaded magazine in the firearm and the bolt locked to the rear, depressing the bolt release to allow the bolt to drop freely may ignite the round as the bolt closes without engaging the trigger and with the safety selector in either the safe or the fire position, and may also result in multiple discharges.
2) With a loaded magazine in the firearm, bolt in the closed position and a round in the chamber and the safety selector in the fire position, depressing the trigger will cause the round to fire normally, however as the bolt cycles, the next round may be ignited by the bolt crushing the rim of the case as it closes, causing multiple discharges.
We believe that these are isolated incidents, however, any unintended discharge of a firearm has the potential to cause injury. Therefore, we have developed this inspection procedure to ensure that all products in the field are safe to use. We are asking customers to perform the following procedure and to refrain from using their M&P15-22 until the bolt has been inspected and replaced as necessary.
REMEDY/ACTION TO BE TAKEN: The bolt from your M&P15-22 must be inspected to determine whether it exhibits the condition identified in this notice. To determine whether your firearm is affected by this condition, please inspect your firearm by following the inspection instructions provided here.
Safety Alert Tip from EdLongrange. We welcome reader submissions.
This is good news for gun-owners. Sportsman’s Warehouse (SW), which operates 92 retail stores in 23 states, now offers gunsmithing. Gun enthusiasts can get complete firearms gunsmithing services at the new Sportsman’s Warehouse Gunsmith Center in Utah. You can ship your rifles, pistols, or shotguns to the SW Gunsmith Center, or simply drop off your firearm at ANY Sportsman’s Warehouse store. The SW Gunsmith Center, equipped with mills and lathes, offers complete repair, refinishing, threading, metal, and stock work. For more info, visit: www.Sportsmans.com/gunsmith.
“Customers can quickly and easily drop off their firearms directly at our new Gunsmith Service Center in Utah, take them to any Sportsman’s Warehouse store, or ship them in for service,” states Jon Barker, Sportsman’s Warehouse President/CEO. “Expanding from the Utah market, we now offer this unique service to customers nationwide, including our 92 store locations.” SW has a loyalty program — each dollar spent at the Gunsmith Center gives members a point towards earning SW gift cards.
Fees Are Reasonable — $200 for Barrel Chambering
There is a $45 minimum charge for guns left overnight, and a $68/hour labor rate. A barrel chambering/fitting job costs $200. Threading a muzzle costs $100.00. Fitting an aftermarket AR trigger is $45. Blue-printing a bolt-action receiver costs $175.00. Glass-bedding an action costs $90-$175. CLICK HERE for Gunsmithing Fee Schedule.
The new Sportsman’s Warehouse gunsmith shop is located in SW’s Salt Lake City Distribution Center. The workspace features four stations for gunsmiths to work on rifles, shotguns, pistols, and muzzleloaders. They also have added a full production lathe that is designed for 24-hour-a-day operation, as well as a large end mill for a variety of metal working operations.
Finish tanks, a spray booth and oven for Cerakote, along with other pieces of equipment that will allow them to perform almost any gun service or customization are being installed.
“The only thing we won’t offer is custom wood stock building,” said Bill Sturtevant, Head Gunsmith. “The time necessary for that service takes too much time and pulls our gunsmiths off of other projects for too long. But just about anything else, including refinishing stocks, is on the table.”
Sportsman’s Warehouse will offer 1-year and 3-Year Firearm Service Plans supported by the company’s gunsmiths. Plans include: mounting and bore sighting, field cleaning, factory-service augmentation, free shipping to the factory for repair, and discounts on Gunsmith Service Center work.
Story Tip from EdLongrange. We welcome reader submissions.
A team of Texas engineers uses the principle of convolution to plot shot impacts. By triangulating data from multiple accelerometers, each shot’s exact point of impact can be plotted with great precision.
Waterloo Labs is a group of engineers from National Instruments and other self-declared “nerds” from Austin, Texas. These folks conducted an interesting demonstration using electronic accelerometers to plot bullet impacts from a suppressed Ruger MKIII .22LR pistol. The accelerometers respond to vibrations caused when the bullets hit a drywall target backer. By triangulating data from multiple accelerometers, each shot’s exact point of impact can be plotted with great precision. These point-of-impact coordinates are then fed into a computer and super-imposed into a Flash version of the Half-Life video game (which is projected on the drywall board). The end result is being able to “play” a video game with a real firearm.
Do-It-Yourself Electronic Target System?
Now, we are NOT particularly interested in shooting Zombies in a video game. However, the technology has interesting potential applications for real shooters. Waterloo Labs has published the computer code, used to triangulate bullet impacts from multiple accelerometers. Potentially, a system like this could be built to provide display and scoring of long-range targets. Sophisticated electronic target systems already exist, but they use proprietary hardware and software, and they are very expensive. The Waterloo Labs experiment shows that shooters with some computer and electronic skills could build their own electronic scoring system, one that can be adapted to a variety of target sizes and materials.
In addition, we imagine this system could be utilized for military and law enforcement training. The walls of structures used for “live-fire” room-clearing exercises could be fitted with accelerometers so the bullet impacts could be plotted and studied. Then, later, the impact plots could be combined with a computer simulation so that trainees could “replay” their live-fire sessions, viewing the actual location of their hits (and misses).
This is one amazing .50-caliber rifle. Along with the lever-actuated falling block, it has a massive swing-out breech block like you’d find on a field artillery piece. The action is so wide that the sights and scope are offset. You’ve heard of the “Beauty and the Beast”? Well here the Beast IS a Beauty….
View looking down at the action from above. Note the hinged Breech-Block.
This extraordinary example of gunsmithing art was crafted by the late J.T. (Jack) Smith of Sudbury, Massachusetts. This unique .50-caliber rifle features an aircraft machine gun barrel cut down to 38-1/4″, and turned octagon to round (in the style of Schuetzen rifles). The round portion of the barrel is tapered with a heavy boss at the muzzle. The barrel is inlaid in gold on both left and right side top flats. Custom scope bases are fitted to the receiver and to the top of the barrel. These hold an externally adjusting Unertl 15X target scope in offset scope mounts.
Huge Falling Block Receiver
The massive receiver (8″ long x 2-3/4″ wide x 3″ deep) is remarkable in design and construction. Machined from solid steel, the action incorporates several unique features. Note the hinged Howitzer-style breech block which swings to the right and mortises into the back of the receiver in the loading slot, providing a back-up for the falling block. We’ve never seen anything like that on any rifle. The one-piece floorplate/lever incorporates a Ruger No. 1-style latch which locks into the bottom of the trigger guard. The entire floorplate and lever retract downward. Firing is accomplished by means of a striker mounted in the hinged (swing-out) breech block. This is manually cocked with another lever on top of the breech block. Dropping the falling block activates the extractor which removes the spent case.
Offset Sights
This rifle features a custom-built, windage-adjustable offset front sight plus a custom-built vernier tang sight with aperture offset to the left side. The sights are offset to the left for a right-handed shooter, to correct for the extreme width of the receiver, allowing a more comfortable head position.
Have you recently purchased a new scope? Then you should verify the actual click value of the turrets before you use the optic in competition (or on a long-range hunt). While a scope may have listed click values of 1/4-MOA, 1/8-MOA or 0.1 Mils, the reality may be slightly different. Many scopes have actual click values that are slightly higher or lower than the value claimed by the manufacturer. The small variance adds up when you click through a wide range of elevation.
In this video, Bryan Litz of Applied Ballistics shows how to verify your true click values using a “Tall Target Test”. The idea is to start at the bottom end of a vertical line, and then click up 30 MOA or so. Multiply the number of clicked MOA by 1.047 to get the claimed value in inches. For example, at 100 yards, 30 MOA is exactly 31.41 inches. Then measure the difference in your actual point of impact. If, for example, your point of impact is 33 inches, then you are getting more than the stated MOA with each click (assuming the target is positioned at exactly 100 yards).
How to Perform the Tall Target Test
The objective of the tall target test is to insure that your scope is giving you the proper amount of adjustment. For example, when you dial 30 MOA, are you really getting 30 MOA, or are you getting 28.5 or 31.2 MOA? The only way to be sure is to verify, don’t take it for granted! Knowing your scopes true click values insures that you can accurately apply a ballistic solution. In fact, many perceived inaccuracies of long range ballistics solutions are actually caused by the scopes not applying the intended adjustment. In order to verify your scope’s true movement and calculate a correction factor, follow the steps in the Tall Target Worksheet. This worksheet takes you thru the ‘calibration process’ including measuring true range to target and actual POI shift for a given scope adjustment. The goal is to calculate a correction factor that you can apply to a ballistic solution which accounts for the tracking error of your scope. For example, if you find your scope moves 7% more than it should, then you have to apply 7% less than the ballistic solution calls for to hit your target.
NOTE: When doing this test, don’t go for the maximum possible elevation. You don’t want to max out the elevation knob, running it to the top stop. Bryan Litz explains: “It’s good to avoid the extremes of adjustment when doing the tall target test.I don’t know how much different the clicks would be at the edges, but they’re not the same.”
Should You Perform a WIDE Target Test Too?
What about testing your windage clicks the same way, with a WIDE target test? Bryan Litz says that’s not really necessary: “The wide target test isn’t as important for a couple reasons. First, you typically don’t dial nearly as much wind as you do elevation. Second, your dialed windage is a guess to begin with; a moving average that’s different for every shot. Whereas you stand to gain a lot by nailing vertical down to the click, the same is not true of windage. If there’s a 5% error in your scope’s windage tracking, you’d never know it.”
Verifying Scope Level With Tall Target Test
Bryan says: “While setting up your Tall Target Test, you should also verify that your scope level is mounted and aligned properly. This is critical to insuring that you’ll have a long range horizontal zero when you dial on a bunch of elevation for long range shots. This is a requirement for all kinds of long range shooting. Without a properly-mounted scope level (verified on a Tall Target), you really can’t guarantee your horizontal zero at long range.”
NOTE: For ‘known-distance’ competition, this is the only mandatory part of the tall target test, since slight variations in elevation click-values are not that important once you’re centered “on target” at a known distance.


 Barrel Velocity Variance
 In our


 Glen’s books, Handloading For Competition and Top-Grade Ammo, are available at Midsouth


 The new Sportsman’s Warehouse gunsmith shop is located in SW’s Salt Lake City Distribution Center. The workspace features four stations for gunsmiths to work on rifles, shotguns, pistols, and muzzleloaders. They also have added a full production lathe that is designed for 24-hour-a-day operation, as well as a large end mill for a variety of metal working operations.
 Do-It-Yourself Electronic Target System?


 Verifying Scope Level With Tall Target Test


