|
|
May 9th, 2019

 Gun guys are always shipping stuff around the country — whether it’s a barrel to be chambered, or a scope that needs to go back for warranty repair. Or maybe you’ve sold some bullets or reloading dies you no longer need. To ensure your precious packages get to their destination in one piece, it’s important to take precautions when boxing up your items. And by all means insure packages for full value — even if your packaging is perfect, there is always the possibility that your shipment might be lost altogether. Sadly, that can happen, no matter which carrier you choose: Fedex, UPS, or the U.S. Postal Service (USPS). Here are some tips for shipping gun stuff — we explain how to pack items properly and how to minimize the risk of loss. Gun guys are always shipping stuff around the country — whether it’s a barrel to be chambered, or a scope that needs to go back for warranty repair. Or maybe you’ve sold some bullets or reloading dies you no longer need. To ensure your precious packages get to their destination in one piece, it’s important to take precautions when boxing up your items. And by all means insure packages for full value — even if your packaging is perfect, there is always the possibility that your shipment might be lost altogether. Sadly, that can happen, no matter which carrier you choose: Fedex, UPS, or the U.S. Postal Service (USPS). Here are some tips for shipping gun stuff — we explain how to pack items properly and how to minimize the risk of loss.
Tips for Shippers
Dennis Haffner from McGowen Precision Barrels offers some advice on how to avoid damage when shipping gun parts or other valuable or heavy items. Dennis explains:
 “First, I started double-packing the contents and in many cases double-boxing. I spend a fortune on heavy-reinforced shipping tape. If the contents are loosely packed, the package is going to get crushed. On real important items or delicate items, wrap the content in plastic and spray the inside void areas with non-expanding foam. They make shipping foam just for this. This method really works. Since I started paying more attention to packaging, I have just about wiped out my issues with all three companies (Fedex, UPS, USPS). Yes, I hate doing it, but in the long run for us, it’s cheaper. “First, I started double-packing the contents and in many cases double-boxing. I spend a fortune on heavy-reinforced shipping tape. If the contents are loosely packed, the package is going to get crushed. On real important items or delicate items, wrap the content in plastic and spray the inside void areas with non-expanding foam. They make shipping foam just for this. This method really works. Since I started paying more attention to packaging, I have just about wiped out my issues with all three companies (Fedex, UPS, USPS). Yes, I hate doing it, but in the long run for us, it’s cheaper.
Bullet shipments are the worst — a shipment of 500+ bullets can destroy a cardboard box. I have ordered bullets from individuals who put them in baggies and filled the remainder of the box with foam peanuts. That is not going to work. Any piece of metal, including a die, will puncture a cardboard box, or destroy a padded envelope. Just look at the tracking information and imagine your package bouncing around in the back of the shipping truck, probably under many other packages. My advice is to NEVER use padded envelopes. Barrel nuts or recoil lugs will most likely never make it.
ORM-D items are required to be shipped in heavily-reinforced, double-walled containers. The packages still get a little damage, but the contents usually survive.
 How do shipments get damaged? Consider this — one of the shipping companies this year flipped (overturned) one of our new CNC machines (which rendered it useless). Maybe your small packages were in the same delivery truck as my CNC machine. I wonder how many little boxes were crushed underneath it. How do shipments get damaged? Consider this — one of the shipping companies this year flipped (overturned) one of our new CNC machines (which rendered it useless). Maybe your small packages were in the same delivery truck as my CNC machine. I wonder how many little boxes were crushed underneath it.
As for USPS flat rate boxes — you would not believe what people try to stuff in these boxes. USPS finally put a weight limit on the boxes — they had to. I sometimes take my delicate items packed in an envelope or small box. I spray foam in a larger flat rate box and insert the smaller package, then fill the remainder of the void with foam. It works, and part usually arrives undamaged.”

Shipping Rifle Barrels (PVC Tube and Tennis Ball Method)
A new match-grade barrel can cost $350 or more, and it might take six months (or more) to replace it, given the current wait time with top barrel-makers. So, you don’t want your nice new tube to get damaged in transit. Forum Member Chuck L. (aka “M-61″) offers these tips for shipping rifle barrels:
 “Packing a barrel can be a problem. Here’s a shipping method that won’t stop lost shipments but so far has stopped damage. Get a PVC pipe (of size appropriate to your barrel) with fitted caps for each end. Attach a cap to one end. Tape the barrel threads and tape over the muzzle. Then drop one standard tennis ball into the pipe. Place barrel in pipe. Next add whatever peanuts or foam you can jam in to support the barrel on the sides. Then place a second tennis ball into the opposite end of the PVC pipe. (So now you have a tennis ball on either end of your barrel.) With everything secure inside, attach the upper cap and tape it down securely. With this packing procedure, when the carrier launches the pipe like a javelin, at least the barrel will not come through like a spear and be gone. Label the pipe with very large address labels so no one suspects it’s just garbage laying around. This procedure may seem ridiculous but it has worked for me. Oh and definitely get insurance. If your item is insured, the shippers will look harder to find it.” “Packing a barrel can be a problem. Here’s a shipping method that won’t stop lost shipments but so far has stopped damage. Get a PVC pipe (of size appropriate to your barrel) with fitted caps for each end. Attach a cap to one end. Tape the barrel threads and tape over the muzzle. Then drop one standard tennis ball into the pipe. Place barrel in pipe. Next add whatever peanuts or foam you can jam in to support the barrel on the sides. Then place a second tennis ball into the opposite end of the PVC pipe. (So now you have a tennis ball on either end of your barrel.) With everything secure inside, attach the upper cap and tape it down securely. With this packing procedure, when the carrier launches the pipe like a javelin, at least the barrel will not come through like a spear and be gone. Label the pipe with very large address labels so no one suspects it’s just garbage laying around. This procedure may seem ridiculous but it has worked for me. Oh and definitely get insurance. If your item is insured, the shippers will look harder to find it.”
Editor’s Note: Fedex also makes a triangular-profile cardboard shipping box. This 38″ x 6″ x 6″ x 6″ Fedex Tube (designed for blueprints and posters) is free for the asking. For most barrels, there should be enough clearance to hold your PVC tube (with barrel packed inside tube). However, don’t ship the barrel inside the cardboard box by itself. Cap and pad the ends and bubble wrap it heavily, or better yet, use the PVC tube method described above, with the PVC tube inside the box.
For More Packing and Shipping Advice, Read this Forum Thread.
April 26th, 2019
The Remington 700 is the most popular bolt-action rifle in America, at least according to Gunbroker.com sales figures for new and “previously-owned” rifles. So, chances are that you (or a close family member) may have a Rem 700 of some vintage sitting in the gunsafe. But do you have a copy of the official Remington 700 product manual in digital PDF format? Probably not.
To get you squared away, CLICK HERE for a PDF version of an official Remington 700 Owner’s Manual (also covers models Seven, and 673). CLICK HERE for the complete Remington Owner’s Manuals Archive.
Perhaps you own other Remington firearms as well. Here are links for other Remington Manuals. For each model, click the link and the manual should appear in your download folder as a PDF file. If that doesn’t work, then Right Click and “Save As” to Download.
Owner’s Manuals
April 20th, 2019

The Giraud power trimmer indexes off the shoulder of the case. It is costly, but offers high production rates, trimming to length and chamfering in one operation.
The folks at PMA Tool, makers of arbor presses, neck-turning tools, and other case-prep tools, offer some good advice about case trimming on the PMA Tool Blog. Here we reprint a PMA blog post that explains case trimming basics and helps you choose the right case-trimming tool for your needs.
Case Trimming Basics
Trimming the cartridge case to the proper length is a crucial step in case preparation that should not be overlooked or underestimated. The cartridge case or the rifle can be damaged, or even worse you get badly injured. In most instances cases should be trimmed after firing and sizing. Trimming new brass is necessary for a lot of wildcats and can be beneficial in some instances, but by and large, trimming new brass is not necessary for most situations (unless you are neck-turning). Cases should be trimmed after you have sized the case, because the expander ball on the decapping pin can (and will) stretch the neck. Those of us who neck size should get into the habit of trimming after sizing as well. This is a good rule of thumb to go by, and hopefully it will keep you safe during the reloading and shooting process.
There are so many case trimmers out there that work, deciding which one is right for you can be confusing. Even though I have trimmed thousands of cases, using about every method possible, I can’t answer the question of what case trimmer is right for you because of all the variables that may be involved. I can, however shed some light on the subject.

The two most popular designs of trimmers either index (1) off the base or the head of the case, (2) off the shoulder or datum line of the case. There are pros and cons to each and it all depends on what you are willing to live with.
Indexing off the Base (Case Head)
Let’s talk about the first one I have listed, indexing off the base, or the head of the case. The pros to this method are that you can achieve a very accurate over all length and that is after all, what it is all about. The cons to this method are that you can get some variation doing it this way. Let me explain, the base is not always square to the body or can be damaged during firing especially if it is fired through a military style rifle with a very aggressive ejector. These cases should be discarded, but sometimes they can be overlooked. This condition can lead to an over all length that is incorrect. The case head being out of square will be corrected upon firing, however that case will wind up being shorter than the rest of your cases, possibly creating a difference in the neck tension on the bullet. The more you can do to eliminate variables in your reloads the better off you are going to be. This method can also be very slow, and if the user gets careless the result will be a inconsistent over all length.

Indexing off the Shoulder (Datum Line)
The second method I mentioned, trimming off the shoulder or the datum line of the case, has its pros as well. I have found this to be the quickest of the methods and very accurate as well. After the case has been sized through the die the dimensions (particularly the headspace) of the cases are usually very uniform and exact, this allows the case to be trimmed by indexing off the shoulder. This method can be done very quickly, by hand, or by powering either the case, or the trimmer. You also don’t have to worry about the case heads being out of square with the body using this method. Generally the trimming time is cut in half, and this leads to greater focus on the job, without becoming careless.

The PMA Micro-Adjust Case Trimmer indexes case length off of the shoulder of a properly fire-formed and full-length re-sized case. We accomplish this through the use of interchangeable Delrin™ inserts which capture the shoulder and neck of the case. This insert is contained in a spring-loaded tool head that rides on a linear bearing. When the case is captured within the tool head the tool head rotates along with the case, the spring allows for the case to self-align squarely to the cutter and allows you to control the feed rate into the cutter.
— Indexes off shoulder for easy, consistent trim length
— Fully rotating head with bearing for smooth operation keeps cuts square
— Large, ergonomic design fits the hand well
— Sharp carbide cutter for quick, smooth cuts with minimal bur
— Cases captured in Delrin™ (completely non-marring material)
— Spring loaded head allows complete control of rate of feed.
Our trimmer can be used in three ways. The first method utilizes our PMA Tool caseholder drivers and your power screwdriver, drill, case lathe, drill press or lathe. Trimming via this method the case is spun and fed into the trimmer while it is held in your hand. In the second method, the trimmer’s adjustment knob is removed (after adjusting and locking the setting) and the cutting shaft is chucked in a drill, drill press or lathe. Using this method, the case itself is held by hand and fed into the cutter. We’ve found this to be the quickest method to trim.
Summary
The choice is yours to make. I hope that this was some help to you, whether you are looking for your first trimmer or looking to replace the trimmer you have. Just remember to always put safety first and accuracy second, and you will start making little bug holes in no time.
Story Tip by EdLongrange. User submissions are welcome.
April 16th, 2019

The Applied Ballistics 2019 Spring Seminar will be held at Snowbird Resort in Utah on June 1-2, 2019. The Seminar Fee is $625.00. However, now through April 21st you can use Code ABWIRE for $75 off registration. Note — Seminar fees do NOT include lodging! However, through May 4, 2019, attendees can reserve rooms at the Center-Cliff Lodge at the special seminar rate of $145.00 per night plus tax.
Primary speaker Bryan Litz will present material from his books, the Applied Ballistics Lab, and his experience shooting in various disciplines. Additional speakers addressing ballistics and long-range shooting topics will include Nick Vitalbo, Doc Beech, Alan Barnhart, Mitchell Fitzpatrick and other industry experts.
Seminar attendees will receive multiple Applied Ballistics products, all included in the registration fee:
1) Full library of Applied Ballistics Books and DVD set, valued at $275.
2) Applied Ballistics Analytics software, valued at $200.
3) Binder including hand-outs, articles, and worksheets.

Seminar Topics Will Include:
1. Trajectory Buildup – Baseline Trajectory, Gravity Drop, Vacuum Trajectory, and Aerodynamic Drag
2. Trajectory Features – Zeroing, Point Blank Range, Danger Space, and Uphill/Downhill Effects.
3. Sights – Tall Target Test (Sight Scale Factor and Cant), Aperture Sights, Turrets vs. Holding Reticles, and Extreme Adjustment for ELR.
4. Drag Modeling – What is a drag model, how is drag measured, how is a drag model used, and standard drag models.
5. Ballistic Coefficients – What is a BC, G1 and G7, Curve Fitting Challenges (averaged BCs, segmented BCs), and Estimating BCs.
6. Wind – Nature of wind, Mechanism of wind deflection (velocity scaling, lag time, wind deflection), near vs. far wind, wind measurement, terrain and vertical wind, competition Wind strategies, Wind coaching.
7. Basic Stability – Gyroscopic Stability Factor, Twist Rate Effects (muzzle velocity, precision, and BC).
8. Advanced Stability – Gyroscopic vs Dynamic Stability, Limit Cycle Yaw, Twist rate and Stability Effects in Transonic Flight, and Spin Decay.
9. Secondary Effects – Spin Drift, Coriolis, Aerodynamic Jump, Secondary Effects in Ballistic Solvers.
10. ELR Shooting – Transonic effects, Secondary Effects, Critical Nature of (Ranging, MV Measurement, Drag Modeling, Wind), Equipment Currently Being Used and Bullet Selection.

11. WEZ Analysis – What is WEZ, Confidence Environments, Precision (Wind, Range, MV), Accuracy (Sights, Trajectory Modeling, Secondary Effects, Calibration (Trueing)).
12. Ballistic Solvers – Components (Interface, Solver/Simulation, Model), Potential Accuracy, and walk-through of use with technical explanation of inputs.
13. Other Topics – Technology, Laser RangeFinders, Non-Linear Divergence, and Much More.
April 15th, 2019

The .260 Remington and the 6.5×55 Swedish (aka 6,5x55mm SE) are both very popular cartridges with hunters and target shooters. The 6.5×55 has a long military heritage and a great record as a hunting round. The .260 Rem, essentially a .308 Win necked down to .264 caliber, is a more recent cartridge, but it grows in popularity every year, being one of the top cartridges for tactical/practical competitions. It offers better ballistics and less recoil than the parent .308 Win cartridge. In our Shooter’s Forum, respected UK gun writer Laurie Holland provided a good summary of the differences between the two chamberings. Laurie writes:
 The 6.5×55 case has 6 or 7% more capacity than the .260s, even more in practice when both are loaded to standard COALs with heavy bullets, which sees them having to seated very deep in the .260 Rem using up quite a lot of powder capacity. So loaded up for reasonable pressures in modern actions, the 6.5×55 will give a bit more performance. The 6.5×55 case has 6 or 7% more capacity than the .260s, even more in practice when both are loaded to standard COALs with heavy bullets, which sees them having to seated very deep in the .260 Rem using up quite a lot of powder capacity. So loaded up for reasonable pressures in modern actions, the 6.5×55 will give a bit more performance.
The issue for many is what action length is available or wanted, the 6.5×55 requiring a long action. So sniper rifle / tactical rifle competitors will go for the .260 Rem with the option of the many good short-bolt-throw designs around with detachable box magazines (DBMs). If a bit more performance is needed, the .260 AI (photo right) can yield another 100-150 fps velocity, depending on bullet weight.
April 13th, 2019

Useful reloading gear does not have to be costly. Here are ten handy (and very inexpensive) items that belong on your loading bench or in your range kit.
|
 • Magnifying Glass – We use a flat, 2″x2″ pocket 4x-8x magnifier. This folds up on itself. Very handy, we use it to inspect bullets and brass. Use this to check your flash holes for burrs, and check the meplats of your bullets before loading. • Magnifying Glass – We use a flat, 2″x2″ pocket 4x-8x magnifier. This folds up on itself. Very handy, we use it to inspect bullets and brass. Use this to check your flash holes for burrs, and check the meplats of your bullets before loading.
• Clear 35mm Film Cannister – Use this to transfer the thrown powder charge to the little measuring cup that sits on your scale. That way you don’t get any kernel splash. Also if the charge weight is obviously off, it’s easy to dump back in the measure. A film canister works pretty well as a trickler too.
• Compressed Air in a Can -- Get these at office supply stores. Use the can (with tube attached) to blow crud out of cases after cleaning the neck with a brush, and blast loose debris out of primer pockets.
• Pin Vise – A simple pin vise with a #53 bit is perfect for deburring Lapua PPC and BR flash holes without reaming the flash-holes any larger. The Lapua PPC/BR flash-hole diameter is 1.5 mm, or 0.059″. Amazon.com sells a handy $8.28 pin vise kit with 10 bits, including the ideal 1.5mm bit. Other vendors offer a #53 pin vise bit that measures .0595″ or .060″ (depending or source). You can find pin vises and bits at hobby stores. Note — The model shown below is currently out of stock, but there are many pin vise sets offered from $7 to $15.

• Bounce Dryer Sheets – The common dryer sheets eliminate “static cling” on your plastic reloading parts such as powder measure cylinders, powder funnels, and reloading press plastic bins. Thanks to Doc76251 for this tip.
 • Ballistol Aerosol – Try using this versatile lubricant/solvent for full-length sizing. Spray some on a patch and you can wipe the carbon of your case necks. Then, continue to apply a very small amount of Ballistol on the case bodies — just thin sheen is all you need. Ballistol is super slippery, and easy to remove. For general full-length sizing (on small cases) it works great and doesn’t leave a gooey, waxy, or chalky residue. For heavier case-forming jobs, we recommend Imperial Die Wax. • Ballistol Aerosol – Try using this versatile lubricant/solvent for full-length sizing. Spray some on a patch and you can wipe the carbon of your case necks. Then, continue to apply a very small amount of Ballistol on the case bodies — just thin sheen is all you need. Ballistol is super slippery, and easy to remove. For general full-length sizing (on small cases) it works great and doesn’t leave a gooey, waxy, or chalky residue. For heavier case-forming jobs, we recommend Imperial Die Wax.
• Shotgun Mop – Stick this in the chamber when using Wipe-Out foaming bore cleaner. This will seal off the chamber so the foam doesn’t flow into your action. For long chambers screw on one section of cleaning rod to aid extraction.
• Colored Sharpie Marking Pens – Mark your bullets ahead of the bearing surface, and the color transfers to the target. This way you can shoot multiple loads at the same point of aim and discern which load shoots the tightest. (Recommended for 300 yards and beyond). With colored bullet tips you can test multiple loads “round robin” to equalize wind effects. When testing seating depths for example, you can mark the longer-seated set of bullets red and the shorter-seated set green and shoot them during the same sequence. Just look at the colored marks on the target to see which grouped better.

• Thin Latex Gloves – You should keep a box of inexpensive, disposable latex gloves (the kind doctors use) in your loading room. These will prevent contamination of primers or powder kernels that you handle directly. Also, use the gloves when handling fine blued tools or firearms to prevent transfering body oils and salts that promote rust.
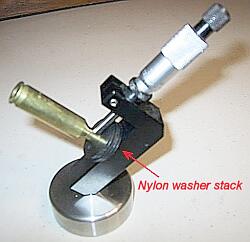
• Plastic Washers for Neck Mic – If you use a Sinclair Neck-wall Micrometer Gauge with integral stand, you can use thin plastic washers to adjust the height of the case on the mandrel. This makes it much easier to measure the same point on the case neck every time. Thanks to MikeCR for this tip (and photo).
|
April 11th, 2019
 
Put the same load in a variety of barrels (with the same length and chamberings) and you’ll see a wide variance in muzzle velocity. In fact, it’s not unusual to see up to 100 fps difference from one barrel to the next. We demonstrated this with a comparison test of Lapua factory ammo.
Chron Testing Lapua Factory Ammo
At our Southern California test range some years ago, we chronographed Lapua 105gr 6mmBR factory ammo in three different 8-twist barrels of similar length. The results were fascinating. Lapua specs this ammo at 2790 fps, based on Lapua’s testing with its own 26″ test barrel. We observed a speed variance of 67 fps based on tests with three aftermarket barrels.
 Barrel Velocity Variance Barrel Velocity Variance
Brand ‘S’ and Brand ‘PN’ were pre-fit barrels shot on Savage actions. Brand ‘K’ was fitted to a custom action. All test barrels were throated for the 100-108 grain bullets, though there may have been some slight variances in barrel freebore. With a COAL of 2.330″, the rounds were “jumping” to the rifling in all barrels.
Among the four barrels, Brand ‘PN’ was the fastest at 2824 fps average — 67 fps faster than the slowest barrel. Roughly 10 fps can be attributed to the slightly longer length (27″ vs. 26″), but otherwise this particular barrel was simply faster than the rest. (Click Here for results of 6mmBR Barrel Length Velocity Test).
IMPORTANT: Results Are Barrel-Specific, Not Brand-Specific
These tests demonstrate that the exact same load can perform very differently in different barrels. We aren’t publishing the barrel-makers’ names, because it would be wrong to assume that ‘Brand X’ is always going to be faster than ‘Brand Y’ based on test results from a single barrel. In fact, velocities can vary up to 100 fps with two identical-spec barrels from the SAME manufacturer. That’s right, you can have two 8-twist, 26″ barrels, with the same land-groove configuration and contour, from the same manufacturer, and one can be much faster than another.
Don’t Demand More Than Your Barrel Can Deliver
We often hear guys lament, “I don’t get it… how can you guys get 2900 fps with your 6BRs and I can only get 2840?” The answer may simply be that the barrel is slower than average. If you have a slow barrel, you can try using more powder, but there is a good chance it may never run as fast as an inherently fast barrel. You shouldn’t knock yourself out (and over-stress your brass) trying to duplicate the velocities someone else may be getting. You need to work within the limits of your barrel.
Factory Ammo Provides a Benchmark
If you have a .223 Rem, 6mmBR, .243 Win, 6.5×47 Lapua, 6.5 Creedmoor, 6.5×55, .308 Win, 30-06, or .338 LM Rifle, we recommend you buy a box of Lapua factory-loaded ammo. This stuff will shoot great (typically around half-MOA), and it can give you a baseline to determine how your barrel stacks up speedwise. [Editor’s NOTE: The original test was conducted in 2008. The velocity of current-production Lapua factory ammo might be higher or lower, so your results may vary.]
When you complete a new 6mmBR rifle, it’s definitely smart to get a box of the factory ammo and chronograph it. That will immediately give you a good idea whether you have a slow, average, or fast barrel. Then you can set your velocity goals accordingly. For example, if the factory 6BR ammo runs about 2780-2790 fps in your gun, it has an average barrel. If it runs 2820+ in a 26″ barrel (or 2835 fps in a 28″), you’ve got a fast tube.

April 9th, 2019
 In our Shooters’ Forum, you’ll find a lengthy thread about accuracy problems with a Savage LRPV, chambered in 6mmBR. The gun would repeatedly split groups at 100 yards, and at 300 yards, the “flyers” would open up the groups to 1.5 MOA or larger. Interestingly, the factory test target (at right) showed a split group — not a good sign. In our Shooters’ Forum, you’ll find a lengthy thread about accuracy problems with a Savage LRPV, chambered in 6mmBR. The gun would repeatedly split groups at 100 yards, and at 300 yards, the “flyers” would open up the groups to 1.5 MOA or larger. Interestingly, the factory test target (at right) showed a split group — not a good sign.
The gun’s owner, forum member LR_Shooter, tried a variety of tweaks: “I did this, done that… [changed] torque, tang floated, bedded action, recut chamber, and [adjusted firing pin]”. But nothing really helped. Frustrated, LR_Shooter asked his fellow Forum members for help. Much advice was proffered, including the novel idea of removing the middle action screw in the Savage 3-screw target action. Some of the advice proved helpful, but none of the suggested remedies produced a major improvement. This rifle, out of the box, tossed flyers and no amount of tweaking (or changes in shooting technique) really cured the basic problem. That is, until, the factory barrel got replaced…

New Criterion Pre-Fit Barrel Works Wonders
LR_Shooter acquired a Criterion pre-fit barrel from Jim Briggs at Northland Shooters Supply (NSS). These pre-fits are designed for easy installation with the standard Savage barrel nut. Wouldn’t you know it, with a new 30″ heavy-contour barrel on the LRPV, the gun started shooting way better. No more crazy fliers, no more split groups, no more excessive vertical. And the improvement came without any other major modifications.
LR_Shooter reports: “I got a replacement barrel from Jim at NSS. It is a 30″ bull Criterion barrel. So far, without playing with torque screws and having my old setup… I’m very satisfied with the barrel I got. Now I have no problem getting [groups] under 0.25 MOA. Finally this thing can shoot!”
Targets Shot with Savage LRPV Fitted with Criterion Barrel

The targets above, shot with the new Criterion barrel, speak for themselves. The left target was shot at 100 yards, while the target on the right was shot at 300 yards (very impressive).
Moral of the Story — Sometimes A New Barrel Really Is the Right Solution
All of us have struggled at times with a rifle that won’t live up to expectations. This Editor personally struggled for over a year with a .260 Rem Savage with a factory tube. The gun tended to split groups and the POI walked as the barrel heated. I tried one powder/primer combination after another, working through a variety of seating depths over many months. I was persistent. Out of stubbornness, I just believed that sooner or later I’d find the magic load.
Well folks, sometimes there’s really nothing you can do about a sub-par barrel. It is what it is. To really improve a gun’s accuracy (particularly a gun with a factory tube), you may need to open your wallet and get a quality aftermarket barrel. Spending months trying one recipe after another may simply be an overwhelming waste of powder, bullets, and your precious time.
Albert Einstein supposedly said: “Insanity is defined as doing the same thing over and over again, and expecting different results.” Well that sort of describes my efforts with my .260 Rem. Once I had enough evidence that my barrel split groups no matter what load combo (and seating depth) I tried, it was time to pony up for a new barrel. When I did finally screw on a nice PacNor 3-groove Supermatch, that Savage suddenly became a true tack-driver. As re-chambered in 6mmBR with the Pac-Nor, in calm conditions, my Savage will now consistently shoot in the twos with heavy bullets, and it can sometimes dip down into the ones with Berger 80gr flat-base bullets. The moral of the story here is simple — don’t waste weeks or months chasing your tail with a barrel that just won’t deliver (after a reasonable amount of testing). Save up for a custom barrel, get it chambered properly, and stop your cycle of frustration.
Contact Information for Northland Shooters Supply:
Northland Shooters Supply
10720 Rose Drive
Bismarck, ND 58503
Email: james@northlandshooterssupply.com
Website: Northlandshooterssupply.com
Telephone: (763) 682-4296; Fax: (763) 682-6098
April 7th, 2019

The Making of MatchKings — How Sierra Produces SMKs
All Sierra bullets begin life as a strip of gilding metal, an alloy consisting of 95% copper and 5% zinc. To meet Sierra’s strict quality requirements, the gilding metal requires three times more dimensional and quality control standards than is considered standard in the copper manufacturing industry.
A blanking press stamps out a uniform disc and forms the cup that will be drawn into the MatchKing jacket. The cup is then polished and sent to a draw press to be drawn into a jacket that is longer than needed for the future MatchKing, thus allowing for the trim process. Press operators constantly check concentricity to make sure we have only quality jackets. The jackets then go to a trimmer where they are visually inspected again.

After being polished a second time, the jacket travels to the bullet press. In the meantime, 80-pound lead billets are being extruded into lead wire for the cores where great care is taken so that the core wire is not stretched. The core wire is lightly oiled before continuing to the bullet press to be swaged.
The lead core wire and trimmed jacket meet at the bullet press where the first stage forms a boattail on the jacket. The lead core is then formed on top of the bullet press and fed down into the jacket. In one stroke of the press, the MatchKing is formed.

Quality control technicians pull samples from each lot of MatchKings to make sure they meet Sierra’s stringent standards. Samples are then sent to Sierra’s 300-meter underground test range (shown below) to be shot for accuracy on mechanical mounts referred to as “unrestricted return to battery rests” that Sierra designed and built in-house.


After inspection, the bullets are placed in the familiar green box along with reloading labels. They are then shrink-wrapped and shipped all over the world.
April 6th, 2019

Here is a very interesting test for the 6 BRA (6mmBR Ackley) cartridge. Forum member James Phillips, a talented long-range benchrest shooter, tested SIX different primer types from three different manufacturers. To help determine vertical dispersion, James set his target out at 500 yards. He then proceeded to shoot 4-shot groups, in order, with each primer type. Velocities were recorded with a chrono. The photo above shows the results. James says: “I’ll retest the best two for accuracy and consistency with 10 shots each”. CLICK HERE for full-screen target photo.
As you can see, ALL the groups are pretty impressive. The smallest groups, 1.253″, was shot with CCI 400 primers. Next best (and very close) was CCI BR4, at 1.275″ for four shots. The “flat line” winner was the Remington 7.5, at upper left. There was almost no vertical. If you are intrigued by this interesting primer test, you can ask join the discussion in this Primer Test FORUM THREAD.
| Primer Brand |
Group Size
| Velocity |
Extreme Spread |
Std Deviation |
| Remington 7.5 |
1.985″ 4 shot
| 2955 FPS |
8 FPS |
4.0 FPS |
| Federal 205M |
2.200″ 4 shot |
2951 FPS |
11 FPS |
4.8 FPS |
| Sellier Bellot SR |
1.673″ 4 shot |
2950 FPS |
14 FPS |
5.9 FPS |
| CCI 450M |
2.341″ 4 shot |
2947 FPS |
14 FPS |
6.6 FPS |
| CCI 400 |
1.253″ 4 shot |
2950 FPS |
3 FPS |
1.3 FPS |
| CCI BR4 |
1.275″ 4 shot |
2949 FPS |
15 FPS |
6.9 FPS |
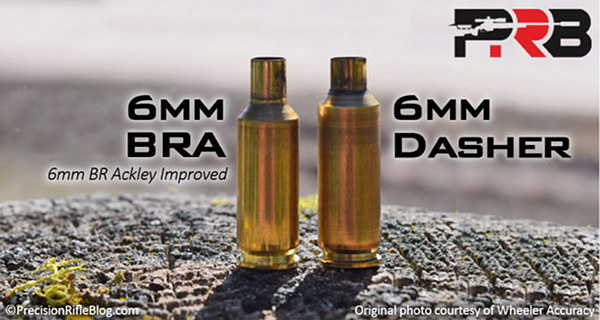
CARTRIDGE: 6mmBR Ackley, aka 6 BRA. Parent case is 6mmBR Norma. The 6 BRA is fire-formed to create a 40-degree shoulder and less body taper. Capacity is increased, but the neck is longer than a 6mm Dasher. The capacity is enough to get to the 2950+ FPS accuracy node. Some shooters say the 6 BRA is more forgiving than the 6mm Dasher. The 6 BRA is certainly easier to fire-form.
LOAD SPEC: 6 BRA (40° 6 BR Improved), 31.1 grains Hodgdon H4895, Bart’s 105gr “Hammer” bullets.
TEST REPORT — Conditions, Shooting Method, Loading Method
Tester James Phillips posted this report in our Shooters’ Forum:
Conditions: The testing was done in the morning over flags. The flags never moved or even twitched. I had as perfect conditions as I could have asked for. It was overcast so no mirage and no wind. There were no other shooters, just me.
Test Procedure: Each shot was precisely shot at my pace and centered the best possible using my Nightforce 15-55X scope. I did not use the round-robin method. Each four-shot group with the same was shot at one time. Then I moved onto the next primer. Everything felt right for each and every shot fired today. Of course I could repeat the test tomorrow and it could be exact opposite of today’s test. We can chase this forever. But [soon] I’m going to test the BR4 and 400 primer… for best accuracy and consistency for 10 shots each.
How Rounds Were Loaded: Each load was weighed to one (1) kernel of powder. So I know that’s as good as I can weigh them. Each bullet seating force was within 1# on my 21st Century hydraulic arbor press.
Previous Initial Load Testing: All groups were shot with 31.1 grains of H4895. During initial load testing I settled in on the Sellier & Bellot primer to finalize everything as it showed more promise over the CCI 450 Magnum I also tried. I was actually surprised to have seen the higher ES and SD from that primer today along with the vertical shown. [Editor: Look carefully — one shot from the CCI 450 is right in the center black diamond, stretching the vertical. By contrast the Rem 7.5 had almost no vertical.]

Velocity and NODE Considerations: I was about 5-6 FPS above what appeared to been my optimum velocity of 2943-2945 FPS, so I’ll test 5 shots of 31.0 and 5 of 31.1 and see what happens from there. I can only assume my velocities where higher due to the higher humidity and of course temps were 5 degrees warmer this morning as well. It wasn’t far off but I noticed it.
|


