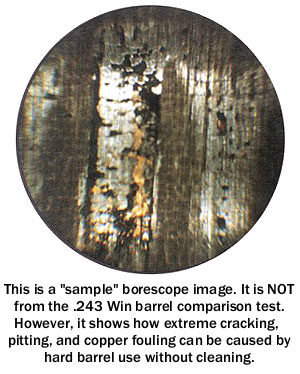
Can sustained rapid-fire shooting with no cool-down period wear out a quality barrel more quickly? The answer is “Yes” according to Forum member LCazador, who did an interesting comparison test with two .243 Winchester barrels. He started off with two, identical, match-grade HV taper stainless barrels. Both were NEW at the start of testing, and LCazador shot the same load through each: 95gr match bullets with 38 grains of Hodgdon Varget. After giving both barrels the same, gentle 20-round break-in, 300 rounds were then fired through each barrel — in very different ways. Barrel condition and wear were monitored with a borescope.
Barrel One — Slow Fire, Cool Down Periods, Cleaning Every 50 Rounds
At the end of the 300-round test, Barrel One looked brand new. There was none of the severe fire cracking found in Barrel Two. This barrel was shot no more than 10 times without a cool down and firing was done at a much slower pace. Cleaning for this barrel was done every 50 shots.
Barrel Two — Fast Firing, No Waiting, Cleaning Every 100 Rounds
The second barrel, which received hard use and minimal cleaning, was severely damaged with severe fire cracking at the leade and throat. As a result, the barrel had to be re-chambered. This barrel was shot 100 rounds at time without cleaning and was shot up to 20 times in succession without a cool down.
LESSON LEARNED — Heat Kills Barrel Life
Don’t let your barrel get too hot, and keep it clean. One afternoon can ruin a barrel!
Monitoring Barrel Wear with Borescope
Some folks worry too much about what their borescopes reveal — many barrels do not have to be “squeaky clean” to perform well. In fact some barrels run better after ten or more fouling shots. However, a borescope can be very helpful when your barrel starts losing accuracy for no apparent reason. Forum member FdShuster writes:
“A borescope is a positive way of backing up your suspicions when the rifle starts to throw an occasional (soon followed by more frequent) wild shot. Using the scope is also an excellent way to determine that the cause is barrel wear and not simply a need for a concentrated cleaning session to remove built up copper and more importantly, carbon fouling.
I’ve had a few barrels that gave every indication of being shot out. But I ‘scoped them out and found the cause to be nothing more than requiring a good cleaning. They then returned to their usual performance. There’s no guessing involved when you are able to get ‘up close and personal’ using the scope. The borescope also provides an excellent view of the all-important condition of the crown. My borescope is one of the most valuable investments I’ve ever made.”
AR-platform rifles can be maintenance-intensive beasts. They need regular inspection, cleaning, and lubrication. But some AR owners make the situation worse by not regularly cleaning important small parts, or by using too MUCH oily/greasy lubricants in the wrong places. A properly maintained and lubricated AR15 can shoot hundreds of rounds (between cleanings) without a problem. If you learn where (and where not) to apply lubricant, you’ll find that your AR will run more reliably and the task of cleaning the bolt, bolt carrier, and upper receiver internals will be less of a burden.
Here we showcase videos that show how to field-strip an AR-15, inspect the key parts, clean components, and lubricate internal parts as needed. Along with these videos, we recommend you read the comprehensive AR-15 Gun Cleaning Clinic article from the Brownells website. This explains in detail important procedures that the videos might only cover in a few seconds.
If you want to keep your black rifle running smoothly and reliably, you must clean it regularly and follow the correct maintenance procedures. Here are five videos that explain how to properly disassemble and clean AR-platform rifles.
1. How To Clean Your AR-15 | Cleaning and Maintenance Tips
This is a quick 90-second starter video that may help new AR owners. Ricky Lehnhardt of OTIS Technology demonstrates the basics of cleaning and maintaining your AR-15. Lehnhardt does a good job identifying the points that need cleaning on the inside of ARs. However he works very quickly in the video. You may want to pause the video at some points. Also, Lehnhardt employs a cable for pulling patches and brushes through the barrel. Yes this is fast and easy. However, for match AR rifles, we recommend that you instead use a cleaning ROD with fitted bore guide.
2. Take-Down and Full Cleaning of AR-15 by Jerry Miculek
Here ace shooter Jerry Miculek takes down and cleans an AR-platform rifle belonging to his daughter Lena. This is a good video because Lena’s rifle was “run hard and packed up dirty” so you can see where carbon and grease build up. This 35-minute video is very thorough. Jerry is one of the nation’s top action carbine shooters, so listen carefully to his advice on cleaning and lubrication.
3. AR-15 Maintenance: Field-strip, Clean and Lubricate an AR-15
Gunsite Academy instructor and gunsmith Cory Trapp demonstrates the proper way to field-strip, clean, and lubricate an AR-15 carbine. In this 30-minute video, Trapp offers several important technical tips and hints. For example, at 11:05 Trap demonstrates how to determine if your bolt needs new gas rings. Along with cleaning procedures, this video explains how to inspect key components and how to function-test your AR before each shooting session.
4. AR-15 Dissassembly and Cleaning Guide
This video does a good job, with close-ups, showing how to remove the bolt carrier and clean the inside of the upper receiver. Then you can see how to work with various tools to clean the bolt, bolt carrier, and inside of chamber. We also recommend that you inspect the ejector recess and extractor recess. When we’ve inspected ARs that failed to cycle properly, we have often found nasty gunk (mixture of carbon, greasy lube, and brass particles) in these areas.
5. Basic AR-15 Quick and Easy Field Maintenance
In this NSSF-sponsored video, pro shooter Ryan Muller demonstrates basic, quick field maintenance of his AR-15. This would be for a quick cleaning and lubrication of the reciprocating parts. This covers rapid maintenance in the field. For full field-stripping and thorough cleaning, watch the previous videos.
Handy Mat for Cleaning AR Rifles
When working on an AR-15, it’s smart to have a pad that can absorb solvents and cushion your upper and lower. The $29.99 Real Avid Smart Mat is a good choice. This features printed take-down instructions and it has a handy parts tray on the right side. The mat rolls up for convenient storage. Click HERE to learn more.
Vital Inspections You Should Do After Disassembly
Last but not least, here are recommended inspections you should do every time you do a full field-strip and cleaning of your black rifle:
Burris Signature Rings with polymer inserts are an excellent product. The inserts allow you to clamp your scope securely without ring marks. Moreover, using the matched offset inserts you can “pre-load” your scope to add additional elevation. This helps keep the scope centered in its elevation range while shooting at long range. Additionally, with a -20 insert set in the front and a +20 insert set in the rear, you may be able to zero at very long ranges without using an angled scope base — and that can save money. (To move your point of impact upwards, you lower the front of the scope relative to the bore axis, while raising the rear of the scope.)
Insert Elevation Values and Ring Spacing
People are sometimes confused when they employ the Burris inserts. The inset numbers (-10, +10, -20, +20 etc.) refer to hundredths of inch shim values, rather than to MOA. And you need the correct, matched top/bottom pair of inserts to give you the marked thousandth value. Importantly, the actual amount of elevation you get with Burris inserts will depend BOTH on the insert value AND the spacing between ring centers.
Forum member Gunamonth has explained this in our Shooters’ Forum:
Working with Burris Signature Rings
Burris inserts are [marked] in thousandths of an inch, not MOA. To know how many MOA you gain you also need to know the ring spacing. For example, with a -20 thou insert set in the front and a +20 thou insert set in the rear, if the ring spacing is 6″, the elevation change will be approximately +24 MOA upwards.
Here’s how we calculate that. If you have a 2 X 0.020″ “lift” over a distance of 6 inches (i.e. 0.040″ total offset at 0.5 feet) that’s equivalent to 0.080″ “lift” over 12 inches (one foot). There are 300 feet in 100 yards so we multiply 0.080″ X 300 and get 24″ for the total elevation increase at 100 yard. (Note: One inch at 100 yards isn’t exactly a MOA but it’s fairly close.)
Here’s a formula, with all units in inches:
Total Ring Offset
——————– X 3600 = Change @ 100 yards
Ring Spacing
(.020 + .020)
—————– X 3600 = 24 inches at 100 yards
Ring Spacing: 6 inches
NOTE: Using the above formula, the only time the marked insert offset will equal the actual MOA shift is when the center to center ring spacing is 3.60″. Of course, you are not required to use 3.60″ spacing, but if you have a different spacing your elevation “lift” will be more or less than the values on the inserts.
Close-up of the Tri-Way Trimmer with clear plastic chip guard removed.
Giraud Tool offers a case trimmer/chamferer device that works with a power drill (or other power source). Giraud’s patented Tri-Way Trimmer is a self-contained unit powered by your drill or motor. Using a sharp carbide blade it will trim your cases to length, deburr, and cut both inside and outside chamfers — all in one pass. That’s pretty impressive for a $120.00 tool that fits in the palm of your hand.
Product Features
1. Fully adjustable for cartridge length (and depth of chamfer).
2. Carbide blade cuts a 15° inside case mouth chamfer and 45° outside chamfer.
3. Case holder supported by sealed ball bearing raceway.
4. Tool includes removable, transparent plastic chip guard.
5. Tool can work in any orientation (vertical, horizontal, or any angle).
The Giraud Tri-Way Trimmer is designed to be powered by a portable hand drill, drill press, or other dedicated rotating power source. The tool indexes off the shoulder of your cases, but the blade adjusts so that cartridge overall length (COAL) can be controlled with precision. Constructed out of 6061-T6 aluminum and 303 stainless steel, the Tri-Way tool should last a lifetime. Note: This tool is not universal. The Tri-Way is dedicated to a single cartridge and “related” cartridges with similar body dimensions. Thus you need a specific tool for each cartridge family. For example, the .308 Win tool will also trim .243 Win, .260 Rem, and 7mm-08.
Precision rifle shooters don’t have to hit a big-league fastball, or launch a top-fuel dragster in the blink of an eye. Nonetheless, reaction times are important in our sport — both for competitive shooters and hunters. Want to catch that prairie dog before he slips down his hole? You’ll need to be quick. Want to win at short-range benchrest? Then you’ll need to watch your windflags and respond quickly to a change. Miss a major wind-shift and you could ruin your whole weekend.
Here’s a fun test of reaction times from HumanBenchmark.com. The way it works is that, after clicking “Start”, you wait until the background color changes from red to green. The instant you see green, immediately click your mouse. The average (median) reaction time is 273 milliseconds, according to data collected so far. Hint: If you keep your finger “preloaded” in contact with your mouse button you can shave some milliseconds — but don’t “jump the gun”.
Tips for Faster Times
Here are three tips to speed up your reaction times:
1) Respond to the color change (by itself), rather than wait to read the word “CLICK!” after the box shifts to green.
2) Try focusing at the corner of the box, rather than the center. This may help you react “without thinking”.
3) Have your index finger “poised and ready” over the left button–you can shave milliseconds by very slightly depressing the button before you actually click.
Readers who have just recently discovered the Daily Bulletin may not realize that AccurateShooter.com has hundreds of reference articles in our archives. These authoritative articles are divided into multiple categories, so you can easily view stories by topic (such as competition, tactical, rimfire, optics, shooting skills etc.). One of the most popular categories is our Technical Articles Collection. On a handy index page (with thumbnails for every story), you’ll find over 120 articles covering technical and gunsmithing topics. These articles can help you with major projects (such as stock painting), and they can also help you build more accurate ammo. Here are five popular selections from our Technical Articles archive.
Stress-Free Pillar Bedding. Richard Franklin explains how to do a top-quality bedding job, start to finish.
OnTarget Software Review. Our Editors test free software that measures shot groups with great precision. We explain how to use the program and configure advanced features.
Savage Action Tuning. Top F-TR shooter Stan Pate explains how to enhance the performance of your Savage rifle by optimizing the torque settings of the action screws.
Complete Precision Case Prep. Jake Gottfredson covers the complete case prep process, including brass weight sorting, case trimming, primer pocket uniforming, neck-sizing, and, case-neck turning.
Stock Painting Instructions. Step-by-step guide for stock painting by expert Mike Ricklefs. Mike shows both simple coverage and fancy effects.
SUMMARY: Powder can have a very long shelf life. You need to watch for changes in smell and color. A reddish tinge, almost like rust on the powder, is a bad sign, as is a foul odor, not to be confused with a normal chemical smell. Either of these signs indicate it is time to dispose of your powder by means other than shooting.
Ever wondered about the stability of the propellants in your reloading room? There are some important things you should know about powder storage, to ensure consistent powder performance and safety. Western Powders (which has been acquired by Hodgdon) published an informative Q & A series entitled Dear Labby: Questions for our Ballistics Lab . Here are some excerpts that pertain to powder storage and shelf life. Worried that your powder may be too old? Western’s experts explain how to check your propellants for warning signs.
Proper Powder Storage
Q: I live in southern Arizona where it is very hot. I am told powders will become unstable if stored in an area not air-conditioned. My wife says no powder or primers in the house. Can powder be stored in a refrigerator? What about using a fireproof safe? I would appreciate your ideas. — M.C.
Lab Answer: SAAMI guidelines are pretty clear on issues of storage. They recommend storing smokeless powder in containers that will not allow pressure to build if the powder is ignited — ruling out gun safes and refrigerators.
In their original containers, the lifespan of smokeless powders is quite long, even in hot, arid climates. In fact the lifespan is typically longer than the average handloader would need to store them. Stored safely in a garage or outbuilding, your powder should last years. If you see the powder developing a reddish tint, or giving off a foul odor, it is time to discard it.
Clumps in Powder Container
Q: I ordered some of your Accurate 1680 powder back about in December. I just now opened it … and it is full of clumps. My knowledge tells me that means moisture. Am I wrong? I just now broke the seal and it has been stored in a ammo can with desiccant packs around it and a dehumidifier running 14-16 hours a day. I can’t imagine this being my fault, if this does indicate moisture. I don’t know if the pink part on the label is suppose to be red or not, but it is definitely pink, so if it was red I am wondering if I was shipped an old container? I hope that this isn’t bad and I am stuck with it…
Lab Answer: All powder contains a certain amount of moisture. When the powder is stored or during shipping, it can go through temperature cycles. During the cycling, the moisture can be pulled to the surface and cause clumping. Clumping can also be caused by static electricity if too dry or the powder has limited graphite content. You can break up the clumps before metering and they shouldn’t be a problem. This will not affect the powder performance, so your product is fine. Accurate 1680 labels are designed in Pink. As a side note, specification for testing powder is at 70° F and 60% humidity.
Shelf Life and Packaging Dates
Q: Does powder ever get to old to use and what identifying marks does your company put on the canister for when it is made, You have helped me out a while ago when I asked about keeping my cowboy shooting under 950 fps and it works great less stress on the hand and the recoil is very minimum. — R.B.
Lab Answer: On one pound bottles, the number is on the corner in a silver box. If the powder was poured today, it would read 012815 followed by a lot number. The whole number would look something like 012815749. Eight pound bottles have a sticker on the bottom with an obvious date code. The lot number appears above the date.
Hunting season is here. We know that many hunters would like to carry less weight in the field, but still want an accurate and rugged rifle. In our Shooters’ Forum, there’s an interesting thread about a very light hunting rifle. Featuring a Defiance ultra-light all-steel action, this 6.5×57 Lapua lightweight tips the scales at just 4.93 pounds including scope and rings! For reference, a half-gallon of milk weighs 4.3 pounds, so this rifle is LIGHT! Here’s a report from the proud owner who built the rifle for a future Kodiak Island Alaska mountain goat hunt.
Ultralight Rifle Report by Forum Member Dave
I decided I wanted the challenge of a Mountain Goat hunt after I turn 60. It was the perfect excuse to put together an ultralight, something I had wanted to do for years. I wanted to see how light a bolt action rifle could actually be. My goal was to stay under 5 pounds, without going to a Titanium action, including rings and scope. I knew this would be difficult but I did manage to achieve the goal.
I started with a Defiance anTi model Rem Model 7 short action. This is an extremely smooth action that weighs just 19.2 ounces in this size. I had Carson Lilja of Lilja Barrels program a barrel taper to my dimensions for a 6.5mm 1:8″-twist stainless, 3-groove 22″ barrel. As fitted in the rifle, the barrel is free-floated except for the first inch or so forward of the action.
Other rifle components are: Bix n Andy Dakota trigger, aluminum trigger guard, blind magazine with an aluminum follower, titanium action screws, and a Leupold 3-9X lightweight optic in Talley rings. I also had an aluminum adapter installed in the for-end to accept a magnetic mount Javelin carbon fiber bipod.
The rifle was chambered up in 6.5×47 Lapua by my friends at Sportsman’s Outfitters in Knox, Pennsylvania. Then I sent the barreled action to Wayne at Oregunsmithing (Pendleton, OR) to have a Kevlar stock built. The stock weighs a whopping 14 ounces! When it came back I had everything Cerakoted (see bottom photo before coating). This stock was a full custom, built around my barreled action. Wayne’s work was reasonably priced with a 3-month turn around.
Excellent Accuracy — 5/8″ Three-Shot Groups at 100 Yards
Now it was time to shoot the rifle and I was not disappointed. It shoots both Barnes TTSX 100s or Swift Scirocco II 130s into 5/8″ at 100 yards. Off a bipod at 400 yards, three go into 3″ or so. This thing is crazy light even though it wears a 22″ barrel.
Without scope and rings, before Cerakoting the action and barrel, this 6.5×47 rifle tipped the scales at a mere 4.20 pounds (67.2 ounces). Check it out:
KEY FEATURES: Ballistics Solver, GPS Tagging, Weather Forecast, Field Notes with Photos
ZEISS offers a FREE mobile Hunting APP for both Apple and Android systems. The ZEISS Hunting App offers many practical functions: full-featured ballistics calculator, field notes with photo archive, compass function, GPS tagging for documentation of hunting experiences, and a detailed weather forecast service. The Hunting App is offered as a FREE download for Android and iOS (iPhone/iPad) mobile devices.
Hunt Log and Photos
The Field Notes function can do many things. You can log all your shots and hits, and you can plot game sightings during the hunt. Events can be augmented with photos and GPS data. With the Field Notes mapping function, you can even locate game populations in the hunting territory. A compass and automatic night mode round off the list of smart features.
NOTE: The rifle featured in this story was built for an Alaska Mountain Goat Hunt. The ZEISS Hunting App can provide info by species type, including deer, elk, and yes, Mountain Goats.
Here’s a tip for guys who shoot the 6 PPC, 6 Dasher, 6 BRA, .284 Shehane, or other wildcat cartridges that require fire-forming. Use your fouler shots to fire-form new cases. That way your fouler shots do “double-duty” and you get your brass fire-formed without putting extra rounds through your expensive barrel.
This procedure is recommended by Joel Kendrick, the 2004 IBS 600-yard Shooter of the Year. After he cleans his barrel, Joel knows it takes two or three shots to foul in the bore before accuracy returns. When shooting his PPC, Joel uses those fouler shots to fire-form his new brass. Joel explains: “I like to have relatively new brass always ready. By fire-forming a couple cases after each barrel-cleaning during a match, by the end of the weekend I’ve got a dozen or more freshly fire-formed cases to put into the rotation. If you do this with your fouler shots you get your fire-forming accomplished without using up any extra barrel life.”
This not only saves barrel wear, but it saves you trips to the range for the purpose of fire-forming. We thank Joel for this smart suggestion. For those who do not have a dedicated barrel for fire-forming, this should help keep your round-count down. Note: With this fouler fire-forming routine, you should ALWAYS do the fire-forming with the SAME POWDER you load for your match ammo. Joel currently works as the Supplier Quality Process Engineer for MMI-TruTec, a company that offers barrel surface coatings that can further extend your barrel life.
Hunting season is here. For many of us, Fall hunting season involves liberating a rifle that sits in a safe most of the year, grabbing a box of cartridges, and heading to the wilds. But this “once a year thing” carries with it potential risks.
It is all to easy to grab some rounds that may look right, but which are, in fact, a slightly different chambering. Likewise it is possible some hunting rounds got put in the wrong box after last year’s hunting trip. Be very careful when you get ready for a hunting trip — check the headstamp, cartridge dimensions, and bullet diameter of all your rounds. If you make an ammo selection mistake, the consequences can be disasterous, as this story reveals.
The .223 WSSM and 6mmBR Disaster Report by Dr. Jim Clary
Under most circumstances, shooters don’t have to worry about chambering the wrong cartridge into the wrong rifle. After all, the cartridges are well marked and we all know which rifle we are shooting on any given day. In many cases, incorrect cartridges cannot be chambered — larger cases will not fit in smaller chambers, for example. No problem! That being said, I can tell you that even an experienced, careful and normally safe shooter can make a mistake.
The following is an account of just such a mistake that could have resulted in death or dismemberment. Fortunately, the shooter was not hurt, but the rifle was completely destroyed.
Last year, a friend purchased a Savage Precision right bolt, left port, single shot bolt action in 6mmBR Norma. It was an incredible prairie dog gun and he spent the summer burning powder and busting dogs. In October, he purchased a stainless steel Browning A-Bolt Varmint in .223 WSSM. The weather in the upper Midwest turned sour by the time he got the brass tuned up and he only got to fire it a few times before he was “socked in” for the winter. Thus, he spent his evenings loading ammo for the spring thaw.
During a break in the weather, he grabbed both rifles and a couple of bags of .223 WSSM and 6mmBR cartridges and headed to the range to check out his new loads. In case you are not familiar, the 6mmBR is smaller in diameter and a mite shorter than the .223 WSSM. Because of this, it will chamber in a .223 WSSM, but the .243 caliber (6mm) bullet is too big for the .22 caliber bore. That is what happened to my friend.
The rest is history — when he squeezed the trigger, all hell broke loose. The entire bottom of the rifle blew out, including the magazine assembly. The explosion actually cut the stock into two pieces. However, the bolt held and amazing as it may seem, the .243 bullet was “swaged” right out of the .223 barrel.
6mmBR (left) and .223 WSSM (right) cartridges above the remains of Browning A-Bolt rifle.
One Small Mistake Is All It Takes
Now, realize that my friend has been shooting all manner of firearms, safely, for over half a century. He is meticulous, thorough and conscientious in his approach to reloading and shooting. However, he made one mistake. He put some lose 6BR cartridges in a baggie as he packed up from a prairie dog hunt last summer, without noticing that the baggie was marked .223 WSSM in black marker. Then, when the break in his winter weather came, he grabbed the bag, believing it to be the WSSM cartridges and didn’t check the head stamp.
Couldn’t happen to you? How many times have we emptied our pockets of cartridges and dropped them into a plastic container on the shooting bench? How many times have we set down to a marathon reloading session, loading several calibers in a row? How many times have we put the wrong bullets, cases or primers into the incorrect container? My point is that even the safest of us can make a mistake. So, look at the picture above and take a bit more time when you reload your ammunition at home or chamber a round in the field. It might save your life.


 Monitoring Barrel Wear with Borescope


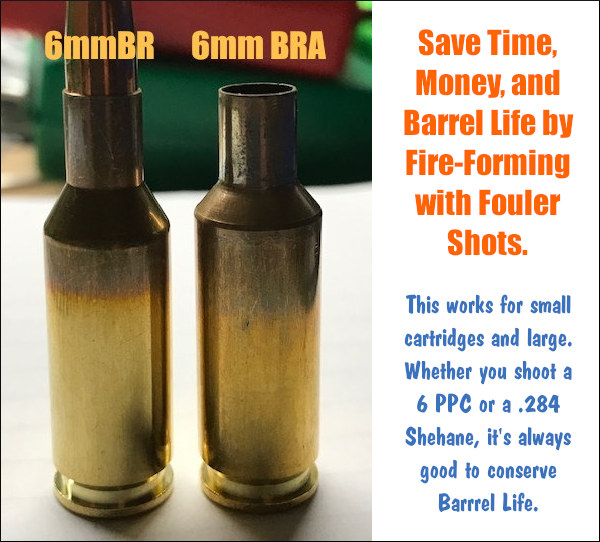
 Here’s a tip for guys who shoot the 6 PPC, 6 Dasher, 6 BRA, .284 Shehane, or other wildcat cartridges that require fire-forming. Use your fouler shots to fire-form new cases. That way your fouler shots do “double-duty” and you get your brass fire-formed without putting extra rounds through your expensive barrel.
 Hunting season is here. For many of us, Fall hunting season involves liberating a rifle that sits in a safe most of the year, grabbing a box of cartridges, and heading to the wilds. But this “once a year thing” carries with it potential risks.


