Some years ago, the folks at TargetWorkz published a a handy set of plans for a 48-inch tall self-supporting target stand. This makes a great do-it-yourself project. To create a sturdy, self-supporting target frame, all you need are some 2x4s, 1x2x48 furring strips, plus fasteners. The target holder, which supports an 18×24 inch cardboard target backer, separates from the base for easy transport.
Note: There is no cross-piece shown in the plan, but we do recommend putting wood crosspieces at the top of the target stand and about 18″ up from the bottom. This will make the frame more rigid, and will allow the frame to work even if the cardboard is badly “shot up”. Use a T-square to set the crosspieces before attaching them with screws.
Alternative Target Stand May from ABS or PVC Pipe
If you like this kind of project, but want to build a frame that is taller, yet can break down into sections, we also have an article showing you how to build a nice frame with inexpensive ABS or PVC tubing. VIEW ABS/PVC Tubing Target Frame Plans.
Here’s a “must-read” article for .22 LR rimfire shooters. The recently-released October 2018 issue of Shooting Sports USA (SSUSA) includes a great article with data on thirty-one (31) different types of popular .22 LR rimfire ammunition. The line-up includes low-speed, standard, and Hi-Velocity types, plus choices for plinking, varminting, and target applications. Brands tested include: Aguila, American Eagle, CCI, Federal, Fiocchi, Lapua, Remington, and Winchester. The slowest ammo, CCI Quiet-22 Lead RN, clocked 727 FPS. The fastest ammo, CCI Short-Range Green Lead-Free HP, ran 1735 FPS, more than twice as fast as the Quiet-22.
For each ammo type, SSUSA lists the bullet weight, velocity (FPS), and average of two, 5-shot groups at fifty yards. The most accurate ammo was Lapua Center-X LRN, with a 0.37″ average 50-yard group size. Second best was Lapua X-ACT LRN at 0.42″. Ammo was tested from a bench with a Cooper Model 57-M rifle fitted with 3-9x33mm Leupold VX-2 scope. The ammo offerings were grouped into three categories: (1) Varmints/Small Game; (2) Target; and (3) Plinking. (See ammo tables below.)
Click for larger page-view.
Different types of .22 LR (Long Rifle) rimfire ammo have different applications. Subsonic ammo, typically, is best for 25m to 50m target work with precision rimfire rigs. Hi-Velocity .22 LR ammo provides a flatter trajectory for longer ranges. SSUSA explains: “The array of .22 LR loads… turns a person’s head every which way. Subsonic target loads are the key to decisive accuracy on targets, while hyper-velocity cartridges provide striking bullet expansion on small varmints. In between, standard and high-velocity .22 LRs are loadrf with a variety of bullet weights and styles for everything from small-game hunting to plinking[.]” READ Full SSUSA .22 LR Rimfire Ammo Story.
When it comes to reloading hardware, some guys have to have the best of the best, regardless of cost. For those guys, K&M Precision has introduced an impressive new variable-speed, multi-station case prep center. This is quite a step up from other variable-speed case prep devices.*
K&M offers two versions, one with a single spindle (tool driver) running 50-200 rpm, and another modular design that can have up to six (6) spindles, running from 50 to 533 rpm. This Ferrari of case prep centers costs $2395.00 with all six spindles, with lesser prices for fewer spindles (e.g. $1795 with three spindles). The basic 50-200 rpm one-spindle machine costs $695.00. That’s still a pretty sizable investment. But for some guys, price is no object.
Watch Video to see six-spindle machine in action. Being able to adjust the speed within a broad rpm range really is a big deal. You can go slow when needed, then instantly bump up the rpm when you need to do other tasks at a higher rate. Cutting vs. brushing work best at different speeds.
The K&M Benchtop Case Prep Machine is an industrial-grade unit that features an industrial DC brushless motor for constant torque control over a speed range from 50 to 533 rpm (or 50-200 rpm for basic model). The speed can be quickly changed by simply rotating the dial switch and pressing to enter the speed. Watch the video to see the speed control in action. Models are available from one- to six-spindle configurations. The driven spindles feature a unique collet design that accepts ¼” hex shank tools that are oriented horizontally for natural ergonomics. Collet and idler spindles ride on oil-impregnated bronze bearings for smooth operation. You can use K&M-made tools or drive other types of tools using a ¼” hex tool shank adapter with either 8-32 or 3/8-24 threads. Each model has a spring-loaded spindle lock pin to hold the spindle position while setting tools or loading/unloading cartridges into the power adapter.
All machines come with quality hard case with foam, chip pan, chip brush, 1/4” hex drive adapter for 8-32 and 1/4” hex drive adapter for 3/8-24.
Product tip from EdLongRange. We welcome reader submissions.
* Lyman will soon introduce the Case Trim Xpress a single-head case trimmer with speed control for the trimmer head. RCBS offers a 6-station Case Prep Center, with variable speeds, controlled by a rheostat. Four of the six heads run up to 350 rpm, while the two high-speed heads run up to 550 rpm.
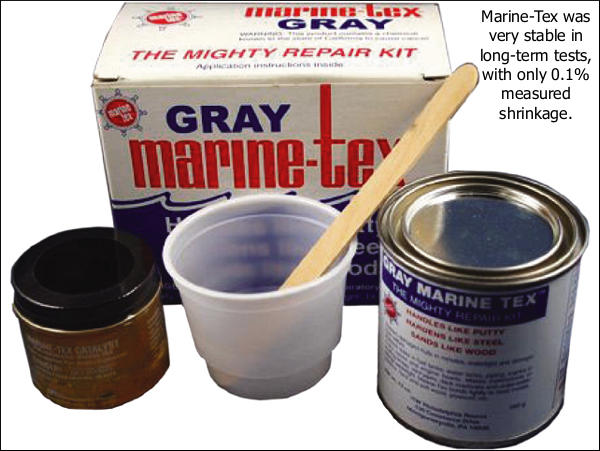
A customer of well-known gunsmith (and Hall-of-Fame shooter) Thomas “Speedy” Gonzalez recently asked Speedy about bedding compounds. Speedy offered some interesting advice based on long-term testing of various materials. Speedy favors Marine-Tex because it is very stable over time, while other materials can shrink up to 6% dimensionally. A good bedding job should be a perfect fit to your barreled action. If the bedding material shrinks over time, that is NOT a good thing….
Speedy’s customer asked: “I know you’re not a Devcon man in regards to bedding compounds but I respect your input in such matters and my question is this in regard to aluminum actions. If Devcon was considered, for an aluminum action, would you prefer aluminum compound formula or steel formula? I personally prefer Devcon steel and Marine-Tex for steel receivers but my experience with aluminum is limited. Also do you have a release agent preference that works better with aluminum?”
Speedy answered: “My only preference of one epoxy over another is their stability over time. My buddy who works for the Texas State Weights and Measures Department had me cast several of the most common types of epoxies used for bedding into 1.000″ machined blocks. After one year of being kept in a controlled climate and measured for shrinkage monthly, the Marine Tex shrunk only 1/10th of 1% (i.e. 0.1%) whereas almost all the others (including Devcon Steel formula, Devcon Aluminum formula…) shrunk 3% to 6%. The only other compounds that matched the Marine Tex were Araldite 1253 and Araldite 2014, with the latter being quite expensive for daily use.”
Speedy added: “The Marine Tex Grey has no atomized metal in its makeup even though it appears that it does. This can be proven by the use of a strong neodymium magnet. What is humorous to me is that people don’t like aluminum yet will bed their actions atop aluminum pillars that have twice the coefficient of expansion (COE) of steel. Like Devcon, it is what people have always done and used. Thus [they] perpetuate the same old stuff. That’s my two cents’ worth. But as I tell everyone, ‘I’ll tell you what I know or do, but it’s not my job to convince anyone to do it my way’.”
Release Agents — Try Shoe Polish
Regarding release agents, Speedy stated: “I use Kiwi Neutral or Tan shoe polish. This works great and you can find it anywhere. Do NOT use the black or brown as it will stick.”
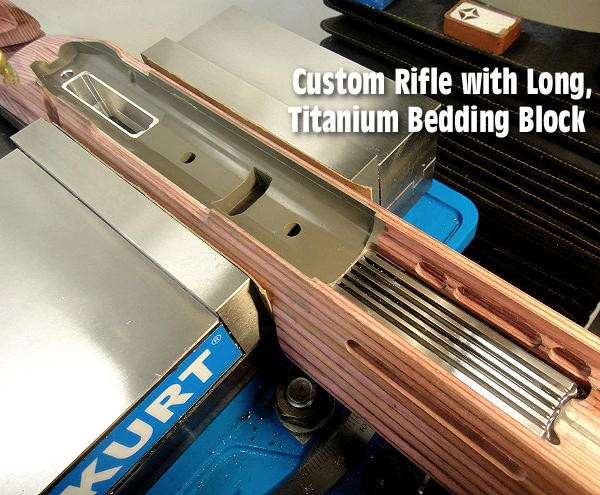
View More Photos of Speedy Inletting and Bedding Job CLICK HERE to see an interesting bedding job done by Speedy using a custom titanium bedding block. Speedy notes, “The stock was a raw blank requiring full inletting for the action to fit properly plus the titanium block. All the loading ports, bolt handle cut, bolt stop, and trigger guard cuts were done with diamond tooling to eliminate fraying and/or delamination of the wood.” You’ll find more projects by Speedy on his Facebook Page. Speedy is in San Antonio, Texas now, and accepting new projects with his company S.G. Rifles LLC.
Posted on June 21, 2017 by Sierra Bullets Written by Sierra Bullets Ballistic Technician Gary Prisendorf
I recently purchased 1,000 rounds of once-fired 5.56 LC brass that was fully processed and ready to load. The brass had been wet tumbled, using stainless steel pins and looked great inside and out, including the primer pockets.
I had always used a vibrating tumbler with either corn cob or walnut media and I always thought my brass looked pretty good until I saw what the wet tumbling and pin combination did.
Being the budget minded reloader that I am, I started looking for a cheap way to wet tumble my brass using stainless steel pins. Harbor Freight had recently opened a store nearby and I had received coupons in the mail, one of the coupons was 20% off any one item.
So I headed for the Harbor Freight store and after roaming around for 20 minutes or so I found a dual drum rotary rock tumbler for $55.00 and thought it would do just fine for what I was planning. The drums are rather small and only have a 3 pound maximum load limit each, but I figured that was big enough for around 150 .223 cases or maybe 300 9MM cases at a time.
I pulled the wrinkled up coupon out of my pocket, paid, and walked out with my new $47.00 brass cleaning machine. I didn’t have any stainless steel pins and couldn’t find any locally. At our local hardware store I picked up some brass plated ½” finishing brads that I thought might work until I could get some pins ordered.
I bought two small packages of the finishing brads (1.75 oz.), for $1.69 each then headed to my local Walmart to pick up some Dawn dish soap (.99 cents) and a bottle of Lemi Shine ($3.27). I had read online that is what a lot of people use for cleaning their brass.
I bought two small packages of the finishing brads (1.75 oz.), for $1.69 each then headed to my local Walmart to pick up some Dawn dish soap (.99 cents) and a bottle of Lemi Shine ($3.27). I had read online that is what a lot of people use for cleaning their brass.
When I got home, I started depriming .223 brass for my new toy, I mean brass tumbler. I deprimed 100 cases, put 50 in each drum, dropped a package of brads in each one, filled them ¾ of the way with water, gave each drum a small squirt of Dawn dish soap and a tablespoon of Lemi Shine. I sealed up the drums and fired up the tumbler.
After an hour and a half, I just couldn’t stand it any longer and had to see the results. The water was filthy but the cases were super clean, I couldn’t be happier. For a total investment of around $55.00, I can now get my cases looking almost new.
Here are the before and after pictures of my first run of brass:
I have since ordered two pounds of stainless steel pins, I put one pound in each drum. To be honest the brass really doesn’t look any better, but the pins don’t seem to get stuck inside of the cases near as bad as the brass-plated brads did.
Tip: Make sure to inspect your cases and look inside each case to ensure all of the brads/pins are removed.
Just lay the brass and brads/pins out on a towel and let them dry. Mine were dry after about 12 hours.
If you want your cases to look like new without breaking the bank, give it a try. You can’t clean 1000 at a time like the $200.00 tumbling machines that are made for specifically for brass, but this is a much cheaper alternative and the results speak for themselves. — Gary Prisendorf, Sierra Bullets
EDITOR: Actually you can get a machine for a whole lot less than $200.00! See the next paragraph.
Lyman Cylone Rotary Tumbler with Factory Rebate
Sierra’s Technician got his rotary tumbler and brass media for $55.00. For eighty bucks more that you can get a much better, higher-capacity system from Lyman. The Lyman Cyclone Rotary Tumbler features a large, polymer drum that holds up to 1000 .223 Rem cases. The kit includes media separation trays, plus five pounds of correct STAINLESS media. The Lyman Cyclone system costs $139.39 delivered from Amazon.
Yep you can get a complete Lyman Cyclone system WITH stainless media for under $140.00. To be honest we think that’s money well spent, compared to the “El Cheapo” Harbor Freight unit. The Lyman will run six times as many .223 Rem cases, be easier to operate, AND get the job done faster. We suspect long-term durability will be better with the Lyman tumbler as well.
At long range, small bullet holes are much easier to see “in the white” than in the black center of the normal High Power target. When you’re practicing at long range using a scoped rifle, one way to enhance your ability to see your bullet holes is to print a “negative” version of the regulation bullseye target so that your black center is now white.
How do you create a “negative” of a target image? Many image programs, including the FREE Irfanview software, have a “Negative” function in the pull-down menu. If you don’t see a “Negative” menu option in your program, look for a “substitute colors” option. Many printers also have a “reverse colors” function. If you can’t find a solution with your computer or printer, just take a normal bullseye target to a copy shop, and the staff can easily print you a set of targets with white centers in black fields.
Forum member Watercam has a Pentax PF-80ED spotting scope that allows him to see 6mm bullet holes in the white at 600 yards. However, 6mm holes in the black are only visible out to 400 yards or so. Accordingly, Watercam uses a modified “reversed” black-to-white target for 600-yard practice. Watercam explains: “[Using the Pentax] With my 6mm and limited mirage I see defined, 6mm holes in the white out to 600. In the black, however, I can see bullets holes at about 400. I now use reverse-color targets for training without a pit partner at the 600-yard line.”
The Hi-Viz Solution — Day-Glo Pasters
If you’re not concerned with official scoring rings, you can use an all-white target with a bright, fluorescent target dot in the middle. A 2″- or 3″-diameter stick-on target dot is highly visible at 600 yards. Birchwood Casey Target Spots® assortment #33928-TSA offers neon orange target dots in 1″, 2″, and 3″ diameters.
TARGET TIP — Use Chart Paper
For practice backers for the Day-GLo pasters at long distance, use Flip Chart Paper (aka Easel Pads) marked with graph lines at 1″ intervals. Available either regular or self-stick, one sheet can hold 4-8 pasters and the white paper allows for easy spotting of the holes and quick estimation of group size. Get Flip Chart Paper at Amazon.com, Staples, or Office Depot.
Brits Use White-Field Target for F-Class
In the UK, some ranges are now using a “reverse-style” target with a mostly white area. Laurie Holland says this allows shooters to see shots much more easily. Laurie reports: “Here’s a photo of the 500/600 yard F-Class match target we use in PSSA comps at Diggle Ranges with club members Chris Hull (L) and Terry Mann (R). We now use this target form at all ranges up to 1K for F-Class, and, yes you can often see your hits at 600 yards on the target before the markers pull it. Regards from England — Laurie”.
Happy New Year to all our readers worldwide, and especially the 43,200 members of our AccurateShooter Forum. We hope 2019 brings you happiness in your lives and success in your endeavors. And we wish for small groups, good scores, and successful hunts in the New Year.
Forum Members — Upgrade Your Membership to Get Unlimited Classifieds for 12 Months.
Looking Forward to 2019
Every year, we work to improve AccurateShooter.com. In 2016 we completely overhauled the Forum, making it faster and mobile-friendly. In 2017 we upgraded our servers to improve speed and security. In 2018 we started vetting every new sign-up to prevent scammers. And we have continued our popular Deals of the Week and launched a weekly Video Product Showcase. We hope you’ll continue to enjoy our feature articles, our Daily Bulletin, our match reports, and our Forum Classifieds. The formula seems to be working — our audience is bigger than ever.
Forum Membership Grows 14% in 2018
Our Shooters’ Forum grew significantly in 2018. Our membership grew by 14% as Forum ranks swelled to 43,200 members! More people are successfully buying and selling in our Forum Classifieds section than ever before. Silver and Gold members get unlimited Classifieds for 12 months. Gold members also get custom Avatars and other privileges.
We need your support. For 15 years the site has relied largely on volunteer efforts. But as the site grows, we need the assistance of Forum moderators, product testers, web gurus, and computer software experts. Those guys don’t work for glory alone.
Consider this — you’ll pay $20 for a couple movie tickets these days. For the same twenty dollars you can become a Silver Forum member for a YEAR and help this site provide info, tests, tech tips, bargains, and shooting news.
And consider the benefits — Silver or Gold Members get unlimited classifieds for 12 months. If you were to sell just one, single $1500 rifle through Gunbroker.com, just one, you would pay $58.75 in fees! For one sale!
In the last quarter of 2018 about 430 site users have donated or upgraded their Forum membership to Silver or Gold Levels. We thank all those who have generously contributed. But that still leaves tens of thousands of users who access the site every week without contributing. With more donations we can deliver more premium content and offer more services to our members.
How to Contribute
If you are a Forum member, you can help the site by UPGRADING your membership. CLICK HERE to UPGRADE.
If you’re not a member, making a donation to the site is simple and easy. Just click on the orange “Donate” button at right. If you have a credit card, you don’t need a Paypal account to contribute.
IMPORTANT: After you click on the orange button a PayPal screen will load. You’ll also see a field that says “0.00”. For desktop users that field will be on the right (with other pre-set amount buttons on the left). Fill in the amount you want to give. For example, to give $25, type 25.00 in the amount field.
Help Support this Site by Making a Secure Donation.
If you don’t like Paypal, you can send a check.
Make the check payable to: Jeff Williams. Please list your Shooters’ Forum Log-In Name (if any), and mail the check to:
Jeff Williams
P.O. Box 240
Solon Springs, WI 54873
Top to bottom – Remington firing pin assembly with ISS, Tubb SpeedLock alloy-composite system without ISS (current versions have dual, opposite-wound springs), and Remington short action firing pin assembly without ISS.
The U.S. Army Marksmanship Unit regularly publishes technical articles on the USAMU Facebook page. One informative USAMU article covered mechanical issues and related ignition irregularities that can cause vertical fliers even with good ammunition in an otherwise excellent rifle. We highly recommend you read this article, which offers some important tech tips.
Vertical Dispersion: Mechanical/Ignition Issues?
Poor or inconsistent ignition has long been known to be one of the “usual suspects” when one encounters vertical fliers that just shouldn’t be there. By having a sense of some of the basic principles involved, and a few basic areas to check, the shooter may avoid colsiderable frustration, not to mention time, expensive loading components and barrel wear.
Is your well-built rifle of high-quality components plagued with vertical fliers across more than 1-3 handload combinations? Consider the bedding, crown and scope/sight mounts. Are they correct? If so, then you might check for ignition issues before boldly undertaking an extensive, expensive, and quite possibly fruitless quest for the “magic handload”.
SEEING IS BELIEVING: While the author had been aware for many years that poor ignition should be considered and ruled out when dealing with vertical fliers in an otherwise-excellent rifle, actually seeing the problem and its almost instantaneous cure really drove the lesson home.
He was working with a “dot” rifle – a .22 LR match rifle that really stacked bullets into little piles at 50 yards and beyond. With one lot of ELEY Tenex, it produced consistent “bughole” groups at 50, but with another, selected lot of Tenex, similar groups were regularly ruined by single, vertical fliers that did not appear in other rifles. Rather than spending days burning up expensive, select ammunition looking for “magic lots”, he contacted a well-respected rimfire gunsmith and explained the situation.
Without so much as batting an eye, the highly-experienced ‘smith tore into the rifle’s action, and quickly found the cause(s) of the problem. He discovered a demonstrably weak firing pin spring, plus a chip out of the face of the firing pin where it contacted the cartridge rim.
After replacing and tuning the offending parts, the rifle immediately began shooting tiny, bughole groups with the previously “unacceptable” lot of Tenex. Centerfire rifles can also benefit from ensuring positive, consistent ignition. A wise riflesmith is literally worth his weight in gold!
So, what are some issues we as shooters can inspect in our rifles to help determine if ignition woes could be part of our problem? At the club level, ask yourself if that “experienced” Remington, Winchester 70, or even Springfield-based match bolt gun you’re using is still running its’ original 40-80 year-old factory striker spring? If so, a new replacement is cheap insurance against current or future problems. (And BTW, it might be best to stick to the normal, factory-spec spring weight. A super-powerful spring can cause vertical, just as a weak one one can.) Along with that, a routine check for proper firing-pin protrusion is a quick preventive measure that can rule out potential issues.
Other areas to consider are the centering and consistency of the firing pin’s operation in the bolt. Admittedly, with the increasing use of precision-machined custom actions, this is becoming less an issue every day. Below is the firing pin assembly from a custom BAT action:
However, particularly with factory actions, a very quick and easy check is to remove the bolt, let the firing pin go forward, and look at the firing pin tip through the firing pin hole. Is the tip off-center in the hole, and possibly striking it as it moves forward? Is the hole out-of-round or burred from being struck repeatedly? If so, a trip to the riflesmith is likely in order.
Similarly, machining issues in the bolt/firing pin system can lead to rough and erratic firing pin movement, in which the firing pin drags against an internal surface of the bolt. In high-quality rifles these issues are relatively rare, but not unheard-of, and it takes mere minutes to rule them out. It may be worthwhile to remove the cocking piece/firing pin/spring assembly and look for any unusual gouges, dings, peening, burrs or signs of abnormal wear.
This task is especially easy with Winchester 70s, Springfields, and the similar Mauser 98s, involving little more than the push of a button and unscrewing the cocking piece assembly. This is just one of the many reasons these tried-and-true actions have earned such a loyal following in the field, among hunters who must maintain their rifles away from a shop.
Particularly with older rifles, watch for and remove excess grease (or even Cosmoline!) from both the firing pin assembly and inside the bolt. This can help improve firing pin speed and consistency. Other bolt-action designs may need a take-down tool or other measures.
As part of this inspection, AFTER ENSURING THE RIFLE IS UNLOADED, slowly cock the rifle, dry-fire, and repeat several times. Listen carefully near the action for inconsistency in the sounds it generates. Does the striker falling make the same sound each time? Do you hear or feel grinding upon operation? If so, where?
Be sure to check the operation of the cocking piece (bolt shroud), firing pin within the bolt shroud, the cocking piece cam and the rear of the bolt body where the cocking piece cam operates. As with our examination for abnormal wear marks discussed above, look for marks indicating roughness or a possible need for light polishing. Then, clean and lightly grease the bearing surfaces while you’re at it.
Remington 700 bolt shroud and cocking cam
These are relatively easy checks that shooters can undertake to perform a preliminary inspection on their own. Other mechanical issues can also cause ignition issues, chiefly centered around the action of the trigger, sear and sear spring. If these are suspected, a trip to an experienced, qualified riflesmith for diagnosis is recommended. We hope you find this information helpful! Join us again next week, and in the meantime, enjoy the shooting sports safely!
The U.S. Army Marksmanship Unit (USAMU) regulary publishes “how-to” articles on the USAMU Facebook page. One informative “Handloading Hump Day” article covers chronograph testing and statistical samples. We highly recommend you read this article, which offers some important tips that can benefit any hand-loader. Visit the USAMU Facebook page next Wednesday for the next installment.
Chronograph Testing — Set-Up, Sample Sizes, and Velocity Factors
Initial Chronograph Setup
A chronograph is an instrument designed to measure bullet velocity. Typically, the bullet casts a shadow as it passes over two electronic sensors placed a given distance apart. The first screen is the “start” screen, and it triggers an internal, high-speed counter. As the bullet passes the second, or “stop” screen, the counter is stopped. Then, appropriate math of time vs. distance traveled reveals the bullet’s velocity. Most home chronographs use either 2- or 4-foot spacing between sensors. Longer spacing can add some accuracy to the system, but with high-quality chronographs, 4-foot spacing is certainly adequate.
Laboratory chronographs usually have six feet or more between sensors. Depending upon the make and model of ones chronograph, it should come with instructions on how far the “start” screen should be placed from one’s muzzle. Other details include adequate light (indoors or outdoors), light diffusers over the sensors as needed, and protecting the start screen from blast and debris such as shotgun wads, etc. When assembling a sky-screen system, the spacing between sensors must be extremely accurate to allow correct velocity readings.
Statistics: Group Sizes, Distances and Sample Sizes
How many groups should we fire, and how many shots per group? These questions are matters of judgment, to a degree. First, to best assess how ones ammunition will perform in competition, it should be test-fired at the actual distance for which it will be used. [That means] 600-yard or 1000-yard ammo should be tested at 600 and 1000 yards, respectively, if possible. It is possible to work up very accurate ammunition at 100 or 200 yards that does not perform well as ranges increase. Sometimes, a change in powder type can correct this and produce a load that really shines at longer range.
The number of shots fired per group should be realistic for the course of fire. That is, if one will be firing 10-shot strings in competition then final accuracy testing, at least, should involve 10-shot strings. These will reflect the rifles’ true capability. Knowing this will help the shooter better decide in competition whether a shot requires a sight adjustment, or if it merely struck within the normal accuracy radius of his rifle.
How many groups are needed for a valid test? Here, much depends on the precision with which one can gather the accuracy data. If shooting from a machine rest in good weather conditions, two or three 10-shot groups at full distance may be very adequate. If it’s windy, the rifle or ammunition are marginal, or the shooter is not confident in his ability to consistently fire every shot accurately, then a few more groups may give a better picture of the rifle’s true average.
Image Courtesy NSSF. This story is based on an NSSF Article.
‘Tis the season of gift-giving (and Christmas Day is nearly here). Perhaps you’re considering giving a a first rifle to your grandson or perhaps a carry pistol to a spouse. When making a gun gift to a friend or family member, however, there are some very important legal considerations. Also the rules on firearms gift transfers vary from state to state. Bottom line here — you need to know the law BEFORE you deliver that shiny new firearm to a family member, close friend, or relative.
The first thing to remember if you’re thinking about giving someone a gun is that … it’s a gun! You already know that ownership of a firearm brings with it some serious legal and ethical obligations that other consumer products don’t. So let’s look at some questions you may have about giving a firearm as a gift.
Image Courtesy NSSF
The first question you have to ask is whether the intended recipient can legally own the firearm where he or she lives. With more than 20,000 different gun laws on the books, even the kinds of firearms that law-abiding citizens can own vary from place to place. For example, juveniles (under age 18) generally speaking are precluded by law from possessing a handgun. Check out the Bureau of Alcohol, Tobacco, Firearms and Explosives (ATF) website for an overview of local laws and, whatever you do, don’t forget that you can never under any circumstances transfer a firearm to someone you know — or have reasonable cause to believe — legally can’t own one. That’s a federal felony, so be careful.
There’s no federal law that prohibits a gift of a firearm to a relative or friend who lives in your home state. Abramski v. United States, a recent Supreme Court decision involving a “straw purchase” of a firearm did not change the law regarding firearms as gifts. The following states (California, Colorado, Connecticut, Delaware, New York, Oregon, Rhode Island, Washington State) and the District of Columbia require you to transfer a firearm through a local firearms retailer so an instant background check will be performed to make sure the recipient is not legally prohibited from owning the gun. Maryland and Pennsylvania require a background check for private party transfer of a handgun. There are exceptions, so it’s important to check the law of your state or ask your local firearms retailer.
Consider a Gift Card Instead of Direct Gift
The ATF recommends that if you want to give someone a new firearm, rather than going to a gun store and buying the gun on your own, consider instead purchasing a gift certificate/card from your favorite gun retailer. Then give that gift card as the present. That way the recipient can choose the exact gun he or she wants, and there’s no question about who is “the actual buyer of the firearm,” which is a question any purchaser must certify on the Federal Form 4473 at the time of purchase. The Gift Card option avoids any “straw purchaser” issues.
Intra-Family Transfers and Antique Arms
What if you want to give “Old Betsy,” your favorite old deer rifle, to your son or daughter as a college graduation gift? Again, in most states, there’s no law that says you can’t, but some states require even intra-family transfers to go through a licensed dealer. Remember, you can never transfer a firearm directly to another person who is a resident of a different state. In that case, you must transfer the firearm through a licensed dealer in the state where the person receiving the gift resides. Using a gift certificate from a firearms retailer near where the recipient lives might be a good solution. Pre-1898 antique firearms are generally exempt from the dealer requirement. [But check with the laws in your jurisdiction]. Be safe and check with your dealer or local law enforcement before you hand over your prized possession.
Regulations on Firearms Shipping to Third Parties
When you intend to transfer a gun, there are important rules on interstate shipping*. Generally speaking, you can only ship a handgun by common carrier (but not U.S. Mail) and a long gun by U.S. Mail or common carrier to a federally licensed dealer, but not to a non-licensed individual. With all carriers, federal law requires you to declare that your package contains an unloaded firearm. To be safe, always consult your carrier in advance about its regulations for shipping firearms. Also check your state laws on transfers.
*Different rules may apply to shipping to parties IN-STATE or shipping firearms to yourself in temporary care of others. Always consult your own state laws, but here are some FAQs copied directly from the ATF.GOV website:




 Forum member Watercam has a Pentax PF-80ED spotting scope that allows him to see 6mm bullet holes in the white at 600 yards. However, 6mm holes in the black are only visible out to 400 yards or so. Accordingly, Watercam uses a modified “reversed” black-to-white target for 600-yard practice. Watercam explains: “[Using the Pentax] With my 6mm and limited mirage I see defined, 6mm holes in the white out to 600. In the black, however, I can see bullets holes at about 400. I now use reverse-color targets for training without a pit partner at the 600-yard line.”






 Is your well-built rifle of high-quality components plagued with vertical fliers across more than 1-3 handload combinations? Consider the bedding, crown and scope/sight mounts. Are they correct? If so, then you might check for ignition issues before boldly undertaking an extensive, expensive, and quite possibly fruitless quest for the “magic handload”.


 The first question you have to ask is whether the intended recipient can legally own the firearm where he or she lives. With more than 20,000 different gun laws on the books, even the kinds of firearms that law-abiding citizens can own vary from place to place. For example, juveniles (under age 18) generally speaking are precluded by law from possessing a handgun. Check out the
  Consider a Gift Card Instead of Direct Gift


