SUMMARY: Powder can have a very long shelf life. You need to watch for changes in smell and color. A reddish tinge, almost like rust on the powder, is a bad sign, as is a foul odor, not to be confused with a normal chemical smell. Either of these signs indicate it is time to dispose of your powder by means other than shooting.
Ever wondered about the stability of the propellants in your reloading room? There are some important things you should know about powder storage, to ensure consistent powder performance and safety. On its website, Western Powders (vendors of Accurate, Norma, and Ramshot powders) published an informative Q & A series entitled Dear Labby: Questions for our Ballistics Lab. Here are some excerpts that pertain to powder storage and shelf life. Worried that your powder may be too old? Western’s experts explain how to check your propellants for warning signs.
Proper Powder Storage
Q: I live in southern Arizona where it is very hot. I am told powders will become unstable if stored in an area not air-conditioned. My wife says no powder or primers in the house. Can powder be stored in a refrigerator? What about using a fireproof safe? I would appreciate your ideas. — M.C.
Lab Answer: SAAMI guidelines are pretty clear on issues of storage. They recommend storing smokeless powder in containers that will not allow pressure to build if the powder is ignited — ruling out gun safes and refrigerators.
In their original containers smokeless powder’s lifespan is quite long, even in your hot, arid climate, typically longer than the average handloader would need to store them. Stored safely in a garage or outbuilding, your powder should last years. If you see the powder developing a reddish tint, or giving off a foul odor, it is time to discard it.
Clumps in Powder Container
Q: I ordered some of your Accurate 1680 powder back about in December. I just now opened it … and it is full of clumps. My knowledge tells me that means moisture. Am I wrong? I just now broke the seal and it has been stored in a ammo can with desiccant packs around it and a dehumidifier running 14-16 hours a day. I can’t imagine this being my fault, if this does indicate moisture. I don’t know if the pink part on the label is suppose to be red or not, but it is definitely pink, so if it was red I am wondering if I was shipped an old container? I hope that this isn’t bad and I am stuck with it…
Lab Answer: All powder contains a certain amount of moisture. When the powder is stored or during shipping, it can go through temperature cycles. During the cycling, the moisture can be pulled to the surface and cause clumping. Clumping can also be caused by static electricity if too dry or the powder has limited graphite content. You can break up the clumps before metering and they shouldn’t be a problem. This will not affect the powder performance, so your product is fine. Accurate 1680 labels are designed in Pink. As a side note, specification for testing powder is at 70° F and 60% humidity.
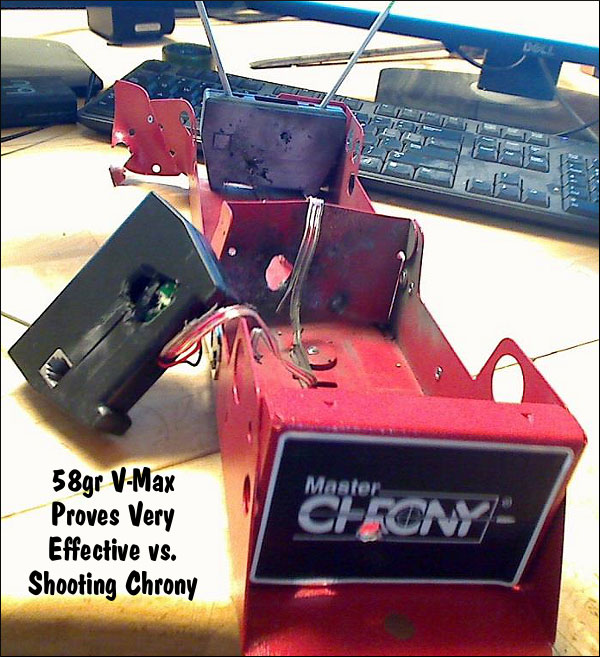
There is nothing more frustrating (or embarassing) than sending a live round into your expensive new chronograph. As the photo below demonstrates, with most types of chronographs (other than the barrel-hung Magnetospeed), you can fatally injure your expensive chrono if it is not positioned precisely.
When setting up a chrono, we always unload the rifle, remove the bolt and bore-sight to ensure that the path of the bullet is not too low. When bore-sighting visually, set up the rifle securely on the sandbags and look through the bore, breech to muzzle, lining up the barrel with your aim point on the target. Then (during an appropriate cease-fire), walk behind the chronograph. Looking straight back through the “V” formed by the sky-screens, you should be able to see light at the end of the barrel if the gun is positioned correctly. You can also use an in-chamber, laser bore-sighter to confirm the visual boresighting (see photo).
Adjust the height, angle and horizontal position of the chronograph so the bullet will pass through the middle of the “V” below the plastic diffusers, no less than 5″ above the light sensors. We put tape on the front sky-screen supports to make it easier to determine the right height over the light sensors.
Use a Test Backer to Confirm Your Bullet Trajectory
You can put tape on the support rods about 6″ up from the unit. This helps you judge the correct vertical height when setting up your rifle on the bags. Another trick is to hang a sheet of paper from the rear skyscreen and then use a laser boresighter to shine a dot on the paper (with the gun planted steady front and rear). This should give you a good idea (within an inch or so) of the bullet’s actual flight path through the “V” over the light sensors. Of course, when using a laser, never look directly at the laser! Instead shine the laser away from you and see where it appears on the paper.
Alignment of Chronograph Housing
Make sure the chrono housing is parallel to the path of the bullet. Don’t worry if the unit is not parallel to the ground surface. What you want is the bullet to pass over both front and rear sensors at the same height. Don’t try to set the chrono height in reference to the lens of your scope–as it sits 1″ to 2″ above your bore axis. To avoid muzzle blast interference, set your chronograph at least 10 feet from the end of the muzzle (or the distance recommended by the manufacturer).
Rifles with Elevated Iron Sights
All too often rookie AR15 shooters forget that AR sights are positioned roughly 2.4″ above the bore axis (at the top of the front sight blade). If you set your bullet pass-through point using your AR’s front sight, the bullet will actually be traveling 2.4″ lower as it goes through the chrono. That’s why we recommend bore-sighting and setting the bullet travel point about 5-8″ above the base of the sky-screen support shafts. (Or the vertical distance the chronograph maker otherwise recommends). NOTE: You can make the same mistake on a scoped rifle if the scope is set on very tall rings, so the center of the cross-hairs is much higher than the bore axis line.
TARGET AIM POINT: When doing chrono work, we suggest you shoot at a single aiming point no more than 2″ in diameter (on your target paper). Use that aiming point when aligning your chrono with your rifle’s bore. If you use a 2″ bright orange dot, you should be able to see that through the bore at 100 yards. Using a single 2″ target reduces the chance of a screen hit as you shift points of aim. If you shoot at multiple target dots, place them in a vertical line, and bore sight on the lowest dot. Always set your chron height to set safe clearance for the LOWEST target dot, and then work upwards only.
Other Chronograph Tips from Forum Members:
When using a chronograph, I put a strip of masking tape across the far end of the skyscreens about two-thirds of the way up. This gives me a good aiming or bore-sighting reference that’s well away from the pricey bits. I learned that one the hard way. — GS Arizona
A very easy and simple tool to help you set up the chronograph is a simple piece of string! Set your gun (unloaded of course) on the rest and sight your target. Tie one end of the string to the rear scope ring or mount, then pull the string along the barrel to simulate the bullet path. With the string showing the bullet’s path, you can then easily set the chronograph’s placement left/right, and up/down. This will also let you set the chrono’s tilt angle and orientation so the sensors are correctly aligned with the bullet path. — Wayne Shaw
If shooting over a chrono from the prone position off a bipod or similar, beware of the muzzle sinking as recoil causes the front of the rifle to drop. I “killed” my first chronograph shooting off a gravel covered firing point where I’d not given enough clearance to start with and an inch or two drop in the muzzle caused a bullet to clip the housing. — Laurie Holland
The Berger SW Nationals is coming up in a couple weeks. At that match, the sling shooters and F-Class competitors need to haul lots of gear from parking lot to the firing line, and then move from yardage to yardage. Along with their rifles, shooters need to bring mats, front rests or bipods, spotting scopes (with stands), rear bags, ammo boxes, log sheets, tool kits, and heavy coats (for the sling shooters).
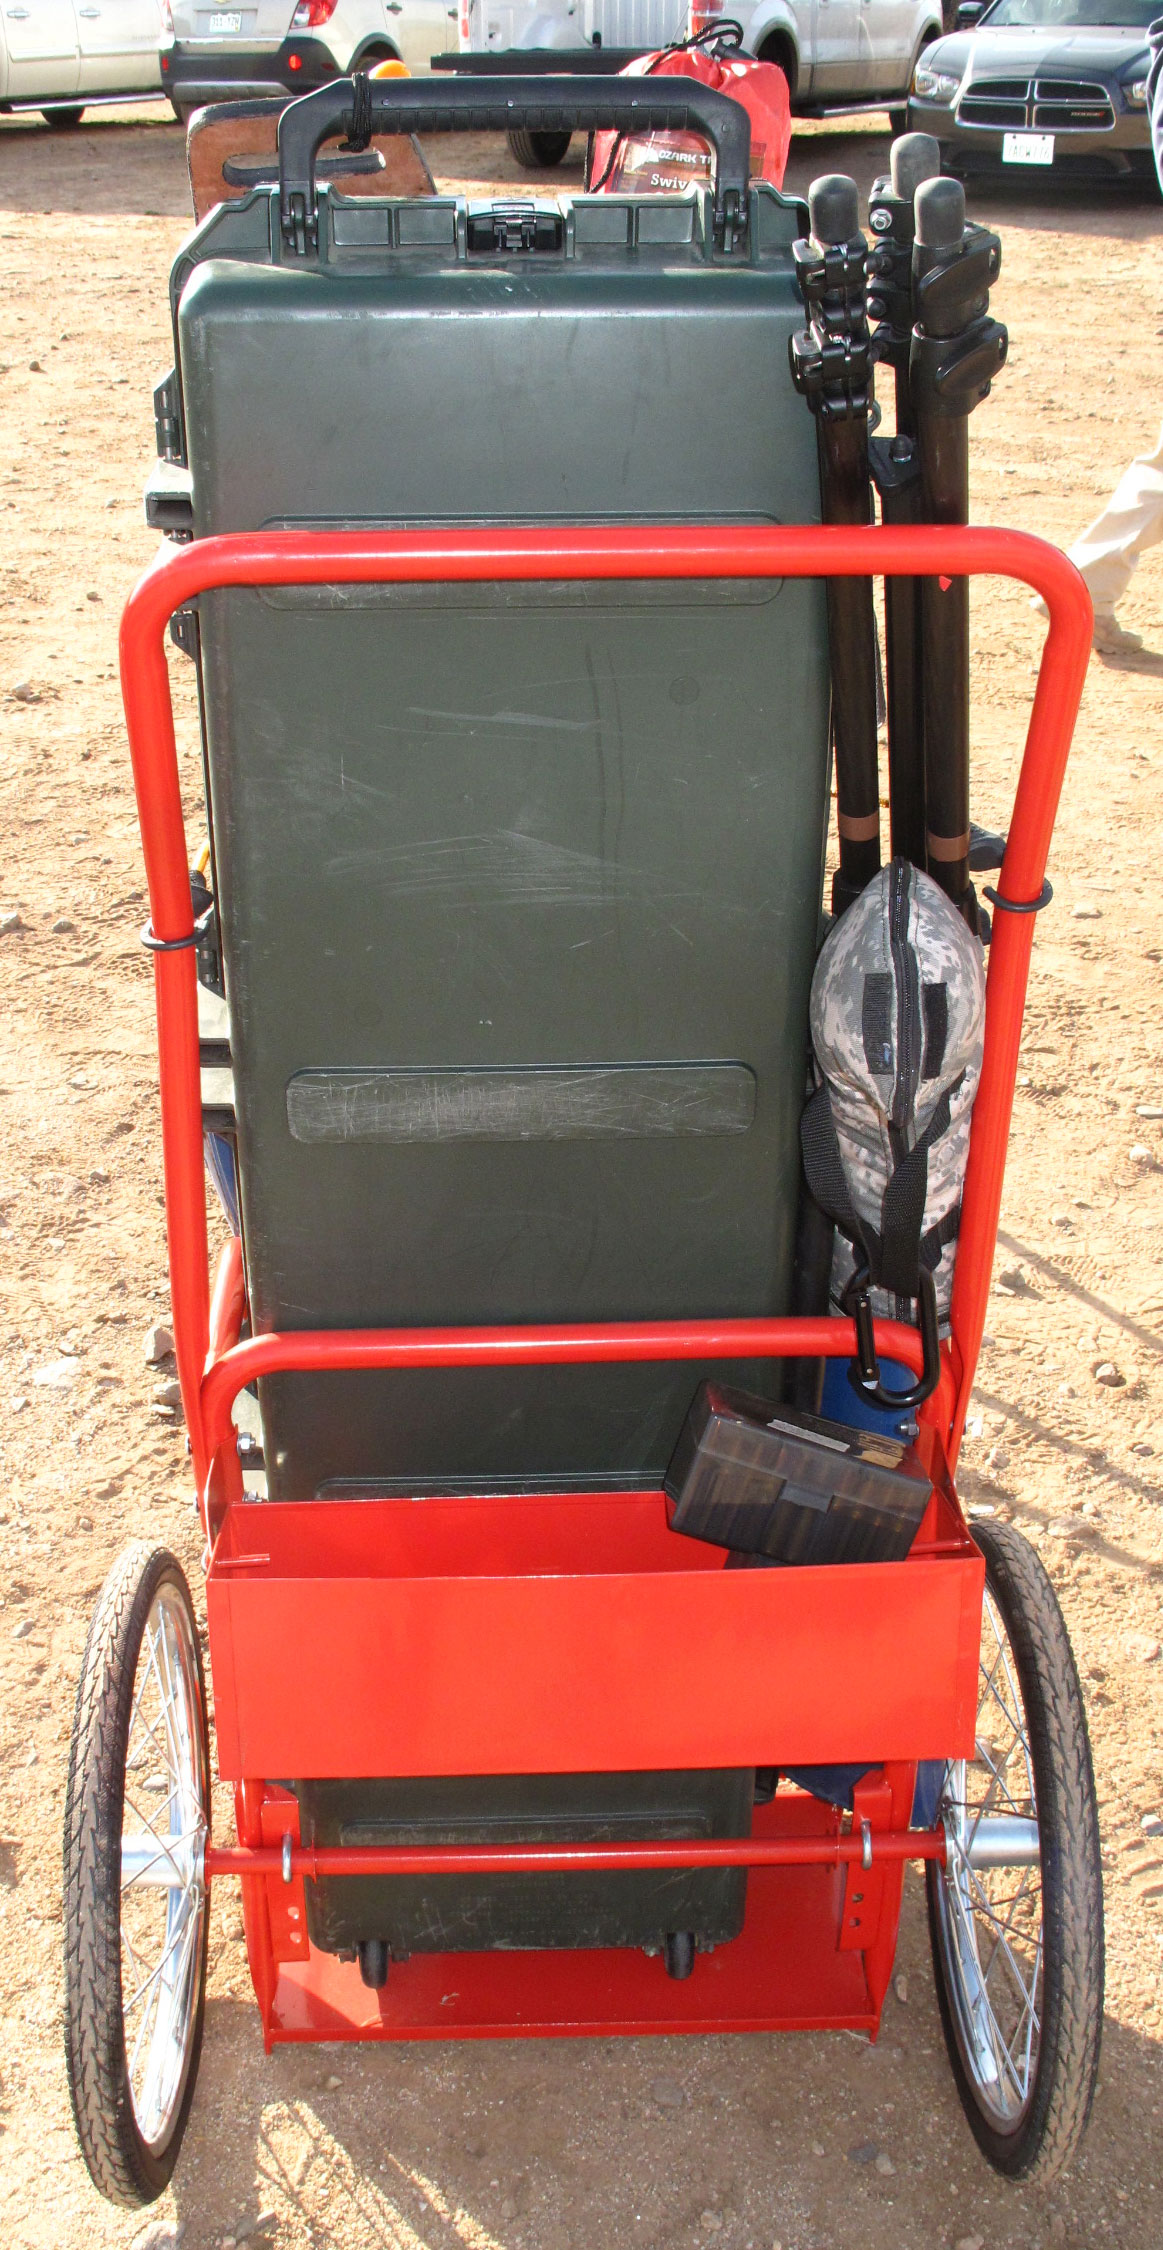
To do the hauling, you can certainly purchase a factory-made, purpose-built cart that folds up and has all the bells and whistles. The Creedmoor Sports CRC-1 (photo right) is a proven, quality product that works great. You’ll find these used by top shooters at Camp Perry. But the Creedmoor CRC-1 cart costs $499.95. For a fraction of that price ($55.99), plus a few dollars more for do-it-yourself enhancements, you can have a heavy-duty cart that will haul all your gear just fine, though it doesn’t fold up. In the top photo is a Harbor Freight Welding Cart we saw at the Berger Southwest Nationals. This rig is carrying a rifle in hard gun case, bipod, folding chair, shooting mat, tripod, spotting scope, rear sand-bag, and ammo box — that’s a lot of gear!
Check out the Harbor Freight Welding Cart, item #65939. This cart is ON SALE right now for just $59.99. Overall size is 29-1/2″ L x 20″ W x 49″ H, and width between side rails is 18″. The wheels (with tires) are 20 3/4″ in diameter for smooth rolling. Consider that, if you made your own cart from scratch you could easily pay $30.00 or more just for the large-diameter wheels and axle. Do note — this cart has air-filled tires. Be sure to inflate before you go to the Range!
This Cart is now on sale for just $55.99 — GREAT DEAL!
As sold, the Harbor Freight Welding Cart can benefit from upgrades for range use. But with a few bungee cords (and some creativity), the cart can be adapted pretty easily to hauling your gun gear. If you want to enhance the basic cart, it’s easy to add plastic side-panels on the bottom unit, and fit a barrel-holding system on the cross-tube. This ensures rifles and gear won’t flop forward. (A small piece of wood under the bottom panel provides a bit of extra lift that will keep the bottom plate out of the dirt and gravel.)
This helpful video from our friend Kirsten Joy Weiss explains how to avoid “scope bite”. This can occur when the scope, on recoil, moves back to contact your forehead, brow, or eye socket area. That’s not fun. While common sense tells us to avoid “scope bite” — sooner or later this happens to most shooters. One viewer noted: “I have come close. I had a Win Model 70 in .375 H & H Mag and I was shooting over a large rock in a strange position. The scope hit my eye glasses hard enough to bend the wire frames and cause a little pain on the bridge of the nose from the nose piece. [That] made a believer out of me.”
Kirsten offers a good basic principle — she suggests that you mount your rifle-scope so that the ocular (eyepiece) of the scope is positioned at least three inches or more from your eyeball when you hold the rifle in your normal shooting position. From a technical standpoint, optical eye relief is a property of the scope, so you want to purchase an optic that offers sufficient optical eye relief (meaning that it allows you to see the full circle of light with your head at least three inches from the eyepiece). Then you need to position the optic optimally for your head/eye position when shooting the rifle — with at least three inches of eyeball-to-scope separation (i.e. physical eye relief).
NOTE: You should mount the scope to provide adequate eyeball-to-scope separation for the actual position(s) you will be shooting most of the time. For an F-TR rig, this will be prone. For a hunting rifle, your most common position could be sitting or standing. Your head position will vary based on the position. You can’t assume the scope placement is correct just because it seems OK when you are testing or zeroing the gun from the bench. When shooting from a prone or kneeling position you may find your eye considerably closer to the eyepiece.
Don’t have time to neck-turn hundreds of cases? Don’t want to invest in your own annealer? Want to try a Dasher or 6 BRA but don’t like the hassle of fire-forming? Then give Darrell Jones at DJ’s Brass a call at 205-461-4680. He can handle all the difficult brass forming/brass restoration chores efficiently and affordably. And Darrell’s turn-around time is typically very fast.
Hydro-Forming News — .284 Shehane, 6 PPC, 6 BRA, 6 Dasher and More
NEW for 2019! Darrell also just got a custom hydro die for the .284 Shehane, a wildcat based on the .284 Winchester. This is a very popular option for F-Open Shooters. He is also doing a ton of fire-forming for the 100/200 benchrest crowd, hydro-forming 220 Russian into 6 PPC. And he tells us “Those guys in Montana are keeping me very busying hydro-forming the 6BR Ackley (6 BRA). NOTE: Darrell offers Free Annealing with hydro-forming services, which starts at $60 per 100 cases.
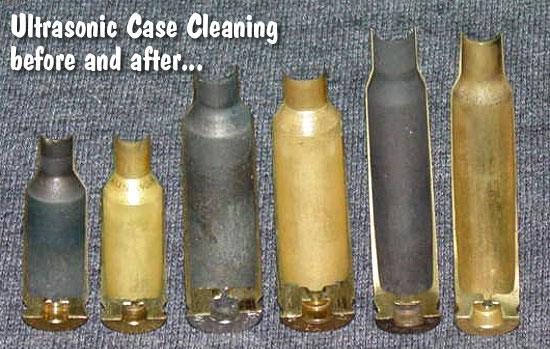
With the price of premium brass topping $1.00 per case for popular match cartridges, it makes sense to consider annealing your brass to extend its useful life. You don’t want to chuck out brass that costs a buck a case (or more)! Forum member Darrell Jones offers a full range of brass prep, brass forming, and brass restoration (annealing, ultra-sonic cleaning) at very affordable prices. Starting at just $20 per 100 cases ($25/100 for magnum cases), Darrell’s company, DJ’s Brass, will anneal your used brass using the impressive Bench-Source annealing machines. Annealing plus ultrasonic cleaning starts at $35 per 100 cases ($45 for magnum cases). For a bit more money Darrell can also uniform the primer pockets and chamfer the case necks.
Custom Neck-Turning Services
Another great service DJ’s Brass provides is precision neck-turning. Darrell can neck-turn any size case to your specified neck-wall thickness. The price starts at $60.00 per hundred for standard cases or $75.00/100 for magnum size. And if you’ve got a bucket of brass to neck-turn, that’s fine with Darrell — he recently neck-turned 1500 pieces of brass for one customer!
DJ’s Brass can process everything from .17 Fireball all the way up to the big magnum cases. And the job gets done quickly. Darrell normally offers a 10-day turn-around. For most jobs, Darrell tells us, he gets the processed brass to the Post Office within three business days. For more info, visit DJsBrass.com or call Darrell Jones at 205-461-4680. IMPORTANT: Contact Darrell for shipping instructions BEFORE sending any brass for processing. ALL BRASS MUST BE DE-PRIMED before you send it.
• Anneal Case Necks Only ($20.00/100 normal or $25.00/100 magnum)
• Ultrasonic Cleaning, Check Necks, and Annealing ($35.00/100 normal or $45.00/100 magnum)
• Full Service: Uniform primer pockets, Chamfer case mouths, Ultrasonic cleaning, Anneal case necks (Starting at $60.00/100 call for quote)
• Neck Turning or trim-to-length Custom Order Service (Starting at $60.00/100 for standard cases and $75.00/100 for magnums)
• Hydro-Form Specialty cases (such as Dasher) $0.60 (sixty cents) each minimum of 100 pieces plus actual return shipping cost
• Expand Case Necks and Anneal brass (Call for Price)
• Create False Shoulder for Fire-Forming (Call for Price)
Hydro-Forming Cartridge Brass
Hydro-forming by Darrell costs $0.60 per case with 100-ct minimum. All hydro-formed cases are annealed at no extra charge after the forming process. After hydro-forming, Darrell can also neck-turn the case for an additional charge (call for combined quote). In addition to the 6mmBR-based cases shown below, Darrell can now hydro-form 6PPC cases from .220 Russian brass, and he also offers .284 Shehane.
With Darrell’s hydro-forming service you don’t have to buy any special dies or other equipment. Darrell says: “Simply send me the brass you need or have it dropped-shipped to me along with a fired case that has not been sized. If you need formed brass for a new build (gun not yet fired), let me know and I will size the brass to fit within .001″ of a PT&G GO gauge.”
DJ’s Brass Offers Specialized Custom Services
Darrell tells us: “At DJ’s Brass, we can handle all your brass refurbishing needs. From ultrasonic cleaning to custom annealing for specific wildcat cartridges. We can expand your necks from .22 caliber to .30 caliber and anneal shoulders for consistent bump-back. We can turn your case-necks and trim the brass to your specs. For some cartridge types, I can pre-form cases to assist in fire-forming a wildcat cartridge. We also remove the carbon build-up in muzzle brakes. Don’t lose your accuracy by having carbon build up and close off the clearance required for the most accurate bullet release through a muzzle brake.” Note: Extra charges apply for neck-turning and neck expansion operations, or specialized cartridge-forming operations. Please call Darrell at 205-461-4680 for special services pricing.
OK, you’ve paid the tax stamp and acquired your new suppressor (aka “silencer” or “moderator”). Do you still need to wear earplugs or muffs? Absolutely. Even with that expensive new “can”, your rifle could be generating over 140 decibels (dB) of noise — about the same as as an unmuffled 9mm pistol shot. That’s loud enough to create permanent hearing loss with repeated exposure.
Firearms Are Loud: 140 dB to 175 dB
Audiology group ASHA explains: “Exposure to noise greater than 140 dB can permanently damage hearing. Almost all firearms create noise that is over the 140-dB level. A small .22-caliber rifle can produce noise around 140 dB, while big-bore rifles and pistols can produce sound over 175 dB. Firing guns in a place where sounds can reverberate, or bounce off walls and other structures, can make noises louder and increase the risk of hearing loss. Also, adding muzzle brakes or other modifications can make the firearm louder. People who do not wear hearing protection while shooting can suffer a severe hearing loss with as little as one shot[.] Audiologists see this often, especially during hunting season when hunters and bystanders may be exposed to rapid fire from big-bore rifles, shotguns, or pistols.” Source: ASHA, Recreational Firearm Noise Exposure.
Suppressors, On Average, Reduce Noise Levels about 30 Decibels
In an article for Ammoland, gunwriter Sam Hoober says that you can expect about 30 decibels (dB) of noise reduction from the average suppressor: “Looking at a few different products, SilencerCo attests their suppressors reduce the sound pressure of a 9mm gunshot to anywhere from 125.7 dB to 131.5 dB, depending on the model. Advanced Armament Co, another popular supplier, attests a 23 dB to 33 dB reduction or down to 127 dB. Liberty Suppressors, another manufacturer, attests a reduction of 24 dB to 38 dB, depending on model and other factors. In short, we can presume something on the order of 30 dB of attenuation as an average.”
Using that 30 dB number you can quickly discern that you’ll still need hearing protection — good hearing protection — when shooting any suppressed firearm (even a .22 LR). “Spikes of 130 dB and more can result in permanent hearing damage instantly”. Source: NRA Blog.
The Myth of the “Quiet” .22 LR
The NRA Blog notes that “many rimfire shooters, particularly those using the beloved .22 Long Rifle cartridge, argue that the small .22 LR caliber doesn’t produce enough sound to damage your hearing”. So, is that really true. or is it a myth?
In fact, a .22 LR can be much louder than you think — a .22 LR pistol can produce sound levels of 134 dB. That’s well above the normal human pain threshhold.
Sound Levels for Common Noises:
9mm Luger pistol: 160 dB
Jet aircraft engine (near): 140 dB
.22 LR pistol: 134 dB
Normal human pain threshold: 120 dB
Noisy Nightclub: 110 db
Riding Motorcycle at 65 mph: 103 db
Power Lawnmower: 95 dB
Hearing damage possible: 85 dB (sustained for 8+ hours)
Ringing Telephone: 80 dB
Normal conversation: 60 dB
The Risk of Hearing Loss
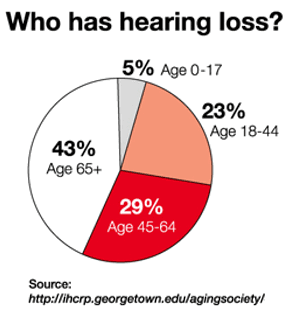
Hearing loss can be progressive and irreversible. If you are a shooter, this is serious business. As the NRA Blog cautions: “You may not even realize you’re harming your hearing. Hearing loss occurs gradually, and can go effectively unnoticed until symptoms become severe. By then, the damage is done.”
Nobody wants to go deaf. But we often see shooters without effective hearing protection when they are walking around a few yards behind the firing line. That’s bad — even if you are away from the firing line, gunshot noises can damage your hearing. You MUST use effective hearing protection every time you go to the range. Good foam earplugs costs mere pennies but they can prevent deafness in your later years. Many folks also wear muffs over plugs.
When it comes to long-range optics, some folks can’t have too much magnification. At 500 yards and beyond, when the air’s misty or the mirage is thick, you can’t always use extreme magnification. But, when the conditions are excellent, it’s nice to have 50X magnification (or more) on tap. You can always “crank it back down”.
Higher magnification (when conditions are good), can help you see your bullet holes at long range, and that makes it easier to judge your hold-offs and keep your group centered.
In addition, there’s no doubt that high magnification lets you aim more precisely, no matter what the distance. Even at 100 and 200 yards, short-range benchresters are using 40X, 50X, and even 60X power scopes. This allows you to position your cross-hairs with extreme precision — something you need when you’re trying to put multiple shots through the same hole.
Raising the Optics Bar
How much power is usable? A few years back, folks said you can’t use more than 45X or so at long range. Well, as modern optics have evolved, now guys are buying scopes with even more magnification — way more. There are practical limits of course — with a 56 to 60mm front objective, the exit pupil of a 60X or higher-power scope will be very tiny, making head orientation ultra-critical. Any many scopes get darker as you bump up the magnification.
Despite the exit pupil and brightness issues, shooters are demanding “more power” these days and the scope manufacturers are providing new products with ever-greater magnification levels. Right now, the most powerful conventional riflescope you can buy is the March X-Series 8-80x56mm scope. Featuring a 34mm main tube and 56mm objective lens, this offers a true 10-times zoom ratio and up to 80X magnification. This scope has minimal distortion thanks to high-quality ED lenses designed in-house by Deon Optical, which also machines the main tube from one solid piece of billet aluminum.
MORE INFO: Learn more about the March 8-80x56mm at MarchScopes.com
To demonstrate the capabilities of high-magnification March scopes, Aussie Stuart Elliot has created a cool through-the-lens video with the March 8-80x56mm scope set at 80-power (See 0:30 timeline). Along with being one of Australia’s top benchrest shooters, Stuart runs BRT Shooters Supply, dealer for March Scopes in Australia. In the video below you can see the March 8-80X focused on a target at 1000 yards (910m). For best resolution, watch this video in fullscreen, 720p mode.
Look through the Lens of 80-power March Scope at Target 1000 Yards Away
Through-the-Lens Views at 40X and 80X at 1100 Yards
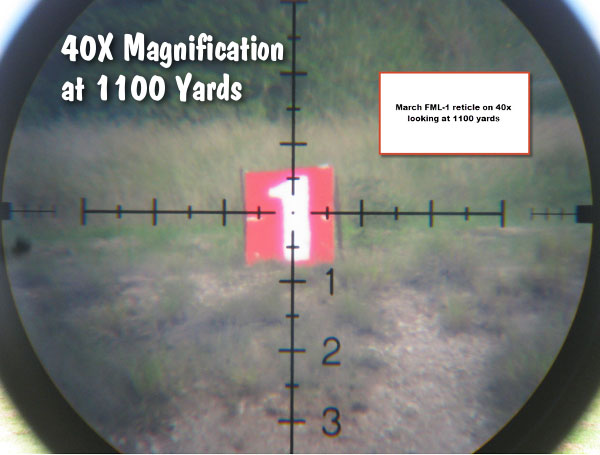
To reveal the difference between 40X and 80X magnification, here are two through-the-lens still images taken with March scopes sighting to 1100 yards. The top photo is at 80X magnification, looking through the March 8-80x56mm. The lower photo is at 40X magnification viewed through a 5-50x56mm March X-Series scope. You can see there is a big difference in perceived target size! Click on the “Larger Image” button to see full-screen version at 80X.
Video Find by Boyd Allen. We welcome reader submissions.
Photo by Werner Mehl, www.kurzzeit.com, all rights reserved.
Most serious shooters can tell you the muzzle velocity (MV) of their ammunition, based on measurements taken with a chronograph, or listed from a manufacturer’s data sheet. (Of course, actual speed tests conducted with YOUR gun will be more reliable.)
Bullet RPM = MV X 720/Twist Rate (in inches)
However, if you ask a typical reloader for the rotational rate of his bullet, in revolutions per minute (RPM), chances are he can’t give you an answer.
Knowing the true spin rate or RPM of your bullets is very important. First, spin rate, or RPM, will dramatically affect the performance of a bullet on a game animal. Ask any varminter and he’ll tell you that ultra-high RPM produces more dramatic hits with more “varmint hang time”. Second, RPM is important for bullet integrity. If you spin your bullets too fast, this heats up the jackets and also increases the centrifugal force acting on the jacket, pulling it outward. The combination of heat, friction, and centrifugal force can cause jacket failure and bullet “blow-ups” if you spin your bullets too fast.
Accuracy and RPM
Additionally, bullet RPM is very important for accuracy. Nearly all modern rifles use spin-stablized bullets. The barrel’s rifling imparts spin to the bullet as it passes through the bore. This rotation stabilizes the bullet in flight. Different bullets need different spin rates to perform optimally. Generally speaking, among bullets of the same caliber, longer bullets need more RPM to stabilize than do shorter bullets–often a lot more RPM.
It is generally believed that, for match bullets, best accuracy is achieved at the minimal spin rates that will fully stabilize the particular bullet at the distances where the bullet must perform. That’s why short-range 6PPC benchrest shooters use relatively slow twist rates, such as 1:14″, to stabilize their short, flatbase bullets. They could use “fast” twist rates such as 1:8″, but this delivers more bullet RPM than necessary. Match results have demonstrated conclusively that the slower twist rates produce better accuracy with these bullets.
On the other hand, Research by Bryan Litz of Applied Ballistics has shown that with long, boat-tailed bullets, best accuracy may be achieved with twist rates slightly “faster” than the minimum required for stabilization. The reasons for this are somewhat complex — but it’s something to consider when you buy your next barrel. If, for example, the bullet-maker recommends a 1:8.25″ twist, you might want to get a true 1:8″-twist barrel.
Calculating Bullet RPM from MV and Twist Rate
The lesson here is that you want to use the optimal RPM for each bullet type. So how do you calculate that? Bullet RPM is a function of two factors, barrel twist rate and velocity through the bore. With a given rifling twist rate, the quicker the bullet passes through the rifling, the faster it will be spinning when it leaves the muzzle. To a certain extent, then, if you speed up the bullet, you can use a slower twist rate, and still end up with enough RPM to stabilize the bullet. But you have to know how to calculate RPM so you can maintain sufficient revs.
Bullet RPM Formula
Here is a simple formula for calculating bullet RPM:
MV x (12/twist rate in inches) x 60 = Bullet RPM
Quick Version: MV X 720/Twist Rate = RPM
Example One: In a 1:12″ twist barrel the bullet will make one complete revolution for every 12″ (or 1 foot) it travels through the bore. This makes the RPM calculation very easy. With a velocity of 3000 feet per second (FPS), in a 1:12″ twist barrel, the bullet will spin 3000 revolutions per SECOND (because it is traveling exactly one foot, and thereby making one complete revolution, in 1/3000 of a second). To convert to RPM, simply multiply by 60 since there are 60 seconds in a minute. Thus, at 3000 FPS, a bullet will be spinning at 3000 x 60, or 180,000 RPM, when it leaves the barrel.
Example Two: What about a faster twist rate, say a 1:8″ twist? We know the bullet will be spinning faster than in Example One, but how much faster? Using the formula, this is simple to calculate. Assuming the same MV of 3000 FPS, the bullet makes 12/8 or 1.5 revolutions for each 12″ or one foot it travels in the bore. Accordingly, the RPM is 3000 x (12/8) x 60, or 270,000 RPM.
Implications for Gun Builders and Reloaders
Calculating the RPM based on twist rate and MV gives us some very important information. Number one, we can tailor the load to decrease velocity just enough to avoid jacket failure and bullet blow-up at excessive RPMs. Number two, knowing how to find bullet RPM helps us compare barrels of different twist rates. Once we find that a bullet is stable at a given RPM, that gives us a “target” to meet or exceed in other barrels with a different twist rate. Although there are other important factors to consider, if you speed up the bullet (i.e. increase MV), you MAY be able to run a slower twist-rate barrel, so long as you maintain the requisite RPM for stabilization and other factors contributing to Gyroscopic Stability are present. In fact, you may need somewhat MORE RPM as you increase velocity, because more speed puts more pressure, a destabilizing force, on the nose of the bullet. You need to compensate for that destabilizing force with somewhat more RPM. But, as a general rule, if you increase velocity you CAN decrease twist rate. What’s the benefit? The slower twist-rate barrel may, potentially, be more accurate. And barrel heat and friction may be reduced somewhat.
Just remember that as you reduce twist rate you need to increase velocity, and you may need somewhat MORE RPM than before. (As velocities climb, destabilizing forces increase somewhat, RPM being equal.) There is a formula by Don Miller that can help you calculate how much you can slow down the twist rate as you increase velocity.
That said, we note that bullet-makers provide a recommended twist rate for their bullets. This is the “safe bet” to achieve stabilization with that bullet, and it may also indicate the twist rate at which the bullet shoots best. Though the RPM number alone does not assure gyroscopic stability, an RPM-based calculation can be very useful. We’ve seen real world examples where a bullet that needs an 8-twist barrel at 2800 FPS MV, would stabilize in a 9-twist barrel at 3200 FPS MV. Consider these examples.
MV = 2800 FPS
8-Twist RPM = 2800 x (12/8) x 60 = 252,000 RPM
MV = 3200 FPS
9-Twist RPM = 3200 x (12/9) x 60 = 256,000 RPM
Of course max velocity will be limited by case capacity and pressure. You can’t switch to a slower twist-rate barrel and maintain RPM if you’ve already maxed out your MV. But the Miller Formula can help you select an optimal twist rate if you’re thinking of running the same bullet in a larger case with more potential velocity.
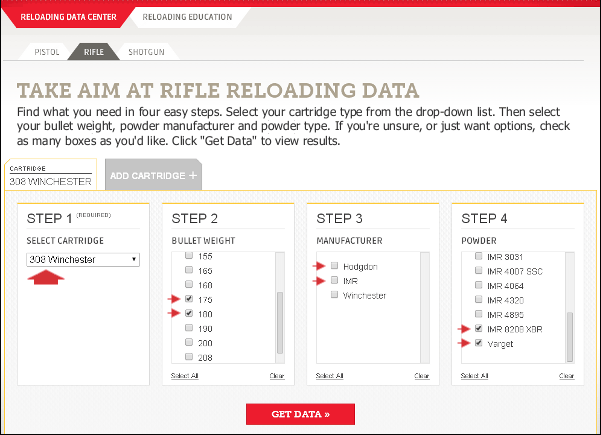
Hodgdon and IMR powders, including H4198, Varget, H4350, and IMR 4451, are some of the most successful propellants used by competitive shooters. If you want to find solid, reliable load data for these and other Hodgdon and IMR powders, we recommend you go right to the source — visit the Hodgdon/IMR Reloading Data Center, at www.HodgdonReloading.com. There you’ll find the latest, updated load recipes for pistol, rifle, and shotgun reloaders.
In the Data Center, you’ll find thousands of load recipes for pistol, rifle, and shotgun. Rifle shooters will find dozens of loads for their favorite Hodgdon, IMR, and Winchester powders such as H4198, Varget, H4350, and IMR 8208 XBR. And Hodgdon’s Reloading Center is now faster and easier to use. Navigation is simplified and the whole interface is more user-friendly.
Precise Search Results for your Cartridge and Favorite Powders
The online Reloading Data Center allows you to get precise search results for any listed cartridge. You can select your preferred powders and bullets. After choosing a cartridge, you can pre-select specific bullet weights and powder types. That quickly delivers just the information you want and need. You won’t have to scroll through scores of entries for bullets or powders you don’t use.
Data Center Works Well with Mobile Devices
Mobile users will notice Reloading Center is very “user-friendly” for smart-phone and tablet users. Controls have been optimized for touch-screens, and buttons are large and easy to use. Likewise the results are displayed in a large, easy-to read format.
Hodgdon tip from EdLongrange. We welcome reader submissions.
In this video, Forum member Erik Cortina shows how to create a custom modified case for use with the Hornady Lock-N-Load Overall Length Gauge (formerly the Stoney Point Tool). While Hornady sells modified cases for many standard cartridges, if you shoot a wildcat such as the 6mm Dasher or .284 Shehane, you’ll need to create a custom modified case*. And even if you shoot a standard cartridge such as the .308 Winchester you can get more consistent measurements if you make a custom modified case from a piece of brass fired in your chamber.
The process is straight-forward. Take a piece of brass fired in your chamber and full-length size it (with about .002″ shoulder bump). Then you need to drill out the primer pocket. Erik uses a mini-lathe for the operation, but this general process can be done with a drill press or other tools. Erik shows how to do this with a 0.290″ HSS (High Speed Steel) drill bit on a mini-lathe. After drilling the hole comes the tricky part — you need to tap the case with the precise 5/16″ x 36 threads per inch (tpi) right-hand thread that matches the male thread on the O.A.L. Gauge. This 5/16″ x 36 tpi tap is pretty uncommon, but you can order it from Amazon.com if you can’t source it locally.
If you use a mini-lathe, Erik suggests loosening the tailstock slightly, so it can float while cutting the threads. Erik also says: “Make sure you get the tap on pretty tight — it’s going to want to spin.” Erik turns the case at about 100 rpm when tapping the threads. Once the case and tap are rigged, the actual tapping process (see video at 6:00) takes only a few seconds. While the mini-lathe makes the tapping process go more quickly, the threading can also be done with other systems.
TIP: Don’t just make one modified case, make three. That gives you one for your range kit, one for your home reloading bench, plus a spare (since you WILL eventually lose or misplace one).
Here’s the Stuff You Need
5/16″-36 TPI Threading Tap
The required thread is somewhat uncommon. You need a 5/16″ – 36 tpi Right Hand Thread Tap. If you can’t find it locally, Amazon.com carries the correct tap. Erik notes: “The 5/16-36 tpi tap is not a common size. I think Hornady did this on purpose to make it more difficult for the average guy to make his own modified cases.”
0.290″ Drill Bit
Erik uses an 0.290″ HSS “L” drill bit. (This “L” Letter Gauge code designates a 0.290″ diameter bit). A close metric equivalent would be 7.3 mm (0.286″). Erik says: “A 9/32″ drill will also work but it will be harder to run the tap in since the hole will be .281″ instead of .290″ with the Letter Gauge L bit.”
Tips for Using O.A.L. Gauge with Modified Case
We’ve noticed that many folks have trouble getting reliable, consistent results when they first start using the Hornady O.A.L. Gauge (formerly the Stoney Point Tool). We’ve found this is usually because they don’t seat the modified case properly and because they don’t use a gentle, consistent method of advancing the bullet until it just kisses the lands.
Here is our suggested procedure for use the O.A.L. Gauge. Following this method we can typically make three of four measurements (with the same bullet), all within .001″ to .0015″. (Yes, we always measure multiple times.)
1. Clean your chamber so there is no build-up of carbon, debris, or lube. Pay particular attention to the shoulder area.
2. Screw the modified case on to the O.A.L. Gauge. Make sure it is seated firmly (and doesn’t spin loose). Note, you may have to re-tighten the modified case after insertion in the chamber.
3. Place your selected bullet so that the ogive (max bullet diameter) is behind the case mouth. This prevents the bullet from “snagging” as you insert the tool in the action.
4. Insert the O.A.L. Gauge into your chamber smoothly. Push a little until you feel resistance. IMPORTANT — You need to ensure that the shoulder of the modified case is seated firmly against the front of your chamber. You may have to wiggle and twist the tool slightly. If you do not have the modified case seated all the way in, you will NOT get a valid measurement.
5. Advance the bullet slowly. (NOTE: This is the most important aspect for consistency!). Push the rod of the O.A.L. tool gently towards the chamber. DON’T shove it hard! Easy does it. Stop when you feel resistance.
6. IMPORTANT. After gently pushing on the rod, give the end of the rod a couple forward taps with your finger. If your bullet was slightly skewed, it may have stopped too far back. Adding a couple extra taps will fix that. If the bullet moves after the taps, then again push gently on the rod. NOT too much! You just want to push the bullet until it just “kisses” the lands and then stops. Do NOT jam the bullet into the rifling. If you do that you will never get consistent results from one measurement to the next.
* For a $15.00 fee, Hornady will make a custom modified case for you if you send two fired pieces of brass. Send two fired cases and $15.00 check to: Hornady Manufacturing, Attn: Modified Cases, 108 S. Apollo St., Alda, NE 68810. More Info HERE.


 When setting up a chrono, we always unload the rifle, remove the bolt and bore-sight to ensure that the path of the bullet is not too low. When bore-sighting visually, set up the rifle securely on the sandbags and look through the bore, breech to muzzle, lining up the barrel with your aim point on the target. Then (during an appropriate cease-fire), walk behind the chronograph. Looking straight back through the “V” formed by the sky-screens, you should be able to see light at the end of the barrel if the gun is positioned correctly. You can also use an in-chamber, laser bore-sighter to confirm the visual boresighting (see photo).


 The Berger SW Nationals is coming up in a couple weeks. At that match, the sling shooters and F-Class competitors need to haul lots of gear from parking lot to the firing line, and then move from yardage to yardage. Along with their rifles, shooters need to bring mats, front rests or bipods, spotting scopes (with stands), rear bags, ammo boxes, log sheets, tool kits, and heavy coats (for the sling shooters).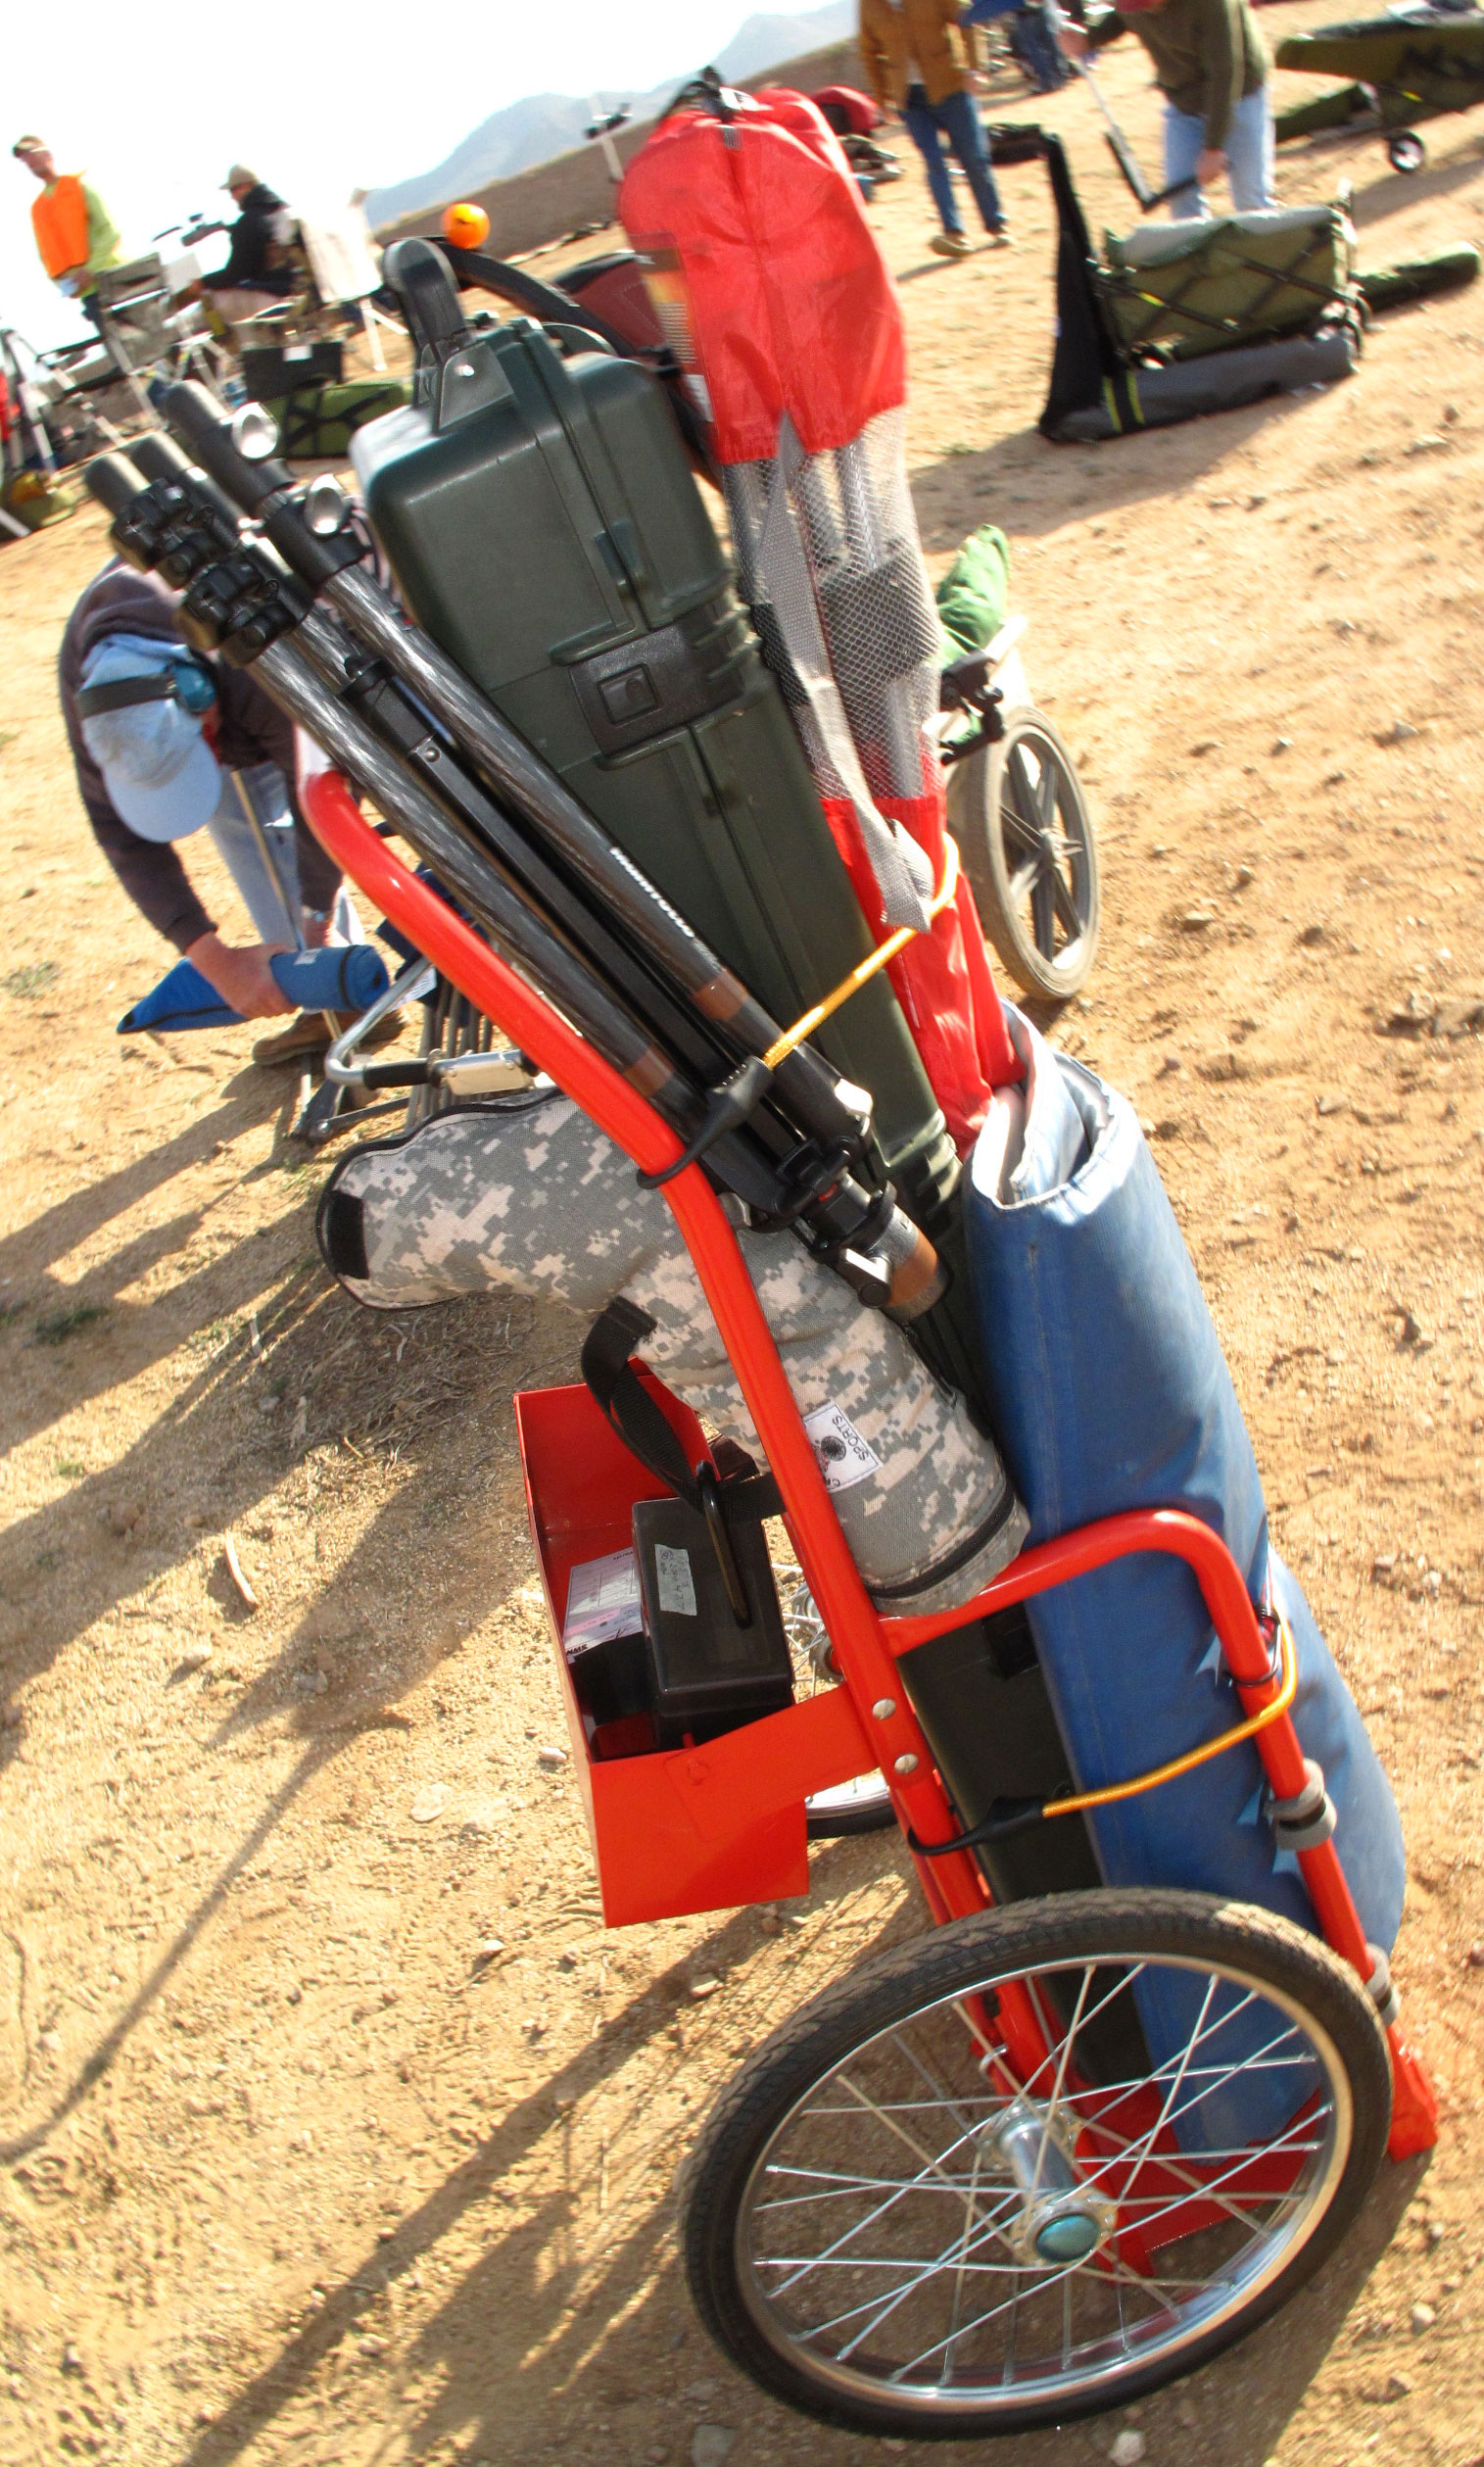


 With the price of premium brass topping $1.00 per case for popular match cartridges, it makes sense to consider annealing your brass to extend its useful life. You don’t want to chuck out brass that costs a buck a case (or more)! Forum member



 The Risk of Hearing Loss
 When it comes to long-range optics, some folks can’t have too much magnification. At 500 yards and beyond, when the air’s misty or the mirage is thick, you can’t always use extreme magnification. But, when the conditions are excellent, it’s nice to have 50X magnification (or more) on tap. You can always “crank it back down”.



 Implications for Gun Builders and Reloaders