In discussions of ballistics, you’ll see references to “tangent”, “secant”, and “hybrid” bullet shapes. We know that, for many readers, these terms can be confusing. To add to the confusion, bullet makers don’t always identify their projectiles as secant or tangent designs. This article provides a basic explanation of tangent, secant, and hybrid ogive bullet designs, to help you understand the characteristics of these three basic bullet shapes.
Tangent vs. Secant vs. Hybrid
Most match bullets produced today use a tangent ogive profile, but the modern VLD-style bullets employ a secant profile. To further complicate matters, the latest generation of “Hybrid” projectiles from Berger Bullets feature a blended secant + tangent profile to combine the best qualities of both nose shapes. The secant section provides reduced drag, while the tangent section makes the bullet easier to tune, i.e. less sensitive to bullet seating depth position.
Berger Bullets ballistician Bryan Litz explains tangent and secant bullet ogive designs in a glossary section of his Applied Ballistics website, which we reprint below. Bryan then explains how tangent and secant profiles can be combined in a “hybrid” design.
How Bullet Ogive Curves are Defined
While the term “ogive” is often used to describe the particular point on the bullet where the curve reaches full bullet diameter, in fact the “ogive” properly refers to the entire curve of the bullet from the tip to the full-diameter straight section — the shank. Understanding then, that the ogive is a curve, how is that curve described?
LITZ: The ogive of a bullet is usually characterized by the length of its radius. This radius is often given in calibers instead of inches. For example, an 8 ogive 6mm bullet has an ogive that is a segment of a circular arc with a radius of 8*.243 = 1.952”. A .30-caliber bullet with an 8 ogive will be proportionally the same as the 8 ogive 6mm bullet, but the actual radius will be 2.464” for the .30 caliber bullet.
For a given nose length, if an ogive is perfectly tangent, it will have a very specific radius. Any radius longer than that will cause the ogive to be secant. Secant ogives can range from very mild (short radius) to very aggressive (long radius). The drag of a secant ogive is minimized when its radius is twice as long as a tangent ogive radius. In other words, if a tangent ogive has an 8 caliber radius, then the longest practical secant ogive radius is 16 calibers long for a given nose length.”
Bryan Litz Explains Hybrid Design and Optimal Hybrid Seating Depths
Ogive Metrics and Rt/R Ratio
LITZ: There is a number that’s used to quantify how secant an ogive is. The metric is known as the Rt/R ratio and it’s the ratio of the tangent ogive radius to the actual ogive radius for a given bullet. In the above example, the 16 caliber ogive would have an Rt/R ratio of 0.5. The number 0.5 is therefore the lowest practical value for the Rt/R ratio, and represents the minimum drag ogive for a given length. An ogive that’s perfectly tangent will have an Rt/R ratio of 1.0. Most ogives are in between an Rt/R of 1.0 and 0.5. The dimensioned drawings at the end of my Applied Ballistics book provide the bullets ogive radius in calibers, as well as the Rt/R ratio. In short, the Rt/R ratio is simply a measure of how secant an ogive is. 1.0 is not secant at all, 0.5 is as secant as it gets.
Hybrid Bullet Design — Best of Both Worlds?
Bryan Litz has developed a number of modern “Hybrid” design bullets for Berger. The objective of Bryan’s design work has been to achieve a very low drag design that is also “not finicky”. Normal (non-hybrid) secant designs, such as the Berger 105gr VLD, deliver very impressive BC values, but the bullets can be sensitive to seating depth. Montana’s Tom Mousel has set world records with the Berger 105gr VLD in his 6mm Dasher, but he tells us “seating depth is critical to the best accuracy”. Tom says a mere .003″ seating depth change “makes a difference”. In an effort to produce more forgiving high-BC bullets, Bryan Litz developed the hybrid tangent/secant bullet shape.
Looking for places to shoot — out to 1000 yards and beyond? Well the folks at Desert Tech have created a very powerful web-based, Range Locator System. Simply type in town name or Zip Code, and the Desert Tech Range Locator plots the nearest ranges on a Google Map interface. Use plus/minus controls to zoom in and out. This handy, online mapping tool includes thousands of shooting ranges, with max target distances for each. As Shooting Sports USA explains, you can find “the exact mileage and directions to the range, then call the contact for information about hours and protocol. Pretty simple.”
How to Use Range Locator
All ranges are marked with “ice cream cone”-shaped markers. Ranges which allow shooting at 500 yards or greater have orange icons. Other ranges limited to shorter distances are marked in blue. When you click on a range icon, the name, address, phone number, and website are displayed. Simply click on the web link to get more info.
NOTE: The system works remarkably well. This Range Locator is our first stop when we are looking for a rifle range in another part of the country. The connection with Google Maps makes this database way more user-friendly than other options. In seconds, you can find rifle ranges anywhere in the nation, including those that specialize in Long Range, and Extreme Long Range shooting. If you are traveling to a shooting match, this will also help you get to your destination. Many undeveloped shooting ranges may not show on your GPS or on AAA maps.
Are there shortcomings? Yes — there are some notable omissions. We searched the Phoenix, Arizona area, and for some reason the Ben Avery Shooting Facility did not show up. Considering that Ben Avery may be the most important outdoor range West of the Rockies, that’s troublesome. That just shows the range locator needs some updates. Overall it is still very impressive. See Ben Avery Map Omission.
Dennis DeMille shows a young competitor at the CMP Western Games how to adjust his leather sling.
Setting-Up a Leather Service Rifle Sling for Competition
So you made the mistake of disassembling your leather service rifle sling, or are intimidated about how to use one? In this Creedmoor Sports InfoZone video, Creedmoor G.M. Dennis DeMille explains how to set up and use a sling. The covers the basics — Dennis starts with a totally disassembled leather service rifle sling and shows you how to set it up properly.
Tip: “Many shooters shy away from using a leather sling because they have never been taught how to use one. That’s unfortunate. In my opinion a leather sling offers more support than a web sling, which is important when competiting with the heavier than normal rifles.”
Configuring the Sling for the Standing (Offhand) Position
In this second in a series of Creedmoor InfoZone videos on the setup and use of the leather service rifle sling, Dennis DeMille details how to configure and best utilize the leather service rifle sling while shooting from the standing position.
Tip: “Putting the Frogs in different hole will change the amount of added elevation a sling provides.”
Looking at Sling Types — Comparing the Features
In this video Dennis showcases a large variety of shooting slings. He explains the strong points of each type so you can choose the sling best suited to your discipline and shooting style.
The Benefits of Dry-Fire Training
Once you know how to set up your sling properly, you’ll want to practice. Dennis DeMille stresses the importance of dry-fire practice with sling and shooting coat. Dry-Fire training is essential to the sling disciplines. Dennis DeMille, a national Service Rifle Champion, told us that, for every minute he spent in actual competition, he would spend hours practicing without ammunition. While in the USMC, Dennis would practice in the barracks, working on his hold and dry-firing:
“The most important thing is to spend time off the range practicing. Most of what I learned as a High Power shooter I learned without ammunition — just spending time dry firing and doing holding exercises. Holding exercises will really identify the weak parts of your position. The primary purpose of dry firing is to get you used to shooting an empty rifle. If you can shoot a loaded rifle the same way you shoot an empty rifle then eventually you will become a High Master.”
Have a good look at the photos below — this may be one of the most noteworthy target strings we’ve ever published. What you can see is the effect of barrel tuner position on point of impact (POI). You can clearly see that the tuner position alters the up/down POI location in a predictable fashion.
This remarkable 15-shot sequence was shot by French benchrester Pascal Fischbach using his 6 PPC fitted with a CG (Carlito Gonzales) action and a Bukys barrel tuner.
Pascal reports: “After [bullet] seating and load validation, I put the Bukys tuner on, screwing it out 10 turns. According to Carlito, the CG’s super stiff action-to-barrel fit gives a faster vibration modulus that is detrimental below 10 turns [position of the tuner].” Pascal’s procedure was to screw out the tuner 1/4 turn progressively from one shot to the next. He shot one bullet at each tuner position, with a total of 15 shots.
Left Half of Target Strip (shots with 1/4 rotation change of tuner in sequence)
Right Half of Target Strip (shots with 1/4 rotation change of tuner in sequence)
Pascal observed: “Note the point of impact displacement [from shot to shot] tracks clearly along a sinusoide (sine wave curve).” This is indeed notable and significant! This shows how the tuner’s ability to change barrel harmonics can alter the position of the muzzle as each bullet exits, resulting in a higher or lower POI. Pascal sent his results to Carlito Gonzales in Argentina for analysis.
Pascal poses this question to readers: “Guess which three positions Carlito recommends to try?”
Editor’s Note: While this target sequence clearly shows how tuner position can alter bullet point of impact, this, by itself, does not tell us which tuner position(s) are best for accuracy. That will require further multi-shot group testing, involving careful experimentation with tuner position (and powder charge weights). But for those folks who doubt that a tuner can make a difference on a short, fat barrel, just take another look at the photos. The up/down changes are undeniable, and noteworthy in the wave pattern they follow.
Shooting Set-up and Test Conditions:
Pascal did this test at an outdoor range under very good conditions: “This was shot at my home range, outdoors, with four Smiley flag. The range is a narrow cut in high woods. Wind was consistent with readable flags. I started testing the tuner from 10 turns out and on to 15. I recently… found a sweet spot very close to the rearmost position of the tuner, so the rigidity provided by this super long tenon (just short of 70mm) was not a reason to overlook the recommended Bukys tuning procedure.”
Report by Boyd Allen, IBS Vice President Photos by Gordie Gritters and Alex Wheeler
The 2018 IBS 1000-Yard Nationals event was hosted by the Montana NW 1000 Yard BR Club, which has an active and well-run 1K benchrest shooting program. Over eighty shooters from as far away as Indonesia participated, 82 in Light Gun, and 85 in Heavy Gun. By all accounts it was a very well-run match, that was enjoyed by all who attended.
The Deep Creek Range is a beautiful place to shoot, with normally favorable conditions. But the winds were challenging at the 2018 IBS 1000-yard Nationals.
One man, Carroll Lance, dominated the match, taking the 2-Gun Overall Aggregate, while also winning HG Score Agg, HG Group Agg, and HG Overall Agg. It was a masterful performance — Carroll shot his Light Gun in both classes, beating dozens of bigger, heavier, and much more expensive rifles. Carroll’s name will be placed on four IBS perpetual trophies. Here’s Carroll with his line-up of trophies.
Winning Form — Carroll Lance Talks Technique
When asked for his advice to a new shooter, Big Winner Carroll Lance said: “Shooters should concentrate on being smooth, so as not to disturb the rifle in the bags. Speed will come naturally. The common mistake is to try to run the shots faster than can be done smoothly.”
Aerial Drone Video Shows Deep Creek Range outside Missoula, Montana. Worth Watching!
Challenging Conditions at Match
While Deep Creek is renown for often having good, “readable” conditions, this was a tough year according to Deep Creek veterans. As proof, there were five DQs on a single relay.
Tom Mosul (who ran the firing line for most of the event) noted that conditions were not extreme but could be tricky, with max wind speed s10-15 mph. It varied enough that being on some relays could effectively put a competitor out of the tournament. Tom also mentioned that indicators that he normally could depend on were not reliable this year.
Leo Anderson, who has been present at nearly all the 1000-yard matches ever held at Deep Creek, said this 2018 match had some of the trickiest conditions he has seen in 20 years of competition. Leo said you could not see the conditions causing POI changes. Alex Wheeler agreed, and added that although it was pretty calm at the benches, that the scorer who was running targets (from the pits to the firing line) said there was a strong cross wind half way down range that could not be felt at the pits or firing line…typical for Deep Creek, tough to read when it does decide to be nasty.
Summary of IBS 1000-Yard Nationals Match Results
For those who are unfamiliar with long range benchrest results, there are seven categories of winners, with seven corresponding traveling trophies (the big ones that bear the names of each year’s winners). For each of the two rifle classes (Light Gun and Heavy Guun) there are group, score, and overall aggregate winners (every target is both measured for group size and scored.) Finally, there is a 2-Gun winner for both rifle classes combined, based on group AND score.
With over eighty competitors, the PDF of the complete results, including those of every relay plus a very detailed list of the equipment used by every competitor for both classes, is a whopping 52 pages long. Links Below:
Equipment List Light Gun and Heavy Gun Classes
The seven travelling trophies went to just three shooters. Cody Finch won the LG Group aggregate. Tim Gonnerman won the LG Score aggregate and LG Overall aggregate. Carroll Lance won everything else — HG Score aggregate, HG Group aggregate, HG Overall aggregate, and the 2-Gun Overall.
Big winner Carroll Lance shot his 6mm Dasher Light Gun for both classes. The rifle, smithed by Jay Cutright, features a Borden BRM drop port action, Krieger barrel, Wheeler LRB stock, and Nightforce scope. Carroll’s match-winning load consisted of Vapor Trail bullets, in front of H4895 powder and CCI primers.
Cody Finch’s Light Gun was a 6BR Ackley (6BRA) with Lederer barrel, BAT action, Nightforce scope, and a DCT stock. His load consisted of Vapor Trail bullets, Hodgdon powder, and CCI primers. Alex Wheeler smithed the rifle.
Tim Gonnerman’s Light Gun, smithed by Mike Bigelow, featured a Krieger barrel (6mm Dasher), BAT action, Nightforce scope, and McMillan stock. The load consists of Vapor Trail bullets, H4895 powder, and CCI 450 primers.
Equipment List by Class Based on Two-Gun Overall Agg Rankings Light Gun Equipment List (click to zoom):
I called the major Aggregate winners (Carroll Lance, Cody Finch, and Tim Gonnerman), and asked them about the 1K Nationals. My questions fell into five major categories: 1) how the wind compared to other matches (including other locations); 2) how each handles his rifle and equipment; 3) how they shot the match; 4) how they clean their barrels (and what their barrel accuracy life is); and 5) How they reload.
They all described the conditions as challenging. This was not a match to use for spotting small differences in accuracy between similar calibers. Even with the rotations of relays and benches, there was an inescapable luck factor, with some relays having significantly more challenging conditions than others. Changes could be rapid, with reversals that could be extreme.
Gun-Handling: On the subject of how the rifle is handled, Cody Finch shoots with only trigger contact, while Tim Gonnerman and Carroll Lance have light stock contact. Tim said that he is so focused on shooting that he is really not aware of the details of how he handles the rifle. Carroll said that he makes light contact with his trigger hand and has the butt touching his shoulder so lightly that he can barely feel it, but solidly enough that it only recoils about a quarter inch.
Shooting Strategies: Cody uses his sighter period to investigate how differences in mirage affect bullet impact location and then holds off shot by shot during his record string. Tim and Carroll do not, they adjust their scopes using the last sighter shot (which they can see because there is target service like an high power match with spotter disks) and then hold center for their record, trying to do as little with their rest adjustments as possible. Carroll mentioned that he only made one adjustment for the whole weekend and that his usual practice is to make small corrections with hand pressure.
Barrel Cleaning: Tim shot the whole weekend, without cleaning. When he does clean he uses Pro Shot Copper Solvent, patches, a nylon brush, and does a lot of soaking. Periodically he uses IOSSO with a patch on a nylon brush. He breaks in his barrels with the common one-shot-and-clean progressing to three and then five, and, sees a velocity increase at about 120 rounds from new. Tim cleans with patches and bronze brushes. I smiled when he told me what he cleans with, CLR, ThorroClean (Bullet Central) and IOSSO. CLR has been the topic of some discussion on the internet, and a friend found that it did a good job on carbon. It has been a controversial topic. Of note, Tim shot the smallest group for the tournament.
Barrel Life: All three Top Guns said that accurate barrel life varied from barrel to barrel. I got the general impression that most were done or close to done by 1,500 rounds, at least for the Dasher, with the BRA being too new to tell if it would stretch that far, but that it might.
Reloading Methods: On the reloading side, none of them anneal regularly, if at all. Carroll’s cases had 15-20 firings on them, and had only been annealed once, early on, but they still felt good when he was seating bullets. Last year he tried to anneal after every event.
Most of his competition has been at 600 yards, where Varget did a good job, with bullets seated .010 to .012 into the lands, but it did not perform well at 1K so he switched to H4895, which likes its bullets .005 into the lands. The chamber has a .268 neck. Case necks were turned to .0105 for a loaded round clearance of about .003. He used a .263 bushing.
Starting with a fired case, he sizes in a FL bushing die, tumbles in corn cob media to remove the lube, and just before seating bullets applies graphite to the insides of case necks with a Q-Tip.
Course of Fire at 1K Nationals (as explained by Tom Mosul):
“Relays were rotated along with bench assignment within each relay. The match is a three-target Aggregate, so what we did was divide the total number of relays and benches by 3, and then rounded down. Due to the number of benches (13) and shooters there were seven relays per target. Saturday morning started with LG target #1, followed by HG target #1, finishing the day with LG target #2. Sunday morning began with HG target #2, then LG target #3, and finished with HG target #3. For each relay six minutes are allowed for sighter shots, followed by a cease fire, and within a minute after that, a ten-minute record period.”
True Treasure Trove of Prizes at Deep Creek
There was a very rich prize table, including BAT, Borden, Curtis Custom, and Defiance actions; McMillan, McMillan/Wheeler and Shehane stocks; Kahles, Nightforce, Swarovski, and Vortex Scopes; SEB NEO Rest; Benchsource Annealing machine; Bartlein, Brux, Lilja, Krieger, and Rock Creek barrels; Zeiss Binoculars; many gift certificates (incl. Kelbly’s and McMillan) and much more.
The Top Guns got the pick of the prizes. Carroll Lance chose a Kahles 10-50 rifle scope, Tim Gonnerman chose a BAT Neuvo action, and Cody Finch chose a Borden BRM action.
NOTE: Prizes that manufacturers and vendors contribute are an important part of any successful match. I am sure that everyone who was connected with this event is grateful to all the generous sponsors who donated prizes and gift certificates. Sebastian Lambang (shown below), creator of SEB Rests, shot the match and donated a SEB NEO rest.
More Photos — Hundreds of Photos
Here are links to ALL pictures that Gordy Gritters and Alex Wheeler were kind enough to take at the 2018 IBS 1000-Yard Nationals. There are 359 images altogether:
This shows Tom Jacobs of Vapor Trail Bullets holding his match rifle while Gordy Gritters drills a couple of ounces out of the butt. We’re told Tom knew he was an ounce heavy when he got there.
Each Wednesday, the U.S. Army Marksmanship Unit publishes a reloading “how-to” article on the USAMU Facebook page. A while back, the USAMU’s reloading gurus looked at the subject of case lubrication. Tasked with producing thousands of rounds of ammo for team members, the USAMU’s reloading staff has developed very efficient procedures for lubricating large quantities of cases. This article reveals the USAMU’s clever “big-batch” lube methods. For other helpful hand-loading tips, visit the USAMU Facebook page on upcoming Wednesdays.
Rapid, High-Volume Case Lubrication
Today’s topic covers methods for quickly applying spray lube to cartridge cases prior to sizing. A typical order for this shop may be 25,000 rounds, so [speeding up] the lubrication process can be a real time-saver. While your ammunition lots probably aren’t this large, the efficient methods discussed here may help save a considerable amount of time over your handloading career. Our case lubrication rates range from 1500-1600 cases per hour, to 2400-2500 cases per hour, depending on caliber.
This shop uses virgin brass, whereas most home handloaders use fired brass, which necessitates some small changes at times. These will be discussed as they arise. Begin with fired brass that has been tumbled clean.
Ensure as much tumbling media as possible is removed from the brass, as when it gets into a size die, it can dent cases significantly. This is a good time to round out dents in the case mouths using a tapered tool to prevent damage from the decapping stem.
First, dump the clean cases into a large box or reloading bin. Shake the bin back and forth so that many cases are oriented with the mouths up. Next, pick up as many cases as is convenient with the mouths “up”, from natural clusters of correctly-oriented cases. With 7.62mm-size cases, this is usually 3-4, and with 5.56mm cases, this can be up to 8-10. Place the cases into the rack slots, mouth-up. Doing this in groups rather than singly saves considerable time. Once these clusters have been depleted, it will be time to re-shake the bin to orient more cases “up.”.
This photo shows a case lubrication rack made by a USAMU staffer.
Naturally, adjust the spacing to best fit the calibers you reload. We have found this size … convenient for handling through the various phases of case lubrication/transfer to progressive case feeders for processing. Note that the 1/2-inch angle does not cover much of the critical case area at the base, just forward of the extractor groove, where most re-sizing force will be exerted. As the USAMU uses virgin brass, less lubrication is required for our brass than would be needed for Full Length (FL) sizing of previously-fired brass.
NOTE: The amount applied using our rack is easily enough for our purpose. If using fired brass, be sure to adequately lube this base area to avoid having cases stick in the full-length sizing die.
Using a spray lube, coat the cases adequately, but not excessively, from all sides. Be sure to get some lube into the case mouths/necks, in order to reduce expander ball drag and case stretching/headspace changes. The spray lube this shop uses does not harm primers or powder, and does not require tumbling to remove after lubing.*
Take a close look at the photo above. The USAMU shop uses a common kitchen turntable, which allows the rack to be rotated easily. We place this in a custom-made box which prevents over-spray on to floors and walls.
Angled Box Method for Smaller Cases to be Neck-Sized
A refinement of the above method which especially speeds processing of 5.56x45mm cases is as follows. A small cardboard box which holds about 100 cases is fitted with an angled “floor” secured by tape. With the smaller 5.56mm cases, usually about 8-10 cases per handful can be picked up, already correctly-oriented, and placed into the box together. This prevents having to place them into the rack slots, saving time.
HOWEVER, note that this does not allow nearly as much lube access to the case bodies as does the rack. For our purposes — neck-sizing and setting neck tension on new brass, this works well. If using this procedure with fired brass, take steps to ensure adequate lube to prevent stuck cases.
As always, we hope this will help our fellow handloaders. Good luck, and good shooting!
*A two-part test performed here involved spraying primed cases heavily, while getting more lube into the case mouth/body than even a careless handloader would likely apply. The second part of the test involved literally spraying considerable quantities of the lube directly into the cases, drenching the primers. After a several-day wait to allow the lube to penetrate the primers, they were then fired in a test barrel. All fired normally; no unusual reports were noted. This bolstered confidence that normal amounts of the lube would not adversely affect our ammunition, and we have been pleased with the results over several years.
Need a new barrel for your Rem-actioned hunting or tactical rifle? Here’s a great DIY option for riflemen. McRee’s Precision offers complete, no-gunsmithing re-barreling kits for Remington and Rem-clone actions. These feature a high-quality, pre-chambered “PRE-FIT” stainless barrel from Criterion, a Savage-style barrel nut, a recoil lug, and a special barrel-nut wrench. Most of the Pre-Fit barrels are 24″ long and threaded at the muzzle. CLICK Here for all Pre-Fit barrel specs.
With this system you can easily re-barrel your favorite Remington rifle yourself in less than an hour. You don’t need to pay gunsmithing fees, or wait weeks (or months) for a busy smith to do the job. And the price is under $500.00. Kits are currently available for these chamberings: 6.5 Creedmoor, 6mm Creedmoor, .243 Win, .308 Win, .308 Winchester Magnum. You can buy with confidence — McRee’s Precision offers a Half-MOA Accuracy Guarantee with its pre-fitted barrel kits.
The stainless steel Barrel Nut is set up for 1 1/16 x 16 barrel threads, while the stainless steel recoil lug has a 1/8 inch removable locator pin and is set up for 1.0625 dia barrel threads.
McRee’s Precision sells Rem-action Pre-Fit barrel packages (complete with barrel nut, recoil lug, and wrench) starting at $489.52. Choose from five chamberings: 6.5 Creedmoor, 6mm Creedmoor, .243 Win, .308 Win, and .300 Win Mag. These Pre-Fit barrel kits come ready-to-install. All you need to do is remove your current barrel, place the recoil lug, spin on the new tube, follow the instructions for setting head-space with standard go/no-go gauges, then torque the barrel nut against the lug. NOTE: You may require a barrel vise and action wrench to remove the original barrel. Chambering-specific headspace gauges required. Minor inletting changes may be needed forward of the action.
The folks at McRee’s Precision say their Pre-Fit system offers many advantages: “Remington Pre-Fitted Barrel Kits have become popular over the years. If Savage can do it, why not for our Remingtons? Our [Criterion-supplied] barrels are spec’d to the McRee standard of performance. There are several places to get the tools required to remove your factory barrel correctly. Once you have your barrel removed all you have to do is follow the normal Savage procedure to install your new barrel. We recommend that you contact your local gunsmith for the install. Feel free to call us with any questions.”
Product Tip from Ed LongRange. We welcome readers’ submissions.
Here are the main tools you’ll need to assemble an AR-platform rifle
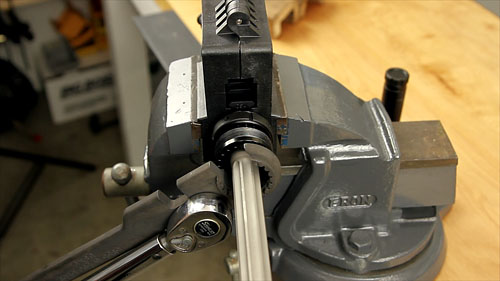
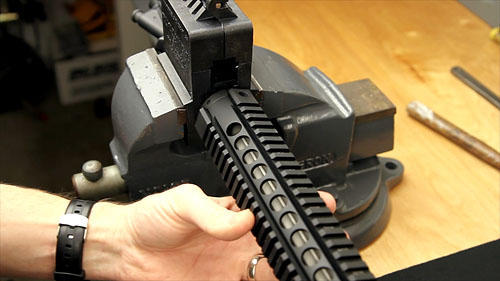
Planning to put together an AR-platform rifle? Or are you looking to upgrade your AR with a new barrel, stock, or trigger group? Then you should check out the AR-15 Rifle Build DVD from our friends at UltimateReloader.com. This DVD covers all the details of a custom build, using high-resolution video sequences, and helpful supporting graphics.
In this DVD, Ultimate Reloader’s Gavin Gear guides you through the entire process including selecting components, acquiring and using the necessary tools, assembly steps and details for each component, and even mounting a scope. Building an AR-15 can be overwhelming, but with the right guidance and help it’s not difficult and can be very rewarding. With this DVD you’ll be able to build your AR-15 with confidence.
Upper: Barrel / Gas Block / Gas Tube
Upper: Handguard Installation
UltimateReloader.com’s AR-15 Build DVD is available just $9.90 (plus $3.80 shipping/handling). This DVD can pay for itself many times over by showing you how to do your own gunsmithing (and get quality AR components at attractive prices).
Gavin in Action — Seven-minute AR-15 Build
To preview the AR Build DVD, check out this YouTube video from UltimateReloader.com. This 12-minute video shows the basics of assembling a standard AR15 with Del-ton components. Gavin shows how to install the AR trigger group and other parts in an AR-15 lower. You’ll also see the basics of barrel and handguard installation. This video covers the highlights, but we strongly recommend you buy the full DVD before starting your first AR-15 build.
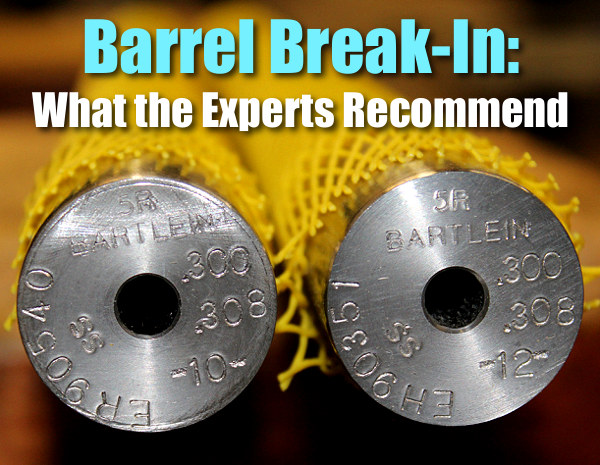
The question of barrel break-in is controversial. Some folks advocate an elaborate, lengthy cycle of shooting and brushing, repeated many times — one shot and clean, two shots and clean and so on. This, it is argued, helps barrels foul less and shoot more accurately. Others say minimal break-in, with patching and brushing after 10-15 rounds, is all you need. Still others contend that break-in procedures are a total waste of time and ammo — you should just load and shoot, and clean as you would normally.
We doubt if there will ever be real agreement among shooters concerning barrel break-in procedures. And one must remember that the appropriate break-in procedure might be quite different for a factory barrel vs. a custom hand-lapped barrel. This Editor has found that his very best custom barrels shot great right from the start, with no special break-in, other than wet patches at 5, 10, and 15 rounds. That said, I’ve seen some factory barrels that seemed to benefit from more elaborate break-in rituals.
What’s the best barrel break-in procedure? Well our friend Eric Mayer of Varminter.com decided to ask the experts. A while back Eric interviewed representatives of three leading barrel manufacturers: Krieger, Lothar-Walther, and Shilen. He recorded their responses on video. In order of appearance in the video, the three experts are:
Do I Need to Break-In a New Rifle Barrel?
Eric Mayer of Varminter.com says: “That is a simple question, [but it] does not necessarily have a simple answer. Instead of me repeating my own beliefs, and practices, on breaking-in a new rifle barrel, I decided to answer this one a bit differently. While we were at the 2016 SHOT Show, we tracked down three of the biggest, and most popular, custom barrel makers in the world, and asked them what they recommend to anyone buying their barrels, and why they recommend those procedures. We asked the question, and let the camera run!” Launch the video above to hear the answers — some of which may surprise you.
Long-Term Barrel Care — More Experts Offer Opinions
Apart from the debate about barrel break-in, there is the bigger question of how should you clean and maintain a barrel during its useful life. Some folks like aggressive brushing, other shooters have had success with less invasive methods, using bore foam and wet patches for the most part. Different strokes for different folks, as they say. In reality, there may not be one solution for every barrel. Different fouling problems demand different solutions. For example, solvents that work well for copper may not be the best for hard carbon (and vice-versa).
“Why worry about a little barrel fouling when the throat is subjected to a brutal 5,600° F volcano at 55,000 PSI? To investigate these and other questions about taking care of a match barrel, we spoke with a dozen experts and share their knowledge in this first of a series of articles.
After listening to folks who shoot, build barrels or manufacture cleaning solvents for a living, we concluded that even the experts each have their own unique recommendations on how to care for a match barrel. But they all agree on one thing — the gun will tell you what it likes best. Because the life expectancy of a match barrel is about 1,500 to 2,500 rounds, the objectives of cleaning one should include: preserve accuracy, slow the erosion, and remove fouling — all without damaging the gun. This article doesn’t claim that one cleaning method is better than the next. Rather, we set out to interject a little science into the discussion and to share some lessons learned from experts in the field.” — Chip Lohman
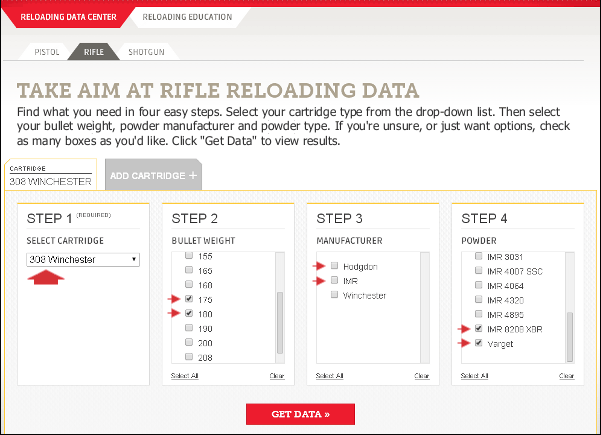
Looking for a good load for a new rifle? Or perhaps you want to try a new powder and bullet combo for an existing rig. One of the best places to start for load data is Hodgdon’s online Reloading Data Center for pistol, rifle, and shotgun reloaders. Check out the enhanced Data Center at www.HodgdonReloading.com.
In the Data Center, you’ll find thousands of load recipes for pistol, rifle, and shotgun. Rifle shooters will find dozens of loads for their favorite Hodgdon, IMR, and Winchester powders such as H4198, Varget, H4350, and IMR 8208 XBR. And Hodgdon’s Reloading Center is “mobile-friendly” so it works well with smartphones and tables. Navigation is easy, and you can set the search criteria easily choosing your favorite powder or bullets. After choosing a cartridge, you can pre-select specific bullet weights and powder types. That quickly delivers just the information you want and need. You won’t have to scroll through scores of entries for bullets or powders you don’t use.
Mobile users will notice that the updated/enhanced Reloading Center is much more “user-friendly” for smart-phone and tablet users. Controls have been optimized for touch-screens, and buttons are large and easy to use. Likewise the results are displayed in a large, easy-to read format.
Hodgdon tip from EdLongrange. We welcome reader submissions.


 Hybrid Bullet Design — Best of Both Worlds?

 How to Use Range Locator
 The Benefits of Dry-Fire Training
 Have a good look at the photos below — this may be one of the most noteworthy target strings we’ve ever published. What you can see is the effect of barrel tuner position on point of impact (POI). You can clearly see that the tuner position alters the up/down POI location in a predictable fashion.





 Do I Need to Break-In a New Rifle Barrel?