At the request of Forum members, we are reproducing this helpful article by gunsmith and Hall-of-Fame benchrest shooter Thomas “Speedy” Gonzalez
How to Reduce Vertical in Your Shot Groups
One of our Shooter’s Forum members recently built a new benchrest rifle. He was concerned because his groups were stringing vertically. This is a common problem that all precision shooters will face sooner or later. In addition to ammo inconsistencies, many other factors can cause vertical stringing. Accordingly, it’s important that you analyze your gun handling and bench set-up systematically.
Hall of Fame benchrest Shooter Speedy Gonzalez has written a helpful article that explains how to eliminate mechanical and gun-handling problems that cause vertical spread in your groups. Speedy’s article addresses both the human and the hardware factors that cause vertical. CLICK HERE to read the full article. Here are a few of Speedy’s tips:
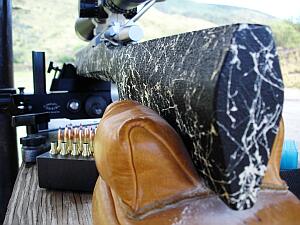
• Front Bag Tension — Vertical can happen if the front sand bag grips the fore-arm too tightly. If…the fore-arm feels like it is stuck in the bag, then the front bag’s grip is too tight. Your rifle should move in evenly and smoothly in the sand bags, not jerk or chatter when you pull the gun back by hand.
• Sandbag Fill — A front sandbag that is too hard can induce vertical. Personally, I’ve have never had a rifle that will shoot consistently with a rock-hard front sandbag. It always causes vertical or other unexplained shots.
• Stock Recoil — Free-recoil-style shooters should be sure their rifle hits their shoulder squarely on recoil, not on the edge of their shoulder or the side of their arm. If you shoulder your gun, you need to be consistent. You can get vertical if your bench technique is not the same every shot. One common problem is putting your shoulder against the stock for one shot and not the next.
• Front Rest Wobble — You will get vertical if the top section of the front rest is loose. Unfortunately, a lot of rests have movement even when you tighten them as much as you can. This can cause unexplained shots.
• Stock Flex — Some stocks are very flexible. This can cause vertical. There are ways to stiffen stocks, but sometimes replacement is the best answer.
• Rifle Angle — If the gun is not level, but rather angles down at muzzle end, the rifle will recoil up at butt-end, causing vertical. You may need to try different rear bags to get the set-up right.
• Unbalanced Rifle — If the rifle is not balanced, it does not recoil straight, and it will jump in the bags. If the rifle is built properly this will not happen. Clay Spencer calls this “recoil balancing”, and he uses dual scales (front and rear) to ensure the rifle recoils properly.
• Firing Pin — A number of firing-pin issues can cause vertical. First, a firing pin spring that is either too weak or too strong will induce vertical problems. If you think this is the problem change springs and see what happens. Second, a firing pin that is not seated correctly in the bolt (in the cocked position) will cause poor ignition. Take the bolt out of rifle and look in the firing pin hole. If you cannot see the entire end of firing pin it has come out of the hole. Lastly, a firing pin dragging in bolt or shroud can cause vertical. Listen to the sound when you dry fire. If you don’t hear the same sound each shot, something is wrong.
• Be Consistent — You can get vertical if your bench technique is not the same every shot. One common problem is putting your shoulder against the stock for one shot and not the next.
• Head Position — Learn to keep your head down and follow-through after each shot. Stay relaxed and hold your position after breaking the shot.
• Last Shot Laziness — If the 5th shot is a regular problem, you may be guilty of what I call “wishing the last shot in”. This is a very common mistake. We just aim, pull the trigger, and do not worry about the wind flags. Note that in the photo below, the 5th shot was the highest in the group–probably because of fatigue or lack of concentration.
“Science tells us that exposure to continuous noise of 85 dB for eight hours is enough to cause permanent hearing loss, and worse, spikes of 130 dB and more can result in permanent hearing damage instantly.” Source: NRA Blog.
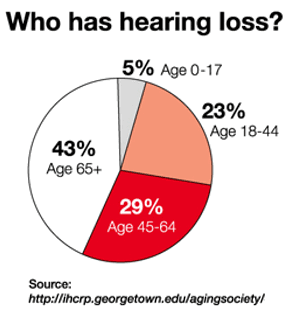
The Risk of Hearing Loss
Hearing loss can be progressive and irreversible. If you are a shooter, this is serious business. As the NRA Blog cautions: “You may not even realize you’re harming your hearing. Hearing loss occurs gradually, and can go effectively unnoticed until symptoms become severe. By then, the damage is done.”
Nobody wants to go deaf. But we often see shooters without effective hearing protection when they are walking around a few yards behind the firing line. That’s bad — even if you are away from the firing line, gunshot noises can damage your hearing. You MUST use effective hearing protection every time you go to the range. Good foam earplugs costs mere pennies but they can prevent deafness in your later years. Many folks also wear muffs over plugs.
Sound Levels for Common Noises:
9mm Luger pistol: 160 dB
Jet aircraft engine (near): 140 dB
.22 LR pistol: 134 dB
Normal human pain threshold: 120 dB
Noisy Nightclub: 110 db
Riding Motorcycle at 65 mph: 103 db
Power Lawnmower: 95 dB
Hearing damage possible: 85 dB (sustained for 8+ hours)
Ringing Telephone: 80 dB
Normal conversation: 60 dB
The Myth of the “Quiet” .22 LR
The NRA Blog notes that “many rimfire shooters, particularly those using the beloved .22 Long Rifle cartridge, argue that the small .22 LR caliber doesn’t produce enough sound to damage your hearing”. So, is that really true … or is it a myth?
In fact, a .22 LR can be much louder than you think — a .22 LR pistol can produce sound levels of 134 dB. That’s well above the normal human pain threshhold.
Highest Protection NRR 34dB-Rated Ear Muffs
For under $20.00 you can buy quality ANSI-approved muffs with a 34dB Noise Reduction Rating — the best you can get. Chose the Bright Yellow TR Industrial Muffs at $13.48, or the dark green Walker EXT Range Muffs for $15.42. Both products have padded head-bands which retract. Another dual-shell design with a 34dB NRR rating is the new FNova Muffs priced at just $13.22.
Howard Leight MAX NRR33 Earplugs, Just $7.98 for 50 Pairs.
20 Pairs
50 Pairs
These Howard Leight NRR33 Max plugs are your Editor’s favorite foam earplugs. Between shooting, motorcycling and mowing lawns, I probably have Max plugs in my ears 3-4 days a week. This is a very good price for a bulk pack of 50 pairs. And if you act soon, you can get free shipping to boot. This Editor just bought a 50-pack myself. And, yep, I got 50 pairs for $7.98 delivered, less than a pint of premium beer costs at my local pub:
This 2010 story is reprinted at readers’ request.
In the past few years, tubeguns have really taken over in high power circles. At most matches you’ll see more tubeguns than conventional prone rifles, and a high percentage of those tubeguns will have been built using an Eliseo (Competition Machine) CSS chassis kit.
Step-By-Step Guide to Stock Set-Up
If you are a new tubegun shooter, or if you are planning a tubegun build this winter, our friend “GS Arizona” has prepared a comprehensive set-up guide for Eliseo tubeguns. Eliseo’s CSS chassis system affords a myriad of adjustments. Initially, one can be overwhelmed by all the variables: Length of Pull, Length to Sights, Length to Handstop, Cheekpad Height, Buttstock Offset, Buttstock Cant Angle, Handstop Angle, and Forearm Rotation.
In his Guide to Configuring the Eliseo Tubegun, GS Arizona shows how to adjust the Tubegun so that a shooter’s prone position is stable, repeatable, and comfortable. The article covers each adjustment, step by step. If you follow the instructions, starting with setting Length of Pull, you should find that your hold becomes more stable, the gun moves less from shot to shot, and your eye position relative to the sights is improved.
About the Set-Up: “Adjusting the stock is a process that you must work at and it builds on itself. As you get one adjustment right, the others begin to fall into place. Our hope is that you take from this article a system for adjusting the stock, not an exact set of dimensions; and that you understand that it will take continuous work over a period of time to really refine the adjustments. Your goal is not to obtain a ‘perfect set of dimensions’ but rather a perfect feel that accomplishes the three objectives of stability, durability and comfort and the knowledge of how to change the adjustments to achieve those objectives under varying conditions such as sloped firing lines or other terrain features.”
High-Tech Rimfire Rigs
If you watched the smallbore position and prone shooters at the 2016 Brazil Olympic Games, you couldn’t help but notice the exotic rifles competitors were shooting. There were wood stocks, metal stocks, factory-built rifles and customized specials. Why are there are so many different design features and stock types? To answer this question, the NRAblog’s editors called on Jessie McClain of the NRA Competitive Shooting Division.
“The customized rifles, like the Anschütz you showed me, can make a real difference in a shooter’s performance,” explained McClain. “I went from a decent shooter to making the varsity shooting team my freshman year because of the rifle.” As Jessie explained, one new feature out there is the adjustable stock, which she called the Porsche of the shooting world. Fully adjustable from the butt plate to the check piece to the hand stop and risers and bolt knobs, this component is fully customizable to the athlete … which can be a huge advantage. “Every person is different … a customizable rifle fits anyone. A rifle team can purchase four of these and field a shooting team for years.”
The Modern Anschütz Position Rifle
Smallbore match rifle makers are using modern materials in response to the need for greater adjustability (and enhanced accuracy). One of the popular new designs is the Anschütz model 1913 position rifle with a “1918 ALU Precise” brushed aluminum stock. This looks like it has been crafted in an aircraft plant.
Probably the most popular centerfire rifle round in the Western Hemisphere is the .223 Remington and its metric match, the 5.56x45mm. Though many folks use “.223 Rem” and “5.56×45″ interchangeably, there are some meaningful differences in specifications for the original .223 Rem and the 5.56x45mm cartridge, as adopted by the U.S. military and NATO armies. The default chamber throats are slightly different and the .223 Rem is rated at 55,000 PSI vs. 62,366 PSI for the 5.56x45mm.*
.223 Rem vs 5.56x45mm — Key Differences
There is a truly outstanding, very thorough article on the subject, published by LuckyGunner.com.** This involved extensive testing, with pressure monitors, of 5.56x45mm ammo in .223 Rem chambers. Those tests revealed the peak pressures. Here is one of the ammo test charts:
NOTE: “The observed chamber pressure for Federal XM855 5.56mm ammunition in a .223 Rem chamber exceeded .223 maximum pressures, but not by a massive amount. The ninth shot (the red line) was an underpowered cartridge which exhibited significantly lower velocity and pressure than the other rounds, so it was excluded from the average velocity and pressure numbers for this chamber.”
And if you’re curious, LuckyGunner also fired .223 Rem ammo in a 5.56x45mm NATO-chambered AR15 rifle. As you would expect, the peak pressures were significantly lower, but the .223 Rem ammo still cycled the semi-auto AR-platform rifle perfectly well:
UltimateReloader.com Explains .223 Rem vs. 5.56x45mm
To explain the key differences between the .223 Rem and 5.56x45mm cartridges our friend Gavin Gear of UltimateReloader.com has created a very thorough 12-minute video. This covers the cartridge specifications and explains key considerations for hand-loaders. Gavin also addresses the oft-asked question “Can I shoot 5.56x45mm ammo in my .223 Rem chamber?” Gavin’s video is definitely worth watching. In fact, this is one of the most popular videos Gavin has ever created — it has been watched over 300,000 times on YouTube.
What Exactly Is the 5.56x45mm NATO Cartridge?
The 5.56×45mm NATO is a rimless bottle-necked intermediate cartridge family standardized by NATO with development work by FN Herstal. It consists of the SS109, SS110, and SS111 cartridges. Under STANAG 4172, it is a standard cartridge for NATO forces as well as many non-NATO countries.
Bullet diameter: 5.70 mm (0.224 in)
Maximum pressure (EPVAT): 430.00 MPa (62,366 psi)
Maximum pressure (SCATP 5.56): 380.00 MPa (55,114 psi)
Case length: 44.70 mm (1.760 in)
Rifling twist: 178 mm or 229 mm (1 in 7 in)
Parent case: .223 Remington (M193)
Ammo-Maker Federal Premium Compares .223 Rem and 5.56x45mm
Here is a video from ammo-maker Federal Premium explaining the difference between .223 Remington and 5.56x45mm NATO. Federal states that you may experience excessive pressures when firing a 5.56x45mm in a standard .223 Remington chamber:
One leading gunwriter has addressed the question of shooting 5.56x45mm ammo in .223 Rem chambers. He advocates caution (for more info, SEE pressure tests by LuckyGunner.com):
“I have received a slew of questions — many from first time AR-type rifle buyers — about the .223 Rem and the 5.56×45 mm NATO cartridges. Can I shoot 5.56×45 mm NATO in my .223 and vice-versa? Are these the same cartridge?
Externally, the two cartridge cases are identical. The main differences are that 5.56×45 mm NATO operates at a higher chamber pressure (about 60,000 PSI versus 55,000 PSI on the .223 Rem.) and the 5.56’s chamber is slightly larger than that of the .223 Rem. Also, the throat or leade is longer in the 5.56×45 mm chamber. What does this mean? You should not shoot 5.56×45 mm NATO out of a rifle that is chambered in .223 Rem. And be aware that some .223 Rem. ammunition will not reliably cycle through some AR-style .223 Rem. rifles, but it usually does. As a matter of fact, I have not encountered any difficulty with current .223 Rem. loads cycling through a 5.56 mm AR-style rifle.” – Mark Keefe, Editor, American Rifleman
* According to the official NATO proofing guidelines, the 5.56×45mm NATO case can handle up to 430.0 MPa (62,366 psi) piezo service pressure. The U.S. SAAMI lists Maximum Average Pressure (MAP) for the .223 Remington cartridge as 55,000 psi (379.2 MPa) piezo pressure with deviation of up to 58,000 psi (399.9 MPa). The chamber for military 5.56×45mm NATO has a longer throat prior to the bullet contacting the rifling which results in lower pressures when firing 5.56×45mm NATO ammunition. If 5.56×45mm NATO is used in rifles chambered for .223 Remington the bullet will be engraving the rifling when chambered. which can increase pressures past SAAMI Max levels. NOTE: The C.I.P. standards for the C.I.P. civilian .223 Remington chamber are much closer to the military 5.56×45mm NATO chamber.
** The full-length LuckyGunner article is well worth reading. It even provides specifications for a number of .223 Rem reamer types, and compares the original .223 Rem, the 5.56x45mm NATO, and the modern .223 Wylde chamberings.
Product innovation is all about “building a better mousetrap”, or in this case, building a better bore-cleaning patch. A real smart guy, Shane Smith, has invented a triangular patch that earned a patent. The U.S. Patent Office has awarded a utility patent for BoreSmith’s triangular Pyramid Patch™. This unique cleaning patch was designed by Shane Smith, a mathematician/physicist who employed his scientific and firearms knowledge to create innovative bore-cleaning products.
BoreSmith’s clever Triangle Patch™ (aka Pyramid Patch) presents more cleaning surface area to the bore wall than does a conventional square or round patch (of equivalent size). At the same time, the unique geometry makes Triangle Patches much less likely to jam in the barrel. This is because the notches in the sides of the triangle allow the patch to sit more uniformly on the jag (without bunching up). In addition, the Pyramid patch is must less likely to jam due to pleating. One reason conventional patches get stuck is unwanted 5-layer pleating. The special notches in the Pyramid patch remove all or most 5-layer pleating. As a result the patch does not bunch up and this also reduces rod bowing.
Triangle Patch Function and Geometry Explained (See 1:18 time-mark):
NOTE: Despite what you may see in this video, you should ALWAYS insert brushes and patches from the chamber end first, using a fitted cleaning rod bore guide. With bolt-action rifles, NEVER insert a cleaning rod (with brush or jag) in through the muzzle. This may damage the delicate crown of your barrel.
Do you have a family member who has recently acquired his or her first firearm? Do you have friends or neighbors who keep firearms in a home with small children? It is important to know and practice the principles of firearms safety, ALL the time. Here are two well-written gun safety manuals in printable PDF format. All firearms owners, even experienced hunters and competitors, can benefit from reviewing these resources from time to time. And new gun owners, in particular, should take the time to read both these guides. The Remington Safety Manual includes the “Ten Commandments of Firearms Safety”. Here’s the First Commandment:
Here’s a simple modification that makes your classic beam balance more user-friendly. For a few dollars you can enhance your balance scale system to improve work-flow and reduce eye strain. This clever modification makes it easier to see the balance’s zero-mark center-line when weighing charges.
When he chooses to measure his loads or sort bullets by weight, Forum Member Boyd Allen likes his trusty RCBS 10-10 scale. He finds that it works predictably, time after time, and it doesn’t suffer from the drift and calibration issues that plague some of the less-expensive electronic scales on the market.
To make it easier to see the balance point, Boyd has adapted a magnifying glass with a mirror. This makes the end of his balance beam easier to view from his normal position on the bench. Boyd explains: “This set-up uses a cheap magnifier with positioning arms that was probably designed to hold and magnify small objects while soldering them. I think that it came from Harbor Freight many years ago. The mirror lets you look at the scale as if is was at eye level, and of course the magnifier makes the image easier to see.”
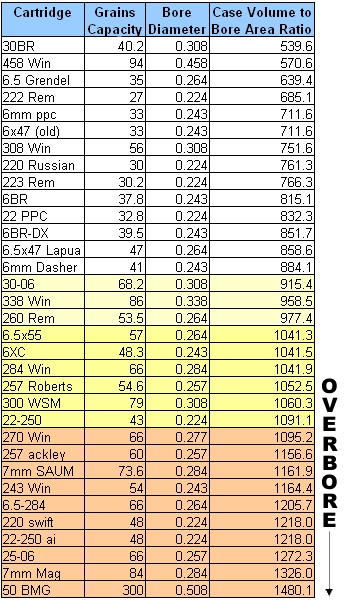
What is “Overbore”? That’s a question rifle shooters can debate to no end. This article from our archives proposes one way to identify “overbore cartridges”. We think the approach outlined here is quite useful, but we know that there are other ways to define cartridges with “overbore” properties. Whenever we run this article, it stimulates a healthy debate among our readers — and that is probably a good thing.
Forum Member John L. has been intrigued by the question of “overbore” cartridges. People generally agree that overbore designs can be “barrel burners”, but is there a way to predict barrel life based on how radically a case is “overbore”? John notes that there is no generally accepted definition of “overbore”. Based on analyses of a wide variety of cartridges, John hoped to create a comparative index to determine whether a cartridge is more or less “overbore”. This, in turn, might help us predict barrel life and maybe even predict the cartridge’s accuracy potential.
John tells us: “I have read countless discussions about overbore cartridges for years. There seemed to be some widely accepted, general rules of thumb as to what makes a case ‘overbore’. In the simplest terms, a very big case pushing a relatively small diameter bullet is acknowledged as the classic overbore design. But it’s not just large powder capacity that creates an overbore situation — it is the relationship between powder capacity and barrel bore diameter. Looking at those two factors, we can express the ‘Overbore Index’ as a mathematical formula — the case capacity in grains of water divided by the area (in square inches) of the bore cross-section. This gives us an Index which lets us compare various cartridge designs.”
OVERBORE INDEX Chart
So what do these numbers mean? John says: “My own conclusion from much reading and analysis is that cartridges with case volume to bore area ratio less than 900 are most likely easy on barrels and those greater than 1000 are hard on barrels.” John acknowledges, however, that these numbers are just for comparison purposes. One can’t simply use the Index number, by itself, to predict barrel life. For example, one cannot conclude that a 600 Index number cartridge will necessarily give twice the barrel life of a 1200 Index cartridge. However, John says, a lower index number “seems to be a good predictor of barrel life”.
John’s system, while not perfect, does give us a benchmark to compare various cartridge designs. If, for example, you’re trying to decide between a 6.5-284 and a 260 Remington, it makes sense to compare the “Overbore Index” number for both cartridges. Then, of course, you have to consider other factors such as powder type, pressure, velocity, bullet weight, and barrel hardness.
Overbore Cases and Accuracy
Barrel life may not be the only thing predicted by the ratio of powder capacity to bore cross-section area. John thinks that if we look at our most accurate cartridges, such as the 6 PPC, and 30 BR, there’s some indication that lower Index numbers are associated with greater inherent accuracy. This is only a theory. John notes: “While I do not have the facilities to validate the hypothesis that the case capacity to bore area ratio is a good predictor of accuracy — along with other well-known factors — it seems to be one important factor.”
MagnetoSpeed’s technology has completely changed the market for firearms chronographs. With a MagnetoSpeed barrel-mounted chrono you can quickly and easily record muzzle velocity (MV) without having to set up tripods or walk down-range. The compact MagnetoSpeed chronos are easy to set up and transport. With the full-featured V3 model, everything you need comes in a small fitted case. In the top photo are the components used with the MagnetoSpeed V3 Kit:
1. V3 Bayonet sensor
2. Display and control unit
3. Bayonet spacers (plastic and rubber)
4. Cords and mounting hardware (left), suppressor heat shield (right)
5. Alignment rod (square cross-section)
6. Rail adapter (sold separately)
Our friend Gavin Gear of UltimateReloader.com recently reviewed the MagnetoSpeed V3 and came away impressed. Gavin explains the a good chrono is essential: “If you want to load and shoot precision ammunition, you need the tools that will produce and validate the precision of your loads. A good chronograph is one of those tools! In this post I’m going to introduce you to the MagnetoSpeed V3 chonograph, the high-end electromagnetic chronograph which fills out the top slot in MagnetoSpeed’s equipment portfolio.”
In this 11-minute video Gavin reviews MagnetoSpeed’s top-of-the-line V3 Chronograph. He shows what ships with the unit, how to set it up for both rifles and pistols, and then he puts it through its paces showing how it captures velocity data. Gavin says he will follow-up with future videos showing how to link the MagnetoSpeed V3 to your mobile phone and how to log velocity data for future reference. To learn more about this high-tech chrono, visit UltimateReloader.com.


 • Front Bag Tension — Vertical can happen if the front sand bag grips the fore-arm too tightly. If…the fore-arm feels like it is stuck in the bag, then the front bag’s grip is too tight. Your rifle should move in evenly and smoothly in the sand bags, not jerk or chatter when you pull the gun back by hand.
 The Risk of Hearing Loss


 In his


 High-Tech Rimfire Rigs