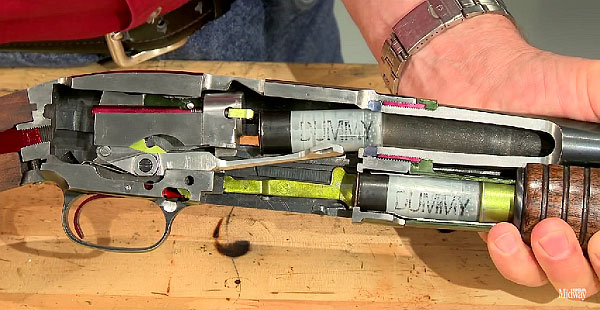
Even wonder how a pump shotgun works? Then watch this fascinating video from MidwayUSA. The operation of a pump-action shotgun is illustrated with a special cut-away version of a Winchester Model 12. The shotgun has been modified to reveal the inner workings. This cut-away Model 12 still loads and ejects dummy shells, but you can see how the lugs, slides, locks, ramps, springs and other internal parts work. You’ll be amazed how complicated this old pump-gun is. (The Model 12, Winchester’s first hammerless shotgun, is one of the most popular scatterguns ever made. Over 2,000,000 were sold.)
Skip Ahead to 3:00 to See Cut-Away in Action
To see how the Model 12 works, you can skip forward to the 3:00 minute mark in the video. The first part of the video shows how the Model 12 was “sliced and diced” to expose the inner workings. Larry Potterfield of MidwayUSA explains that “the factories often used cut-aways as sales tools to show how a specific model operated”. In addition the U.S. Military used cut-aways for training purposes.
Here is the cut-away completed. Even the pump grip has been sliced to reveal the inner workings.
A round has been picked up from the feed tube, and then is lifted into the chamber.
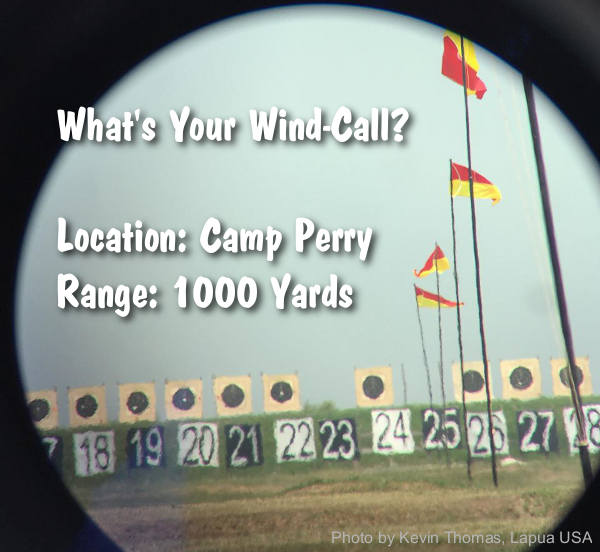
In today’s feature, Emil Praslick III of Team Applied Ballistics explains how to determine wind direction down range. Praslick, now retired from the U.S. Army, was an 18-time National and 2-time World Champion coach with the USAMU. Emil is consider by many to be one of America’s greatest wind readers — a master when is comes to identifying wind value and direction, and predicting wind cycles.
Video ONE: Determining the Direction of the Wind
Key Point in Video — Find the Boil
Emil explains how to determine wind direction using optic. The method is to use spotting scope, riflescope, or binoculars to look for the “Boil” — the condition in mirage when the light waves rising straight up. The wind will generate that straight-up, vertical boil in your optics when it is blowing directly at you, or directly from your rear. To identify this, traverse your scope or optics until you see the boil running straight up. When you see that vertical boil, the direction your optic is pointing is aligned with the wind flow (either blowing towards you or from directly behind you).
Video TWO: The No Wind Zero Setting
In this second video, Emil defines the “No-Wind Zero”, and explains why competitive shooters must understand the no-wind zero and have their sights or optics set for a no-wind zero starting point before heading to a match. In order to hit your target, after determining wind speed and direction, says Emil, “you have to have your scope setting dialed to ‘no wind zero’ first.”
Coach of Champions — Emil Praslick III
SFC Emil Praslick III, (U.S. Army, retired) works with Berger Bullets and Applied Ballistics. Emil served as the Head Coach of the U.S. National Long Range Rifle Team and Head Coach of the USAMU for several years. Teams coached by Emil have won 33 Inter-Service Rifle Championships. On top of that, teams he coached set 18 National records and 2 World Records. Overall, in the role of coach, Praslick can be credited with the most team wins of any coach in U.S. Military history.
Assembly Diagram: Here are all the components of the target frame. The overall maximum assembled dimensions are roughly 26″ wide, 41″ deep, and 66″ tall (the cardboard is 2 x 3 feet).
One of the easiest ways to build a portable target stand is to use PVC pipe and connectors. Utah .308 Shooter “Cheese” has created a simple yet sturdy target frame, and he’s shared his design so you can build a similar frame easily and at low cost. The components are wood furring strips, 2″-diameter PVC pipes (and connections), and a 2’x3′ sheet of cardboard. The PVC base can be glued together, or, for easier transport and storage, you can leave some or all of the connections free. “Cheese” tells us: “I didn’t glue any of it together so I could disassemble it, shove it in a bag and take it anywhere.”
“All the parts are just pushed together and not glued. That way I can break it down and carry it all in a bag. Also, if a buddy (not me!) happens to shoot the stand, I can easily replace just the damaged piece. The last 6 inches of the furring strips are wittled-down a bit so they can be pushed into the upright pipes with a little friction. The cardboard is 2 x 3 feet, and I use a staple gun to attach it to the furring strips. Then I just staple the target onto the cardboard and go at it.
Of course you can modify the dimensions as desired. I chose the black ABS pipe over white PVC simply for cost — black ABS is a little cheaper. You can also glue some or all of the parts together, it’ll just be larger for transporting. In windy conditions, the thing likes to come apart. Duct tape might work well.
For weight, I thought about filling the two end pipes with sand and gluing test caps on each of their ends. The test caps still allow the pipes to slip into the elbows.”
Add Anchors or Internal Weight for Stability
On a very windy day, a PVC stand can shake or even topple over. There are a couple solutions to this. Some people fill the PVC pipe sections with sand to add weight, or you can put short sections of Re-BAR inside the long legs. One GlockTalk forum member noted: “I built [a frame] almost identical to this. I also take four pieces of wire coathanger bent into an inverted “U” shape to anchor the frame to the ground. It is so light that wind will knock the stand over [without anchors].”
You can find photos of a similar home-made PVC target stand (with a slightly different rear section) on the Box of Truth website. This also employs a PVC tubing base with wood uprights. We’ve also seen all-PVC target stands, but we’ve found that it is easier to attach the cardboard to wood strips than to PVC pipe. Also, if the upper section is wood, you can fit different height targets, while using the same base.
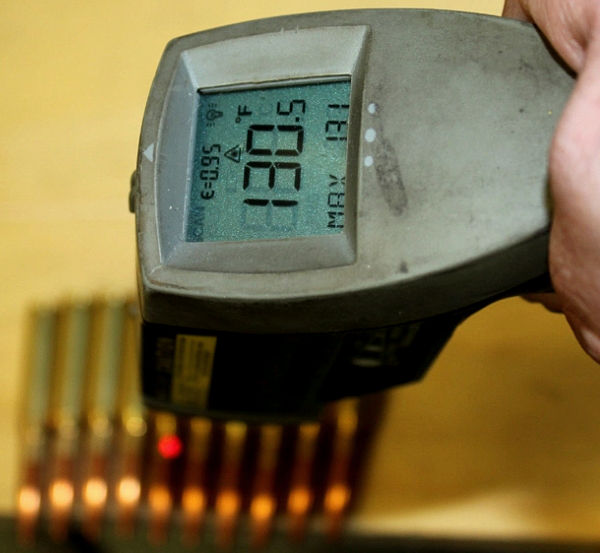
In this .308 Win test, 70° F ammo shot 96 FPS slower than ammo heated to 130.5° F. And the 130.5° ammo was 145 fps faster than ammo right out of the freezer (at 25.5° F). That’s a huge difference…
EDITOR’s NOTE: The Sierra tester does not reveal the brand of powder tested here. Some powders are much more temp sensitive than others. Accordingly, you cannot extrapolate test results from one propellant to another. Nonetheless, it is interesting to see the actual recorded velocity shift with ammo temperature variations in a .308 Win.
Written by Sierra Chief Ballistician Tommy Todd This story originally appeared in theSierra Bullets Blog
A few weeks ago I was attending the Missouri State F-Class Match. This was a two-day event during the summer and temperatures were hot one day and hotter the next. I shot next to a gentleman who was relatively new to the sport. He was shooting a basically factory rifle and was enjoying himself with the exception that his scores were not as good as he hoped they would be and he was experiencing pressure issues with his ammunition. I noticed that he was having to force the bolt open on a couple of rounds. During a break, I visited with him and offered a couple of suggestions which helped his situation somewhat and he was able to finish the match without major issues.
He was shooting factory ammunition, which is normally loaded to upper levels of allowable pressures. While this ammunition showed no problems during “normal” testing, it was definitely showing issues during a 20-round string of fire in the temperatures we were competing in. My first suggestion was that he keep his ammunition out of the direct sun and shade it as much as possible. My second suggestion was to not close the bolt on a cartridge until he was ready to fire. He had his ammo in the direct sunlight and was chambering a round while waiting on the target to be pulled and scored which can take from a few seconds to almost a minute sometimes.
This time frame allowed the bullet and powder to absorb chamber [heat] and build pressure/velocity above normal conditions. Making my recommended changes lowered the pressures enough for the rifle and cartridge to function normally.
Testing Effects of Ammunition Temperature on Velocity and POI
After thinking about this situation, I decided to perform a test in the Sierra Bullets underground range to see what temperature changes will do to a rifle/cartridge combination. I acquired thirty consecutive .30 caliber 175 grain MatchKing bullets #2275 right off one of our bullet assembly presses and loaded them into .308 Winchester ammunition. I utilized an unnamed powder manufacturer’s product that is appropriate for the .308 Winchester cartridge. This load is not at the maximum for this cartridge, but it gives consistent velocities and accuracy for testing.
I took ten of the cartridges and placed them in a freezer to condition.
I set ten of them on my loading bench, and since it was cool and cloudy the day I performed this test I utilized a floodlight and stand to simulate ammunition being heated in the sun.
I kept track of the temperatures of the three ammunition samples with a non-contact laser thermometer.
The rifle was fired at room temperature (70 degrees) with all three sets of ammunition. I fired this test at 200 yards out of a return-to-battery machine rest. The aiming point was a leveled line drawn on a sheet of paper. I fired one group with the scope aimed at the line and then moved the aiming point across the paper from left to right for the subsequent groups.
NOTE that the velocity increased as the temperature of the ammunition did.
The ammunition from the freezer shot at 2451 fps.
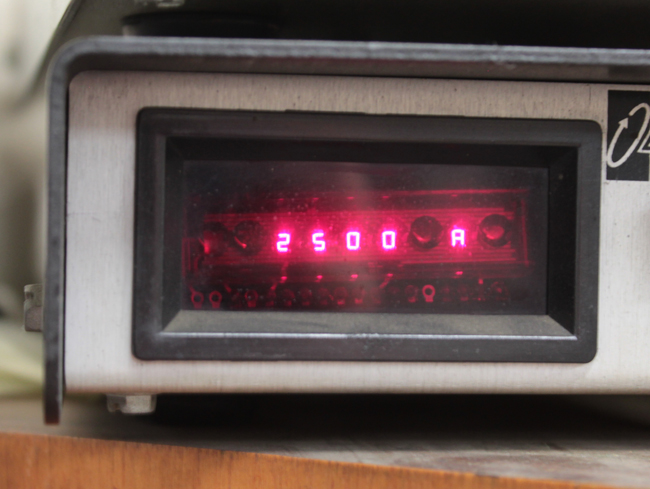
The room temperature ammunition shot at 2500 fps.
The heated ammunition shot at 2596 fps.
The tune window of the particular rifle is fairly wide as is shown by the accuracy of the three pressure/velocity levels and good accuracy was achieved across the board. However, notice the point of impact shift with the third group? There is enough shift at 200 yards to cause a miss if you were shooting a target or animal at longer ranges. While the pressure and velocities changed this load was far enough from maximum that perceived over pressure issues such as flattened primer, ejector marks on the case head, or sticky extraction did not appear. If you load to maximum and then subject your ammunition to this test your results will probably be magnified in comparison.
This test showed that pressures, velocities, and point-of-impact can be affected by temperatures of your ammunition at the time of firing. It’s really not a bad idea to test in the conditions that you plan on utilizing the ammo/firearm in if at all possible. It wouldn’t be a bad idea to also test to see what condition changes do to your particular gun and ammunition combination so that you can make allowances as needed. Any personal testing along these lines should be done with caution as some powder and cartridge combination could become unsafe with relatively small changes in conditions.
A while back, Cal Zant at PrecisionRifleBlog.com did a big muzzle brake comparison test. Along with measuring recoil reduction, Cal’s team recorded sound levels in PRB’s exhaustive muzzle brake field test. In the PRB archives you’ll find comprehensive muzzle brake sound test results, with hard data on 20 different muzzle brakes.
Sound can be a tricky subject, but Cal Zant, the editor of PrecisionRifleBlog.com, presents everything an informed shooter should know about muzzle brake noise in a straightforward and practical way. Most sound tests are measured from the side of the muzzle, in accordance with mil-spec standards, and Cal did that. But he also measured the sound level of each brake from behind the rifle, closer to the shooter’s position. This provides a more accurate indicator of the actual sound levels firearms operators will encounter while shooting.
Muzzle brakes ARE really loud — that’s something most active shooters have observed. But this study finally gives us some hard data and makes objective comparisons. The difference between brakes was quite significant. Some brakes were ear-splitting — more than twice as loud as other brakes tested.
As a bonus, Cal also provides data on how the new Ultra series suppressors from Thunder Beast Arms Corp (TBAC) compare in terms of sound level behind the rifle.
Today, July 10, 2018 is the last day to register for the Crosman All American Field Target Championship.
Upstate New York heats up in the summer with the largest field target event in the country — the Crosman All-American Field Target Championship (CAAFTC). This very popular airgun event takes place July 20-22, 2018 in upstate New York. If you are a Field Target Shooter and want to attend, don’t hesitate — today is the very last day to register for the big event.
Shooters from across the nation and many foreign competitors will compete this year at the CAAFTC held at the Rochester Brooks Int’l Skeet and Trap Club.
On July 20-22, the Crosman All-American Field Target Championship (CAAFTC) will be held at the Rochester Brooks International Skeet and Trap Club in Rush, New York. 0ver 100 air rifle and air pistol competitors will participate in the big event hosted by Crosman. This event attracts top Airgunners from across the nation (and some foreign countries). Along with regular Field Target matches, there will be specialty side matches, plus a factory tour. The event is free to the public.
The CAAFTC is sanctioned by the American Airgun Field Target Association and is a featured AAFTA Grand Prix event. The 120-shot match has competitive rifle divisions based on allowable gun and support equipment. Here are the main air rifle classifications:
Hunter Division – rifle fires at a maximum 20 foot pounds of energy (FPE), shooter may use a non-attached bipod, non-restrictive clothing, and sitting stool. Open Division - maximum 20 FPE maximum rifle, shooter may wear a body harness, no bipod, 6″ maximum height seat. World Field Target Federation (WFTF) – similar to Open but shooters compete according to international standard of maximum 12 fpe for rifles. Freestyle Division – 20 FPE maximum rifle, no other restrictions. (This is new for 2016).
The pistol competition includes similar divisions based on shooting styles. Both rifle and pistol divisions include sub-classes based on the air rifle powerplant: piston driven or precharged pneumatic.
“If you want to see some of the country’s finest airgun shooters, this is the hottest event of the summer and it’s free for the public,” says Chip Hunnicutt, Marketing Manager for Crosman. “Alongside the world-class shooters, we’ll have enthusiasts simply having a good time and even parents bringing their kids for some good fun outdoors.”
The three-day competition features multiple shooting matches including the main two-day rifle event. There are five divisions for competitors: Open, Hunter, WFTF, Freestyle, and Pistol. In addition to the main rifle event, this year will also feature a pistol match, the Quigley Bucket Match and the Pyramyd Air Gunslinger match. The Bucket match re-creates famous scene in the movie “Quigley Down Under” in which the lead character shoots a bucket at 700 yards. Here the distances are scaled down a wee bit (wink). Competitors, using iron sights only, get 5 shots at a 1.75″ bucket placed at 55 yards.
Tech Talk: Why the Big Side-Wheels on the Scopes?
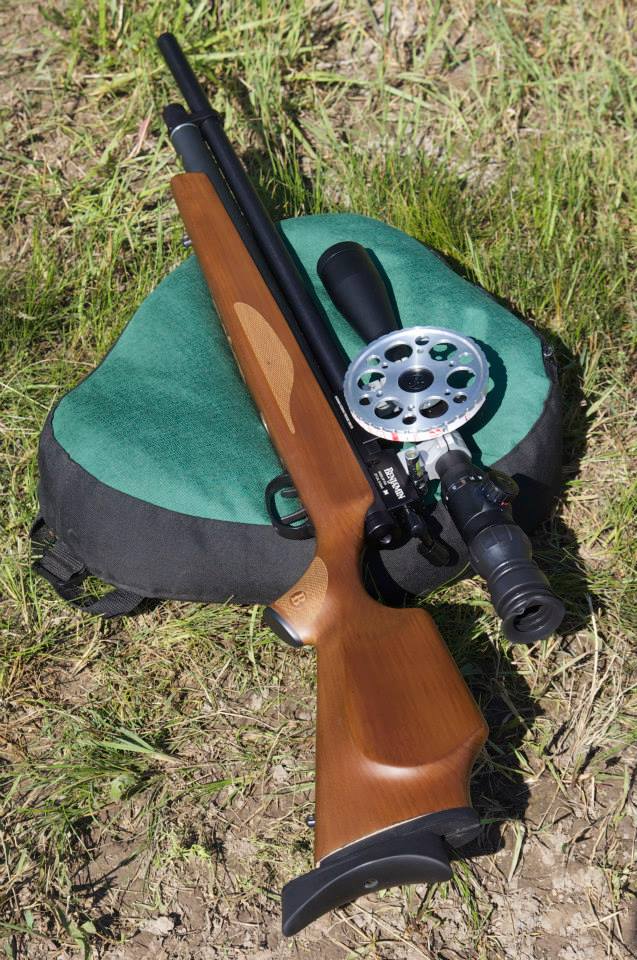
Field Target rifles shoot pellets propelled by compressed air. These light-weight, low-BC projectiles drop very quickly, with a looping trajectory. In order to hit targets at distances out to 50 yards or so, you have to adjust your scope to compensate for pellet drop. But you can’t set the scope correctly without knowing the precise range to the target. This is the function of the big wheels on the side of the scope. Field Target Competitors use the parallax adjustment on high-magnification scopes to determine target range. The big wheel allows quick, yet precise parallax adjustment. Markings on the wheel show the shooter the scope settings required for the distance “dialed-in” via the over-size parallax wheel.
This article, from the USAMU Facebook Page, concerns reloading safety. In the relentless quest for more speed and flatter ballistics, some hand-loaders load way too hot, running charges that exceed safe pressure levels. Hint: If you need a mallet to open your bolt, chances are your load is too hot. Stay within safe margins — your equipment will last longer, and you won’t risk an injury caused by over-pressure. In this article, the USAMU explains that you need to account for bullet shape, diameter, and bearing surface when working up a load. Don’t assume that a load which is safe for one bullet will be safe for another even if both bullets are exactly the same weight.
Today, we continue our handloading safety theme, focusing on not inadvertently exceeding the boundaries of known, safe data.
Bullet manufacturers’ loading manuals often display three, four, or more similar-weight bullets grouped together with one set of load recipes. The manufacturer has tested these bullets and developed safe data for that group. However, seeing data in this format can tempt loaders — especially new ones — to think that ALL bullets of a given weight and caliber can interchangeably use the same load data. Actually, not so much.
The researchers ensure their data is safe with the bullet yielding the highest pressure. Thus, all others in that group should produce equal or less pressure, and they are safe using this data.
However, bullet designs include many variables such as different bearing surface lengths, hardness, and even slight variations in diameter. In fact, diameters can occasionally range up to 0.001″ by design. Thus, choosing untested bullets of the same weight and caliber, and using them with data not developed for them can yield excess pressures.
This is only one of the countless reasons not to begin at or very near the highest pressure loads during load development. Always begin at the starting load and look for pressure signs as one increases powder charges.
Bullet Bearing Surface and Pressure
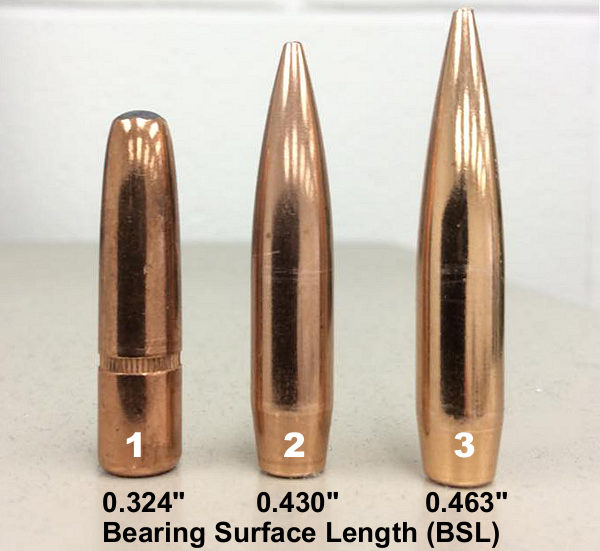
Bullet bearing surface length (BSL) is often overlooked when considering maximum safe powder charges and pressures. In Photo 1, note the differences in the bullets’ appearance. All three are 7 mm, and their maximum weight difference is just five grains. Yet, the traditional round nose, flat base design on the left appears to have much more BSL than the sleeker match bullets. All things being equal, based on appearance, the RN/FB bullet seems likely to reach maximum pressure with significantly less powder than the other two designs.
Photo 1: Three Near-Equal-Weight 7mm Bullets with Different Shapes
Due to time constraints, the writer used an approximate, direct measurement approach to assess the bullets’ different BSLs. While fairly repeatable, the results were far from ballistics engineer-grade. Still, they are adequate for this example.
Bullet 1 (L-R), the RN/FB, has a very slight taper and only reaches its full diameter (0.284 inch) very near the cannelure. This taper is often seen on similar bullets; it helps reduce pressures with good accuracy. The calculated BSL of Bullet 1 was ~0.324″. The BSL of Bullet 2, in the center, was ~0.430″, and Bullet 3’s was ~ 0.463″. Obviously, bullets can be visually deceiving as to BSL!
Some might be tempted to use a bullet ogive comparator (or two) to measure bullets’ true BSL for comparison’s sake. Unfortunately, comparators don’t typically measure maximum bullet diameter and this approach can be deluding.
Photo 2: The Perils of Measuring Bearing Surface Length with Comparators
In Photo 2, two 7mm comparators have been installed on a dial caliper in an attempt to measure BSL. Using this approach, the BSLs differed sharply from the original [measurements]. The comparator-measured Bullet 1 BSL was 0.694” vs. 0.324” (original), Bullet 2 was 0.601” (comparator) vs. 0.430” (original), and Bullet 3 (shown in Photo 2) was 0.602” (comparator) vs. 0.463” (original). [Editor’s comment — Note the very large difference for Bullet 1, masking the fact that the true full diameter on this bullet starts very far back. You can use comparators on calipers, but be aware that this method may give you deceptive reading — we’ve seen variances just by reversing the comparators on the calipers, because the comparators, typically, are not perfectly round, nor are they machined to precision tolerances.]
Thanks to the U.S. Army Marksmanship Unit for allowing the reprint of this article.
John Whidden of Whidden Gunworks used the .243 Winchester cartridge to win the 2017 NRA Long Range Championship, his fifth LR title at Camp Perry (and second in a row). John selected the .243 Win because it offers excellent ballistics with manageable recoil. John says that, at least for a sling shooter, the .243 Win is hard to beat at long range. Yes, John says, you can get somewhat better ballistics with a .284 Win or .300 WSM, but you’ll pay a heavy price in increased recoil. Here’s John’s story of how he wins with a .243 Win.
Great Ballistics with 6mm 105s at 3275 FPS
Running at an impressive 3275 FPS, Berger 6mm 105 grain Hybrids deliver ballistics that are hard to beat, according to John Whidden:
“My .243 Win shoots inside a 6.5-284 with 142-grainers. Nothing out there is really ahead of [the .243], in 1000-yard ballistics unless you get into the short magnums or .284s and those carry a very significant recoil penalty. In the past I did shoot the 6.5-284. I went to the .243 Win because it had similar ballistics but had much less recoil. It doesn’t beat me up as much and is not as fatiguing.
With the .243 Win, there’s no tensing-up, no anticipating. With the reduced recoil (compared to a 7mm or big .308), I can break and shoot very good quality shots. I find I just shoot better shots with the .243 than I ever did with the 6.5-284.”
The .243 Winchester — Good Enough to Win LR Championships
by John Whidden, Five-Time National Long Range Champion
My experience with the .243 cartridge for use as a Long Range High Power cartridge dates back about 10 years or so. After building a .300 WSM, I realized that the recoil was hurting the quality of my shots. The WSM shot great, but I couldn’t always execute good shots when shooting it. From here I built a 6.5-284, and it shot well. I also had a very accurate 6mmBR at the time, and my logic in going to the .243 Win was to get wind performance equal to the 6.5-284 with recoil similar to the 6mmBR. The experiment has worked out well indeed!
Championship-Winning Load: Berger Bullets, Lapua Brass, and Vihtavuori N160
For a load, currently I’m shooting Lapua brass, PMC primers (Russian, similar to Wolf), VihtaVuori N160 single-base powder, and Berger 105 grain Hybrid bullets. I switched to the Hybrid bullets fairly recently at the beginning of the 2015 season. Previously I shot the 105gr Berger hunting VLDs, and in testing I found that the Hybrids were just as accurate without having to seat the bullet into the lands. The velocity of this combination when shot through the excellent Bartlein 5R barrels (32” length) is around 3275 FPS. Surprising to some, John does load his ammo on a Dillon Progressive press (with help from his ultra-precise Auto-trickler).
For my match ammo, I seat the Berger 105 Hybrids well off the lands — my bullets are “jumping” from .035″-.060″. I only use one seating depth for ammunition for multiple guns (I know some benchrest shooters will stop reading right here!) and the bullets jump further in the worn barrels than in the fresh barrels. The bullets are pointed up in our Bullet Pointing Die System and are moly-coated. The moly (molybdenum disulfide) does extend the cleaning interval a little bit, probably 20% or so. The Lapua .243 Win brass is all neck-turned to .0125″ thickness.
Whidden’s .243 Win Ammo is Loaded on a Dillon
My loading process is different than many people expect. I load my ammo on a Dillon 650 progressive press using our own Whidden Gunworks dies. However powder charges are individually weighed with a stand-alone automated scale/trickler system from AutoTrickler.com (see below). Employing a high-end force restoration scale, this micro-processor controlled system offers single-kernel precision. The weighed charges are then dropped into the cases with a funnel mounted to the Dillon head.
The Lapua .243 Win brass is full-length sized every time, and I run one of our custom-sized expanders in my sizer die. The expander measures .243″ which yields the desired .001″ neck tension. In my experience, the best way to get consistent neck tension is to run an expander in the case neck at some point. When sizing the case neck by a minimal amount such as is the case here, I don’t find any negative points in using an expander in the sizer die.
In my experience, the keys to accurate long range ammo are top quality bullets and the most consistent neck tension you can produce. From these starting points, the use of quality components and accurate powder measurement will finish out the magic.
“Garbage In, Garbage Out.” You have to input key variables with precision if you want your Ballistics Apps to deliver reliable long-range trajectories. So says Tom Beckstrand, Field Editor for Guns & Ammo magazine. A former U.S. Army Special Forces Officer, and avid long-range competitor, Beckstrand knows the importance of using your ballistic calculator correctly. Here are his tips on how to achieve the best results using Ballistics Calculators.
“The most important inputs to make any ballistic calculator work correctly are muzzle velocity, ballistic coefficient, and sight height,” says Beckstrand.
Ascertain Accurate Muzzle Velocity with a Good Chronograph
“Cheap chronographs will not give an accurate muzzle velocity, so the serious shooter needs to spend the money on a quality chrono.” When you chronograph, make sure to measure the distance from the muzzle to the chrono unit. That input is also important to your Ballistic calculations.
Use Reliable G1 and G7 Ballistic Coefficients
Beckstrand added, “Ballistic Coefficients are available from ammunition and bullet manufacturers, and most of these coefficients the manufacturers provide are really quite accurate.” Ballistic Coefficient or BC, is a number that reflects how well a bullet cuts through the air. The higher the BC, the less the bullet is affected by air drag.
Measure Sight Height Correctly Using Calipers
Beckstrand has found that many shooters aren’t inputting sight height or they are guessing at the correct height. As target distance increases, just a half-inch of sight height inaccuracy can mean several inches up or down.
“Sight height is the input most often overlooked and is usually the source of greatest error. I think a lot of shooters, especially those new to long-range shooting, simply don’t understand the importance of this input.”
Sight height is the distance from the centerline of the scope to the centerline of the bore. Some shooters, Beckstrand believes, just “eye it up” and estimate the distance. “Really, you should use a set of calipers to measure the sight height distance … within 0.1 inch”.
Get Leading Ballistics App for iOS Devices
Need a top-notch Ballistics App for your iPhone, iPad, or iPod? Start with Ballistic AE, the number 1 (i.e. most installed) App for iOS systems. Ballistics AE (Advanced Edition) is the most popular iOS ballistics program for many good reasons. Full-featured and easy to use, Ballistics AE has been refined over many years, and it supplies rock-solid solutions derived from JBM Ballistics solver (created by James B. Millard). Unlike some other Apps, Ballistics AE is STABLE on iPhones (with various OS levels). What’s cool is that Ballistics AE is now on sale for $12.99.
We’ve used the Ballistic AE program on an iPhone 5S, iPhone 6, and iPad, and it performed well. Here are some of the features we liked:
1. Mirrors output from online version of JBM Ballistics we often use for initial calculations.
2. Controls are simple to use and (mostly) intuitive.
3. Handy comparison feature lets you compare ballistics for different projectiles side by side.
4. Advanced Wind Kit allows you to account for complex wind situations.
5. Projectile and BC Databases are very comprehensive.
6. Software is regularly updated to match Apple OS changes.
Editor: Many new barrels will deliver higher velocities with the same load after 100-150 rounds through the bore. The exact reasons for this speed-up are not 100% certain, and velocity increases (if any) will vary from one barrel to the next. But this “speeding up” phenomenon is common, so be prepared if this happens with your next barrel. If you do experience a significant velocity increase you should probably re-tune your load AFTER the velocity stabilizes at the higher level.
From the Sierra Bullets Blog Article by Mark Walker, Sierra New Product Development Director
In a previous post, I discussed a couple of methods to tune a load to your barrel to help achieve the best accuracy possible. People most often work on load tuning if they get a new rifle or have a different barrel installed. In both instances, the barrel is new and has not been fired very much. According to most competitive shooters, this is the most accurate your barrel will ever be, so getting it tuned and shooting accurately is a priority.
The Speed Up Phenomenon After 100-150 Rounds
Even though after you work up a load and your new barrel is shooting great, a lot of shooters notice that at around 100 to 150 rounds their rifle may stop shooting as accurately. I had this happen to a rifle and I was confused as to why something that worked so well to begin with would all of a sudden quit shooting. I decided to break out the chronograph to do another load work up to see what was going on. To my surprise, the velocity had increased around 80 fps over the original velocity! After performing another ladder test and adjusting the seating depth, the rifle was once again shooting well.
There are several thoughts on why this may happen, however, you can rest assured that it does happen. One thought is that as the barrel breaks in, the tooling marks in the throat of the chamber smooth out and allow less resistance to the bullet as it exits the bore thereby increasing speed. Another idea is that the throat area starts to get a little rough which in turn causes more resistance which increases pressure and therefore more velocity. I’m sure there are some out there who have a better understanding as to why this happens, but it can definitely affect the accuracy of your rifle. So be aware and never be afraid to rework a load to keep your rifle in tune.
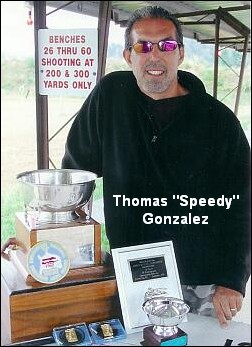
Experts Confirm That Barrel Speed-Up Is Common Two respected shooters have observed an increase in velocity with new barrels, typically after 100 rounds. Gunsmith and Hall-of-Fame benchrest shooter Thomas “Speedy” Gonzalez has documented barrel speed-up with testing. Moreover, Speedy’s bore-scope barrel inspections revealed a smoothing of the barrel lands. Jim See, a top PRS competitor, has encountered barrel speed-up many times. Accordingly, he re-tunes his load at 150 rounds.
“Alex Lipworth and I documented this phenomenon about four years ago and I have told all my customers about this. My son Mikee would shoot 100 rounds through all new barrels we planned on shooting before we would begin to do load development. We had a shooting snail that caught all the bullets set up in front of an indoor bench. We called it a wear-in process because upon careful examination of the bore when the ‘Speed Up’ takes place the cut-rifled bore resembles that more of a button-rifled barrels with the lands taking on more the softer look of a buttoned bore.” — Speedy Gonzalez
“Seen it [barrel velocity increase] too many times to count. All my match barrels get a ‘generic round’ loaded for them, which has worked well in barrels historically. After I hit 150 rounds I fine-tune the load and never look back, until the tube starts to slow down at it’s life end.” — Jim See




 One of the easiest ways to build a portable target stand is to use PVC pipe and connectors. Utah .308 Shooter “Cheese” has created a simple yet sturdy target frame, and he’s shared his design so you can build a similar frame easily and at low cost. The components are wood furring strips, 2″-diameter PVC pipes (and connections), and a 2’x3′ sheet of cardboard. The PVC base can be glued together, or, for easier transport and storage, you can leave some or all of the connections free. “Cheese” tells us: “I didn’t glue any of it together so I could disassemble it, shove it in a bag and take it anywhere.”












 Two respected shooters have observed an increase in velocity with new barrels, typically after 100 rounds. Gunsmith and Hall-of-Fame benchrest shooter Thomas “Speedy” Gonzalez has documented barrel speed-up with testing. Moreover, Speedy’s bore-scope barrel inspections revealed a smoothing of the barrel lands. Jim See, a top PRS competitor, has encountered barrel speed-up many times. Accordingly, he re-tunes his load at 150 rounds.


