Can you guess what your next barrel will weigh? In many competition disciplines, “making weight” is a serious concern when putting together a new match rifle. A Light Varmint short-range Benchrest rifle cannot exceed 10.5 pounds including scope. An F-TR rifle is limited to 18 pounds, 2 oz. (8.25 kg) with bipod.
One of the heaviest items on most rifles is the barrel. If your barrel comes in much heavier than expected, it can boost the overall weight of the gun significantly. Then you may have to resort to cutting the barrel, or worse yet, re-barreling, to make weight for your class. In some cases, you can remove material from the stock to save weight, but if that’s not practical, the barrel will need to go on a diet. (As a last resort, you can try fitting a lighter scope.)
Is there a reliable way to predict, in advance, how much a finished barrel will weigh? The answer is “yes”. PAC-NOR Barreling of Brookings, Oregon has created a handy, web-based Barrel Weight Calculator. Just log on to Pac-Nor’s website and the calculator is free to use. Pac-Nor’s Barrel Weight Calculator is pretty sophisticated, with separate data fields for Shank Diameter, Barrel Length, Bore Diameter — even length and number of flutes. Punch in your numbers, and the Barrel Weight Calculator then automatically generates the weight for 16 different “standard” contours.
Calculator Handles Custom Contours
What about custom contours? Well the Pac-Nor Barrel Weight Calculator can handle those as well. The program allows input of eight different dimensional measurements taken along the barrel’s finished length, from breech to muzzle. You can use this “custom contour” feature when calculating the weight of another manufacturer’s barrel that doesn’t match any of Pac-Nor’s “standard” contours.
Nightforce Optics has just launched a new monthly newsletter. This free, subscription-based digital publication will offer information on optics, target shooting, hunting, and other topics of interest. The debut October issue, released this week, features match reports, tactical shooting hold-over advice, plus a TECH TIP explaining Parallax.
PARALLAX – What is it and Why is it important?
What is Parallax?
Parallax is the apparent movement of the scope’s reticle (cross-hairs) in relation to the target as the shooter moves his eye across the exit pupil of the riflescope. This is caused by the target and the reticle being located in different focal planes.
Why is it Important?
The greater the distance to the target and magnification of the optic, the greater the parallax error becomes. Especially at longer distances, significant sighting error can result if parallax is not removed.
How to Remove Parallax
This Nightforce Tech Tip video quickly shows how to remove parallax on your riflescope.
While keeping the rifle still and looking through the riflescope, a slight nod of the head up and down will quickly determine if parallax is present. To remove parallax, start with the adjustment mechanism on infinity and rotate until the reticle remains stationary in relation to the target regardless of head movement. If parallax has been eliminated, the reticle will remain stationary in relation to the target regardless of eye placement behind the optic.
If you want to subscribe to the Nightforce Newsletter, CLICK HERE to open the Newsletter then click the green “Join Email List” button at the top of the page.
Gun guys are always shipping stuff around the country — whether it’s a barrel to be chambered, or a scope that needs to go back for warranty repair. Or maybe you’ve sold some bullets or reloading dies you no longer need. To ensure your precious packages get to their destination in one piece, it’s important to take precautions when boxing up your items. And by all means insure packages for full value — even if your packaging is perfect, there is always the possibility that your shipment might be lost altogether. Sadly, that can happen, no matter which carrier you choose: Fedex, UPS, or the U.S. Postal Service (USPS). Here are some tips for shipping gun stuff — we explain how to pack items properly and how to minimize the risk of loss.
Tips for Shippers
Dennis Haffner from McGowen Precision Barrels offers some advice on how to avoid damage when shipping gun parts or other valuable or heavy items. Dennis explains:
“First, I started double-packing the contents and in many cases double-boxing. I spend a fortune on heavy-reinforced shipping tape. If the contents are loosely packed, the package is going to get crushed. On real important items or delicate items, wrap the content in plastic and spray the inside void areas with non-expanding foam. They make shipping foam just for this. This method really works. Since I started paying more attention to packaging, I have just about wiped out my issues with all three companies (Fedex, UPS, USPS). Yes, I hate doing it, but in the long run for us, it’s cheaper.
Bullet shipments are the worst — a shipment of 500+ bullets can destroy a cardboard box. I have ordered bullets from individuals who put them in baggies and filled the remainder of the box with foam peanuts. That is not going to work. Any piece of metal, including a die, will puncture a cardboard box, or destroy a padded envelope. Just look at the tracking information and imagine your package bouncing around in the back of the shipping truck, probably under many other packages. My advice is to NEVER use padded envelopes. Barrel nuts or recoil lugs will most likely never make it.
ORM-D items are required to be shipped in heavily-reinforced, double-walled containers. The packages still get a little damage, but the contents usually survive.
How do shipments get damaged? Consider this — one of the shipping companies this year flipped (overturned) one of our new CNC machines (which rendered it useless). Maybe your small packages were in the same delivery truck as my CNC machine. I wonder how many little boxes were crushed underneath it.
As for USPS flat rate boxes — you would not believe what people try to stuff in these boxes. USPS finally put a weight limit on the boxes — they had to. I sometimes take my delicate items packed in an envelope or small box. I spray foam in a larger flat rate box and insert the smaller package, then fill the remainder of the void with foam. It works, and part usually arrives undamaged.”
Shipping Rifle Barrels (PVC Tube and Tennis Ball Method)
A new match-grade barrel can cost $350 or more, and it might take six months (or more) to replace it, given the current wait time with top barrel-makers. So, you don’t want your nice new tube to get damaged in transit. Forum Member Chuck L. (aka “M-61″) offers these tips for shipping rifle barrels:
“Packing a barrel can be a problem. Here’s a shipping method that won’t stop lost shipments but so far has stopped damage. Get a PVC pipe (of size appropriate to your barrel) with fitted caps for each end. Attach a cap to one end. Tape the barrel threads and tape over the muzzle. Then drop one standard tennis ball into the pipe. Place barrel in pipe. Next add whatever peanuts or foam you can jam in to support the barrel on the sides. Then place a second tennis ball into the opposite end of the PVC pipe. (So now you have a tennis ball on either end of your barrel.) With everything secure inside, attach the upper cap and tape it down securely. With this packing procedure, when the carrier launches the pipe like a javelin, at least the barrel will not come through like a spear and be gone. Label the pipe with very large address labels so no one suspects it’s just garbage laying around. This procedure may seem ridiculous but it has worked for me. Oh and definitely get insurance. If your item is insured, the shippers will look harder to find it.”
Editor’s Note: Fedex also makes a triangular-profile cardboard shipping box. This 38″ x 6″ x 6″ x 6″ Fedex Tube (designed for blueprints and posters) is free for the asking. For most barrels, there should be enough clearance to hold your PVC tube (with barrel packed inside tube). However, don’t ship the barrel inside the cardboard box by itself. Cap and pad the ends and bubble wrap it heavily, or better yet, use the PVC tube method described above, with the PVC tube inside the box.
Dave Diana is a clever fellow. He not only fabricated his own wireless Target Cam system, but he invented a mount that places the receiver/monitor unit conveniently next to his bench rifle. The hooded view-screen actually mounts to his SEB front Rest via a bracket. The monitor unit includes wireless receiver and a short directional antenna (see below):
Dave says his new CCTV monitor bracket on the SEB NEO rest is “working as planned”. However, after taking these photos, Dave did make a modification. Dave explained: “I found moving the monitor over to the left-hand side was more shooter-friendly. I can stay in a natural shooting position, look at the screen, see my windflags and shoot with little movement. The next task is to add a coffee cup holder somewhere to house my group tightener double expresso!”
Target Cam Monitor Has Built-In Receiver
Dave built a very nice system. He tells us: “The security camera is a 27x power zoom camera housed in a weather proof case that also houses the wireless transmitter. The monitor has a built-in receiver, and I am running spiral polarized antennas on both ends. The system will run all day long on the waterproof-cased, game-camera batteries.”
Here are the internals of the wireless camera system. Note the antenna at right.
Here is the entire system, with monitor/receiver placed conventionally on a tripod. Batteries are housed in waterproof plastic cases.
Ask 10 shooters about barrel cleaning and you’ll get 10 different opinions. This reflects that fact that different fouling problems demand different solutions. For example, solvents that work well for copper may not be the best for hard carbon (and vice-versa). To come up with the right solution, first you must understand the nature of the fouling in your barrel.
The debate about the proper care of a match barrel is a hot one, spiked with folklore and old wives’ tales, Lohman said. He and his staff set out to set the record straight: “We tried to interject some science into the discussion of cleaning a match barrel,” he explained. In his article, Lohman writes:
Why worry about a little barrel fouling when the throat is subjected to a brutal 5,600° F volcano at 55,000 PSI? To investigate these and other questions about taking care of a match barrel, we spoke with a dozen experts and share their knowledge in this first of a series of articles.
After listening to folks who shoot, build barrels or manufacture cleaning solvents for a living, we concluded that even the experts each have their own unique recommendations on how to care for a match barrel. But they all agree on one thing — the gun will tell you what it likes best. Because the life expectancy of a match barrel is about 1,500 to 2,500 rounds, the objectives of cleaning one should include: preserve accuracy, slow the erosion, and remove fouling — all without damaging the gun. This article doesn’t claim that one cleaning method is better than the next. Rather, we set out to interject a little science into the discussion and to share some lessons learned from experts in the field.
For more Shooting Sports USA articles, visit www.ssusa.org.
John Krieger Interview with AccurateShooter at SHOT Show:
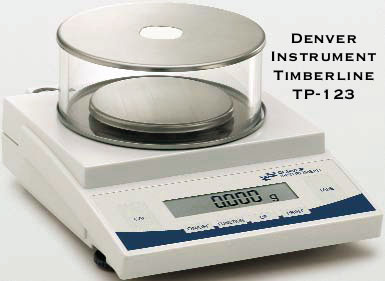
Denver Instrument, maker of the MXX and Timberline Series of precision balances, has created a helpful guide explaining how to get the best performance from a digital scale. Denver Instrument knows that, to achieve and maintain a very high level of accuracy with digital scales, they must be calibrated regularly, leveled properly, and kept away from sources of interference. Unfortunately, some reloaders treat their electronic scales as if the machines were toasters — something to place on a tabletop, plug into an outlet, then “set and forget.” There’s a better way to set up your scale and keep it functioning optimally. Here are ten guidelines provided by Denver Instrument. Follow these “Ten Commandments” and you’ll benefit:
ONE: Thou shalt choose the best resting spot. The performance of your balance depends greatly on the surrounding environment. Choose a location away from the main traffic flow of the room, especially doors. Also be aware of heating and cooling vents as these produce air movement. You can adjust the environmental settings on your balance to provide the best performance in the chosen location. Balances must be placed away from magnets as they affect the weigh cell performance.
TWO: Thou shalt avoid vibrations. Vibrations can come from large machinery in production environments and from fume hoods in laboratories. An alternative to fume hoods are Power Safety Workstations which are designed specifically for use with a balance.
THREE: Thou shalt watch temperature changes. On an analytical balance a one degree temperature change can cause a 1 digit (0.0001g) drift. Although Denver balances have temperature correction built-in, it is still important to calibrate your balance when the temperature changes significantly. Choosing to place your balance in a temperature controlled room, away from sunlight, and calibrating often helps minimize the effects of temperature.
FOUR: Thou shalt calibrate often. Upon installation and each time the balance is moved you should calibrate your balance. For example moving an analytical balance to a location that is only 13 feet higher changes the weight reading from 200.0000 g to 199.9997 g; which means the result is 0.0003 g lighter than the actual mass.
FIVE: Remember to check the level. The instrument should be leveled upon installation with all feet (two front feet for round pan units, four feet for square pan units) touching the countertop. If the level changes, the balance should be re-leveled and recalibrated. As an example, a 200g sample would weigh 0.0025 g less when tilted at an angle of 0.3°.
SIX: Honor thy weights. Keep in mind that weights are only as reliable as their quality and certification. Remember, a 1 g does not weigh precisely 1.00000 grams. Weights should be recertified annually. Denver Instrument offers recertification services on all weights 1 mg to 5 kg. Check to make sure you have selected the proper weight class for your balance. The weight tolerance should be better than balance readability. Always use tweezers or gloves when handling weights as smudges and indentations change the value of the weight. Keep weights in cases so they don’t get scratched or dusty.
SEVEN: Thou shalt always use a small container and weigh in the center of the pan. Especially when using an analytical balance, the effects of air buoyancy increase as the sample container size increases. Using a small sample container will minimize the effects. Items placed on the pan provide a downward force. Placing them directly in the center of the pan keeps corner loading errors at a minimum.
EIGHT: Thou shalt not unplug. To perform within published speci-fications, balances must have power applied for 30 minutes to 48 hours depending on the resolution of the balance. Denver balances have a standby mode which turn the display to standby but keep power cycling through the electronics.
NINE: Thou shalt not ignore static. Static is one of the most common weighing “noises”. It can cause reading to appear too high, too low or just be unstable. Denver balances include grounding methods to reduce the effects of static. However sometimes extra supplies are needed. Consider anti-static weigh dishes, anti-static brushes or low tech ways to increase the humidity of the chamber like placing damp cotton balls or glass wool in a small vial in the corner of the analytical draft shield.
TEN: Thou shalt clean often. Dirty weigh pans and powder in weighing chamber can contribute to static issues and lead to a wide variety of problems. Denver weigh pans are made from stainless steel and can be cleaned using a variety of household and laboratory chemicals. A small paint brush can be used to get power away from the edges of the draft shield for easy clean up.
The ANSI / SAAMI group, short for “American National Standard Institute” and “Sporting Arms and Ammunition Manufacturers’ Institute”, have made available some time back the voluntary industry performance standards for pressure and velocity of centerfire rifle sporting ammunition for the use of commercial manufacturers. [These standards for] individual cartridges [include] the velocity on the basis of the nominal mean velocity from each, the maximum average pressure (MAP) for each, and cartridge and chamber drawings with dimensions included. The cartridge drawings can be seen by searching the internet and using the phrase ‘308 SAAMI’ will get you the .308 Winchester in PDF form. What I really wanted to discuss today was the differences between the two accepted methods of obtaining pressure listings. The Pounds per Square Inch (PSI) and the older Copper Units of Pressure (CUP) version can both be found in the PDF pamphlet.
CUP Pressure Measurement
The CUP system uses a copper crush cylinder which is compressed by a piston fitted to a piston hole into the chamber of the test barrel. Pressure generated by the burning propellant causes the piston to move and compress the copper cylinder. This will give it a specific measurable size that can be compared to a set standard. At right is a photo of a case that was used in this method and you can see the ring left by the piston hole.
PSI Pressure Measurement
What the book lists as the preferred method is the PSI (pounds per square inch or, more accurately, pound-force per square inch) version using a piezoelectric transducer system with the transducer flush mounted in the chamber of the test barrel. Pressure developed by the burning propellant pushes on the transducer through the case wall causing it to deflect and make a measurable electric charge.
Q: Is there a standardized correlation or mathematical conversion ratio between CUP and PSI values?
Mahin: As far as I can tell (and anyone else can tell me) … there is no [standard conversion ratio or] correlation between them. An example of this is the .223 Remington cartridge that lists a MAP of 52,000 CUP / 55,000 PSI but a .308 Winchester lists a 52,000 CUP / 62,000 PSI and a 30-30 lists a 38,000 CUP / 42,000 PSI. It leaves me scratching my head also but it is what it is. The two different methods will show up in listed powder data[.]
So the question on most of your minds is what does my favorite pet load give for pressure? The truth is the only way to know for sure is to get the specialized equipment and test your own components but this is going to be way out of reach for the average shooter, myself included. The reality is that as long as you are using printed data and working up from a safe start load within it, you should be under the listed MAP and have no reason for concern. Being specific in your components and going to the load data representing the bullet from a specific cartridge will help get you safe accuracy. [With a .308 Winchester] if you are to use the 1% rule and work up [from a starting load] in 0.4 grain increments, you should be able to find an accuracy load that will suit your needs without seeing pressure signs doing it. This is a key to component longevity and is the same thing we advise [via our customer service lines] every day. Till next time, be safe and enjoy your shooting.
Derek Rodgers is a member of the Team Sinclair F-TR squad. This talented group of shooters hasn’t lost a team match in years. What’s the secret of Team Sinclair’s success? Well there is not one single factor. These guys have very accurate rifles, work hard on load development, and practice in all conditions. In this interview, Derek Rodgers talks about long range competition, reviewing the hardware (and skill set) it takes to win. He offers some great tips on developing loads. You’ll find a longer version of this interview on the Sinclair Int’l website. CLICK HERE to Read Full Interview.
Derek Rodgers BIOGRAPHY
Derek Rodgers (Albuquerque, NM), is the only shooter to have won BOTH the F-Open and F-TR National Championships. Derek shot his first NRA sanctioned-match in 2007, and just three years later Derek won the 2010 F-Open Nationals. He also won the 2013 F-TR Nationals, making him the only person to win both divisions. He has won other major F-TR matches, including the 2013 Sinclair East Coast Nationals and the 2015 Berger SW Nationals. Derek holds the current 1000-yard, 20-shot, National F-TR Record (200-12X). Derek enjoys spending his time outdoors with his wife and two daughters, ages 12 and 7. He is blessed by his faith and supported by his family. Derek’s goal is to pass on what he has learned to the next generation.
Q: What is your favorite reloading product?
I really like my BenchSource Case Annealer. There is something about watching fire that I find relaxing. I can watch those shells go around the wheel for hours.
Q: What’s your preferred front rest or bipod?
I’m currently using a Duplin bipod. At 17.2 ounces it allows me a solid platform to shoot from and the extra wiggle room to make weight with a heavy barrel and Nightforce NXS scope. Also, I can’t do without my board under the bipod. We shoot off sand at my local range and in most cases the feet will tend to dig holes if not supported. The board is necessary gear for me.
Q: What rear bag do you use?
I have an Edgewood bag that I’ve used for years. Recently, I got a SEB Bigfoot and like how it supports the gun and stays put under recoil.
Q: Explain your load development process. What’s your methodology?
I have two log books that have many combinations that work with 308s. I have tried to keep detailed notes in these books. Now I am reaping the rewards, as I can go back to a particular twist and barrel length and find something very close. I usually start with 3-shot groups and check the chamber behavior. If something looks promising I will go back to the range and load up 6-shot groups. If those shoot well, I take it to a match to verify it in a 20-shot string. If it passes that test it is either good to go or I table it and try another. I tend to pick mild loads that the cartridge shoots well — consistently.
Q: What piece of shooting gear helps your load development?
I use a MagnetoSpeed Chronograph to record velocities. Then I can slow down or speed up my loads to reach an accuracy node. It is amazing that most barrels will shoot very accurately when fired at certain known velocity nodes.
Q: What do you carry in your range bag on Match days?
Multi-piece Brownells tool set, RX Glasses, Sunglasses, Range Rod, Towel, Empty Chamber Indicators, Jacket, Sunscreen, Foam Ear Protection, Ear Muffs, Data Book, Plot Sheets, Pen, Clip Board, iPod with ballistic data, and chewing gum.
Q: How did you get started shooting?
I was raised in New Mexico where outdoor activities are abundant. Once my father introduced me to a Crossman pellet gun, all I wanted to do was shoot and refine my skills. Shooting evolved into hunting and then into perfecting my skills in off-season matches. Shooting local F-Class matches made me better as a marksman. Now I feel like I am competitive with anyone. However, I will never forget that my roots started with hunting and still cherish the opportunity to hunt…
Q: What do you find most challenging? How do you learn from mistakes?
What I find most challenging about precision shooting sports is how great shooters are able to reflect on what was learned — both positively and negatively. It is important to slow down and perform this step. Stopping to reflect and learn from mistakes I’ve made on the firing line is challenging. Not many people enjoy accurately critiquing themselves. Also the wind usually blows here in New Mexico and choosing the right time to shoot and to stop is important. It’s often tempting to try to finish out a string of fire. But sometimes challenging yourself to quit and wait out some wind will pay off[.]
Q: What advice do you have for selecting a gunsmith?
The best recommendation I can give is for a person to get to know a gunsmith. If you can find a local gunsmith that is available — even better! If you run into a snag along the way, it is so nice to be able to work it out without sending things back and forth. Be honest, realistic with your expectations and tell the gunsmith what you want. If he only wants to do things his way, or takes extra or excessive time in meeting the goals, you may want to consider someone else.
Q: Who would you recommend for stock work on your rifle?
Alex Sitman from Master Class Stocks and Doan Trevor can build or fix most anything.
Q: What do you do to mentally prepare before a shooting competition?
I relax and try to remember I do this for fun. I anticipate what game plan I want to go to the line with. I also try to take small snapshots of the conditions. I do not like getting overloaded with staring down a spotting scope for long periods of time. I try not to get overwhelmed with the match and just shoot my game. My approach is “One shot at a time — good or bad”. I will usually tell my scorer what I’m going to do so he or she is ready as well.
Q: What advice would you give to novice competitors?
Partner up with an experienced shooter that is ranked nationally. Mentoring under a veteran shooter would be the best way to help save time learning instead of experimenting. Chances are an experienced shooter has already tried what you are considering. As a new shooter, do not get sucked into reading all of the opinionated blogs on the internet. Stick to good information. AccurateShooter.com | 6mmBR.com is a great resource with a wealth of information from knowledgeable writers. That site has articles that are based from facts and/or industry news and information.
Q: What is something you would NOT recommend before a shoot?
I do not recommend coming unprepared. If you are late, scrambling around, or do not have your gear in order, you will not perform at your best.
Q: How many rounds do you shoot in a year and how often do you practice?
I shoot 3000+ rounds a year. I try to shoot 1 x a week if I can get away in the evening or on the weekend. If I am close to finding a load I may try to get out more until I exhaust that load as an option. So there may be occasions that I will try to shoot three times a week. Fortunately, the winters are mild in New Mexico and it allows me to shoot year round. I actually shoot more when it is colder. The summer sun here can create mirage that makes it nearly impossible to learn anything.
Jonathan Ocab, a High Power shooter from California, had gunsmith Doan Trevor install a Sako-style extractor in the Rem 700 bolt in Ocab’s 6mmBR Eliseo R5 tubegun. Jonathan produced an excellent video showing how the Sako extractor improves the ejection of the short, fat 6mmBR cartridges in his rifle. Jonathan’s video demonstrates 6mmBR case ejection with an unmodified Rem 700 factory bolt versus a factory bolt fitted with a Sako-style extractor.
Johnathan explains: “Note how even when slowly operating the bolt, the bolt with the Sako extractor easily ‘kicks’ out the brass on ejection with minimal chance of operator error resulting in a failure to extract. While the unmodified bolt has issues ejecting brass on slow operation, it will eject if the operator pulls the bolt back quickly (fast and with some force).
While a Sako-style extractor isn’t an absolute necessity, this video shows the definite improvement this modification provides. For short cartridges like the 6mmBR, this is very useful. This modification is highly recommended for competition shooters, especially High Power competitors who seek improved function in rapid-fire stages. This modification is fairly inexpensive and any competent gunsmith should be able to perform the work (usually under $100 with parts and labor).”
EDITOR’s NOTE: In his video, Jonathan deliberately worked the unmodified Remington bolt slowly to show how the standard Rem extractor can struggle with short fat cases like the 6mmBR. In fact, when you work a standard, unmodified bolt more quickly, the extraction can be much more positive. Cycling the bolt with more “snap” provides more energy to eject the cases. We have run an R5 Tubegun chambered in 6mmBR with an unmodified Rem 700 bolt (no SAKO extractor), and the extraction was reliable, provided the bolt was worked quickly.
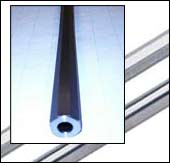
Larry Racine is a respected gunsmith based in New Hampshire. He is also a two-time member of the U.S. Palma Team, and a five-time New Hampshire State High Power rifle champion. Larry, who runs LPR Gunsmithing, has developed a brilliantly simple means of switching rifle barrels with an ordinary spanner or open-end wrench. With this set-up you can switch barrels in the field in seconds without the need for a barrel vise.
For most barrels, Larry mills a hex with six flats on the end of the barrel. This allows a shooter to change barrels quickly at home or on the line with a simple box-head wrench or a socket wrench. Larry says: “You don’t even have to take the barreled action out of the gun. Just set the buttstock on the ground, between your feet, put a wrench on it, hit it with the palm of your hand — and off comes the barrel.” For barrels fitted with a muzzle brake, Larry has a slightly different system. He mills two flats behind the brake so you can use an open-end wrench to do the job.
With either a hex on the end, or two flats for a brake-equipped rifle, the system works with any medium- to heavy-contour barrel with a muzzle-diameter of at least 0.700″. This will even work for high-power rigs using clamp-on sights or bloop tubes. Larry explains: “A lot of us here in New England use clamp-on front sights. The barrel will be turned to 0.750 for the sight, with the hex on the end. A bloop tube can go right over the end, no problem.”
Larry has used this system over the past few years to win a number of matches. In one 600-yard 3 by 20 prone match, Larry used three different barrels, with three different chamberings, on the same Savage rifle. Larry changed the barrels on the line.
Larry was able to do this because the system has little to no loss of zero from one installation of a given barrel to the next installation of that barrel. This lets the shooter start the match with confidence that the first sighter will be on paper. Larry reports that the simple system works great: “To date we have used this system on Savage, Remington, Winchester, RPA, and Nesika actions.”
Racine’s system is very affordable. If Larry does the chamber work on your barrel he charges $45.00 extra to mill a hex or two flats on your barrel. If you only want the hex or flats done, Larry charges $55.00. For more info, visit LPRGunsmith.com or call Larry at (603) 357-0055.


 Can you guess what your next barrel will weigh? In many competition disciplines, “making weight” is a serious concern when putting together a new match rifle. A Light Varmint short-range Benchrest rifle cannot exceed 10.5 pounds including scope. An F-TR rifle is limited to 18 pounds, 2 oz. (8.25 kg) with bipod.
 Is there a reliable way to predict, in advance, how much a finished barrel will weigh? The answer is “yes”. PAC-NOR Barreling of Brookings, Oregon has created a handy, web-based Barrel Weight Calculator. Just log on to Pac-Nor’s website and the calculator is free to use. Pac-Nor’s Barrel Weight Calculator is pretty sophisticated, with separate data fields for Shank Diameter, Barrel Length, Bore Diameter — even length and number of flutes. Punch in your numbers, and the Barrel Weight Calculator then automatically generates the weight for 16 different “standard” contours.


 Gun guys are always shipping stuff around the country — whether it’s a barrel to be chambered, or a scope that needs to go back for warranty repair. Or maybe you’ve sold some bullets or reloading dies you no longer need. To ensure your precious packages get to their destination in one piece, it’s important to take precautions when boxing up your items. And by all means insure packages for full value — even if your packaging is perfect, there is always the possibility that your shipment might be lost altogether. Sadly, that can happen, no matter which carrier you choose: Fedex, UPS, or the U.S. Postal Service (USPS). Here are some tips for shipping gun stuff — we explain how to pack items properly and how to minimize the risk of loss.
 “First, I started double-packing the contents and in many cases double-boxing. I spend a fortune on heavy-reinforced shipping tape. If the contents are loosely packed, the package is going to get crushed. On real important items or delicate items, wrap the content in plastic and spray the inside void areas with non-expanding foam. They make shipping foam just for this. This method really works. Since I started paying more attention to packaging, I have just about wiped out my issues with all three companies (Fedex, UPS, USPS). Yes, I hate doing it, but in the long run for us, it’s cheaper.
 How do shipments get damaged? Consider this — one of the shipping companies this year flipped (overturned) one of our new CNC machines (which rendered it useless). Maybe your small packages were in the same delivery truck as my CNC machine. I wonder how many little boxes were crushed underneath it.
 “Packing a barrel can be a problem. Here’s a shipping method that won’t stop lost shipments but so far has stopped damage. Get a PVC pipe (of size appropriate to your barrel) with fitted caps for each end. Attach a cap to one end. Tape the barrel threads and tape over the muzzle. Then drop one standard tennis ball into the pipe. Place barrel in pipe. Next add whatever peanuts or foam you can jam in to support the barrel on the sides. Then place a second tennis ball into the opposite end of the PVC pipe. (So now you have a tennis ball on either end of your barrel.) With everything secure inside, attach the upper cap and tape it down securely. With this packing procedure, when the carrier launches the pipe like a javelin, at least the barrel will not come through like a spear and be gone. Label the pipe with very large address labels so no one suspects it’s just garbage laying around. This procedure may seem ridiculous but it has worked for me. Oh and definitely get insurance. If your item is insured, the shippers will look harder to find it.”


 ONE: Thou shalt choose the best resting spot. The performance of your balance depends greatly on the surrounding environment. Choose a location away from the main traffic flow of the room, especially doors. Also be aware of heating and cooling vents as these produce air movement. You can adjust the environmental settings on your balance to provide the best performance in the chosen location. Balances must be placed away from magnets as they affect the weigh cell performance.
 SEVEN: Thou shalt always use a small container and weigh in the center of the pan. Especially when using an analytical balance, the effects of air buoyancy increase as the sample container size increases. Using a small sample container will minimize the effects. Items placed on the pan provide a downward force. Placing them directly in the center of the pan keeps corner loading errors at a minimum.
 CUP Pressure Measurement

 Derek Rodgers is a member of the Team Sinclair F-TR squad. This talented group of shooters hasn’t lost a team match in years. What’s the secret of Team Sinclair’s success? Well there is not one single factor. These guys have very accurate rifles, work hard on load development, and practice in all conditions. In this interview, Derek Rodgers talks about long range competition, reviewing the hardware (and skill set) it takes to win. He offers some great tips on developing loads. You’ll find a longer version of this interview on the

 Larry Racine is a respected gunsmith based in New Hampshire. He is also a two-time member of the U.S. Palma Team, and a five-time New Hampshire State High Power rifle champion. Larry, who runs


