Bryan Litz has produced an informative new video on the subject of bullet stability. The video explains how stability is related to spin rate (or RPM), and how RPM, in turn, is determined by barrel twist rate and velocity. For long-range shooting, it is important that a barrel have a fast-enough twist rate to stabilize the bullet over its entire trajectory.
Detailed Bullet Stability Article
To complement the above video, Bryan has authored a detailed article that explains the key concepts involved in bullet stabilization. Bryan explains: “Bullet stability can be quantified by the gyroscopic stability factor, SG. A bullet that is fired with inadequate spin will have an SG less than 1.0 and will tumble right out of the barrel. If you spin the bullet fast enough to achieve an SG of 1.5 or higher, it will fly point forward with accuracy and minimal drag.”
There is a “gray zone” of marginal stability. Bryan notes: “Bullets flying with SGs between 1.0 and 1.5 are marginally stabilized and will fly with some amount of pitching and yawing. This induces extra drag, and reduces the bullets’ effective BC. Bullets in this marginal stability condition can fly with good accuracy and precision, even though the BC is reduced. For short range applications, marginal stability isn’t really an issue. However, shooters who are interested in maximizing performance at long range will need to select a twist rate that will fully stabilize the bullet, and produce an SG of 1.5 or higher.”
Berger Twist-Rate Stability Calculator
On the updated Berger Bullets website you’ll find a handy Twist-Rate Stability Calculator that predicts your gyroscopic stability factor (SG) based on mulitiple variables: velocity, bullet length, bullet weight, barrel twist rate, ambient temperature, and altitude. This very cool tool tells you if your chosen bullet will really stabilize in your barrel.
LIVE DEMO BELOW — Just enter values in the data boxes and click “Calculate SG”.
Top photo with bullet by Werner Mehl, www.kurzzeit.com, all rights reserved.
For a prone shooter, particularly on dusty, dirty or sandy ground, muzzle blast is a major bummer. Muzzle blast can be very disturbing — not just for the trigger-puller but for persons on either side of the gun as well. Some muzzle brakes send a huge shockwave back towards the shooter, and others send blast towards the ground, kicking dirt and debris into the prone shooter’s face. If there was a way to illustrate those factors — shockwave and debris — that might help shooters select one brake design over another.
Cal Zant at PrecisionRifleBlog.com applied a unique blend of creativity and resourcefulness to try to answer that question for 20+ muzzle brakes. Using high-speed photography and household products, he captured the blast pattern of 20+ different brake designs for easy side-by-side comparison. Can you figure out how Cal managed to show muzzle brake blasts so clearly? His “hi-viz” solution, revealed in the article, is very clever. See the eye-opening results for 20+ brakes, with illustrative photos, by visiting the Precision Rifle Blog Muzzle Brake Ground Signature Test Page.
German Salazar has written a very thorough guide to measuring nearly all the critical dimensions of cartridge brass. In his Measuring the Case article, on his Rifleman’s Journal website, German reviews the tools and techniques required to measure everything from case overall length to case neck concentricity. Step-by-step, German shows how to measure: Case Length, Case Body length (below neck), Neck Diameter, Headspace, Base Diameter, Neck Thickness, and Case Neck Concentricity.
If you are an “advanced reloader” or want to be, you should read German’s article. Not only does German explain the most common measuring procedures, he highlights some alternative methods you might not have tried yet. The article also links to related discussions of more complex measurement tasts, such as determining case body wall thickness variation.
Even if you’re not a competitive shooter, measuring your brass can provide important safety benefits. As German explains in the conclusion of his article: “There are obviously a lot of measurements that can be taken on the cartridge case and in some cases, more than one way to take them. However, the first two that any new reloader must learn are case length and neck clearance, these two are safety concerns and if overlooked can results in serious damage to the rifle and injury to you.”
We are re-publishing this article at the request of Forum members who told us the information proved very valuable. If you haven’t read this Safety Tip before, take a moment to learn how you can inspect your fired brass to determine if there may be a potential for case separation. A case separation can be dangerous, potentially causing serious injury.
On the older Riflemans’ Journal blog, GS Arizona wrote an excellent article about cartridge Case-Head Separation. We strongly recommend that you read this article. It examines the causes of this serious problem and he explains the ways you can inspect your brass to minimize the risk of a case-head separation. As cases get fired multiple times and then resized during reloading, the cases can stretch. Typically, there is a point in the lower section of the case where the case-walls thin out. This is your “danger zone” and you need to watch for tell-tale signs of weakening.
The photo at the top of this article shows a case sectioned so that you can see where the case wall becomes thinner near the web. German scribed a little arrow into the soot inside the case pointing to the thinned area. This case hadn’t split yet, but it most likely would do so after one or two more firings.
One great tip offered involves using a bent paper clip to detect potential case wall problems. Slide the paper clip inside your case to check for thin spots. The author explains: “This simple little tool (bent paper clip) will let you check the inside of cases before you reload them. The thin spot will be immediately apparent as you run the clip up the inside of the case. If you’re seeing a shiny line on the outside and the clip is really hitting a thin spot inside, it’s time to retire the case. If you do this every time you reload, on at least 15% of your cases, you’ll develop a good feel for what the thin spot feels like and how it gets worse as the case is reloaded more times. And if you’re loading the night before a match and feel pressured for time — don’t skip this step!”
The Kestrel weather meter is an invaluable tool for shooters. While the standard model Kestrels can record wind and atmospheric conditions, the advanced Kestrel 4500 Shooter’s Weather Meter with Applied Ballistics incorporates a built-in ballistics program developed by Bryan Litz of Applied Ballistics. This is a very powerful tool, but it can be a bit complicated to program at first.
In this detailed 22-minute video, John McQuay of 8541 Tactical shows how to input firearm specs, MV, and BC into a Kestrel 4500 NV (Applied Ballistics model). This handy unit combines a Kestrel Weather meter with a full-fledged ballistics computer.
Step-by-step the video shows how to set up all the important variables. The video shows how to input Muzzle Velocity, Bullet BC (G1 or G7), Zero Distance and the other key ballistics variables. In addition, the video explains how to input gun-specific data such as bore height, barrel twist rate, and barrel rifle twist direction (right-hand vs. left-hand). (Twist direction comes into play in long range spin drift calculations).
If you own a Kestrel 4500 NV (Applied Ballistics), we think you’ll find this video helpful — particularly when it comes to setting up some of the lesser-known data items. The video also offers tips on navigating through the menus most efficiently.
Here’s a great tip from Forum member Greg C. (aka “Rem40X”). Greg has created a trajectory table with windage and elevation data for various distances and wind speeds. Greg prints out a compact version of his drop chart to place on his rifle. While many shooters tape a ‘come-up’ table on their buttstock, Greg has a better solution. He tapes the trajectory table to the outside of his front flip-up scope cover. This way, when he flips up the cover, his data is displayed for easy viewing right in front.
With your ‘come-up’ table on the flip-up cover you can check your windage and elevation easily without having to move up off the rifle and roll the gun over to look at the side of the stock. Greg tells us: “Placing my trajectory table on the front scope cover has worked well for me for a couple of years and thought I’d share. It’s in plain view and not under my armpit. And the table is far enough away that my aging eyes can read it easily. To apply, just use clear tape on the front objective cover.”
We’ve all seen them — you know those guys who don’t follow range rules, or who handle firearms in a careless manner. Sometimes bad range etiquette is simply annoying. Other times poor gun-handling practices can be downright dangerous. The NRA Blog has published a useful article about range safety and “range etiquette”. While these tips were formulated with indoor ranges in mind, most of the points apply equally well to outdoor ranges. You may want to print out this article to provide to novice shooters at your local range or club.
8 Tips for Gun Range Etiquette
Story by Kyle Jillson for NRABlog
Here are eight tips on range etiquette to keep yourself and others safe while enjoying your day out [at the range]. Special thanks to NRA Headquarters Range General Manager Michael Johns who assisted with this article.
1. Follow the Three Fundamental Rules for Safe Gun Handling
ALWAYS keep the gun pointed in a safe direction.
ALWAYS keep your finger off the trigger until ready to shoot.
ALWAYS keep the gun unloaded until ready to use.
2. Bring Safety Gear (Eye and Ear Protection)
Eye and Ear protection are MANDATORY for proper safety and health, no matter if “required” by range rules or not. It is the shooter’s responsibility to ensure proper protection is secured and used prior to entering/using any range. Hearing loss can be instantaneous and permanent in some cases. Eyesight can be ruined in an instant with a catastrophic firearm failure.
3. Carry a Gun Bag or Case
Common courtesy and general good behavior dictates that you bring all firearms to a range unloaded and cased and/or covered. No range staff appreciates a stranger walking into a range with a “naked” firearm whose loaded/unloaded condition is not known. You can buy a long gun sock or pistol case for less than $10.
4. Know Your Range’s Rules
Review and understand any and all “range specific” rules/requirements/expectations set forth by your range. What’s the range’s maximum rate of fire? Are you allowed to collect your brass? Are you required to take a test before you can shoot? Don’t be afraid to ask the staff questions or tell them it’s your first time. They’re there to help.
5. Follow ALL Range Officer instructions
ROs are the first and final authority on any range and their decisions are generally final. Arguing/debating with a Range Officer is both in poor taste and may just get you thrown out depending on circumstances.
6. Don’t Bother Others or Touch Their Guns
Respect other shooters’ privacy unless a safety issue arises. Do NOT engage other shooters to correct a perceived safety violation unless absolutely necessary – inform the RO instead. Shooters have the right and responsibility to call for a cease fire should a SERIOUS safety event occur. Handling/touching another shooter’s firearm without their permission is a major breech of protocol. Offering unsolicited “training” or other instructional suggestions to other shooters is also impolite.
7. Know What To Do During a Cease Fire
IMMEDIATELY set down your firearm, pointed downrange, and STEP AWAY from the shooting booth (or bench). The Range Officer(s) on duty will give instructions from that point and/or secure all firearms prior to going downrange if needed. ROs do not want shooters trying to “secure/unload” their firearms in a cease fire situation, possibly in a stressful event; they want the shooters separated from their guns instantly so that they can then control the situation as they see fit.
8. Clean Up After Yourself
Remember to take down your old targets, police your shooting booth, throw away your trash, and return any equipment/chairs, etc. Other people use the range too; no one wants to walk up to a dirty lane.
Do you have some old, tired brass that needs a thorough cleaning — inside and out? Consider using an ultrasonic cleaning machine. When used with the proper solution, a good ultrasonic cleaning machine can quickly remove remove dust, carbon, oil, and powder residue from your cartridge brass. The ultrasonic process will clean the inside of the cases, and even the primer pockets. Tumbling works well too, but for really dirty brass, ultrasonic cleaning may be a wise choice.
Our friend Gavin Gear recently put an RCBS Ultrasonic cleaning machine through its paces using RCBS Ultrasonic Case Cleaning Solution (RCBS #87058). To provide a real challenge, Gavin used some very dull and greasy milsurp brass: “I bought a huge lot of military once-fired 7.52x51mm brass (fired in a machine gun) that I’ve been slowly prepping for my DPMS LR-308B AR-10 style rifle. Some of this brass was fully prepped (sized/de-primed, trimmed, case mouths chamfered, primer pockets reamed) but it was gunked up with lube and looking dingy.”
UltimateReloader.com Case Cleaning Video (7.5 minutes):
Gavin describes the cleaning exercise step-by-step on UltimateReloader.com. Read Gavin’s Cartridge Cleaning Article to learn how he mixed the solution, activated the heater, and cycled the machine for 30 minutes. As you can see in the video above, the results were impressive. If you have never cleaned brass with ultrasound before, you should definitely watch Gavin’s 7.5-minute video — it provides many useful tips and shows the cleaning operation in progress from start to finish.
The RCBS ultrasonic cleaning machine features a large 3-liter capacity, 60 watt transducer, and 100 watt ceramic heater. The RCBS ultrasonic machine can be found under $140.00, and this unit qualifies for RCBS Rebates ($10 off $50 purchase or $50 off $300.00 purchase). RCBS also sells 32 oz. bottles of cleaning concentrate that will make up to 10 gallons of Ultrasonic Solution.
by Tony Chow
In recent years, the use of electronic trainer systems has revolutionized training in all disciplines of position shooting. By capturing (and illustrating) key performance variables like the steadiness of a shooter’s hold, accuracy of aiming, and the timeliness of trigger release, these devices can offer tremendous insights into the strengths and weakness of a shooter’s position and technique, making high-level marksmanship training less voodoo and more of a science.
Until now, electronic trainers all suffered from one critical limitation: the inability to be used outdoors in live fire training. Now, however, SCATT has introduced the next-generation MX-02 electronic trainer, a product that can finally support outdoor live firing in broad daylight, as well as dry firing indoors. In addition, the MX-02 is the first electronic trainer to support centerfire rifles. It goes without saying that, when we at AccurateShooter.com were offered an MX-02 test unit to review, we jumped at the opportunity.
How the SCATT MX-02 Works
The SCATT sensor mounted on the end of the barrel has a digital camera that “sees” the black bullseye in the target, even in broad daylight outdoors. Using the bullseye as a reference, the SCATT software tracks the movement of the muzzle relative to the center of the target. The unit can plot these movements as a continuous trace, which appears on a monitor as a squiggly, colored line. Data points from the trace are also available in a tabular spreadsheet format. This allows the shooter to “crunch the numbers”, revealing strengths and weaknesses in his gun-handling and aiming technique.
In our testing, we confirmed that, like SCATT’s earlier indoor-only WS-01, the MX-02 offers excellent support for indoor dry-fire training, which will continue to be the primary means through which position shooters sharpen their fundamental skills. Since the new SCATT uses the same familiar Windows software for data capture and analysis as its predecessors, shooters and coaches upgrading to MX-02 will have no learning curve to overcome, and newcomers to the SCATT platform can tap into the wealth of institutional knowledge accumulated over the years by the shooting community on how to interpret shot data.
It’s in the support for outdoor live firing, however, that SCATT MX-02 distinguishes itself from its predecessors and the competition. Shot trace data captured by MX-02 during live firing turned out to be every bit as valuable (and revealing) as we had hoped. The ability to correlate SCATT tracing with real shots on target gave us a better understanding of the shooting process, and helped the reviewer, already a high-level smallbore prone shooter, uncover a significant problem in his shooting. SCATT MX-02’s outdoor capability is therefore an invaluable feature, particularly for experienced shooters aspiring to world-class performance.
In summary, SCATT MX-02 is an outstanding product that delivers on its promises. We heartily recommend it, both for first-time users of electronic training aids, and also for those shooters who may wish to upgrade their current electronic training system. The MSRP for SCATT MX-02 is $1,799, $500 more than its predecessor, the SCATT WS-01, which is still available. In my view, the $500 premium for the MX-02 is justified by the MX-02’s enhanced capabilities, making it a better long-term investment.
Our complete, 3600-word MX-02 review of the SCATT MX-02 can be accessed through the link below. This full review contains many more photos plus detailed field test results. For the time being, the review only covers our experience with the product in smallbore shooting. An upcoming addendum to the review will include test results from centerfire shooting. Those attending SHOT Show in Las Vegas next week can examine SCATT MX-02 in person. SCATT will have the MX-02 on display at Booth 111.
Every summer weekend, there are probably 400 or more club “fun matches” conducted around the country. One of the good things about these club shoots is that you don’t have to spend a fortune on equipment to have fun. But we’ve seen that many club shooters handicap themselves with a few common equipment oversights or lack of attention to detail while reloading. Here are SIX TIPS that can help you avoid these common mistakes, and build more accurate ammo for your club matches.
1. Align Front Rest and Rear Bags. We see many shooters whose rear bag is angled left or right relative to the bore axis. This can happen when you rush your set-up. But even if you set the gun up carefully, the rear bag can twist due to recoil or the way your arm contacts the bag. After every shot, make sure your rear bag is aligned properly (this is especially important for bag squeezers who may actually pull the bag out of alignment as they squeeze).
Forum member ArtB adds: “To align my front rest and rear bag with the target, I use an old golf club shaft. I run it from my front rest stop through a line that crosses over my speed screw and into the slot between the two ears. I stand behind that set-up and make sure I see a straight line pointing at the target. I also have a piece of tape that I’ve placed on the golf shaft that indicates how far the back end of the rear bag should be placed from the front rest stop. Don’t have an old golf shaft? Go to Home Depot and buy an inexpensive piece of wood dowel.”
2. Avoid Contact Interference. We see three common kinds of contact or mechanical interference that can really hurt accuracy. First, if your stock has front and/or rear sling swivels make sure these do NOT contact the front or rear bags at any point of the gun’s travel. When a sling swivel digs into the front bag that can cause a shot to pop high or low. To avoid this, reposition the rifle so the swivels don’t contact the bags or simply remove the swivels before your match. Second, watch out for the rear of the stock grip area. Make sure this is not resting on the bag as you fire and that it can’t come back to contact the bag during recoil. That lip or edge at the bottom of the grip can cause problems when it contacts the rear bag. Third, watch out for the stud or arm on the front rest that limits forward stock travel. With some rests this is high enough that it can actually contact the barrel. We encountered one shooter recently who was complaining about “vertical flyers” during his match. It turns out his barrel was actually hitting the front stop! With most front rests you can either lower the stop or twist the arm to the left or right so it won’t contact the barrel.
3. Weigh Your Charges — Every One. This may sound obvious, but many folks still rely on a powder measure. Yes we know that most short-range BR shooters throw their charges without weighing, but if you’re going to pre-load for a club match there is no reason NOT to weigh your charges. You may be surprised at how inconsistent your powder measure actually is. One of our testers was recently throwing H4198 charges from a Harrell’s measure for his 30BR. Each charge was then weighed twice with a Denver Instrument lab scale. Our tester found that thrown charges varied by up to 0.7 grains! And that’s with a premium measure.
4. Measure Your Loaded Ammo — After Bullet Seating. Even if you’ve checked your brass and bullets prior to assembling your ammo, we recommend that you weigh your loaded rounds and measure them from base of case to bullet ogive using a comparator. If you find a round that is “way off” in weight or more than .005″ off your intended base to ogive length, set it aside and use that round for a fouler. (Note: if the weight is off by more than 6 or 7 grains you may want to disassemble the round and check your powder charge.) With premium, pre-sorted bullets, we’ve found that we can keep 95% of loaded rounds within a range of .002″, measuring from base (of case) to ogive. Now, with some lots of bullets, you just can’t keep things within .002″, but you should still measure each loaded match round to ensure you don’t have some cases that are way too short or way too long.
5. Check Your Fasteners. Before a match you need to double-check your scope rings or iron sight mounts to ensure everything is tight. Likewise, you should check the tension on the screws/bolts that hold the action in place. Even with a low-recoiling rimfire rifle, action screws or scope rings can come loose during normal shooting.
6. Make a Checklist and Pack the Night Before. Ever drive 50 miles to a match then discover you have the wrong ammo or that you forgot your bolt? Well, mistakes like that happen to the best of us. You can avoid these oversights (and reduce stress at matches) by making a checklist of all the stuff you need. Organize your firearms, range kit, ammo box, and shooting accessories the night before the match. And, like a good Boy Scout, “be prepared”. Bring a jacket and hat if it might be cold. If you have windflags, bring them (even if you’re not sure the rules allow them). Bring spare batteries, and it’s wise to bring a spare rifle and ammo for it. If you have just one gun, a simple mechanical breakdown (such as a broken firing pin) can ruin your whole weekend.


 Berger Twist-Rate Stability Calculator


 On the older Riflemans’ Journal blog, GS Arizona wrote an excellent article about cartridge


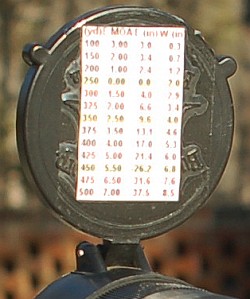 Here’s a great tip from Forum member Greg C. (aka “Rem40X”). Greg has created a trajectory table with windage and elevation data for various distances and wind speeds. Greg prints out a compact version of his drop chart to place on his rifle. While many shooters tape a ‘come-up’ table on their buttstock, Greg has a better solution. He tapes the trajectory table to the outside of his front flip-up scope cover. This way, when he flips up the cover, his data is displayed for easy viewing right in front.


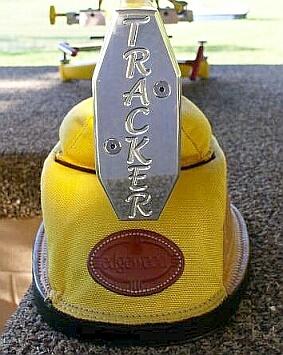 1. Align Front Rest and Rear Bags. We see many shooters whose rear bag is angled left or right relative to the bore axis. This can happen when you rush your set-up. But even if you set the gun up carefully, the rear bag can twist due to recoil or the way your arm contacts the bag. After every shot, make sure your rear bag is aligned properly (this is especially important for bag squeezers who may actually pull the bag out of alignment as they squeeze).
 3. Weigh Your Charges — Every One. This may sound obvious, but many folks still rely on a powder measure. Yes we know that most short-range BR shooters throw their charges without weighing, but if you’re going to pre-load for a club match there is no reason NOT to weigh your charges. You may be surprised at how inconsistent your powder measure actually is. One of our testers was recently throwing H4198 charges from a Harrell’s measure for his 30BR. Each charge was then weighed twice with a Denver Instrument lab scale. Our tester found that thrown charges varied by up to 0.7 grains! And that’s with a premium measure.
 5. Check Your Fasteners. Before a match you need to double-check your scope rings or iron sight mounts to ensure everything is tight. Likewise, you should check the tension on the screws/bolts that hold the action in place. Even with a low-recoiling rimfire rifle, action screws or scope rings can come loose during normal shooting.


