When shooting targets, the closer to the center the better the result. But this is not necessarily true when it comes to using jags and patches. There are some good reasons to try spiking your patches away from the center. This Creedmoor Sports Tech Tip explains why you may want to spike (puncture) your patch away from the center. CLICK HERE to order patches and Swab-Its cleaning bore tips from Creedmoor Sports.
You begin to push your first patch down the barrel and you notice it is extremely tight and then it jams! How can this be? A commonly overlooked solution to remedy the frustrating occurrences of overly tight or jammed patches is what we like to call “Side-Spiking”. Side-Spiking is super simple and works!
“Side-Spiking”, as the words suggest, refers to moving your patch spiking position from the center of the patch towards the corner of a square patch or the edge of a round patch.
Moving From Center-Spiking To Side-Spiking
The closer toward the edge of the patch you spike your jag, the looser the patch will be when pushed down the bore.
Important: Be careful to not go to the very edge of the patch. Leave enough patch material to fully cover the first set of rings on your jag as this insures your jag is properly centered in the bore and that no contact with the rifling will occur.
Proper Side-Spiking Location Creedmoor Sports recommends side spiking all wet patches. This allows for a looser patch in the bore which removes gross powder fouling and leaves more cleaning solution behind to start working on the remaining fouling.
When a tighter patch is needed, simply move your spike closer toward the center of the patch. The closer to the center of the patch you get, the tighter the patch will become in the bore. The objective is to have a snug-fitting patch that allows you to smoothly push your rod down the bore. Remember you do not need to end up in the center of the patch!
Bore-Tech Patch Size Selection Chart Recommends Patch Sizes by Caliber:
Most modern match rifle barrels are stainless steel alloy. These are from Benchmark Barrels.
Though some grades of stainless are more corrosion-resistant, ALL varieties of stainless steel can rust if they are not handled and stored properly.
Some folks feel that they don’t have to worry about rust and corrosion on stainless steel barrels, actions, and other components. That’s not really true. “Stainless” is a bit of a misnomer. First, there are different types of stainless steel alloys, with different degrees of rust resistance. 300 series stainless is more corrosion resistant than the 416 stainless commonly used in barrels. The composition (by percentage weight) of 416 stainless is 0.15% carbon, 12-14% chromium and the rest iron. 416 stainless steel lacks the roughly 10% nickel content that makes the 300 series more corrosion resistant in atmospheric conditions. But because 416 handles pressure better and is easier to machine (than 300 series steel), 416 stainless remains the better choice for barrels.
Though some grades of stainless are more corrosion-resistant, ALL varieties of stainless steel can rust if they are not handled and stored properly. Forum reader Kells81 observed: “Wanna see some rusted stainless? Go to the big “C” brand store in Ft. Worth. Every stainless gun they have on the used gun rack is rusted.” Tom Easly of TRE Custom explains: “Sweat is very corrosive. Sweat and blood will rust many stainless steels. I hate to handle my guns or drip on them when I sweat. It really helps to just wipe them good with a wet rag, dry and wipe on a light coating of gun oil. I think most stainless barrels are made from type 416 stainless, and it is generally pretty corrosion resistant, but not when exposed to sweat, blood, or chlorates (corrosive priming), and some other electrolytes.”
Forum member Jacob, who is studying materials science at LSU, provides this technical information: “The basic resistance of stainless steel occurs because of its ability to form a protective coating on the metal surface. This coating is a ‘passive’ film which resists further ‘oxidation’ or rusting. The formation of this film is instantaneous in an oxidizing atmosphere such as air, water, or other fluids that contain oxygen. Once the layer has formed, we say that the metal has become ‘passivated’ and the oxidation or ‘rusting’ rate will slow down to less than 0.002″ per year (0.05 mm per year).
Unlike aluminum or silver, this passive film is invisible in stainless steel. It’s created when oxygen combines with the chrome in the stainless to form chrome oxide which is more commonly called ‘ceramic’. This protective oxide or ceramic coating is common to most corrosion resistant materials.
Halogen salts, especially chlorides, easily penetrate this passive film and will allow corrosive attack to occur. The halogens are easy to recognize because they end in the letters ‘ine’. Listed in order of their activity they are: fluorine, chlorine, bromine, iodine, astatine.
These are the same chemicals that will penetrate Teflon and cause trouble with Teflon coated or encapsulated O-rings and/ or similar coated materials. Chlorides are one of the most common elements in nature and if that isn’t bad enough, they’re also soluble, active ions. These provide the basis for electrolytes. The presence of electrolytic solutions can accelerate corrosion or chemical attack.”
CONCLUSION: Stainless steel barrels and components won’t rust nearly as fast as blued steel, but you still have to take precautions — particularly removing sweat and corrosive salts from the barrel. Also, don’t let moisture build up inside or outside of the barrel. We recommend wiping your barrels and actions with Eezox, or Corrosion-X after each use. These are both extremely effective rust-fighters that go on thin, without leaving a greasy residue. (Eezox leaves a clear finish, while Corrosion-X has a slightly waxy finish.) Also store your guns in Bore-Store bags when the guns go in the safe. Bore-Stores wick away moisture, and the synthetic fleece inner surface is treated with rust-fighting chemicals. Bore-Stores also protect your guns against dings and scratches.
Ever wondered what the air around a moving supersonic bullet really looks like? Check out this video from the Bryan Litz Ballistics Facebook page. This is a Schlieren video* of a 6mm 109gr Berger LRHT bullet at about 2800 fps as fired from Francis Colon’s PRS rifle at the Applied Ballistics Lab.
Bryan Litz notes: “You can clearly see the compression (shock) wave at the front of the bullet. A compression wave is formed when the air has to move faster than the speed of sound to get out of the way, which is certainly the case for this bullet which is moving about 2.5 times the speed of sound (Mach 2.5).
That shock wave is the ‘snap’ you hear when bullets fly past you if/when you’re downrange. Also, compressing the air into a shockwave takes energy, and that energy comes directly out of the forward velocity of your bullet and gets converted into heat and noise as the shock wave forms and dissipates.
The turbulent wake at the base of the bullet shows where/how base drag applies. The third and smallest component of drag for a supersonic bullet is skin friction drag, which is a viscous boundary layer effect, and is the least visible in this image. So as you head to the range or the hunting stand, think about the absolute violence your bullets are committing in the atmosphere, before they even reach the target!”
In discussions of ballistics, you’ll see references to “tangent”, “secant”, and “hybrid” bullet shapes. We know that, for many readers, these terms can be confusing. To add to the confusion, bullet makers don’t always identify their projectiles as secant or tangent designs. This article provides a basic explanation of tangent, secant, and hybrid ogive bullet designs, to help you understand the characteristics of these three basic bullet shapes.
Tangent vs. Secant vs. Hybrid
Most match bullets produced today use a tangent ogive profile, but the modern VLD-style bullets employ a secant profile. To further complicate matters, the latest generation of “Hybrid” projectiles from Berger Bullets feature a blended secant + tangent profile to combine the best qualities of both nose shapes. The secant section provides reduced drag, while the tangent section makes the bullet easier to tune, i.e. less sensitive to bullet seating depth position.
Berger Bullets ballistician Bryan Litz explains tangent and secant bullet ogive designs in a glossary section of his Applied Ballistics website, which we reprint below. Bryan then explains how tangent and secant profiles can be combined in a “hybrid” design.
How Bullet Ogive Curves are Defined
While the term “ogive” is often used to describe the particular point on the bullet where the curve reaches full bullet diameter, in fact the “ogive” properly refers to the entire curve of the bullet from the tip to the full-diameter straight section — the shank.
Understanding then, that the ogive is a curve, how is that curve described?
LITZ: The ogive of a bullet is usually characterized by the length of its radius. This radius is often given in calibers instead of inches. For example, an 8 ogive 6mm bullet has an ogive that is a segment of a circular arc with a radius of 8*.243 = 1.952”. A .30-caliber bullet with an 8 ogive will be proportionally the same as the 8 ogive 6mm bullet, but the actual radius will be 2.464” for the .30 caliber bullet.
For a given nose length, if an ogive is perfectly tangent, it will have a very specific radius. Any radius longer than that will cause the ogive to be secant. Secant ogives can range from very mild (short radius) to very aggressive (long radius). The drag of a secant ogive is minimized when its radius is twice as long as a tangent ogive radius. In other words, if a tangent ogive has an 8 caliber radius, then the longest practical secant ogive radius is 16 calibers long for a given nose length.”
Bryan Litz Explains Hybrid Design and Optimal Hybrid Seating Depths
Ogive Metrics and Rt/R Ratio
LITZ: There is a number that’s used to quantify how secant an ogive is. The metric is known as the Rt/R ratio and it’s the ratio of the tangent ogive radius to the actual ogive radius for a given bullet. In the above example, the 16 caliber ogive would have an Rt/R ratio of 0.5. The number 0.5 is therefore the lowest practical value for the Rt/R ratio, and represents the minimum drag ogive for a given length. An ogive that’s perfectly tangent will have an Rt/R ratio of 1.0. Most ogives are in between an Rt/R of 1.0 and 0.5. The dimensioned drawings at the end of my Applied Ballistics book provide the bullets ogive radius in calibers, as well as the Rt/R ratio. In short, the Rt/R ratio is simply a measure of how secant an ogive is. 1.0 is not secant at all, 0.5 is as secant as it gets.
Hybrid Bullet Design — Best of Both Worlds?
Bryan Litz has developed a number of modern “Hybrid” design bullets for Berger. The objective of Bryan’s design work has been to achieve a very low drag design that is also “not finicky”. Normal (non-hybrid) secant designs, such as the Berger 105gr VLD, deliver very impressive BC values, but the bullets can be sensitive to seating depth. Montana’s Tom Mousel has set world records with the Berger 105gr VLD in his 6mm Dasher, but he tells us “seating depth is critical to the best accuracy”. Tom says a mere .003″ seating depth change “makes a difference”. In an effort to produce more forgiving high-BC bullets, Bryan Litz developed the hybrid tangent/secant bullet shape.
Video Reviews Selected by Brandon Green
For this week’s Saturday Showcase, we present seven videos featuring modern Electronic Target Systems. These videos were selected by Brandon Green, one of America’s greatest marksmen. Recent winner of the legendary King’s Prize in the UK, Brandon is a three-time National High Power Champion, and a National Long-Range Champion. Brandon has chosen these videos to illustrate how electronic target systems work, and so viewers can optimize their performance when working with e-Targets, both for live fire and dry-fire training. The first four videos cover electronic live-fire systems for rifles. The second three videos cover dry-fire systems for pistols that can be used indoors.
Electronic Targets for Rifles
Shotmarker Target Unboxing, Overview and Set-Up
The convenience of electronic targets offers the competitive marksman or enthusiast the ability to train and gather data without having to enlist help. These systems allow the shooter to set up a target at any distance where the projectile is supersonic and collect vital data. This system allows you to see impacts on target, get retained velocities, and measure group sizes with remarkable accuracy provided the target frame is square, rigid, and calibrated properly. This 14-minute Ultimate Reloader video will cover the unboxing of the system as well as discussing the capabilities, setup, and calibration for proper use. This ShotMarker unit retails at $799.00 USD. LINK: ShotMarker Product Page.
Long Shot LR-3 Long Range Target Camera
With the versatility of shooting steel or paper targets at distance, the camera style target systems can bring undeniable convenience to your range sessions. These systems can give you both the visual indication of shot placement on target and group sizes right on your phone or tablet.
This video covers unboxing, compatibility, and functionality of the Long Shot LR-3 target camera system with a live fire demo that shows image quality and speed. This impressive system can work out to 2 miles and syncs directly to your device. No range WiFi is required. This Longshot LR-3 Target Camera System is on sale for $899.99 USD.
If you typically shoot inside 1000 yards there are less expensive Long Shot devices. The Ranger+ 1K system is $404.00, The Marksman 300-yard UHD (ultra-high definition) is $449.00, and the Range 100-yard unit is just $224.00. LINK: LongShot Camera Options.
Caldwell Ballistic Precision LR Target Camera System
The Caldwell camera system appears to work similarly to the Long Shot system while coming in at a bit of a reduced cost. This video will cover unboxing, setup, and capabilities as well as a live fire demo that shows video quality and speed. This unit retails at $604.99 USD. LINK: Caldwell Camera System.
Kongsberg Electronic Targets for CMP
The CMP’s outdoor electronic targets at Camp Perry employ Kongsberg Target System (KTS) technology. The system includes monitors at each firing point that instantly display shot scores. The mobile version of the KTS system, which has been featured at CMP Travel Games events and the National Matches highpower series for many years, was used at the 2025 National Matches this summer. The advanced Kongsberg eTarget system at the National Matches will includes the KTS Shooter’s Journal, which keeps a log of each individual’s shots/scores on the firing line. LINK: Kongsberg Target System Products.
Pistol Dry-Fire Training Systems
Strikeman Laser Firearm Training System
The Strikeman Laser Training System is another dryfire training aid that allows the user to choose calibrated targets and get instant feedback with the training App on their smartphone. This video covers the unboxing, setup, and demonstration of the system. This unit is sold for $124.98 on the Strikeman website. LINK: Strikeman Pistol Training System.
Mantis Laser Academy Training System
The Mantis Laser Academy is a complete dryfire training system that allows the user to train indoors with the added benefit of getting feedback of shot placement, score on target and split times between shots. This system allows you train on numerous calibrated targets and offers several training drills with the app. You can also adjust your offset if you’re running an optic such as an RMR on your pistol. This kit is sold for $159.00 USD on the Mantis website. LINK: Mantis Laser Academy Kit.
Laser Ammo i-MTTS Target Training System
Laser Ammo’s i-MTTS training system is an interactive training system that allows the shooter to set up a complete indoor training range with various target sizes and shapes. This system allows the user to program drills, group targets together, and track splits with elapsed time. This video will cover the target system, setup, programming and drill demonstrations. This unit starts at $99.95 for a single target or $395.00 for the 5-in-1 combo pack on the Laser Ammo website. LINK: Laser Ammo i-MTTS Target System.
Proper eye protection is ‘must-have’ gear for shooting sports. In addition to providing reliable impact protection, good shooting glasses should be comfortable, fog-free, and not interfere with your preferred hearing protection. Those who require corrective lenses also need to consider the various options available. In a past episode of their Weekly Gear Review, the 6.5 Guys discuss a variety of shooting glasses they have tried, including examples from DeCot, Oakley, and Wiley-X. Ed and Steve outline the key considerations when choosing eye protection, and then review practical aspects of eyewear design and construction that enhance comfort and functionality in the field.
The 6.5 Guys (Ed and Steve) offer a number of smart tips consider safety eyewear, helping you select the most effective safety glasses at an affordable price. Here are the 6.5 Guys’ KEY Take-aways when choosing shooting glasses, including prescription eyewear:
Key Things To Consider When Choosing Eye Protection
1. Avoid polarized lenses or lenses that reduce light transmission significantly (except for action shooting in very bright conditions with large, close targets).
2. Avoid frame designs that interfere with prone shooting.
3. Avoid designs that easily fog.
4. Avoid frame designs with thicker temples that are uncomfortable to wear underneath hearing protection.
5. Select lenses with an appropriate degree of ballistic protection. CLICK HERE to learn more about eyewear safety standards.
6. When you get your prescription, be sure your ophthalmologist includes the interpupillary distance. This is a critical measurement particularly for heavier prescriptions.
7. If you have a complicated prescription select a vendor who will actually spend time with you to address any concerns.
Horrific .50 BMG Kaboom — Eye Saved by Protective Eyewear
Think you don’t need eye protection? Watch this video starting at 4:10. The screw-on barrel “cap” (chamber closure) of the .50 BMG action flies into the shooter’s face. Without eye protection the shooter would have definitely lost his right eye. (See video at 5:20 for analysis).
Safety First — Your Eyes Are Irreplaceable Accurate shooting begins and ends with the human eye. Your career as a marksman could be cut short if you don’t use good eye protection every time you go to the range and/or handle a firearm.
Every year, over 1,000,000 people suffer serious eye injuries. Shooting is hazardous; it is estimated that there are 30,000 firearms-related eye injuries each year (if you include paintball sports.) After paintball, general hunting accidents comprise most firearms-related eye injuries.
Quality eye protection need not be expensive. You can find comfortable, ANSI Z87.1-certified shooting glasses for under $10.00.
If you select shooting glasses carefully, and ensure that your eyewear is safety-certified, inexpensive shooting glasses can perform very well. But you need to avoid cheap, soft-plastic lenses that claim “impact resistance” without satisfying a testing standard.
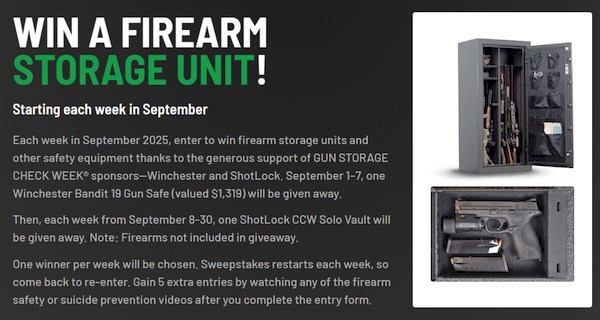
Make sure your firearms are stored securely. The NSSF’s Gun Storage Check Week runs September 1-7, 2025. This national awareness campaign is intended to ensure gun owners store their firearms securely, both to prevent theft and to reduce the risk of misuse and suicide.
Secure firearm storage is the most effective way to help prevent firearm accidents, suicides, and theft. Many secure storage options are available, including lock boxes, cable locks, and full-size safes, to secure firearms when not in use in homes and vehicles. When firearms are not under your direct control, you should place them in locked storage. We recommend large, heavy gun safes for rifle and shotgun storage. It’s best to buy a larger, heavier gun safe than you may think you need initially. We recommend your read our Gun Safe Buyers Guide.
We can do more to help prevent firearm-related accidents, suicides and thefts. During Gun Storage Check Week you should review storage practices and make changes, as needed, to prevent unauthorized access. “No one wants their gun in the hands of an unsupervised child, a person in crisis, an individual who lacks knowledge of safely operating firearms or a thief”, says Joe Bartozzi, President and CEO of NSSF.
Opportunity to WIN a FREE Winchester Gun Safe
Those who visit GunStorageCheck.org will have chances to win firearm storage units and other safety equipment thanks to the generous support of Gun Storage Check Week sponsors — Winchester and ShotLock. For the week of September 1–7, one Winchester Bandit 19 Gun Safe (valued $1,319) will be given away. Then, from September 8 through the 30th, one ShotLock CCW Solo Vault will be given away each week, with one winner per week. The Sweepstakes restarts each week, so come back to re-enter. Note: Firearms are NOT included in giveaway.
Our friend Gavin Gear has just released an excellent video showing how to make a threaded Modified Case for use with the Hornady Lock-N-Load Overall Length Gauge. You can watch Gavin make a Modified Case start to finish in the video below:
Video Shows How to Drill and Tap Modified Case
Gavin has some clever tricks. First he uses a sizing die to hold the cartridge case during the threading process. Second he uses two drill bits in sequence — a smaller bit to ream out the primer pocket, and then a larger “M” bit to increase the hole diameter before threading the brass. Finally he leaves the threading tap IN the brass, locks the tailstock, and then “gently pulls on the quill” to remove the brass from the die held in his lathe (See 5:46 timemark).
Get the Correct 5/16″-36 RH Tap
Unfortunately, Hornady has selected an uncommon thread type for OAL Gauges. You probably won’t be able to buy the correct 5/16″ – 36 RH HSS Tap at your local hardware store. However you CAN order this special tap from Amazon for $9.99.
Modified Case Q & A — TECH TIPS
Why do I need a Modified Case?
Every serious reloader should have a Modified Case for each cartridge type they shoot. The reason is that this allows you to get very precise measurements of the length-to-lands in your chamber. When used with the Hornady OAL Gauge, with some practice, you should be able to get repeatable length-to-lands measurements within about 0.0015″. We generally do 4-5 measurements with the OAL Gauge and usually 3 or 4 will be “on the money”. NOTE: We recommend a gentle, easy pressure on the plastic pusher rod. Don’t push too hard or you will jam the bullet hard into the lands, which produces inconsistent results.
Can’t I Just Buy a Modified Case?
Hornady makes a variety of Modified Cases sold on Amazon and through retailers such as Midsouth. While Hornady makes modified cases for many standard cartridges, if you shoot a wildcat such as the 6mm Dasher or .284 Shehane, you’ll need to create a custom modified case. And even if you shoot a standard cartridge such as the .308 Win, you can get more consistent measurements with a custom Modified Case.
If you do decide to make your own modified case, you’ll want to start with a case that’s been fired in your rifle. That way you get the best fit to YOUR chamber. Also, you won’t need to expand the neck to provide bullet clearance. Then you need to drill out the primer pocket and tap the base of the case to match the threads on the Hornady OAL Gauge tool. Make at least two modified cases, as you’ll probably misplace one at some point.
MORE INFORMATION: Want to learn more? We published a much longer story in which Erik Cortina explains in greater detail how to made the Modified Case. That article illustrates the 5/16″ – 36 RH HSS Tap required and shows how to set up the lathe to drill and tap your case. If you are serious about making your own Modified Cases, you should Read the Full Article.
Labor Day 2025 (September 1st) is just 5 days away. Soon we’ll be enjoying a major 3-day holiday weekend. We know many of our readers will be out on the road visiting friends or enjoying end-of-summer getaways. How do you do your reloading chores while traveling on holiday? Here’s a solution from Forum member Dave Gray (U.S. Army Retired).
Dave is a self-declared “full-time RVer” who spends most of his time on the road. Behind his Ram 3500 pickup, Dave tows a huge 41-foot Heartland Cyclone toy hauler featuring a 12X8 foot garage in the rear. In the rear garage area, which holds a compact Smart Car, Dave has set up a removable reloading bench complete with RCBS Rockchucker single stage press and Dillon progressive press.
Reloading Bench Mounts to RV Wall with Brackets
Dave explains: “I used a 2″X6″X5′ board for the bench. It’s perfect for my needs, and is easy to disassemble. I made it this small so that I can park my Smart Car in the garage during travel to my destinations. The bench, attached to the wall frames, is very solid. The presses’ centers are 3″ and 6.5″ from the brackets. [There are] four bolts on the wall into aluminum wall frame and 3 bolts in the bench. If I ever have to replace the current board, I’ll do so with oak or birch or hickory. When I’m not reloading, I remove the presses and store them in a protected space. I can easily attach other equipment to the bench by using C-Clamps.” Dave’s “rolling reloading room” looks very well thought-out. We commend Dave for his inventiveness.
How to Fill Shooting Sandbags Most Effectively
For both front and rear Edgewood bags, start by looking for the black nylon/cordura flap. This flap will have white stiches running along both sides. Note that the flap is actually two pieces of nylon/cordura which are sewn together. These two pieces must be separated at the end where there are no stitches in order to insert a funnel or other filling device.
Hold the bag so that the flap is pointed straight up and fill half way. Using a blunted rod and alternating between filling and packing, begin packing the sand firmly into the bag until the shape is uniform and you are satisfied with the firmness. Slam the base of the bag firmly on the bench several times to compact and evenly seat the sand. Then, check to see if more sand needs to be added. Repeat this process for the ears if you are filling a rear bag. Note that as the sand continues to condense during use, the bag may occasionally require additional sand until it reaches maximum capacity. NOTE: This tip is from Creedmoor Sports, which carries Edgewood Shooting Bags.
Edgewood offers an innovative rear Twisted Gater bag with an unusual asymmetrical footprint. This provides arm/hand support for the shooter while still providing superb rear support for your bench rifles.
SANDBAG Fill Options — Yes Weight Matters
For most shooting applications, “heavy is good” when it comes to sandbags. The more your sandbag weighs, the better it will resist movement or mis-alignment that can throw off a shot. In order to increase the weight of their rear bags, serious shooters have turned to exotic sand formulations that offer greater density (hence higher weight by volume) than plain silica sand (aka “play sand”).
In this article, Jason Baney reviews three popular alternatives to play sand for rear sandbags. He tested each variety to determine its density, i.e. how much volume it would displace per pound. Then he calculated how much each type of sand would weigh in various sizes of rear sandbags: standard, large, and ultra-large (Bigfoot). Check our Rapid Reference Chart to see how much weight you can add to your sandbag by switching to heavy sand.
Is heavy sand worth the added expense? For serious shooters, the answer is yes. More mass equals more stability, and a more stable bag will help you shoot tighter groups. By switching from conventional sand to Zircon or Chromite, you can DOUBLE the weight of sand in your rear bag.
Shown above are the SEB Bigfoot Bags. Note that the bags sit perfectly flat — there is no bulge on the bottom even though the bags are “packed to the brim with sand”.
Heavy Sand — Weighing the Benefits by Jason Baney
Many serious Benchrest shooters fill their sand bags with “heavy sand”. This practice may seem “overkill” to most shooters, but its benefits are realized quickly when shooting from a bench. Heavy sand is more dense than normal silica “play sand” and therefore makes the sandbag heavier and more stable. How much heavier is the heaviest sand? Check the chart below and you’ll see that Zircon sand weighs essentially TWICE as much as ordinary play sand. More weight equals more inertia opposing bag movement, plus more gravity-induced “stiction” on the bottom of the bag. In other words, using heavy sand helps your rear bag stay planted on the bench during a string of fire. When you shoot a hard-recoiling gun, the difference between a bag filled with play sand vs. Zircon is very noticeable. The Zircon-filled bag stays put. The play sand-filled bag may not.
Rapid Reference Chart
Comparative Sand Weights by Sandbag Size
SandBag Type
Play Sand
Riverbed Sand
Chromite
Zircon
Standard 5″x6″
5.1 lbs.
7.9 lbs.
9.9 lbs.
10.1 lbs.
Large 6″x8″
6.8 lbs.
10.5 lbs.
13.2 lbs.
13.4 lbs.
BigFoot 6″x13″
10.2 lbs.
15.8 lbs.
19.7 lbs.
20.1 lbs.
Weight Increase Compared to Play Sand
Zincon +98%
Chromite +94%
Riverbed Sand +55%
The Benefits of Heavier Sand
Heavy Sand helps your sandbag resist the tendency to shift or change alignment (relative to the stock) during recoil. This ability to maintain sandbag alignment is vital when shooting competitive Benchrest, either short-range or long-range. Having to fight a “migrating” rear bag during a group at 1000 yards will not do anything to help your accuracy. In non-competitive use, heavy sand can still benefit shooters. Friction from the stock on the rear bag, or bumping the bag on recoil with either a body part or pistol grip can move a lighter bag out of place and necessitate realigning the bag to get on target.
Of course there are some shooting situations where you don’t need (or don’t want) maximum sandbag weight. During a “walk-around” varmint session you may prefer a lighter bag. Beanbags that I carry around the groundhog fields stay filled with plastic beads, making the bag handier to tote. But, any rear bag used on a bench will be as heavy as I can make it while still using “sand” as filler.
Heavy Sand, Lead Shot, and Competition Rules
Some will say, “Well if you want a heavier sandbag, why not just add lead shot?” That is a great idea, but as far as I know, it is also illegal in every form of Benchrest competition. The material in sandbags must actually be “sand”, and only sand. It’s tempting to filter in a mix of shot and sand to increase weight, but that would also violate the rules.
Heavy Sand — Available Types and Properties
Heavy sand comes in several different varieties. In this article we tested three types: Zircon, Chromite, and commercial Riverbed sand (Exo-Terra brand “Reptile Sand”). All these are heavier alternatives to normal silica “play sand.” There are other types of Heavy Sand not tested here, such as Garnet Sand, which is between Chromite and Zircon in weight.
Sources: ProtektorModel.com sells black “Heavy Sand”, basically chromite. Large quantities of Zircon and Chromite are available from IFS Industries, and other industrial suppliers.
Exo-Terra Riverbed sand (amber). Available at pet stores.
Silica “Play Sand” (tan or light gray). Available at Home/Garden stores.
Zircon — Heavy-Weight Champion
To my knowledge, “Dupont Zircon M” is the heaviest “sand” that a normal human can acquire. It is also the most expensive. Zircon is a very light tan/brown color and is very similar in appearance to normal sandbox “play sand”. Zircon is normally rated as having the greatest density among heavy sands and it has the smallest particle size, though some Chromite sand density values overlap the Zircon numbers.
1.00 pound of Zircon displaces 149cc vs. 295cc for Play Sand. So, that means Zircon is 98% heavier than an equal volume of Play Sand.
CONSUMER TIP: Real ZIRCON sand is TAN in color, not black or dark gray. Some “heavy sand” vendors promise Zircon but deliver a dark gray sand that is something else entirely!
Chromite — Almost as Heavy as Zircon, and 30% Cheaper
Chromite sand is nearly the same density as Zircon but it costs quite a bit less. Chromite typically sells for about 25-30% less than Zircon (comparing bulk prices of both types of sand). Chromite sand is black in color. So when you buy “heavy sand,” make sure you are getting what you pay for.
1.00 pound of Chromite displaces 152cc vs. 295cc for Play Sand. So, that means Chromite is 94% heavier than an equal volume of Play Sand.
Riverbed Sand — Weighs Less but Costs More than Chromite
Riverbed sand, is about 30% less dense than Zircon or Chromite, but is about 150% more dense than silica sand. Depending upon where you buy this sand, and the quantity, you will most likely pay more for this sand than you would Zircon or Chromite. Riverbed sand is a conglomerate of several different sizes and colors and appears red and black. Unless you are unable to get Zircon or Chromite, I would not bother with the riverbed sand.
1.00 pound of Riverbed Sand displaces 190cc vs. 295cc for Play Sand. So, that means Riverbed Sand is 55% heavier than an equal volume of Play Sand.
Density/Volume Testing and Weight Comparisons
All four sand varieties mentioned above were tested for volumetric density by weight. Each type of sand was weighed out to 1.00 lbs. on a commercial postal scale. Each 1.00 lb sample of sand was then poured loosely into a 600ml beaker and shaken minimally to level the top surface. This served to determine the volume that the sand occupied.
1.00 pound of sand displaced the following volumes:
Zircon: 149 cc
Chromite: 152 cc
Riverbed sand: 190 cc
Play Sand: 295 cc
How do the density-volume numbers translate to the real world? Here is an estimate of how much each sand would weigh in various sizes of rear bag:
Standard Bunny Ear Bag
5″ by 6″ footprint or about 1500cc
Zircon: 10.1 lbs.
Chromite: 9.9 lbs.
Riverbed Sand: 7.9 lbs.
Play Sand: 5.1 lbs.
Protektor Doctor Bag
6″ by 8″ footprint or about 2000cc
Zircon: 13.4 lbs.
Chromite: 13.2 lbs.
Riverbed Sand: 10.5 lbs.
Play Sand: 6.8 lbs.
Seb BigFoot Rear Loaf Bag
6″ by 13″ footprint or about 3000cc
Zircon: 20.1 lbs.
Chromite: 19.7 lbs.
Riverbed Sand: 15.8 lbs.
Play Sand: 10.2 lbs.
Conclusions and Recommendations
What’s the best choice? For most users, we recommend Chromite. Chromite delivers nearly the same bag weight as Zircon but is more economical to buy. But for those who demand the maximum weight in their sandbag (without consideration of cost), Zircon is the top choice because it is sold at a finer grade (higher density) than Chromite. However, Chromite will save you money, and deliver very nearly the same amount of weight by volume. When purchased in bulk, Chromite is typically 25-30% LESS expensive than Zircon.
I would not suggest using the Riverbed sand unless you really need to fill a sandbag immediately and can’t wait to locate a source for either Zircon or Chromite. Keep in mind that Sinclair Int’l and other major mail-order vendors do sell heavy sand (though Zircon and Chromite may be much less expensive when purchased in larger quantities from local industrial sources.) The price of the Riverbed sand will vary quite a bit depending on the pet store and quantity bought. The Riverbed sand I tested, Exo-Terra Reptile sand (photo right), was fairly expensive as purchased at a pet store.
Bottom Line: When it comes time to fill your new rear bag, you may want to save a few dollars and go with cheaper Chromite sand, but if you want to gain every bit of weight possible, step up to the heavier Zircon.
Lenzi Rear bags work very well and are popular with top competitors. This are sold through PMA Tool.


 “Side-Spiking”, as the words suggest, refers to moving your patch spiking position from the center of the patch towards the corner of a square patch or the edge of a round patch.


 CONCLUSION: Stainless steel barrels and components won’t rust nearly as fast as blued steel, but you still have to take precautions — particularly removing sweat and corrosive salts from the barrel. Also, don’t let moisture build up inside or outside of the barrel. We recommend wiping your barrels and actions with Eezox, or Corrosion-X after each use. These are both extremely effective rust-fighters that go on thin, without leaving a greasy residue. (Eezox leaves a clear finish, while Corrosion-X has a slightly waxy finish.) Also store your guns in


 Hybrid Bullet Design — Best of Both Worlds?

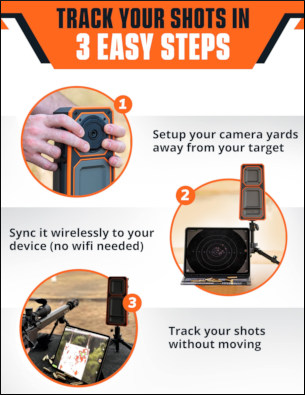 With the versatility of shooting steel or paper targets at distance, the camera style target systems can bring undeniable convenience to your range sessions. These systems can give you both the visual indication of shot placement on target and group sizes right on your phone or tablet.
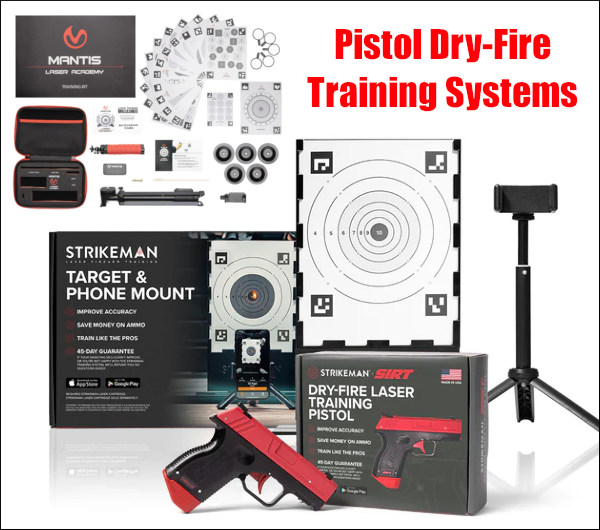

 Accurate shooting begins and ends with the human eye. Your career as a marksman could be cut short if you don’t use good eye protection every time you go to the range and/or handle a firearm.


 Labor Day 2025 (September 1st) is just 5 days away. Soon we’ll be enjoying a major 3-day holiday weekend. We know many of our readers will be out on the road visiting friends or enjoying end-of-summer getaways. How do you do your reloading chores while traveling on holiday? Here’s a solution from Forum member Dave Gray (U.S. Army Retired).
 Reloading Bench Mounts to RV Wall with Brackets

 How to Fill Shooting Sandbags Most Effectively
 For most shooting applications, “heavy is good” when it comes to sandbags. The more your sandbag weighs, the better it will resist movement or mis-alignment that can throw off a shot. In order to increase the weight of their rear bags, serious shooters have turned to exotic sand formulations that offer greater density (hence higher weight by volume) than plain silica sand (aka “play sand”).
 Many serious Benchrest shooters fill their sand bags with “heavy sand”. This practice may seem “overkill” to most shooters, but its benefits are realized quickly when shooting from a bench. Heavy sand is more dense than normal silica “play sand” and therefore makes the sandbag heavier and more stable. How much heavier is the heaviest sand? Check the chart below and you’ll see that Zircon sand weighs essentially TWICE as much as ordinary play sand. More weight equals more inertia opposing bag movement, plus more gravity-induced “stiction” on the bottom of the bag. In other words, using heavy sand helps your rear bag stay planted on the bench during a string of fire. When you shoot a hard-recoiling gun, the difference between a bag filled with play sand vs. Zircon is very noticeable. The Zircon-filled bag stays put. The play sand-filled bag may not.
 Dupont Zircon M (pale tan): 165-175 lb/cu.ft; avg. particle size 0.01″.
 Prince Minerals Chrome CAST 7850 (Chromite) (black): 172 lb/cu.ft; avg. particle size 0.02″.

 Zircon — Heavy-Weight Champion
 Chromite — Almost as Heavy as Zircon, and 30% Cheaper
 Riverbed Sand — Weighs Less but Costs More than Chromite


 I would not suggest using the Riverbed sand unless you really need to fill a sandbag immediately and can’t wait to locate a source for either Zircon or Chromite. Keep in mind that


