Close-up view of a sectioned case. This one here was “fixin’ to pop”, observed Glen Zediker.
Here are highlights from an article Glen Zediker wrote for the Midsouth Blog. In that article Glen, who sadly passed away in 2020, focused on cartridge brass. Glen identified the most common failures that appear with brass that has been shot multiple times, or which has been fired at excessive pressures. Glen explained some simple ways to check your cartridge brass to detect “early warning signs” of case failure, particularly case head separation, which can be very dangerous.
How Cases Degrade with Multiple Firings By Glen Zediker
This article explains when, and then how, to check after the progress of changes commencing with the firing on a new case. It’s the “progress of degeneration,” in a way of looking at it because the concern is getting a handle on when enough change in the brass has come about to require attention. Or abandonment. As said then, for me that’s 4 firings. That, as said last time, is when I might see changes that need attention. Also as said, that figure didn’t come out of a hat, but from my own notes in running my competition NRA High Power Rifle loads. [Editor’s Note: With Lapua brass, using moderate loads, in bolt-action rifles, we typically get about 10 good (match-worthy) firings. But if you anneal your Lapua brass, and run modest pressures, Lapua brass can perform well for 20 or more load cycles.]
The areas most affected are the case neck and case head area. Case neck walls get thicker [but] the case head area body walls get thinner. Primer pockets get shallower and larger diameter.
This case shows a cracked neck AND a crack (separation) above the case head. Zediker says it is “rare to see one case with both of the most common failures. [This case] was attacked by an M14.”
Case Head — Causes of Separation and Cracking
When a case is under pressure during firing, the brass, like water, flows where it can, where it’s more free to move. Of course, the chamber steel limits the amount it can expand. The case shoulder blows fully forward and the case base is slammed back against the bolt face. There is, therefore and in effect, a tug on both ends — it gets stretched. The shoulder area is relatively free to expand to conform to the chamber, but the other end, the case head area, is not. Since that’s the area of the case with the thickest walls, it doesn’t expand “out” much at all. What it does is stretch. The “case head area,” as I refer to it here, is the portion of the case above the web, which is just above the taper that leads in to the extractor groove. The “area” extends approximately an eighth-inch up the case body.
Here’s a “pressure ring.” You’ll see this after firing, if you see it. And, if you see it, that case is done. The bright ring indicates excessive stretching, which indicates excessive thinning. If you see a ring circling the case, noticeable because it’s lighter color than the case body, and it’s in this area, I’d say that case is done. And that’s right where a “head separation” occurs. It can crack and also blow slap in two, and that’s the “separation” part of case head separation.
Photo courtesy GS Arizona.
This is a spot to keep close watch on as cases age. It is also the area that is more “protected” by sizing with less case shoulder set-back. That is, pretty much, where the freedom for the stretching movement in this area comes from (the case shoulder creates a gap). If you’re seeing a sign that a head separation [might happen with relatively few firings], chances are the shoulder set-back is excessive, and also… the load pressure level.
Bent Paper Clip Case-Wall Gauge
Editor: You can use a bent paper clip to detect potential case wall problems. Slide the paper clip inside your case to check for thin spots. GS Arizona explains: “This simple little tool (bent paper clip) will let you check the inside of cases before you reload them. The thin spot will be immediately apparent as you run the clip up the inside of the case. If you’re seeing a shiny line on the outside and the clip is really hitting a thin spot inside, it’s time to retire the case.” Photo by GS Arizona.
Monitor Primer Pocket Dimensional Changes
Another case-head-area and pressure-related check is the primer pocket. As said, the primer pocket will get larger in diameter and shallower in depth each firing. As with many such things, the questions are “when” and “how much,” and the main thing, “how much?”
If the pocket gets excessively shallow, and that’s judged by a primer that seats fully but isn’t at least a tick below flush with the case base, there could be function issues. There’s a risk of a “slam-fire” with a semi-auto that uses a floating firing pin, and, if there is actual protrusion, that has the same effect as insufficient headspace. A primer pocket uniformer can reset the depth of a shallowed primer pocket to what it should be, but the real test for me is how easily the next primer seats into it. If it’s significantly less resistance, I’ll say that case is done. Shallower can be refurbished. That’s a primary function of a primer pocket uniformer. Larger diameter, though, can’t be fixed. I’ve mentioned in another article or two that, any more at least, my main gauge of load pressure has become how much primer pocket expansion there’s been.
Many barrel-makers mark the twist rate and bore dimensions on their barrel blanks.
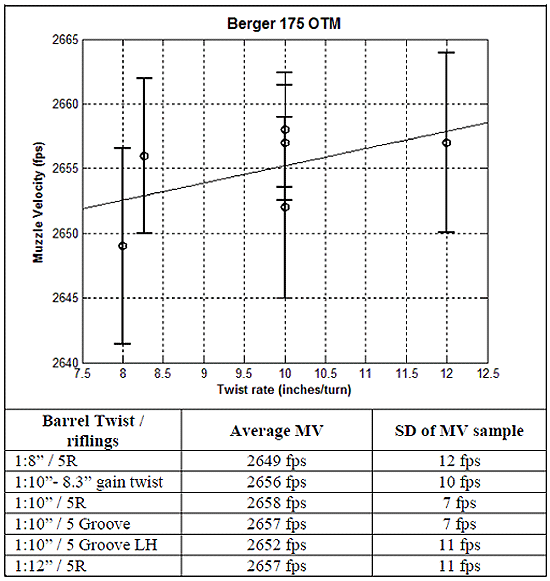
Does muzzle velocity change with faster or slower barrel twist rates? Absolutely, but much less than you might think. Faster twist rates do slow down bullets somewhat, but the speed loss is NOT that significant. With Bartlein .308 Win barrels of identical length and contour, a 1:12″-twist barrel was only 8 fps faster than a 1:8″-twist barrel. That was the result of testing by Applied Ballistics.
The Applied Ballistics team tested six (6) same-length/same-contour Bartlein barrels to observe how twist rate might affect muzzle velocity. This unique, multi-barrel test is featured in the book Modern Advancements in Long Range Shooting, Vol. 1. That book includes other fascinating field tests, including a comprehensive chronograph comparison.
Barrel Twist Rate vs. Velocity — What Tests Reveal by Bryan Litz
When considering barrel twist rates, it’s a common belief that faster twist rates will reduce muzzle velocity. The thinking is that the faster twist rate will resist forward motion of the bullet and slow it down. There are anecdotal accounts of this, such as when someone replaces a barrel of one brand/twist with a different brand and twist and observes a different muzzle velocity. But how do you know the twist rate is what affected muzzle velocity and not the barrel finish, or bore/groove dimensions? Did you use the same chronograph to measure velocity from both barrels? Do you really trust your chronograph?
Summary of Test Results
After all the smoke cleared, we found that muzzle velocity correlates to twist rate at the average rate of approximately 1.33 FPS per inch of twist. In other words, your velocity is reduced by about 5 FPS if you go from a 1:12″ twist to a 1:8″ twist. — Bryan Litz
Savage Test Rifle with Six Bartlein Barrels
Most shooters don’t have access to the equipment required to fully explore questions like this. These are exactly the kinds of things we examine in the book Modern Advancements in Long Range Shooting, Vol. 1. In that book, we present experiments conducted in the Applied Ballistics lab. Some of those experiments took on a “Myth Buster” tone as we sought to confirm (or deny) popular pre-conceptions. For example, here’s how we approached the question of barrel twist and muzzle velocity.
Six .308 Win Barrels from Bartlein — All Shot from the Same Rifle
We acquired six (6) barrels from the same manufacturer (Bartlein), all the same length and contour, and all chambered with the same reamer (SAAMI spec .308 Winchester). All these barrels were fitted to the same Savage Precision Target action, and fired from the same stock, and bench set-up. Common ammo was fired from all six barrels having different twist rates and rifling configurations. In this way, we’re truly able to compare what effect the actual twist rate has on muzzle velocity with a reasonable degree of confidence.
Prior to live fire testing, we explored the theoretical basis of the project, doing the physics. In this case, an energy balance is presented which predicts how much velocity you should expect to lose for a bullet that’s got a little more rotational energy from the faster twist. In the case of the .30 caliber 175 grain bullets, the math predicts a loss of 1.25 fps per inch-unit of barrel twist (e.g. a 1:8″ twist is predicted to be 1.25 fps slower than a 1:9″ twist).
Above, data shows relationship between Twist Rate and Muzzle Velocity (MV) for various barrel twist rates and rifling types. From fast to slow, the three 1:10″ twist barrels are: 5R (canted land), 5 Groove, 5 Groove left-hand twist.
We proceeded with testing all 6 barrels, with twist rates from 1:8″ to 1:12″. After all the smoke cleared, we found that muzzle velocity correlates to twist rate at the average rate of approximately 1.33 fps per inch of twist. In other words, your velocity is reduced by about 5 fps if you go from a 1:12″ twist to a 1:8″ twist. [Editor: That’s an average for all the lengths tested. The actual variance between 1:12″ and 1:8″ here was 8 FPS.] In this case the math prediction was pretty close, and we have to remember that there’s always uncertainty in the live fire results. Uncertainty is always considered in terms of what conclusions the results can actually support with confidence.
This is just a brief synopsis of a single test case. The coverage of twist rates in Modern Advancements in Long-Range Shooting Vol. 1 is more detailed, with multiple live fire tests. Results are extrapolated for other calibers and bullet weights. Needless to say, the question of “how twist rate affects muzzle velocity” is fully answered.
Other chapters in the book’s twist rate section include: · Stability and Drag — Supersonic
· Stability and Drag — Transonic
· Spin Rate Decay
· Effect of Twist rate on Precision
Other sections of the book include: Modern Rifles, Scopes, and Bullets as well as Advancements in Predictive Modeling. This book is sold through the Applied Ballistics online store at thescienceofaccuracy.com. Modern Advancements in Long Range Shooting is also available as an eBook in Amazon Kindle format.
Wind effects are complex. In trying to access wind speeds and angles, you’ll want to watch multiple indicators — mirage, dust, wind-flags, grass movement, and more. You’ll also need to be concerned about wind cycles. In the video below, Bryan Litz talks about variable wind speed along a bullet’s flight path. A respected ballistics guru, Bryan is the founder of Applied Ballistics and a designer of Berger’s Hybrid Match projectiles. He is also a past F-TR National Champion and a High Master Palma ace.
In this video, Bryan discusses how wind effects can vary in intensity at different points along the bullet’s flight path to the target. Sometimes the firing line is sheltered, and the strongest winds come into effect in the middle of the trajectory. Bryan concludes: “Wind matters everywhere … but the best thing you can do is try to get a handle on the wind [velocity and angle] where you are. That may or may not represent the wind down-range — that’s when you have to look downrange and make a judgment[.]”
Litz Competition Tip: Select your wind shooting strategy carefully. For beginners and veterans, most points are typically lost to wind. Successful shooters put a lot of thought into their approach to wind shooting. Sometimes it’s best to shoot fast and minimize the changes you’ll have to navigate. Other times it’s best to wait out a condition which may take several minutes. Develop a comfortable rest position so you have an easier time waiting when you should be waiting.
More Wind Tips from Wind Wizard Emil Praslick
In these two short videos, Emil Praslick III, former coach of the USAMU and USA National long range teams, explains how to find the wind direction and how to confirm your no-wind zero. Praslick is widely considered to be one of the best wind coaches in the USA.
When Winds Are EXTREME — Near Gale Force at Ben Avery
This video shows INSANE winds at NBRSA 100/200 Benchrest Nationals. This was filmed at the Ben Avery Range in Phoenix, AZ during the recent NBRSA 100/200 yard National Championships. Extreme to say the least. Based on what we’re seeing here, there are 20-25 mph crosswinds, with gusts to 35 mph — near Gale Force. Video by Hall-of-Fame Benchrest competitor Gene Bukys, whom we sadly lost to COVID last year. RIP Gene.
Texas gunsmith Mike Bryant reports: “This video shows the Unlimited Class 200 at the Nationals in Phoenix. I had three 10-shot groups in the low 2″ range with a 2.228″ being my big group and was glad they weren’t bigger. Thursday and Friday were the worst of the windy days. Unfortunately those were the days for the UL 200 and it was about as windy through most all of the Sporter 200.”
Excellent Wind Reading Resource
The Wind Book for Rifle Shooters covers techniques and tactics used by expert wind-readers. The authors provide a wind-reading “toolbox” for calculating wind speed, direction, deflection and drift. They explain how to read flags and mirage, record and interpret your observations, and time your shots to compensate for wind. Here are two reviews:
This is a must-have book if you are a long-range sport shooter. I compete in F-Class Open and when read it from cover to cover, it helped me understand wind reading and making accurate scope corrections. Buy this book, read it, put into practice what it tells you, you will not be disappointed. — P. Janzso
If you have one book for wind reading, this should be it. It covers how to get wind speed/direction from flags, mirage, and natural phenomenon. This is the best book for learning to read wind speed and direction. — Muddler
Many short-range Benchresters have thought about converting their 6 PPC to shoot a 30BR for score matches, or a Dasher for mid-range (or even 1000-yard) games. That way you have a rifle that does double duty, giving you the most bang for your buck. Though an action with a PPC bolt won’t normally work with 30BR/6BR/Dasher cases with their larger .308-class rim (0.4728″ diameter), there is a pretty easy solution that allows you to cycle these bigger cartridges with a 6PPC-style bolt (designed to fit .220 Russian rims).
“Rebating case rims … lets you shoot a 30BR in score matches using your PPC action. All you need is a new barrel. This saves buying another bolt, receiver, or rifle.” — Butch Lambert
Butch Lambert of ShadeTree Engineering provided this tip. Butch notes that many 6 PPC benchrest group shooters also enjoy shooting in score matches. But to be really competitive in the BR for score game, that means shooting a 30BR, which has a wider, .308-class rim (0.4728″ diameter). Likewise, if you want to compete in 600-yard registered BR events or in varmint matches, you probably want to run a bigger case, such as the 6BR, 6mm Dasher, or 6-6.5×47. Those cartridges also have the larger 0.4728″ rims.
Rebate Your 30 BR Rims
To convert a PPC-boltface action to shoot bigger cases you can spend a ton of money to buy a new bolt. That can cost hundreds of dollars. The simpler solution is to turn down the diameter of the larger cases on a lathe. Butch explains: “We’ve seen plenty of interest in rebating case rims. This lets you shoot a 30BR in score matches using your PPC action. All you need is a new barrel. This saves buying another bolt, receiver, or rifle if you have a PPC boltface. Anyone who has access to a lathe can do this job pretty easily. Yesterday I turned 150 case in about an hour.”
At right is the lathe form tool Butch uses to rebate the case rims.
As a cartridge case is reloaded multiple times, burnt powder residue and carbon builds up on the inside of the case. Unless the case interior is cleaned in some fashion, eventually you’ll see a slight reduction in case capacity. One of our Forum members from Australia wonders about the effects of reduced case capacity: “If the capacity of the case decreases as the crud builds up, then it effectively reduces the size of the cartridge (inside). Wouldn’t that change the pressure produced from that of an equivalent clean case?”
Interesting Test of Case Capacity Changes
Forum member Fred Bohl has actual test results that can help answer the above question. Fred proved that, over a 20-reload cycle, the case capacity of uncleaned cases did decline a small amount. However, surprisingly, this did not seem to affect the actual chronographed velocity of the load. Extreme Spread (ES) did increase, but Fred believes the higher ES was due to changes in case-neck tension, rather than due to the slight reduction in case capacity. Fred reports:
“Back when beginning to use ultrasonic case cleaning, part of the motivation was to get the inside clean based on the assumption that allowing burnt residue to build up inside cases would affect capacity, and, ultimately, performance. An experiment was done to test this hypothesis. The load used, 30.5 grains of RL15 behind 107gr SMKs in a 6mmBR, was selected for best group and lowest ES in prior load development. It turned out to be 92% of initial case capacity and neither “full” or compressed. (I would suspect that different powders, load weight, and total case capacity might produce very different results.)
We took 30 cases of identical initial capacity and tracked three lots of 10 each:
LOT 1: No Internal cleaning LOT 2: Cleaned with media in tumbler LOT 3: Cleaned with Ultrasound machine
Each case (in each lot) was shot and reloaded 20 times. The simplified results after 20 reloads of each lot were as follows:
Lot 1 (not cleaned) – 0.3 to 0.4 gr. loss of capacity, 5 to 8 fps greater ES.
Lot 2 (tumble cleaned) – 0.1 to 0.3 gr. loss of capacity, 4 to 6 fps greater ES.
Lot 3 (ultrasonic cleaned) – no loss of capacity, no detectable change in ES.
FINDINGS
There was no detectable correlation of velocity change to the lots. An oddity was that on very hot days Lot 1 velocities were, occasionally, slightly higher. From results of another ongoing test, I believe the above differences in ES are probably due more to variance in bullet grip tension than case capacity. The ultrasound cleaned cases (LOT 3) did maintain the lowest ES, but we are not 100% sure of the reasons why. More consistent bullet seating might be the reason.”
Editor’s NOTE: Fred’s results do suggest that carbon build-up inside the uncleaned cases might cause a slight increase in pressure that shows up on hot days. Fred has posted that: “A local shooter reported doing the 20 reload, no-clean test on a .308 that gave a loss of capacity of 2.0 grains, doubled ES and significant velocity changes. However, I don’t have any details on his load weight or powder.” Obviously a lot of carbon can build up with 20 reloads. Many shooters retire their brass before then.
Ultrasonic Cleaning and Neck Lube
Some time ago, Jason Baney did a lengthy test on ultrasonic cleaning. Jason found that with his ultrasonically-cleaned cases, the inside of the necks got so “squeaky clean” that he needed to use dry lube in the necks. Jason uses the $21.50 dry lube kit from Neconos.com. This applies ultra-fine Moly powder to the neck using small carbon steel balls.
The Shooting Sports USA website includes two excellent articles about the basics of metallic cartridge reloading. These two articles provide an excellent summary of the key procedures. If you are new to reloading, we recommend you read both articles:
Part II is particularly helpful because it explains the entire reloading process step-by-step, with 14 listed steps. The author notes: “In this, the second installment on metallic cartridge reloading, we’ll follow the sequence of steps involved in reloading a rifle cartridge and refining a metallic cartridge load. These steps are based on the use of a single-stage reloading press and a separate priming tool.”
Much important advice is provided as this article runs through the 14 Steps of Reloading. For example, when explaining Step 13, Bullet Seating, the article states:
“Proper seating depth is critical. Too much bullet protrusion and the cartridge may not work through the gun’s magazine, or it may fail to chamber. Too little and the bullet intrudes excessively into the powder chamber, decreasing volume and raising pressure. Neck tension is also important; any bullet that fails to seat with some resistance may be held only loosely by the neck and may be driven back into the case when the round is chambered, especially in semi-automatic arms.”
Important Guide to Detecting Over-Pressure Signs in Brass
As an example of the invaluable advice provided in these two articles, here’s a sample from Part II that explains how to determine if your load is over-pressure. We recommend that EVERY reader read this twice. There are more things to consider than a stiff bolt lift. You need to inspect cartridges very carefully:
So you’re thinking of buying a suppressor (aka “moderator”, “silencer”). You can’t just get one off the shelf at Walmart. Acquiring a suppressor requires filling out paperwork and paying a Federal $200 Tax Stamp. Plus there is typically a pretty long wait. However, the good news is that suppressor ownership is now legal in 42 of the 50 American states — that’s 84%! For most American adults, getting a suppressor is legal, provided the buyer passes the required background checks (explained below). The 42 “suppressor-friendly” states are shown as RED in the illustration below.
States Where Suppressor Ownership is Allowed
These 42 states allow private ownership of suppressors: AL, AK, AZ, AR, CO, CT, FL, GA, ID, IN, IA, KS, KY, LA, ME, MD, MI, MN, MS, MO, MT, NE, NV, NH, NM, NC, ND, OH, OK, OR, PA, SC, SD, TN, TX, UT, VT, VA, WA, WV, WI, WY. Note: Even if you live in one of the states listed, you should still verify that owning a suppressor is legal in your area. Some states may have municipal- or county-based restrictions.
“Suppressor ownership [has] boomed in the 21st century. Thanks in part to companies like Silencer Central that streamline the purchasing process, the number of registered suppressors has grown from 285,000 in 2010 to over 2.6 million in 2020.” — GunsAmerica Digest
States Which Prohibit Suppressor Ownership
The eight states which prohibit suppressor ownership are: California, Delaware, Hawaii, Illinois, Massachusetts, New Jersey, New York, and Rhode Island. These states are shown in GRAY in the map.
Good News — Suppressor Tax Will Be Eliminated Next Year
The suppressor transfer tax has not been eliminated yet, but it will be reduced to $0 (zero) starting January 1, 2026. This law change was effectuated by recent Federal legislation through Congress and signed by President Trump. The “One Big Beautiful Bill”, passed by Congress and signed into law by President Trump on July 4, 2025, includes a provision reducing the NFA tax stamp on suppressors and short-barreled firearms to $0. The Silenco Video below from 8/4/2025 explains the new law changes.
Current Status: As of today, August 10, 2025, the $200 tax stamp is still required for the purchase of suppressors and other NFA items.
Effective Date: This change to a $0 tax stamp will take effect on January 1, 2026.
Interim Period (August 2025 – December 2025): Some retailers, like Silencer Central, are offering promotions to cover the $200 tax stamp fee on select suppressors purchased before the $0 tax stamp becomes effective, according to Silencer Central.
NFA Regulations Still Apply: Even after the tax stamp is eliminated in 2026, suppressors will still be regulated under the National Firearms Act (NFA). This means you’ll still need to go through the ATF process, including fingerprinting and background checks, to acquire a suppressor.
Qualifications to Obtain a Suppressor
To legally obtain a suppressor, you must fill out Federal Forms and pay a $200 fee to the ATF. You must also pass BATFE background checks and otherwise comply with Federal and state laws. States can regulate suppressor ownership or use, so be sure to check the laws in your area. On the federal level, the process to acquire a suppressor is regulated under the National Firearms Act of 1934. According to the American Suppressor Association, to own a suppressor in the United States you must:
1. Be at least 21 years of age to purchase a suppressor from a dealer.
2. Be at least 18 years of age to purchase a suppressor from an individual on a Form 4 to Form 4 transfer (contingent on state laws).
3. Be at least 18 years of age to possess a suppressor as a beneficiary of a trust or as a member of a corporation (contingent on state laws).
4. Be a resident of the United States.
5. Be legally eligible to purchase a firearm.*
6. Pass a BATFE background check with a typical process time of 8 to 10 months.
7. Pay a one time $200 Transfer Tax. NOTE: This tax will be eliminated as of 1/1/2026.
*That fifth requirement, “be legally eligible to purchase a firearm”, involves a list of factors. The prohibitions are set forth in the “prohibited person” list found on ATF Form 4473.
For many Americans, real incomes have stayed flat in recent years, while inflation increased the cost of living very significantly during the Biden presidency. The 2025 quarterly inflation rates are lower, yes, but prices are still rising. Accordingly, it’s important to save money whenever possible. Prices are going up, but wages aren’t following (for most of us). Here are six ways shooters can save money on gear purchases and other shooting-related expenses.
1. Watch for Our Deals of the Week. Every Monday, in our Daily Bulletin, AccurateShooter.com offers some of the best deals to be found. We search the web to find great deals on ammo, reloading components, optics, tools, firearms, gun safes, electronics and more. It’s not unusual to find savings of 20-35% through our Deals of the Week. And many of our vendors are now offering special deals just for AccurateShooter.com readers.
2. Check Out the Forum Classifieds. There are great deals to be found every day in the AccurateShooter Shooters’ Forum. The latest deals are displayed in the right column of every Forum page. To see all the listings, browse through the Forum MarketPlace section which has four main categories:
Guns, Actions, Stocks, & Barrels
Tools, Dies, Rests, Reloading Components & Misc
Scopes, Optics, Sights, Rings, Bases Etc.
Commercial Sales by Paid Sponsors
3. Share a Ride to Matches. Fuel prices are on the rise — Regular-grade gasoline is over $4.90 per gallon in California now and around $3.20+ per gallon nationwide. With many shooters living 30-100 miles from the nearest range, fuel remains a big part of a shooter’s hobby budget. We’d say 90% of shooters drive solo to matches, often in large, gas-guzzling trucks. If you drive 200 miles round-trip to attend a match in a 20-mpg vehicle, you’ll burn over $32.00 worth of gasoline on your trip. That adds up. By simply sharing the ride with one fellow shooter you cut your fuel expenditures in half. And, if you alternate vehicles with a buddy from one match to the next, you save on vehicle wear and tear. At $0.70/mile (overall operating costs) consider the savings.
4. Use Discount Codes to Save. It’s always smart to check for discount codes before you buy. In the Daily Bulletin, we feature “Deals of the Week” every Monday morning, and we provide discount Coupon Codes when available. These can reduce the price substantially or lower shipping costs. Search codes for Brownells, Creedmoor Sports, EuroOptic, Graf’s, Midsouth, Powder Valley, Sportsman’s Warehouse, KYGUNCO, MidwayUSA, and Precision Reloading. Check your email also — some discount codes are only announced in email newsletters. If you can’t find a Coupon Code for your preferred vendor, visit Gun.deals and/or RetailMeNot.com. Both those sites list current coupon codes, and RetailMeNot.com covers thousands of vendors.
5. Shop for “Demo” Optics. Modern high-quality optics can easily cost $2000.00 or more, often exceeding the value of the rifle on which they are mounted. However, you can often save 20-30% by purchasing demo optics. These are normally display units used at trade shows. They may have slight ringmarks, but otherwise they are “as new”, having never been carried in the field or used on a rifle that has fired live ammo. When purchasing demo scopes, you should always ask about the warranty before making the sale. However, most demo scopes from name-brand manufacturers come with full factory warranties. EuroOptic.com and Bruno Shooters Supply are two respected vendors that offer a good selection of demo optics.
6. Train with Rimfire Rifles. Good match-grade centerfire, hand-loaded ammo, counting premium bullets, powder, primers, and brass (figuring 10X loads), can now exceed $1.50 per round. And if your $600 (as chambered and fitted) competition barrel is toast after 1500 rounds, add $0.40 for barrel deprecation per shot. So you’re approaching two bucks a round total! By contrast, you can get quite good .22 LR target ammo for $0.16 per round. Good rimfire barrels last a long, long time, so you don’t have to be concerned about wearing out your barrel quickly. A quality rimfire barrel can retain its accuracy for 7,000 rounds or more. If you run the ballistics, a .22 LR round at 100 yards can emulate the wind drift experienced by a centerfire cartridge at long range. This allows for effective cross-training with much less expensive ammo.
Tired of spending $15-$25 for a can of spray lube that doesn’t last that long? For about the same price as a single 10 oz. can you can make your own effective spray lube that should last for multiple seasons and lube thousands of cases quickly and easily.
In the YouTube video embedded below, our friend Gavin Gear of UltimateReloader.com shows how to make your own case lube using simple, inexpensive ingredients. As recommended by the 6.5 Guys, this Liquid Lanolin + Isopropyl Alchohol mix works well and is very cost-effective. You can make a pint of this home-brew Lanolin case lube that will lube thousands of cases — many more than a typical commercial aerosol spray can (that’s mostly compressed air).
Gavin describes the exact mixing process on his Ultimate Reloader website. Gavin says this lube mix is a good complement to the Hornady One-Shot (pistol) and Dillon DCL (rifle) lubes he has used for pistol and rifle reloading sessions. CLICK HERE to read more.
In our Shooters’ Forum, there was an discussion about a range that was threatened with closure because rifle over-shoots were hitting a farm building over two miles from the firing line. One reader was skeptical of this, asking “how’s that possible — were these guys aiming at the stars?” Actually, you may be surprised. It doesn’t take much up-angle on a rifle to have a bullet land miles down-range. That’s why it’s so important that hunters and target shooters always orient their barrels in a safe direction (and angle). Shooters may not realize how much a small tilt of the barrel (above horizontal) can alter a bullet’s trajectory.
How many degrees of muzzle elevation do you think it would take to hit a barn at 3000 yards? Ten Degrees? Twenty Degrees? Actually the answer is much less — for a typical hunting cartridge, five to seven degrees of up-angle on the rifle is enough to create a trajectory that will have your bullet impacting at 3000 yards — that’s 1.7 miles away!
Five degrees isn’t much at all. Look at the diagram above. The angle actually displayed for the up-tilted rifle is a true 5.07 degrees (above horizontal). Using JBM Ballistics, we calculated 5.07° as the angle that would produce a 3000-yard impact with a 185gr .30-caliber bullet launched at 2850 fps MV. That would be a moderate “book load” for a .300 Win Mag deer rifle.
Here’s how we derived the angle value. Using Litz-derived BCs for a 185gr Berger Hunting VLD launched at 2850 fps, the drop at 3000 yards is 304.1 MOA (Minutes of Angle), assuming a 100-yard zero. This was calculated using a G7 BC with the JBM Ballistics Program. There are 60 MOA for each 1 degree of Angle. Thus, 304.1 MOA equals 5.068 degrees. So, that means that if you tilt up your muzzle just slightly over five degrees, your 185gr bullet (2850 fps MV) will impact 3000 yards down-range.
Figuring Trajectories with Different Bullets and MVs
If the bullet travels slower, or if you shoot a bullet with a lower BC, the angle elevation required for a 3000-yard impact goes up, but the principle is the same. Let’s say you have a 168gr HPBT MatchKing launched at 2750 fps MV from a .308 Winchester. (That’s a typical tactical load.) With a 100-yard zero, the total drop is 440.1 MOA, or 7.335 degrees. That’s more up-tilt than our example above, but seven degrees is still not that much, when you consider how a rifle might be handled during a negligent discharge.
Think about a hunter getting into position for a prone shot. If careless, he could easily touch off the trigger with a muzzle up-angle of 10 degrees or more. Even when shooting from the bench, there is the possibility of discharging a rifle before the gun is leveled, sending the shot over the berm and, potentially, thousands of yards down-range.
Hopefully this article has shown folks that a very small amount of barrel elevation can make a huge difference in your bullet’s trajectory, and where it eventually lands. Nobody wants to put holes in a distant neighbor’s house, or worse yet, have the shot cause injury.
Let’s go back to our original example of a 185gr bullet with a MV of 2850 fps. According to JBM, this projectile will still be traveling 687 fps at 3000 yards, with 193.7 ft/lbs of retained energy at that distance. That’s more than enough energy to be deadly.


 2. Check Out the Forum Classifieds. There are great deals to be found every day in the AccurateShooter
  3. Share a Ride to Matches. Fuel prices are on the rise — Regular-grade gasoline is over $4.90 per gallon in California now and around $3.20+ per gallon nationwide. With many shooters living 30-100 miles from the nearest range, fuel remains a big part of a shooter’s hobby budget. We’d say 90% of shooters drive solo to matches, often in large, gas-guzzling trucks. If you drive 200 miles round-trip to attend a match in a 20-mpg vehicle, you’ll burn over $32.00 worth of gasoline on your trip. That adds up. By simply sharing the ride with one fellow shooter you cut your fuel expenditures in half. And, if you alternate vehicles with a buddy from one match to the next, you save on vehicle wear and tear. At $0.70/mile (overall operating costs) consider the savings.
 4. Use Discount Codes to Save. It’s always smart to check for discount codes before you buy. In the Daily Bulletin, we feature “Deals of the Week” every Monday morning, and we provide discount Coupon Codes when available. These can reduce the price substantially or lower shipping costs. Search codes for Brownells, Creedmoor Sports, EuroOptic, Graf’s, Midsouth, Powder Valley, Sportsman’s Warehouse, KYGUNCO, MidwayUSA, and Precision Reloading. Check your email also — some discount codes are only announced in email newsletters. If you can’t find a Coupon Code for your preferred vendor, visit
  5. Shop for “Demo” Optics. Modern high-quality optics can easily cost $2000.00 or more, often exceeding the value of the rifle on which they are mounted. However, you can often save 20-30% by purchasing demo optics. These are normally display units used at trade shows. They may have slight ringmarks, but otherwise they are “as new”, having never been carried in the field or used on a rifle that has fired live ammo. When purchasing demo scopes, you should always ask about the warranty before making the sale. However, most demo scopes from name-brand manufacturers come with full factory warranties.
  6. Train with Rimfire Rifles. Good match-grade centerfire, hand-loaded ammo, counting premium bullets, powder, primers, and brass (figuring 10X loads), can now exceed $1.50 per round. And if your $600 (as chambered and fitted) competition barrel is toast after 1500 rounds, add $0.40 for barrel deprecation per shot. So you’re approaching two bucks a round total! By contrast, you can get quite good .22 LR target ammo for $0.16 per round. Good rimfire barrels last a long, long time, so you don’t have to be concerned about wearing out your barrel quickly. A quality rimfire barrel can retain its accuracy for 7,000 rounds or more. If you run the ballistics, a .22 LR round at 100 yards can emulate the wind drift experienced by a centerfire cartridge at long range. This allows for effective cross-training with much less expensive ammo.
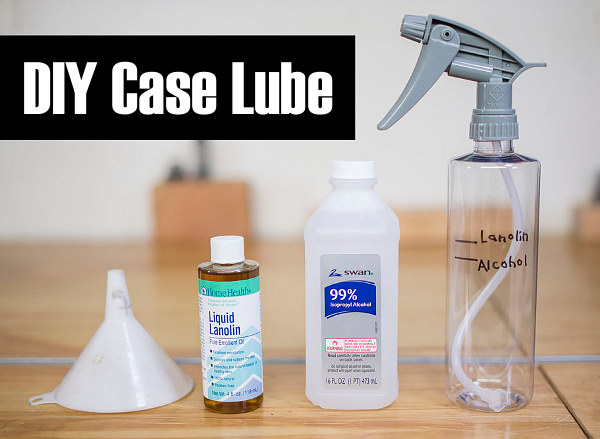

 In our Shooters’ Forum, there was an discussion about a range that was threatened with closure because rifle over-shoots were hitting a farm building over two miles from the firing line. One reader was skeptical of this, asking “how’s that possible — were these guys aiming at the stars?” Actually, you may be surprised. It doesn’t take much up-angle on a rifle to have a bullet land miles down-range. That’s why it’s so important that hunters and target shooters always orient their barrels in a safe direction (and angle). Shooters may not realize how much a small tilt of the barrel (above horizontal) can alter a bullet’s trajectory.


