The National Shooting Sport Foundation (NSSF) has released its new Where2Shoot app for the Apple’s iPhone and iPod Touch. The App — available for free in the iTunes App Store — puts North America’s most comprehensive directory of shooting ranges in the palm of your hand.
This free App provides the functionality of NSSF’s WhereToShoot.org website in a smartphone-friendly format. You’ll find listings of literally thousands of ranges and shooting clubs, in locations across the country. Listings are updated frequently with range information in every U.S. state and Canadian province. Click a button to find ranges near you or you can search by state, by zip code, or by keyword. You can also limit your search to specific types of facilities (such as indoor pistol ranges). The App provides specifics about each range, including shooting activities offered and contact information.
The Where2Shoot App also includes news, safety procedures, and firearms tips. New tips for hunters and shooters are also added regularly. Visit the App store to learn more about the Where2Shoot App or download it for free. You can also scan the QR code above with your device to download the free App.
Many visitors to the site ask us, “I’ve got a .223 and .308. What will a 6mmBR Norma (6BR) give me that I’m not getting already?” Well first you will probably average consistently smaller groups than your current .223 or .308 rifle (assuming the 6BR has a quality barrel and trigger). A good .308 Winchester can be superbly accurate, no question about that, but the lesser recoil of the 6BR works in the shooter’s favor over a long string of fire. Even with a Rem 700 or Savage action factory action, a 6BR with a benchrest stock, premium barrel, and a high-quality chambering job should deliver 5-shot groups in the high twos to mid-threes, provided you do your job. We have one 6BR rifle that shoots Lapua factory-loaded 6BR ammunition in the low twos and high ones. That’s exceptional, we admit, but it still shows how the 6BR is an inherently accurate cartridge, even with factory loads.
Compared to a .223, the 6BR offers a much better selection of high-BC projectiles, and will deliver considerably more power on the target. Compared to the .308 shooting 168gr MatchKings, a 6BR shooting 105-107gr bullets offers better ballistics all the way out to 1000 yards. Plus, for most people, the 6BR is just easier to shoot than a .308. Recoil is less than half of the .308 cartridge. Both the .308 and 6BR chamberings offer good barrel life, but the 6BR uses 15-18 grains less powder, saving you money. Here’s how the 6BR stacks up vs. a number of popular calibers:
Jeffrey Block has created a great new FREE software program, OnTarget, that measures shot groups quickly and precisely. All you need is a photo or scan of your target. The program allows you to set your target distance, and provides caliber-specific tools to precisely mark the center of each shot. Once you’ve marked each bullet hole, Jeff’s OnTarget program automatically calculates group center, maximum group spread (CTC), average distance to center, group width and height, and group offset from point of aim. The program will even measure multiple groups on the same target.
After just a few minutes spent learning the program’s tool buttons, we were able to plot shot groups on a variety of targets with ease. Once you select the target distance and bullet diameter, figuring group size is a simple matter of centering a circle tool over each bullet hole. Then the program “connects the dots” and provides all the info you could want automatically.
The program worked with bullet holes as small as 17 caliber and as large as 50 caliber. It is very precise, but remember that if your target photo was taken at an angle, distorted perspective can cause slight errors in measurement. Therefore, for the ultimate precision, you want to start with a flat scan of the target.
OnTarget Compared to Measuring Manually
We found OnTarget to be especially useful for groups with widely dispersed bullet holes, or very small bullet holes, such as 17 caliber holes. We’ve found that it’s difficult to measure 17-cal group sizes with a standard caliper, because the tool itself obscures the tiny holes. With OnTarget, the program can zoom up your target view, making it much easier to plot the center of each shot. And with a widely dispersed group of shots, the program automatically finds the two most distant shots. You can’t mistakenly pick the wrong pair of shots to measure.
Flash Tutorial Shows How It Works
Jeff created an excellent animated Animated Tutorial demonstrating OnTarget’s functions. It shows how to import a target image or scan, how to set target distance and scale, how to set bullet size and circle each bullet hole, and how to save the marked and measured target. VIEW OnTarget TUTORIAL
MEASURING REAL TARGETS — Actual Examples
Here are examples we created with OnTarget. The first photo shows a 17 Mach 2 target. These tiny 17-cal holes are notoriously hard to measure. With OnTarget, it’s a snap. You just load the target image into the program, zoom in with the controls, and then click on the center of the holes. The program automatically calculates group size, displaying measurements in both inches and minutes of angle (MOA)
Original Target (with ruler for scale)
Target Captured and Displayed in Program
Detail of Group, Enlarged by Program
10-shot Groups? — No Problem
Here’s another target, showing 6mm bullet holes at 600 yards. The first image shows the target image loaded into the program with the ten holes circled in red.
Target Displayed in Program
For this target we have used the Aiming Point option. The Aim Point was set at the center of the “X” and the program calculates average distance from the Aim Point. Very cool.
Detail of 10-Shot Group, Enlarged by Program
No Scanner Needed
The OnTarget program grabs target scans directly from a flatbed scanner using Microsoft’s Windows Image Acquisition system. But don’t worry if you don’t have a scanner. You can just take a digital photo of your target and OnTarget will import it quickly and easily. To set target scale, a simple tool allows you to mark a known length on the target (such as the diameter of the “X” Ring), and the program will then size the target accordingly. Is OnTarget precise and accurate? Here’s what Forum Member Steve W. says: “I used the extreme spread measurement of a group on one of my 600-yard match targets… as it was officially scored at the match. By clicking the +—+ icon, then clicked the cursor in the centers of the two extreme spread holes, I then entered that value in the reference window. After that it was simple because the bullet placement cursor’s circle was the same size as the black outline of the actual bullet holes on the picture of the target. OnTarget’s measurement came up within .006″ of the official 2.772 inch measurement of the group. That’s pretty darned close; well inside the human judgment of aligning the tips of a micrometer on the bullet holes.”
Bottom Line — Great Program — Download It Today
Jeffrey Block has done a great service for shooters by creating the FREE OnTarget program. It is easy to learn, it functions great, and it can save you time and effort measuring targets. It also lets you easily archive and compare multiple targets produced during load development or rifle testing. You can record ammo type, date, location, weather etc. in note fields accessed by “Group Info” and “Target Info” tabs.
Keep in mind that OnTarget was NOT created to replace existing methods for scoring competition targets. But for all other target measuring purposes it does a great job. Visit Jeff’s website, OnTargetShooting.com, view the tutorial, and check out OnTarget for yourselves.
To learn more about OnTarget, see more measuring samples, and read advanced Power-User Tips, visit our full OnTarget Product Review.
At SHOT Show 2013 we had the chance to chat with legendary barrel-maker John Kreiger of Krieger Barrels. In this wide-ranging interview, John addressed a number of questions our readers often pose…. What is better for a 6mm, 0.236″ land or 0.237″ land? What are the pros/cons of various barrel types: 3-groove, 4-groove, 6-groove, 8-groove, and 5R? What types of land/groove configurations clean up more easily? (John says the 5R might be the winner there).
John also discusses barrel cleaning and he explains why it’s unwise to pull a dirty brush back across your delicate crown: “The problem comes from the fact that abrasive materials — powder and primer residues in particular — get embedded in the brush. Essentially that is how a lap works.”
When we suggested that Krieger Barrels might want to offer three-groove barrels in the future, John surprised us by revealing that he has been considering putting a 3-groove design into production. John says that, in theory at least, a canted-land 3-groove holds a lot of promise. John hopes to build some prototype 3-grooves to test. Krieger Barrels has a 300-yard underground tunnel where barrels with various land/groove configurations and calibers can be tested using a return-to-battery fixture. John admits that tunnel testing of barrels is “on the back burner” as his company focuses on filling orders. But he says that he has a strong personal interest in testing different land/groove configurations, different amounts of choke, and different internal dimensions. We hope we’ll be able to share some results from the Krieger Barrels test tunnel in the near future.
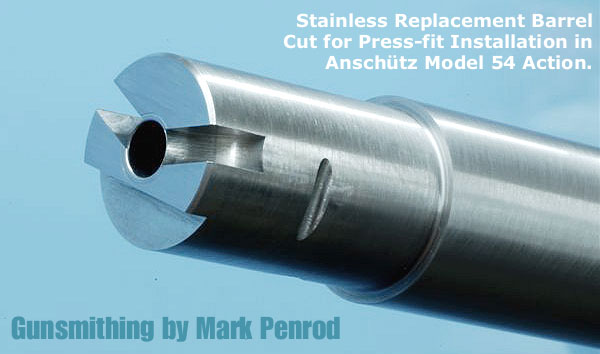
Do you have an older Anschütz model 54-actioned match rifle with a press-in barrel? Perhaps you want to re-barrel your Anschütz to get a few more years of precision shooting out of the old warhorse? Or maybe you want to adapt the Anschütz to a modern stock design for Silhouette, Rimfire Benchrest, or Prone shooting. If you’ve got an older Anschütz m54 that needs re-barreling, you need to send it to a gunsmith who has a proven track record with the model 54s, a smith who can remove the original barrel properly and then install either a new press-in barrel, or a screw-in barrel (after threading the action).
Mark Penrod — Recommended Anschütz Smith
Forum member Edward (aka EAL22) suggests sending Anschütz rimfire projects to Mark Penrod in North Manchester, Indiana. Writing in our Shooters’ Forum, Edward states:
“Penrod can fix you up. He can either press fit [a new barrel] or thread your action [for a screw-in barrel]. He has built guns both ways. Here are some photos of his work. It’s not a bench gun but a nice Anschütz in a System Gemini stock.”
Forum member Bill B. concurs: “I second the suggestion that you send it to Mark Penrod. I’ve just got done working with him on a Hall rimfire action to which he fitted two barrels, a Benchmark and a Lilja. I am building a prone position rifle. He was easy to work with providing good communication, and he’ll do whatever is needed to make your rifle shoot its best.”
Other Recommended Smiths — Bruce Hongista and MT Guns
Another recommended rimfire smith is Bruce Hongisto. Forum member Steve W., a benchrest shooter, says: “My suggestion is to email Butch Hongisto at Hongisto [at] fidnet.com. Butch does amazing work and has made two rimfires for Lapua to use in their factory accuracy evaluations in Finland. Write Butch and ask him which way you should go. He knows his stuff.”
In California, Chesebro Rifles (the successor to Mac Tilton’s MT Guns) has a vast selection of older Anschütz match rifles. Gunsmith Mark Chesebro can rebarrel an older model 54 as well as adapt older Anschütz rifles to modern stocks. Mark even is working on converting single-shot model 54s to repeaters fitted with sturdy, inexpensive CZ detachable magazines. I’ve held the prototype repeater conversion with a 24″ barrel, and it is very cool. I predict the rimfire tactical guys will be lining up to buy these single-shot-to-repeater conversions. Availability is still a few months away. For more info, visit ChesebroRifles.com.
In our Shooters’ Forum a reader recently asked: “How much neck tension should I use?” This prompted a Forum discussion in which other Forum members recommended a specific number based on their experience, such as .001″, .002″, or .003″. These numbers, as commonly used, correspond to the difference between case-neck OD after sizing and the neck OD of a loaded round, with bullet in place. In other words, the numbers refer to the nominal amount of interference fit (after sizing).
While these commonly-used “tension numbers” (of .001″, .002″ etc.) can be useful as starting points, neck tension is actually a fairly complex subject. The actual amount of “grip” on the bullet is a function of many factors, of which neck-OD reduction during sizing is just one. Understanding these many factors will help you maintain consistent neck tension as your brass “evolves” over the course of multiple reloadings.
Neck Tension (i.e. Grip on Bullets) Is a Complex Phenomenon
While we certainly have considerable control over neck tension by using tighter or looser bushings (with smaller or bigger Inside Diameters), bushing size is only one factor at work. It’s important to understand the multiple factors that can increase or decrease the resistance to bullet release. Think in terms of overall brass-on-bullet “grip” instead of just bushing size.
One needs to understand that bushing size isn’t the beginning and end of neck tension questions, because, even if bushing size is held constant, the amount of bullet “grip” can change dramatically as the condition of your brass changes. Bullet “grip” can also change if you alter your seating depth significantly, and it can even change if you ultrasonically clean your cases.
Bullet grip is affected by many things, such as:
1. Neck-wall thickness.
2. Amount of bearing surface (shank) in the neck.
3. Surface condition inside of neck (residual carbon can act as a lubricant; ultrasonic cleaning makes necks “grabby”).
4. Length of neck (e.g. 6BR neck vs. 6BRX).
5. Whether or not the bullets have an anti-friction coating.
6. The springiness of the brass (which is related to degree of work-hardening; number of firings etc.)
7. The bullet jacket material.
8. The outside diameter of the bullet and whether it has a pressure ridge.
9. The time duration between bullet seating and actual firing (necks can stiffen with time).
10. How often the brass is annealed
— and there are others…
Seating Depth Changes Can Increase or Decrease Grip on Bullet
You can do this simple experiment. Seat a boat-tail bullet in your sized neck with .150″ of bearing surface (shank) in the neck. Now remove the bullet with an impact hammer. Next, take another identical bullet and seat it with .300″ of bearing surface in another sized case (same bushing size/same nominal tension). You’ll find the deeper-seated bullet is gripped much harder.
Neck-Wall Thickness is Important Too
I have also found that thinner necks, particularly the very thin necks used by many PPC shooters, require more sizing to give equivalent “grip”. Again, do your own experiment. Seat a bullet in a case turned to .008″ neckwall thickness and sized down .003″. Now compare that to a case with .014″ neckwall thickness and sized down .0015″. You may find that the bullet in the thin necks actually pulls out easier, though it supposedly has more “neck tension”, if one were to consider bushing size alone.
In practical terms, because thick necks are less elastic than very thin necks, when you turn necks you may need to run tighter bushings to maintain the same amount of actual grip on the bullets (as compared to no-turn brass). Consequently, I suspect the guys using .0015″ “tension” on no-turn brass may be a lot closer to the guys using .003″ “tension” on turned necks than either group may realize.
Toward a Better Definition of Neck Tension
As a convenient short-cut, we tend to describe neck tension by bushing size alone. When a guy says, “I run .002 neck tension”, that normally means he is using a die/bushing that sizes the necks .002″ smaller than a loaded round. Well we know something about his post-sizing neck OD, but do we really have a reliable idea about how much force is required to release his bullets? Maybe not… This use of the term “neck tension” when we are really only describing the amount of neck diameter reduction with a die/bushing is really kind of incomplete.
My point here is that it is overly simplistic to ask, “should I load with .001 tension or .003?” In reality, an .001″ reduction (after springback) on a thick neck might provide MORE “grip” on a deep-seated bullet than an .003″ reduction on a very thin-walled neck holding a bullet with minimal bearing surface in the neck. Bushing ID is something we can easily measure and verify. We use bushing size as a descriptor of neck tension because it is convenient and because the other important factors are hard to quantify. But those factors shouldn’t be ignored if you want to maintain consistent neck tension for optimal accuracy.
Consistency and accuracy — that’s really what this all about isn’t it? We want to find the best neck tension for accuracy, and then maintain that amount of grip-on-bullet over time. To do that you need to look not only at your bushing size, but also at how your brass has changed (work-hardened) with time, and whether other variables (such as the amount of carbon in the neck) have changed. Ultimately, optimal neck tension must be ascertained experimentally. You have to go out and test empirically to see what works, in YOUR rifle, with YOUR bullets and YOUR brass. And you may have to change the nominal tension setting (i.e. bushing size) as your brass work-hardens or IF YOU CHANGE SEATING DEPTHS.
Remember that bushing size alone does not tell us all we need to know about the neck’s true “holding power” on a bullet, or the energy required for bullet release. True bullet grip is a more complicated phenomenon, one that is affected by numerous factors, some of which are very hard to quantify.
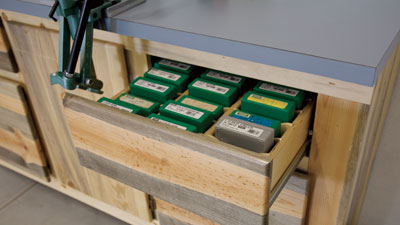
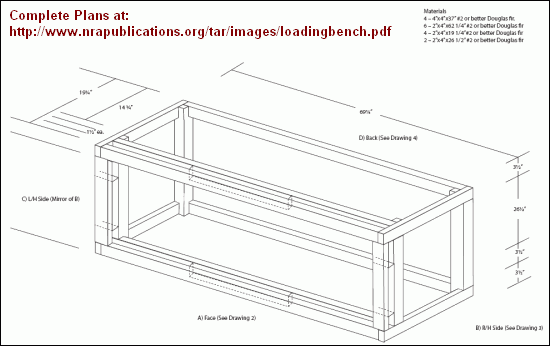
The NRA’s American Rifleman Online website has an excellent article showing how to construct a rock-solid Reloading Bench. There are plenty of photos, and a detailed set of Bench Blueprints showing all dimensions and listing all needed materials. This bench is very well designed, with many deluxe features, such as an upper drawer with fitted slots for die boxes, and large lower drawers with 100-lb rated slides to store heavy materials or tools. If you have good wood-working skills this would be an excellent project.
The author, Dave Campbell, offers good advice on building the bench top: “I ripped a sheet of 3/4″ AC plywood into two 24″ wide pieces and cut them to 72″ long. Then I glued them together to form a 72″ long, 1 1/24″ thick top. The trick here is to keep the edges smooth and flat so that the laminate will adhere properly and without voids. I chose a light grey laminate finish for the top because it’s easier to see what I am working on and keep clean. If you have never worked with laminate, remember it’s prudent to glue and rout the edges flush before gluing on the top. The top was attached to the carcass with eight steel L-shaped angle brackets and No. 10×1 1/4″ wood screws.”
How to Set Up Your Full Length Sizing Die
by Ron Dague, Sinclair International Technician
From Sinclair’s Reloading Press Blog
At Sinclair International, we are often asked for a fool-proof method to set up a full-length sizing die, and begin reloading our fired cases. The method used by many target shooters today is to set up your full length die to closely match your rifle chamber and minimally full-length size your cases –as little as .001″ for bolt-action rifles. I prefer to use this method for all of my bolt-action cartridges.
STEP ONE
I like to de-prime five (5) cases (de-prime only, do not full length resize) and measure from the base of the case to the shoulder with our Sinclair Comparator Body (09-1000) and Bump Gage Insert(09-10200). We refer to this as our headspace measurement. Our Electronic Caliper (#MIC-14) works well and may be pre-set at .000” making this headspace measurement easy to capture. The Sinclair Comparator/Gauge Body and Bump Gage Inserts make this task fairly simple. L.E. Wilson Tools & Gages, Hornady Manufacturing, and RCBS all make similar units to achieve your headspace measurement.
STEP TWO
With your full-length die threaded into your reloading press, loosen the lock ring and run the press ram up toward the full length die with a shell holder in place (with no case). Then, screw the die toward the shell holder until it stops. Back the die out of the press and away from the shell holder one full turn and set the lock ring finger tight.
STEP THREE
Lubricate each of the cases with your favorite sizing lube (my favorite is Imperial Sizing Die Wax) and resize a case. Again, take a headspace measurement from base to shoulder. [When running the case up into the die, be sure the press ram moves the full limit of its upward travel.] If there’s no change in the measurement from the fired dimension, loosen the die lock ring and turn the full length sizing die downward 1/8 of a turn. [Editor’s Note: You’ll need to use smaller turn amounts as you get close to the desired amount of bump. We suggest moving just a few degrees of die rotation at a time once you’ve reached the point where the die hits the shoulder without moving it back.] Now repeat the sizing process with a second lubricated case and take the measurement again. Keep rotating the die downward gradually (in small increments) and repeat the case sizing process until you see approx-imately .001”-.002” reduction to your fired headspace measurement. We prefer a headspace reduction of approximately .001″ – .002″ for bolt action rifles and .003″ – .005″ for semi-auto rifles. You can adjust to your rifle as to what works best. Don’t forget to load 10 rounds or so and try them from the rifle’s magazine to make sure they function properly.
Full-length Sizing vs. Neck-Sizing
Just a quick word on neck sizing…..I have personally never been a big fan of neck sizing. Often times when I put neck sized cases back in the rifle, the bolt would close with some drag, or it would be a bit “snug”. This was mostly recognized with factory rifles. I didn’t have any problems with accuracy, just with cycling the action for a follow up shot. If your rifle is custom chambered with the action straightened and trued, neck sizing will work well on 4-5 firing’s and then you will need to full length size or use a body die to set the shoulders back when the cases begin to “stick”. Hope these tips help make the use of a headspace gauge and full length die set up much easier.
Ron Dague
Sinclair Tech and Reloading Instructor
800-717-8211
rond@sinclairintl.com
Reloading Tip Courtesy Sinclair Int’l; Story Sourced by Edlongrange
Most of us assume that if we weigh our powder carefully (down to the tenth of a grain or less) we can achieve a uniform powder fill from case to case in our handloads. Weighing does ensure that the weight of the propellant in each case is the same, but is the column of powder the same by volume each time? “Not necessarily” is the answer. An interesting experiment by our friend Boyd Allen demonstrates that the manner in which you place kernels in the case can make a significant difference in the height of the powder column within the brass case.
Using a Gempro 250 scale, Boyd measured exactly 30.6 grains of Vihtavuori N-133 powder. He then inserted this powder in the same cartridge case multiple times. (The case has a fired primer in place.) But here is the key — Boyd used various filling techniques. He did a slow fill, and a fast fill, and he also experimented with tapping and drop tubes. What Boyd discovered was that you can start with the exact same weight of powder (in fact the very same set of kernels), yet end up with vary different fill heights, depending on how you drop the kernels into the case. Look at the photos. Despite variations in lighting, the photos show the same 30.6 grains of powder, placed in the same cartridge, with four different methods.
Boyd Explains the Procedure Used for his Experiment.
EDITOR’s NOTE: So there is no misunderstanding, Boyd started with a weighed 30.6 grain charge. This identical charge was used for ALL four fills. After a fill the powder was dumped from the case into a pan which was then used for the next fill technique to be tried. So, the powder weight was constant. Indeed the exact same kernels (of constant weight and number) were used for each fill.
Boyd writes: “I used the same powder for all fills, 30.6 gr. on a GemPro 250 checked more than once. All fills employed the same RCBS green transparent plastic funnel. The fast drop with the funnel only overflowed when it was removed from the case neck, and 15 granules of powder fell on the white paper that the case was sitting on. The fast-funnel-only drop with tapping, was done with the funnel in place and the case and funnel in one hand, while tapping the case body with the index finger hard, many times (about 20 fast double taps). My idea here was to “max out” the potential of this tapping technique.
The slow drop with the funnel and 10″-long .22 cal. Harrell’s Precision drop tube, was done by holding the scale pan over the funnel and tapping the spout of the pan repeatedly on the inside of the funnel about 1/3 down from the top, with the scale pan tilted just enough so that the powder will just flow. Many taps were involved, again, to max out the technique.
Again, to be clear, after each case filling, the powder was poured from the case back into the scale pan carefully. You may notice the similarity between the fast drop with the drop tube, and the funnel only with tapping. Although I did not photograph it, fast tube drop and tapping (combined) improved on tapping alone, but only to about half as far down the neck as the slow with drop tube. Due to the endless possible permutations, I picked four and left it at that.
I believe that I can make the rough judgment that the scale pan funnel and drop tube technique, which involved a longer drop period, and probably less velocity at the top of the tube, left more room in the top of the case neck than the slow drop from the measure with the same drop tube. You have both pictures, so you can make the comparison.” — Boyd
Does Powder Column Height Variance Make a Difference?
Boyd’s experiment proves pretty conclusively that the method of dropping a given weight of powder can affect the height of the powder column in the case and the degree of powder compression (when a bullet is seated). He showed this to be true even when the exact same set of kernels (of constant weight) was used in repetitive loadings. This raises some interesting questions:
1. Will subsequent cartridge transport and handling cause the powder to settle so the variances in powder column height are diminished?
2. If significant inconsistencies in powder column height remain at time of firing, will the difference in fill level hurt accuracy, or result in a higher extreme spread in velocity?
3. Is there any advantage (beyond increased effective case capacity) for a tight (low level) fill vs. a loose (high level) fill?
We don’t know the answer to these follow up questions. This Editor guesses that, if we tested low-fill-height rounds vs. high-fill-height rounds (all with same true fill quantity by weight), we might see meaningful differences in average velocity. I would also guess that if you fired 10 rounds that exhibited quite a difference in powder column heights, you might see a higher ES/SD than if you shot 10 rounds loaded with a very consistent powder column height (either high or low). But further testing is needed to determine if these predictions are true.
Here’s a clever, easy modification for your RCBS ChargeMaster electronic powder dispenser. Many folks use a McDonald’s straw to smooth kernel flow out of the dispensing tube. Forum member Mike S. (aka in2deep) found that, even with a straw in place, he sometimes got clumps, which dropped 5-6 kernels at once, throwing off his dispensed weight.
Mike looked at the situation and ingeniously decided to trim the straw into little v-shaped arms or prongs. This helps to break up the clumps, so the kernels flow out the end of the tube more consistently during the dispense cycle. Mike writes:
Soda Straw Modification
This is a further tweak of the popular soda straw modification as the original mod would still allow Varget powder to collect in the straw and dump sometimes as many as 6 or 8 or even more extra kernels in the pan. It would sometimes signal an overcharge, but even when it didn’t there could be as many as 6+ kernels too high or too low (total spread of 12+).
The little arms (prongs) on the straw tend to separate the kernels into groups of 1 or 2 or 3 and prevents piling and many times the throw is now within 1 or 2 kernels of the desired weight.
Straw Cutting Tips — Mike found the shape/angle of the “arms” is very important. If the cuts are too fine or too course it allows the kernels to collect almost like before but the illustrated angle seems to allow an average of only 2 or 3 kernels per trickle input from the machine. This means that more charges are much closer to the actual desired weight and max kernel variances will be cut in less than half and there will be almost no overthrows.


 The National Shooting Sport Foundation (NSSF) has released its new Where2Shoot app for the Apple’s iPhone and iPod Touch. The App — available for free in the iTunes App Store — puts North America’s most comprehensive directory of shooting ranges in the palm of your hand.
 Many visitors to the site ask us, “I’ve got a .223 and .308. What will a 6mmBR Norma (6BR) give me that I’m not getting already?” Well first you will probably average consistently smaller groups than your current .223 or .308 rifle (assuming the 6BR has a quality barrel and trigger). A good .308 Winchester can be superbly accurate, no question about that, but the lesser recoil of the 6BR works in the shooter’s favor over a long string of fire. Even with a Rem 700 or Savage action factory action, a 6BR with a benchrest stock, premium barrel, and a high-quality chambering job should deliver 5-shot groups in the high twos to mid-threes, provided you do your job. We have one 6BR rifle that shoots Lapua factory-loaded 6BR ammunition in the low twos and high ones. That’s exceptional, we admit, but it still shows how the 6BR is an inherently accurate cartridge, even with factory loads.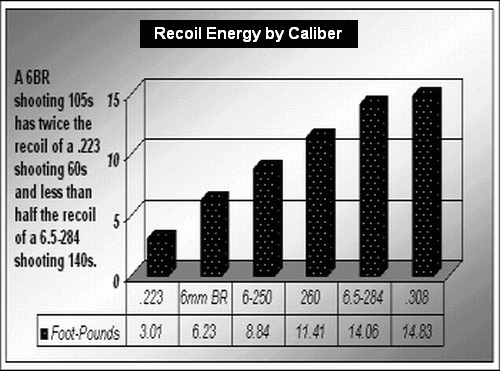

 After just a few minutes spent learning the program’s tool buttons, we were able to plot shot groups on a variety of targets with ease. Once you select the target distance and bullet diameter, figuring group size is a simple matter of centering a circle tool over each bullet hole. Then the program “connects the dots” and provides all the info you could want automatically.


 At SHOT Show 2013 we had the chance to chat with legendary barrel-maker John Kreiger of
  Mark Penrod — Recommended Anschütz Smith
 In our
  Neck-Wall Thickness is Important Too
 STEP TWO


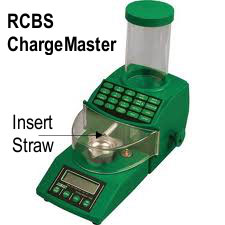 Here’s a clever, easy modification for your RCBS ChargeMaster electronic powder dispenser. Many folks use a McDonald’s straw to smooth kernel flow out of the dispensing tube. Forum member Mike S. (aka in2deep) found that, even with a straw in place, he sometimes got clumps, which dropped 5-6 kernels at once, throwing off his dispensed weight.


