|
|
December 9th, 2012
While many of us now favor digital photography over “old-fashioned” 35mm film, don’t toss those old 35mm film canisters, especially the clear Fuji-type with secure snap-in lids. Small plastic film canisters have a multitude of uses for the shooter and reloader.

Here Are Some of the Things You Can Do with Film Canisters:
1. If you weigh powder charges after throwing them with a manual powder dispenser, throw the charges first into a film canister and then use that to drop the powder into the measuring pan on your scale. The canister will catch every kernel of powder. If you throw charges directly into a weighing pan, powder can sometimes bounce out. Using the film canister will help keep spilled powder off your loading bench and floor.
2. Store extra sets of foam ear-plugs in the canister. You never want to be without ear protection. This editor has four film canisters filled with plugs. Two go in the range kit, one goes in the car’s glove compartment, and a second stays in a lock box I use to transport pistols. This way I never find myself at the range without ear protection.
3. Place your smaller cotton patches in film canisters, marked by caliber. If you use the water-tight Fuji-style canisters, you can even pre-soak the patches with solvent. You can have one canister for wet patches, another for dry patches. That saves time when you’re at the range, and avoids spillage. One caution–some solvents may react with plastic, so test this first before you put a solvent-filled canister in your range kit.
4. Use film canisters to hold your neck bushings, sorted by caliber. With a permanent marking pen, you can mark the side or top of the canister with the bushing sizes, or caliber.
5. Store your favorite Bolt Grease (for rifles) or anti-seize compound (good for pistol slide rails), in the canister. You don’t need to fill it all the way up — a little dab will do ya. We only recommend this with the snap-top Fuji canisters.
6. During transport, Protect your muzzle with canisters. When shipping a rifle or barrel, slip the film canister over the muzzle, then secure it with electrical tape. This will protect the precious crown of a match barrel from dings or damage.

There are countless other uses for 35mm film canisters. We invite readers to respond with their own tips on using these handy containers. If you don’t have some stashed in your workshop already, you can get empties for free at most film processing centers. The clear plastic Fuji canisters are the best — you can see what’s inside and the lids are watertight.
December 6th, 2012
Even with high-quality brass from Lapua, Norma, and RWS, occasionally you may find one or two cases per box which have a small flake or obstruction in the flash-hole. This will appear like a thin crescent on one side of the flash hole (see photo). You should inspect ALL new brass before loading to identify any pieces with a partially-obstructed flash hole. It’s a good idea to remove any flake or thin crescent left as an artifact of the flash-hole forming process. Because the flash-hole itself is normally centered and of the correct diameter, it is not necessary to ream the flash-hole to a larger diameter. All you really need to do is remove the small obstruction(s). This can be done quickly with inexpensive tools.

Use a Small Pin Vise to Remove Flash-Hole Obstructions
Folks have asked if there is a tool that can remove obstructions from a Lapua small, BR-sized flash hole without opening the hole size. The Lapua PPC/BR flash hole is spec’d at 1.5mm, which works out to 0.059055″. Most of the PPC/BR flash-hole uniforming tools on the market use a 1/16″ bit which is nominally 0.0625″, but these often run oversize — up to 0.066″.
If you want to just clear out any obstructions in the flash hole, without increasing the flash hole diameter, you can use an inexpensive “pin vise” with an appropriate drill bit. For $1.00, eHobbyTools.com sells a 1.5mm drill bit, item 79186, that matches the Lapua flash hole exactly. Other vendors offer a #53 pin vise drill bit that measures .0595″ or .060″ (depending or source). An 0.0595″ bit is close enough. You can find pin vises and these small-diameter drill bits at hobby stores.

For quite some time, Sinclair Int’l has sold a similar device for small (PPC and BR-size) flash holes. Like the new 07-3081 unit for large flash holes, the 07-3000 Reamer for small flash holes works from the outside, so it can index off the primer pocket. It reams to .0625″, and also costs $45.99. The standard dimension for Lapua 220 Russian and 6mmBR flash holes is 1.5mm or .0590″. This tool will permit standard-size decapping rods with .0625″ tips to work without binding. However, note that both Forster and Redding normally supply .057″ decapping pins with their PPC and BR dies. So, it is NOT necessary to ream your Lapua BR/PPC flashholes, unless you prefer to do so for uniformity. It IS, however, a good idea to check BR/PPC flash holes for burrs before loading the first time.
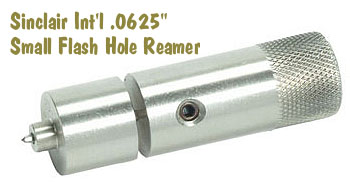
NOTE: If you purchase either the 07-3081 or 07-3000 Sinclair Flash Hole Reamer tools, we recommend you mic the cutter tip before you process a bunch of cases. Sometimes a tip comes through that is oversize. This will ream the flash holes larger than you may intend.
December 1st, 2012
You’ve heard of Heavy Metal, maybe even Heavy Water, but what about Heavy Sand? Every serious shooter should know about Heavy Sand for benchrest sandbags. Heavy Sand can weigh up to twice as much as ordinary silica sand (sold as “Play Sand”). By filling your rear bag with Heavy Sand rather than silica sand, you can nearly double the bag’s mass, and that can translate to better bag performance. A heavier bag resists movement and stays aligned better during recoil. If your bag moves during recoil, or becomes misaligned from shot to shot, that can alter your point of impact and open up your groups. Adding weight to your rear bag is a simple, cost-effective way to shoot more consistently, with greater overall accuracy.

Jason tested and compared four kinds of sandbag fillers: Zircon, Chromite, Riverbed Sand, and ordinary Play Sand. Zircon is the heaviest type of sand readily available to shooters, followed by Chromite. Zircon is 98% heavier than Play Sand, while the black Chromite sand is 94% heavier than Play Sand. Riverbed Sand, commonly sold in pet stores as “Reptile Sand”, is less dense, measuring about 55% heavier than Play Sand.
Increase Bag Weight Up to 10 pounds
Compared to silica sand, how much extra weight can Heavy Sand (Zircon, Chromite, Riverbed) add to your sandbag? Up to 10 pounds, depending on the size of your rear bag. Check the chart below for the specifics. By filling a standard bunny ear bag with Zircon (vs. silica sand), you can increase bag weight by about 5 pounds. A super-sized BigFoot bag can gain 10 pounds in overall weight when filled with Zircon as opposed to silica sand.
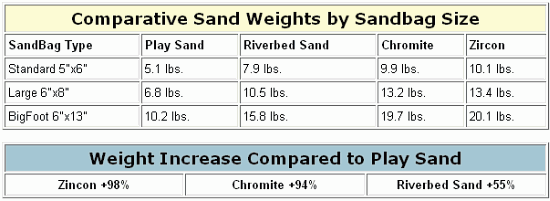
To learn more about Heavy Sand (and where you can buy it), read Jason’s comprehensive Sand Comparison Article. It includes photos of the different sand types and links to Heavy Sand vendors, such as R.W. Hart (Zircon) and Sinclair International (Chromite).
December 1st, 2012
Let’s say you’ve purchased a new scope, and the spec-sheet indicates it is calibrated for quarter-MOA clicks. One MOA is 1.047″ inches at 100 yards, so you figure that’s how far your point of impact (POI) will move with four clicks. Well, unfortunately, you may be wrong. You can’t necessarily rely on what the manufacturer says. Production tolerances being what they are, you should test your scope to determine how much movement it actually delivers with each click of the turret. It may move a quarter-MOA, or maybe a quarter-inch, or maybe something else entirely. (Likewise scopes advertised as having 1/8-MOA clicks may deliver more or less than 1 actual MOA for 8 clicks.)
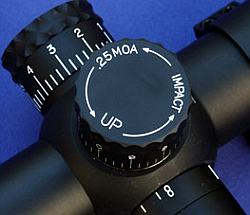 Reader Lindy explains how to check your clicks: “First, make sure the rifle is not loaded. Take a 40″ or longer carpenter’s ruler, and put a very visible mark (such as the center of an orange Shoot’N’C dot), at 37.7 inches. (On mine, I placed two dots side by side every 5 inches, so I could quickly count the dots.) Mount the ruler vertically (zero at top) exactly 100 yards away, carefully measured. Reader Lindy explains how to check your clicks: “First, make sure the rifle is not loaded. Take a 40″ or longer carpenter’s ruler, and put a very visible mark (such as the center of an orange Shoot’N’C dot), at 37.7 inches. (On mine, I placed two dots side by side every 5 inches, so I could quickly count the dots.) Mount the ruler vertically (zero at top) exactly 100 yards away, carefully measured.
Place the rifle in a good hold on sandbags or other rest. With your hundred-yard zero on the rifle, using max magnification, carefully aim your center crosshairs at the top of the ruler (zero end-point). Have an assistant crank on 36 (indicated) MOA (i.e. 144 clicks), being careful not to move the rifle. (You really do need a helper, it’s very difficult to keep the rifle motionless if you crank the knobs yourself.) With each click, the reticle will move a bit down toward the bottom of the ruler. Note where the center crosshairs rest when your helper is done clicking. If the scope is accurately calibrated, it should be right at that 37.7 inch mark. If not, record where 144 clicks puts you on the ruler, to figure out what your actual click value is. (Repeat this several times as necessary, to get a “rock-solid”, repeatable value.) You now know, for that scope, how much each click actually moves the reticle at 100 yards–and, of course, that will scale proportionally at longer distances. This optical method is better than shooting, because you don’t have the uncertainly associated with determining a group center.
Using this method, I discovered that my Leupold 6.5-20X50 M1 has click values that are calibrated in what I called ‘Shooter’s MOA’, rather than true MOA. That is to say, 4 clicks moved POI 1.000″, rather than 1.047″ (true MOA). That’s about a 5% error.
I’ve tested bunches of scopes, and lots have click values which are significantly off what the manufacturer has advertised. You can’t rely on printed specifications–each scope is different. Until you check your particular scope, you can’t be sure how much it really moves with each click.
I’ve found the true click value varies not only by manufacturer, but by model and individual unit. My Leupold 3.5-10 M3LR was dead on. So was my U.S.O. SN-3 with an H25 reticle, but other SN-3s have been off, and so is my Leupold 6.5-20X50M1. So, check ‘em all, is my policy.”
From the Expert: “…Very good and important article, especially from a ballistics point of view. If a ballistics program predicts 30 MOA of drop at 1000 yards for example, and you dial 30 MOA on your scope and hit high or low, it’s easy to begin questioning BCs, MVs, and everything else under the sun. In my experience, more than 50% of the time error in trajectory prediction at long range is actually scope adjustment error. For serious long range shooting, the test described in this article is a MUST!” — Bryan Litz, Applied Ballistics for Long-Range Shooting.
November 30th, 2012
In the wintertime, it’s common to encounter problems with static electricity when throwing your powder charges. The static can cause powder kernels to cling to the surface of reloading components, and can cause powder clumping. Clumped or sticky powder may make your measure bind or grab in the middle of the cycle, which can throw off your charge weight. Here are a couple simple ways you can minimize the effects of static electricity and improve the consistency of your powder measuring.
Ground Your Powder Measure — If you’re throwing powder charges in the fall or winter and have problems with bridging or sticking powder, use a ground wire. Bullet-smith Victor Johnson (Johnson Precision Bullets) tells us: “I have a 25-foot piece of real small wire with alligator clips on each end. It’s that long so I can run it down the hall to a water pipe. Use the wire tie from a bread bag to hold it in a small roll to put in the range box. When using it at the range use a 6″ nail from the co-op or Lowe’s / Home Depot and just push it into the ground.”
Use Bounce Dryer Sheets — A quick pass with the thin sheets used in dryers will eliminate “static cling” on your plastic reloading parts like powder throwers, powder funnels, and reloading press guides. Thanks to Doc76251 for this tip.
Reduce Electronic Scales’ Drift with Anti-Static Spray
Reloading Tip by German Salazar from RiflemansJournal.com
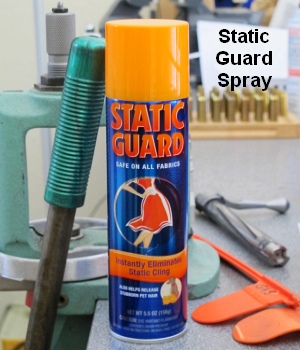 Apparently reducing static charges on and around electronic scales can reduce their propensity to drift, lessening the problem of “wandering zero”. Just how and why static charges interfere with scale performance is unclear, but many shooters have noticed that static electricity can cause electronic scales to behave strangely. So how do you reduce static charges around your digital balance? German Salazar has found a very simple solution — an anti-static aerosol spray — that, by all indications, actually works. When this “spray-can solution” was suggested to German by a fellow shooter, German was skeptical. However, German tried the stuff and he says that it really does help the scale maintain zero over time, with much less observed drift. Apparently reducing static charges on and around electronic scales can reduce their propensity to drift, lessening the problem of “wandering zero”. Just how and why static charges interfere with scale performance is unclear, but many shooters have noticed that static electricity can cause electronic scales to behave strangely. So how do you reduce static charges around your digital balance? German Salazar has found a very simple solution — an anti-static aerosol spray — that, by all indications, actually works. When this “spray-can solution” was suggested to German by a fellow shooter, German was skeptical. However, German tried the stuff and he says that it really does help the scale maintain zero over time, with much less observed drift.
On his Rifleman’s Journal website, German explains that the use of “Static Guard” spray helped mitigate the problem of a drifting zero on his Ohaus Navigator electronic scale. German writes: “My electronic scale… suffers from drifting zero (as they all seem to). I’ve read dozens of forum posts about drift and how to minimize its occurrence, so I know this problem isn’t limited to my scale or my workshop. Sometime last year, John Lowther mentioned the use of anti-static spray as a solution to the drift problem. John stated that the spray had virtually eliminated drift for him.”

German found that the Static Guard actually worked: “The spray works great, just as John said it would. I spray all surfaces that I touch with my hands and arms as well as the pan (top and bottom), the metal tray on which the pan rests and the table under the scale. In six months or so of using the spray I’ve re-applied it about two or three times; it certainly isn’t something that you need to do each time you sit down to load. Before using the spray, it was not uncommon for me to re-zero the scale 10 times in the course of loading 72 rounds; now it might need it once during a session.”
READ Full Story on RiflemansJournal.com
November 20th, 2012
 How much does it cost you to send a round downrange? Ask most shooters this question and they’ll start adding up the cost of components: bullets, powder, and primers. Then they’ll figure in the cost of brass, divided by the number of times the cases are reloaded. How much does it cost you to send a round downrange? Ask most shooters this question and they’ll start adding up the cost of components: bullets, powder, and primers. Then they’ll figure in the cost of brass, divided by the number of times the cases are reloaded.
For a 6BR shooting match bullets, match-grade primers, and 30 grains of powder, in brass reloaded ten times, this basic calculation gives us a cost per shot of $0.51 (fifty-one cents):
Bullet $0.33 (Berger 105 VLD) Grafs.com
Primer $0.02 (Tula/Wolf SmR magnum) PVI
Powder $0.08 (Reloder 15 @ $19.15/lb) PVI
Brass $0.08 (Lapua @ $82.30/100, 10 reloads)
Total = $0.51 per round
NOTE: If you shoot a larger caliber that burns more powder, and uses more expensive bullets and/or brass, your total cost per round will be higher than $0.51.
$1.00 Per Shot True Cost? Yikes!
OK, we’ve seen that it costs about $0.51 per round to shoot a 6BR. Right?
Wrong! — What if we told you that your ACTUAL cost per round might be closer to double that number? How can that be? Well… you haven’t accounted for the cost of your barrel. Every round you fire down that tube expends some of the barrel’s finite life. If, like some short-range PPC shooters, you replace barrels every 700 or 800 rounds, you need to add $0.60 to $0.70 per round for “barrel cost.” That can effectively double your cost per round, taking it well past the dollar per shot mark.
Calculating Barrel Cost Per Shot
In the table below, we calculate your barrel cost per shot, based on various expected barrel lifespans.
 As noted above, a PPC barrel is typically replaced at 700-800 rounds. A 6.5-284 barrel can last 1200+ rounds, but it might need replacement after 1000 rounds or less. A 6BR barrel should give 2000-2600 rounds of accurate life, and a .308 Win barrel could remain competitive for 4,000 rounds or more. As noted above, a PPC barrel is typically replaced at 700-800 rounds. A 6.5-284 barrel can last 1200+ rounds, but it might need replacement after 1000 rounds or less. A 6BR barrel should give 2000-2600 rounds of accurate life, and a .308 Win barrel could remain competitive for 4,000 rounds or more.
The table below shows your barrel cost per shot, based on various “useful lives.” We assume that a custom barrel costs $540.00 total to replace. This includes $300.00 for the barrel itself, $200.00 for chambering/fitting (conservative number), and $40.00 in 2-way shipping costs. These are typical costs shooters will encounter when ordering a rebarreling job.

The numbers are interesting. If you get 2000 rounds on your barrel instead of 1000, you save $0.27 per shot. However, extending barrel life from 2000 to 3000 rounds only saves you $0.09 per round. The longer you keep your barrel the more you save, but the savings per shot decreases as the round count increases.

How to Reduce Your TRUE Cost per Round
What does this tell us? First, in figuring your annual shooting budget, you need to consider the true cost per round, including barrel cost. Second, if you want to keep your true costs under control, you need to extend your barrel life. This can be accomplished in many ways. First, you may find that switching to a different powder reduces throat erosion. Second, if you’re able to slow down your shooting pace, this can reduce barrel heat, which can extend barrel life. (A varminter in the field is well-advised to switch rifles, or switch barrels, when the barrel gets very hot from extended shot strings.) Third, modifying your cleaning methods can also extend the life of your barrel. Use solvents that reduce the need for aggressive brushing, and try to minimize the use of abrasives. Also, always use a properly fitting bore guide. Many barrels have been prematurely worn out from improper cleaning techniques.
November 13th, 2012
|
Available for under $180.00 including front bag, the Caldwell Fire Control front rest is a remarkable value. It makes the co-axial, joystick design more affordable than ever. We used the Fire Control front rest when testing our Ultimate Varminter 20 Practical AR. Once we removed some sand from the tri-lobe front bag, the rest worked quite well.
Get a Fire Control Rest for Just $179.40
Amazon.com currently sells the Fire Control rest (item 956104) for $179.40. That’s a really spectacular deal for guys on a tight budget, looking to try out a joystick-style front rest. With the conversion described in this article, you can put together a system that works pretty darn well, and is more than adequate for many applications, including prairie-dog hunting (from a bench). |
|
While most Fire Control owners are happy with the product, many have wanted to replace the tri-lobe front bag with a more conventional front bag from Protektor or Edgewood. This isn’t as easy as it looks because the width of the Fire Control top is too narrow for most standard 3″-wide front bags. On a “special order” basis, Protektor has crafted some narrower leather front bags that fit pretty well, but some shooters have decided to “upgrade” the entire front assembly.
Forum member Doug M. (aka DrJeckyl), has come up with an elegant solution that allows a Sinclair Int’l Benchrest Rest Top to be fitted to the Fire Control Rest. Doug notes: “The Caldwell Fire Control is a nice rest for the money, but it comes up short in the rest top department. The Sinclair RT-3 [or its replacement, the Gen II B/R top] fits perfect with minor modifications.” Shown below are the main components:

To adapt the Sinclair RT-3 or Gen II B/R top, Doug merely had to drill a couple holes in the RT-3 baseplate, and adapt a spacer to get the height correct: “The Caldwell factory top has a raised mounting portion so a 1/8″ piece of stock will be needed as a spacer to the flat-bottom RT-3. The spacer needs to be cut to the same length as the movable portion on the rest. And you should plan the mounting accordingly so the left thumbscrew clears the vertical height column at full left position (there is a cutaway in the rest under the thumbscrew that allows for easy access to the screw).” We have labeled the photo with dimensions, but Doug cautions you should measure your own original plate to insure the drill locations are correct for your unit.

Below you’ll see the completed installation, with the RT-3 installed on the Fire Control rest. Doug says it works very well. For more information on this Fire Control rest top conversion, with Doug’s measurments for the hole-spacing and his specs on the fasteners, go to the original thread in our Shooter’s Forum. NOTE: Sinclair no longer sells the RT-3 top, but Sinclair’s $69.95 Gen II B/R top can be converted just as easily. LINK to Fire Control Rest Top Conversion Forum Thread.

October 23rd, 2012
Put the same load in a variety of barrels (with the same length and chamberings) and you’ll see a wide variance in muzzle velocity. In fact, it’s not unusual to see up to 100 fps difference from one barrel to the next. We demonstrated this with a comparison test of Lapua factory ammo.
Chron Testing Lapua Factory Ammo
At our Southern California test range, we chronographed Lapua 105gr 6mmBR factory ammo in three different 8-twist barrels of similar length. The results were fascinating. Lapua specs this ammo at 2790 fps, based on Lapua’s testing with its own 26″ test barrel. We observed a speed variance of 67 fps based on tests with three aftermarket barrels.

Brand ‘S’ and Brand ‘PN’ were pre-fit barrels shot on Savage actions. Brand ‘K’ was fitted to a custom action. All test barrels were throated for the 100-108 grain bullets, though there may have been some slight variances in barrel freebore. With a COAL of 2.330″, the rounds were “jumping” to the rifling in all barrels. Among the four barrels, Brand ‘PN’ was the fastest at 2824 fps average — 67 fps faster than the slowest barrel. Roughly 10 fps can be attributed to the slightly longer length (27″ vs. 26″), but otherwise this particular barrel was simply faster than the rest. (Click Here for results of 6mmBR Barrel Length Velocity Test).
Results Are Barrel-Specific, Not Brand-Specific
These tests demonstrate that the exact same load can perform very differently in different barrels. We aren’t publishing the barrel-makers’ names, because it would be wrong to assume that ‘Brand X’ is always going to be faster than ‘Brand Y’ based on test results from a single barrel. In fact, velocities can vary up to 100 fps with two identical-spec barrels from the SAME manufacturer. That’s right, you can have two 8-twist, 26″ barrels, with the same land-groove configuration and contour, from the same manufacturer, and one can be much faster than another.
Don’t Demand More Than Your Barrel Can Deliver
We often hear guys lament, “I don’t get it… how can you guys get 2900 fps with your 6BRs and I can only get 2840?” The answer may simply be that the barrel is slower than average. If you have a slow barrel, you can try using more powder, but there is a good chance it may never run as fast as an inherently fast barrel. You shouldn’t knock yourself out (and over-stress your brass) trying to duplicate the velocities someone else may be getting. You need to work within the limits of your barrel.
Factory Ammo Provides a Benchmark
 If you have a .223 Rem, 6BR, .243 Win, 6.5×47 Lapua, 6.5×55, .308 Win, 30-06, or 300 WM Rifle, we recommend you buy a box of Lapua factory-loaded ammo. This stuff will shoot great (typically around half-MOA), and it can give you a baseline to determine how your barrel stacks up speedwise. When you complete a new 6BR rifle, it’s wise to get a box of the factory ammo and chronograph it. That will immediately give you a good idea whether you have a slow, average, or fast barrel. Then you can set your velocity goals accordingly. For example, if the factory 6BR ammo runs about 2780-2790 fps in your gun, it has an average barrel. If it runs 2820+ in a 26″ barrel (or 2835 fps in a 28″), you’ve got a fast tube. If you have a .223 Rem, 6BR, .243 Win, 6.5×47 Lapua, 6.5×55, .308 Win, 30-06, or 300 WM Rifle, we recommend you buy a box of Lapua factory-loaded ammo. This stuff will shoot great (typically around half-MOA), and it can give you a baseline to determine how your barrel stacks up speedwise. When you complete a new 6BR rifle, it’s wise to get a box of the factory ammo and chronograph it. That will immediately give you a good idea whether you have a slow, average, or fast barrel. Then you can set your velocity goals accordingly. For example, if the factory 6BR ammo runs about 2780-2790 fps in your gun, it has an average barrel. If it runs 2820+ in a 26″ barrel (or 2835 fps in a 28″), you’ve got a fast tube.

October 15th, 2012
One of our readers has been shooting his 6BR with considerable success in tactical/practical matches. Thus far he’s been using Lapua factory-loaded 105gr ammo. The factory ammo has delivered superb accuracy for him — under 1/4 MOA at 100 yards. Now, he is making the jump into reloading. He asked for some tips on working up a good load for an 8-twist 6BR with a no-turn neck, and selecting reloading tools. Since other readers may be 6BR novices as well, here are some helpful hints…
Accurate Reloading Tips for the 6mmBR Cartridge
 ▪ Brass Prep — You need to look at the flash-holes to make sure they’re not occluded. A few lots of Lapua brass came with a little sliver/flake of brass in the hole, sort of like a quarter moon. You can clean that up with an inexpensive pin vise. Otherwise, there is no need to ream flash holes or uniform primer pockets. ▪ Brass Prep — You need to look at the flash-holes to make sure they’re not occluded. A few lots of Lapua brass came with a little sliver/flake of brass in the hole, sort of like a quarter moon. You can clean that up with an inexpensive pin vise. Otherwise, there is no need to ream flash holes or uniform primer pockets.
▪ Neck Chamfering — You want to develop a good feel for neck chamfering. You don’t want/need to remove a lot of brass — just knock off the sharp edge. I use a Forster 45 deg “rocket” tool. It works fine. After a couple light turns, spin backwards to smooth the cut and then finish with a twist with a green scotch pad. If you use a deep-angle chamferer, be very careful not to overcut and remove too much brass.
▪ Neck Tension — On brand new, unfired Lapua 6BR brass, neck tension is excessive. You should run an expander mandrel down the case necks before the first firing. This will reduce the neck tension while it fixes necks that may be dented or out of round. After the first firing, we suggest sizing the necks so that, after they come out of your sizing die, the neck outside diameter (OD) is .002″ less than the neck diameter of a loaded round with bullet seated. If that doesn’t work, try the next size up bushing for .001″ tension. Many top shooters like low neck tension, but we’ve also seen heavy tension work. The .002″ under loaded OD is a good starting point with the 6BR. (But note — if you have thin-walled turned necks, you may need to use a smaller bushing, running your sized necks .003 or .0035 under the OD of a loaded round.)
▪ Primers — A lot of guys like the CCI 450 primers. They’re a lot cheaper than the Federal and CCI BR primers and may give a little more velocity. The cups are also hard, which lets you run faster loads with less concern about cratering. Wolf/Tula primers also have hard cups, but you must make sure to seat them deep enough.
▪ Load Development and Bullet Choice — With the 6BR and 100-108gr bullets, load development should be relatively easy. With Varget, Reloder 15, Norma 203B, or VV N150, between 30.0 and 30.7 grains should work as your final load. My match load is 30.3 Varget and that has shot under 2.0″ at 600 yards. Start at 29.0 grains and and work up in 0.2 grain increments, checking for pressure. DO weigh every load… twice. If possible, use a chronograph during your load work-up. 2880-2920 fps is a nice “sweet spot” for the 6BR, but slower can be very accurate too. (With custom actions, tight chambers, and long barrels, some guys are going even faster — but that’s hard on brass.)
If you have a barrel on the slow side, consider shooting the Berger 100gr ‘Match Target’ BTs. These bullets are very accurate, and we’ve found that you can drive them 75-100 fps faster than the Berger 108s or Sierra 107s at similar pressure levels. With the 100-grainers, you may find that you can hit a superior velocity/accuracy node, so they may shoot better overall than the 105-108 class bullets. Varget, RL15, and IMR 8208 all work great with this 100gr bullet.
For shooting from 300-500 yards, you should consider the lighter-weight bullets: Sierra 95gr MK, Lapua 90gr Scenar, Berger 95gr and 87gr VLD. The Sierra and Lapua bullets are very accurate and not sensitive to seating depth. In addition to the powders mentioned above, H4895 and IMR 8208 XBR work very well with the 90-grain-class bullets. One note about the smaller Berger VLDs — the Berger 95gr VLD and 87gr VLD both have very short bearing surfaces, so they work best in a chamber with a short-to-moderate Freebore. We had the best luck with the 95gr VLD about .010″ into the lands. We could achieve that with an 0.075″ Freebore chamber. But you won’t be able to hit the rifling with the 95s in a long-throated chamber. With this bullet we recommend sorting bullets by base to ogive.
 For guys with 10-twist barrels, try out the new Berger 87gr VLD. It was expressly designed to work great in the 1:10″ twist barrels. Forum member Mark Schronce reports that this bullet is extremely accurate and can be driven fast. It has an 0.412 G1 BC. Note: The new 87gr VLD, product #24524, is hard to find on the Berger website, but it IS available. Berger calls it a “hunting bullet”, but it works great on paper also. MidwayUSA has the 87-grainers in stock as item #77854. For guys with 10-twist barrels, try out the new Berger 87gr VLD. It was expressly designed to work great in the 1:10″ twist barrels. Forum member Mark Schronce reports that this bullet is extremely accurate and can be driven fast. It has an 0.412 G1 BC. Note: The new 87gr VLD, product #24524, is hard to find on the Berger website, but it IS available. Berger calls it a “hunting bullet”, but it works great on paper also. MidwayUSA has the 87-grainers in stock as item #77854.

▪ Pure Accuracy — If you are looking for bughole accuracy out of your 6BR, try the Berger 80gr FBHP ‘Match Varmint’ bullets (item #24321). Many folks have reported these bullets will shoot in the ones and low twos, even in 8-twist barrels. For 100- to 200-yard distances, these bullets are hard to beat for pure accuracy. Beyond those distances, you’ll want something with a higher BC. We’ve had good luck with the Berger 80s pushed by Vihtavuori N135, and IMR 8208 XBR.
▪ C.O.A.L. — Bullet seating depth is very important. You should get the Hornady (Stoney Point) O.A.L. Gauge (shown below). This will let you discern the OAL at which the bullets just contact the rifling. The trick is tapping gently on the stick. (Get a wood dowel as the bullet can get stuck if you tap a little too aggressively.) With some practice, measuring is quick and you can get repeatable measurements of your distance to lands within .001-.002″.

A good starting point for the Berger and Lapua 105s is about .010-.015 IN the lands and then work back. Each barrel is different, but about .010″ in the lands works for many folks. One guy I know started at .012″ in the lands with Berger 105s, adjusted his load up from 30.0 to 30.4 Varget, and within an hour he was done with load dev — the gun was shooting in the low 2s. He went out and won his first match with that load the next day! With the Sierra 107s you might want to start .020″ out of the lands.
▪ Seating Die — We recommend the Wilson Micrometer Seating Die. The adjustable top makes it really easy to play with seating depths. Keep in mind, however, that moving 5 hash marks on the die may not give you exactly .005″ seating depth change — it will be close, but you should measure and write down the actual base to ogive length. FYI, I measure base to ogive of every loaded round. Occasionally you’ll find a bullet that ends up seated a little long or short.
NOTE: The fit of the 6BR Wilson seating die is very tight. You may have difficulty getting a fired case into the die if you do not full-length size the case first. Even with FL-sized cases, there may be a vacuum fit that makes the loaded round a little hard to remove. If you can’t easily extract your loaded round, try lifting the entire micrometer head and attached stem. This can release the vacuum so the case can slide out easily (unless there is a really tight fit). If that doesn’t work, here’s another trick — use the end of a Popsicle stick placed under the cartridge rim to lever the case out. I’ve found that the “working” end of a metal spoon works well too, but be careful not to nick the bottom of the die.
October 8th, 2012
 A while back, we featured a portable reloading bench built on a Black & Decker Workmate. That proved a VERY popular do-it-yourself project so we’re showing it again, in case you missed it the first time. A while back, we featured a portable reloading bench built on a Black & Decker Workmate. That proved a VERY popular do-it-yourself project so we’re showing it again, in case you missed it the first time.
Texan Robert Lewis made himself a great portable reloading bench from plywood mounted to a Black & Decker Workmate. The bench, roughly 22″ x 19″ on top, folds up to fit easily in your car’s trunk or behind the seats in a pick-up truck cab. Four recessed bolts hold the wood top section to the collapsible B&D Workmate.The sides and back of the unit are attached to the base with small nails. There is a small shelf (also nailed in place) which can be used to clamp a powder measure or hold a scale. Shown in the photo is a Harrell’s Benchrest measure and Harrell’s single-stage “C” press.
Click for Larger Photo.
The whole unit can be built for about $65.00 with pine, or $80.00 with oak (as shown). Robert explained: “The Workmate was $40. If someone bought a 2’x4′ sheet of 3/4″ oak plywood, I think it is around $30. Using pine plywood would be about half that. Fasteners were $3. Spar Urethane would be $5.”
Robert told us: “I used a couple ideas I found on the web. The Larry Willis website gave me the idea to use the Black and Decker Workmate as a base. I found the Workmate on sale for $40 and the top is made from oak plywood I had in my shop. I sealed the wood with three coats of Spar Urethane. The whole thing folds into a nice package for transportation to and from the range.”
Editor’s NOTE: In the time that’s transpired since we first ran this story, the price of a Black & Decker workmate has gone up. However you can still pick a WM225 Workmate for under $60.00. Target is currently selling WM225 Workmates for $59.99.
Click HERE for FREE WORKBENCH PLANS.

|


