Do you know which one of your eyes is dominant? It’s easy to determine eye dominance with a simple exercise. Pick an object about 6-10 feet away (a light switch or door knob works well). Make an “OK” sign with your right hand (see photo) and hold that about 18″ from your face. Now, with both eyes open, look through the circle formed by your thumb and index finger. Center the circle on the object, so you can see the object in the middle.
Now, here’s the important part — while still holding your hand up, centered on the object, first close your right eye. If you don’t see the object anymore, then your right eye is dominant. If you still see the object, then repeat the procedure with the left eye shut and right eye open. If you don’t see the object when your left eye (only) is closed, then you are left-eye dominant.
The digital archives of Shooting Sports USA contain many interesting articles. A while back, Shooting Sports USA featured a “must-read” expert Symposium on Eye Dominance, as it affects both rifle and pistol shooting. No matter whether you have normal dominance (i.e. your dominant eye is on the same side as your dominant hand), or if you have cross-dominance, you’ll benefit by reading this excellent article. The physiology and science of eye dominance is explained by Dr. Norman Wong, a noted optometrist. In addition, expert advice is provided by champion shooters such as David Tubb, Lones Wigger, Dennis DeMille, Julie Golob, Jessie Harrison, and Phil Hemphill. NOTE: If the story doesn’t open at the links, go to the ssusa.org home page first, indicate you are over 18, and then CLICK HERE.
Top Rifle Champions Talk About Eye Dominance:
David Tubb — 11-Time National High Power Champion
I keep both eyes open, always. Some use an opaque blinder in rifle or shotgun shooting. If you close your non-dominant eye, you will not get as good a sight picture. If your aiming eye is not your dominant eye, you have even more of a problem to overcome.
Lones Wigger — World, National and Olympic Champion Rifleman
Shooters should try to use the dominant eye unless the vision is impaired and the non-dominant eye has better vision. You should always shoot with both eyes open since this will allow the shooting eye to function properly.
Dennis DeMille — National Service Rifle Champion
I close my non-shooting eye initially. Once I pick up my sight picture, it’s not something I focus on. For those that use a patch, I recommend that they use something white to block their view, rather than cover the eye.
Bruce Piatt — 2015 World Shooting Championship Winner
Some shooters, especially those with nearly equal or cross-dominance, will naturally find themselves squinting one eye. When anyone does this, you are also closing your dominant eye to some extent and adding stress to your face.
Hand-loaders have never had so many great choices in single-stage presses, with many different configurations and features. There are classic O-Frame presses, Coax-style presses, Open-front presses, Pyramid presses, and compact C-Frame presses. Here is our 2019 Single Stage Press Showcase with products from Forster, Hornady, Lee, Lyman, MEC, and RCBS. We’ve included short videos showing the features of these reloading presses.
If you are shopping for a new press you should look at the various features of each. You may prefer something classic like a Rock Chucker, or the innovative open-front MEC. If you are looking for a compact press to use at the range, the Lyman C-Frame is very impressive for the price. And the Forster Co-Ax remains a great addition to any loading room.
MEC Marksman Single-Stage Press
If you are looking for a new, full-size single-stage reloading press, definitely consider the MEC Marksman. Created by the makers of the popular MEC shotshell reloading systems, the MEC Marksman combines a sturdy cast-iron frame with a modern open-front design. If you are looking for a new, full-size single-stage reloading press, definitely consider the MEC Marksman. Created by the makers of the popular MEC shotshell reloading systems, the MEC Marksman combines a sturdy cast-iron frame with a modern open-front design. With a $245.49 street price, the MEC Marksman press now costs more than an RCBS Rock Chucker Supreme press, but the MEC offers some distinct advantages — such as an open front plus a floating shell-holder system.
Our friend Gavin Gear of UltimateReloader.com got his hands on a MEC Marksman press and put it through its paces. He came away impressed with the product, saying it delivers excellent performance, and has many impressive features. Gavin tells us: “Cast iron tools and machines are a lifetime investment. The made-in-USA MEC Marksman features ductile cast-iron construction, an open-front frame design for easy cartridge access, a new floating shell-holder design with a unique retention system, and ambidextrous handle setup.” MEC also offers a wide selection of accessories for the Marksman press, including a press riser/mount, shell-holder caddy, and die trays.
Forster Co-Ax Press
If you are not yet familiar with the many unique features of the Forster Co-Ax, we recommend you watch the video above, a very thorough video review by Rex Roach. This shows how the press operates and highlights the design elements which set the Co-Ax apart from every other reloading press on the market. This 14-minute video shows the key Co-Ax features, explaining how the floating case-holder jaws work (3:30 time-mark), how the dies are held in place (4:40 time-mark), how spent primers are captured (6:10 time-mark), and how to set the primer seating depth (10:00 time-mark). We’ve used a Co-Ax for years and we still learned a few new things by watching this detailed video. If you are considering purchasing a Co-Ax, definitely watch this video start to finish.
In recent years, Forster Co-Ax® presses have been somewhat hard to find, as demand has out-stripped supply. The Co-Ax has many dedicated fans, given its unique features, such as the floating case-holder jaws, and easy, rapid slide-in/slide-out die placement. We’ve also found that Co-Ax presses load very straight ammo and we like the ability to switch between short handle (good for bullet seating) and long handle (ideal for heavy case-sizing tasks). We also think the Forster Co-Ax has one of the best spent primer capture systems on the market — a straight drop into a removable plastic cup. Simple and it works.
Lyman Brass Smith Victory Single-Stage Press
Lyman’s sturdy Victory Single-stage Press is a full-size unit that competes with the RCBS Rock Chucker Press. With beefy cast iron construction, the Victory’s strength and leverage rivals the Rock Chucker. The press operates smoothly and the handle can be mounted on either side.
If you like to prime cases using a press, this Victory press has a priming system that’s much easier to use than the RCBS Rock Chucker system. The priming tube is right up front, with multiple primers loaded vertically in a tube. Simply push the shuttle at the button of the tube to advance the primer into place.
For convenience, the entire primer-loading system can also be removed so it doesn’t interfere with case and bullet-handling operations. We generally prefer to prime cases separately using a dedicated hand- or bench-mounted tool, but the Victory press does the job nicely.
Overall, the Victory is a great value in a full-size “O-Frame” press with sturdy construction and a solid Lyman warranty. It is available now for $208.52 on Amazon.
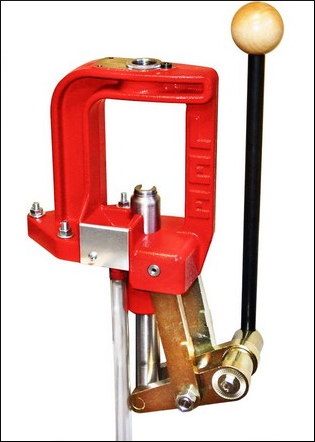
RCBS Rock Chucker Supreme Single-Stage Press
Nearly every serious hand-loader has owned or used the RCBS Rock Chucker press. This Editor still uses a Rock Chucker passed down by his brother 20 years ago. And yes, it is still going strong. The latest Rock Chucker Supreme single-stage press features an improved “upside-down Y-path” dual-bin spent primer catcher. Otherwise the Rock Chucker Supreme remains big, strong, versatile and sturdy. It has very strong linkages, with a compound leverage system providing plenty of power — FL-sizing is a breeze even with large, magnum cases. The 1″-diameter ram has 12.5 sq. inches of ram-bearing surface.
Some people may not know that the Rock Chucker offers a secondary 1 1/4″ x 12 thread for shotshell reloading dies and Piggyback 3 upgrade. The Rock Chucker Supreme retails for $213.79 now at Powder Valley and qualifies for a $35 RCBS rebate, lowering your net cost to $178.79 (after rebate). The RCBS Rock Chucker is definitely a quality product that can last a lifetime. For heavy-duty sizing chores this remains one of the best choices in single-stage presses. This is a good time to buy a RCBS press with the current RCBS Rebate Program.
Lyman Brass Smith Ideal C-Frame Compact Press
The Lyman Brass Smith Ideal Press is a very affordable, cast iron C-Frame reloading press. We think it is the new “class leader” in compact presses. This works great as a secondary press for your reloading room or a small press you can take to the range. The large front opening allows you to access the shell holder without hitting the support bar on other types of presses. Unlike other compact presses made from aluminum, Lyman’s Ideal press is cast iron so it is rigid and strong. The high-quality steel ram is one inch in diameter. The Brass Smith is a true ambidextrous press that can be accessed from either side and mounted the same. This is a great choice for a second, auxiliary press for depriming and bullet seating. It is now just $119.66 at Precision Reloading.
Hornady Iron Single Stage (Open-front) Press
In this “Reloading with Rosie” video, the attractive female host loads some ammo using the Hornady Iron Press. With a beefy, pyramid-style cast-iron frame with an open front, this press offers some advantages over a traditional “O-Frame” type press. Access is considerably easier, for one thing. And the top of the press includes slots to hold dies and tools — that’s really a very nice feature that saves time. Also an optional “automatic” priming system shuttles primers from a vertical tube in the back to the shell-holder in the front. That’s clever. Over all the Iron Press is a nice piece of engineering — good job Hornady. It is offered for $314.78 at Precision Reloading.
Lee Classic Cast (Iron) Breech Lock Press
The Lee Classic Cast Breech Lock Press offers excellent value for the money ($190.99 at Midsouth). Based on the proven design of the Classic Cast press, the updated Breech Lock series adds the quick-change die bushing and an improved primer drop system. This press is strong, with cast iron frame, all-steel linkage, and 12 square inches of ram bearing surface.
Lee says this press has the “largest opening and the longest stroke in the industry” among O-frame type presses. The handle can be mounted on either side. We love the fact that the handle ANGLE can be adjusted, as well as the lever arm length — that allows you to adjust travel and leverage to suit your preference. Smart engineering.
The new spent primer drop features a large-diameter hollow ram with clear hose that drops primers straight to a bin — that’s simple and effective. The press is very rigid and the base is wide enough for good stability. We have one of these Classic Cast Breech Lock Presses in our reloading room and it works well.
This article comes from the Criterion Barrels website. It provides good, conservative advice about barrel cleaning. Understand that cleaning methods may need to be adapted to fit the amount and type of fouling (and the particular barrel). In general, we do try to minimize brushing, and we follow the procedures Criterion recommends respecting the crown/muzzle. We have also had very good success using wet patches followed by Wipe-Out bore foam. Along with the practices outlined by Criterion below, you may want to try Wipe-Out foam. Just be sure to use a fitted cleaning rod bore guide, to keep foam out of the action recesses and trigger assembly.
The above video shows how to apply Wipe-Out or other bore-cleaning foam. We use a slightly different method. First, we use 3-4 wet patches to remove loose carbon fouling. Then we apply the foam as shown, but usually from the muzzle end (with bore guide in chamber). Here’s the important point — after 20-30 minutes, once the bubbles have dissipated, we apply the foam a second time, getting more of the active ingredients into the barrel. We then patch out, as shown, after 3-4 hours.
What is the Best Way to Clean a Rifle Barrel?
We are asked this question quite frequently alongside requests for recommended break-in procedures. Improper barrel cleaning methods can damage or destroy a barrel, leading to diminished accuracy or even cause a catastrophic failure. When it comes to barrel maintenance, there are a number of useful techniques that we have not listed. Some techniques may work better with different barrel types. This series of recommendations is designed to incorporate a number of methods that the Criterion Barrels staff has used successfully both in the shop and on their personal rifles. Please feel free to to list your own recommendations in the below comments section.
We recommend the use of the following components during rifle cleaning:
• Cloth patches (sized for the appropriate caliber)
• Brass jag sized properly for your bore [Aluminum and Nylon Jags also work]
• One-piece coated cleaning rod
• General bore cleaner/solvent (Example: Hoppes #9)
• Copper solvent of your choosing (Example: Sweets/KG 12)
• Fitted cleaning rod bore guide
• Plastic AP brush or toothbrush
• Q-Tips
• Plastic dental picks
• CLP or rust preventative type cleaner
There are a number of schools of thought relating to the frequency in which a barrel should be cleaned. At minimum we recommend cleaning a barrel after each shooting session to remove condensation, copper, and carbon build-up. Condensation is the greatest immediate threat, as it can cause the barrel to rust while the rifle sits in storage. Copper and carbon build-up may negatively impact future barrel performance, increasing the possibility of a failure in feed or function. Fouling should be removed whenever possible.
The below tips will help limit the wear of different parts of your barrel during routine maintenance, helping extend the life of the barrel and improving its performance.
The Lands and Grooves
This portion of the barrel may experience reduced efficiency due to copper fouling and cleaning rod damage. If copper fouling takes place during the initial break-in of the rifle, make sure to check our barrel break-in article.
For regular maintenance we suggest using a single piece coated cleaning rod rather than the traditional segmented rod or bore snake. While segmented rods and bore snakes may be convenient for field use, the corners between the segments may bow out and catch on the lands, scraping along the length of the rifling. Residual grit and particles from expended cartridges may also get caught between segments, resulting in an abrasive surface working its way down the length of the barrel. Most bore snakes will remove significant amounts of carbon fouling, but may fall short in the removal residual carbon buildup and copper fouling during deep cleaning. Good rods can be sourced from multiple manufacturers, but we have found good results using both Pro-Shot and Dewey brand products.
General cleaning requires the use of patches rather than nylon or brass bore brushes. Brass brushes may be required when aggressive cleaning is required, but can lead to unnecessary wear on the barrel if used frequently. This is not due to the nature of the soft brushes themselves, but from the abrasive particles of grit that become embedded in the material that is being run repeatedly through the bore. We recommend the use of bore guides when cleaning from both the muzzle and breech. These bore guides will help serve to protect the crown and throat from cleaning rod damage.
If significant resistance develops while running the cleaning rod through the bore, no attempt should be made to force it in further. Back the rod out and inspect the barrel to determine the cause of the resistance. The jag may be pushing between a bore obstruction and the rifling, digging a divot into the barrel before pushing the obstruction back through the muzzle. One way to minimize the risk of a stuck rod is by utilizing a slightly smaller patch during the initial push.
The process of cleaning the length of the rifling is relatively straightforward:
1. Check to make sure the rifle is safely unloaded.
2. Carry out any necessary disassembly procedures prior to cleaning.
3. Remove bolt (if possible) and insert fitted cleaning rod bore guide in action.
4. Soak a patch in bore solvent (similar to Hoppes #9).
5. Center and affix the patch on the brass jag, inserting it into the chamber end of the barrel. A misaligned patch may cause the jag to damage the lands of the rifling, so make sure the patch is centered on the jag. [Note, an aluminum or nylon jag will not show a “false positive”.]
6. Run the patch the full length of the barrel, retracting it upon reaching the end of the muzzle.
7. Let the solvent sit for a minute.
8. Continue to run patches through the bore until carbon residue is minimized.
9. Run a dry patch through the bore to ensure carbon residue has been removed.
10. Soak a patch in copper solvent (Sweet’s or KG-12).
11. Run the patch through the bore, leaving it to sit for 3-5 minutes (do not let solvent sit for more than 15 minutes.*)
12. Repeat this process until no blue residue remains on the patches.
13. Run a patch of Hoppes #9 and a dry patch through the bore to neutralize the copper solvent.
14. Inspect the barrel prior to reassembling the rifle, verifying that no bore obstructions remain.
*Please note that some ammonia-based copper solvents may prove to be corrosive if left sitting in the barrel for an extended period of time. It is essential that these solvents be removed within 15 minutes to avoid ruining the bore.
The Crown
The crown is the portion of the barrel where the bullet loses contact with the lands and grooves and proceeds to exit the firearm. The area most critical to accuracy potential is the angle where the bullet last touches the bore of the barrel.
Avoid damage to this area by using a plastic toothbrush and CLP type cleaner to scrub the crown from the exterior of the barrel. Even the most minimal variation in wear to the crown will negatively impact barrel performance, so be careful to avoid nicking or wearing away this part of the barrel.
The 30 BR is an amazing little cartridge. However, 30 BR shooters do have to neck-up 6mmBR or 7mmBR brass and then deal with some issues that can arise from the expansion process. One of our Forum members was concerned about the donut that can form at the new (expanded) neck-shoulder junction. Respected bullet-maker Randy Robinett offers tips on how to deal with the “dreaded donut”.
The Forum member was concerned about thinning the brass if he turned his 30 BR necks after expansion: “Everything I have found on 30 BR case-forming says to simply turn off the bulge at the base of the neck caused by the old 6BR shoulder. I expanded my first case and measured the neck at 0.329″ except on the donut, where it measures 0.335″. Looking inside the case… reveals a groove inside the case under the donut. Now, it is a fact that when I turn that neck and remove the donut, the groove is still going to be there on the inside? That means there is now a thin-spot ring at the base of the neck that is .005 thinner than the rest of the neck. Has anyone experienced a neck cracking on this ring?”
Randy Robinett, who runs BIB Bullet Co., is one of the “founding fathers” of the 30 BR who help prove and popularize the 30 BR for benchrest score shooting. Randy offers this advice on 30 BR case-forming:
While the thinner neck-base was one of our original concerns, unless one cuts too deeply INTO the shoulder, it is not a problem. For my original 30BR chamber, thirty (30) cases were used to fire 6,400 rounds through the barrel. The cases were never annealed, yet there were ZERO case failures, neck separations, or splits. The case-necks were turned for a loaded-round neck diameter of .328″, and, from the beginning, sized with a .324″ neck-bushing.
The best method for avoiding the ‘bulge’ is to fire-form prior to neck-turning (several methods are successfully employed). Cutting too deeply into the shoulder can result in case-neck separations. I have witnessed this, but, with several barrels and thousands to shots fired, have not [personally] experienced it. The last registered BR event fired using that original barrel produced a 500-27x score and a second-place finish. [That’s] not bad for 6K plus shots, at something over 200 firings per case.
Check Out the 30 BR Cartridge Guide on AccurateShooter.com
You’ll find more information on 30 BR Case-forming in our 30 BR Cartridge Guide. Here’s a short excerpt from that page — some tips provided by benchrest for score and HBR shooter Al Nyhus:
30 BR Case-Forming Procedure by Al Nyhus
The 30 BR cartridge is formed by necking-up 6mmBR or 7mmBR brass. You can do this in multiple stages or in one pass. You can use either an expander mandrel (like Joe Entrekin does), or a tapered button in a regular dies. Personally, I use a Redding tapered expander button, part number 16307. This expands the necks from 6mm to .30 cal in one pass. It works well as long as you lube the mandrel and the inside of the necks. I’ve also used the Sinclair expander body with a succession of larger mandrels, but this is a lot more work and the necks stay straighter with the Redding tapered button. This button can be used in any Redding die that has a large enough inside diameter to accept the BR case without any case-to-die contact.
Don’t be concerned about how straight the necks are before firing them the first time. When you whap them with around 50,000 psi, they will straighten out just fine! I recommend not seating the bullets into the lands for the first firing, provided there is an adequate light crush-fit of the case in the chamber. The Lapua cases will shorten from approx. 1.550″ to around 1.520″ after being necked up to 30-caliber I trim to 1.500″ with the (suggested) 1.520 length chambers. I don’t deburr the flash holes or uniform the primer pockets until after the first firing. I use a Ron Hoehn flash hole deburring tool that indexes on the primer pocket, not through the case mouth. — Al Nyhus
Here’s a November video bonus for our Daily Bulletin readers. Today we showcase three of the most amazing 3D “cutaway” gun animations ever created. Watch the operations of a pump shotgun, bolt-action rifle, and semi-automatic pistol. The superb cutaway views show details of the firearms’ internal parts, and show how ammunition cycles start to finish. Each of these videos took hundreds of man-hours to create, and each has been watched many millions of times.
Remington 870 Pump-Action Shotgun
This 3D animation shows how a Remington 870 pump-action shotgun works. The animation is superbly done, showing every aspect of the internal operation. Folks, if you have any interest in shotguns you should definitely watch this video start to finish. This shotgun video has received 3.9 million views in just 10 days!
The video’s talented creator, Matt Rittman states: “Cinema 4D was used to create each individual part, as well as animating everything. Substance Painter was used to create the wood stock and fore-end textures. Corona renderer was used for final output of lighting and textures.” See more of Matt’s 3D videos on his popular YouTube Channel.
This 3D animation showing how a Mauser Karabiner 98K (KAR 98K) bolt-action rifle works. The Karabiner 98K is a controlled-feed bolt-action rifle based on the famous Mauser M98 system. Video creator Matt Rittman notes: “Cinema 4D was used to create each individual part, as well as animating everything. Substance Painter was used to create the wood stock texture. Corona renderer was used to render everything. This animation took me over 500 hours to create.” This video has been watched over 21 million times!
Every bolt-action rifle owner should watch this remarkable video. It shows key processes which are common to many actions — Cocking the Bolt, Feeding from magazine, Engagement of Bolt Lugs, Activation of Trigger and Movement of Firing Pin, and Extraction with Ejection. The modeling of the inside of the bolt and fire-control group is excellent. This really is a superb video that will help rifle owners understand what happening inside their guns as the bolt is cycled. See more of Matt’s 3D videos on his popular YouTube Channel.
This 3D animation demonstrates how a modern semi-automatic, double-action-only Glock 19 handgun works. Cinema 4D was used to create each individual part, as well as animating everything. Substance Painter was used to create the main textures. Corona renderer was used to render everything. This animation took me over 500 hours to create. one of the most-watched gun videos ever created, this Glock 19 animation has been viewed over 78.6 MILLION times!
Video Highlights for Glock 19 Pistol
0:00 Intro
0:11 Basic Function
0:39 Case Extraction
0:47 Cartridge Loading
1:02 Trigger Reset
About Matt Rittman, the 3D Animator/Artist These three amazing videos were all created by the gifted computer graphics artist Matt Rittman. On his Matt Rittman YouTube Channel, Matt states: “I’m a 3D Generalist/Motion Designer from Des Moines, Iowa. I have always enjoyed animation and illustrating how things work. I’m especially interested in cars and anything mechanical.
My aim for this channel is to provide easy to understand how-it-works 3D animations. I will occasionally be releasing tutorials centered around Cinema 4D and the different capabilities of the software.”
For many years, the U.S. Army Marksmanship Unit (USAMU) regularly published reloading “how-to” articles on the USAMU Facebook page. In this article, the USAMU’s reloading gurus address a question frequently asked by prospective handloaders: “Should I buy a single-stage press, or a progressive?” The USAMU says the best answer is Solomon-esque in both its wisdom and simplicity: “Get BOTH!” However, there is definitely more to the issue, as the USAMU explains below.
Progressive Press Safety Considerations
by USAMU Staff
Many are the beginning handloaders who have asked a friend about their “setting up” a progressive press for them. The idea is that the newbie could then just feed in components and crank out buckets of practice ammo without needing to really learn much about handloading. Tempting though this might be, that’s simply not how it works. Such an approach might be ok if there were never a malfunction with either press or operator, but that’s unrealistic. Our hypothetical newbie would then lack the knowledge to problem-solve most situations.
Worse yet, several different handloading operations would be occurring at different stations on the progressive press at the same time. It takes an experienced operator to keep track of, and truly understand the significance of, all those potential mini-problems. Loading without this experience is a recipe for potential disaster – such as a double powder charge (especially with pistol cartridges) dropped while the loader was attending to some other function, etc. Progressives are an animal unto themselves, and while they offer many benefits, they do take some getting used to – even by experienced handloaders!
ILLUSTRATIVE HORROR STORY
Here, enter a 40-year veteran handloader who decided to jump onto the progressive bandwagon late in his career, having used only single-stage presses all his life. A High Master NRA High Power Rifle competitor, he had no background in competitive pistol shooting, where historically most progressive presses are found.
Experienced Action Pistol shooters have typically encountered multiple episodes in which shooters “skipped” a powder charge for some reason, leading to a squib round and a bullet possibly lodged in the bore. Thus, at matches, it’s reflexive for them to yell “STOP!” in unison if they see a shooter get a “click” vs. a “bang”, and rack the slide to keep firing. This writer has personally seen several pistols saved in just such scenarios over the years.
Click No Bang — What NOT to Do
Our High Master set up a popular progressive press and began turning out .223 Rem 100-yard practice ammo with abandon. He was using a moly-coated 52gr match bullet and an economical, fast-burning surplus powder that gave great accuracy. Once on the range, he began practicing strings of rapid-fire. All was well, until he heard “Click!” rather than “Boom”.
Lacking the above experience or onlookers to halt him, he reflexively operated the charging handle on his expensive, custom NM AR15 Service Rifle, and the next trigger squeeze reportedly registered on seismographs over at least a three-state radius. He sat, uninjured but bewildered, until the hail of expensive bits and pieces quit raining down around him.
When the smoke cleared, he immediately cursed the horrid, evil, demonically-possessed progressive press for this, his first-ever reloading mishap. His $1400 NM upper was ruined, but thankfully, his $800 pre-ban lower… and he had escaped injury.
This tale is told not to discourage the use of progressive presses, but to emphasize the need to EASILY and IMMEDIATELY KNOW what is happening with the press at each station, every time the handle is cranked. Not to do so is, as they say, “bad ju-ju.”
It illustrates why we at the USAMU Handloading Shop agree in recommending that new handloaders should begin with a single-stage press. Once one thoroughly learns the steps in each phase of handloading by repeated experience, then one will be qualified to move on to a progressive press.
The single-stage press will REMAIN virtually indispensable for one’s entire handloading career, even after having purchased a progressive press (or two). There are endless small projects that are best handled on a single-stage press, and a poll of USAMU’s Handloading staff reveals that not one would willingly be without his single-stage press, despite owning at least one progressive.
Sinclair Internationalhas released an interesting article about Case Concentricity* and bullet “run-out”. This instructional article by Bob Kohl explains the reasons brass can exhibit poor concentricity, and why high bullet run-out can be detrimental to accuracy.
Concentricity, Bullet Alignment, and Accuracyby Bob Kohl
The purpose of loading your own ammo is to minimize all the variables that can affect accuracy and can be controlled with proper and conscientious handloading. Concentricity and bullet run-out are important when you’re loading for accuracy. Ideally, it’s important to strive to make each round the same as the one before it and the one after it. It’s a simple issue of uniformity.
The reason shooters work with tools and gauges to measure and control concentricity is simple: to make sure the bullet starts down the bore consistently in line with the bore. If the case isn’t properly concentric and the bullet isn’t properly aligned down the center of the bore, the bullet will enter the rifling inconsistently. While the bore might force the bullet to align itself with the bore (but normally it doesn’t), the bullet may be damaged or overstressed in the process – if it even it corrects itself in transit. These are issues we strive to remedy by handloading, to maintain the best standard possible for accurate ammunition.
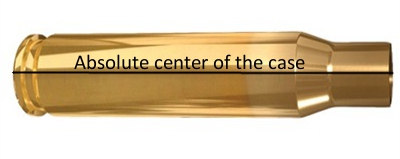
The term “concentricity” is derived from “concentric circle”. In simple terms it’s the issue of having the outside of the cartridge in a concentric circle around the center. That goes from case head and center of the flash hole, to the tip of the bullet.
Factors Affecting Concentricity
The point of using this term is to identify a series of issues that affect accurate ammunition. Ideally this would work best with a straight-walled case; but since most rifle cartridge cases are tapered, it equates to the smallest cross section that can be measured point by point to verify the concentric circle around the center. For the examples below, I’m working with .308 Winchester ammo.
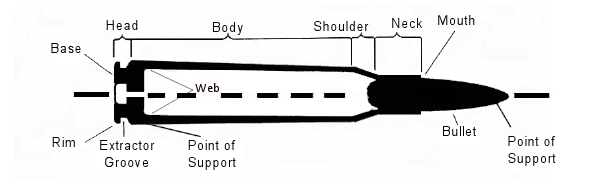
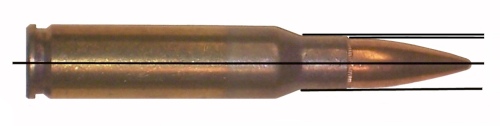
Figure 1: The cartridge.
Figure 2: Centerline axis of the case, extending from flash hole to case mouth.
The case walls have to be in perfect alignment with the center, or axis, of that case, even if it’s measured at a thousandth of an inch per segment (in a tapered case).
Figure 3: Case body in alignment with its axis, or centerline, even in a tapered case.
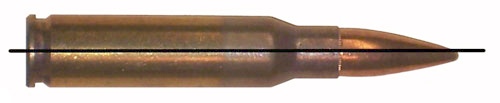
The case neck must also be in alignment with its axis. By not doing so you can have erratic bullet entry into the bore. The case neck wall itself should be as uniform as possible in alignment and in thickness (see the M80 7.62x51mm NATO cartridge in Figure 5) and brass can change its alignment and shape. It’s why we expand the case neck or while some folks ream the inside of the neck and then turn the outside for consistent thickness, which affects the tension on the bullet when seated.
Figure 4: Neck in alignment with center of the case axis.
Figure 5: Variations in case neck wall thickness, especially on some military brass, can cause an offset of the bullet in its alignment. This is an M80 ball round. Note the distinct difference of the neck walls.
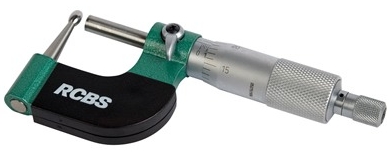
Having a ball micrometer on hand helps, especially with military brass like 7.62x51mm in a semi-auto rifle, where there are limits as to how thin you want the neck walls to be. In the case of 7.62 ball brass you want to keep the wall to .0145″.
Figure 6: A ball micrometer like this RCBS tool (#100-010-268) can measure case neck thickness.
Turning the outside of the neck wall is important with .308 military cases regardless of whether you expand or ream the neck walls. There are several outside neck turning tools from Forster, Hornady, Sinclair, and others. I’ve been using classic Forster case trimming (#100-203-301) and neck turning (#749-012-890) tools for 40 years.
Bullet Run-Out
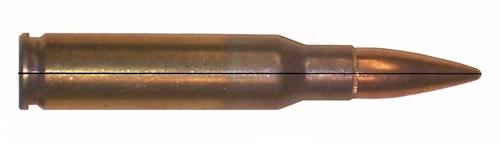
The cartridge, after being loaded, still needs to be in alignment with the center of the case axis. Figure 7 shows a bad example of this, a round of M80 ball. A tilted bullet is measured for what’s known as bullet “run-out”.
Figure 7: An M80 round with the bullet tilted and not aligned with the axis. This will be a flyer!
Run-out can be affected by several things: (1) improperly indexing your case while sizing, which includes not using the proper shell holder, especially while using a normal expander ball on the sizing die (it also can stretch the brass). (2) The head of a turret press can flex; and (3) improper or sloppy bullet seating. This is also relevant when it comes to using a progressive press when trying to load accuracy ammo.
Mid Tompkins came up with a simple solution for better bullet seating years ago. Seat your bullet half way into the case, back off the seater die and rotate the case 180 degrees before you finish seating the bullet. It cuts down on run-out problems, especially with military brass. You also want to gently ream the inside of the neck mouth to keep from having any brass mar the surface of the bullet jacket and make proper seating easier. A tilted bullet often means a flyer.
Figure 8: Proper alignment from the center of the case head to the tip of the bullet.
(NOTE: This links to a Web Archive version of the original Sinclair Int’l article.)
*Actually some folks would say that if we are talking about things being off-center or out-of-round, we are actually talking about “eccentricity”. But the tools we use are called “Concentricity Gauges” and Concentricity is the term most commonly used when discussing this subject.
In years past, the U.S. Army Marksmanship Unit published weekly reloading “how-to” article on the USAMU Facebook page. Here is a very informative USAMU article the subject of case lubrication. Tasked with producing thousands of rounds of ammo for team members, the USAMU’s reloading staff has developed very efficient procedures for lubricating large quantities of cases. This article reveals the USAMU’s clever “big-batch” lube methods. For other helpful hand-loading tips, visit the USAMU Facebook page on upcoming Wednesdays.
Rapid, High-Volume Case Lubrication
Today’s topic covers methods for quickly applying spray lube to cartridge cases prior to sizing. A typical order for this shop may be 25,000 rounds, so [speeding up] the lubrication process can be a real time-saver. While your ammunition lots probably aren’t this large, the efficient methods discussed here may help save a considerable amount of time over your handloading career. Our case lubrication rates range from 1500-1600 cases per hour, to 2400-2500 cases per hour, depending on caliber.
This shop uses virgin brass, whereas most home handloaders use fired brass, which necessitates some small changes at times. These will be discussed as they arise. Begin with fired brass that has been tumbled clean.
Ensure as much tumbling media as possible is removed from the brass, as when it gets into a size die, it can dent cases significantly. This is a good time to round out dents in the case mouths using a tapered tool to prevent damage from the decapping stem.
First, dump the clean cases into a large box or reloading bin. Shake the bin back and forth so that many cases are oriented with the mouths up. Next, pick up as many cases as is convenient with the mouths “up”, from natural clusters of correctly-oriented cases. With 7.62mm-size cases, this is usually 3-4, and with 5.56mm cases, this can be up to 8-10. Place the cases into the rack slots, mouth-up. Doing this in groups rather than singly saves considerable time. Once these clusters have been depleted, it will be time to re-shake the bin to orient more cases “up.”.
This photo shows a case lubrication rack made by a USAMU staffer.
Naturally, adjust the spacing to best fit the calibers you reload. We have found this size … convenient for handling through the various phases of case lubrication/transfer to progressive case feeders for processing. Note that the 1/2-inch angle does not cover much of the critical case area at the base, just forward of the extractor groove, where most re-sizing force will be exerted. As the USAMU uses virgin brass, less lubrication is required for our brass than would be needed for Full Length (FL) sizing of previously-fired brass.
NOTE: The amount applied using our rack is easily enough for our purpose. If using fired brass, be sure to adequately lube this base area to avoid having cases stick in the full-length sizing die.
Using a spray lube, coat the cases adequately, but not excessively, from all sides. Be sure to get some lube into the case mouths/necks, in order to reduce expander ball drag and case stretching/headspace changes. The spray lube this shop uses does not harm primers or powder, and does not require tumbling to remove after lubing.*
Take a close look at the photo above. The USAMU shop uses a common kitchen turntable, which allows the rack to be rotated easily. We place this in a custom-made box which prevents over-spray on to floors and walls.
Angled Box Method for Smaller Cases to be Neck-Sized
A refinement of the above method which especially speeds processing of 5.56x45mm cases is as follows. A small cardboard box which holds about 100 cases is fitted with an angled “floor” secured by tape. With the smaller 5.56mm cases, usually about 8-10 cases per handful can be picked up, already correctly-oriented, and placed into the box together. This prevents having to place them into the rack slots, saving time.
HOWEVER, note that this does not allow nearly as much lube access to the case bodies as does the rack. For our purposes — neck-sizing and setting neck tension on new brass, this works well. If using this procedure with fired brass, take steps to ensure adequate lube to prevent stuck cases.
As always, we hope this will help our fellow handloaders. Good luck, and good shooting!
*A two-part test performed here involved spraying primed cases heavily, while getting more lube into the case mouth/body than even a careless handloader would likely apply. The second part of the test involved literally spraying considerable quantities of the lube directly into the cases, drenching the primers. After a several-day wait to allow the lube to penetrate the primers, they were then fired in a test barrel. All fired normally; no unusual reports were noted. This bolstered confidence that normal amounts of the lube would not adversely affect our ammunition, and we have been pleased with the results over several years.
You’d like to protect your hearing, and maybe you’re a little curious about how your rifle might shoot suppressed. So you’re thinking of buying a suppressor (aka “can”, “moderator”, “silencer”). You can’t just get one off the shelf at Walmart. Acquiring a suppressor requires filling out paperwork and paying a Federal $200 Tax Stamp. Plus there is typically a pretty long wait. However, the good news is that suppressor ownership is now legal in 42 of the 50 American states — that’s 84%! For most American adults, getting a suppressor is legal, provided pass the required background checks.
States Where Suppressor Ownership is Allowed
Currently, the following 42 states allow private ownership of suppressors: AL, AK, AZ, AR, CO, CT, FL, GA, ID, IN, IA, KS, KY, LA, ME, MD, MI, MN, MS, MO, MT, NE, NV, NH, NM, NC, ND, OH, OK, OR, PA, SC, SD, TN, TX, UT, VT, VA, WA, WV, WI, WY.
Note: Even if you live in one of the states listed, you should still verify that owning a suppressor is legal in your area. Some states may have municipal- or county-based restrictions.
States Where Suppressor Ownership is Prohibited
Unfortunately, there are still eight (8) States that forbid private ownership of suppressors. The eight No-Go States are: California, Delaware, Hawaii, Illinois, Massachusetts, New Jersey, New York, Rhode Island. In these eight states, private ownership of suppressors (aka “silencers”) is forbidden. Hopefully that a few of those eight hold-out states will change their laws in the months ahead.
Looking Inside a Suppressor in Action
Popular YouTube Channel Smarter Every Day recently released a cool video featuring rifle suppressors with see-through acrylic sleeves. The team filmed shots through the suppressors using ultra-high-speed (110,000 frame per second) cameras. When played back in super-slow-motion, you can see the flame propagate through the suppressor and the bullet move through each baffle before it exists the muzzle. Watch the results in the video below — it’s mesmerizing:
See Through Suppressor in Super Slow Motion (110,000 fps) — Click Arrow to Watch:
Suppressors, On Average, Reduce Noise Levels about 30 Decibels
In an article for Ammoland, gunwriter Sam Hoober says that you can expect about 30 decibels (dB) of noise reduction from the average suppressor: “Looking at a few different products, SilencerCo attests their suppressors reduce the sound pressure of a 9mm gunshot to anywhere from 125.7 dB to 131.5 dB, depending on the model. Advanced Armament Co, another popular supplier, attests a 23 dB to 33 dB reduction or down to 127 dB. Liberty Suppressors, another manufacturer, attests a reduction of 24 dB to 38 dB, depending on model and other factors. In short, we can presume something on the order of 30 dB of attenuation as an average.”
Using that 30 dB number you can quickly discern that you’ll still need hearing protection — good hearing protection — when shooting any suppressed firearm (even a .22 LR). “Spikes of 130 dB and more can result in permanent hearing damage instantly”. Source: NRA Blog.
Here is a simple technique that can potentially help you load straighter ammo, with less run-out (as measured on the bullet). This procedure costs nothing and adds only a few seconds to the time needed to load a cartridge. Next time you’re loading ammo with a threaded (screw-in) seating die, try seating the bullet in two stages. Run the cartridge up in the seating die just enough to seat the bullet half way. Then lower the cartridge and rotate it 180° in the shell-holder. Now raise the cartridge up into the die again and finish seating the bullet.
Steve, aka “Short Range”, one of our Forum members, recently inquired about run-out apparently caused by his bullet-seating process. Steve’s 30BR cases were coming out of his neck-sizer with good concentricity, but the run-out nearly doubled after he seated the bullets. At the suggestion of other Forum members, Steve tried the process of rotating his cartridge while seating his bullet. Steve then measured run-out on his loaded rounds. To his surprise there was a noticeable reduction in run-out on the cases which had been rotated during seating. Steve explains: “For the rounds that I loaded yesterday, I seated the bullet half-way, and turned the round 180 degrees, and finished seating the bullet. That reduced the bullet runout by almost half on most rounds compared to the measurements from the first test.”
Steve recorded run-out measurements on his 30 BR brass using both the conventional (one-pass) seating procedure, as well as the two-stage (with 180° rotation) method. Steve’s measurements are collected in the two charts above. As you can see, the run-out was less for the rounds which were rotated during seating. Note, the change is pretty small (less than .001″ on average), but every little bit helps in the accuracy game. If you use a threaded (screw-in) seating die, you might try this two-stage bullet-seating method. Rotating your case in the middle of the seating process won’t cost you a penny, and it just might produce straighter ammo (nothing is guaranteed). If you do NOT see any improvement on the target, you can always go back to seating your bullets in one pass. READ Forum Thread.


 Do you know which one of your eyes is dominant? It’s easy to determine eye dominance with a simple exercise. Pick an object about 6-10 feet away (a light switch or door knob works well). Make an “OK” sign with your right hand (see photo) and hold that about 18″ from your face. Now, with both eyes open, look through the circle formed by your thumb and index finger. Center the circle on the object, so you can see the object in the middle.
 The digital archives of Shooting Sports USA contain many interesting articles. A while back, Shooting Sports USA featured a “must-read” expert Symposium on Eye Dominance, as it affects both rifle and pistol shooting. No matter whether you have normal dominance (i.e. your dominant eye is on the same side as your dominant hand), or if you have cross-dominance, you’ll benefit by reading this excellent article. The physiology and science of eye dominance is explained by Dr. Norman Wong, a noted optometrist. In addition, expert advice is provided by champion shooters such as David Tubb, Lones Wigger, Dennis DeMille, Julie Golob, Jessie Harrison, and Phil Hemphill. NOTE: If the story doesn’t open at the links, go to the ssusa.org home page first, indicate you are over 18, and then CLICK HERE.

 If you are not yet familiar with the many unique features of the Forster Co-Ax, we recommend you watch the video above, a very thorough video review by Rex Roach. This shows how the press operates and highlights the design elements which set the Co-Ax apart from every other reloading press on the market. This 14-minute video shows the key Co-Ax features, explaining how the floating case-holder jaws work (3:30 time-mark), how the dies are held in place (4:40 time-mark), how spent primers are captured (6:10 time-mark), and how to set the primer seating depth (10:00 time-mark). We’ve used a Co-Ax for years and we still learned a few new things by watching this detailed video. If you are considering purchasing a Co-Ax, definitely watch this video start to finish.
 Lyman’s sturdy Victory Single-stage Press is a full-size unit that competes with the RCBS Rock Chucker Press. With beefy cast iron construction, the Victory’s strength and leverage rivals the Rock Chucker. The press operates smoothly and the handle can be mounted on either side.
 Nearly every serious hand-loader has owned or used the RCBS Rock Chucker press. This Editor still uses a Rock Chucker passed down by his brother 20 years ago. And yes, it is still going strong. The latest Rock Chucker Supreme single-stage press features an improved “upside-down Y-path” dual-bin spent primer catcher. Otherwise the Rock Chucker Supreme remains big, strong, versatile and sturdy. It has very strong linkages, with a compound leverage system providing plenty of power — FL-sizing is a breeze even with large, magnum cases. The 1″-diameter ram has 12.5 sq. inches of ram-bearing surface.

 The Lee Classic Cast Breech Lock Press offers excellent value for the money (
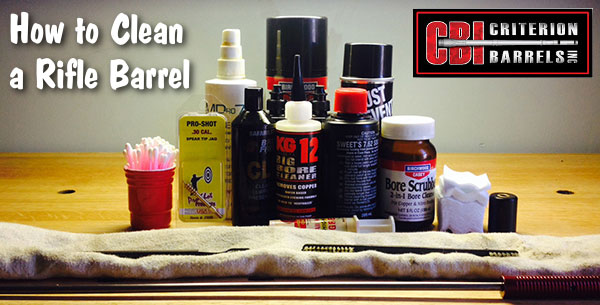

 The 30 BR is an amazing little cartridge. However, 30 BR shooters do have to neck-up 6mmBR or 7mmBR brass and then deal with some issues that can arise from the expansion process. One of our Forum members was concerned about the donut that can form at the new (expanded) neck-shoulder junction. Respected bullet-maker Randy Robinett offers tips on how to deal with the “dreaded donut”.

 These three amazing videos were all created by the gifted computer graphics artist Matt Rittman. On his