A new Vortex video series, Cartridge Talks Comparisons, looks at multiple variables along with ballistics gel tests to determine the comparative performance of popular cartridge types. Each Month, Cartridge Talks will examine and test two popular cartridges, comparing their head to head performance. In Episode 1, Vortex Nation™ hosts Mark Boardman and Ryan Muckenhirn pit the 6.5 Creedmoor and .308 Winchester cartridges against each other, examining projectile performance. Mark and Ryan then make conclusions about the applications best suited to each cartridge type.
Cartridge Comparison 14-minute video, Highlighting Ballistic Gel Testing
This first Cartridge Talks Episode pits the 6.5 Creedmoor against the .308 Winchester in a head-to-head, ballistics gel-induced bullet battle. Ballistics (drop/drift), penetration ability, terminal performance and other variables are tested with a variety of tools and tests. Viewers are invited to check out Episode 1, and suggest future cartridge battles in the comments section.
Here is the full 67-minute 6.5 Creedmoor vs. .308 Win Cartridge comparison video:
“With the myriad of cartridges available to the big game hunter, picking which chambering is best for you and your application can be a daunting task,” says Muckenhirn. “In Cartridges Talks, we put our biases on the shelf and put as much scientific process to this as possible. From ‘shootability’ and accessibility, to terminal performance as observed in ballistics gel, Cartridge Talks wades through the numbers and figures with you, loads you up with the pertinent information, and helps you select the ideal cartridge for your next hunt!”
We like well-executed DIY (Do-It-Yourself) projects. You can save money with DIY projects, and often create something unique and special that can’t be purchased from any vendor. That’s the case with this very cool double shooting bench built by Jacob D., a pilot and 6.5 Creedmoor shooter. The design of the bench is smart — it allows two right-handed shooters, but it can also handle a right-hander and a left-hander. (The lefty sets up in the right half of the bench.)
Jacob, who flies for Arizona’s Mesa Airlines, built his own side-by-side benchrest shooting bench. He then posted photos of this on the 6.5 Creedmoor Group Facebook Page. We like this — very nice work Jacob!
Jacob writes: “Sighting in my new Ruger Precision Rifle with Leupold VX3i LRP 6.5-20x50mm and Burris tactical rings, using my benchrest table I built. Very happy with the combo!”
There is plenty of room for two shooters and two rifles on Jacob’s big and sturdy DIY shooting bench.
AR-platform rifles can be maintenance-intensive beasts. They need regular inspection, cleaning, and lubrication. But some AR owners make the situation worse by not regularly cleaning important small parts, or by using too MUCH oily/greasy lubricants in the wrong places. A properly maintained and lubricated AR15 can shoot hundreds of rounds (between cleanings) without a problem. If you learn where (and where not) to apply lubricant, you’ll find that your AR will run more reliably and the task of cleaning the bolt, bolt carrier, and upper receiver internals will be less of a burden.
Here we showcase videos that show how to field-strip an AR-15, inspect the key parts, clean components, and lubricate internal parts as needed. Along with these videos, we recommend you read the comprehensive AR-15 Gun Cleaning Clinic article on the Brownells website. This explains in detail important procedures that the videos might only cover in a few seconds.
If you want to keep your black rifle running smoothly and reliably, you must clean it regularly and follow the correct maintenance procedures. Here are five videos that explain how to properly disassemble and clean AR-platform rifles.
1. How To Clean Your AR-15 | Cleaning and Maintenance Tips
This is a quick 90-second starter video that may help new AR owners. Ricky Lehnhardt of OTIS Technology demonstrates the basics of cleaning and maintaining your AR-15. Lehnhardt does a good job identifying the points that need cleaning on the inside of ARs. However he works very quickly in the video. You may want to pause the video at some points. Also, Lehnhardt employs a cable for pulling patches and brushes through the barrel. Yes this is fast and easy. However, for match AR rifles, we recommend that you instead use a cleaning ROD with fitted bore guide.
2. Take-Down and Full Cleaning of AR-15 by Jerry Miculek
Here ace shooter Jerry Miculek takes down and cleans an AR-platform rifle belonging to his daughter Lena. This is a good video because Lena’s rifle was “run hard and packed up dirty” so you can see where carbon and grease build up. This 35-minute video is very thorough. Jerry is one of the nation’s top action carbine shooters, so listen carefully to his advice on cleaning and lubrication.
3. AR-15 Maintenance: Field-strip, Clean and Lubricate an AR-15
Gunsite Academy instructor and gunsmith Cory Trapp demonstrates the proper way to field-strip, clean, and lubricate an AR-15 carbine. In this 30-minute video, Trapp offers several important technical tips and hints. For example, at 11:05 Trap demonstrates how to determine if your bolt needs new gas rings. Along with cleaning procedures, this video explains how to inspect key components and how to function-test your AR before each shooting session.
4. AR-15 Dissassembly and Cleaning Guide
This video does a good job, with close-ups, showing how to remove the bolt carrier and clean the inside of the upper receiver. Then you can see how to work with various tools to clean the bolt, bolt carrier, and inside of chamber. We also recommend that you inspect the ejector recess and extractor recess. When we’ve inspected ARs that failed to cycle properly, we have often found nasty gunk (mixture of carbon, greasy lube, and brass particles) in these areas.
5. Basic AR-15 Quick and Easy Field Maintenance
In this NSSF-sponsored video, pro shooter Ryan Muller demonstrates basic, quick field maintenance of his AR-15. This would be for a quick cleaning and lubrication of the reciprocating parts. This covers rapid maintenance in the field. For full field-stripping and thorough cleaning, watch the previous videos.
Handy Mat for Cleaning AR Rifles
When working on an AR-15, it’s smart to have a pad that can absorb solvents and cushion your upper and lower. The $24.99 Real Avid Smart Mat is a good choice. This features printed take-down instructions and it has a handy parts tray on the right side. The mat rolls up for convenient storage. Click HERE to learn more.
Vital Inspections You Should Do After Disassembly
Last but not least, here are recommended inspections you should do every time you do a full field-strip and cleaning of your black rifle:
If the battery on your safe’s electronic lock is more than a year old, or if it is not giving you the right voltage, replace it today!
Check Your Gun Safe Batteries
We’re into Q2 of 2024 already. Hey guys — when was the last time you replaced the batteries in your gun safe? Has it been more than a year? If so, it’s time you get a new battery (or two) for that safe. The electronic keypad won’t work with an insufficient charge, and the lock system could potentially lose its combination memory if you wait too long.
IMPORTANT: If you have a safe with an electronic keypad, you should replace the battery every year as a precautionary measure. Trust us, you don’t want to come back in a few months and find that the keypad memory is kaput, and you’re locked out. That can lead to frustration and an expensive locksmith visit.
Here’s a true story. I have one safe with a Sargent & Greenleaf (S&G) keypad. A couple years back, in early December, I went to get into the safe. I punched in the correct combination, but all I got was a rapid “beep, beep, beep, beep” after I finished the last combination entry. I tried again to ensure I entered the combination correctly (I did). But again, the locking system responded with multiple rapid beeps indicating something was wrong. And the safe would not open. Now I was worried….
I popped out the battery holder (which slides in from the bottom of the keypad housing on the door). I removed the battery and tested it with a volt-meter. The 12-month-old Duracell 9-volt battery only registered 6.1 volts.
Low voltage was the problem. I went down to the store and got a couple new 9V batteries. I tested the new batteries and both measured 9.4 volts output. I slipped one of the new 9V batteries into the keypad housing, punched in the combination and everything worked OK again. Eureka.
Most electronic locks for safes WILL “remember” the combination for a period of time even when the battery is low (and the keypad’s “brain” should retain the combination when you remove the battery for replacement). However, a dead battery, or extended periods of low voltage can give you problems. Don’t rely on wishful thinking…
Mirage shields are useful for all shooters, not just hard-core competitors. A mirage shield helps you see your target better, without distortion caused by heat waves coming off your barrel. This isn’t rocket science — it’s a simple, inexpensive way to see better and shooter more accurately. We’ve advocated that varmint shooters give mirage bands a try on those hot summer groundhog and prairie dog expeditions. And we observed that practically every shooter at the 2013 World F-Class Championship was using a mirage shield of some kind.
Forum member Fabian from Germany, whose Sako 6mmBR Rifle was featured many years ago as a Gun of the Week, has devised a clever and inexpensive mirage band option. Fabian is a radiologist by trade. He notes that many X-ray machines require a daily test film for calibration. These are normally just discarded in the trash, so you can get them for free.
Fabian explains: “I’m a radiologist, so I handle medical x-ray films every day. Modern X-ray machines use laser-based printers and they need to print a test-film every day. One x-ray film is about 43×35 cm (16.9″ x 13.7″). Made from polyester, the films are very stable and only 0.007″ inches thick. They are light-weight, semi-transparent, and very stable. Using normal scissors, you can easily cut four mirage shields from a single sheet of film. Then glue on some velcro to attach to your barrel. Try it, you will not be disappointed.”
Carbon Fiber Mirage Shield from Rodzilla
If you’re not into making your own mirage shield, aka “mirage band”, Rodzilla, makers of the superb Raptor front rest and 5-Axis rest tops, offers an excellent 3″ x 24″ carbon fiber mirage shield. This 1/32″-thick band is really a top-tier, state-of-the-art shield. Order it for $30.00 from TheRodzilla.com web store.
Here’s a “must-read” article for .22 LR rimfire shooters. The October 2018 issue of Shooting Sports USA (SSUSA) includes a great article with data on thirty-one (31) different types of popular .22 LR rimfire ammunition. The line-up includes low-speed, standard, and Hi-Velocity types, plus choices for plinking, varminting, and target applications. Brands tested include: Aguila, American Eagle, CCI, Federal, Fiocchi, Lapua, Remington, and Winchester. The slowest ammo, CCI Quiet-22 Lead RN, clocked 727 FPS. The fastest ammo, CCI Short-Range Green Lead-Free HP, ran 1735 FPS, 2.4 times the speed of the Quiet-22.
For each ammo type, SSUSA lists the bullet weight, velocity (FPS), and average of two, 5-shot groups at fifty yards. The most accurate ammo was Lapua Center-X LRN, with a 0.37″ average 50-yard group size. Second best was Lapua X-ACT LRN at 0.42″. Ammo was tested from a bench with a Cooper Model 57-M rifle fitted with 3-9x33mm Leupold VX-2 scope. The ammo offerings were grouped into three categories: (1) Varmints/Small Game; (2) Target; and (3) Plinking. (See ammo tables below.)
Click for larger page-view.
Different types of .22 LR (Long Rifle) rimfire ammo have different applications. Subsonic ammo, typically, is best for 25m to 50m target work with precision rimfire rigs. Hi-Velocity .22 LR ammo provides a flatter trajectory for longer ranges. SSUSA explains: “The array of .22 LR loads… turns a person’s head every which way. Subsonic target loads are the key to decisive accuracy on targets, while hyper-velocity cartridges provide striking bullet expansion on small varmints. In between, standard and high-velocity .22 LRs are loaded with a variety of bullet weights and styles for everything from small-game hunting to plinking[.]” READ Full SSUSA .22 LR Rimfire Ammo Story.
Spring varmint season is well underway, and we just showcased six groundhog hunting videos. So here’s a very accurate Half-Mile ‘Hog rifle, that can drill a groundhog at long range. While just about any cartridge from a 22 Magnum on up will do the job on a groundhog at close range, when you want to “reach out and touch” your prey at very long distance, it takes a case capable of tossing a heavier, wind-bucking projectile at ultra-high speeds. This week we feature a 6mm Remington Ackley Improved (6mm AI) belonging to our friend John Seibel, who ran the Varmints for Fun website for many years.
John’s handsome BAT-actioned rifle sends the 87gr V-Max at a blistering 3675 fps. With its 1/4-MOA accuracy and flat-shooting ballistics, this gun is a varmint’s worst nightmare, a rig that regularly nails groundhogs at a half-mile (880 yards) and beyond.
Quarter-MOA Accuracy For Long-Distance Varminting
GunDay Report by John Seibel
John reports: “So far this gun has been an awesome long-distance varmint rig, with enough velocity to smack those critters hard at 800 yards and beyond. I have some more testing to do, but it seems that the 87gr V-Max (molyed) pushed by 52 grains of N160 or 51.5 grains of RL-19 shoots very well indeed. Velocity runs around 3675 fps. I shot consistent 1″ groups at 500 yards with both of these loads. Warning: These are max loads that work in my rifle, so start at least 10% lower and work up.
My fire-forming procedure is just jam and shoot. I start with a powder (such as H414) that works for the parent case, fire a few cases as I work up the load to where I get a well-formed case, then shoot them at varmints. Then I work my load up with the newly-formed cases over a chrono. If a load looks good at 100 yards, I will go straight for 200 yards. I’ve seen that some loads which grouped well at 100 won’t shoot well at 200. If it is consistent at 200, then I’ll shoot it a steel plate at 500 yards. Then the truth will be told.
Man I love that BAT action! I have tried some Berger 88gr Lo-Drag bullets as well. They have the same BC as the V-Maxs but offer excellent accuracy. The action is BAT’s Model B round action configured Right Bolt, Left Port, with a fluted .308-faced bolt. The port is 3.0 inches wide — perfect for the 6mm Rem Improved cartridge’s OAL. I use a NightForce 8-32x56mm NXS scope mounted to BAT’s 20-MOA aluminum Weaver-style base. I use Burris Signature Zee rings because they are self-aligning and easy on scope tubes, plus you have the option of adding more MOA if needed.
Krieger with Harrell Brake
The barrel is a stainless Krieger 1:12″ twist Heavy Varmint contour, finished at 26″. I installed a Harrell’s muzzle brake because I hate recoil and I like to be able to spot my hits when target shooting and hunting–especially hunting.
When hunting I am usually by myself so when I eyeball a varmint I want to see my shot flatten him … and I hardly ever miss (heh-heh). Make sure you have your earplugs in though — that muzzle brake is loud!
Easy-Steering Thumbhole Varminter
The stock is Richard’s Custom Rifles Model 005 Thumbhole Varminter. This is a big stock that rides the sand bags very well. Took me a while to get used to this stock as I had never shot a thumbhole before. It is very comfortable and easy to control when you are shooting a moving target. In fact, my first kill with this rifle was a coyote at a little over 200 yards, she was moving along at a slow clip and I had to give her the ole’ Texas heart shot before she disappeared over a hill! (It’s pretty rare for me to shoot moving varmints though — at long-range, I want my cross-hairs steady on the target.)
Regarding the stock selection, I like Richard Franklin’s stocks [now out of production] because they are well-suited to my kind of shooting. I prefer a stock that is flat most of the way back towards the action because when I’m shooting out of my truck window it has to balance around mid-point. Also his stocks seem to track very well on the bench. I guess the stocks I like the most are his Model 001 and Model 008 F-Class. [Editor’s note: John often shoots from the driver’s seat of his truck because he is partially paralyzed. He also has a hoist in his truck bed for his wheelchair. Even with his mobility challenges, John tags more varmints in a season than most of us ever will.]
Choice of Caliber — A 6mm with More Punch for Long Distance
I picked the 6mm Rem Improved mainly because it has that long neck for holding long bullets and it doesn’t burn the throats out as fast as a .243 AI would. I don’t use Remington brass; it splits when fire-forming and seems to work-harden fast. Another reason I picked the 6mm Improved was what I saw in the field–it seemed to be a perfect long-range groundhog getter. I saw my stocker, Richard Franklin, flat smack groundhogs out to 900+ yards with regularity. The OAL of a 6mm Improved does make it hard to remove a loaded round from a standard Remington 700 action. That’s why I went with the BAT Model B, with its longer 3.0″ port. For a standard action, a .243 AI might function better.
As for the 6 Dasher, from what I have read, I think it is a fine round. I’m a hunter though and a lot of case-forming isn’t worth it to me. Forming the Ackleyized cases is bad enough. The 6-250 is a real screamer and very accurate but it doesn’t have the capacity to drive the heavier bullets as well as the 6mm Improved. I have tried a .243 WSSM, also with a Richard’s stock (#008) and a BAT action. It may not shoot as well as the 6mm Rem Improved, but I like those short fat cases.
John’s Views on the Great Moly Debate
Editor: John started with moly-coated bullets for this 6mm Rem AI rifle, but he has moved away from that. He does have considerable experience with coated bullets, and now, at least with custom, hand-lapped barrels, he normally uses uncoated bullets. He now favors coated bullets only for the small .17 caliber.
Moly or no moly… hmm? I have used moly and Danzac for several years, mainly Danzac. In my experience, both moly and Danzac can work well for somebody who shoots a lot of rounds before cleaning. A barrel has to be broken-in correctly whether you use moly or not. I have done break-in with naked bullets, using the conventional method of shooting and cleaning till the copper stops sticking. I have also gone through the break-in process using molyed bullets from the start. It seems to me the barrels broke-in more readily with moly bullets than with naked bullets. I think if there are any rough or sharp places in the barrel the slick molyed bullet doesn’t grab it as badly and the moly will “iron” the flaw out without leaving copper behind.
The main mistake I think most people make with moly is improper cleaning. By that I mean they don’t get the bore clean from the beginning. Some people will scoff at me for this but I use JB bore paste for most all my cleaning, hardly ever use a brush. Just JB and Montana Extreme or Butch’s Bore Shine. It works for me! Now shooting molyed bullets works fine to say 500 yards, but any further and you really need a lot of tension on the bullet. If not you will get bad flyers.
Personally, I use coated bullets only with .17 cal rounds now. I did use them initially in my 6mm Rem AI but I am starting to move away from that. With proper break-in, the fine custom barrels we have now will not copper if you clean correctly and don’t push those bullets too fast! And remember that powder-fouling build-up is an accuracy-killer too. That is another reason I use a lot of JB paste.
John lives and works on a farm in Virginia. Getting rid of intrusive varmints is part of the job of running the farm. Here is one of John’s bolt-action pistols, which is very handy when shooting from a vehicle.
The Guru of Varmints For Fun
For many years John Seibel ran the popular Varmints For Fun website (now offline). This site offered excellent advice for hunters and reloaders. John covered a wide variety of varmint chamberings, from big 6mm wildcats, to the popular 6BR, 22BR and .22-250 caliber varmint rounds, and even the micro-caliber wildcats such as the 20 Vartarg and 20 PPC. Shown below is one of his favorite rifles, a 20 PPC with a special short version of Richard Franklin’s Model 008 stock.
John tells us: “I guess one reason I started my web site is that I was getting a lot of inquiries about hunting groundhogs, custom rifles and reloading. Plus I thought it was a fine way to get young people interested in the shooting sports. Lord knows hunting and firearms aren’t taught any more. I get a lot of young hunters and shooters asking what’s the best caliber for hunting varmints, and they’ll ask for reloading help too. It’s a shame, but many of them have no one to teach them. I do my best to help.
Showing others that a person can still shoot, even with a disability, is another reason I started my web site. I am a C 6-7 Quadraplegic, which means I have no grip in my hands. Imagine shooting those 1.5 oz Jewels that way! I had a therapist tell me I wouldn’t be able to shoot or reload once I got out of the hospital…shows you how much he knows! First time I got home from the hospital it was deer season and I had Pops park me at the edge of some woods. Well I had a 7-point buck on the ground in thirty minutes! Being raised on a farm didn’t hurt none either–it helped me figger ways to jury-rig stuff. Of course I couldn’t have done much if it wasn’t for my family and my lovely wife Cathy[.]”
John’s Favorite 20 PPC Varmint Rifle
Cartridge History Lesson — the Original .244 Remington
Here’s bit of cartridge history. The 6mm Remington, parent of John’s 6mm AI, actually started its life with a different name, the “.244 Remington”. What we now know as the “6mm Remington” was originally called the .244 Remington. The cartridge was renamed because it was not a commercial success initially, being eclipsed by the .243 Winchester. The .244 Remington and the 6mm Remington are identical — only the name was changed.
Spring Groundhog Hunting — Fun and Challenging
Springtime is the right time for groundhog hunting in the Northeast USA. Groundhog hunting is both fun and challenging. In today’s Saturday Showcase, we feature three videos showing successful groundhog hunts. Then there is a video about checking your equipment and verifying your varmint rifle zero.
We’ve even included a good video offering cooking tips for groundhog/woodchuck.* Yes groundhog meat can be quite savory — used in stews, sandwiches, or tacos. Last but not least we’ve included a section on groundhog shooting matches. These are fun matches with paper and/or steel groundhog targets.
Groundhog Hunt Report — Successful Stalk and Shoot
Here’s a great Realtree.com video showing successful groundhog hunts. This covers the process of spotting and tracking groundhogs on farmlands. Woodchucks are sensitive creatures that get easily spooked. This video shows that groundhog hunters need patience and skill, plus an accurate rifle.
Groundhog Hunting on the Family Farm with .17 HMR
In this video, the host employs his CZ 457 rifle chambered in .17 HMR to hunt groundhogs on his farm. The video provides a hunter’s POV with excellent Scope-Cam footage. This young shooter has 280 videos on his popular Blocketh Outdoors Channel including videos showing how to stalk groundhogs successfully. These critters go to ground quickly if they see or hear the hunter. NOTE: The lead photo for this Saturday Showcase comes from another Blocketh Outdoors groundhog video.
Groundhog Killshot Compilation Video
Here’s a classic “killshot” video showing multiple hits on groundhogs. If you want to see how a well-aimed varmint bullet can flip, spin, and elevate a groundhog, this video will keep you entertained. While we like explosive hits on prairie dogs, it may be better to use a solid, non-expanding bullet if you plan to harvest the groundhog (aka woodchuck) meat.
Groundhog Hunting — Importance of Confirming Your Zero
This AR15 Hunter channel video covers getting ready for spring groundhog season. This is a helpful video that shows how to confirm your zero on your varmint rifle. If you have an AR-platform Modern Sporting Rifle, this video is worth watching.
If you don’t have groundhogs in your part of the USA, don’t fret. You can still have fun hunting smaller varmints such as ground squirrels and Prairie Dogs. Here’s a good video covering P-dog hunts with a suppressed .223 Rem AR. The video covers recommended equipment including bipod, tripod, and optics.
Groundhog Matches — Fun Shooting at Paper and Steel ‘Hogs
Along with actual groundhog hunting, many shooters like to shoot paper and/or steel groundhogs in club groundhog competitions. These are fun matches that you can shoot with a variety of rifles. Our first choice would be a 22 BR for ranges out to 450 yards or a 6 BRA if targets are farther out. One popular match in the Northeast is the St. Thomas Ground hog shoot in Pennsylvania (see below).
At clubs across the country, varmint fun shoots (also known as “groundhog matches”) are becoming more popular every year. In these matches, usually shot from the bench, you engage paper targets, clay pigeons, steel “critter” silhouettes, or some combination of paper and reactive targets. Shooters like these matches because you can shoot a wide variety of rifles, you don’t have to spend a fortune to be competitive, and there is fun for the whole family. Rules are inclusive — you won’t be turned away because your rifle is two ounces overweight. A large percentage of the match fees usually go back to shooters in the form of cash prizes. And the level of camaraderie is high.
St. Thomas Groundhog Shoot, Report by Jonathan Trivette
Nestled at the base of a mountain in south-central Pennsylvania is the St. Thomas Sportsmen’s Association. On a cool Saturday morning you’ll find some of the area’s best shooters at the monthly Groundhog Match. The match attracts shooters from Virginia, Maryland, West Virginia, and of course Pennsylvania.
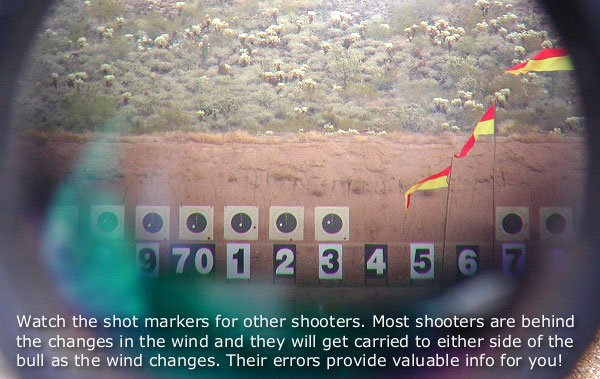
It may not be the longest-yardage match in the area, but it can be the one of the toughest. The range is sloped up the mountain a little so the winds can be very tricky. Often times the three wind flags at 200, 300, and 400 yards will all be blowing in different directions.
* “Groundhog” and “Woodchuck” are simply two different names for the same animal. Both terms have been used in the English language since the 1600s. In many places, the terms are used interchangeably, but “groundhog” is now increasingly more common in the USA.
In this article, three great champions reveal their wind-calling secrets in video interviews. We first published this “Three Champions” story a few years ago. If you are a competitive shooter, and you want to learn more about reading the wind, you should watch all three of these interviews. These guys are among the best shooters to ever shoulder a rifle, and they have much wisdom to share.
At the 2010 SHOT Show, we had the unique opportunity to corner three “superstars” of High Power shooting, and solicit their wind-reading secrets. In the three videos below (in alphabetical order), Carl Bernosky (10-Time Nat’l High Power Champion), David Tubb (11-time Nat’l High Power Champion and 7-time Nat’l Long-Range Champion), and John Whidden (6-Time Nat’l High Power Long-Range Champion) shared some of the wind-doping strategies that have carried them to victory in the nation’s most competitive shooting matches. This is GOLD folks… no matter what your discipline — be it short-range Benchrest or Long-Range High Power — watch these videos for valuable insights that can help you shoot more accurately, and post higher scores, in all wind conditions.
We were very fortunate to have these three extraordinarily gifted champions reveal their “winning ways”. These guys REALLY know their stuff. I thought to myself: “Wow, this is how a baseball fan might feel if he could assemble Babe Ruth, Hank Aaron, and Ted Williams in the same room, and have them each reveal their hitting secrets.” Editor’s Note: These interviews were conducted before all three men won their most recent National Championships so the introductions may list a lower number of titles won. For example, John Whidden won back-to-back LR Championships in 2016 and 2017.
NRA publication Shooting Sports USA (SSUSA) has thousands of articles online, all free for the reading. Many of these stories have been written by top competitors, including National and Olympic Champions. You will find SSUSA articles spotlighted every week on the NRA Competitive Shooting Facebook page. We recommend you bookmark that page as a valuable resource. Here are four notable SSUSA articles that have been featured on Facebook this month. Go to SSUSA.org to see even more current articles, with new content every day.
Here is an insightful, fairly lengthy 1850-word article about the phenomenon we call mirage. The article explains how and why mirage appears, how it can best be monitored, and how mirage can indicate both wind velocity and direction. Top competitors follow the adage “Mirage is your friend”, because mirage can often be the most important indicator of wind variables — sometimes even more important than wind flags. “The mirage is more sensitive than the flags since it has less inertia and momentum”, wrote Desmond T. Burke, in his book, Canadian Bisley Shooting, an Art and a Science.
Well worth reading, this SSUSA article talks about the properties of mirage. Here is a sample:
“Mirage — can make all the difference between a shot landing squarely in the X-ring or being victimized by an undetected downrange breeze. The true power of mirage is found in its ability to betray the subtlest of breezes downrange. Its fluid movement… can not only provide wind direction, but speed as well.
Typically, the ability to detect mirage is maximized on warm, sunny and sultry days. Expect mirage to be most pronounced in mid-morning or early afternoon, although it ignores these rules with regularity[.]
Mirage is extremely powerful at identifying winds of less than 12 mph, particularly those gentle breezes subtle enough to not even bother moving the flags.
When there is no wind, or a gentle head or tail wind, mirage will appear to be ‘bubbling’ directly up from the ground. Many call this ‘boiling’, and it is probably the easiest of all to detect.
As a general rule of thumb, when wind speed increases, overall height of the waves produced by the mirage is reduced. Large peaks and valleys in the waves mean that particular mirage is being driven by a very slight breeze. Conversely, crest size is reduced with wind speed, making it harder and harder to detect, until the mirage disappears entirely at somewhere around 12 miles per hour. In other words, the taller mirage’s waves appear, the slower the breeze.”
Authored by the late Glen Zediker, this article covers barrel break-in procedures. It is particularly useful for dealing with factory barrels. We CAUTION readers — with outstanding, hand-lapped custom barrels from top barrel-makers, you may want to do very little break-in — clean sparingly and keep barrel heat low. Do NOT use abrasives aggressively. On our Krieger and Brux barrels, we simply wet-patched every 2-3 rounds for 20 rounds and the barrels shot superbly from the start with minimal fouling. But for factory barrels, a moderate break-in process may prove beneficial.
Zediker explains: “Lesser, lower-cost barrels are going to have more pronounced … imperfections within the bore[.] These imperfections are largely tool marks resulting from the drilling and rifling processes. And if it’s a semi-automatic, like an AR-15, there might be a burr where the gas port was drilled. The goal of break-in is to knock down these imperfections, thereby smoothing the interior surface.”
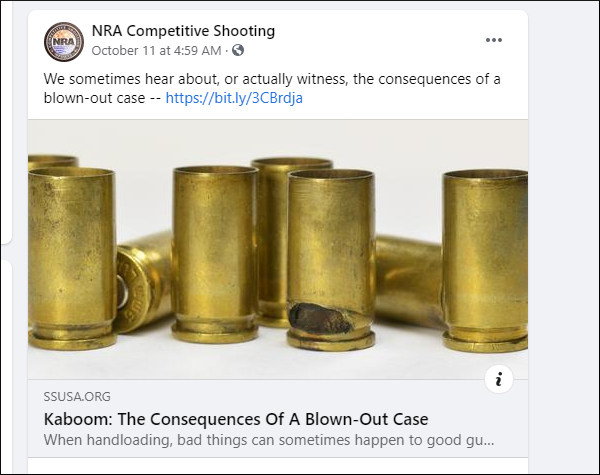
As one who has experienced a cartridge case-head blow-out with a 9mm pistol, this Editor is very conscious of the risks involved and the damage a blow-out can do to the pistol, to the magazine, and (worst of all) to the shooter. Even with new brass, the possibility of a case failure is always present. And even if the case remains intact, we’ve seen primer failures that create a dangerous jet back towards the pistol shooter. That’s why shooters should always employ protective eyewear whenever they shoot.
We love our wheelguns, but there’s no doubt that forcing cone damage can occur, particularly with hot loads and if your cylinder-to-barrel gap is excessive. This article explains how to inspect your revolvers, and how to mitigate the likelihood of forcing cone damage. The article also explains how to clean your revolvers properly. This is very important to avoid build-up of lead and powder residues.


 Check Your Gun Safe Batteries


 My fire-forming procedure is just jam and shoot. I start with a powder (such as H414) that works for the parent case, fire a few cases as I work up the load to where I get a well-formed case, then shoot them at varmints. Then I work my load up with the newly-formed cases over a chrono. If a load looks good at 100 yards, I will go straight for 200 yards. I’ve seen that some loads which grouped well at 100 won’t shoot well at 200. If it is consistent at 200, then I’ll shoot it a steel plate at 500 yards. Then the truth will be told.

 Choice of Caliber — A 6mm with More Punch for Long Distance

 The Guru of Varmints For Fun


 Spring Groundhog Hunting — Fun and Challenging
 Along with actual groundhog hunting, many shooters like to shoot paper and/or steel groundhogs in club groundhog competitions. These are fun matches that you can shoot with a variety of rifles. Our first choice would be a 22 BR for ranges out to 450 yards or a 6 BRA if targets are farther out. One popular match in the Northeast is the St. Thomas Ground hog shoot in Pennsylvania (see below).