Yet another .300 Blackout disaster. Unfortunately, that .300 Blackout cartridge can fit in a .223 Rem chamber. Shooting a .308-caliber bullet in .223 bore is a recipe for disaster.
The .300 AAC Blackout aka “300 BLK”, is a compact 30-caliber cartridge designed to work in AR-15 rifles. It has a shorter cartridge case to accommodate the bigger 30-caliber bullet while still fitting in a standard AR-15 magazine. Unfortunately, that’s the danger. A careless shooter can toss a .300 Blackout cartridge in with .223 Rem rounds without noting. And because the case-head size is the same as the .223 Rem (5.56×45) the rifle’s bolt assembly will happily chamber and fire the .300 BLK round. Problem is, that forces a .308 diameter bullet down an undersized .223-caliber bore. Not good!
This images were provided by Tactical Rifle Shooters on Facebook. The message was clear: “Don’t try to run 300 Blackout in your .223/5.56mm. It won’t end well. The problem is identical rifles and identical magazines but different calibers.”
Image from Accurate Shooter Forum. Cutaway shows the jammed .30-Cal bullet:
For those who MUST have a .300 Blackout, here are some things you can do:
1. Use different colored magazines for .300 Blackout vs. .223 Rem.
2. Fit all your uppers with caliber-labeled ejection port covers.
3. Mark .223 Rem upper handguards with the caliber in bright paint.
4. Mark all .300 BLK Rounds with heavy black marker.
Comments by Folks Who Viewed these .300 Blackout Disaster Photos:
“The .300 Blackout is simply a badly-designed round. A properly-designed round would have had a feature in the shape that would have prevented cross loading in the first place.” — D. Santiago
“I almost made that mistake… I had a magazine of 300 BLK inserted in my .223/5.56 all night. Fortunately, I never pulled the trigger. Once I realized the mistake, I almost got ill. [After that incident] I no longer own a 300 BLK.” — B. Welch
“Happened to me hog hunting from a helo. Gun exploded in my face.” — B. Hood
“Fire-forming projectiles [is] so wrong in centerfire!” — M. Stres
“Had some dude come into the store the other day wanting .300 Blackout ammo to shoot in his 5.56 AR. It took 15 minutes of explaining for him to understand you got to have a .300 Blackout Upper!” — R. Williams
Want to improve your understanding of Ballistics, Bullet Design, Bullet Pointing, and other shooting-related tech topics? Well here’s a treasure trove of gun expertise. Applied Ballistics offers dozens of FREE tech articles on its website. Curious about Coriolis? — You’ll find answers. Want to understand the difference between G1 and G7 BC? — There’s an article about that.
“Doc” Beech, technical support specialist at Applied Ballistics says these articles can help shooters working with ballistics programs: “One of the biggest issues I have seen is the misunderstanding… about a bullet’s ballistic coefficient (BC) and what it really means. Several papers on ballistic coefficient are available for shooters to review on the website.”
Credit Shooting Sports USA Editor John Parker for finding this great resource. John writes: “Our friends at Applied Ballistics have a real gold mine of articles on the science of accurate shooting on their website. This is a fantastic source for precision shooting information[.] Topics presented are wide-ranging — from ballistic coefficients to bullet analysis.”
Here are six (6) of our favorite Applied Ballistics articles, available for FREE to read online. There are dozens more, all available on the Applied Ballistics Education Webpage. After Clicking link, select Plus (+) Symbol for “White Papers”, then find the article(s) you want in the list. For each selection, then click “Download” in the right column. This will send a PDF version to your device.
Are you a High Power or F-Class marksman looking for official bullseye paper targets? Here are bulk sets of 25, 50 and 100 targets from Creedmoor Sports. All these can can be used for general practice, fun matches, or official sanctioned events. Choose the official 200-yard SR target with all scoring rings (X,10,9,8,7,6,5), priced at $49.95 for 50. For long-range practice, try the NRA Official 600-yard High Power Target ($58.95 for 25ct), or the Official “Full Face” MR-65 500-Yard F-Class Target ($31.95 for 50ct). Creedmoor also offers a variety of Repair Centers, including the 300-Yard SR-3C Target Repair Center ($34.95), or the 600-yard MR-1 Target Repair Center ($32.95). These target centers can be used on top of full targets, or by themselves for practice on smaller target frames.
Creedmoor Sports also offers match-grade spotter discs. These are used to mark shot locations. They are offered in three diameters: 1.5″, 3.0″, and 5.0″. In addition, you can purchase the spindles used with spotter discs along with orange Golf Tees also employed to mark shots. These are placed in the shot holes by pit workers.
Frankly for practice, we recommend a target cam, or ShotMarker system.
Are you in the market for your first handgun, for target use or for self-defense? The Winchester Blog has a good article for handgun buyers. This story, “Things You Should Know When Purchasing Your First Pistol”, provides many smart tips that can help you choose the right handgun, and save money in the process. In addition, the article explains how to train with your new pistol and handle it safely. READ Full Article.
If possible, you should test a variety of different pistols, to determine which works best for you. Check the feel, the ergonomics, the sight picture, and the controls. And, if possible, test the pistols with live-fire at a range which rents samples.
How do you know if your choice is right for you?
Once you’ve narrowed down choices, try to get time shooting the pistol(s) you are considering. You can usually rent guns at commercial ranges. This is an excellent way to “try before you buy.” NSSF has a list of places to shoot[.] When looking for a range that rents firearms, an online search and then a phone call to confirm what options are available is a solid plan. If you have friends and family who own a model you are interested in, ask if they will go to the range with you so that you can try it.
Take pistols for a test drive
First, dry-fire and manipulate the pistol. Can you easily lock the slide open? Are the sights suited to your vision? Then, fire a magazine or two of ammo [in a supervised range facility]. — Winchester Blog
The Winchester Blog article lists techniques that can help you get the “feel” for a particular firearm:
1. Practice the 4 Rules of Firearm Safety and make sure the gun is empty.
2. [After confirming the gun is empty] manipulate the slide, safety, magazine release, and dry-fire.
3. Perform a dry or empty magazine change — make sure you can hit the release and also reload a new magazine easily.
4. Perform a draw, or if you’re at a range where that is not allowed, simply pick the pistol up off the table and bring it up to your eye level and align the sights. Do this a few times. Can you acquire the sights quickly?
5. How does the backstrap fit your hand? Can you get both hands on the gun with enough “purchase” that you can really grip it well?
This Winchester Blog article is by Becky Yackley. Becky has competed in 3-Gun, Bianchi pistol, Service Rifle, NCAA air rifle, smallbore and air pistol events around the world since 1989.
If you will be flying with firearms this summer, here are six videos you should watch before you travel. You need to familiarize yourself with current Federal Regulations on gun transport before you get anywhere near an airport. Thankfully, the Transportation Security Administration (TSA) has an official INFO page that states the important requirements for airline passengers traveling with firearms and/or ammunition.
You’ll want to visit the TSA Firearms and Ammunition webpage, and read it start to finish. In addition, before your trip, you should check the regulations of the airline(s) with which you will fly. Some airlines have special requirements, such as weight restrictions.
We have two other key tips: 1) WEIGH Your Guns and ammo (as packed) BEFORE you get to the airport — so you comply with all airline flight limits without being surcharged; 2) Carry a printed copy of TSA and airline baggage regulations pertaining to firearms — this can help when dealing with airline personnel.
TSA offers this general advice: “You may transport unloaded firearms in a locked, hard-sided container as checked baggage only. Declare the firearm and/or ammunition to the airline when checking your bag at the ticket counter. The container must completely secure the firearm from being accessed. Locked cases that can be easily opened are not permitted. Be aware that the container the firearm was in when purchased may not adequately secure the firearm when it is transported in checked baggage.”
Traveling by Air with Firearms — Advice from Legal Expert
This is a good video by a very knowledgeable attorney. Washington Gun Law President William Kirk goes over everything you need to know in order to fly safely, and legally, with a firearm if you travel domestically. Kirk states: “While many believe this is a complicated formula of various state laws, in actuality TSA regulations govern all travel domestically with a firearm. There are very specific rules which must be followed in order to do this correctly.”
Colion Noir — Air Travel with Packed Firearms
Popular YouTube host and lawyer Colion Noir has created a good video that shares important points about traveling with firearms. Colion says: “Don’t risk making costly mistakes — get informed and ensure your firearm journey is hassle-free and lawful.” In this video, Colion covers these key points:
1. Bag Check: Learn the crucial pre-flight checklist to avoid any unwanted surprises at the TSA checkpoint.
2. Airline Check: Discover the differences in airline policies and ensure a smooth journey by reviewing your chosen carrier’s firearm guidelines.
3. Law Check: Stay on the right side of the law by understanding the gun regulations in every state you’ll visit during your trip.
4. The Gun Case: Explore the essential details about the TSA-required hard-sided lockable case and find out which one is my top choice.
5. Ammo Transport: Learn the correct way to transport ammunition separately from your firearm, all while staying within the weight limit.
Step-By-Step Guide to Gun Transport — Good Tips
This 18-minute Spiritus Systems video provides some very valuable practical tips for gun owners traveling by air. The host explains what to look for in a rifle case and locking system. He also explains how to pack the rifle and gear efficiently and how to label and track your gun/ammo cases. If you’re new to airline travel with guns, this video is worth watching start to finish. Here are highlights are listed by video times:
00:01 Introduction and Regulations
00:51 Storage Container Options
2:50 Type of Lock You Should Use
6:25 Tape Tip
7:16 Contact Information, and Labeling Your Bag
8:07 Firearm Considerations / Configuration
10:03 Documents
12:30 Tracking Your Bag
13:20 Packing Your Ammo
16:00 Prepping Your Magazines
How to Efficiently Pack Your Rifles and Gear
Our friend F-Class John often travels by air to major F-Class matches (most recently to the V2 Finale in Texas). John has learned how to transport valuable match rifles and optics most efficiently and economically. In these two videos F-Class John shows how to pack your rifles and equipment, and how to employ carry-on bags to secure optics and other non-regulated equipment.
TSA Video about Airline Travel with Guns and/or Ammo
This is the latest official TSA video covering gun/ammo transport via airlines. When packing for a flight be sure to start with an empty bag (make sure there are no forgotten gun parts or ammo inside before you pack). If you’re planning to travel with a firearm, follow the tips in this video and remember that you may NEVER bring a firearm in your carry-on bag. Also make sure you are not “packing” when entering the airport even if you have a CCW permit. TSA.gov Firearms/Ammo Transport INFO Page.
Official TSA Guidelines for Airline Travel with Firearms and Ammo
When traveling, comply with the laws concerning possession of firearms as they vary by local, state, and international governments.* Declare each firearm each time you present it for transport as checked baggage. Ask your airline about limitations or fees that may apply.
Firearms must be unloaded and locked in a hard-sided container and transported as checked baggage only. As defined by 49 CFR 1540.5 a loaded firearm has a live round of ammunition, or any component thereof, in the chamber or cylinder or in a magazine inserted in the firearm. For civil enforcement purposes, TSA also considers a firearm to be loaded when both the firearm and ammunition are accessible to the passenger.
Only the passenger should retain the key or combination to the lock unless TSA personnel request the key to open the firearm container to ensure compliance with TSA regulations. You may use any brand or type of lock to secure your firearm case, including TSA-recognized locks.
Bringing an unloaded firearm with accessible ammunition to the security checkpoint carries the same civil penalty/fine as bringing a loaded firearm to the checkpoint. You may find information on civil penalties at the Civil Enforcement page.
Firearm parts, including magazines, clips, bolts and firing pins, are prohibited in carry-on baggage, but may be transported in checked baggage. Replica firearms, including firearm replicas that are toys, may be transported in checked baggage only.
Rifle scopes are permitted in carry-on and checked baggage.
TSA Guidelines for Transporting Ammunition on Flights
Ammunition is prohibited in carry-on baggage, but may be transported in checked baggage. NOTE: Check with your airline for quantity limits for ammunition.
Firearm magazines and ammunition clips, whether loaded or empty, must be securely boxed or included within a hard-sided case containing an unloaded firearm. Read the requirements governing the transport of ammunition in checked baggage as defined by 49 CFR 175.10 (a)(8).
Small arms ammunition (up to .75 caliber and shotgun shells of any gauge) must be packaged in a fiber (such as cardboard), wood, plastic, or metal box specifically designed to carry ammunition and declared to your airline.
Ammunition may be transported in the same hard-sided, locked case as a firearm if it has been packed as described above. You cannot use firearm magazines or clips for packing ammunition unless they completely enclose the ammunition. Firearm magazines and ammunition clips, whether loaded or empty, must be boxed or included within a hard-sided, locked case.
*INTERNATIONAL: If you are traveling internationally with a firearm in checked baggage, please check the U.S. Customs and Border Protection website for information and requirements prior to travel.
A Kestrel Wind Meter will record wind speed with its impeller wheel. However, to get the most accurate wind velocity reading, you need to have your Kestrel properly aligned with the wind direction. To find wind direction, first orient the Kestrel so that the impeller runs at minimal speed (or stops), and only then turn the BACK of the Kestrel into the wind direction. Do NOT simply rotate the Kestrel’s back panel looking for the highest wind speed reading — that’s not the correct method for finding wind direction. Rotate the side of the Kestrel into the wind first, aiming for minimal impeller movement. The correct procedure is explained below by the experts at Applied Ballistics.
How to Find the Wind Direction with a Kestrel Wind Meter
Here is the correct way to determine wind direction with a Kestrel wind meter when you have no environmental aids — no other tools than a Kestrel. (NOTE: To determine wind direction, a mounted Wind Vane is the most effective tool, but you can also look at flags, blowing grass, or even the lanyard on your Kestrel).
Step 1: Find the wind’s general direction.
Step 2: Rotate the Wind Meter 90 degrees, so that the wind is impacting the side (and not the back) of the wind meter, while still being able to see the impeller.
Step 3: Fine-tune the direction until the impeller drastically slows, or comes to a complete stop (a complete stop is preferred). If the impeller won’t come to a complete stop, find the direction which has the lowest impact on the impeller.
Step 4: Turn the BACK of the Kestrel towards the direction from which the wind is blowing. Then press the capture button, and record your wind speed.
Do NOT simply point the Kestrel’s back into the wind until you get the highest wind speed — that’s not the correct method.
Gun Storage Check Week is the time to ensure your firearms are stored safely and securely. This week, make sure your guns are secure. NSSF, the Firearm Industry Trade Association, is promoting Gun Storage Check Week, June 1-7, 2024, to remind gun owners to review their storage practices to prevent accidents, suicides and thefts.
“Securely storing guns when they’re not in use can save lives. It’s really that simple,” said Joe Bartozzi, President and CEO of NSSF. “No one wants their gun in the hands of an unsupervised child, a person in crisis, someone who does not understand how to safely operate firearms, or a thief. If something bad happens because your gun isn’t stored securely, you’ll regret it, probably forever.”
This video covers gun safety rules and secure storage of firearms.
Gun Storage Check Week’s safety resources highlight many options to store firearms securely so that guns are off limits to unauthorized persons. Secure gun storage devices include:
Cable Locks — Available free of charge through NSSF’s Project ChildSafe® program Lock Boxes — Secure storage solution for guns kept for home security and in vehicles Lockable Gun Cases — for security, portability, and travel Full-size Gun Safes — For owners with multiple firearms to protect against fire and theft.
Win a FREE Lockbox and/or Get a FREE Cable lock
Lock boxes come in a range of models using keys, access codes or biometrics to open them. Go to gunstoragecheck.org to enter the Gun Storage Check Week Sweepstakes for a chance to win one of 25 ShotLock Lock Boxes. To enter, CLICK HERE, then scroll down page and fill out the online entry form. Even if you don’t win, FREE cable gun locks are also available through NSSF’s Project ChildSafe program.
by Sierra Bullets Ballistic Technician Paul Box
All of us who have been in reloading and shooting for any period of time have read how sectional density has been regarded as a bullet’s ability to penetrate. Back before high velocity came along and modern bullet design, the easiest way to get more “power” and penetration was by increasing the diameter and mass. After all, a bowling ball will hurt more than a golf ball, right?
Let’s take a closer look at sectional density.
The formula for calculating sectional density is pretty simple and straight forward. Take the bullet weight and divide by 7000. This number is then divided by the bullet diameter squared. Two bullets of equal weight and the same diameter will have equal sectional sectional density. No regard is given to the bullet construction. This is where the fly hits the soup in considering sectional density as far as penetration is concerned.
Section Density Formula: (Bullet Weight divided by 7000) divided by Bullet Diameter squared.
Bullet construction is the biggest factor in how it is able to penetrate. The best example I can think of here is to look at the Sierra .224 55 Gr. FMJBT GameKing #1355 compared to the 55 Gr. BlitzKing #1455. Both are .224 and weigh 55 grs. Both have a sectional density of .157. But there is a huge difference in their construction. The FMJ has a thick jacket and is designed to penetrate. The BlitzKing is designed for fast and rapid expansion with little concern for how deep they will penetrate.
The next time you’re choosing a bullet, look at the construction and less at the sectional density number. It’s all about the construction anyway. If you have any questions or would like to discuss sectional density or bullet penetration further, please give us a call at 800-223-8799 or shoot us an email at sierra@sierrabullets.com.
On the Applied Ballistics Facebook Page, there is a fascinating series of posts showing traces of bullets at various speeds from Mach 0.86 to Mach 3.0. At the slowest speed, Mach 0.86, i.e. 962 FPS, there is turbulence behind the bullet, but no clear shockwave. At the highest velocity, Mach 3.0 (3375 FPS at sea level, 68° F), there is a dramatic double nose and tail wave formation.
To learn more, visit TheScienceofAccuracy.com. On that site you’ll find exclusive video content and you can subscribe to member’s only Podcasts. And you can purchase Applied Ballistics books on the Science of Accuracy webstore.
Mach 3.00 Bullet Flight Image
At Mach 3 (3355 FPS) this bullet now has a strong and well established shock wave forming at the tip, and at the base. Unlike the transition through Mach 1.0, nothing really interesting happens to the aerodynamics or shock waves meaning the aerodynamics and stability are: continuous, easy to predict, and model. As you go faster, the shockwaves make a shallower angle because the bullet is moving forward 3X faster than the shock wave is moving away from it. So the shock wave makes an angle that has a rise/run ratio of 1/3.
If a bullet flew within 10 feet of you traveling this fast, it would be about as loud as a 22 magnum. You’d certainly want hearing protection as the energy contained in a Mach 3 shock wave is high! How high…? Well, in 10 yards, this bullet slows from 3355 FPS to 3334 FPS in a time of 0.0090 seconds. The 55 ft-lb of kinetic energy lost during this 10 yards is due to aerodynamic drag on the bullet, which is comprised of wave, base, and skin friction drag components with the majority of the drag being due to shock wave formation. Expending 55 ft-lb of energy in 0.0090 seconds requires a power output of 6111 ft-lb/sec = 11.1 horsepower, most of which goes into creating the shock wave. Remember it’s a 3-D cone that travels great distance, and it gets its energy by stealing velocity from your bullet!
Mach 1.00 Bullet Flight Image
Many shots were fired to capture an image of the transonic shockwave structure at exactly Mach 1.00. With the bullet now moving at the speed of sound, the local airflow on some parts of the bullet exceeds Mach 1.0. Anytime something is moving thru the air faster than the air can get out of the way, you get a compression wave, aka “shock wave”. That’s what’s visible in this image — the areas where the air density changes rapidly (in the compression wave) are visible as near vertical lines and a detached bow wave out front. As the bullet progresses through transonic speed, this shockwave structure develops which has strong effects on the drag (wind sensitivity) and stability of the bullet.
The exact development of the shockwaves and the resulting effects are unique and sensitive to the bullet geometry, and become very difficult to predict through the transition from subsonic (incompressible flow without shock waves) to supersonic (compressible flow with shock waves). Each bullet geometry does this differently which is why it’s difficult to determine transonic stability criteria for bullets of different shapes.
Mach 0.86 Bullet Flight Image
Here’s a bullet at Mach 0.86 (86% the speed of sound, which is 962 FPS at 61° F). As you can see, this 0.86 Mach is not fast enough to make any discernable waves but you can see turbulence in the bullet wake (right side in photo). The beginning of small shock waves can be seen on the bullet tip, and at the bearing surface/boat tail juncture. For the most part, all of the airflow around this bullet is subsonic. You wouldn’t hear a supersonic ‘crack’ from this bullet flying past the observer.
If you are planning to shoot a PRS match with factory ammo or use factory ammo when hunting, you should definitely check the ammo velocity in YOUR rifle. Otherwise your ballistics come-up tables could be all wrong. It’s not uncommon to find that the actual velocity in YOUR gun is NOT the same as the listed velocity on the ammunition package. We explain why in today’s article…
Why You CANNOT Rely on the MV Printed on the Ammo Box!
When figuring out your come-ups with a ballistics solver or drop chart it’s “mission critical” to have an accurate muzzle velocity (MV). When shooting factory ammo, it’s tempting to use the manufacturer-provided MV which may be printed on the package. That’s not such a great idea says Bryan Litz of Applied Ballistics. Don’t rely on the MV on the box, Bryan advises — you should take out your chrono and run your own velocity tests. There are a number of reasons why the MV values on ammo packaging may be inaccurate. Below is a discussion of factory ammo MV from the Applied Ballistics Facebook Page.
Five Reasons You Cannot Trust the Velocity on a Box of Ammo:
1. You have no idea about the rifle used for the MV test.
2. You have no idea what atmospheric conditions were during testing, and yes it matters a lot.
3. You have no idea of the SD for the factory ammo, and how the manufacturer derived the MV from that SD. (Marketing plays a role here).
4. You have no idea of the precision and quality of chronograph(s) used for velocity testing.
5. You have no idea if the manufacturer used the raw velocity, or back-calculated the MV. The BC used to back track that data is also unknown.
1. The factory test rifle and your rifle are not the same. Aside from having a different chamber, and possibly barrel length some other things are important too like the barrel twist rate, and how much wear was in the barrel. Was it just recently cleaned, has it ever been cleaned? You simply don’t know anything about the rifle used in testing.
2. Temperature and Humidity conditions may be quite different (than during testing). Temperature has a physical effect on powder, which changes how it burns. Couple this with the fact that different powders can vary in temp-stability quite a bit. You just don’t know what the conditions at the time of testing were. Also a lot of factory ammunition is loaded with powder that is meter friendly. Meter friendly can often times be ball powder, which is less temperature stable than stick powder often times.
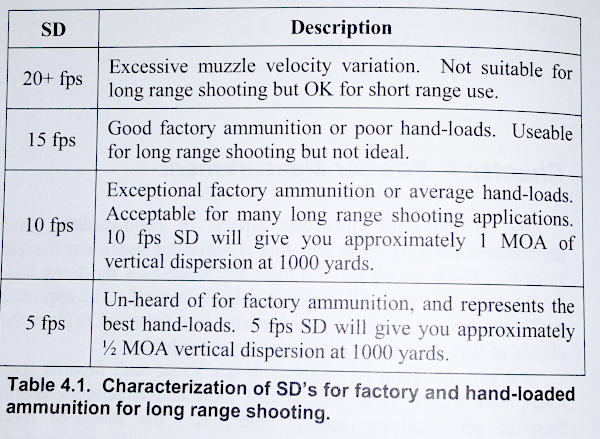
3. The ammo’s Standard Deviation (SD) is unknown. You will often notice that while MV is often listed on ammo packages, Standard Deviation (normally) is not. It is not uncommon for factory ammunition to have an SD of 18 or higher. Sometimes as high as 40+. As such is the nature of metering powder. With marketing in mind, did they pick the high, low, or average end of the SD? We really don’t know. You won’t either until you test it for yourself. For hand-loaded ammo, to be considered around 10 fps or less. Having a high SD is often the nature of metered powder and factory loads. The image below is from Modern Advancements in Long Range Shooting: Volume II.
4. You don’t know how MV was measured. What chronograph system did the manufacturer use, and how did they back track to a muzzle velocity? A chronograph does not measure true velocity at the muzzle; it simply measures velocity at the location it is sitting. So you need to back-calculate the distance from the chrono to the end of the barrel. This calculation requires a semi-accurate BC. So whose BC was used to back track to the muzzle or did the manufacturer even do that? Did they simply print the numbers displayed by the chronograph? What kind of chronograph setup did they use? We know from our Lab Testing that not all chronographs are created equal. Without knowing what chronograph was used, you have no idea the quality of the measurement.
5. The MV data may not be current. Does the manufacturer update that data for every lot? Or is it the same data from years ago? Some manufacturers rarely if ever re-test and update information. Some update it every lot (ABM Ammo is actually tested every single lot for 1% consistency). Without knowing this information, you could be using data for years ago.
CONCLUSION: Never use the printed MV off a box of ammo as anything more than a starting point, there are too many factors to account for. You must always either test for the MV with a chronograph, or use carefully obtained, live fire data. When you are using a Ballistic Solver such as the AB Apps or Devices integrated with AB, you need to know the MV to an accuracy down to 5 fps. The more reliable the MV number, the better your ballistics solutions.


 The .300 AAC Blackout aka “300 BLK”, is a compact 30-caliber cartridge designed to work in AR-15 rifles. It has a shorter cartridge case to accommodate the bigger 30-caliber bullet while still fitting in a standard AR-15 magazine. Unfortunately, that’s the danger. A careless shooter can toss a .300 Blackout cartridge in with .223 Rem rounds without noting. And because the case-head size is the same as the .223 Rem (5.56×45) the rifle’s bolt assembly will happily chamber and fire the .300 BLK round. Problem is, that forces a .308 diameter bullet down an undersized .223-caliber bore. Not good!