Every wondered how modern rifle actions are designed and crafted? Want to know the fine details of firing pin function and bolt lock-up? Then you should definitely watch this highly informative YouTube video. Top F-Class shooter Eric Cortina of Cortina Precision interviews Jim Borden, an engineer whose Borden Accuracy company produces some of the best rifle actions ever made. This is one of the better Eric Cortina video interviews. You’ll learn quite a bit from watching the video. The full video runs over two hours, so you may want to watch in segments over a couple of days.
Viewers have praised this interview, saying it has a wealth of information:
Gunsmith Alex Wheeler observed: “I consider Jim a friend even though we have never met. Definitely one of the guys that really gets actions. There’s not as many of them as you would think. He was the first timed action out there that had good ignition, at least in my opinion. It was a great interview. I do hope he has him on again.”
“Agreed. Jim is full of information and really does a good job on his actions. This [Cortina] interview with Jim Borden was excellent.” — Jud96
“I really like Jim’s explanations on why ductility is so important in an action. Especially in the critical areas that basically form 90 degree surfaces, such as where bolt lugs meet the bolt body. There is a lot of great info in this interview.” — Jackie Schmidt
“I have enjoyed all of Erik’s interview videos, which are very informative. But I agree [that] this interview with Jim Borden is the best. I learned a lot. Thank you Erik and Jim!” — Alexander-M
About Jim Borden and Borden Accuracy
Jim began shooting high power silhouette and benchrest matches in the mid 1970s while working for a Fortune 500 company as an engineer. In the early 1980s he began building rifles for himself and then for others. Jim has a background as a gunsmith, machinist, registered mechanical engineer, engineering instructor, project manager, hunter, and benchrest competitor.
In benchrest competition Jim has set ten world records and won 11 National Championships thereby earning induction into the Benchrest Hall of Fame. Jim also served six terms as President of the International Benchrest Shooters (IBS).
Jim operates Borden Rifles/Borden Accuracy with his wife Joan, sons Jim Junior and John, daughter Andrea Mecca and son-in-law John (Mike) Mecca. Jim is also an outstanding photographer. Below is a stunning eagle image photographed by Jim Borden.
Borden Accuracy — A Success Story
Borden Accuracy/Borden Rifles has been a source for precision benchrest and hunting rifles for many years. Jim started doing his own gunsmithing while competing in benchrest and High Power silhouette matches. Jim launched his business in 1987, working nights and weekends while still employed at P&G. The business became full-time in 1995 with Jim and his wife Joan doing the work. The business was expanded in 1999 with the construction of the new Springville, PA facility and the addition of sons Jim Jr. and John to the staff. Daughter Andrea Mecca joined the staff in May 2016 as machinist and machine operator and Son-in-law John Mecca came onboard in January 2000.
Jim and company began making Rimrock benchrest and Rimrock hunting actions in 2001. They added Borden Alpine and Timberline actions in 2006. These actions are made in an advanced manufacturing facility which has three CNC vertical machining centers, 1 CNC lathe and 2 CNC turning centers, three manual lathes, a manual knee mill, a surface grinder, a cylindrical grinder and wire EDM machine. To learn more, visit BordenRifles.com, call 570-965-2505, or send email to info [at] bordenrifles.com.
The USAMU has published a “how-to” article about bullet sorting. While many of us may sort bullets by base-to-ogive length (and/or weight), the USAMU story explores the “how and why” of sorting bullets by Overall Length (OAL). Read the article highlights below, and make your own decision as to whether OAL sorting is worth the time and effort. Bryan Litz of Applied Ballistics says that sorting by OAL is not a bad idea, but base-to-ogive bullet sorting probably represents a better investment of your time.
Bullet Sorting by Overall Length
We’d like to share a specialized handloading technique which we’ve long found beneficial to our long-range (600 yards and beyond) accuracy. Sorting of bullets for extreme long range (LR) accuracy is not difficult to do, but some background in theory is needed.
Here at USAMU’s Handloading Shop, we only sort individual bullets for the most demanding Long-Range applications and important competitions. Only the most accurate rifles and shooters can fully exploit the benefits of this technique. The basic sorting process involves measuring the Overall Length (OAL) of the bullets, and grouping them in 0.001″ increments. It’s not unusual to find lots of match bullets that vary as much as 0.015″-0.020″ in length throughout the lot, although lots with much less variation are seen as well. Even in bullet lots with 0.015″ OAL variation, the bullet base-to-ogive length will show much less variation. Hence, our basic sort is by bullet OAL. One obvious benefit of sorting is easily seen in the attached photo. The few bullets that are VERY different from the average are culled out, reducing probable fliers.
How does one know what OAL increments to use when sorting? The answer is simple. As each lot of bullets is unique in its OAL distribution, it’s best to sample your bullet lot and see how they are distributed. In the attached photo, you will see a set of loading trays with a strip of masking tape running along the bottom. Each vertical row of holes is numbered in 0.001″ increments corresponding to the bullets’ OAL. A digital caliper makes this task much easier. As each bullet is measured, it is placed in the line of holes for its’ OAL, and gradually, a roughly bell-shaped curve begins to form.
Note that near the center, bullets are much more plentiful than near the edges. At the extreme edges, there are a few that differ markedly from the average, and these make great chronograph or sighting-in fodder. We recommend using a sample of 200 bullets from your lot, and 300 is even better. Some bullet lots are very consistent, with a tall, narrow band of highly-uniform bullets clustered together over just a few thousandths spread. Other lots will show a long, relatively flat curve (less uniform), and you may also see curves with 2 or more “spikes” separated by several 0.001″ OAL increments.
Bullet Sorting — OAL vs. Base-to-Ogive vs. Weight
Expert advice from Bryan Litz, Applied Ballistics
I’m often asked what is a the best measure to sort bullets by, and the answer (to this and many other questions in ballistics) is: it depends.
Choosing to sort by overall length (OAL), base to ogive (BTO), bearing surface, weight, etc. can get overwhelming. Shooters typically look for something they can measure, which shows a variation and sort by that. It’s common for dimensional variations to correlate. For example, bullets which are longer in OAL are typically also shorter in BTO, and have longer noses. All these are symptoms of a bullet that was pushed a little further into the pointing die, or possibly had more than average lube while being swaged. So in essence, if you sort by BTO, you’re measuring one symptom which can indicate a pattern in the bullets shape.
So, the question still stands — what should you measure? You’ll always see more variation in OAL than BTO, so it’s easier to sort by OAL. But sometimes the bullet tips can be jagged and have small burrs which can be misleading. Measuring BTO will result in a lower spread, but is a more direct measure of bullet uniformity.
Then there’s the question of; how much variation is too much, or, how many bins should you sort into? Shooters who see 0.025” variation in BTO may choose to sort into 5 bins of 0.005”. But if you have only 0.005” variation in the box, you’ll still sort into 5 bins of 0.001”. What’s correct? You have to shoot to know. Live fire testing will answer more questions, and answer them more decisively than any amount of discussion on the subject. The test I recommend is to identify bullets on the extreme short end of the spectrum, and some on the extreme long end. Load at least 10 rounds of each, and take turns shooting 5-shot groups with them. If there is a difference, it will be evident. The results of the testing will answer your question of: should I sort based on X, Y, or Z?”
You can read more discussions on this and other similar subjects in our Accurateshooter.com Shooters’ Forum. Here’s a link to a thread discussing bullet sorting: Bullet Sorting Thread
Ever wish you could look inside your rifle, to see how the trigger and fire-control system work? Well now that is possible with the magic of 3D computer graphics. Modern software allows detailed “cutaway” side-views (see below), as well as 3D views with 360° rotation. The software can also provide X-Ray-type views into the gun’s internals — as you can see above. And computer animation can show the complete firing process from trigger pull to chambering of the next round.
Rem 700 Cutaway View from Right Side
This article provides some very cool 3-D “Cutaway View” animations of the popular Remington 700 action, probably the most successful American bolt-action ever created.
READERS — Take the time to watch the video! The Rem 700 animation is really outstanding! EVERY bolt-action shooter should watch this video all the way through.
Cutaway 3D Animation of Rem 700 Action — Watch Video
The Model 700 series of bolt-action rifles have been manufactured by Remington Arms since 1962. All are based on basically the same centerfire bolt action. They are typically sold with an internal magazine depending on caliber, some of which have a floor-plate for quick-unloading, and some of which are “blind” (no floor-plate). The rifle can also be ordered with a detachable box magazine. The Model 700 is a development of the Remington 721 and 722 series of rifles, which were introduced in 1948.
The Remington 700 is a manually-operated bolt action with forward, dual opposed lugs. It features “Cock On Opening”, meaning the upward rotation of the bolt when the rifle is opened cocks the firing pin. A cam mechanism pushes the firing pin’s cocking piece backward. The bolt face is recessed, fully enclosing the base of the cartridge. The extractor is a C-clip sitting within the bolt face. The ejector is a plunger on the bolt face actuated by a coil spring. The bolt is of 3-piece construction, brazed together (head, body. and bolt handle). The receiver is milled from round cross-section steel.
This video was made with the help of the World of Guns: Gun Disassembly interactive encyclopedia with 3D rendering. This remarkable web-based software allows users to view the inner workings of hundreds of different rifles and pistols — everything from a .22 LR Ruger to a .55-caliber Boys Anti-Tank rifle. There are also 25,000+ parts diagrams. This is a remarkable technical resource. SEE MORE HERE.
Are you seeing unpredictable changes in Point of Impact on your target? Think you may have a scope issue? Well maybe not — when was the last time you checked your BARREL?
Yes scopes do fail, and scope bases/rings do get loose. But sometimes problems with erratic POI shifts are caused by a LOOSE BARREL. This issue came up a while back in our Shooter’s Forum. One member complained that his zero was shifting from day to day — by as much as two inches at 100 yards. He was convinced he had a scope problem, based on erratic POI:
“I think my scope loses 1 to 3 MOA per day. When I shot my rifle Monday it was dead on. On Tuesday it was 1″ low. Then on Wednesday it was 1 or 2″ lower. I don’t get it. — the elevation knob never touched. Scope will track and return to zero that day perfect. Yes EVERYTHING has been checked, nothing loose. What is the chance the erector tube spring has gone south? For the record this is a Vortex GE. Never had a bad scope, but this has me wondering”. — LB
On Forum member told LB to send the scope right back to the manufacturer. Two other members suggested mounting the scope on a different rifle to test. Good advice. That’s generally a smart strategy before you conclude a scope has gone bad…
Could Problem Be the Scope Base?
Two Forum members, ExPiper and Dickn52, suggested checking the scope base, recounting their past experiences with troublesome bases. This was intelligent — anyone with a POI problem should check all the optics attachments:
“Went crazy one day chasing my impacts on a 100-yard target. Shots would group fine for three then go nuts for 4-5. I cranked and un-cranked for about an hour. Then I reached up and the base wobbled on the rifle. Removed scope, tightened base screws and back in business.” — Dickn52
“Years ago I had a problem [where] shots were climbing with almost every shot. I was blaming the scope. However, when removing the scope I noticed that the 20 MOA base was cracked and getting wider with every shot. Needless to say I replaced the base and the problem was solved. — ExPiper
Eureka Moment — The problem was the BARREL, not the Scope
There were many helpful suggestions, but member PirateAmmo steered LB to the real problem — a loose BARREL: “We had a problem on a home-built AR-platform rifle once, barrel was loose a tad…”
Member Snert chimed in: “Yep — I had a PPC that suddenly went 19″ low. Picked up gun off bench by barrel and felt a wiggle. I tightened the barrel and the POI went 19 inches up”.
Problem Solved — Barrel Tightened up and POI Back to Normal
The gentleman with the POI problem took the advice of PirateAmmo and checked his barrel. BINGO! Low and behold, the barrel WAS loose.
LB posted: “Barrel loose by about 2%, checked it twice before and didn’t find it the first two times”.
After LB re-tightened his barrel, his rifle started shooting normally again. No more shooting low by 1-2 inches. Problem solved. The fix didn’t cost a penny and now LB doesn’t have to send a perfectly good optic back to the manufacturer.
Lesson learned? Check ALL the variables before you assume a scope has gone bad. Along with the barrel, also check your action screw tension, and of course the scope base and rings.
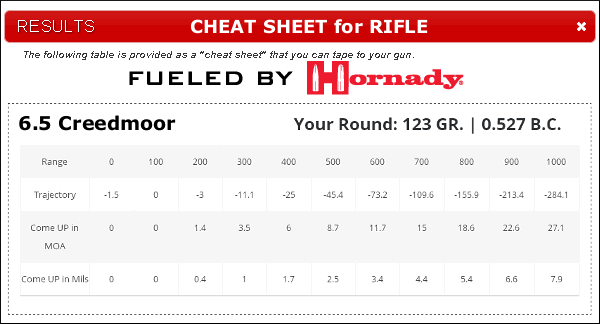
Need a simple, easy-to-use drop chart for your rifle? Something you can tape right to the buttstock? Then check out Hornady’s handy Online Ballistics Calculator. This user-friendly calculator will compute your drops accurately, and output a handy “Cheat Sheet” you can print and attach to your rifle.
Here’s how it works. From the Ballistics Calculator Page, first select 4DOF or Standard. Next input G1 or G7 BC values, muzzle velocity, bullet weight, zero range, and a few other variables.
Click “Calculate” to view the full chart (shown below). Then click “View Cheatsheet” and the simpler, 4-line Drop Chart (shown above) appears. Click “Print” and you’re done!
Choose Basic Table or Advanced Version with More Variables
The online ballistics caculator is easy to use. You can select the basic version, or an advanced version with more data fields for environmental variables (altitude, temperature, air pressure, and humidity). You can also get wind drift numbers by inputing wind speed and wind angle.
Conveniently, on the trajectory output, come-ups are listed in both MOA and Mils — so this will work with either MOA clicks or Mil-based clicks. There are more sophisticated ballistics solvers available on the web, such as the outstanding Applied Ballistics Online Calculator, but the Hornady Calculator is very simple and easy to use. If you just want a basic drop chart, you may want to check this out.
This thought-provoking article is one of the 15 most popular Daily Bulletin features over the last 12 months. We are republishing this story today for readers who may have missed it the first time around…
Here’s a little known fact that may startle most readers, even experienced gunsmiths: your barrel wears out in a matter of seconds. The useful life of a typical match barrel, in terms of actual bullet-in-barrel time, is only a few seconds. How can that be, you ask? Well you need to look at the actual time that bullets spend traveling through the bore during the barrel’s useful life. (Hint: it’s not very long).
Bullet-Time-in-Barrel Calculations
If a bullet flies at 3000 fps, it will pass through a 24″ (two-foot) barrel in 1/1500th of a second. If you have a useful barrel life of 3000 rounds, that would translate to just two seconds of actual bullet-in-barrel operating time.
Ah, but it’s not that simple. Your bullet starts at zero velocity and then accelerates as it passes through the bore, so the projectile’s average velocity is not the same as the 3000 fps muzzle velocity. So how long does a centerfire bullet (with 3000 fps MV) typically stay in the bore? The answer is about .002 seconds. This number was calculated by Varmint Al, who is a really smart engineer dude who worked at the Lawrence Livermore Laboratory, a government think tank that develops neutron bombs, fusion reactors and other simple stuff.
On his Barrel Tuner page, Varmint Al figured out that the amount of time a bullet spends in a barrel during firing is under .002 seconds. Al writes: “The approximate time that it takes a 3300 fps muzzle velocity bullet to exit the barrel, assuming a constant acceleration, is 0.0011 seconds. Actual exit times would be longer since the bullet is not under constant acceleration.”
We’ll use the .002 number for our calculations here, knowing that the exact number depends on barrel length and muzzle velocity. But .002 is a good average that errs, if anything, on the side of more barrel operating life rather than less.
So, if a bullet spends .002 seconds in the barrel during each shot, and you get 3000 rounds of accurate barrel life, how much actual firing time does the barrel deliver before it loses accuracy? That’s simple math: 3000 x .002 seconds = 6 seconds.
Gone in Six Seconds. Want to Cry Now?
Six seconds. That’s how long your barrel actually functions (in terms of bullet-in-barrel shot time) before it “goes south”. Yes, we know some barrels last longer than 3000 rounds. On the other hand, plenty of .243 Win and 6.5-284 barrels lose accuracy in 1500 rounds or less. If your barrel loses accuracy at the 1500-round mark, then it only worked for three seconds! Of course, if you are shooting a “long-lived” .308 Win that goes 5000 rounds before losing accuracy, then you get a whopping TEN seconds of barrel life. Anyway you look at it, a rifle barrel has very little longevity, when you consider actual firing time.
People already lament the high cost of replacing barrels. Now that you know how short-lived barrels really are, you can complain even louder. Of course our analysis does give you even more of an excuse to buy a nice new Bartlein, Krieger, Shilen etc. barrel for that fine rifle of yours.
If you are evaluating a firearm for self-defense use, you should consider three main factors: Reliability, Functionality (sights, trigger, ergonomics), and Effectiveness (ability to halt/neutralize threats). Regarding effectiveness, you need to consider what happens when the projectiles from your firearm reach the target. That involves penetration and terminal ballistics.
A 12ga shotgun is very effective inside 20 yards, with less risk of over-penetration* vs. a centerfire rifle.
You’ve probably heard the term “Terminal Ballistics”. But do you really know what this refers to? Fundamentally, “Terminal Ballistics” describes the behavior of a projectile as it strikes, enters, and penetrates a target. Terminal Ballistics, then, can be said to describe projectile behavior in a target including the transfer of kinetic energy. Contrast this with “External Ballistics” which, generally speaking, describes and predicts how projectiles travel in flight. One way to look at this is that External Ballistics covers bullet behavior before impact, while terminal ballistics covers bullet behavior after impact.
The study of Terminal Ballistics is important for hunters, because it can predict how pellets, bullets, and slugs can perform on game. This NRA Firearm Science video illustrates Terminal Ballistics basics, defining key terms such as Impact Crater, Temporary Cavity, and Primary Cavity.
External Ballistics, also called “exterior ballistics”, is the part of ballistics that deals with the behavior of a non-powered projectile in flight.
Terminal Ballistics, a sub-field of ballistics, is the study of the behavior and effects of a projectile when it hits its target.
*This Shooting Illustrated article discusses over-penetration risks with a variety of cartridge types. “A bullet passing through a threat and continuing with the potential to cause unintentional damage to a bystander or object is a situation commonly described as over-penetration.”
Think you need a relatively long case-neck for good accuracy? Think again. Stan Ware broke all the rules with his radical Wolfpup cartridge, proving that a near-no-neck design can deliver match-winning accuracy. Read on to learn how the Wolfpup works…
Retired gunsmith Stan Ware is a talented shooter who’s not afraid to think “outside the box”. Stan competes in both Hunter Benchrest (HBR) and Varmint for Score (VFS) disciplines. In his quest to build the ultimate Hunter Benchrest cartridge, Stan created the radical “Wolfpup” wildcat, based on a 6mmBR parent case. Noting the dominance of 30 BRs in VFS matches, Stan wondered if a stretched 30 BR could work in HBR competition. The challenge was case capacity. Under HBR rules the cartridge must hold at least 45.0 grains of water, equal to the capacity of the classic 30/30 case.
To get the requisite HBR case capacity, Stan figured he needed to boost the volume of a 30 BR case significantly, so he would have to move the shoulder forward — a lot. He did this by running a 30 BR reamer deeper and deeper, test-firing brass along the way. After three reamer passes, he ended up with the capacity he needed (the Wolfpup holds 45.3 grains of water). But then he looked at the finished product — a case with almost no neck, and he wondered “how could this possibly work?”.
From Trashbin to Winner’s Circle
Ware’s prototype Wolfpup ended up so short-necked, so unlike any “normal” cartridge, that Stan figured it was “dead on arrival”. Stan told us: “I said ‘this ain’t going to work’ and I threw the brass in the trash can. Honest. But later I thought I better shoot it and see what it does.” There was one problem — Stan didn’t have a seating die. He noticed the short neck provided a bit of tension after fire-forming, so he literally seated some bullets, BIB 118s and 125s, with his fingers. For powder he used H4198 and started with 35 grains, one grain more than a 30 BR load. Stan then did a pressure work-up: “I actually went up to 41.0 grains and didn’t have a sticky bolt. I ended up at 37.9 grains of Hodgdon 4198 — that gave 3150 fps, where the sweet spot is.” (Later testing revealed a second accuracy node at about 3020 fps, using 36.4 grains of H4198).
Stan’s radical short-necked Wolfpup shot great from the get-go. Once he found the right velocity node, the gun shot in the ones and zeros with both 7-ogive and 10-ogive bullets, both 118s and 125s. The Wolfpup proved easy to tune — it’s not finicky at all. And it’s a winner. Stan began shooting the Wolfpup in 2006 in both VFS and HBR matches and the ‘Pup’ started winning matches right away. In 2007, Stan won the Wisconsin State VFS Championship shooting the Wolfpup. In June 2010 at a Webster City, Iowa VFS match, Stan won the Grand Agg and posted high X-Count for the match, while placing first at 100 yards and second at 200 yards. How’s that for a cartridge that almost ended up in the trash bin?
Does Stan deserve an award for “most innovative benchrest cartridge design”? Stan chuckles at that notion: “I’m not a hero, not a genius. I really didn’t do anything. The fun part is thinking outside the box — for me anyway. Shooting is an age-old process of experimentation. You never learn it all.”
Why Does It Work?
How can such a radical case design perform so well? “That’s a good question,” Stan admitted. He then explained: “The 30 BR is inherently accurate, so I figured something based on the 30 BR should be accurate too. My personal belief is that the short neck doesn’t hurt you. Plus if the throat in the barrel is straight, the bullet can self-align. If the chamber is good, the bullet will self-center in the throat. In a regular case there’s not much room to do that, so a bullet can start off-center, and you don’t get the same results every time. A bullet in a conventional case is stopped from self-centering by the stiffer neck, particularly in a tight-clearance BR gun.”
Reloading the .30 Wolfpup
Stan’s Wolfpup chamber has a neck dimension of 0.330″. He turns his necks for a 0.327″ loaded round. Bullets are jammed .020″ forward of first contact with the lands. When he closes the bolt it pushes the bullet back in the case — almost a soft seat. Stan notes: “To start with I normally bump the shoulder .0005-.001″ so they go in easy. Just by doing that I get a little neck tension. I also use a bushing. Right now I’m running a .322, but it’s not particularly sensitive. I’ve tried one-thousandths increments up to a .325 bushing and couldn’t tell a lot of difference.” For bullet seating, Stan uses a Wilson 30 BR seater die into which he ran the chamber reamer. This gives perfect case fit during seating operations.
About the Illustrated Gunstock
You’ll notice Stan’s stock contains scenes from Vietnam and a quotation. Here’s the story. A Vietnam combat veteran, Stan served “in-country” with the Army’s 509th Non-Divisional Combat Unit (out of Fort Riley) from 1965-1966. Shortly before he left Vietnam, Stan went to a shop to have a souvenir lighter engraved. He asked the vendor for an appropriate inscription. The shop’s metal-worker engraved: “War is a tragedy. It takes mans’ best to do mans’ worst.” That message, along with the combat scenes, were hand-painted on Stan’s rifle by his wife Susan, a talented artist. She spent more than 20 hours painting the rifle stock.
Do you find that the crosshairs in your scope get blurry after a while, or that you experience eye strain during a match? This is normal, particularly as you get older. Focusing intensely on your target (through the scope or over iron sights) for an extended period of time can cause eye strain. Thankfully, there are things you can do to reduce eye fatigue. For one — breathe deeper to take in more oxygen. Secondly, give your eyes a break between shots, looking away from the scope or sights.
In our Forum there is an interesting thread about vision and eye fatigue. One Forum member observed: “I have noticed recently that if I linger on the target for too long the crosshairs begin to blur and the whole image gradually darkens as if a cloud passed over the sun. I do wear contacts and wonder if that’s the problem. Anyone else experienced this? — Tommy”
Forum members advised Tommy to relax and breath deep. Increase oxygen intake and also move the eyes off the target for a bit. Closing the eyes briefly between shots can also relieve eye strain. Tommy found this improved the situation.
Phil H. explained: “Tom — Our eyes are tremendous oxygen hogs. What you are witnessing is caused by lack of oxygen. When this happens, get off the sights, stare at the grass (most people’s eyes find the color green relaxing), breath, then get back on the rifle. Working on your cardio can help immensely. Worked for me when I shot Palma. Those aperture sights were a bear! The better my cardio got the better and longer I could see. Same thing with scopes. Try it!”
Keith G. noted: “Make sure you are still breathing… [your condition] sounds similar to the symptoms of holding one’s breath.”
Watercam concurred: “+1 on breathing. Take a long slow deep breath, exhale and break shot. Also make sure you take a moment to look at the horizon without looking through rifle or spotting scope once in a while to fight fatigue. Same thing happens when using iron sights.”
Arizona shooter Scott Harris offered this advice: “To some extent, [blurring vision] happens to anyone staring at something for a long time. I try to keep vision crisp by getting the shot off in a timely fashion or close the eyes briefly to refresh them. Also keep moisturized and protect against wind with wrap-around glasses”.
Breathing Better and Relaxing the Eyes Really Worked…
Tommy, the shooter with the eye problem, said his vision improved after he worked on his breathing and gave his eyes a rest between shots: “Thanks guys. These techniques shrunk my group just a bit and every little bit helps.”
Read more tips on reducing eye fatigue in our Forum Thread: That Vision Thing.
To avoid eye fatigue, take your eyes away from the scope between shots, and look at something nearby (or even close your eyes briefly). Also work on your breathing and don’t hold your breath too long — that robs your system of oxygen.
Do you have a friend or family member who is a first-time gun owner? Then show them this article. It provides important guidelines for new gun owners. There’s an Infographic printed below. And, there’s a helpful Firearm Storage and Safety Assessment Quiz. This walks gun owners through questions related to safe handling and storage of firearms. Here is Part One of the Quiz. If you click on this part, you can complete the entire Quiz and see how you score.


 About Jim Borden and Borden Accuracy
Borden Accuracy — A Success Story


 This video was made with the help of the


 Gone in Six Seconds. Want to Cry Now?


 Retired gunsmith Stan Ware is a talented shooter who’s not afraid to think “outside the box”. Stan competes in both Hunter Benchrest (HBR) and Varmint for Score (VFS) disciplines. In his quest to build the ultimate Hunter Benchrest cartridge, Stan created the radical “Wolfpup” wildcat, based on a 6mmBR parent case. Noting the dominance of 30 BRs in VFS matches, Stan wondered if a stretched 30 BR could work in HBR competition. The challenge was case capacity. Under HBR rules the cartridge must hold at least 45.0 grains of water, equal to the capacity of the classic 30/30 case.
 From Trashbin to Winner’s Circle
 Why Does It Work?