Readers who have just recently discovered the Daily Bulletin may not realize that AccurateShooter.com has hundreds of reference articles in our archives. These authoritative articles are divided into multiple categories, so you can easily view stories by topic (such as competition, tactical, rimfire, optics, shooting skills etc.). One of the most popular categories is our Technical Articles Collection. On a handy index page (with thumbnails for every story), you’ll find over 120 articles covering technical and gunsmithing topics. These articles can help you with major projects (such as stock painting), and they can also help you build more accurate ammo. Here are five popular selections from our Technical Articles archive.
Stress-Free Pillar Bedding. Richard Franklin explains how to do a top-quality bedding job, start to finish.
OnTarget Software Review. Our Editors test free software that measures shot groups with great precision. We explain how to use the program and configure advanced features.
Savage Action Tuning. Top F-TR shooter Stan Pate explains how to enhance the performance of your Savage rifle by optimizing the torque settings of the action screws.
Complete Precision Case Prep. Jake Gottfredson covers the complete case prep process, including brass weight sorting, case trimming, primer pocket uniforming, neck-sizing, and, case-neck turning.
Stock Painting Instructions. Step-by-step guide for stock painting by expert Mike Ricklefs. Mike shows both simple coverage and fancy effects.
You may have heard the phrase “blueprinting an action”, but do you know what that really means? Do you know what operations are done to an action during the blueprinting process? To help you understand, gunsmith Bill Marr of RifleShooter.com has created a helpful article showing a Rem 700 blueprinting job start to finish. This article spotlights how the procedures can be done with manual tools. Bill, who runs 782 Custom Gunworks Ltd., can also perform many of these operations with modern automated machinery. In fact, Bill has written a follow-up article on Truing a Rem 700 receiver with a Lathe.
Bill explains: “Blue-printing, or truing a rifle action, ensures the receiver face, threads, lugs, bolt lugs, and bolt face are square to the center line of the receiver.” In Bill’s informative article, Bill shows how he blueprints a Remington 700 short action receiver with .308 Win bolt face. He covers the following procedures step by step:
Action Disassembly
Ream Minor Diameter of Receiver Threads
Square the Receiver Lugs
Square the Face of the Receiver
Lap the Bolt Lugs
Square the Bolt Face
We use the bushings to guide the receiver tap. This chases the threads and ensures they are square.
2. Truing the Receiver Face
Using the receiver facing tool, the front of the receiver is trued. The tool is placed over the tap and turned by hand. We used Do Drill to lubricate it.
3. Lapping the Lugs
The bolt lapping tool screws into the front of the action and applies rearward pressure on the bolt face. A little bit of lapping compound is placed on the front of the receiver lugs. The bolt handle is then raised and lowered repeatedly. Note — it is critical that we do not get any lapping compound on any other surfaces.
4. Truing the Bolt Face
On this bolt, the central part of the bolt face was low. After the truing operation, this Rem 700 bolt face is now completely square to the action.
IMPORTANT: Rifleshooter.com states: “This article highlights our project and is presented for information purposes only. This provides an overview of the process and should not be attempted without the guidance and supervision of an experienced gunsmith“.
SUMMARY: Powder can have a very long shelf life. You need to watch for changes in smell and color. A reddish tinge, almost like rust on the powder, is a bad sign, as is a foul odor, not to be confused with a normal chemical smell. Either of these signs indicate it is time to dispose of your powder by means other than shooting.
Ever wondered about the stability of the propellants in your reloading room? There are some important things you should know about powder storage, to ensure consistent powder performance and safety. Western Powders (which has been acquired by Hodgdon) published an informative Q & A series entitled Dear Labby: Questions for our Ballistics Lab . Here are some excerpts that pertain to powder storage and shelf life. Worried that your powder may be too old? Western’s experts explain how to check your propellants for warning signs.
Proper Powder Storage
Q: I live in southern Arizona where it is very hot. I am told powders will become unstable if stored in an area not air-conditioned. My wife says no powder or primers in the house. Can powder be stored in a refrigerator? What about using a fireproof safe? I would appreciate your ideas. — M.C.
Lab Answer: SAAMI guidelines are pretty clear on issues of storage. They recommend storing smokeless powder in containers that will not allow pressure to build if the powder is ignited — ruling out gun safes and refrigerators.
In their original containers, the lifespan of smokeless powders is quite long, even in hot, arid climates. In fact the lifespan is typically longer than the average handloader would need to store them. Stored safely in a garage or outbuilding, your powder should last years. If you see the powder developing a reddish tint, or giving off a foul odor, it is time to discard it.
Clumps in Powder Container
Q: I ordered some of your Accurate 1680 powder back about in December. I just now opened it … and it is full of clumps. My knowledge tells me that means moisture. Am I wrong? I just now broke the seal and it has been stored in a ammo can with desiccant packs around it and a dehumidifier running 14-16 hours a day. I can’t imagine this being my fault, if this does indicate moisture. I don’t know if the pink part on the label is suppose to be red or not, but it is definitely pink, so if it was red I am wondering if I was shipped an old container? I hope that this isn’t bad and I am stuck with it…
Lab Answer: All powder contains a certain amount of moisture. When the powder is stored or during shipping, it can go through temperature cycles. During the cycling, the moisture can be pulled to the surface and cause clumping. Clumping can also be caused by static electricity if too dry or the powder has limited graphite content. You can break up the clumps before metering and they shouldn’t be a problem. This will not affect the powder performance, so your product is fine. Accurate 1680 labels are designed in Pink. As a side note, specification for testing powder is at 70° F and 60% humidity.
Shelf Life and Packaging Dates
Q: Does powder ever get to old to use and what identifying marks does your company put on the canister for when it is made, You have helped me out a while ago when I asked about keeping my cowboy shooting under 950 fps and it works great less stress on the hand and the recoil is very minimum. — R.B.
Lab Answer: On one pound bottles, the number is on the corner in a silver box. If the powder was poured today, it would read 012815 followed by a lot number. The whole number would look something like 012815749. Eight pound bottles have a sticker on the bottom with an obvious date code. The lot number appears above the date.
Top to bottom: Remington firing pin assembly with ISS, Tubb SpeedLock alloy-composite system without ISS (current versions have dual, opposite-wound springs), and Remington short action firing pin assembly without ISS.
The U.S. Army Marksmanship Unit regularly publishes technical articles on the USAMU Facebook page. One informative USAMU article covered mechanical issues and related ignition irregularities that can cause vertical fliers even with good ammunition in an otherwise excellent rifle. We highly recommend you read this article, which offers some important tech tips.
Vertical Dispersion: Mechanical/Ignition Issues?
Poor or inconsistent ignition has long been known to be one of the “usual suspects” when one encounters vertical fliers that just shouldn’t be there. By having a sense of some of the basic principles involved, and a few basic areas to check, the shooter may avoid colsiderable frustration, not to mention time, expensive loading components and barrel wear.
Is your well-built rifle of high-quality components plagued with vertical fliers across more than 1-3 handload combinations? Consider the bedding, crown and scope/sight mounts. Are they correct? If so, then you might check for ignition issues before boldly undertaking an extensive, expensive, and quite possibly fruitless quest for the “magic handload”.
SEEING IS BELIEVING: While the author had been aware for many years that poor ignition should be considered and ruled out when dealing with vertical fliers in an otherwise-excellent rifle, actually seeing the problem and its almost instantaneous cure really drove the lesson home.
He was working with a “dot” rifle – a .22 LR match rifle that really stacked bullets into little piles at 50 yards and beyond. With one lot of ELEY Tenex, it produced consistent “bughole” groups at 50, but with another, selected lot of Tenex, similar groups were regularly ruined by single, vertical fliers that did not appear in other rifles. Rather than spending days burning up expensive, select ammunition looking for “magic lots”, he contacted a well-respected rimfire gunsmith and explained the situation.
Without so much as batting an eye, the highly-experienced ‘smith tore into the rifle’s action, and quickly found the cause(s) of the problem. He discovered a demonstrably weak firing pin spring, plus a chip out of the face of the firing pin where it contacted the cartridge rim.
After replacing and tuning the offending parts, the rifle immediately began shooting tiny, bughole groups with the previously “unacceptable” lot of Tenex. Centerfire rifles can also benefit from ensuring positive, consistent ignition. A wise riflesmith is literally worth his weight in gold!
So, what are some issues we as shooters can inspect in our rifles to help determine if ignition woes could be part of our problem? At the club level, ask yourself if that “experienced” Remington, Winchester 70, or even Springfield-based match bolt gun you’re using is still running its’ original 40-80 year-old factory striker spring? If so, a new replacement is cheap insurance against current or future problems. (And BTW, it might be best to stick to the normal, factory-spec spring weight. A super-powerful spring can cause vertical, just as a weak one one can.) Along with that, a routine check for proper firing-pin protrusion is a quick preventive measure that can rule out potential issues.
Other areas to consider are the centering and consistency of the firing pin’s operation in the bolt. Admittedly, with the increasing use of precision-machined custom actions, this is becoming less an issue every day. Below is the firing pin assembly from a custom BAT action:
However, particularly with factory actions, a very quick and easy check is to remove the bolt, let the firing pin go forward, and look at the firing pin tip through the firing pin hole. Is the tip off-center in the hole, and possibly striking it as it moves forward? Is the hole out-of-round or burred from being struck repeatedly? If so, a trip to the riflesmith is likely in order.
Similarly, machining issues in the bolt/firing pin system can lead to rough and erratic firing pin movement, in which the firing pin drags against an internal surface of the bolt. In high-quality rifles these issues are relatively rare, but not unheard-of, and it takes mere minutes to rule them out. It may be worthwhile to remove the cocking piece/firing pin/spring assembly and look for any unusual gouges, dings, peening, burrs or signs of abnormal wear.
This task is especially easy with Winchester 70s, Springfields, and the similar Mauser 98s, involving little more than the push of a button and unscrewing the cocking piece assembly. This is just one of the many reasons these tried-and-true actions have earned such a loyal following in the field, among hunters who must maintain their rifles away from a shop.
Particularly with older rifles, watch for and remove excess grease (or even Cosmoline!) from both the firing pin assembly and inside the bolt. This can help improve firing pin speed and consistency. Other bolt-action designs may need a take-down tool or other measures.
As part of this inspection, AFTER ENSURING THE RIFLE IS UNLOADED, slowly cock the rifle, dry-fire, and repeat several times. Listen carefully near the action for inconsistency in the sounds it generates. Does the striker falling make the same sound each time? Do you hear or feel grinding upon operation? If so, where?
Be sure to check the operation of the cocking piece (bolt shroud), firing pin within the bolt shroud, the cocking piece cam and the rear of the bolt body where the cocking piece cam operates. As with our examination for abnormal wear marks discussed above, look for marks indicating roughness or a possible need for light polishing. Then, clean and lightly grease the bearing surfaces while you’re at it.
Remington 700 bolt shroud and cocking cam
These are relatively easy checks that shooters can undertake to perform a preliminary inspection on their own. Other mechanical issues can also cause ignition issues, chiefly centered around the action of the trigger, sear and sear spring. If these are suspected, a trip to an experienced, qualified riflesmith for diagnosis is recommended. We hope you find this information helpful! Join us again next week, and in the meantime, enjoy the shooting sports safely!
The Coriolis Effect comes into play with extreme long-range shots like this (2100 yards at Raton, New Mexico). The rotation of the earth actually moves the target a small distance (in space) during the long duration of the bullet’s flight.
When you’re out at the range, the Earth seems very stable. But it is actually a big sphere zooming through space while spinning around its axis, one complete turn every 24 hours. The rotation of the earth can create problems for extreme long-range shooters. During extended bullet flight times, the rotation of the planet causes an apparent deflection of the bullet path over very long distances. This is the ballistics manifestation of the Coriolis Effect.
Bryan Litz of Applied Ballistics discusses and explains the Coriolis Effect in his Ballistics Books and Seminars. Bryan notes that Coriolis is “a very subtle effect. People like to make more of it than it is because it seems mysterious.” In most common shooting situations inside 1K, Coriolis is not important. At 1000 yards, the Effect represents less than one click (for most cartridge types). Even well past 1000 yards, in windy conditions, the Coriolis Effect may well be “lost in the noise”. But in very calm conditions, when shooting at extreme ranges, Bryan says you can benefit from adjusting your ballistics solution for Coriolis.
Bryan explains: “The Coriolis Effect… has to do with the spin of the earth. You are basically shooting from one point to another on a rotating sphere, in an inertial reference frame. The consequence of that is that, if the flight time of the bullet gets significantly long, the bullet can have an apparent drift from its intended target. The amount [of apparent drift] is very small — it depends on your latitude and azimuth of fire on the planet.”
Coriolis is a very subtle effect. With typical bullet BCs and velocities, you must get to at least 1000 yards before Coriolis amounts to even one click. Accordingly, Bryan advises: “Coriolis Effect is NOT something to think about on moving targets, it is NOT something to think about in high, uncertain wind environments because there are variables that are dominating your uncertainty picture, and the Coriolis will distract you more than the correction is worth.”
“Where you could think about Coriolis, and have it be a major impact on your hit percentage, is if you are shooting at extended range, at relatively small targets, in low-wind conditions. Where you know your muzzle velocity and BC very well, [and there are] pristine conditions, that’s where you’re going to see Coriolis creep in. You’ll receive more refinement and accuracy in your ballistics solutions if you account for Coriolis on those types of shots. But in most practical long-range shooting situations, Coriolis is NOT important. What IS important is to understand is when you should think about it and when you shouldn’t, i.e. when applying it will matter and when it won’t.”
Most of us have access to a printer at home or at work. That means you can print your own targets. You’ll find hundreds of free target designs online, including dozens of downloadable targets on our AccurateShooter.com Target Page. If you’re feeling creative, you can design your own target with a computer drawing program such as MS Paint.
Paper Stock Is Important
If you want your self-printed targets to show shots cleanly (and not rip when it gets windy), you should use quality paper stock. We recommend card stock — the kind of thick paper used for business cards. Card stock is available in both 65-lb and 110-lb weights in a variety of colors. We generally print black on white. But you might experiment with bright orange or yellow sheets. Forum Member ShootDots report: “They sell cardstock at Fed-Ex Kinko! I use either Orange or Yellow. That makes it easy to see the bullet holes clearly.” On some printers, with the heavier 110-lb card stock, you will need to have the paper exit through the rear for a straighter run.
Here are some Target-Printing Tips from our Forum members:
“Staples sells a 67-lb heavy stock that I have settled on. I use the light grey or light blue, either of these are easy on the eyes on bright days. I have used the 110-lb card stock as well and it works fine. It’s just a little easier to print the lighter stuff.” (JBarnwell)
“Cardstock, as mentioned, works great for showing bullet holes as it doesn’t tear or rip like the thin, lightweight 20-lb paper. I’ve never had a problem with cardstock feeding in the printer, just don’t stick too many sheets in there. If I need three targets, I load only three card stock sheets”. (MEMilanuk)
“I’ve used Staples Sticker paper. This works well and no staples are required (joke intended). It helps if you put slight tension on the lighter weight paper when mounting it on the target frame.” (Mac 86951).
Here are some tips for using lighter weight paper (if you want to save money or your printer won’t work with heavier stock):
“20-lb bond works pretty well for me if I use a spray adhesive and stick the entire back of the paper’s surface to the backer board.” (Lapua40X)
“I use the regular 20-lb paper but the only time it tears is when there is no backer to support it. This can be an issue when going to a public range and the backer are all shot out. I use a large construction paper backer that I clip onto the stands.” (CPorter)
Here Are Three of Our Favorite Targets. Click to Download PDFs.
What if you could see a speeding bullet in the milliseconds it exits the muzzle of a pistol? How cool would that be… Well, the Mythbusters folks (Adam Savage and Jamie Hyneman) have made that possible. Using an exotic Phantom super-high-speed camera running at 73,000 frames per second, the Mythbusters recorded a .45 ACP bullet being fired from a 1911-type handgun.
Watch Mythbusters Super-Slow-Motion Pistol Video:
Watch this FULL SCREEN to see the amazing details of the flame and smoke exiting the muzzle.
What unfolds is spectacular. First you see a ball of flame as the bullet emerges from the barrel of the 1911, then two distinct, separate swirling clouds form as the bullet races toward the target. Watch the video a couple times — it’s mesmerizing.
Co-host Adam Savage is nearly rendered speechless by the remarkable slow-motion footage from the Phantom. Filmed at 73,000 frames per second, the video reveals a dance of pressure and fire that would otherwise be missed by the unaided eye.
Headed to SHOT Show in Las Vegas? Then you should download the FREE SHOT Show Mobile App. Available for all mobile devices, this App really makes it easier to plan your SHOT Show schedule, and navigate the floor of the Sands Convention Center. The 2024 SHOT Show Mobile App is now available for download. There are versions for Apple and Android smartphones and tablets. And there is even an Apple Watch version. Apple users will find the App in the App Store, Android users will find their version in the Google Play Store. Learn more at SHOTmobile.com.
Handy Interactive Map
The App includes an interactive map that can direct you from your current location to your next destination. Arrange your meetings with a handy scheduling calendar. And you can search for any SHOT exhibitor by name or product category. In addition, the App lists major show events as well as important new products.
SHOT SHOW 2024 APP FEATURES
— Locate Exhibitor Booths with searchable Vendor Database/Floor Map
— Build a personalized Schedule and bookmark Exhibitors
— Visit bookmarked Exhibitors with Quick Route Feature
— Multi-Device Sync for smartphones, tablets, laptops
— Up-to-date Exhibitor, Speaker, and Event information
The 2024 SHOT Show takes place January 23-26 at the Venetian EXPO and Caesars Forum in Las Vegas, Nevada. Media Day at the Range takes place Monday the 22nd in Boulder City. To learn more about SHOT Show, including seminar times, educational resources, event listings, and hotel/travel information, visit SHOTShow.org.
“Science tells us that exposure to continuous noise of 85 dB for eight hours is enough to cause permanent hearing loss, and worse, spikes of 130 dB and more can result in permanent hearing damage instantly.” Source: NRA Blog.
The Risk of Hearing Loss
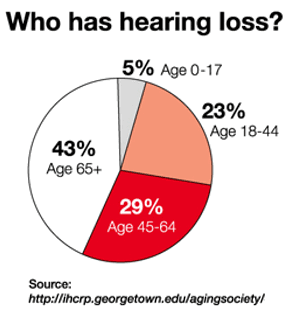
Hearing loss can be progressive and irreversible. If you are a shooter, this is serious business. As the NRA Blog cautions: “You may not even realize you’re harming your hearing. Hearing loss occurs gradually, and can go effectively unnoticed until symptoms become severe. By then, the damage is done.”Effective hearing protection is a must whenever you are shooting firearms or when you are in the vicinity of gun-shots. For ultimate protection, we recommend a good set of tapered foam earplugs, topped by ear-muffs. However, there are situations when you may prefer lighter-weight hearing protection that can be quickly removed. For example, if you are standing well behind the firing line as an observer, or if you are working as a rangemaster or waddie some distance away from the shooters.”
Sound Levels for Common Noises:
9mm Luger pistol: 160 dB
Jet aircraft engine (near): 140 dB
.22 LR pistol: 134 dB
Normal human pain threshold: 120 dB
Noisy Nightclub: 110 db
Riding Motorcycle at 65 mph: 103 db
Power Lawnmower: 95 dB
Hearing damage possible: 85 dB (sustained for 8+ hours)
Ringing Telephone: 80 dB
Normal conversation: 60 dB
What about suppressors? If you use a suppressor is it OK to dispense with hearing protection? Not really. Even the most effective suppressors, on the smallest and quietest calibers (.22 LR), reduce the peak sound level of a gunshot to between 110 to 120 dB. To put that in perspective, according to the National Institute for Occupational Safety and Health (NIOSH), that is as loud as a jackhammer (110 dB) or an ambulance siren (120 dB). For normal caliber handguns and rifles, suppressed sound levels routinely exceed 130 dB, just shy of OSHA’s “hearing safe” threshold of 140 dB. Accordingly, we recommend use of hearing protection even when shooting suppressed.
1. Ear Muffs — Max Protection and Compact Options
The highest current USA Noise Reduction Rating is 34 dB NRR. To get that kind of protection, you need pretty big muffs, but thankfully, you don’t have to spend big bucks. For under $15.00 you can buy quality ANSI-approved muffs with a 30+ dB Noise Reduction Rating. Chose the 34 NRR G&F Pro Muffs at $13.99 or the more comfortable 30 NRR Walker EXT Range Muffs for $14.97. Both products have padded head-bands which retract.
Many hunters and competitive shooters prefer low-profile ear muffs. As these typically have a lower Noise Reduction Rating, perhaps NRR 22-24, we recommend running earplugs under muffs, particularly when you are at a busy range or shooting a match. If you use low-profile electronic muffs, such as Howard Leight Impact Sport Muffs, you should still be able to hear range commands even with plugs underneath.
2. Electronic Plugs — New Technology with Adjustable Volume
For maximum hearing protection we still recommend good muffs over quality foam ear plugs, there is a new option available. A variety of companies now offer electronic ear buds that include small speakers so you can hear range commands and conversations. Please note — these MUST be specially-designed protective in-ear devices. Do NOT just use ear-buds designed for music playback!
Howard Leight recently introduced new Impact Sport In-Ear plugs with an impressive 29 dB Noise Reduction Rating (NRR). That NRR is better than most compact ear muffs. The plugs automatically compress amplification when loud impulse sounds (like gunshots) exceed 85dB. Internal amplification allows you to hear range commands and conversations. The cord connecting the plugs includes twin, handy volume controls. These plugs come with moldable earhooks with 3 different ear tip sizes. The deluxe model with quick-connect BlueTooth is available for $79.99 on Amazon. With this high-tech BlueTooth version you can take phone calls.
3. Foam Earplugs — Small, Inexpensive, but Essential
20 Pairs
50 Pairs
Quality foam earplugs offer great hearing protection at low cost. These Howard Leight NRR33 Max plugs are your Editor’s favorite foam earplugs. Between shooting, motorcycling and mowing lawns, I probably have Max plugs in my ears 3-4 days a week. These Leight Max plugs are very effective, easy to insert/remove (with the flared ends), and they seem to be less abrasive in the ear canal than some other brands. Right now you can get 20 pairs of these NRR33 Leight Max plugs for just $9.25.
Note, if you prefer thin, light-weight earmuffs, we recommend running earplugs underneath for double protection while shooting firearms (or when you’re on the firing line). Sound experts tell us that running plugs and muffs together can effectively improve your effective noise reduction by 4-7 dB NRR.
Hearing bands are inexpensive, lightweight, and are handy for special situations, such using hedgetrimmers and noisy power tools, when you may need to frequently remove the protection. These banded products are a also a very good form of hearing protection for hunters. You can keep them handy around the neck while spotting game, and then insert the plugs before shooting. We have tried two types of banded hearing protection, the Howard Leight Quiet Band (shown above) (25 dB NRR), and the Radians Rad-Band (23 dB NRR). The Leight Quiet Band is quite durable and the plugs can be replaced.
Radians Rad-Band is very light-weight, with Jelli™ Plugs that are comfortable, washable, and reusable — all for just $6.58 on Amazon. Peltor also offers Sport Banded Earplugs. These conveniently ship with 3 pairs of ear buds, all for $12.20 on Amazon.
As an Amazon affiliate, this site can earn revenues through sales commissions.
Conventional brass jags work great — except for one thing. They can react to solvents, leaving a blue “false positive” on patches. In recent years, jag-makers have experimented with many different materials in an effort to cure the solvent-reaction problem. Today we have polymer jags, nickel-plated jags, and stainless steel jags. And the latest innovation is the aluminum jag from Dewey.
J. Dewey Mfg. offers a series of “Copper Eliminator” jags and brush adapters made from aircraft-grade aluminum with the same hardness as brass. Dewey claims that its aluminum jags will not become embedded with grit or particles that could harm your bore. At the same time, Dewey’s aluminum jags will not react to ammoniated bore solvents that can turn patches blue green when used with brass jags. Dewey aluminum jags are offered with either male OR female 8/32 threads. The $5.25 aluminum jags and $3.70 brush adapters are offered in a wide variety of calibers. You can order these products from Dewey Mfg. or Brownells.
Story Tip from Boyd Allen. We welcome submissions from our readers.


 Readers who have just recently discovered the Daily Bulletin may not realize that AccurateShooter.com has hundreds of reference articles in our archives. These authoritative articles are divided into multiple categories, so you can easily view stories by topic (such as competition, tactical, rimfire, optics, shooting skills etc.). One of the most popular categories is our Technical Articles Collection. On a handy index page (with thumbnails for every story), you’ll find over 120 articles covering technical and gunsmithing topics. These articles can help you with major projects (such as stock painting), and they can also help you build more accurate ammo. Here are five popular selections from our Technical Articles archive.



 Is your well-built rifle of high-quality components plagued with vertical fliers across more than 1-3 handload combinations? Consider the bedding, crown and scope/sight mounts. Are they correct? If so, then you might check for ignition issues before boldly undertaking an extensive, expensive, and quite possibly fruitless quest for the “magic handload”.


 When you’re out at the range, the Earth seems very stable. But it is actually a big sphere zooming through space while spinning around its axis, one complete turn every 24 hours. The rotation of the earth can create problems for extreme long-range shooters. During extended bullet flight times, the rotation of the planet causes an apparent deflection of the bullet path over very long distances. This is the ballistics manifestation of the

 Most of us have access to a printer at home or at work. That means you can print your own targets. You’ll find hundreds of free target designs online, including dozens of downloadable targets on our


 The Risk of Hearing Loss


