For today’s Saturday at the Movies special, we provide a selection of videos showcasing rifle and pistol cartridge types — from tiny .17 caliber cases to huge 20mm cases. Two of the videos use advance computer animation to provide 3D views of dozens of cartridge types. Then there are some expert commentaries by Jerry Miculek and Ron Spomer discussing the characteristics and performance of various cartridge types. Finally, we provide two videos that discuss rimfire cartridges and show how .22 LR rounds are produced in a modern CCI factory.
90 Different Rifle Cartridge Types in Computer Animation
In this rifle ammunition comparison animation there are 90 different cartridge types, from very small (.22 Flobert) to very, very big (20mm Vulcan). This video employs sophisticated, 3D CAD animation to showcase 90 different rifle cartridges, one after the other, in sequence. It covers from .17 Caliber up to 20mm. Obviously a lot of time and effort went into this video, but it really is cool to see so many different cartridge types in one 3.5-minute video.
After the full line-up is complete at 1:41, the video then provides other smaller comparison, such as multiple large hunting cartridges (2:15) and .22 Caliber cartridges (2:45, see above). All the cartridge models are made using Autodesk Inventor software, and then the “line-up” animation was completed with Autodesk Showcase.
Cartridge Types Included (in Caliber Order, then Metric Order):
1) .17 HM2
2) .17 HMR
3) .204 Ruger
4) .218 Bee
5) .22 Flobert
6) .22 Hornet
7) .22 LR
8) .22 Magnum
9) .22 PPC
10) .22 Short
11) .220 Jaybird
12) .223 Rem/5.56x45mm
13) .223 WSSM
14) .224 Weatherby Magnum
15) .225 Winchester
16) .240 Weatherby Magnum
17) .243 Winchester
18) .25 Remington Auto
19) .250 Savage
20) .25-06 Remington
21) .256 Winchester Magnum
22) .257 Roberts
23) .260 Remington
24) .264 Winchester Magnum
25) .270 Weatherby Magnum
26) .270 Winchester
27) .280 British
28) .280 Remington
29) .284 Winchester
30) .30 Carbine
31) .300 H&H Magnum
32) .300 Rem Ultra Magnum
33) .300 Savage
34) .300 Winchester Magnum
35) .300 Win Short Mag (WSM)
36) .30-06 Springfield
37) .303 British
38) .30-30
39) .308 Norma Magnum
40) .308 Winchester
41) .32 Winchester Special
42) .325 WSM
43) .338 Lapua Magnum
44) .35 Whelen
45) .350 Remington Magnum
46) .375 H&H Magnum
47) .376 Steyr
48) .408 Cheyenne
49) .416 Remington Magnum
50) .416 Weatherby Magnum
51) .444 Marlin
52) .450 Marlin
53) .450 Nitro Express
54) .458 Win Magnum
55) .45×70
56) .460 Weatherby Magnum
57) .465 H&H Magnum
58) .470 Nitro Express
59) .50 BMG / 12.7×99 NATO
60) .500 jeffery
61) .505 Gibbs
62) .577 Nitro Express
63) .577 Tyrannosaur
64) .600 Nitro Express
65) .700 Nitro Express
66) .950 JDJ
67) 4.6×30 mm
68) 4.6x30mm
69) 5.6×50 Magnum
70) 5.7x28mm
71) 5mm/SMc
72) 6mm LEE
73) 6.5×55 Swedish
74) 6.5×6 mm Schuler
75) 6.8mm Remington SPC
76) 6mm PPC
77) 6×45 mm
78) 7mm Weatherby Magnum
79) 7mm Remington Magnum
80) 7mm Rem Ultra Magnum
81) 7.62×39 mm FMJ
82) 7.7×58 Arisaka
83) 7.95×57 Mauser
84) 8mm Remington Magnum
85) 9.3×62 mm
86) 9.3×64 Brenneke
87) 14.5×114 mm
88) 20mm Vulcan
89) 25mmx137mm
90) 30mmx173 mm
Ammunition Size Line-Up — from Tiny to Massive
This animation video shows the size comparison of ammunition from a 2.34mm rimfire caliber to the massive 800mm caliber shell of the Schwerer Gustav railway cannon used by German forces in World War II. This video includes many common rifle and pistol cartridges/calibers, but also includes large artillery ammunition. This video has very good CGI Graphics. Below is part of the line-up from the .17 Remington Fireball (far left) to the famed .50 BMG (far right):
Ammunition Types Showcased in this video:
2.34mm rimfire
2.7mm Kolibri
3mm Kolibri
4.25 mm Liliput
.17 Hornady Mach 2
.17 Remington Fireball
.17 Hornady Magnum Rimfire
.22 Long Rifle
.22 Winchester Magnum Rimfire
HK 4.6×30mm
4.6×36 Loffelspitz
5.45mmx18 MPTs
5.7×28mm SS190
.280 British 7×43
.297/230 Morris Short
.297/230 Morris Long
.30 Pedersen 7.65×20mm
7.92×33mm Kurz
.300 Winchester Short Magnum
8×50mmR Mannlicher
.499 LWR
.577/450 Martini–Henry
.600 Nitro Express
.470 Nitro Express
.50 Beowulf
.50 BMG
20×102 M55A3
25×137 M793
Popular Cartridges/Calibers for Self-Defense and Hunting
This video focuses on popular calibers/cartridges used for self-defense and hunting. It provides a quick but informative overview of the capabilities (and intended uses) of many types of pistol, rifle, and shotgun ammunition. The video discusses the pros/cons of various cartridge types and explains how you would select ammo for a particular purposes (e.g. skeet loads vs. defense shotshells). If you are considering buying a carry pistol and are undecided about caliber choice, this is a good video to watch.
Flattest-Shooting Cartridges by Caliber (Ron Spomer)
In this 15-minute video, hunting expert Ron Spomer examines a variety of standard and wildcat cartridges from .17 caliber all the way to .338 caliber. For each caliber, Ron picks a flat-shooting “winner” and provides some ballistics comparison tables. This video is quite popular, with over 550,000 views on YouTube.
Ammo Types and Calibers — Jerry Miculek Explains the Basics
In this video, legendary shooter Jerry Miculek talks about popular types of pistol and rifle ammunition and the various bullet options used for plinking, competition, and self-defense. Jerry, one of the greatest pistol shooters on the planet, provides useful insights on cartridge selection and bullet choices. Jerry notes: “There are a TON of different types of ammunition” so he explains the basics. And Jerry answers common questions such as: “What is the difference between ball and hollow-point bullets?” and “What type of gun takes rimmed cartridge versus rimless?”.
.22 Caliber Rimfire Cartridges — Some Key Facts Revealed
We recommend all .22 rimfire shooters watch this video from Old English Outfitters. It explains some important facts and clarifies some common misconceptions about to .22 caliber ammunition. To learn more about modern .22 LR rimfire ammo, we also recommend the video below, which shows how CCI .22 LR ammunition is manufactured, start to finish.
BONUS Video — How .22 LR Ammunition Is Made
YouTube host 22Plinkster toured the CCI/Speer production facility in Lewiston, Idaho. While touring the plant, 22Plinkster was allowed to capture video showing the creation of .22 LR rounds from start to finish. This is a fascinating video, well worth watching.
This revealing video shows all phases of .22 LR ammo production including cupping, drawing, annealing, washing, drying, head-stamping, priming, powder charging, bullet seating, crimping, waxing, inspection, and final packaging. If you’ve got ten minutes to spare, we really recommend you watch the video from start to finish. You’ll definitely learn some new things about rimfire ammo.
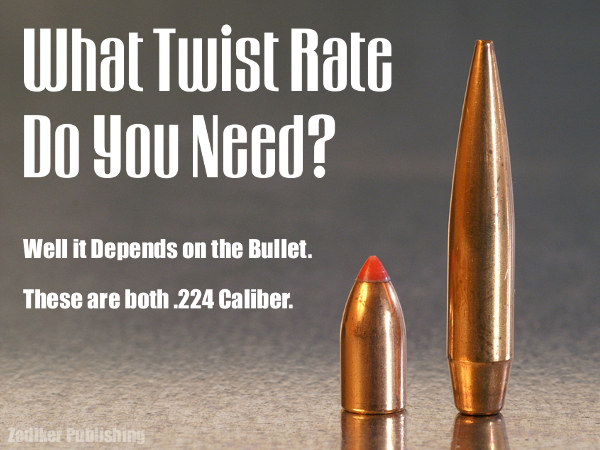
Here’s an extreme range of .224-Caliber bullets: 35gr varmint bullet and 90gr match bullet. Of course, along with bullet length/design, you need to consider MV when choosing twist rate.
Even with the same caliber (and same bullet weight), different bullet types may require different rates of spin to stabilize properly. The bullet’s initial spin rate (RPM) is a function of the bullet’s muzzle velocity and the spin imparted by the rifling in the barrel. You want to ensure your bullet is stable throughout flight. It is better to have too much spin than too little, according to many ballistics experts, including Bryan Litz of Applied Ballistics. The late Glen Zediker put together some basic tips concerning barrel twist rates and bullet stability. These come from Glen’s book, Top Grade Ammo.
Choosing the Right Twist Rate
I’d always rather have a twist too fast than not fast enough. Generally… I recommend erring toward the faster side of a barrel twist decision. 1:8″ twist is becoming a “new standard” for .224 caliber, replacing 1:9″ in the process. The reason is that new bullets tend to be bigger rather than smaller. Don’t let a too-slow twist limit your capacity to [achieve] better long-range performance.
Base your next barrel twist rate decision on the longest, heaviest bullets you choose to use, and at the same time realize that the rate you choose will in turn limit your bullet choices. If the longest, heaviest bullet you’ll shoot (ever) is a 55-grain .224, then there’s honestly no reason not to use a 1:12″. Likewise true for .308-caliber: unless you’re going over 200-grain bullet weight, a 1:10″ will perform perfectly well.
Bullet Length is More Critical than Weight
Bullet length, not weight, [primarily] determines how much rotation is necessary for stability. Twist rate suggestions, though, are most usually given with respect to bullet weight, but that’s more of a generality for convenience’s sake, I think. The reason is that with the introduction of higher-ballistic-coefficient bullet designs, which are longer than conventional forms, it is easily possible to have two same-weight bullets that won’t both stabilize from the same twist rate.
Evidence of Instability
The tell-tale for an unstable (wobbling or tumbling) bullet is an oblong hole in the target paper, a “keyhole,” and that means the bullet contacted the target at some attitude other than nose-first.
Increasing Barrel Length Can Deliver More Velocity, But That May Still Not Provide Enough Stability if the Twist Rate Is Too Slow
Bullet speed and barrel length have an influence on bullet stability, and a higher muzzle velocity through a longer tube will bring on more effect from the twist, but it’s a little too edgy if a particular bullet stabilizes only when running maximum velocity.
My failed 90-grain .224 experiment is a good example of that: I could get them asleep in a 1:7″ twist, 25-inch barrel, which was chambered in .22 PPC, but could not get them stabilized in a 20-inch 1:7″ .223 Rem. The answer always is to get a twist that’s correct.
These tips were adapted from Glen’s popular 2016 book, Top-Grade Ammo That work has numerous helpful articles on technical topics. Berger Bullets also has a FREE online Twist Rate Stability Calculator, developed by Applied Ballistics.
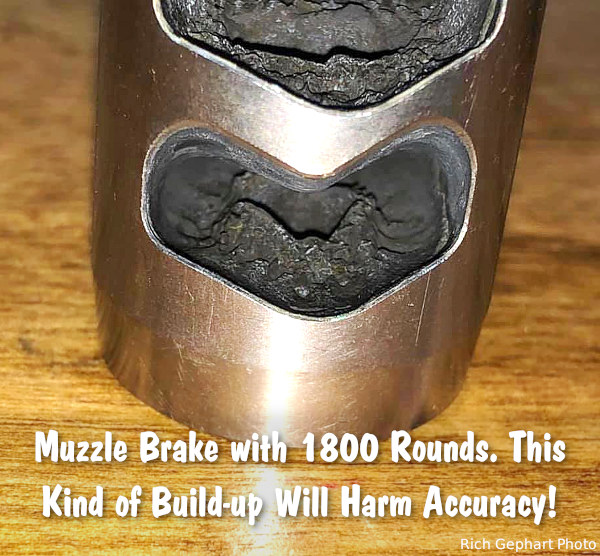
Many hunters and precision rifle competitors use muzzle brakes because these ported devices reduce felt recoil significantly. That makes a real difference getting back on target for quick follow-up shots. While many rifle owners appreciate the benefits of muzzle brakes, they may also neglect their brakes, allowing hard carbon and powder residue to build up. Not good. You should regularly clean your muzzle brake to remove fouling and carbon build-up.
As Mark Edgreen posted: “Carbon build up on the crown and in the brake is a recipe for poor accuracy.” And another gunsmith reported that customers complained about guns that “shot out way too early” but they only needed to have the brakes cleaned.
Gunsmith and PRS/NRL competitor Jim See recently reminded his Facebook Fans about the importance of cleaning muzzle brakes: “How many times do I have to say it? You need to maintain your rifles. Clean your muzzle brakes people!”. Jim, who runs Elite Accuracy LLC, notes that hard carbon build-up in brakes can definitely harm accuracy. Look at this example:
Muzzle Brake Cleaning Methods
There are various methods for cleaning a brake, we list a variety of techniques, but we would start with NON-corrosive ultrasound. You’ll want to remove the muzzle device before doing these tasks.
1. Use Ultrasonic Cleaning Machine with cleaning solution. This may be the most efficient method: “I place my brake in the ultrasonic cleaner. Shiney as new.” (Jim Moseley).
2. Spray with commercial Carb Cleaner and brush. Then apply anti-corrosion coating.
3. Soak in half hydrogen peroxide and half vinegar. Suggestion: “Let sit over night and carbon melts off. Brush remaining carbon off, rinse and put the brake back on.” Apply anti-corrosive before mounting.
4. Soak in 50/50 solution of water and white vinegar and brush. (Be sure to apply anti-corrosion coating, such as Eezox, after soaking).
5. Tumble in liquid solution with stainless pins. Comment: “Comes out slightly faded, but perfectly clean on stainless, non-painted brakes though.” Warning — do NOT do this with threaded brakes — tumbling could affect threads of screw-on brakes. Also, tumbling can harm painted or Cerakote finishes.
Gunsmithing Tip: By fitting the muzzle brake so that the barrel crown is slightly forward, it is easier to wipe carbon fouling off the end of the barrel. See photo:
Over the past 12 months, this article was one of the TOP TEN most-read Daily Bulletin features. We’re reprising it today for those who may have missed it the first time. The above diagram comes from a TiborasurasRex YouTube Video comparing G1 and G7 BC models. CLICK HERE to watch the video.
The better, up-to-date ballistics programs let you select either G1 or G7 Ballistic Coefficient (BC) values when calculating a trajectory. The ballistic coefficient (BC) of a body is a measure of its ability to overcome air resistance in flight. You’ve probably seen that G7 values are numerically lower than G1 values for the same bullet (typically). But that doesn’t mean you should select a G1 value simply because it is higher.
Some readers are not quite sure about the difference between G1 and G7 models. One forum member wrote us: “I went on the JBM Ballistics website to use the web-based Trajectory Calculator and when I got to the part that gives you a choice to choose between G1 and G7 BC, I was stumped. What determines how, or which one to use?”
The simple answer is the G1 value normally works better for shorter flat-based bullets, while the G7 value should work better for longer, boat-tailed bullets.
G1 vs. G7 Ballistic Coefficients — Which Is Right for You?
G1 and G7 refer both refer to aerodynamic drag models based on particular “standard projectile” shapes. The G1 shape looks like a flat-based bullet. The G7 shape is quite different, and better approximates the geometry of a modern long-range bullet. So, when choosing your drag model, G1 is preferable for flat-based bullets, while G7 is ordinarily a “better fit” for longer, boat-tailed bullets.
Drag Models — G7 is better than G1 for Long-Range Bullets
Many ballistics programs still offer only the default G1 drag model. Bryan Litz, author of Applied Ballistics for Long Range Shooting, believes the G7 standard is preferable for long-range, low-drag bullets: “Part of the reason there is so much ‘slop’ in advertised BCs is because they’re referenced to the G1 standard which is very speed sensitive. The G7 standard is more appropriate for long range bullets. Here’s the results of my testing on two low-drag, long-range boat-tail bullets, so you can see how the G1 and G7 Ballistic coefficients compare:
G1 BCs, averaged between 1500 fps and 3000 fps:
Berger 180 VLD: 0.659 lb/in²
JLK 180: 0.645 lb/in²
The reason the BC for the JLK is less is mostly because the meplat was significantly larger on the particular lot that I tested (0.075″ vs 0.059″; see attached drawings).
For bullets like these, it’s much better to use the G7 standard. The following BCs are referenced to the G7 standard, and are constant for all speeds.
Many modern ballistics programs, including the free online JBM Ballistics Program, are able to use BCs referenced to G7 standards. When available, these BCs are more appropriate for long range bullets, according to Bryan.
[Editor’s NOTE: BCs are normally reported simply as an 0.XXX number. The lb/in² tag applies to all BCs, but is commonly left off for simplicity.]
Tech Report by B. Walker, owner of The Urban Rifleman LLC
I have been moly coating since I started shooting rifles nearly 26 years ago. I have always moly-coated my bullets. I figured if it was good enough for Walt Berger, it was good enough for me (Walt still moly coats his bullets to this day, if recent match pictures are any indication). I had always used the typical dry method (without the wax) and I had the same jar of moly (molybdenum disulfide) for many years.
I had tried all kinds of methods over the years. But then AccurateShooter Forum member “Bowfisher” sent me a message about moly-coating bullets using water. After his suggestion, I did several batches using the moly-in-the-water method. I was stunned with the great results. This Wet Moly method is the cleanest, easiest, and best coating method I have ever tried. I strongly believe Wet Moly should be the recommended method.
Traditional Dry Moly Coating Process is Dusty and Messy
Before I started the Wet Moly process, I always coated my bullets in small containers in my big Dillon tumbler. I would put the bullets in old EMPTY 1-lb powder containers and add the moly. I would place the powder containers in my big Dillon tumbler and tumble for at least three hours. I would then throw rice in with the bullets to soak up any excess moly dust and shine the bullets. Then I would shake out the rice using a lid with holes drilled in it. My coated stuff came out beautiful if I do say so myself even dry. However, there was always dust and moly mess (there was always some on my fingers when I would handle the bullets after). I only liked to doing coating in big batches to get it over with because it was a chore (by all means don’t get moly on the bottom of your shoes and track the carpet)!
Wet Moly Method — Tumbling in Bottles with Moly and Water
The new wet method entails adding water to the bullets during the tumble in the bottle, and it is way easier and cleaner. The final product is totally dust free and will not come off on your fingers as there is no dust or residue. I think they shoot better too, and the moly works as it is supposed to. I won’t get into the debates over the merits of moly. Some folks believe it works for them. This article is intended for those guys — it is not intended to convert handloaders who are happy with shooting uncoated bullets.
Editor: None other than John Whidden, Multi-Time National Long Range Champion, moly-coats his bullets. Whidden also uses a Wet Moly application method. He agrees that applying moly in a water solution delivers the best results, and doesn’t leave dusty residues.
Here is the basic outline of the Wet Moly application method. In addition to this outline, I created an instructional video that shows my entire process. [Editor: Definitely WATCH the video. It is important to see the post-tumbling rinsing and buffing processses.]
1. Use old 1-lb powder containers. Work over a sink. Add the bullets in reasonable batches to the containers (lets say 2-3 inches of bullets). I try to use use only enough water to cover the bullets and I use a little more moly than I used to with a dry application. I suggest using half a teaspoon of moly per two inches depth of bullets.
2. Tumble for four hours (at least). I tape the container lids shut before placing them in the tumbler. Then, simply place the powder container in your vibratory tumbler.
3. After the elapsed time, take the bottle to the sink and, dump contents into a plastic strainer. I use an old spaghetti strainer that I save just for moly. IMPORTANT: BE SURE you have a strainer that won’t let the bullets fall out! Stream water (from faucet) gently over the bullets to thoroughly clean excess residues off the bullets. Shake strainer to get all the water out. See video time 6:00-10:00.
4. Sift out the bullets onto a paper towel inside an old baking pan and shake to buff. Repeat until the bullets are completely dry and buffed to a high shine. The bullets are clean, dust-free and the moly is gorgeous! Leave for several days before storing or put them in your oven at about 130 degrees for 30 minutes to remove the last bit of any moisture. (WARNING: DO NOT use excessive oven heat or cook too long — set a timer!).
If you follow these instructions, the result should be the best moly coating you have ever seen!
Before and AFTER Wet Moly. Note how uniform the moly coating is on the bullets. The Wet Moly process also leaves a perfect glossy finish after rinsing and drying. And the bullets are totally dust-free! These are Sierra #1380 .224 69gr HPBT MatchKings.
Be sure to visit our online store at TheUrbanriflemanstore.com. We have a full compliment of front and rear bag riders for various rifles that we designed and produce in-house. We also stock Revolution laminated benchrest stocks, and we sell stainless steel Remington prefit barrels (which are getting rave reviews from customers). Also available are Wilson dies, Timney and Triggertech triggers, Berger and Sierra bullets, Magpul and Accuracy International chassis, and lots more.
Forum member F-Class John is an avid F-Class competitor and expert handloader. John reviews reloading hardware and shooting-related products for his popular F-Class John YouTube Channel, which now boasts 500+ videos. John also does important product testing for AccurateShooter.com. Through his YouTube channel, John has reviewed many of the latest and greatest reloading tools and accessories. For today’s Video Showcase, we selected six F-Class John product reviews. Products tested include front rests, borescopes, precision triggers, ammo caddies, steel rimfire targets, and a concentricity checker.
If you like these informative videos, consider joining F-Class John’s Patreon Channel for live video meetings, more in-depth videos, and detailed explanations. Join Patreon via Patreon.com/fclassjohn for full length videos, live chats, and more.
SEB NEO-X and Rodzilla Raptor Front Rests
This video covers two outstanding front joystick rests, the SEB Neo-X and the Rodzilla Raptor. Both of these rests work great for both benchrest and F-Class shooters, centerfire and rimfire. Build quality is outstanding for both rests. Tester F-Class John observes: “Both are great units and user preference will really dictate which to get. I own both and find they give me consistent target acquisition.” To learn more about these two excellent front rests, visit TheRodzilla.com and/or SEB Rests USA.
Testing Flavio Fare Triggers
The Flavio Fare triggers are some of the best on the market. These are offered for various action types including Remington clones and custom actions. CLICK HERE for a discussion of these triggers on our Forum. The Flavio Fare Veloce Hunting Trigger (with safety) adjusts from 5 to 25 ounces pull weight and retails for $439.95. The Flavio Fare Whisper 2.1 BenchRest Trigger (no safety) adjusts from 0.7 to 2.8 ounces, and costs $419.95. Reviewer F-Class John says these Flavio Fare triggers are “smooth, crisp, with a wide range of trigger pull weights … I love these things.”
Steel Targets for Rimfire Competition — Options Reviewed
NRL-22 and PRS Rimfire matches are growing in popularity. These types of competition are fun because reactive targets are used at the matches. Such targets provide “instant gratification” for a good shot — you hear a “ping” and may see the target swing or rotate. This video reviews a large variety of rimfire steel targets from D-M Targets. F-Class John notes: “These D-M Targets rimfire metal targets set-up quickly and easily. These targets are made from good steel and produce a good sound when hit.” John also observed that these DM steel rimfire targets don’t hang up when hit.
Teslong BoreScope Comparison — NTG500H and NTG450H Models
All serious rifle shooters should have a good digital borescope that allows you to view the inside of your rifle barrels. That helps you diagnose fouling/wear issues and evaluate the effectiveness of your cleaning procedures. Teslong makes some of the most popular electronic borescope systems. There are versions that can connect to your smartphone, iPad, or mobile device. We like the Teslong units that have their own dedicated hard-case display unit. This ensures you don’t have to fiddle with smartphone software updates or security conflicts. In this video, F-Class John reviews two different Teslong Borescope systems: model NTG500H and model NTG450H. Both these units have their own control cases with glass display screens. John notes: “Both units are priced right, have great screens, and are easy to use.”
Ammunition Caddies for F-Class and Benchrest Competition
If you shoot at a quick pace during benchrest, varmint, or F-Class competition, you can definitely benefit by having a well-designed ammo caddie that puts your round within easy reach. This video reviews loaded ammo holders produced by Accurate Forum member BGInvestor using a 3-D printer. The video showcases two different versions, one dark blue for benchrest, and a second, larger black unit for F-Class which is shown above. This video review shows different ways to mount these ammo holders, and discusses the multiple block sizes which are offered. F-Class John says you’ll want to pick a caddie that suits your shooting style and particular discipline.
Concentricity Checking with Accuracy One Gauge
Every serious hand-loader needs a quality concentricity gauge. The Accuracy One Concentricity Gauge boasts a smart design that delivers precise, repeatable results. We like the unit’s easy adjustability and its ability to work in a variety of configurations. The Accuracy One Gauge measures internal and external neck runout of cartridge cases as well as seated bullet runout. It can also measure the runout of the ogive, bearing surface, and boat-tail of individual bullets. And it can even measure your primer pocket runout. Reviewer F-Class John notes: “I think this is the best concentricity tool on the market. Such a tool is a necessity for new loaders or those who are always setting up new dies.”
If you ever shoot with electronic targets, ShotMarkers, or target cams, chances are you’ll spend lots of time looking at the screen of a tablet computer or iPad. These electronic devices are pretty amazing, but they have one major shortcoming when used outdoors — reflections from the highly-polished glass screen.
Well it turns out there is a simple, inexpensive solution to the problem of annoying tablet screen reflections. Just purchase a quality anti-reflective screen protector for your tablet, iPad, or smartphone and you will eliminate most annoying reflections and make your mobile device MUCH easier to use at the range.
Take a look at the two photos above. The first photo shows how annoying reflections can obscure the ShotMarker display on a tablet. The second shot shows how much easier it is to view the ShotMarker target image with an anti-reflective screen cover in place. BIG improvement!
Our friend Keith Glasscock recently added an anti-reflective screen protector to his iPad tablet and found that it works wonders. Keith recently reviewed the iCarez Matte Screen Protector for his Winning in the Wind YouTube Channel. These screen covers are available in a wide variety of sizes to fit most Apple iPhones and Apple iPads. These thin, matte screen protectors are quite affordable, with prices starting at just $9.95.
In addition, there are other brands of screen protectors for Android devices that work the same way. Again, you’ll find a variety of sizes. For example, Supershieldz now offers a 3-pack of matte screen covers for 10″ Samsung tablets for just $5.99 on Amazon
In the above video, Keith Glasscock explains the problem of screen reflections when using mobile devices for shot monitoring. Keith then describes his positive experience with the iCarez Matte screen cover installed on his personal iPad.
A good screen cover can eliminate this kind of harsh reflection on tablet screens:
Here’s a story about a $1500 screw-up. Last year a fellow was shooting pistols at a range in Colorado. After his range session, the shooter left behind a specialty back-pack containing two nice 9mm handguns, plus ammo, hearing protection, and other gear. The smaller pistol appears to be a Smith & Wesson M&P M2.0 compact, while the larger handgun looks like a SIG Sauer P320 Nitron full size. Combined current value of those two handguns (with mags) was over $1200.00.
What was the total value of the forgotten items? To the handguns’ value, you must add the cost of the ammo ($150+), hearing protection ($50+) and the price of the range backpack and other accessories ($150). All totaled, this unfortunate shooter left over $1500.00 worth of guns, ammo, and gear on the bench.
The poor fellow was fortunate however. His backpack filled with guns and ammo was found by an HONEST member of our Shooters’ Forum. That Forum member put up a notice about the lost items on the shooting club’s website. The objective was to safely return the guns and gear to their absent-minded rightful owner.
“I was at my club range in Colorado this morning right at sun up. I wanted to fire a box of 7mm-08 before the heat set in. I found this backpack left behind from the day before on a bench. The backpack had two pistols and was packed to the gills with ammo, magazines, and ear protection.
But there was NO OWNER ID inside!
I left a big note there at the range saying that I found the pack, and listing my phone number. I will have a ‘found gear’ notice posted on our shooting club website very soon.
Guys, this isn’t the first time. Last fall I found a Ruger 77 .30-06 rifle left in a rifle rack. The owner got it back a few days later.”
Guys — Slow down!
Look around before leaving the range!
Be sure to gather ALL your guns and gear!
HAPPY ENDING — Guns and Gear Returned to Owner
“The very happy owner was reunited with his pack after coming to my house. He drove out to the range at 1:00 PM and saw my note held down with a rock on that bench. He called and ID’d the contents. I love a happy ending!” READ Forum Thread.
For load development, some guys shoot 3-shot groups. Other guys shoot 5-shot groups, or even 10-shot strings. But for testing its projectiles, Sierra Bullets takes it to another level entirely. A while back Sierra was testing its .30-Caliber 175gr HPBT MatchKing in the Sierra underground tunnel. The results appear above — a FIVE HUNDRED Round group!
500 Shots Form 0.82 MOA Group at 300m (328 yards)
Sierra’s trigger-pullers sent five full boxes of bullets down-range at a single target. The photo above shows the result of 500 shots taken in a 300 meter test tunnel. The raw group size, edge to edge of the farthest shots, is about 3.13 inches, as shown on the calipers’ metal linear scale. Subtract a .308″ nominal bullet diameter* to get the 2.823″ on the digital readout. So you’re seeing a 2.823″ group at 300 meters (328 yards). One MOA at this distance is 3.435″ so this 500-round group is 2.823 divided by 3.435 or 0.82 MOA (0.8218 MOA to be precise).
This 500-round group was shoot as part of a pressure/velocity test for a commercial customer. The cartridge was .308 Winchester, loaded at 2.800″. The powder was Reloder 15. A 26″ barrel was shot from a return to battery rest. The gun was cleaned every 125 rounds and two foulers shot.
What do you think — could you beat this group from a bench for 500 rounds?
One Facebook poster joked: “500-round group? Everyone knows anything less than 1000-round groups are a waste of time and statistically irrelevant.”
Sierra’s 300 Meter Testing Tunnel
Ever wonder how (and where) Sierra tests its bullets? The answer is underground, in a 300-meter test tunnel located under Sierra’s factory in Sedalia, Missouri. The photo above shows the construction of the tunnel back in May, 1990. Like most bullet manufacturers, Sierra does live-fire bullet testing of its projectiles. Sierra’s 300-meter test range is the longest, manufacturer-owned underground bullet test facility in the world. In years past, Sierra offered free visits to the test tunnel as part of a factory tour.
* Normally, to get an exact group size, you should subtract the TRUE bullet hole size, which is usually smaller than the nominal bullet diameter. E.g. a .308 bullet hole may show on paper as .298 or so. But here, for simplicity, we are subtracting .308″ because we do not have the original target to measure.
Here is an important safety reminder for readers who employ hand priming tools with trays of multiple primers. In this instance a primer detonated while being seating in a pistol cartridge case. This caused a “flash-over” which instantly ignited multiple other primers in the tray. That, in turn, caused a small explosion which broke the tray and Hornady Handheld Priming Tool. The user, a Forum member, reported this last summer in our Shooters’ Forum.
Report by Forum Member about Primer Flash-Over Incident
I had a small scare the other day while reloading. My experience might be a helpful reminder to people to keep safe and follow proper procedures and not be sloppy.
A primer popped (went off) when being seated and (while hot) flashed over into the tray causing other primers in the tray to detonate. That, in turn, broke my Hornady Handheld Priming Tool and injured my hand.
Here is my loading area after the incident. Note the damage to the hand priming tool. I’m not not sure where the rest of the pieces are.
Injuries to User — Multiple Cuts on Hand and Forearm
This photo shows the resulting cuts to hand. Fortunately they seem superficial. Note — I was wearing latex gloves so my hand had some protection.
The blast also blew my glasses off my face and they landed about six feet away. Be careful folks and wear your eye protection! EDITOR: Guys — This is yet more compelling evidence why handloaders should always wear eye protection!
More Details — Primers Were Federal LP, Case Primer Pockets Had Been Checked
The forum member noted: “Just in case people are interested, I didn’t notice anything different from usual. Cases were Privi Partizan (PPU) factory brass on their fourth firing. The primers were Federal Large Pistol. The cases had been ultrasonic cleaned and the primer pockets checked prior to priming. I had primed around 50 cases during this session before the accident.”
Here is a close-up of “flashed” primers — note the empty but dented cups and triangular “anvils”:
Two other Forum members reported feeding issues with this particular Hornady handheld priming tool and one other member, Kiwi Greg, suffered a multi-primer detonation causing injury: “I had the same thing happen a few years ago now with the same Hornady hand primer with 50-75 [Federal 215M primers] in the tray. Made a bit of a mess of both my hands, blew primers and tray all around my large workshop. Scared the [heck] out of my employee who was near me at the time. Some stitches, bandages and it was all good, [but with] some wicked scars… I think a primer had turned side-on when being put into Bertram .408 CT brass which had nice tight pockets and required more force than usual. I use RCBS [priming tools] now with a flat bar that slides across to prevent sympathetic detonations. I hadn’t heard of it before, but found out it wasn’t that uncommon after it happened.”


 Increasing Barrel Length Can Deliver More Velocity, But That May Still Not Provide Enough Stability if the Twist Rate Is Too Slow


 The better, up-to-date ballistics programs let you select either G1 or G7 Ballistic Coefficient (BC) values when calculating a trajectory. The ballistic coefficient (BC) of a body is a measure of its ability to overcome air resistance in flight. You’ve probably seen that G7 values are numerically lower than G1 values for the same bullet (typically). But that doesn’t mean you should select a G1 value simply because it is higher.
 Drag Models — G7 is better than G1 for Long-Range Bullets


 Be sure to visit our online store at


 What was the total value of the forgotten items? To the handguns’ value, you must add the cost of the ammo ($150+), hearing protection ($50+) and the price of the range backpack and other accessories ($150). All totaled, this unfortunate shooter left over $1500.00 worth of guns, ammo, and gear on the bench.
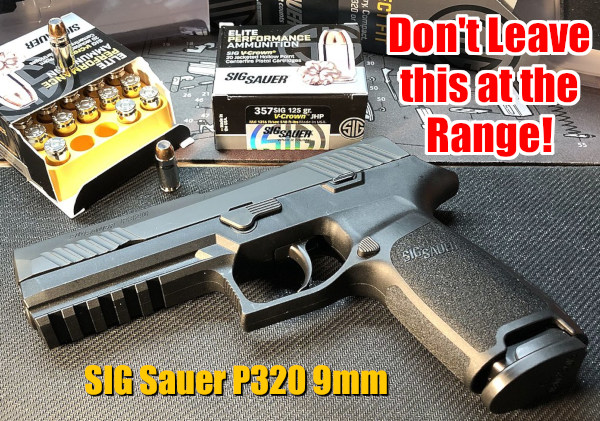


 Report by Forum Member about Primer Flash-Over Incident


