With exceptionally cold temperatures predicted for the next few days, we know many of our readers are struggling to keep warm outdoors when shoveling snow or just shopping and doing regular chores. Here’s an option to consider for those days when temperatures dip into the negative numbers.
Battery-Heated Socks, Gloves, Muffs
Avid huntress Nikki Boxler (see above) enjoys hunting in late fall and winter seasons. But she knows it’s vital to stay warm when outdoors. Nikki advocates using battery-heated socks to keep ones feet and lower legs warm. Writing for the Winchester Blog, Nikki explained: “I have used heated insoles and hand/foot warmers in the past but they have always left my feet sweating. Then, heat would fade leaving them wet and frozen or they wouldn’t get warm enough to heat my toes at all. However, all of that changed when I got introduced to battery-heated socks from The Warming Store while I was hunting in Canada. They have a variety of options and price points. On the pair that I use, I can feel the heat as soon as the power is turned on… the wonderful thing about these is there are different heat settings and they can last for up to seven hours!”
Purchase Options — Heated Gloves and Hand Pouch
A popular brand of heated winter wear is Smilodon. This clothing maker offers battery-heated SAVIOR gloves, heated socks, and an electric heated hand warmer pouch.
Neberon also offers highly reviewed heated gloves on Amazon, starting at about $76 per pair. These carry heat all the way to the fingertips.
Christmas Day is this upcoming Sunday, just five days away. We know many of our readers and Forum members will be traveling to spend the holidays with friends and families. If you will be transporting any firearms when traveling by air over the holidays you need to know the rules.
If you will be flying with firearms this winter, you should read this article. You need to familiarize yourself with current Federal Regulations on gun transport before you get anywhere near an airport. Thankfully, the Transportation Security Administration (TSA) has a web page that states the important requirements for airline passengers traveling with firearms and/or ammunition.
You’ll want to visit the TSA Firearms and Ammunition webpage, and read it start to finish. In addition, before your trip, you should check the regulations of the airline(s) with which you will fly. Some airlines have special requirements, such as weight restrictions.
Here are the TSA’s key guidelines for travel with firearms:
TSA FIREARM Guidelines
1. When traveling, comply with the laws concerning possession of firearms as they vary by local, state and international governments.
2. If you are traveling internationally with a firearm in checked baggage, please check the U.S. Customs and Border Protection website for information and requirements prior to travel.
3. Declare each firearm each time you present it for transport as checked baggage. Ask your airline about limitations or fees that may apply.
4. Firearms must be unloaded and locked in a hard-sided container and transported as checked baggage only. As defined by 49 CFR 1540.5, a loaded firearm has a live round of ammunition, or any component thereof, in the chamber or cylinder or in a magazine inserted in the firearm. Only the passenger should retain the key or combination to the lock unless TSA personnel request the key to open the firearm container to ensure compliance with TSA regulations. You may use any brand or type of lock to secure your firearm case, including TSA-recognized locks.
5. Bringing an unloaded firearm with accessible ammunition to the security checkpoint carries the same civil penalty/fine as bringing a loaded firearm to the checkpoint. You may find information on civil penalties at the Civil Enforcement page.
6. Firearm parts, including magazines, clips, bolts and firing pins, are prohibited in carry-on baggage, but may be transported in checked baggage.
7. Replica firearms, including firearm replicas that are toys, may be transported in checked baggage only.
8. Rifle scopes are permitted in carry-on and checked baggage.
TSA Ammunition Guidelines
1. Ammunition is prohibited in carry-on baggage, but may be transported in checked baggage.
2. Firearm magazines and ammunition clips, whether loaded or empty, must be securely boxed or included within a hard-sided case containing an unloaded firearm. Read the requirements governing the transport of ammunition in checked baggage as defined by 49 CFR 175.10 (a)(8).
3. Small arms ammunition (up to .75 caliber and shotgun shells of any gauge) must be packaged in a fiber (such as cardboard), wood, plastic, or metal box specifically designed to carry ammunition and declared to your airline.
4. Ammunition may be transported in the same hard-sided, locked case as a firearm if it has been packed as described above. You cannot use firearm magazines or clips for packing ammunition unless they completely enclose the ammunition. Firearm magazines and ammunition clips, whether loaded or empty, must be boxed or included within a hard-sided, locked case.
5. Please check with your airline for quantity limits for ammunition.
More Airline Travel Tips from Tom McHale
A while back, Tom McHale wrote an excellent article for the Beretta Blog, entitled Ten Things You Need to Know about Flying with Guns. Here are two of Tom McHale’s Travel Tips from that article:
Weigh your gun case and ammunition
Most airlines will allow up to 11 pounds of ammunition. And, like any luggage, you will be charged more for any baggage weighing more than 50 pounds. This sounds like a lot, but when traveling to the Crimson Trace Midnight 3 Gun competition last year, my case with shotgun, rifle, pistol and ammunition tipped the scale past the 50 pound mark.
Pack ammo in the same locking case
This is another area that’s misunderstood and full of internet myth. Your ammo just needs to be stored in some type of safe container and not loose. Technically, you can keep ammunition in magazines, but I wouldn’t recommend it. It meets the letter of the law storage requirement, but too many airline and TSA agents will give you grief. Use a plastic ammo box or original cardboard packaging and you’ll be fine carrying that in the same lockable case as your gun.
*Please see, United States Code, Title 18, Part 1, Chapter 44 for information about firearm definitions.
This deluxe, roll-out Rush Creek Creations 42-0000 69″ x 16″ gun cleaning mat (with pockets), is available from Tractor Supply for $76.49.
We normally use a gun cradle when cleaning or adjusting our rifles. But there are situations, such as when working on a barreled action, when it’s nice to use a pad that lies flat. Many work pads are too small — they’re nothing more than oversize mouse pads. Here are three gun pads that are big enough to work well with rifles and/or barreled actions.
DryMate Gun Cleaning Pad
The Drymate Gun Cleaning Pad is a full 59″ x 16″. That’s nearly five FEET from end to end — longer than most rifles, so you have plenty of surface area for working. Conveniently, this product can be washed with soap and water. It is offered in Green and Charcoal Gray colors. We prefer the Green version because the color makes it a bit easier to see small black and gray parts such as screws and springs.
Boyt Harness Counter Pad
The 48″ x 12″ Boyt Harness Counter Pad was originally designed more for display purposes than for serious work sessions, but we like this product. It is useful if you want to lay your gun on a bench to make small adjustments. The Boyt Counter Pad, $25.99 at MidwayUSA, is nice and big, a full four feet from end to end. The back side is canvas while the top-size is a quilted cotton fabric. This product has received high praise from buyers. Here are actual owner reviews:
Worth every penny. I bought three of them because I want to have at least one always around. I use one for a shooting bench or tailgate mat and another for my primary gun cleaning workbench mat. Awesome for both purposes. This one was perfect for my array of needs. — Joe D.
This mat is great for cleaning guns and keeping your surfaces clear of oil or solvent. The mat has plenty of space for a rifle or handgun and the padding is thick enough[.] I would definitely buy again and have recommended this to my friends and family. — Safety Guy
I bring this to the rifle range with me every time, to rest my rifle on the table without worrying about scratches. It fits nicely in my soft rifle case. One side is a tough canvas material that doesn’t show scratches, and the other side is a soft fleece material that protects the finish of your gun. — MACPSU
Hoppes Gun Cleaning Pad
The Hoppes Gun Cleaning Pad is 36″ wide x 12″. That’s big enough for many barreled actions (unless you have a really long barrel). This pad has a non-slip nylon backing, and Hoppes claims that the “Soft acrylic material absorbs 8 times its weight in fluids.” This Hoppes Cleaning Pad is very affordable. It costs just $10.95 at Amazon.
OK, you’ve paid the tax stamp and acquired your new suppressor (aka “silencer” or “moderator”). Do you still need to wear earplugs or muffs? Absolutely. Even with that expensive new “can”, your rifle could be generating over 140 decibels (dB) of noise — about the same as as an unmuffled 9mm pistol shot. That’s loud enough to create permanent hearing loss with repeated exposure.
Firearms Are Loud: 140 dB to 175 dB
Audiology group ASHA explains: “Exposure to noise greater than 140 dB can permanently damage hearing. Almost all firearms create noise that is over the 140-dB level. A small .22-caliber rifle can produce noise around 140 dB, while big-bore rifles and pistols can produce sound over 175 dB. Firing guns in a place where sounds can reverberate, or bounce off walls and other structures, can make noises louder and increase the risk of hearing loss. Also, adding muzzle brakes or other modifications can make the firearm louder. People who do not wear hearing protection while shooting can suffer a severe hearing loss with as little as one shot[.] Audiologists see this often, especially during hunting season when hunters and bystanders may be exposed to rapid fire from big-bore rifles, shotguns, or pistols.” Source: ASHA, Recreational Firearm Noise Exposure.
Suppressors, On Average, Reduce Noise Levels about 30 Decibels
In an article for Ammoland, gunwriter Sam Hoober says that you can expect about 30 decibels (dB) of noise reduction from the average suppressor: “Looking at a few different products, SilencerCo attests their suppressors reduce the sound pressure of a 9mm gunshot to anywhere from 125.7 dB to 131.5 dB, depending on the model. Advanced Armament Co, another popular supplier, attests a 23 dB to 33 dB reduction or down to 127 dB. Liberty Suppressors, another manufacturer, attests a reduction of 24 dB to 38 dB, depending on model and other factors. In short, we can presume something on the order of 30 dB of attenuation as an average.”
Using that 30 dB number you can quickly discern that you’ll still need hearing protection — good hearing protection — when shooting any suppressed firearm (even a .22 LR). “Spikes of 130 dB and more can result in permanent hearing damage instantly”. Source: NRA Blog.
The Myth of the “Quiet” .22 LR
The NRA Blog notes that “many rimfire shooters, particularly those using the beloved .22 Long Rifle cartridge, argue that the small .22 LR caliber doesn’t produce enough sound to damage your hearing”. So, is that really true. or is it a myth?
In fact, a .22 LR can be much louder than you think — a .22 LR pistol can produce sound levels of 134 dB. That’s well above the normal human pain threshhold.
Sound Levels for Common Noises:
9mm Luger pistol: 160 dB
Jet aircraft engine (near): 140 dB
.22 LR pistol: 134 dB
Normal human pain threshold: 120 dB
Noisy Nightclub: 110 db
Riding Motorcycle at 65 mph: 103 db
Power Lawnmower: 95 dB
Hearing damage possible: 85 dB (sustained for 8+ hours)
Ringing Telephone: 80 dB
Normal conversation: 60 dB
The Risk of Hearing Loss
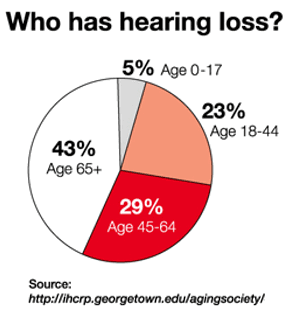
Hearing loss can be progressive and irreversible. If you are a shooter, this is serious business. As the NRA Blog cautions: “You may not even realize you’re harming your hearing. Hearing loss occurs gradually, and can go effectively unnoticed until symptoms become severe. By then, the damage is done.”
Nobody wants to go deaf. But we often see shooters without effective hearing protection when they are walking around a few yards behind the firing line. That’s bad — even if you are away from the firing line, gunshot noises can damage your hearing. You MUST use effective hearing protection every time you go to the range. Good foam earplugs costs mere pennies but they can prevent deafness in your later years. Many folks also wear muffs over plugs.
You’ve probably heard of cut-rifling, but did you know this process was invented in Germany nearly 500 years ago? Read on to learn more about how a cut-rifled barrel is made…
The cut-rifling process, used by leading barrel-makers such as Bartlein, Blake, Brux, and Krieger can yield a very high-quality barrel with a long useful life. Cut-rifled barrels have been at the top in short- and long-range benchrest competition in recent years, and cut-rifled barrels have long been popular with F-Class and High Power shooters.
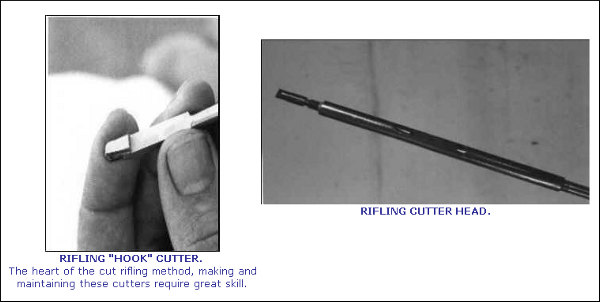
You may be surprised to learn that cut-rifling is probably the oldest method of rifling a barrel. Invented in Nuremberg around 1520, the cut-rifling technique creates spiral grooves in the barrel by removing steel using some form of cutter. In its traditional form, cut rifling may be described as a single-point cutting system using a “hook” cutter. The cutter rests in the cutter box, a hardened steel cylinder made so it will just fit the reamed barrel blank and which also contains the cutter raising mechanism.
Above is a computer animation of an older style, sine-bar cut-rifling machine. Some machine features have been simplified for the purposes of illustration, but the basic operation is correctly shown. No, the cut-rifling machines at Krieger don’t use a hand-crank, but the mechanical process shown in this video is very similar to the way cut-rifling is done with more modern machines.
Read About Cut-Rifling Process at FirearmsID.com
To learn more about the barrel-making process, and cut-rifling in particular, visit FirearmsID.com. There you’ll find a “must-read” article by Dr. Geoffrey Kolbe: The Making of a Rifled Barrel. This article describes in detail how barrels are crafted, using both cut-rifling and button-rifling methods. Kolbe (past owner of Border Barrels) covers all the important processes: steel selection, hole drilling, hole reaming, and rifling (by various means). You’ll find a very extensive discussion of how rifling machines work. Here’s a short sample:
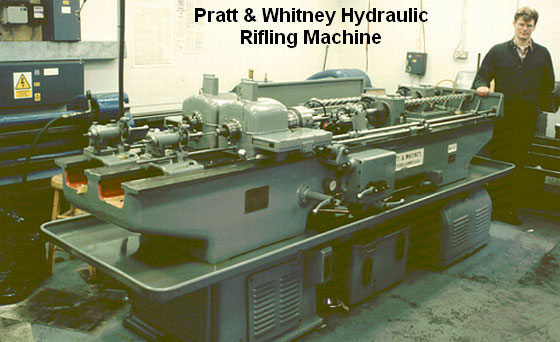
“At the start of World War Two, Pratt & Whitney developed a new, ‘B’ series of hydraulically-powered rifling machines, which were in fact two machines on the same bed. They weighed in at three tons and required the concrete floors now generally seen in workshops by this time. About two thousand were built to satisfy the new demand for rifle barrels, but many were broken up after the war or sold to emerging third world countries building up their own arms industry.
Very few of these hydraulic machines subsequently became available on the surplus market and now it is these machines which are sought after and used by barrel makers like John Krieger and ‘Boots’ Obermeyer. In fact, there are probably less of the ‘B’ series hydraulic riflers around today than of the older ‘Sine Bar’ universal riflers.
The techniques of cut rifling have not stood still since the end of the war though. Largely due to the efforts of Boots Obermeyer the design, manufacture and maintenance of the hook cutter and the cutter box have been refined and developed so that barrels of superb accuracy have come from his shop. Cut rifled barrel makers like John Krieger (Krieger Barrels), Mark Chanlyn (Rocky Mountain Rifle Works) and Cliff Labounty (Labounty Precision Reboring)… learned much of their art from Boots Obermeyer, as did I.” — Geoffrey Kolbe
Video find by Boyd Allen. Archive photos from Border Barrels. In June 2013, Birmingham Gunmakers Ltd. acquired Border Barrels. Dr. Geoffrey Kolbe has set up a new company called BBT Ltd. which produces chamber reamers and other gunsmithing tools and gauges. (Thanks to L. Holland for the Kolbe update).
Image Courtesy NSSF. This story is based on an NSSF Article.
‘Tis the season of gift-giving (Christmas Day is 8 days hence). Perhaps you’re considering giving a a first rifle to your grandson or perhaps a carry pistol to a spouse. When making a gun gift to a friend or family member, however, there are some very important legal considerations. Also the rules on firearms gift transfers vary from state to state. Bottom line here — you need to know the law BEFORE you deliver that shiny new firearm to a family member, close friend, or relative.
The first thing to remember if you’re thinking about giving someone a gun is that … it’s a gun! You already know that ownership of a firearm brings with it some serious legal and ethical obligations that other consumer products don’t. So let’s look at some questions you may have about giving a firearm as a gift.
Image Courtesy NSSF
The first question you have to ask is whether the intended recipient can legally own the firearm where he or she lives. With more than 20,000 different gun laws on the books, even the kinds of firearms that law-abiding citizens can own vary from place to place. For example, juveniles (under age 18) generally speaking are precluded by law from possessing a handgun. Check out the Bureau of Alcohol, Tobacco, Firearms and Explosives (ATF) website for an overview of local laws and, whatever you do, don’t forget that you can never under any circumstances transfer a firearm to someone you know — or have reasonable cause to believe — legally can’t own one. That’s a federal felony, so be careful.
There’s no federal law that prohibits a gift of a firearm to a relative or friend who lives in your home state. Many states — including California, Colorado, Connecticut, Delaware, New York, Oregon, Rhode Island, Washington State and the District of Columbia — require you to transfer a firearm through a local FFL-holder so an instant background check will be performed to make sure the recipient is not legally prohibited from owning the gun. Maryland and Pennsylvania require a background check for private party transfer of a handgun. And yes, Oregon has new restrictions due to the passage of Ballot Measure 114 (though a State Judges has issued an injunction blocking some provision BM 114). There are exceptions, so it’s important to check the law of your state or ask your local firearms retailer.
Consider a Gift Card Instead of Direct Gift
The ATF recommends that if you want to give someone a new firearm, rather than going to a gun store and buying the gun on your own, consider instead purchasing a gift certificate/card from your favorite gun retailer. Then give that gift card as the present. That way the recipient can choose the exact gun he or she wants, and there’s no question about who is “the actual buyer of the firearm”, which is a question any purchaser must certify on the Federal Form 4473 at the time of purchase. The Gift Card option avoids any “straw purchaser” issues.
And right now you can earn a “bonus” for giving a gift card. Brownells is running a promotion. For every $100 you give in Brownells Gift Cards you get a $25.00 gift card for yourself. That’s essentially a 25% Bonus for your generosity. You can have the Brownells Gift Card mailed directly to the lucky recipient. Or, if you’re running low on time, you can have electronic Gift Card sent via email. CLICK HERE for details.
Intra-Family Transfers and Antique Arms
What if you want to give “Old Betsy,” your favorite old deer rifle, to your son or daughter as a college graduation gift? Again, in some states, there’s no law that says you can’t, but many states require even intra-family transfers to go through a licensed dealer. Remember, you can never transfer a firearm directly to another person who is a resident of a different state. In that case, you must transfer the firearm through a licensed dealer in the state where the person receiving the gift resides.
Using a gift certificate from a firearms retailer near where the recipient lives might be a good solution. Be safe and check with an in-state FFL dealer before you give any firearm to a friend or family member.
Here is a stunning highlight reel created by Bullet Theory Films, a Los Angeles-based production company that specializes in capturing action that is too quick for the human eye to see. Using ultra-high-speed cameras, these talented film-makers have captured blindingly fast phenomena — things that happen in micro-seconds. The resulting video imagery can be used for R&D, scientific analysis, product marketing, or (of course) entertainment.
We recommend you watch this video full-screen in High-Definition:
This impressive slo-mo “sizzle reel” features many notable sequences, including:
00:18: .45 ACP leaving m1911 muzzle
00:27: Rifle bullet penetrating barrier with explosive ejecta
00:33: M1A cycling 7.62×51 cartridges
00:38: Pistol bullet disintegrating on steel
00:40: Huge muzzle flame from 12ga shotgun and lead shot on steel
00:45: 5.56 bullet in ballistics gelatin with secondary explosion
01:07: Handgun flame ring from muzzle
01:11: Massive shotgun blast with slug in midair
About the Film-Makers
Bullet Theory Films Co-Founders Matt Novello and Matt Drake first met on the set of History Channel’s highly successful competition reality show TOP SHOT. Throughout five seasons, the show set a benchmark in the art of capturing firearms and live ammunition in action, which has yet to be surpassed.
Utilizing the latest digital high speed technology, Bullet Theory Films offers a full range of production services; from concept development, to the final delivery of your vision. For more information, visit BulletTheoryFilms.com.
For load development, some guys shoot 3-shot groups. Other guys shoot 5-shot groups, or even 10-shot strings. But for testing its projectiles, Sierra Bullets takes it to another level entirely. A while back Sierra was testing its .30-Caliber 175gr HPBT MatchKing in the Sierra underground tunnel. The results appear above — a FIVE HUNDRED Round group!
500 Shots Form 0.82 MOA Group at 300m (328 yards)
Sierra’s trigger-pullers sent five full boxes of bullets down-range at a single target. The photo above shows the result of 500 shots taken in a 300 meter test tunnel. The raw group size, edge to edge of the farthest shots, is about 3.13 inches, as shown on the calipers’ metal linear scale. Subtract a .308″ nominal bullet diameter* to get the 2.823″ on the digital readout. So you’re seeing a 2.823″ group at 300 meters (328 yards). One MOA at this distance is 3.435″ so this 500-round group is 2.823 divided by 3.435 or 0.82 MOA (0.8218 MOA to be precise).
This 500-round group was shoot as part of a pressure/velocity test for a commercial customer. The cartridge was .308 Winchester, loaded at 2.800″. The powder was Reloder 15. A 26″ barrel was shot from a return to battery rest. The gun was cleaned every 125 rounds and two foulers shot.
What do you think — could you beat this group from a bench for 500 rounds?
One Facebook poster joked: “500-round group? Everyone knows anything less than 1000-round groups are a waste of time and statistically irrelevant.”
Sierra’s 300 Meter Testing Tunnel
Ever wonder how (and where) Sierra tests its bullets? The answer is underground, in a 300-meter test tunnel located under Sierra’s factory in Sedalia, Missouri. The photo above shows the construction of the tunnel back in May, 1990. Like most bullet manufacturers, Sierra does live-fire bullet testing of its projectiles. Sierra’s 300-meter test range is the longest, manufacturer-owned underground bullet test facility in the world. In years past, Sierra offered free visits to the test tunnel as part of a factory tour.
* Normally, to get an exact group size, you should subtract the TRUE bullet hole size, which is usually smaller than the nominal bullet diameter. E.g. a .308 bullet hole may show on paper as .298 or so. But here, for simplicity, we are subtracting .308″ because we do not have the original target to measure.
We created this custom target in 5 minutes using PrintTargets.net. If you like it, DOWNLOAD HERE.
AccurateShooter.com has a HUGE collection of FREE downloadable PDF targets. We offer a very wide range of target designs: Load Development Grids, NRA Bullseye targets, Official-Size BR targets, Realistic Varmint Targets, Silhouette Shapes, Fun Plinking Targets, and even specialized tactical training targets. If our collection of free targets isn’t enough, or if you want to create a new kind of target — you’re in luck. The Australian-based interactive website, PrintTargets.net, allows you to create your own customized, printable PDF targets. Shown below are just a few of the target designs you can create in minutes:
CLICK Graphic to Create Your Own Targets.
Just follow the step-by-step instructions to set paper size, layout, bullseye color, line thickness, number of rings and diameter. You can even add Score Numbers to your target rings. PrintTargets.net is easy and fun to use. It’s much faster to create targets this way than to try to draw a series of circles with PowerPoint or MS Paint.
Power-User Tip: PrintTargets.net even offers a handy diamond-grid calibration diagram that you can add to your custom target designs. You’ll find the calibration grid as option #15 when you design your target — just scroll all the way down the PrintTargets.com home page.
Gun-maker Bear Creek Arsenal has a good article on its website about rifling barrels. The article explains four common methods of rifling the interior of barrels: Cut Rifling, Broach Rifling, Button Rifling, and Hammer Forging. In addition, the article describes a new (and somewhat radical) method, Cation Rifling, which employs acid to etch rifling. READ Full Article.
The main focus of the article is on Cold Hammer Forging of barrels. This requires massive, expensive tooling, but the results can be very consistent. Many top gun-makers, such as FN, HK, and Ruger, have used the hammer forging process. And now Bear Creek Arsenal also offers hammer-forged barrels. Bear Creek recently acquired two state-of-the-art cold hammer forging machines. With hammer forging, a chamber can be formed and barrel contour shaped at the same time. This process produces some of the most consistent barrels available today. Here is a summary of how Cold Hammer Forging works:
Cold Hammer Forging — Machinery and Process
A cold hammer-forged barrel starts life… as a short and fat blank with a polished hole running through the center. A hardened mandrel of proper width (caliber) and rifling pattern — again reversed/inverted — is placed into the smooth bore. The pair go into a forging machine that compresses the steel against the mandrel, hammering it into final shape. The barely detectable external spiral patterns that remain on some barrels are imprints from those hammers at work. Some companies polish them out, however.
Cold hammer forging machinery is very expensive, representing a significant investment for companies. However, when the hammer forging process is done and the mandrel removed, the resulting barrel is the proper length and profile with rifling that is consistent and butter smooth. No lapping is required — a time and expense saver — although a stress-relief step often follows.
The process takes place at room temperature, despite the misleading “cold” terminology. There is a hot hammer forging process, but the equipment is even more expensive and the slight improvement in grain consistency hasn’t proven advantageous enough for a return on that investment. Performance is impressive and consistent.
One of the biggest advantages of a cold hammer forged barrel is longevity. They… survive abuse and last longer. The manufacturing process adds those enviable virtues with each strike of those hammers — strengthening the metal in a work-hardening process employed by blacksmiths for centuries.
Comparing Popular Rifling Methods
What rifling process should you choose? If long-distance is your passion and you home brew custom cartridges to print tiny groups in the next zip code, cut rifling is the optimum choice. Button rifling is a solid second choice, but not always the Holy Grail long-distance shooters dream about. Cold hammer forged barrels, however, last longer and [offer great performance for the price.]


 Avid huntress Nikki Boxler (see above) enjoys hunting in late fall and winter seasons. But she knows it’s vital to stay warm when outdoors. Nikki advocates using battery-heated socks to keep ones feet and lower legs warm. Writing for the Winchester Blog, Nikki explained: “I have used heated insoles and hand/foot warmers in the past but they have always left my feet sweating. Then, heat would fade leaving them wet and frozen or they wouldn’t get warm enough to heat my toes at all. However, all of that changed when I got introduced to battery-heated socks from The Warming Store while I was hunting in Canada. They have a variety of options and price points. On the pair that I use, I can feel the heat as soon as the power is turned on… the wonderful thing about these is there are different heat settings and they can last for up to seven hours!”


 The
The 


 The
The 


 The Risk of Hearing Loss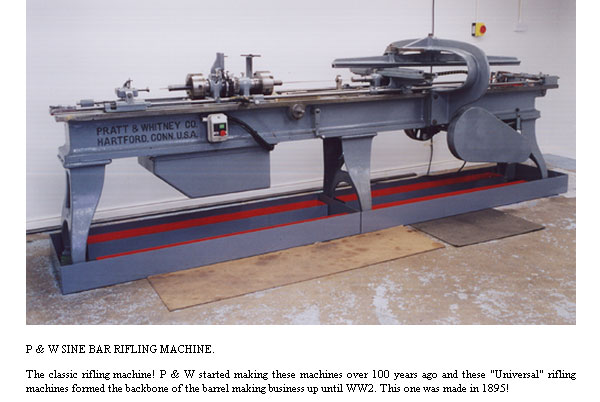


 The first question you have to ask is whether the intended recipient can legally own the firearm where he or she lives. With more than 20,000 different gun laws on the books, even the kinds of firearms that law-abiding citizens can own vary from place to place. For example, juveniles (under age 18) generally speaking are precluded by law from possessing a handgun. Check out the
  Consider a Gift Card Instead of Direct Gift


