Creedmoor Sports has released a series of helpful “how-to” videos in its new InfoZone web page. In the latest InfoZone video Bill Gravatt shows how to seat bullets using L.E. Wilson Hand Dies and an Arbor Press. The basic process is simple, particularly with a micrometer-top seating die. That makes it easy to adjust and set seating depth. Before you start seating bullets, you want to adjust the height of the arbor so the stroke is appropriate to the height of your die.
Bill Gravatt Shows How to Use Hand Seating Dies — Creedmoor INFOZONE
ARBOR PRESS TECHNIQUE: When using an arbor press, smooth is good. You don’t want to slam the handle down quickly. Try to repeat the same motion each time. You can also experiment by seating the bullet part way, then rotate the cartridge (in the die) and do the final seating with a second stroke. If your arbor press has a force gauge, note both the max value of the gauge needle and how it moves as you seat the bullet. If the needle spikes too rapidly, or bounces back and forth irregularly, set that cartridge aside and/or mark it. You could have neck tension issue with that case or some other fault. You might even have a bad bullet. That’s rare, but can happen. The key to success is moving the press arm in a smooth motion every time, maintaining the same down-pressure with each cartridge.
Here Bill Gravatt Offers a Simple Tip for Adjusting Wilson Seating Dies
One of our Forum readers asked “How can I get a custom in-line seater for my new rifle?”. First, we would say that, if you are not shooting an unusual Wildcat, check first to see if L.E. Wilson makes a stainless Micrometer Seater Die for your rifle. These dies are a joy to use, and we’ve found the fit to be exceptionally good with many calibers. Typically priced from $90-$100, Wilson stainless micrometer-top seaters are available for dozens of cartridge types: .204 Ruger, 20 BR, .222 Rem, .223 Rem, 22 PPC, 22 BR, .22-250, .223 WSSM, 6 PPC, 6mmBR, 6XC, 243 Win, .243 WSSM, 25 WSSM, 6.5×47 Lapua, 6.5 Creedmoor, 6.5-284, 26 Nosler, .270 WSM, 7mm-08, .284 Win, 28 Nosler, 7mm RUM, 30 BR, 30 IHMSA, .308 Win, .300 WinMag, .338 Edge (and MORE).
If you do want a custom seater die, the process is relatively simple. Purchase a die blank from Wilson and have your gunsmith run the chambering reamer in. Forum member Gunamonth explains: “I start with a Wilson seating die blank. They’re available from Sinclair and other vendors. Just run the reamer in. For some of my rifles, where I wanted the stainless die with the micrometer adjustment, I bought a smaller die and had the smith ream it with the chamber reamer. That’s how I had my 6 Dasher and 6mm AI seaters made. With the Dasher I stared with a 6mmBR Micrometer die.”
SEATER STEM TIP: If, on your seated bullets, you are seeing a sharp line around the jacket near the ogive, you may want to smooth out the leading edge of the Wilson seater stem (see above left). Do this by putting a little lapping compound on one bullet and manually spin this around in the stem. Without much effort you’ll have a smooth bullet/stem interface.
Micrometer Top Add-on
We really like micrometer tops on a seating die. But what if Wilson doesn’t make a micrometer top seater for your chambering? Don’t despair, Brownells sells a $39.99 Sinclair Micrometer Top that can be added to Wilson standard seaters or to a custom seater die made from a Wilson die blank.
Even with high-quality brass from Lapua, Peterson, Norma, Alpha and RWS, occasionally you may find one or two cases per box which have a small flake or obstruction in the flash-hole. This will appear like a thin crescent on one side of the flash hole (see photo). You should inspect ALL new brass before loading to identify any pieces with a partially-obstructed flash hole. It’s a good idea to remove any flake or thin crescent left as an artifact of the flash-hole forming process. Because the flash-hole itself is normally centered and of the correct diameter, it is not necessary to ream the flash-hole to a larger diameter. All you really need to do is remove the small obstruction(s). This can be done quickly with inexpensive tools.
Use a Small Pin Vise to Remove Flash-Hole Obstructions
Folks have asked if there is a tool that can remove obstructions from a Lapua small, BR-sized flash hole without opening the hole size. The Lapua PPC/BR flash hole is spec’d at 1.5mm, which works out to 0.059055″. Most of the PPC/BR flash-hole uniforming tools on the market use a 1/16″ bit which is nominally 0.0625″, but these often run oversize — up to 0.066″.
If you want to just clear out any obstructions in the flash hole, without increasing the flash hole diameter, you can use an inexpensive “pin vise” with an appropriate drill bit. For $0.99, eHobbyTools.com sells a 1.5mm drill bit, item 79186, that matches the Lapua flash hole exactly. Other vendors offer a #53 pin vise drill bit that measures .0595″ or .060″ (depending or source). An 0.0595″ bit is close enough. You can find pin vises and these small-diameter drill bits at hobby stores.
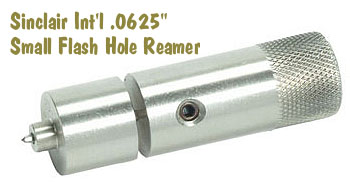
For quite some time, Sinclair Int’l has sold a similar device for small (PPC and BR-size) flash holes. Like the 07-3081 unit for large flash holes, the 073000 Reamer for small flash holes works from the outside, so it can index off the primer pocket. It reams to .0625″, and also costs $29.99. The standard dimension for Lapua 220 Russian and 6mmBR flash holes is 1.5mm or .0590″. This tool will permit standard-size decapping rods with .0625″ tips to work without binding. However, note that both Forster and Redding normally supply .057″ decapping pins with their PPC and BR dies. So, it is NOT necessary to ream your Lapua BR/PPC flashholes, unless you prefer to do so for uniformity. It IS, however, a good idea to check BR/PPC flash holes for burrs before loading the first time.
NOTE: If you purchase either the 073081 or 073000 Sinclair Flash Hole Reamer tools, we recommend you mic the cutter tip before you process a bunch of cases. Sometimes a tip comes through that is oversize. This will ream the flash holes larger than you may intend.
This thought-provoking article has been one of the most popular Daily Bulletin features in recent years. We are republishing this story today for readers who may have missed it the first time around…
Here’s a little known fact that may startle most readers, even experienced gunsmiths: your barrel wears out in a matter of seconds. The useful life of a typical match barrel, in terms of actual bullet-in-barrel time, is only a few seconds. How can that be, you ask? Well you need to look at the actual time that bullets spend traveling through the bore during the barrel’s useful life. (Hint: it’s not very long).
Bullet-Time-in-Barrel Calculations
If a bullet flies at 3000 fps, it will pass through a 24″ (two-foot) barrel in 1/1500th of a second. If you have a useful barrel life of 3000 rounds, that would translate to just two seconds of actual bullet-in-barrel operating time.
Ah, but it’s not that simple. Your bullet starts at zero velocity and then accelerates as it passes through the bore, so the projectile’s average velocity is not the same as the 3000 fps muzzle velocity. So how long does a centerfire bullet (with 3000 fps MV) typically stay in the bore? The answer is about .002 seconds. This number was calculated by Varmint Al, who is a really smart engineer dude who worked at the Lawrence Livermore Laboratory, a government think tank that develops neutron bombs, fusion reactors and other simple stuff.
On his Barrel Tuner page, Varmint Al figured out that the amount of time a bullet spends in a barrel during firing is under .002 seconds. Al writes: “The approximate time that it takes a 3300 fps muzzle velocity bullet to exit the barrel, assuming a constant acceleration, is 0.0011 seconds. Actual exit times would be longer since the bullet is not under constant acceleration.”
We’ll use the .002 number for our calculations here, knowing that the exact number depends on barrel length and muzzle velocity. But .002 is a good average that errs, if anything, on the side of more barrel operating life rather than less.
So, if a bullet spends .002 seconds in the barrel during each shot, and you get 3000 rounds of accurate barrel life, how much actual firing time does the barrel deliver before it loses accuracy? That’s simple math: 3000 x .002 seconds = 6 seconds.
Gone in Six Seconds. Want to Cry Now?
Six seconds. That’s how long your barrel actually functions (in terms of bullet-in-barrel shot time) before it “goes south”. Yes, we know some barrels last longer than 3000 rounds. On the other hand, plenty of .243 Win and 6.5-284 barrels lose accuracy in 1500 rounds or less. If your barrel loses accuracy at the 1500-round mark, then it only worked for three seconds! Of course, if you are shooting a “long-lived” .308 Win that goes 5000 rounds before losing accuracy, then you get a whopping TEN seconds of barrel life. Anyway you look at it, a rifle barrel has very little longevity, when you consider actual firing time.
People already lament the high cost of replacing barrels. Now that you know how short-lived barrels really are, you can complain even louder. Of course our analysis does give you even more of an excuse to buy a nice new Bartlein, Krieger, Shilen etc. barrel for that fine rifle of yours.
It’s great to be able to access online load data for your cartridges. You can quickly get load data for a particular powder and bullet weight. However, there are times when we prefer to consult old-fashioned printed/bound load manuals. The primary reason is that manuals produced by bullet- and tool-makers will, for a particular cartridge, include data for powders from multiple manufacturers. Having a single source can save you time and trouble. For example, if you want to find 6.5 Creedmoor loads using H4350 (Hodgdon), Reloder 16 (Alliant), and N150 (Vihtavuori) you would have to visit three different powder-maker websites, one after another. OR you can pick up a modern load manual and find everything in one place.
There are many excellent printed load manuals on the market. We have used the Berger Manual, Sierra Manual, Speer Manual, Lyman Manual, and Hornady Manual. We like the Berger and Sierra manuals for match rifle cartridges, and the Lyman and Hornady manuals for hunting loads and pistol cartridges. Unfortunately, the popular binder-format Sierra Manual is currently back-ordered. But the excellent Nosler Reloading Guide 9 is back in stock at Midsouth for $28.99.
The Lyman Reloading Manuals have earn praise over the years:
“Every other reloading book I’ve used favors their own bullets over every other manufacturers. With Lyman you get an honest representation of a wide variety of different… manufacturers. [Lyman has] a ton of reloading data on just about any bullet style you can imagine. I’ve tried a wide range of their recipes and everyone I’ve tried has been spot on. The overall breadth of information this book covers is impressive.” Review by RangetoReal.com.
Along with the Lyman 50th Edition Manual, here are other recommended Reloading Manuals:
Here Are Four General Instructional Books That Cover Reloading Procedures:
POWDER BURN RATE TABLE
Here is the most recent powder burn rate chart from Hodgdon/IMR that we could find. Click links below to access printable PDF. Note, some readers have suggested a couple powder ranking issues in the table. However, this is the latest official version from the IMR website, released in November 2019.
Precision Benchrest and F-Class shooters favor premium brass from Lapua, Norma, Peterson, or RWS. (Lake City also makes quality brass in military calibers.) Premium brass delivers better accuracy, more consistent velocities, and longer life. Shooters understand the importance of good brass, but many of us have no idea how cartridge cases are actually made. Here’s how it’s done.
The process starts with a brass disk stamped from strips of metal. Then, through a series of stages, the brass is extruded or drawn into a cylindrical shape. In the extrusion process the brass is squeezed through a die under tremendous pressure. This is repeated two or three times typically. In the more traditional “draw” process, the case is progressively stretched longer, in 3 to 5 stages, using a series of high-pressure rams forcing the brass into a form die. While extrusion may be more common today, RWS, which makes some of the most uniform brass in the world, still uses the draw process: “It starts with cup drawing after the bands have been punched out. RWS cases are drawn in three ‘stages’ and after each draw they are annealed, pickled, rinsed and subjected to further quality improvement measures. This achieves specific hardening of the brass cases and increases their resistance to extraordinary stresses.” FYI, Lapua also uses a traditional draw process to manufacture most of its cartridge brass (although Lapua employs some proprietary steps that are different from RWS’s methods).
After the cases are extruded or drawn to max length, the cases are trimmed and the neck/shoulder are formed. Then the extractor groove (on rimless cases) is formed or machined, and the primer pocket is created in the base. One way to form the primer pocket is to use a hardened steel plug called a “bunter”. In the photos below you see the stages for forming a 20mm cannon case (courtesy OldAmmo.com), along with bunters used for Lake City rifle brass. This illustrates the draw process (as opposed to extrusion). The process of draw-forming rifle brass is that same as for this 20mm shell, just on a smaller scale.
River Valley Ordnance explains: “When a case is being made, it is drawn to its final draw length, with the diameter being slightly smaller than needed. At this point in its life, the head of the draw is slightly rounded, and there are no provisions for a primer. So the final drawn cases are trimmed to length, then run into the head bunter. A punch, ground to the intended contours for the inside of the case, pushes the draw into a cylindrical die and holds it in place while another punch rams into the case from the other end, mashing the bottom flat. That secondary ram holds the headstamp bunter punch.
The headstamp bunter punch has a protrusion on the end to make the primer pocket, and has raised lettering around the face to form the headstamp writing. This is, of course, all a mirror image of the finished case head. Small cases, such as 5.56×45, can be headed with a single strike. Larger cases, like 7.62×51 and 50 BMG, need to be struck once to form a dent for the primer pocket, then a second strike to finish the pocket, flatten the head, and imprint the writing. This second strike works the brass to harden it so it will support the pressure of firing.”
Thanks to Guy Hildebrand, of the Cartridge Collectors’ Exchange, OldAmmo.com, for providing this 20mm Draw Set photo. Bunter photo from River Valley Ordnance.
What is the most-used piece of equipment on this Editor’s reloading bench? No it’s not my Rock-Chucker press, my priming tool, or even my calipers. The one item in near-constant use is a small, folding magnifying glass. Mine folds into a square case and offers 4X viewing with an 8X bifocal insert. With this handy tool I can inspect case mouths for burrs, check primer pockets, inspect meplats, and look for flaws on bullet jackets. I also use the magnifier to see rifling marks on bullets seated into the rifling, or check my bolt for galling. The number of uses is nearly endless. I keep one magnifier at my reloading bench and another in my range kit.
Folding magnifiers are so handy yet inexpensive that you should own a couple spares (including one in the range box). I bought my magnifier in a book-store, but you can also find them on Amazon.com and FoldingMagnifier.com starting at under $2.00. To see inside cases and dies and view fine details, consider the 5X Meromore Folding Magnifier with a built-in, battery-powered LED light, plus a 11X high-magnification insert.
With a decent small magnifier, you can easily see any minute flaws in your barrel crowns. That’s important because crown damage can cause hard-to-diagnose accuracy issues. We’ve known guys who spend weeks tinkering with loads, when the real problem was a worn-out or damaged crown.
The slide-out iLumen8, shown at left in top photo, offers 3X power with built-in illumination. An “Amazon’s Choice” item, this palm-sized magnifier is $20.75 on Amazon.
Tomorrow is July 4th, our nation’s birthday. To mark this important day in American history, we are featuring a great American military rifle, the M1 Garand, a rifle General George S. Patton called: “the greatest battle implement ever devised”. We think every serious vintage rifle collector should acquire an M1 Garand at some point.
The CMP has, in the past couple of years, received over 90,000 Garands from overseas arsenals, so there are plenty to be had currently. This article explains how to order an M1 Garand from the CMP, and how to select the right grade for your needs and budget.
How to Order an M1 Garand from the CMP
To purchase an M1 Garand through the CMP, you must be an adult U.S. Citizen, and a member of an affiliated organization who has participated in a “Marksmanship Activity”. This basically means you need to join a gun club and participate in a clinic or match. Proof of club membership and citizenship is mandatory for all ages. However, the marksmanship requirement is waived for those over 60 years of age. Garands must be ordered by mail or through official CMP Auctions. CLICK HERE to Start Order.
Here are two videos that explain the procedure for ordering an M1 Garand from the CMP. Along with mail-order sales, the CMP has brick-and-mortar stores where M1 Garands can be inspected and purchased and then transferred via your FFL (in compliance with state law). The three CMP stores are located in Anniston, Alabama; Talladega, Alabama; and Port Clinton (Camp Perry), Ohio.
M1 Garand Barreled Actions and Aftermarket Barrels
Along with complete M1 Garand rifles, the CMP also offers barreled actions. This can save you money, and also makes sense if you are looking to create a rifle with high-grade wood, or you want to bed the action for improved accuracy. You can order an M1 Garand barreled action, as well as complete M1 Garand rifles, from the Civilian Marksmanship Program (CMP). The eligibility requirements and ordering process will be the same for a barreled action as for a complete rifle.
If you already have an M1 Garand, but need a new barrel, you can order a pre-chambered Criterion barrel in .30-06 Springfield. Criterion tell us: “This is a direct replacement barrel for the M1 Garand rifle, manufactured to Mil-spec print #6535448. It has the original G.I. contour and Parkerized finish. Receiver threads are timed, all milling cuts are made, and all M1 Garand barrels are hand-lapped.” NOTE: Each barrel is .010 short-chambered and should be headspaced by a qualified gunsmith. These Criterion .30-06 replacement barrels, priced at $295.00, are legal for use in Service Rifle and John C. Garand matches.
How to Maintain the M1 Garand Rifle
Once you have an M1 Garand in your collection, you’ll want to keep it in tip-top condition so it works flawlessly for vintage military matches and fun shooting. Below we’ve linked two good SSUSA articles on M1 Garand maintenance. Following that you’ll find two excellent videos covering M1 Garand Disassembly, Cleaning, and Lubrication. Finally there are links to recommended print manuals for the M1 Garand.
M1 Service and Maintenance Shooting Sports USA (SSUSA) published an excellent article on Service and Maintenance of M1 Garand Rifles. This offers some smart tricks, such as using smoke from burning masking tape to darken the front sight post. There is also an older SSUSA article that covers basic cleaning and servicing and also explains how to upgrade the performance of your Garands. READ Article HERE.
As a resource for Garand owners, SSUSA recommends GarandGear.com: “[At] Garand Gear you’ll find USGI spec parts, tools, gauges, clips and a few Garand accessories. They also have some interesting freebies, most notably a direct analysis of M1 gas port pressures produced by different brands of commercial .30-06 ammunition, showing which ones exceed M2 Ball pressure, as well as the pressures produced by ammo manufactured specifically for the M1 Garand, such as Hornady’s M1 Garand Match and Federal’s American Eagle M1 Garand. Here you’ll also find free, downloadable and printable PDF copies of War Department M1 Garand maintenance manuals TM9-1275 and TM9-1005.”
In June 2020, Hornady introduced the 6mm ARC, a new SAAMI cartridge optimized for AR-platform rifles*. The new 6mm ARC is basically a 6.5 Grendel necked down to 6mm, with the shoulder moved back around .030″. That pushed-back shoulder does reduce case capacity (and velocity), but we assume Hornady did that to create a shorter, proprietary chamber so people could not simply neck-down Lapua 6.5 Grendel brass, as has been done for years with Robert Whitley’s outstanding 6mm AR wildcat.
What Is the 6mm ARC Cartridge? The 6mm ARC cartridge is a new SAAMI-spec cartridge based on the 6.5 Grendel case necked down for 6mm bullets, with the shoulder moved back 0.030. Yes it is designed to run in AR15-platform rifles. You’ll need a new barrel, bolt, and mags. If you already have an AR chambered in 6.5 Grendel, the ONLY thing you need to change is the barrel. Everything else — bolt, magazines, gas system – is compatible with 6mm ARC.
▶ Official SAAMI Cartridge (not wildcat)
▶ Fits standard AR15-platform rifles
▶ Fits Short/Mini action bolt rifles
▶ Efficient short, fat case design
▶ 30-degree case shoulder
What Do I Need To Shoot the 6mm ARC?
Faxon and Ballistic Advantage are already producing barrels, with more manufacturers sure to follow. All the other required components are already on the market for 6.5 Grendel rifles. Aero Precision already offers complete 6mm ARC uppers.
If you’re converting a standard 5.56×45 mm (.223 Rem) AR15 upper to shoot 6mm ARC, you’ll need a 6mm barrel, a Type II 6.5 Grendel bolt carrier group, and new magazines. Some folks have suggested standard AR mags will work, but trust us, you want the magazines that have been designed for 6.5 Grendel. All the hardware you need is currently available at Brownells.
* While 6-6.5 Grendel shooters are known to run stout pressures, the new 6mm ARC cartridge has a relatively moderate Maximum Average Pressure (MAP) rating of 52,000 psi according to the official SAAMI specifications. For a variety of reasons, is wise to keep pressures in a semi-auto rifle moderate. Don’t chase the velocities you might get in a bolt-action gun.
Whidden Gunworks makes great sizing and seating dies. The Whidden full-length sizing die with neck bushing is very popular because it allows you to “tune” the neck tension by using different bushings, with larger or smaller inside diameters. In this video, John Whidden explains how to choose a the right bushing size for use with your neck-sizing and full-length sizing bushing dies.
For most applications, John suggest starting with the caliper-measured outside diameter of a loaded cartridge (with your choice of bullet), and then SUBTRACT about three thousandths. For example, if your loaded round mics at .333, then you would want to start with a 0.330 neck bushing. John notes, however, that you may want to experiment with bushings, going down a thousandth and up a thousandth. With thin In addition, as your brass ages and the necks harden, you may want to change your bushing size.
Quick Tip: Try Flipping Your Bushings
You may also want to experiment with “flipping” your neck bushings to alternate the side that first contacts the neck of the case. (One side of the bushing is usually marked with the size, while the other side is unmarked.) So try “number side up” as well as “number side down”.
Some folks believe that one side of the bushing may allow a smoother entry, and that this can enhance concentricity. Other people think they can get very slightly more or less neck tension depending on how the bushing is oriented. This is a subtle effect, but it costs nothing to experiment.
If one bushing orientation proves better you can mark the “up” side with nail polish so that you can always orient the bushing optimally. NOTE: We have confirmed that some bushings are actually made with a slight taper. In addition, bushings may get distorted slightly when the brand name and size is stamped. Therefore there IS a reason to try both orientations.
Do you have a concealed carry permit, or do you plan to carry a concealed handgun in the future? Then you can benefit from Beretta’s FREE 15-page e-book, Ten Essential Tips for CCW Holders. This eBook, in handy PDF format, helps gun owners select an appropriate handgun (and holster), understand legal obligations and responsibilities, and train effectively with the firearm. This short eBook offers many useful tips to consider, in particular for gun owners who are contemplating the pros and cons of everyday carry for themselves.
As the Beretta CCW booklet says, “Carrying a concealed handgun requires a certain amount of confidence. You need to be confident in your knowledge of laws and regulations. You have to have confidence in your accuracy, and you need to trust that you can carry a gun effectively, securely and comfortably. If a gun is a burden for you to carry, you probably won’t.”
Surprising Facts About Actual Defensive Handgun Use
You may be surprised to learn when and how handguns are actually used for self-defense. Most defensive uses are at very short range and the incident only lasts a matter of seconds. You need to be prepared, and train to be proficient drawing and aiming your weapon. And remember, shooting is a last resort, when a safe retreat is not available.
55% of gunfights take place in 0-5 feet.
20% of gunfights take place in 5-10 feet.
20% of gunfights take place in 10-21 feet.
95% of gunfights take place in 0-21 feet. (Source: FBI)
The average man can cover 21 feet of ground in 1.5 seconds.
The average gunfight is over in 3-5 seconds.
3 to 4 shots are usually fired.
Most gunfights take place in low-light conditions.
On average, one shot in four strikes someone.
Here are two (2) sample pages from Beretta’s CCW eBook.


 One of our Forum readers asked “How can I get a custom in-line seater for my new rifle?”. First, we would say that, if you are not shooting an unusual Wildcat, check first to see if L.E. Wilson makes a stainless Micrometer Seater Die for your rifle. These dies are a joy to use, and we’ve found the fit to be exceptionally good with many calibers. Typically priced from $90-$100, Wilson stainless micrometer-top seaters are available for dozens of cartridge types: .204 Ruger, 20 BR, .222 Rem, .223 Rem, 22 PPC, 22 BR, .22-250, .223 WSSM, 6 PPC, 6mmBR, 6XC, 243 Win, .243 WSSM, 25 WSSM, 6.5×47 Lapua, 6.5 Creedmoor, 6.5-284, 26 Nosler, .270 WSM, 7mm-08, .284 Win, 28 Nosler, 7mm RUM, 30 BR, 30 IHMSA, .308 Win, .300 WinMag, .338 Edge (and MORE).


 Gone in Six Seconds. Want to Cry Now?


 Precision Benchrest and F-Class shooters favor premium brass from


 The headstamp bunter punch has a protrusion on the end to make the primer pocket, and has raised lettering around the face to form the headstamp writing. This is, of course, all a mirror image of the finished case head. Small cases, such as 5.56×45, can be headed with a single strike. Larger cases, like 7.62×51 and 50 BMG, need to be struck once to form a dent for the primer pocket, then a second strike to finish the pocket, flatten the head, and imprint the writing. This second strike works the brass to harden it so it will support the pressure of firing.”
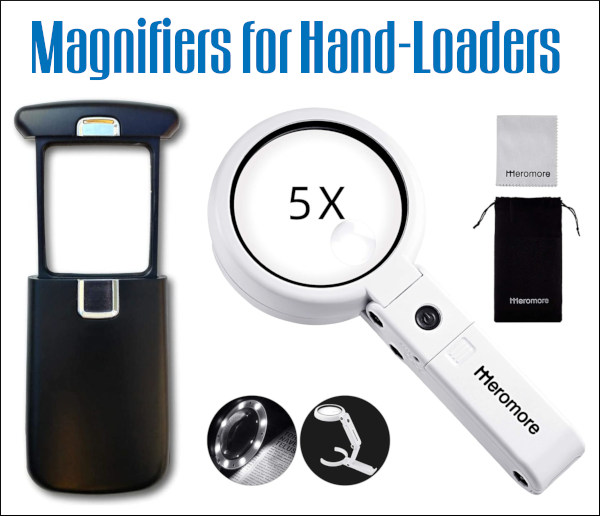
 What is the most-used piece of equipment on this Editor’s reloading bench? No it’s not my Rock-Chucker press, my priming tool, or even my calipers. The one item in near-constant use is a small, folding magnifying glass. Mine folds into a square case and offers 4X viewing with an 8X bifocal insert. With this handy tool I can inspect case mouths for burrs, check primer pockets, inspect meplats, and look for flaws on bullet jackets. I also use the magnifier to see rifling marks on bullets seated into the rifling, or check my bolt for galling. The number of uses is nearly endless. I keep one magnifier at my reloading bench and another in my range kit.


 Quick Tip: Try Flipping Your Bushings


