It’s great to be able to access online load data for your cartridges. You can quickly get load data for a particular powder and bullet weight. However, there are times when we prefer to consult old-fashioned printed/bound load manuals. The primary reason is that manuals produced by bullet- and tool-makers will, for a particular cartridge, include data for powders from multiple manufacturers. Having a single source can save you time and trouble. For example, if you want to find 6.5 Creedmoor loads using H4350 (Hodgdon), Reloder 16 (Alliant), and N150 (Vihtavuori) you would have to visit three different powder-maker websites, one after another. OR you can pick up a modern load manual and find everything in one place.
There are many excellent printed load manuals on the market. We have used the Berger Manual, Sierra Manual, Speer Manual, Lyman Manual, and Hornady Manual. We like the Berger and Sierra manuals for match rifle cartridges, and the Lyman and Hornady manuals for hunting loads and pistol cartridges.
The Lyman Reloading Manuals have earn praise over the years:
“Every other reloading book I’ve used favors their own bullets over every other manufacturers. With Lyman you get an honest representation of a wide variety of different… manufacturers. [Lyman has] a ton of reloading data on just about any bullet style you can imagine. I’ve tried a wide range of their recipes and everyone I’ve tried has been spot on. The overall breadth of information this book covers is impressive.” Review by RangetoReal.com.
Nosler #9 Manual Features New Cartridges
If you are looking for up-to-date cartridge/bullet/powder information, in late 2020 Nosler released the Nosler Reloading Guide #9, the latest in a respected series of Nosler load manuals.
This 800-page guide covers 101 cartridge types. New in this edition you’ll find the popular 6mm Creedmoor, 6mm XC, 6.5 PRC, and 7.62×39, along with 20 Nosler, 22 Nosler, 24 Nosler, 27 Nosler and 33 Nosler. This manual is a good resource for PRS shooters and hunters. The Nosler #9 book draws from thousands of hours in the Nosler Ballistic Lab, along with the experience of many respected experts.
The book is available for $24.99 at Midsouth or $29.95 on Amazon. Keep in mind that much of the book’s latest load data is available for free on the Nosler.com online LOAD DATA Center. But to get ALL the data, PLUS all the technical articles, you’ll need to buy the book.
Along with the new Nosler #9 Manual, here are four other recommended Reloading Manuals:
Here Are Four General Instructional Books That Cover Reloading Procedures:
POWDER BURN RATE TABLE
Here is the most recent powder burn rate chart from Hodgdon/IMR that we could find. Click links below to access printable PDF. Note, some readers have suggested a couple powder ranking issues in the table. However, this is the latest official version from the IMR website, released in November 2019.
The 2022 NRA F-Class National Championships commence this weekend at the Ben Avery range in Phoenix, Arizona. The Mid-Range F-Class Nationals commence this Sunday, October 16, with practice on Saturday, October 15. The 1000-yard Long Range match starts on October 20th.
How to Avoid “Train Wrecks” In Competition
In any shooting competition, you must try to avoid major screw-ups that can ruin your day (or your match). In this article, past F-TR National Mid-Range and Long Range Champion Bryan Litz talks about “Train Wrecks”, i.e. those big disasters (such as equipment failures) that can ruin a whole match. Bryan illustrates the types of “train wrecks” that commonly befall competitors, and he explains how to avoid these “unmitigated disasters”.
Urban Dictionary “Train Wreck” Definition: “A total @#$&! disaster … the kind that makes you want to shake your head.”
Success in long range competition depends on many things. Those who aspire to be competitive are usually detail-oriented, and focused on all the small things that might give them an edge. Unfortunately it’s common for shooters lose sight of the big picture — missing the forest for the trees, so to speak.
Consistency is one of the universal principles of successful shooting. The tournament champion is the shooter with the highest average performance over several days, often times not winning a single match. While you can win tournaments without an isolated stellar performance, you cannot win tournaments if you have a single train wreck performance. And this is why it’s important for the detail-oriented shooter to keep an eye out for potential “big picture” problems that can derail the train of success!
Train wrecks can be defined differently by shooters of various skill levels and categories. Anything from problems causing a miss, to problems causing a 3/4-MOA shift in wind zero can manifest as a train wreck, depending on the kind of shooting you’re doing.
Below is a list of common Shooting Match Train Wrecks, and suggestions for avoiding them.
1. Cross-Firing. The fastest and most common way to destroy your score (and any hopes of winning a tournament) is to cross-fire. The cure is obviously basic awareness of your target number on each shot, but you can stack the odds in your favor if you’re smart. For sling shooters, establish your Natural Point of Aim (NPA) and monitor that it doesn’t shift during your course of fire. If you’re doing this right, you’ll always come back on your target naturally, without deliberately checking each time. You should be doing this anyway, but avoiding cross-fires is another incentive for monitoring this important fundamental. In F-Class shooting, pay attention to how the rifle recoils, and where the crosshairs settle. If the crosshairs always settle to the right, either make an adjustment to your bipod, hold, or simply make sure to move back each shot. Also consider your scope. Running super high magnification can leave the number board out of the scope’s field view. That can really increase the risk of cross-firing.
2. Equipment Failure. There are a wide variety of equipment failures you may encounter at a match, from loose sight fasteners, to broken bipods, to high-round-count barrels that that suddenly “go south” (just to mention a few possibilities). Mechanical components can and do fail. The best policy is to put some thought into what the critical failure points are, monitor wear of these parts, and have spares ready. This is where an ounce of prevention can prevent a ton of train wreck. On this note, if you like running hot loads, consider whether that extra 20 fps is worth blowing up a bullet (10 points), sticking a bolt (DNF), or worse yet, causing injury to yourself or someone nearby.
[Editor’s Note: The 2016 F-Class Nationals will employ electronic targets so conventional pit duties won’t be required. However, the following advice does apply for matches with conventional targets.]
3. Scoring/Pit Malfunction. Although not related to your shooting technique, doing things to insure you get at least fair treatment from your scorer and pit puller is a good idea. Try to meet the others on your target so they can associate a face with the shooter for whom they’re pulling. If you learn your scorer is a Democrat, it’s probably best not to tell Obama jokes before you go for record. If your pit puller is elderly, it may be unwise to shoot very rapidly and risk a shot being missed (by the pit worker), or having to call for a mark. Slowing down a second or two between shots might prevent a 5-minute delay and possibly an undeserved miss.
4. Wind Issues. Tricky winds derail many trains. A lot can be written about wind strategies, but here’s a simple tip about how to take the edge off a worse case scenario. You don’t have to start blazing away on the command of “Commence fire”. If the wind is blowing like a bastard when your time starts, just wait! You’re allotted 30 minutes to fire your string in long range slow fire. With average pit service, it might take you 10 minutes if you hustle, less in F-Class. Point being, you have about three times longer than you need. So let everyone else shoot through the storm and look for a window (or windows) of time which are not so adverse. Of course this is a risk, conditions might get worse if you wait. This is where judgment comes in. Just know you have options for managing time and keep an eye on the clock. Saving rounds in a slow fire match is a costly and embarrassing train wreck.
5. Mind Your Physical Health. While traveling for shooting matches, most shooters break their normal patterns of diet, sleep, alcohol consumption, etc. These disruptions to the norm can have detrimental effects on your body and your ability to shoot and even think clearly. If you’re used to an indoor job and eating salads in air-conditioned break rooms and you travel to a week-long rifle match which keeps you on your feet all day in 90-degree heat and high humidity, while eating greasy restaurant food, drinking beer and getting little sleep, then you might as well plan on daily train wrecks. If the match is four hours away, rather than leaving at 3:00 am and drinking five cups of coffee on the morning drive, arrive the night before and get a good night’s sleep.”
Keep focused on the important stuff. You never want to lose sight of the big picture. Keep the important, common sense things in mind as well as the minutia of meplat trimming, weighing powder to the kernel, and cleaning your barrel ’til it’s squeaky clean. Remember, all the little enhancements can’t make up for one big train wreck!
Here is a cool video that shows the entire production process for a SilencerCo Octane pistol suppressor start to finish. Beginning with the raw materials, this video shows a wide variety of cutting, milling, drilling, burnishing, fitting, metal bathing, surface finishing, and laser etching processes.
If you have any interest in production methods you’ll want to watch this video all the way through, and maybe a second time.
SilencerCo states: “From cutting metal to chemical baths, to extensive quality control every step of the way, our streamlined process is more than just a few steps.” We think you may be surprised by how many steps are involved in producing this silencer (aka “suppressor”).
The Octane is a user-maintainable, multi-caliber centerfire pistol silencer featuring a modular mounting system for use across a wide range of hosts. High strength, stainless steel CTA™ (Click Together Assembly) baffles are easily disassembled for cleaning. This design makes the Octane one of the most durable small-caliber suppressors on the market.
In its Octane 45 review, SilencerShop notes: “When it comes to ease of maintenance, the Octane 45 is probably the simplest .45 suppressor on the market. It uses the new click-together baffle system from Silencerco/SWR – which allows the suppressor to come apart like a monocore suppressor, while providing performance that is closer to a K-Baffle design.””
I have seen it time and time again, shooters on the line wrestling with their rifle trying to get the bolt closed while the wind is switching. They were too focused trying to get their bolt to close and getting their rifle settled back on the bags that they missed the wind switch. Bang… Eight! The straw that broke the camel’s back for me was at the 2017 Canadian Nationals. I was paired up with a young girl and she would try really hard to close the bolt on her rifle. The majority of the time she would get it to close, but often times she could not even get the round to chamber. She was focused on her rifle the entire time rather than on the conditions. When we completed our strings, she had five rounds that did not chamber our of 15! That is way too many!. I told her she needed to think about Full-length sizing with 0.002″ shoulder bump, or Controlled Full-length Sizing like I call it. I told her not to worry about losing accuracy. I told her that I full-length size all my rounds and asked if she noticed how smooth my bolt was and noticed my score. She said yes, they were both great!
Controlled Full-length Sizing Does NOT Harm Accuracy
I have found that Controlled Full-length Sizing does NOT hurt accuracy or shorten brass life. I find that I can focus much more on the conditions when I don’t have to think about chambering a round nor extracting it. It has become second nature. After firing, I keep my head welded to the stock, I open the bolt by placing my thumb on top of stock and rotating hand upwards. I reach in and retrieve spent case, place it back in ammo box, and pick up another loaded round and put in chamber. I verify conditions and when ready, I push the bolt in and close it with my index and middle finger.
With Controlled Full-length Sizing you “bump” the shoulder around .002″ for bolt guns.* Image courtesy Sinclair International which carries a variety of Full-length dies.
Whidden Full-Length Sizing Dies by AccurateShooter.com Editor
For proper Full-length sizing, you want a quality die that’s a very good match to your chamber. For our project rifles we usually turn to Whidden Gunworks which offers both bushing and non-bushing FL dies. And if you want the hot new option, check out Whidden’s patent-pending, click-adjustable FL-sizing die. This gives instant, precise control over shoulder bump. It works great.
*With gas guns, such as the AR10, you may want to increase shoulder bump to .003″ or more. With some benchrest cartridges, .0015″ bump may prove optimal. But .002″ is a good starting point.
We first ran this story a few years back. But it’s still a very interesting subject for benchrest shooters. Shown above, the 30 BR (a 6mmBR necked up to .30 caliber) currently rules the benchrest-for-score game. However, a 30 BR Improved offers some potential advantages, particularly when the winds are strong or tricky. In this article Al Nyhus explains his 30 BRX wildcat. Running Hodgdon H4198, Al says he gets an easy 150 -200 FPS more than the conventional 30 BR. That can translate to less drift in the wind. It also lets you pursue a higher speed node, which can lead to improved accuracy with some barrels.
Forum member Al Nyhus is a top-level score shooter who has competed successfully with the 30 BR cartridge in VFS (Varmint for Score) matches. Al has been working on an “improved” 30 BR cartridge that delivers extra velocity. Al’s 30 BRX cartridge is inspired by the 6mm BRX cartridge, popular in 600-yard benchrest and across-the-course competition. The 6mm BRX cartridge maintains the same sidewall profile and shoulder angle as the parent 6mmBR case. Likewise, the 30 BRX retains the 30° shoulder used on the popular 30 BR cartridge.
Al reports: “Thought you might like to see what I’ll be working with in my VFS gun this season. It’s a true 30 BRX — a 30 BR with the shoulder moved forward 0.100″ with the standard BR shoulder angle. Stan Ware of SGR Custom Rifles built one last season for Steve Grosvenor and I was really impressed by the performance of Steve’s gun. The 30 BR barrel on my VFS gun needed replacing, so the new 30 BRX got the nod.”
30 BRX Delivers 150-200 FPS More Velocity than 30 BR
Al says his 30 BRX gives a solid 150-200 fps speed gain over the 30 BR at the top, while needing just 2.5-3.0 more grains of Hodgdon H4198 to do so. A 30 BR case holds on average 40.8 grains of water, while the 30 BRX holds 42.3 grains (roughly 4% more). So the 30 BRX delivers a 7% increase in velocity with a mere 4% increase in H20 capacity. That’s pretty good efficiency. [Editor’s Note: Assuming 34 grains of H4198 is a typical 30 BR match load, Al’s increase of 2.5-3.0 grains for the 30 BRX represents roughly a 7.5-8.5% increase in actual powder burned. That explains the higher velocities.]
Why did Nyhus decide to try an “improved” 30 BR?
Al explains: “The 30 BRX was created to operate at a [higher] velocity level than can be achieved with the standard 30 BR case, while at the same time keeping the easy-tuning characteristics of the standard 30 BR case. We also wanted to use the same powders currently used with the 30 BR and maintain similar operating pressures.” Is the 30BRX harder to shoot because of the increased velocity? Al doesn’t think so: “In a 13.5-lb HV gun, the 30 BRX case is a pleasure to shoot with just a flea bite of recoil.”
Will the 30 BRX Become Popular in Score Competition?
The 30 BR is already an exceptionally accurate cartridge that dominates short-range Benchrest for Score competition. Will the 30 BRX make the standard 30 BR obsolete? Nyhus doesn’t think so. However, Al believes the 30 BRX offers a small but important edge in some situations: “On any given day, it’s the shooter that hits the flags best and makes the fewest mistakes that ends up on top. No amount of velocity will save you when you press the trigger at the wrong time. Missing a switch or angle change at 200 yards that results in 3/4″ of bullet displacement on the target can’t be compensated for with another 200 fps. That’s the hard fact of benchrest shooting. But on those days when, as Randy Robinett says, ‘our brains are working’, the BRX may offer enough of an advantage to turn a close-but-no-cigar 10 into an ‘X’ at 200 yards. Or turn a just-over-the-line 9 into a beggar 10.” Given the fierce competition in Score matches, an extra 10 or another X can make the difference between a podium finish and also-ran status.
The U.S. Army Marksmanship Unit (USAMU) has published a series of reloading articles on its Facebook Page. In this article, the second in a 3-part series, the USAMU covers the process of loading competition pistol ammunition. The authors focus on two key elements — the taper crimp and the quality/uniformity of the original brass. If you shoot pistol competitively, or just want to maximize the accuracy of your handguns, read this article. The taper crimp tips are very important.
Loading Accurate Competition Pistol Ammunition — Part 2 of 3
Today, we resume our series on factors affecting accuracy in pistol handloads. Readers who missed Part One can visit our USAMU Facebook Page. Scroll down to March 28, 2018 to find that first installment which is worth reading.
One often-overlooked aspect of handloading highly-accurate pistol ammunition is the amount of taper crimp used, and its effect on accuracy. (NOTE: this article pertains to loading for semi-autos – revolver crimp techniques involve some quite different issues.) Briefly, different amounts of taper crimp are used with various handloads to obtain best accuracy. The amount is based on bullet weight, powder burn rate and charge, plus other factors such as case neck tension. During machine-rest testing of experimental Service Pistol ammunition, many variables are examined. Among these, our Shop often varies a load’s crimp in degrees of 0.001″ when re-testing for finest accuracy.
How to Measure Taper Crimp on Pistol Cartridges
One question that often arises is, “How do I measure the taper crimp I’m putting on my cartridges?” Using the narrow part of one’s dial caliper jaws, carefully measure the case diameter at the exact edge of the case mouth on a loaded cartridge. It’s important to take several measurements to ensure consistency. Also, be sure to measure at several places around the case mouth, as case wall thickness can vary. After measuring 2-3 cartridges with a given crimp setting, one can be confident of the true dimension and that it can be repeated later, if needed.
However, for good results, one must use brass from one maker due to variances in case wall thickness. For example, the same degree of crimp that imparts a measurement of 0.471″ with Brand X brass may result in 0.469″ with Brand Y. Thus, for best accuracy, using brass from the same manufacturer is important — particularly for 50-yard Slow Fire. In a perfect world, it is better still to use brass from one lot number if possible. With the popularity of progressive presses using interchangeable tool heads, keeping separate tool heads adjusted for each load helps maximize uniformity between ammunition lots.
Brass Uniformity and Accuracy
Brass is important to pistol accuracy. While accurate ammunition can be loaded using brass of mixed parentage, that is not conducive to finest results, particularly at 50 yards. It is important for the serious competitor to pay attention to his brass – even if only for the 50-yard “Slow Fire” portions of “Bullseye” matches and practice. By segregating brass as described above, and additionally keeping track of the number of times a given batch of cases has been fired, one can ensure case neck tension and case length are at their most uniform.
Given the large volumes of ammunition consumed by active pistol competitors, using inexpensive, mixed surplus brass for practice, particularly at the “short line” (25 yards), is understandable. In NRA Outdoor Pistol (“Bullseye”), the 10-ring is relatively generous — especially for a well-trained shooter with an accurate pistol and load. However, for the “long line” (50 yards), purchasing and segregating a lot of high-quality brass to be used strictly for slow-fire is a wise idea. To keep track of your brass on the line, use a unique headstamp marking with 1 or 2 colors of marking pen ink.
Uniform Cartridge Overall Length is Important
Cartridge case Overall Length (OAL) uniformity as it comes from the factory is important to achieving utmost accuracy. More uniform case lengths (best measured after sizing) contribute to greater consistency of crimp, neck tension, ignition/burn of powder charge, headspace (rimless cartridges), etc. Cartridge case-length consistency varies noticeably by maker and, with lesser manufacturers, also from lot to lot. Some manufacturers are more consistent in their dimensions than others, and also in the hardness/ductility of their brass. Similarly, pay attention to primer brands, powder lot numbers, etc.
Consider Using a Lock-Out Die with Progressive Presses
When reloading pistol ammo with a Progressive press, we strongly recommend the use of a lock-out die, or other system that can detect double charges or low charges. If your progressive is manually advanced, the possibility of a double charge is very real — and that can have disastrous consequences.
On UltimateReloader.com website you’ll find an excellent two-part series on the function and set-up of the RCBS Lock-Out Die. This die prevents loading if a high or low powder charge is detected. The video below shows setup of the RCBS Lock-Out Die on the Dillon XL-650 progressive press.
The Shooting Sports USA website includes two excellent articles about the basics of metallic cartridge reloading. These two articles provide an excellent summary of the key procedures. If you are new to reloading, we recommend you read both articles:
Part II is particularly helpful because it explains the entire reloading process step-by-step, with 14 listed steps. The author notes: “In this, the second installment on metallic cartridge reloading, we’ll follow the sequence of steps involved in reloading a rifle cartridge and refining a metallic cartridge load. These steps are based on the use of a single-stage reloading press and a separate priming tool.”
Much important advice is provided as this article runs through the 14 Steps of Reloading. For example, when explaining Step 13, Bullet Seating, the article states:
“Proper seating depth is critical. Too much bullet protrusion and the cartridge may not work through the gun’s magazine, or it may fail to chamber. Too little and the bullet intrudes excessively into the powder chamber, decreasing volume and raising pressure. Neck tension is also important; any bullet that fails to seat with some resistance may be held only loosely by the neck and may be driven back into the case when the round is chambered, especially in semi-automatic arms.”
Important Guide to Detecting Over-Pressure Signs in Brass
As an example of the invaluable advice provided in these two articles, here’s a sample from Part II that explains how to determine if your load is over-pressure. We recommend that EVERY reader read this twice. There are more things to consider than a stiff bolt lift. You need to inspect cartridges very carefully:
Put the same load in a variety of barrels (with the same length and chamberings) and you’ll see a wide variance in muzzle velocity. In fact, it’s not unusual to see up to 100 fps difference from one barrel to the next. We demonstrated this with a comparison test of Lapua factory ammo.
Chron Testing Lapua Factory Ammo
At our Southern California test range some years ago, we chronographed Lapua 105gr 6mmBR factory ammo in three different 8-twist barrels of similar length. The results were fascinating. Lapua specs this ammo at 2790 fps, based on Lapua’s testing with its own 26″ test barrel. We observed a speed variance of 67 fps based on tests with three aftermarket barrels.
Barrel Velocity Variance
Brand ‘S’ and Brand ‘PN’ were pre-fit barrels shot on Savage actions. Brand ‘K’ was fitted to a custom action. All test barrels were throated for the 100-108 grain bullets, though there may have been some slight variances in barrel freebore. With a COAL of 2.330″, the rounds were “jumping” to the rifling in all barrels.
Among the four barrels, Brand ‘PN’ was the fastest at 2824 fps average — 67 fps faster than the slowest barrel. Roughly 10 fps can be attributed to the slightly longer length (27″ vs. 26″), but otherwise this particular barrel was simply faster than the rest. (Click Here for results of 6mmBR Barrel Length Velocity Test).
IMPORTANT: Results Are Barrel-Specific, Not Brand-Specific
These tests demonstrate that the exact same load can perform very differently in different barrels. We aren’t publishing the barrel-makers’ names, because it would be wrong to assume that ‘Brand X’ is always going to be faster than ‘Brand Y’ based on test results from a single barrel. In fact, velocities can vary up to 100 fps with two identical-spec barrels from the SAME manufacturer. That’s right, you can have two 8-twist, 26″ barrels, with the same land-groove configuration and contour, from the same manufacturer, and one can be much faster than another.
Don’t Demand More Than Your Barrel Can Deliver
We often hear guys lament, “I don’t get it… how can you guys get 2900 fps with your 6BRs and I can only get 2840?” The answer may simply be that the barrel is slower than average. If you have a slow barrel, you can try using more powder, but there is a good chance it may never run as fast as an inherently fast barrel. You shouldn’t knock yourself out (and over-stress your brass) trying to duplicate the velocities someone else may be getting. You need to work within the limits of your barrel.
Factory Ammo Provides a Benchmark
If you have a .223 Rem, 6mmBR, .243 Win, 6.5×47 Lapua, 6.5 Creedmoor, 6.5×55, .308 Win, 30-06, or .338 LM Rifle, we recommend you buy a box of Lapua factory-loaded ammo. This stuff will shoot great (typically around half-MOA), and it can give you a baseline to determine how your barrel stacks up speedwise. [Editor’s NOTE: The original test was conducted in 2008. The velocity of current-production Lapua factory ammo might be higher or lower, so your results may vary.]
When you complete a new 6mmBR rifle, it’s definitely smart to get a box of the factory ammo and chronograph it. That will immediately give you a good idea whether you have a slow, average, or fast barrel. Then you can set your velocity goals accordingly. For example, if the factory 6BR ammo runs about 2780-2790 fps in your gun, it has an average barrel. If it runs 2820+ in a 26″ barrel (or 2835 fps in a 28″), you’ve got a fast tube.
Every serious hand-loader benefits from a precise, repeatable, and efficient powder dispensing system. There are many electronic powder dispensers on the market, starting at about $230 for a Frankford Arsenal Intellidropper and $240 for a Lyman Gen6. At the high end, the ultimate powder weighing/dispensing system would be an Auto-Trickler V4 mated to an top-tier electronic Force Restoration scale. Such a system can run $1200 or more, depending on scale cost.
In today’s Saturday video showcase we feature eight videos about electronic powder dispensers, as well as Auto-Trickler systems (both V3 and V4). If you are in the market for a new powder scale/dispenser system, we recommend you watch these videos. You may be surprised by some of the findings, and you will certainly learn more about these machines — their pros and cons. That knowledge can help you decide what electronic powder dispenser best deserves your hard-earned dollars.
Five Powder Dispenser Comparison Test (All Units Purchased)
If you are in the market for a sub-$500 electronic powder dispenser, definitely watch this review. This Backfire comparison test is notable because the tester spent his own money to purchase all five powder dispensers being reviewed. That means Backfire could tell the full truth, both good and bad, about the machines. In fact, Backfire bought TWO ChargeMaster Lites because one failed (See 14:12 time-mark). The reviewer liked the RCBS ChargeMaster Supreme, but his top choice overall was the Hornady Auto Charge Pro. He favored the overall design, and really liked the way the dispensing speeds could be easily set faster or slower. Here are highlights from the video review:
00:08 Speed Test
03:09 Accuracy Test
07:57 Frankford Arsenal Intellidropper
09:08 Lyman Gen 6
10:44 RCBS Chargemaster Supreme
12:03 Hornady Auto Charge Pro
14:12 RCBS Chargemaster Lite
14:41 Conclusions
AutoTrickler V3 vs. Hornady Auto Charge Pro
In the Backfire comparison video above, the Hornady Auto Charge Pro powder dispenser earned top marks among sub-$500 units. Here the Auto Charge takes on some tougher competition — an ultra-precise Force Restoration scale fitted with an Auto-Trickler V3, a system that cost upwards of $1150.00 U.S. Dollars. The Australian duo running the comparison found the Auto-Trickler system was more accurate and consistent. Notably, with a dispense speed of just 14 seconds. the Auto-Trickler V3 system was significantly faster than the Hornady machine. The Auto-Tricker V3 has been superseded by the new Auto-Trickler V4 which retails for $490.00 USD. Add $625 or more for a good Force Restoration scale such as the A&D FX-120i.
RCBS New ChargeMaster Supreme and Other ChargeMasters
In this well-made video, Gavin Gear of UltimateReloader.com does a detailed review of the new-generation RCBS ChargeMaster Supreme. He puts it through his paces, verifying its accuracy and repeatability. He shows how the unit can be programmed. At the 17:20 time-mark, Gavin employs an A&D FX-120i Force Restoration scale to check the ChargeMaster Supreme’s charge-weighing precision. The results were good.
Frankford Arsenal Intellidropper vs. RCBS ChargeMaster Link
The Frankford Arsenal Intellidropper, now just $230 on sale at Midsouth, was very innovative when first released, offering remote Bluetooth access and a wide range of programmable features. The downloadable App stores your load data and has preloaded bullet and powder databases. This video compares the Intellidropper with another Bluetooth-enabled modern powder dispenser, the RCBS Chargemaster Link. A free RCBS App allows you to control settings remotely.
Hornady Auto Charge Pro Review by Ultimate Reloader
As the $350 Hornady Auto Charge Pro dispenser was top-rated in the Backfire comparison at the start of this article, we thought we’d include a detailed review from Gavin Gear of UltimateReloader.com. If you are thinking of buying a Hornady Auto Charge Pro, definitely watch this video, as it is the most thorough Auto Charge Pro review on the web and Gavin is by far the most articulate tester. SEE FULL TEST.
AutoTrickler V4 and Force Restoration Scale
The AutoTrickler V4, paired with a quality Force Restoration scale, is the “Rolls Royce” of electronic powder dispensing systems, offering unrivaled charge-weight accuracy, great repeatability, and ultra-fast dispensing speeds. If you have the budget — $490 for the V4 plus $625+ for scale — the AutoTrickler V4 is a superb system that lets you load extremely accurate, consistent ammo. This detailed F-Class John video shows how to set up the system properly and control the dispensing and trickling functions.
RCBS MatchMaster vs. AutoTrickler V3 with A&D FX-120i Scale
This video is interesting because it compares the most advanced and expensive mass-market electronic dispenser, the $899 RCBS MatchMaster, with an AutoTrickler V3 mated to an ultra-precise Force Restoration scale. The AutoTrickler V3 + scale system offers wicked fast dispensing while delivering near-single-kernel precision and great repeatability. The MatchMaster has some interesting features, including dual dispensing tubes and a special slower, “Match Mode” dispensing function which provides enhanced precision.
BONUS Video: RCBS ChargeMaster Dispenser vs. Four Scales
This video answers the question “How does a common powder dispenser’s weighing accuracy compare to stand-alone scales?” Here the tester compares the weighing precision of an early-model RCBS ChargeMaster with four dedicated scales: A&D FX-120i (Force Restoration), Hornady G2-1500, Hornady GS-1500 (Gen 1), and a WAOAW milligram scale. These scales range significantly in price, with the FX-120i Force Restoration the most expensive by far. The features/prices of the four scales are listed at 4:41 time-mark. Accuracy/repeatability comparison testing with test weights starts at 10:12 time-mark.
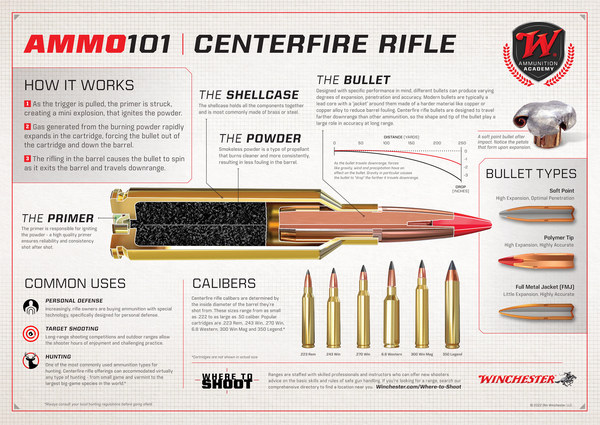
Winchester’s new “Introduction to Ammunition — Ammo 101” is a four-part series including custom illustrations and information for four major ammunition categories: rifle, pistol, rimfire, and shotshell. The Ammo 101 series provides a detailed overview of centerfire rifle, centerfire pistol, rimfire, and shotshell ammunition, showcasing ammunition construction, components, calibers, and common usage. The Ammo 101 resource is free to download from Winchesters.mediaassets.com. Or, simply click one or more diagrams below. Each image will launch a large PDF which you can print or download.
TIP: Click Each Image for Full-Screen Printable PDF
Shown below are the first four ammunition information sheets prepared by Winchester. These show all the key components of cartridges and shotshells, and explain the functions. These diagrams are useful for training, and for persons getting started in reloading.
Ammo 101 Centerfire Rifle Cartridge Diagram (click for PDF)
Ammo 101 Rimfire Cartridge Diagram (click for printable PDF)
Ammo 101 Pistol Cartridge Diagram (click for printable PDF)
Ammo101 Shotshell Diagram (click for printable PDF)
About the Ammo 101 Series
The FREE Ammo 101 resources can help instructors nationwide who introduce new entrants to the shooting sports and hunting. Instructors can incorporate these resources into their training presentations, use them as handouts, or have them printed locally.
“The basics of ammunition… is what we want to deliver with the Ammo 101 series,” said Matt Campbell, Winchester V.P. of Sales & Marketing. “With millions of people across the United States starting their journey in the shooting sports as new firearm owners, providing easy-to-understand information on ammunition types is one way we can help educate our customers.”


 Nosler #9 Manual Features New Cartridges


 Train Wrecks (and How to Avoid Them)
 4. Wind Issues. Tricky winds derail many trains. A lot can be written about wind strategies, but here’s a simple tip about how to take the edge off a worse case scenario. You don’t have to start blazing away on the command of “Commence fire”. If the wind is blowing like a bastard when your time starts, just wait! You’re allotted 30 minutes to fire your string in long range slow fire. With average pit service, it might take you 10 minutes if you hustle, less in F-Class. Point being, you have about three times longer than you need. So let everyone else shoot through the storm and look for a window (or windows) of time which are not so adverse. Of course this is a risk, conditions might get worse if you wait. This is where judgment comes in. Just know you have options for managing time and keep an eye on the clock. Saving rounds in a slow fire match is a costly and embarrassing train wreck.


 Forum member Al Nyhus is a top-level score shooter who has competed successfully with the





 Barrel Velocity Variance