Peterson Cartridge Company (“Peterson”) has released a lengthy, authoritative guide to the 22 Creedmoor cartridge, a popular wildcat based on the 6.5 Creedmoor or 6mm Creedmoor necked down to .224 caliber. We think the .22 Creedmoor would be a great long-range varmint cartridge, similar to the .22-250 Rem, but with a more modern, efficient cartridge design. In addition, some PRS/NRL competitors may turn to the .22 Creedmoor because it has less recoil and is flatter-shooting than the 6mm Creedmoor. In addition, .224-caliber match bullets are typically less expensive than heavier 6mm and 6.5mm projectiles. Less recoil, and less cost — what’s not to like?*
Along with load data, this article has specific sections dedicated to: Primers, Rifling Twist Rates, and Reloading Supplies. If you are considering building a .22 Creedmoor, we recommend you download the full Peterson .22 Creedmoor article, which is available in PDF format.
Peterson states, “Since its inception in 2007… the 6.5 Creedmoor has seen some pretty meteoric growth in popularity. That growth continues as of this writing, as the cartridge has now gone mainstream with hunters and shooters alike. As the popularity of the 6.5 Creedmoor has increased, so has the number of wildcat cartridges based off of it. Some of those popular wildcat cartridges are the 6mm Creedmoor, the .25 Creedmoor, and now the .22 Creedmoor. This data sheet will cover the .22 Creedmoor.
To help our customers, and anyone else who shoots .22 Creedmoor, we decided to create this Data Sheet and distribute it. [In this LOAD DATA Document] you will find four (4) common bullets, and four (4) common rifle powders used when handloading the .22 Creedmoor cartridge. We then took the different bullet and powder combinations and loaded them up to the SAAMI Maximum Average Pressure (MAP) for the 6.5 Creedmoor and 6mm Creedmoor cartridges, which is 62,000 PSI. [O]ur goal was to provide a wide spectrum of bullet weights and the powders used with them.
All of the following data was gathered by our ballistician in our indoor ballistics lab located in our factory in Pennsylvania. Although we were able to gather pressure and velocity data in our lab, we have NOT tested these loads for accuracy. Again, these loads are just designed to give shooters information regarding what velocity, a given bullet and powder charge combination, will produce the SAAMI Maximum Average Pressure (MAP) of 62,000 psi.”
Sample 22 Creedmoor LOAD DATA
IMPORTANT — Pressures can vary significantly with different Cartridge Overall Lengths (COAL). In addition, ANY change to ANY load components — primers, bullets, brass, powder — can affect pressure. Always load conservatively. In addition, because of variances in bore dimensions, some barrels may show higher pressures than others. Again, always start with conservative loads, well below MAX pressures.
*Actually there IS a potential downside — reduced barrel life. We expect that a .22 Creedmoor running hot varmint loads would experience shorter useful barrel life compared to a 6.5 Creedmoor. This is based on what we’ve observed with .22-250 and .22-250 Ackley barrels compared to our 6.5 CM barrels.
Do you need to find an FFL for a firearms transfer in your local area? Or perhaps you are selling a gun and need it shipped to an FFL in another city or state. Thankfully, there are two good online resource that can, in a matter of seconds, provide a list of Federal Firearms License holders in the area you need. These web resources will even locate those FFLs on a map AND list the fees they typically charge for transfers.
Sportsman’s Guide FFL Finder
The first resource is the Sportsman’s Guide FFL LOOKUP Page. This online search tool is fast and easy to use. Simply enter a Zip Code and then select a radius (in miles) within which to find FFLs. Here is an example for Billings, Montana with Zip Code 59103. Note that the transfer fees are listed for the first three “In-Network” FFLs. Click on each FFL business name to get more details.
Gunbroker FFL Finder
A good second resource is offered by GunBroker, the online gun trading/auction site. Gunbroker offers a handy online FFL Finder. This resource allows you to quickly find an FFL by zip code or state. Along with the FFL business name, this also lists fees. Click the “Map It” button to see a local map.
Gunbroker states: “Use our FFL Finder to locate FFL dealers in your area. You can search for FFL dealers by your zip code or by state. Use our FFL finder to get in touch with a local FFL dealer in order to complete your firearms purchase, or sign up to be part of our FFL Dealer Network.”
Shown below are the FFL Finder results for Billings, Montana and Zip Code 59103:
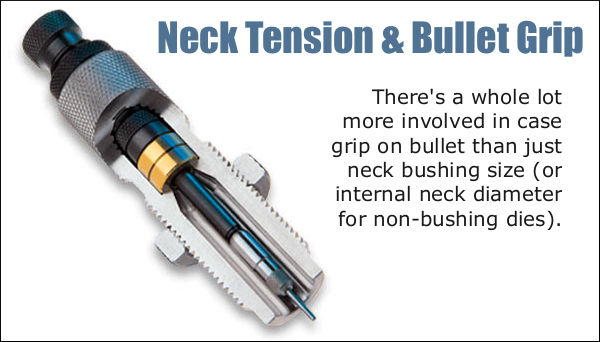
Many novice hand-loaders believe that neck bushing Inside Diameter (ID) size is the only important factor in neck tension. In fact, many different things will influence the grip on your bullet and its ability to release from the case neck. To learn more about neck tension and “case grip”, take the time to read this article carefully. We bet you’ll gain knowledge that will let you load more accurate ammo, with better ES/SD.
Editor: Guys, this is a VERY important article. You really should read it over carefully, twice. Variations in the force required to release a bullet can significantly affect accuracy and ES/SD. You really need to know how the grip on bullet can be altered by many different factors.
Neck Tension (i.e. Grip on Bullets) Is a Complex Phenomenon
While we certainly have considerable control over neck tension by using tighter or looser bushings (with smaller or bigger Inside Diameters), bushing size is only one factor at work. It’s important to understand the multiple factors that can increase or decrease the resistance to bullet release. Think in terms of overall brass-on-bullet “grip” instead of just bushing size (or the internal neck diameter in non-bushing full-length sizing dies).
Bullet grip is affected by many things, such as:
1. Neck-wall thickness.
2. Amount of bullet bearing surface (shank) in the neck.
3. Surface condition inside of neck (residual carbon can act as a lubricant; ultrasonic cleaning makes necks “grabby”).
4. Length of neck (e.g. 6mmBR neck vs. 6mm Dasher).
5. Whether or not the bullets have an anti-friction coating.
6.The springiness of the brass (which is related to degree of work-hardening; number of firings etc.)
7. The bullet jacket material.
8. The outside diameter of the bullet and whether it has a pressure ridge.
9. Time duration between bullet seating and firing (necks can stiffen with time).
10. How often the brass is annealed.
11. Amount (length) of neck sized (e.g. you can size only half the neck).
12. Interior diameter of bushing, or neck section of non-bushing die.
– and there are others…
One needs to understand that bushing size isn’t the beginning and end of neck tension questions, because, even if bushing size is held constant, the amount of bullet “grip” can change dramatically as the condition of your brass changes. Bullet “grip” can also change if you alter your seating depth, and it can even change if you ultrasonically clean your cases.
5-time U.S. National Long-Range Champion John Whidden adds: “Our tests show us that the condition of the necks in regards to lubed or not, carbon inside or not, squeaky clean or not, etc., matter even more than the size of the bushing used. An ultrasonically cleaned or brand new dry case neck make for some quite high seating force.”
In our Shooters’ Forum a reader recently asked: “How much neck tension should I use?” This prompted a Forum discussion in which other Forum members recommended a specific number based on their experience, such as .001″, .002″, or .003″. These numbers, as commonly used, correspond to the difference between case-neck OD after sizing and the neck OD of a loaded round, with bullet in place. In other words, the numbers refer to the nominal amount of interference fit (after sizing).
While these commonly-used “tension numbers” (of .001″, .002″ etc.) can be useful as starting points, neck tension is actually a fairly complex subject. The actual amount of “grip” on the bullet is a function of many factors, of which neck-OD reduction during sizing is just one. Understanding these many factors will help you maintain consistent neck tension as your brass “evolves” over the course of multiple reloadings.
Seating Depth Changes Can Increase or Decrease Grip on Bullet
You can do this simple experiment. Seat a boat-tail bullet in your sized neck with .150″ of bearing surface (shank) in the neck. Now remove the bullet with an impact hammer. Next, take another identical bullet and seat it with .300″ of bearing surface in another sized case (same bushing size/same nominal tension). You’ll find the deeper-seated bullet is gripped much harder.
Neck-Wall Thickness is Important Too
I have also found that thinner necks, particularly the very thin necks used by many PPC shooters, require more sizing to give equivalent “grip”. Again, do your own experiment. Seat a bullet in a case turned to .008″ neckwall thickness and sized down .003″. Now compare that to a case with .014″ neckwall thickness and sized down .0015″. You may find that the bullet in the thin necks actually pulls out easier, though it supposedly has more “neck tension”, if one were to consider bushing size alone.
In practical terms, because thick necks are less elastic than very thin necks, when you turn necks you may need to run tighter bushings to maintain the same amount of actual grip on the bullets (as compared to no-turn brass). Consequently, I suspect the guys using .0015″ “tension” on no-turn brass may be a lot closer to the guys using .003″ “tension” on turned necks than either group may realize.
Toward a Better Definition of Neck Tension
As a convenient short-cut, we tend to describe neck tension by bushing size alone. When a guy says, “I run .002 neck tension”, that normally means he is using a die/bushing that sizes the necks .002″ smaller than a loaded round. Well we know something about his post-sizing neck OD, but do we really have a reliable idea about how much force is required to release his bullets? Maybe not… This use of the term “neck tension” when we are really only describing the amount of neck diameter reduction with a die/bushing is really kind of incomplete.
My point here is that it is overly simplistic to ask, “should I load with .001 tension or .003?” In reality, an .001″ reduction (after springback) on a thick neck might provide MORE “grip” on a deep-seated bullet than an .003″ reduction on a very thin-walled neck holding a bullet with minimal bearing surface in the neck. Bushing ID is something we can easily measure and verify. We use bushing size as a descriptor of neck tension because it is convenient and because the other important factors are hard to quantify. But those factors shouldn’t be ignored if you want to maintain consistent neck tension for optimal accuracy.
Consistency and accuracy — that’s really what this all about isn’t it? We want to find the best neck tension for accuracy, and then maintain that amount of grip-on-bullet over time. To do that you need to look not only at your bushing size, but also at how your brass has changed (work-hardened) with time, and whether other variables (such as the amount of carbon in the neck) have changed. Ultimately, optimal neck tension must be ascertained experimentally. You have to go out and test empirically to see what works, in YOUR rifle, with YOUR bullets and YOUR brass. And you may have to change the nominal tension setting (i.e. bushing size) as your brass work-hardens or IF YOU CHANGE SEATING DEPTHS.
Remember that bushing size alone does not tell us all we need to know about the neck’s true “holding power” on a bullet, or the energy required for bullet release. True bullet grip is a more complicated phenomenon, one that is affected by numerous factors, some of which are very hard to quantify.
Today is Halloween (originally “All Hallows Eve”). With the slow return to post-Pandemic normalcy, there will be trick-or-treating in many locales across the country. U.S. LawShield has provided Halloween safety tips for homeowners and families with kids. These tips are designed to keep kids safe/secure and to help adults supervise the young ones and avoid potential liabilities as homeowners. READ Full Article HERE.
Halloween Safety Tips for Adults (Parents and Homeowners) Drive Carefully – Drive slowly and watch for people crossing the street. Avoid distractions like phones or food so you can be ready to stop quickly. (But it’s best to just avoid driving after dark on Halloween[.]) Clear the Way – Clear your front steps, driveway, and lawn of any potential safety hazards. If any injuries happen on your property, you could be held liable! Leave a Light On – If you leave the house, keep a few visible lights on inside to discourage criminals. However, leave your porch light off to let trick-or-treaters know you aren’t giving out candy! Verify Insurance – Are you turning your home into a neighborhood haunted house? Are you charging admission? Make sure to check your local laws and verify your homeowners insurance coverage! Something like this could be considered a business activity, and accidents or injuries typically are not covered. (You should also verify your self-defense insurance coverage!) Go Flameless – Use electric lights in your jack-o-lanterns and other décor. House fires are one of the more common accidents reported by homeowners on Halloween.
Halloween Safety Tips for Kids Adult Supervision – All children aged 13 and under should be accompanied by an adult when trick-or-treating. Older kids without an adult should be in groups of three or more. Create a Route – Only trick-or-treat in familiar neighborhoods and at houses with porch lights on. Be aware of and avoid the addresses of local sex offenders. Street Smart – Walk only on sidewalks, and cross streets only at crosswalks or corners. Make eye contact with drivers before crossing to help prevent accidents. Take extra caution with costume masks, as they greatly reduce a child’s ability to see their surroundings. High Visibility – Carry glow sticks or flashlights when out after dark, and avoid wearing costumes that are dark-colored or aren’t reflective. Treat Smart – Check your kids’ candy! The CDC Halloween Safety Guide highly recommends throwing away any unwrapped or unsealed pieces.
U.S. LawShield also strongly recommends not having toy guns — even Nerf guns or squirt guns — as part of costumes. At night toy guns can cause confusion, with potential bad reactions.
About U.S. LawShield
Founded in 2009, U.S. LawShield now has 700,000+ members and 6,000+ industry partners. The goals are to help members handle critical, life-threatening situations and prevent potential injustices in the legal system after acts of self-defense. For more information on U.S. LawShield visit USLawshield.com.
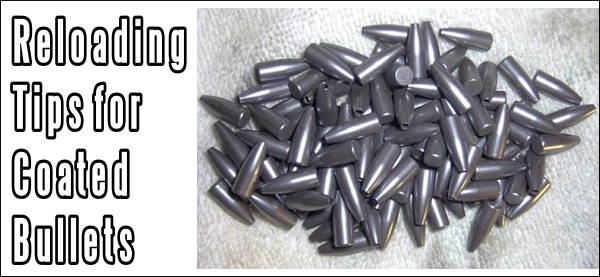
Coating bullets with a friction-reducing compound such as Molybdenum Disulfide (Moly) offers potential benefits, including reduced barrel heat, and being able to shoot longer strings of fire between bore cleanings. One of the effects of reduced friction can be the lessening of internal barrel pressures. This, in turn, means that coated bullets MAY run slower than naked bullets (with charges held equal).
To restore velocities, shooters running coated bullets are inclined to “bump up” the load — but you need to be cautious.
Be Careful When Increasing Loads for Coated Bullets
We caution shooters that when your start out with coated bullets in a “fresh barrel” you should NOT immediately raise the charge weight. It may take a couple dozen coated rounds before the anti-friction coating is distributed through the bore, and you really start to see the reduced pressures. Some guys will automatically add a grain or so to recommended “naked” bullet charge weights when they shoot coated bullets. That’s a risky undertaking.
We recommend that you use “naked” bullet loads for the first dozen coated rounds through a new barrel. Use a chronograph and monitor velocities. It may take up to 30 rounds before you see a reduction in velocity of 30-50 fps that indicates that your anti-friction coating is fully effective.
We have a friend who was recently testing moly-coated 6mm bullets in a 6-6.5×47. Moly had not been used in the barrel before. Our friend had added a grain to his “naked” bullet load, thinking that would compensate for the predicted lower pressures. What he found instead was that his loads were WAY too hot initially. It took 30+ moly-coated rounds through the bore before he saw his velocities drop — a sign that the pressure had lowered due to the moly. For the rounds fired before that point his pressures were too high, and he ended up tossing some expensive Lapua brass into the trash because the primer pockets had expanded excessively.
LESSON: Start low, even with coated bullets. Don’t increase your charge weights (over naked bullet loads) until you have clear evidence of lower pressure and reduced velocity.
Procedure After Barrel Cleaning
If you shoot Moly, and clean the barrel aggressively after a match, you may want to shoot a dozen coated “foulers” before starting your record string. Robert Whitley, who has used Moly in some of his rifles, tells us he liked to have 10-15 coated rounds through the bore before commencing record fire. In a “squeaky-clean” bore, you won’t get the full “benefits” of moly immediately.
To learn more about the properties of dry lubricants for bullets, read our Guide to Coating Bullets. This covers the three most popular bullet coatings: Molybdenum Disulfide (Moly), Tungsten Disulfide (WS2 or ‘Danzac’), and Hexagonal Boron Nitride (HBN). The article discusses the pros and cons of the different bullet coatings and offers step-by-step, illustrated instructions on how to coat your bullets using a tumbler.
Ruger has created a helpful set of online resources for new Firearm owners. The New Firearm Owner Resources site features a Fundamentals of Firearms Ownership Video Series, Industry Resources for local “hands-on” training, as well as information on safe storage. In addition, this online Resource Center offers a full library of product instruction manuals along with suggestions for recommended safety equipment.
There are a variety of informative videos, hosted by Mark Gurney, Ruger Director of Product Management. These short (2 min. on average) videos provide key information for new gun owners. If you have friends or family members who are new gun owners, they should watch these videos.
Introduction for New Firearms Owners
Safety Rules — The FOUR Fundamental Safety Rules
Range Safety Equipment — What You Need
This video reviews essential Eye and Ear Protection for shooters.
Sherri Jo Gallagher, the second woman in history to win the NRA High Power National Championship, sports Eye Protection at Camp Perry. The first lady High Power Champion was Sherri’s mother, Nancy Tompkins.
In response to a Bulletin article about Protective Eyewear, one of our Canadian readers posted a personal story. His account demonstrates the importance of wearing eye protection whenever you shoot — no matter what type of firearm you are using — even air rifles. We hope all our readers take this to heart. All too often at rifle matches we see shooters, even some top competitors, risking their vision by failing to wear eye protection.
Eye and Hearing Protection are now MANDATORY for Highpower Rifle competitors and Pistol shooters in all CMP-affiliated matches. The 2020 CMP Highpower Rifle, Pistol, and CMP Games Rulebooks all contain the following rule: “All competitors and competition officials are required to wear appropriate eye and hearing protection when on shooting range firing lines during highpower rifle or pistol firing. All competitors must comply with this requirement before they can participate in a CMP sponsored or sanctioned competition. Competitors are responsible for selecting their eyewear and hearing protection.”
Eye Protection — Lesson Learned by Nicholas from Canada
As a boy on a mixed farm on the plains the first shooting stick I owned was a Red Ryder BB gun. My Dad bought it for me as I showed a keen interest in the shooting and hunting sports. I was about 9 years old at the time.
We had literally thousands of sparrows in our large farm yard and they liked to roost on the steel railings in the barn loft. I took to slowly thinning out their ranks by flashlight at night as these little winged pests settled in the farm buildings.
One evening as I slayed sparrow after sparrow in the barn loft — with about a dozen farm cats following me to consume these easy meals, I fired at another bird centered in my flashlight beam.
However, my aim was a bit low — and the copper pellet hit the steel beam square on. Instantly I felt a sharp pain as the BB bounced back and hit me squarely between the eyes on the bridge of my nose – drawing blood from the partial penetration into the skin. A half inch either way and I’d have lost an eye!
Never, never, never shoot at any target with a steel background with any firearm, even a BB gun – is the hard lesson I learned, and wear the best shooting glasses that money can buy!
PLEASE REMEMBER THAT!!
Editor’s Comment: Among competitive pistol shooters, the use of safety eyewear is universal. You’ll never see Rob Leatham, Julie Golob, or Jerry Miculek competing without eye protection — for good reason. The handgun sports’ governing bodies effectively enforce mandatory eye protection policies. We wish the same could be said for competitive rifle shooting. We often see benchrest, High Power, and F-Class competitors shooting without eye protection. We’ve heard all the excuses, yet none of them trump the safety considerations involved.
We recommend that all shooters and hunters employ eye protection whenever they use firearms or are at a location where live fire is taking place. You only have two eyes. A tiny bullet fragment or ricochet is all it takes to cause permanent blindness in one or both eyes. As rifle shooters, we place our eyes a couple inches away from a combustion chamber operating at pressures up to 70,000 psi. I know quite a few guys who will religiously put on safety glasses when running a lathe or a drill press, yet the same guys won’t use eye protection when shooting their rifles — simply because it is “inconvenient”. That’s nuts. It doesn’t matter is you are a cub scout or a multi-time National Champion — you should wear eye protection.
I will give you a personal example. A year ago I was shooting a 9mm pistol. One of the cartridges had a primer burst outward blowing small particles, some brass, and a piece of the pistol’s extractor right back into my eyes. Thankfully I was wearing good wrap-around safety glasses. No injuries at all. But without those safety glasses, this could have been very serious. I always wear safety glasses with ALL firearms. Shown below is the same kind of primer blow-out I experienced, but with a .270 Win rifle cartridge.
Be wise — protect your eyes. To learn more about eyewear safety standards, and to learn about the latest options in ANSI Z87-certified protective eyewear, read our article on Eye Protection for Shooters.
Rio 2016 World Cup Photo Courtesy ISSF and Team USA.
Would you like to try position shooting? Here are some tips from one of the best 3P shooters on the planet, Olympian Matt Emmons.
Matt Emmons is one of the USA’s top smallbore rifle competitors in recent decades. Emmons has competed on the U.S. National Team since 1997 and he has represented the USA in various rifle events at four Olympics Games — 2004, 2008, 2012 and 2016. Matt earned multiple Olympic medals: Gold in 2004 in Men’s 50m Prone*; Silver in 2008 in Men’s 50m Prone; and Bronze in 2012 in Men’s 50m 3X40. Although his specialty is Men’s 3-Position rifle, Emmons’ World Championship and Olympic Gold are in Men’s 50m Prone. He usually shoots an Anschütz or Bleiker .22LR rifle, with Eley Tenex ammo.
Here are shooting tips from Matt, courtesy Anschütz. Click image below to launch a large PDF file. Right-click the image and “save as” to download the poster-sized PDF.
Here Matt Shows the Kneeling Position. The other two positions are Standing and Prone.
CLICK Photo to Load Large PDF File
Three Sets of Hardware for Three Positions
You may be surprised to find that Matt often totes three complete sets of rifle parts to important matches — three buttplates, three cheekpieces, and three Centra sights with adjustable irises. Matt told Shooting Sports USA that he travels with “three sets for three positions. Our final is so fast that I need three sets of everything to allow a fast change-over between positions.” Matt carries his gear in an an Anschütz sport bag: “It’s similar to the big Ogio duffels with wheels, but lighter. I’ve worked with AHG/Anschütz for many years and I like their bag because all of my junk fits in it.”
*Emmons’s gold medal at the 2004 Summer Olympics in the prone position came while using a borrowed rifle. In April 2004, just prior to the Olympic Team Trials, Emmons discovered his rifle had been severely sabotaged in the supposedly secure locker room at the United States Olympic Training Center. The precisely tuned barrel and action were heavily damaged by what appeared to be a screwdriver. “I unpacked my gun and I noticed that something wasn’t right,” Emmons said. “Sure enough, somebody had done something to it. I shot it and I couldn’t get the shell out. I said, ‘Something’s wrong here’.” Emmons said it could not have been an accident: “Oh no, no,” Emmons said. “Somebody took a screwdriver and went in.” Emmons went on to the 2004 Summer Olympics, and his gold medal in the prone position event, using his former University of Alaska Fairbanks teammate, Amber Darland’s .22 rifle. He never found out who the saboteur was, but said “I’d like to know so I could shake their hand and say thanks.”
Protect Your Hearing — Wear Protection Whenever You Shoot
Noise induced hearing loss and tinnitus are two of the most common afflictions for recreational shooters and hunters. Everyone knows that gunfire is loud, but very few people understand the repercussions that shooting can have on their hearing until it’s too late.
The better quality suppressors can reduce the noise of a gunshot by 20 to 35 decibels (dB). Good muffs or plugs will reduce sound by 23 to 33 dB. By decreasing the overall sound signature, suppressors help to preserve the hearing of recreational shooters and hunters. Even the most effective suppressors, on the smallest and quietest calibers (.22 LR) reduce the peak sound level of a gunshot to between 110 to 120 dB. To put that in perspective, according to the National Institute for Occupational Safety and Health (NIOSH), that is as loud as a jackhammer (110 dB) or an ambulance siren (120 dB). For normal caliber handguns and rifles, suppressed sound levels routinely exceed 130 dB, just shy of OSHA’s “hearing safe” threshold of 140 dB.
According to Dr. William W. Clark, the current Director of the Washington Univ. School of Medicine’s Audiology/Communication Sciences Program, a “serious threat to hearing comes from recreational hunting or target shooting”. This is in large part due to the fact that many people choose not to use traditional hearing protection devices like earplugs and earmuffs because they want to be able to hear their surroundings. Multiple studies have found that between 70 to 80% of hunters never wear earplugs or earmuffs, and nearly half of all target shooters don’t consistently wear traditional hearing protection. Thus, it should come as no surprise that for every five years of hunting, hunters become seven percent more likely to experience high frequency hearing loss.
This article is based on information from the American Suppressor Association (ASA). Since the ASA’s formation in 2011, three additional states have legalized suppressor ownership and 18 states have legalized suppressor hunting. For more information, visit www.AmericanSuppressorAssociation.com.
The late Bill Myers was recognized as one of greatest rimfire smiths who ever lived. Myers crafted many match-winning, record-setting rimfire benchrest rigs. Here we feature one of Bill’s most interesting creations — a clamping action that allows a rimfire barrel to be indexed (rotated) around the bore axis.
Bill was a creative thinker, and his own exhaustive testing has convinced him that barrel indexing can enhance accuracy in rimfire benchrest guns. Myers did acknowledge that, particularly with a very good barrel, the advantages of indexing may be subtle, and extensive testing may be required. Nonetheless, Myers believed that indexing could improve rimfire accuracy.
Indexing with the Myers’ Clamping Action
To index the barrel, Myers simply loosens the three clamping-bolts and rotates the barrel in the action. Because there is no thread to pull the barrel in or out, the headspace stays the same no matter how much the barrel is rotated. In other words you can rotate the barrel to any position on the clockface and the headspace remains unchanged.
The Challenge of Barrel Indexing With a conventional barrel installation, employing a shoulder with a threaded tenon, it is difficult to index the barrel. Even with a cone breech (photo right) that eliminates the problem of extractor cuts, you’d have to use shims to alter the barrel index position, or otherwise re-set the shoulder each time you screwed the barrel in further.
Clamping Action Allows Barrel to Be Rotated to Any Position
Bill has come up with a masterful solution to barrel indexing. He designed and built his own prototype custom action that clamps the barrel rather than holding it with threads. The front section of the action is sliced lengthways, and then clamped down with three bolts. A special bushing (the gold-color piece in photos) fits between the barrel and the action. By using bushings of different inside diameters, Bill can fit any barrel up to an inch or so diameter, so long as it has a straight contour at the breech end. To mount the barrel, Bill simply places the fitted bushing over the barrel end-shank, then slips the “sleeved” barrel into the front end of the action. Tighten three bolts, and the barrel is secure.


 In our
  Neck-Wall Thickness is Important Too




 In response to a Bulletin article about
 Eye Protection — Lesson Learned
 Editor’s Comment: Among competitive pistol shooters, the use of safety eyewear is universal. You’ll never see Rob Leatham, Julie Golob, or Jerry Miculek competing without eye protection — for good reason. The handgun sports’ governing bodies effectively enforce mandatory eye protection policies. We wish the same could be said for competitive rifle shooting. We often see benchrest, High Power, and F-Class competitors shooting without eye protection. We’ve heard all the excuses, yet none of them trump the safety considerations involved.

 Matt Emmons is one of the USA’s top smallbore rifle competitors in recent decades. Emmons has competed on the U.S. National Team since 1997 and he has represented the USA in various rifle events at four Olympics Games — 2004, 2008, 2012 and 2016. Matt earned multiple Olympic medals: Gold in 2004 in Men’s 50m Prone*; Silver in 2008 in Men’s 50m Prone; and Bronze in 2012 in Men’s 50m 3X40. Although his specialty is Men’s 3-Position rifle, Emmons’ World Championship and Olympic Gold are in Men’s 50m Prone. He usually shoots an Anschütz or Bleiker .22LR rifle, with Eley Tenex ammo.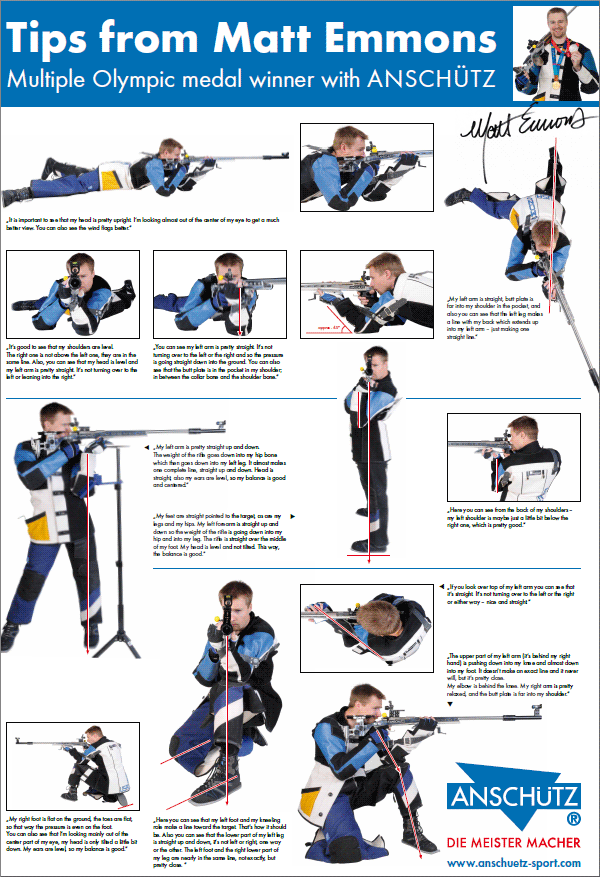


 With a conventional barrel installation, employing a shoulder with a threaded tenon, it is difficult to index the barrel. Even with a cone breech (photo right) that eliminates the problem of extractor cuts, you’d have to use shims to alter the barrel index position, or otherwise re-set the shoulder each time you screwed the barrel in further.


