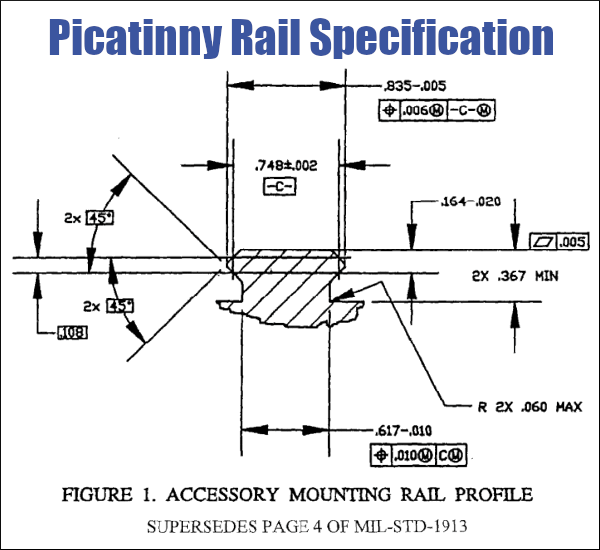
Readers often ask “What’s the difference between a Weaver scope rail and a Picatinny Rail?” The answer is not as simple as it seems. The dimensions of a Picatinny Rail should be consistent (from one rail-maker to another), since there IS a government spec. Conversely, there is some variance in “Weaver-style” rails. The width of the groove is the most important difference between Picatinny Rails and Weaver-type rails. “Mil-spec” Picatinny rails will have a grove width of 0.206″ while Weaver rails typically have a narrower, 0.180″ groove width.
Does your rifle have a Weaver Rail or Picatinny Rail? Check the dimensions to be sure.
Brownell’s has a helpful GunTech™ Article that discusses the Picatinny Rail vs. Weaver Rail. That article explains:
What are the differences between the ‘Picatinny’ and the ‘Weaver’ systems? The profile of the two systems is virtually identical. Depending on the quality of the machining done by the manufacturer, the two systems should be indistinguishable from the profile. The key difference lies in the placement of the recoil grooves and with width of the grooves. MIL-STD-1913 (Picatinny) grooves are .206″ wide and have a center-to-center width of .394”. The placement of these grooves has to be consistent in order for it to be a true Picatinny MIL-STD system. Weaver systems have a .180” width of recoil groove and are not necessarily consistent in a center-to-center measurement from one groove to the next.
In many instances, a Weaver system has a specific application that it is machined for, so interchangeability is not necessarily an issue. A MIL-STD-1913 system must adhere to the specifications listed above in order for it to be considered MIL-STD, since the military desires uniformity in the recoil grooves to allow for different systems to be mounted on the weapon with no concern for compatibility.
Now, what does this mean? Boiled down, it means that accessories designed for a Weaver system will, in most cases, fit on a Picatinny system. The reverse, however, is probably not the case. Due to the larger recoil groove, Picatinny accessories will not fit a Weaver system. There are, of course, exceptions to every rule, but for a good rule-of-thumb, [full-width] Picatinny won’t fit Weaver, but Weaver accessories WILL fit Picatinny.
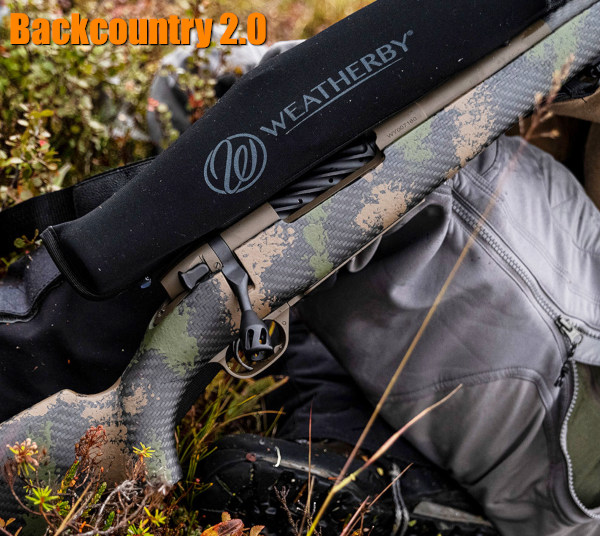
Light is Right — Weatherby’s Backcountry 2.0 rifles weigh as little as 4.7 pounds (before optics).
It’s hunting season now. Here’s a rig that should please backcountry hunters looking for a light-weight but very accurate option. Weatherby’s Backcountry 2.0 carbon-stocked hunting rifles weigh well under 6 pounds before optics. There is even one titanium action model series that weighs just 4.7 pounds. The 2.0 series now offers both standard steel receivers or even lighter titanium receivers. And Backcountry 2.0 Carbon models are equipped with a new carbon fiber stock that is the lightest in the industry — weight a mere 20 ounces for standard actions. For further weight savings, some models feature a tensioned carbon fiber-wrapped barrel. But all that high-tech doesn’t come cheap — MSRP for the titanium action carbon barrel model is $3749.00!
Ultralight Carbon Stock — Weatherby’s new Blacktooth stock features a Carbon Link™ bedding system which engages the recoil lug and distributes recoil throughout the stock without the weight of a traditional aluminum bedding block. This makes the overall stock lighter and stiffer.
Along with the new ultra-light elements, these Weatherbys have premium Mark V features: 54-degree bolt lift for fast cycling, fluted bolts, TriggerTech triggers, and Cerakote finish on metal parts. All the Backcountry 2.0 series rifles have a sub-MOA accuracy guarantee.
Weights for Backcountry 2.0 Models range with chamberings:
Weight Saving Secrets — How Weatherby Achieved Such Light Weights GunsAmerica Digest reports: “A huge amount of the weight savings comes thanks to the updated carbon fiber Blacktooth stock by Peak 44. This stock uses what they call their Rock Solid Carbon Link bedding system which eliminates the need for a metallic bedding block. The Blacktooth stock weighs less than 20 ounces. The Backcountry 2.0 [series adds] both a carbon fiber stock and either fluted #1 MOD-profile or #2 MOD-profile carbon steel barrels or #4 MOD-profile BSF carbon fiber-tensioned barrel to achieve these light weights.” READ GunsAmerica Review.
To mitigate recoil Weatherby developed its new 3DHEX® recoil pad — the gun industry’s first production 3D-printed pad. The 3DHEX’s three-dimensional honeycombed design extends the duration of the recoil pulse — taking away the sharp kick. Weatherby explains: “With the same amount of recoil spread out over a much greater time period, felt recoil is greatly reduced[.]” Backcountry 2.0 rifle recoil is also reduced by factory-fitted Accubrakes, contoured to match barrel profile.
Readers who have just recently discovered the Daily Bulletin may not realize that AccurateShooter.com has hundreds of reference articles in our archives. These authoritative articles are divided into multiple categories, so you can easily view stories by topic (such as competition, tactical, rimfire, optics, shooting skills etc.). One of the most popular categories is our Technical Articles Collection. On a handy index page (with thumbnails for every story), you’ll find over 120 articles covering technical and gunsmithing topics. These articles can help you with major projects (such as stock painting), and they can also help you build more accurate ammo. Here are six popular selections from our Technical Articles archive.
Stress-Free Pillar Bedding. Richard Franklin explains how to do a top-quality bedding job, start to finish.
Gun Safe Buyers Guide. Our comprehensive Safe Buyers Guide examines the key features to consider in a safe — Wall Thickness, Volume, Shelving, Fire Rating, Lighting, Weight and more. We also explain the Pros/Cons of Dial vs. Digital (Keypad) locking systems.
Savage Action Tuning. Top F-TR shooter Stan Pate explains how to enhance the performance of your Savage rifle by optimizing the torque settings of the action screws.
Complete Precision Case Prep. Jake Gottfredson covers the complete case prep process, including brass weight sorting, case trimming, primer pocket uniforming, neck-sizing, and, case-neck turning.
Stock Painting Instructions. Step-by-step guide for stock painting by expert Mike Ricklefs. Mike shows both simple coverage and fancy effects.
Ultrasonic Case Cleaning. This article reviews the recommended process for cleaning cartridge brass with ultrasonic cleaning machine. We cover the right liquid solutions, processing times, and case drying options.
Are laser sights really useful on a handgun? Yes, and not just in low-light situations. That said, many folks who own laser-equipped handguns do not train effectively with the laser. For many gun-owners, the laser is just a toy, a gimmick that is used a few times and then ignored. Those gun-owners miss out on some of the most important advantages of a laser sights, benefits you can get from formal training with your laser-equipped pistol.
Crimson Trace has produced a series of TRAINING Videos that may change your mind about lasers. If you shoot a handgun you should watch these videos. They show how laser sights can help diagnose and correct common handgun-shooting errors (such as flinching and anticipating the shot). The videos also show how to improve sight alignment and get your sights on target quickly.
Training with Laser Sights, Full 12-minute Video
Covers Muzzle Awareness, Sight Alignment, Target Acquisition, Trigger Control
This video shows how training with laser sights can: 1) improve muzzle direction awareness; 2) aid with sight alignment; 3) speed up target acquisition; and 4) improve trigger control. The video also demonstrates the obvious advantage of laser sights in low light conditions. Numerous firearms experts are featured in this video filmed at Arizona’s Gunsight Academy.
Training With Lasers — Trigger Control
Training with laser sights helps diagnose and improve trigger control errors by showcasing the importance of “surprise break” and follow-through. Lasers quickly diagnose errors such as recoil anticipation, jerking the trigger, and breaking the wrist.
Training with Lasers — Sight Alignment
Training with laser sights can improve/correct alignment. The laser provides a visual indicator of proper sight alignment, allowing shooters to quickly see any errors before taking a shot. Additionally, lasers can enhance sight alignment on popular sub-compact carry guns with small, low-profile sights.
Muzzle Awareness — All-Important for Safe Shooting
Training with laser sights improves a shooter’s muzzle awareness. A daylight-visible laser shows the gun operator where his or her muzzle is pointing at all times. This helps teach proper safety practices.
A Canadian F-Class shooter (who shall remain nameless) was surprised when he saw this “flat-line” target displayed from a ShotMarker system. That’s 30 shots with almost no vertical at all. So what gives? The ShotMarker uses acoustic sensors to plot shot location. It is normally accurate to within a few millimeters. The shooter posted: “I’ve never had this happen before with a waterline. This is myself and another shooter, 30 rounds total, including four sighters at 900 meters in super strong winds that twitched back and forth every minute.”
So what happened? It turns our that the system’s wires were not connected correctly. AccurateShooter IT expert (and top F-Class Shooter) Jay Christopherson posted: “The wires are connected incorrectly… you’ve got the sensors crossed”. This ShotMarker system error can be diagnosed by doing a “tap test” as explained by Cal Waldner: “Thats a crossed sensor wire! That’s why a tap test needs to be done every time you rig the equipment. If a wire is crossed then you will catch it on the tap test.”
Other folks who viewed this target photo on Facebook said that they have seen a similar problem, so this is NOT an uncommon fault:
“Yup, my club had the same issue (and results) in an early outing with one of our ShotMarker units. The system reads the target area as a horizontal rectangle not as a square.” — Laurie Holland.
“I have seen this exact same result with the sensors plugged incorrectly.” — Dino Christopoulos
“This happened to several people at one match early on. Sensors crossed.” — Jen Bondurant
“I thought I was shooting a great waterline once [but the] wires were crossed — [a mistake from] setting up in the dark.”– Jerry Stephenson
The ShotMarker System — Technology and Performance
The ShotMarker was invented by Adam McDonald, a brilliant young Canadian who also created the AutoTrickler. The ShotMarker is an advanced system for plotting shot impacts on targets using acoustic sensors placed in the four corners of the target frame. The central Sensor Hub at each target transmits to the Access Point at the firing line using LoRa, a low frequency RF protocol. Unlike Wifi, this power-efficient design works at over 2 miles and provides hassle-free connectivity even without direct line of sight.
The sensor unit in each corner of your frame contains two precision MEMS ultrasonic microphones which are capable of measuring a supersonic bullet within 1mm – when the frame is perfectly still.
Real-world accuracy will be limited by motion of the sensors and the air while shots are being detected. Typically, every shot will be reported within a few millimeters, with ideal performance being realized on a stable frame in calm conditions.
“The pessimist complains about the wind; the optimist expects it to change; the realist adjusts the sails.” — William Arthur Ward
Readers often ask us: “Is there a decent, easy-to-comprehend book that can help my wind-reading?” Many of our Forum members have recommended The Wind Book for Rifle Shooters by Linda Miller and Keith Cunningham.
New Edition Released in May 2020
A NEW hardback edition of The Wind Book for Rifle Shooters was released a year ago in May 2020. This 144-page book, first published in 2007, is a great resource. But you don’t have to take our word for it. If you click this link, you can read book excerpts and decide for yourself. When the Amazon page opens, click the book cover photo (labeled “Look Inside”) and another screen will appear. This lets you preview chapters from the first edition, and view some illustrations. Along with the new hardback edition ($17.96), Amazon offers a Kindle (eBook) edition for $14.99.
Other books cover wind reading in a broader discussion of ballistics or long-range shooting, such as Applied Ballistics for Long-Range Shooting by Bryan Litz. But the Miller & Cunningham book is ALL about wind reading from cover to cover, and that is its strength. The book focuses on real world skills that can help you accurately gauge wind angle, wind velocity, and wind cycles.
All other factors being equal, it is your ability to read the wind that will make the most difference in your shooting accuracy. The better you understand the behavior of the wind, the better you will understand the behavior of your bullet. — The Wind Book for Rifle Shooters
The Wind Book for Rifle Shooters covers techniques and tactics used by expert wind-readers. There are numerous charts and illustrations. The authors show you how to put together a simple wind-reading “toolbox” for calculating wind speed, direction, deflection and drift. Then they explain how to use these tools to read flags and mirage, record and interpret your observations, and time your shots to compensate for wind.
I believe this is a must-have book if you are a long-range sport shooter. I compete in F-Class Open and when I first purchased this book and read it from cover to cover, it helped me understand wind reading and making accurate scope corrections. Buy this book, read it, put into practice what it tells you, you will not be disappointed. — P. Janzso
If you have one book for wind reading, this should be it. Whether you’re a novice or experienced wind shooter this book has something for you. It covers how to get wind speed and direction from flags, mirage, and natural phenomenon. In my opinion this is the best book for learning to read wind speed and direction. — Muddler
What is Parallax?
Parallax is the apparent movement of the scope’s reticle (cross-hairs) in relation to the target as the shooter moves his eye across the exit pupil of the riflescope. This is caused by the target and the reticle being located in different focal planes.
Why is it Important?
The greater the distance to the target and magnification of the optic, the greater the parallax error becomes. Especially at longer distances, significant sighting error can result if parallax is not removed.
How to Remove Parallax
This Nightforce Tech Tip video quickly shows how to remove parallax on your riflescope.
While keeping the rifle still and looking through the riflescope, a slight nod of the head up and down will quickly determine if parallax is present. To remove parallax, start with the adjustment mechanism on infinity and rotate until the reticle remains stationary in relation to the target regardless of head movement. If parallax has been eliminated, the reticle will remain stationary in relation to the target regardless of eye placement behind the optic.
To shoot tight groups and high scores from the bench, or in prone F-Open competition, a quality front rest is essential. And a good rest is also very valuable when zeroing rifles, testing loads, and shooting varmints from a portable bench. Today’s Saturday video showcase includes multiple video reviews of some of the best front rests on the market — great products from SEB, Rodzilla, 21st Century, Lenzi, and Sinclair Int’l. In addition, the lead-off video from F-Class John covers some of the less expensive rests as well as SEB Joy-Pod coaxial bipods.
Review of Many Popular Front Rests from $250 to $2200
If you are shopping for a front rest, definitely watch this comprehensive 42-minute video from start to finish. This is probably the most informative video about premium shooting rests available on YouTube. Top F-Class shooter and video-maker F-Class John covers a wide selection of front rests, with some observations about coaxial bipods as well. John covers the impressive new SEB NEO-X, the easy-to-transport SEB Mini-X, the excellent Rodzilla Rest, the innovative 21st Century Hybrid Rest, the sleek Italian Lenzi Rest. And at the end of the video John reviews the very affordable Caldwell Fire Control Rest ($249.99 on Amazon), explaining how it can be a decent choice for shooters on a limited budget.
NEW SEB NEO-X — Set-Up in the Field
Still in its final prototype stage, the innovative SEB NEO-X raises the bar for transportable coaxial front rests. An innovative design with hinged legs allows the 20-lb NEO-X to be transported in a small case. Once the legs are extended however, the NEO-X has proven to be very stable. And this new coaxial rest offers very precise, easy-to-use controls. A swivel head speeds up deployment, as the allows you to quickly align the rest top to the target. Users have confirmed the NEO-X works great and is very stable. In the video above ace F-Class shooter Erik Cortina (below) shows how to quickly deploy the NEO-X in the field.
Rodzilla T-Rex — High Quality, Big Footprint, Advanced Features
The impressive Rodzilla T-Rex front rest offers outstanding stability with smooth, precise performance. Designer/builder Rod Brakhage (the Rod in Rodzilla) started from the ground up to create a user-friendly, match-ready, modular front rest on the market. The T-Rex weighs just over 21 pounds, and the T-Rex has a large footprint, rivaling the largest rests on the market. That provides exceptional stability, even with heavy-recoiling rifles.
The T-Rex boasts an adjustable joystick that extends from 15.5″ to 21″ in length. With this adjustability, no matter what your stock length or design, you can find a comfortable position without having to stretch uncomfortably. Rodzilla delivers the T-Rex in a custom-designed hard carry case that fits it perfectly and still has room for additional feet and accessories. The T-Rex can be ordered with excellent Sand Feet.
21st Century Hybrid-X Front Rest
Lateral Control Arm, Vertical Elevation Knob
The innovative 21st Century Hybrid-X front rest offers the “best of both worlds”. It allows precise lateral movement (for wind holds) with no elevation change. The entire center section of the rest rotates as one unit for fast, perfect horizontal alignment to target. Then adjust vertical precisely with the rotary knob on the outboard end of the control rod. Our Daily Bulletin Hybrid-X article has a full description with multiple photos of this unique rest. See additional Hybrid-X Video.
Sinclair Int’l Competition Front Rest — Sturdy and Stable Design
The Sinclair Int’l Competition Rest is a classic heavy and very stable rest that works great on the bench. Weighing 30+ pounds, with a 1″-thick steel base, this rest has a very low center of gravity and is ultra-stable. Currently priced at $699.99, the Sinclair Competition Rest is less than half the cost of the more exotic front rests.
Horizontal (windage) movement is controlled with a large rear knob which uses dual sets of twin tapered roller bearings for a non-binding windage operation. Nearly four feet of windage adjustment is offered at 100 yards. Elevation changes are made with the large wheel. With its mass and low COG, this Sinclair Rest is very stable. And because of its ability to hold elevation shot to shot, this rest has been popular with long-range benchrest competitors who often shoot quick strings of 5 or 10 shots.
SEB Mini-X and SEB Mini — Transportable Joystick Tripod Rests
The original SEB Mini was an innovative collapsible tripod rest with a coaxial top. On its introduction the SEB Mini became immediately popular with varminters, F-TR shooters, and anyone who wanted an affordable, easy-to-transport front rest that offered easy, precise and rapid adjustment of windage and elevation with the Joystick. Building on the success of the original SEB Mini, the new SEB Mini-X offers an improved head design, and new adjustable “ankle” units on all three legs. This makes it easier to level the Mini-X on uneven ground. The Mini-X has proven very successful in competition, winning major F-Open matches. Folding into a very compact package, it is easy to transport in airline luggage. Yet it offers a very stable shooting platform with precise, effortless joystick control of elevation and windage.
Laminated wood stocks offer an excellent combination of price and performance, and they can be obtained in a myriad of styles to suit your discipline — hunting, benchrest, tactical, silhouette, or high power. Laminated stocks can be a little trickier to finish compared to a hardwood such as walnut, as laminates are often delivered in bright or highly contrasting colors. Traditional wood finishes can alter the colors. Also, filling the pores in laminated stocks is an issue.
Automotive clear-coat products have become popular for finishing laminated wood stocks because they won’t alter the stock’s colors, and the clear-coat provides a durable weather-resistant finish. Clear-coat is also easy to “touch up” and it fills pores better than some other alternatives. Mike Ricklefs has written a comprehensive article on stock painting that includes a special section on clear-coating over laminated woods. If you want to clear-coat a stock, Mike’s article is a must-read!
1. When finishing laminated stocks with clear-coat, you need to prepare the wood carefully, and build up quite a few thin layers one at a time. Begin by sanding, with progressively finer paper, all the way to 400 grit. Certain laminated stocks are so rough when they come from the stock-maker, that you may have to be very aggressive at first. But be careful with angles and the edges of flats. You don’t want to round these off as you sand.
2. After sanding, use compressed air to blow out all dust from the pores of the wood. This is very important to avoid a “muddy” looking finish. If you don’t blow the dust out with air before spraying the clear it will migrate out as you apply the clear. Also, after each sanding session, clean your painting area to remove excess dust. I also wet down the floor of my spray booth to keep the dust down.
3. Some painters recommended using a filler to close the pores. That’s one technique, but the filler can detract from the clarity of the final finish. Rather than use a pore-filling sealer, I use a high solids or “build” clear for the initial applications. This is slightly thicker than “finish” clear and does a good job of sealing the pores. Three (3) fairly heavy coats of “build” clear are applied. If you get a thick spot or a run in the finish at this point, it is not the end of the world but this does create more sanding work.”
There is a helpful thread in our Shooters’ Forum that discusses the use of clear-coating on laminated stocks. Member BHoges offered this advice: “Stick with Diamont, Glassurit, and Spies. If anyone has questions, I painted cars for a long time.”
Forum member Preacher, whose bolt-action pistol is shown at right, states: “I buy my two-part clear-coat from the local NAPA dealer. They recommended Crossfire mixed 4:1. I really like the end results. There are six coats on that stock that were sanded down to bare wood for the first two, and then 600 wet-sanded for the other four coats. Two to three coats would be sufficient if the pores were filled first, but I would rather fill ‘em with the clear as it seems to make it appear deeper and I have the time to devote to it. I have PPG’s Deltron DC 3000 clear-coat on a few stocks of mine, but I like the NAPA better price wise, and it seems to hold up just as good as the Deltron.”
We know some guys who make their own stocks, and others who do their own chambering. But consider this, Robert Carnell of Australia built his own state-of-the-art, water-cooled, tension-barrel Rail Gun, even including the action. That’s right, Robert designed and crafted his own precision action. This has got to be the ultimate home gunsmithing, do-it-yourself (DIY) project.
Carnell is an accomplished benchrest shooter and past Australian Sporter Class Champion. In 1993 he won a Silver Medal at the World Championships. But Carnell is far more than an ace trigger-puller. Robert is a skilled and creative “home gunsmith” who has crafted his own custom action and built his own railguns from scratch. Robert also runs the Austrialian Benchrest Bulletin website.
Home-Built Rail Gun — Aussie Innovation
Below are photos of one of Rob Carnell’s most amazing builds. This liquid-cooled, tension-barrel rail gun is a great example of self-reliant Aussie engineering. The barrel runs inside a coolent-filled, large-diameter sleeve, much like an old water-cooled machine gun. This is the fourth rail gun that Rob built, and the second fitted with a tensioned barrel.
Robert explains: “My railgun design has a 1.75″ barrel under tension inside an aluminium tube filled with radiator coolant. There is nearly a gallon of coolant, and the barrel stays cool no matter how many shots I seem to fire, or how quickly they are shot. The brass nut on the front rides on a nylon bearing and can be tightened to get the best accuracy. I am a believer in the ‘tuner’ idea and this seems to work for me. The main tube is thick-walled aluminium 600mm (24″) long. There is a flange at both ends. The flange at the back fits onto the barrel before the action is screwed on. The front flange is a press-fit into the tube, then there is a brass nut that fits over the barrel and screws against a nylon washer on the front flange. The Railgun’s base is aluminium and has the standard adjustments — windage, elevation and a sighter cam. In addition, there is a 1/10 thou dial indicator for windage. This allows me to zero the indicator and shoot my group. If I need to add a bit of windage for a condition, I can quickly get back to the original position if my condition comes back.”
Home-Built Action Uses Rem Bolt
Rob’s rail gun uses his own home-made stainless action, which features Panda-spec threads and a modified Remington 700 aftermarket bolt. Not bad for a do-it-yourself project we’d say! CLICK HERE to read how Rob designed and built the action.









 The
The 

 Forum member Preacher, whose bolt-action pistol is shown at right, states: “I buy my two-part clear-coat from the local NAPA dealer. They recommended Crossfire mixed 4:1. I really like the end results. There are six coats on that stock that were sanded down to bare wood for the first two, and then 600 wet-sanded for the other four coats. Two to three coats would be sufficient if the pores were filled first, but I would rather fill ‘em with the clear as it seems to make it appear deeper and I have the time to devote to it. I have PPG’s Deltron DC 3000 clear-coat on a few stocks of mine, but I like the NAPA better price wise, and it seems to hold up just as good as the Deltron.”


