Small patches are not very efficient at distributing bore cleaning liquids inside your bore. The problem with a tight-fitting patch is that the solvent gets squeezed off in the first few inches. You can switch to a smaller jag, or a bore mop, but there is an even better way to get an ample amount of solvent in your bore. Just spray directly into the bore with a wash bottle, an inexpensive plastic bottle with an L-shaped dispensing neck, tapered at the end.
When using the wash bottle, you can either just plug the breech and spray from the muzzle end (where most copper fouling is), or, alternately, put the wash bottle neck directly in the chamber and spray forward. When spraying from the chamber forward, you may need to use a rubber O-Ring to seal off the action… depending on the bore size and the particular wash bottle’s neck spout diameter. We prefer to plug the breech and squirt from the muzzle.
Bottle Solvent Application Great for Smaller Bores
Using wet patches or wet brushes is an inefficient way to really saturate the tight bores of 17s, 20s, and 22s. Even with a cotton bore mop, most of the solvent will be squeezed out before it gets to the end of the bore, where most copper fouling occurs. For these smaller 17, 20, and 22-caliber bores, you can just take the wash bottle and stick the tapered nozzle right in the chamber. The tapered end will press fit in the throat, sealing off the chamber. With the barrel slightly nose-down, give the bottle a couple good squirts until the solvent mists out the muzzle. In just a few seconds, this will put more solvent in the bore than a half-dozen wet patches.
A solvent-filled wash bottle is also handy for wetting your brushes. It’s much easier to saturate a bore brush (without spilling solvent on your stock), by using the wash bottle. You can get wash bottles from USPlastic.com, Amazon.com, or lab supply stores.
Hey guys, you’ll probably want to download this Powder Burn Rate Chart issued by Hodgdon/IMR. This table includes the latest IMR powders including the Enduron series (IMR 4166, 4451, 4955, 7977), shown in green below. Please note, the chart is not limited to Hodgdon and IMR propellants. This table also includes popular powders from Accurate, Alliant, Norma, Ramshot (Western), Vihtavuori, and Winchester. There are a total of 163 powders listed in the chart.
This chart provides useful information for all hand-loaders. When doing load development, and testing one powder versus another, it’s generally wise to choose propellants that share the same relative burn rate, as least for starters. While this chart contains “Nov. 2019″ in the title, this is the most recent chart available from Hodgdon/IMR. It is the chart currently linked on the Hodgdon.com Reference Data Center.
NOTE: Hodgdon powders are shown in blue, IMR standard powders are shown in yellow, IMR Enduron powders are shown in green, and Winchester powder are shown in red. DOWNLOAD Chart HERE.
Burn Rate Chart from LoadData.com with 197 Powders
The LoadData.com website has released its own burn rate chart, which is even more comprehensive than the official Hodgdon/IMR chart. We recommend starting with the Hodgdon/IMR listings, but if you can’t find a particular powder on the Hodgdon/IMR chart above, then consult the alternative from LoadData.com which lists 197 powders.
We also caution that, with any powder, start conservatively, at the low end of official load recommendations. Be aware that, even within the same burn range a ball powder can behave differently than an extruded powder. And some powders are much more temperature sensitive than others. Among the available powders on the market, some of best in terms of temp stability are the Alliant TS (temp stable) series, and the popular Hodgdon powders, such as H4350, made by ADI in Australia.
For decades, Shooting USA has been a leading video resource for the shooting sports and hunting. This popular cable TV show covers shooting matches, and provides expert information on precision shooting, gun maintenance, optics, and defensive firearms use. Here are five interesting videos all worth watching. Learn about wind-reading, gun maintenance, and optics.
1. Reading the Wind — SGT Sherri Jo Gallagher of USAMU
Sergeant Sherri Jo Gallagher formerly of the U.S. Army Marksmanship Unit (USAMU) shows us how to read the wind in given conditions, and how to apply your wind assessment when aiming down-range. During her time with the USAMU, Sherri won the National High Power Championship, and was the first woman in history to earn the U.S. Army “Soldier of the Year” honors. Sherri comes from a legendary family of shooters — she was raised by Ace Marksman Mid Tompkins and mother Nancy Tompkins, the first female to win the NRA National High Power Championship.
2. Field-Stripping and Cleaning AR-Platform Rifles
Let’s face it — Black Rifles run dirty. On AR-platform rifles, the gas system blows carbon and powder residues back into the action and bolt carrier group. Accordingly, you need to clean ARs early and often, and you should fully disassemble the bolt carrier to access parts and recesses which accumulate greasy lube and hard carbon. This helpful video shows how to field-strip and clean AR-platform rifles. If you own an AR, this is definitely worth viewing. With over 2.7 million views, this is the second most-watched video on Shooting USA’s YouTube Channel.
2. MOA Defined — Jim Scoutten Explains Minute of Angle
Minute of Angle (MOA) — this is the most common measurement of group size, and hence rifle accuracy. You hear about shooters hoping to shoot 1 MOA or “half-MOA”, but many folks could not give you a precise definition. In fact MOA is an angular measurement that equates to one-sixtieth of one degree of Arc. In this video, host John Scoutten defines MOA. He then demonstrates how MOA translates to accuracy on target. He demonstrates one-half-MOA accuracy with a Les Baer Custom rifle. This company offers a three-shot, half-MOA guarantee for its rifles.
4. How to Adjust for Parallax
Most precision rifle scopes have parallax adjustment, typically a knob on the left side of the scope. but what exactly is “Parallax” and why do you need to adjust optics to ensure the parallax setting is optimal? In this Shooting USA video, John Paul of JP Rifles defines parallax and explains why you need to set parallax correctly for the distance to your target. The video then shows how to adjust parallax correctly, a process which should start with the scope’s ocular focus.
5. How to Mount a Riflescope
When mounting a scope you want to use quality rings, and ensure that the scope is leveled properly. In addition, you need to adjust the fore/aft position of the scope so that eye relief is correct. Ideal scope position may be different when shooting from the bench vs. shooting prone. In this Shooting USA video John Paul of JP Rifles reviews scope mounting basics.
Creedmoor Sports is a leading vendor of products for competitive shooters and serious hand-loaders. Along with great gear, Creedmoor Sports provides informative content for its customers. The Creedmoor InfoZone provides Reloading Tips, Gear Reviews, Shooting News, and basic gunsmithing information.
Bill Gravatt, President of Creedmoor Sports, is an expert on reloading processes and gear. He developed many of the popular tools marketed by Sinclair Int’l, and he brings that expertise to Creedmoor Sports. Bill hosts a series of “how-to” videos produced for the Creedmoor InfoZone.
In this video, Bill Gravatt demonstrates several methods to clean your cases. Bill tells us: “Powder residue should be removed before you insert your cases into your reloading dies. There are several ways to clean your cases. Many shooters use a combination of various methods…”
1. Manual Cleaning — You can use 0000 Steel wool for the outside of the case and a Case Neck brush for the inside. A paper towel can remove any remaining residue. This is a handy way to clean if you load at the range.
2. Vibratory Tumbling — This traditional method works well, particularly for pistol brass. Experiment with both Corn Cob and Walnut media. You can get a brighter shine by putting a small amount of liquid brass polish in the media.
3. Wet Tumbling with Stainless Media — This process can get your brass clean inside and out. Do check to ensure no pins are stuck in the flash-holes. Watch for peening of case mouths that can occur over time.
4. Ultrasonic Cleaning — Ultrasonic cleaning works great for small parts as well as brass. The ultrasonic process removes all carbon and traces of lube, which can leave the inside of case necks too dry. To smooth bullet seating, try putting a tablespoon of Ballistol in the cleaning solution.
Cleaning Reloading Dies
Cleaning your reloading dies is something that many hand-loaders neglect. In this 60-second Tech Tip, Bill Gravatt provides some smart advice on cleaning your dies. Bill notes: “After heavy use, case lube and carbon can build up in your reloading dies. It’s important to keep them clean. Also, with new dies, give them a good cleaning before first use, because they ship with a corrosion inhibitor.”
1. Step 1 — Prior to cleaning, disassemble the die and spray it with a good degreaser. Do this with brand new dies too.
2. Step 2 – Take a patch and run it in the die to remove old lube and gunk. Don’t forget the decapping assembly and other internal parts.
3. Step 3 — After cleaning the die, but before reassembly, spray the die with a good corrosion inhibitor, such as Corrosion-X or Starrett M1.
“Science tells us that exposure to continuous noise of 85 dB for eight hours is enough to cause permanent hearing loss, and worse, spikes of 130 dB and more can result in permanent hearing damage instantly.” Source: NRA Blog.
The Risk of Hearing Loss
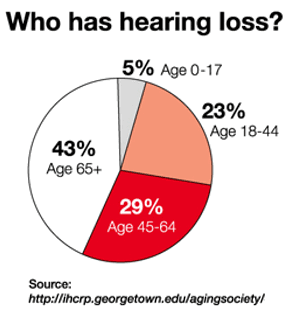
Hearing loss can be progressive and irreversible. If you are a shooter, this is serious business. As the NRA Blog cautions: “You may not even realize you’re harming your hearing. Hearing loss occurs gradually, and can go effectively unnoticed until symptoms become severe. By then, the damage is done.”Effective hearing protection is a must whenever you are shooting firearms or when you are in the vicinity of gun-shots. For ultimate protection, we recommend a good set of tapered foam earplugs, topped by ear-muffs. However, there are situations when you may prefer lighter-weight hearing protection that can be quickly removed. For example, if you are standing well behind the firing line as an observer, or if you are working as a rangemaster or waddie some distance away from the shooters.”
Sound Levels for Common Noises:
9mm Luger pistol: 160 dB
Jet aircraft engine (near): 140 dB
.22 LR pistol: 134 dB
Normal human pain threshold: 120 dB
Noisy Nightclub: 110 db
Riding Motorcycle at 65 mph: 103 db
Power Lawnmower: 95 dB
Hearing damage possible: 85 dB (sustained for 8+ hours)
Ringing Telephone: 80 dB
Normal conversation: 60 dB
What about suppressors? If you use a suppressor is it OK to dispense with hearing protection? Not really. Even the most effective suppressors, on the smallest and quietest calibers (.22 LR), reduce the peak sound level of a gunshot to between 110 to 120 dB. To put that in perspective, according to the National Institute for Occupational Safety and Health (NIOSH), that is as loud as a jackhammer (110 dB) or an ambulance siren (120 dB). For normal caliber handguns and rifles, suppressed sound levels routinely exceed 130 dB, just shy of OSHA’s “hearing safe” threshold of 140 dB. Accordingly, we recommend use of hearing protection even when shooting suppressed.
Compact, Low-Profile NRR 27 dB-Rated Ear Muffs
Many hunters and competitive shooters prefer low-profile ear muffs. As these typically have a lower Noise Reduction Rating, perhaps NRR 22-27, we recommend running earplugs under muffs. If you use low-profile electronic muffs, such as Howard Leight Impact Sport Muffs, you should still be able to hear range commands even with plugs underneath.
Another good option for hunters and range visitors are hearing bands, basically earplugs connected with a semi-rigid plastic band. These banded products provide “quick access” hearing protection for hunters. You can keep them handy around the neck while spotting game, and then insert the plugs before shooting.
Howard Leight MAX NRR 33 Earplugs, Just $9.40 for 20 Pairs
20 Pairs
50 Pairs
These Howard Leight NRR 33 Max-1 Plugs are your Editor’s favorite foam earplugs. Between shooting, motorcycling and mowing lawns, I probably have Howard Leight foam plugs in my ears 3-4 days a week. They are comfortable and the flared outer edge helps the NRR. There is also a Max-30 corded version, with the same excellent 33 dB Noise Reduction Rating. Get five pairs of Max-30 Corded Plugs for $6.80 on Amazon, or 25 pairs of Max-30s for $14.50.
Note, if you prefer thin, light-weight earmuffs, we recommend running earplugs underneath for double protection while shooting firearms (or when you’re on the firing line). Sound experts tell us that running plugs and muffs together can effectively improve your effective noise reduction by 4-7 dB NRR.
Gun safety is not just about safe firearms handling and safe shooting. Your guns need to be safe and SECURE during the 95+% of the time they are NOT in use. This article offers a helpful Firearm Storage and Safety Assessment Quiz. This walks gun owners through questions related to safe handling and storage of firearms. Here is Part One of the Quiz. If you click on this part, you can complete the entire Quiz and see how you score.
Many of our readers have been interested in learning how modern bullets are made. While a “boutique” bullet-maker, supplied with appropriate cores and jackets, can craft bullets using relatively simple hand dies and manual presses, factory production is different. The major bullet-makers, such as Barnes, employ huge, complex machines to craft their projectiles on an assembly line.
Modern hunting bullets are made with a variety of sophisticated (and expensive) machines, such as Computer Numerical Control (CNC) lathes, giant multi-stage presses, and hydraulic extruding machines that draw lead ingots into lead wire. Barnes offers an “inside look” at the bullet production process in a series of videos filmed at its Mona, UT factory. We’ve embedded four videos from the series here. These videos can also be viewed on the Barnes Bullets YouTube Channel.
Milling Slots in TSX All-Copper Bullet
This video shows how the slots (between the drive bands) in the TSX all-copper bullet are cut. The slots reduce the bearing surface that contacts the rifling. This helps reduce friction and heat, extending the life of barrels used with all-metal, drive-band bullets:
Varminator Bullets Produced in Jumbo Transfer Press
Here is the transfer press used in the production of Varminator and MPG Bullets. The process begins with a giant spool of flat copper material. The copper is stamped into jackets and eventually the formed Varminator bullets are ejected one by one into a bucket.
CNC Lathe Turns Bullets Automatically
In the video below, a Bar-Feed CNC crafts mono-bloc bullets from metal bar stock. Barnes uses a small CNC lathe to turn .50-caliber bullets from brass bar stock. We’re not sure which bullet is being made in this video. The material looks to be sintered metal. In the close-ups you can gold-colored shavings from when the machine was previously used for CNC-turned brass bullets.
Accuracy Testing in 100-yard Tunnel
Barnes regularly tests bullet samples for accuracy. In the video below, a Barnes technician loads sample rounds and tests them for accuracy in a 100-yard tunnel. The rounds are shot through a special fixture — basically a barreled action connected to parallel rods on either side. This allows the testing fixture to slide straight back on recoil (see it move back at 1:07-08 minute mark).
Upside-Down Trigger — Application for Unlimited Benchrest Competition?
Note how the tester actuates the trigger, which points UPWARDS, just the opposite of a normal rifle. The technician lightly taps the upward-pointing trigger shoe with a metal rod. Could this upside-down trigger work in benchrest shooting — perhaps with railguns? It could make for an interesting experiment.
Story suggestion by EdLongrange. We welcome reader submissions.
Are you a do-it-yourself kind of guy with a creative eye? Then you’ll love the FREE Target Generator from the folks at ShooterShed.com. This free, interactive webpage allows you to design a variety of fun targets, including grids, benchrest-type Score Shooting targets, sight-in targets, and even playing card targets. Choose the paper size and orientation (vertical or horizontal), then select the number of target elements on the page. For example, you could have four (4) bulls or 52 playing cards. Then click the Style TAB to choose your target style. Use the OPTIONS TAB to overlay a grid on the target, choose squares or diamonds, or include load information blocks. For bullseye targets, you can control the number, color, and spacing (diameter) of the rings. LINK to TARGET GENERATOR.
Click the TARGET STYLE TAB to select one of many target styles, including NBRSA Benchrest targets and 20+ types of NRA bullseye targets, scaled to distance:
Benchrest
Bullseye
Shapes
NRA High Power
NRA Pistol
NRA Rimfire
Images
Playing Cards
Load Test Blocks
Creating new targets is fast and easy. No computer graphics skills required! We created this green diamonds grid target in just five minutes using the ShooterShed Target Generator:
And here is a handy target with short-range range Benchrest competition-style box/circle aiming points, along with fields for entry of gun/load data:
The program provides a preview of each target you generate. There are controls to choose border and fill colors. If you like a particular design, save the file, and then print as many targets as you want. Check it out, this program is fun and handy to use. Here are four (4) targets your Editor created just for this article. With a bit of practice, you can be generating your own custom targets in minutes.
About the Creator of the Target Generator
The Target Generator program was created by Rod Brown of Sheridan, Wyoming. Rod tells us: “I build custom rifles and coach shooters. I’ve got a 100-yard range out my back door. I shoot short- and long-range benchrest competitively around the country. I’m a full-time software development consultant and an FFL holder. When I’m not developing custom software for my clients, I’m usually fiddling in the shop, building a custom benchrest rifle, traveling to a match, chambering a barrel, or reloading some ammunition.
Story tip from Boyd Allen. We welcome reader submissions.
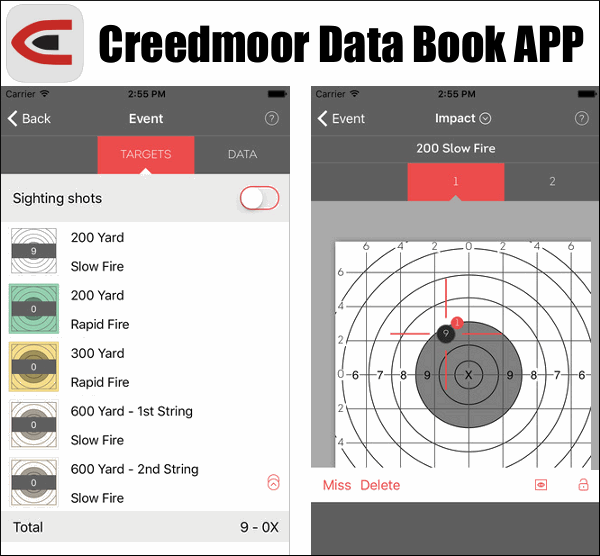
Tired of carrying old-fashioned paper Score Books? Well now you can go digital — Creedmoor Sports offers a full-featured Scoring Book App that lets you plot your shot locations/scores using an Android device or Apple iPhone or iPad. The price is right — FREE! Just visit the Apple App Store or Google Play Store to download the App for FREE.
Record Match and Practice Data
This new App, available for free in the Apple App Store, and the Google Play Store provides all the same functions and capabilities of the traditional, spiral-bound print-format Creedmoor Rifle Data/Score Book, but with the convenience and ease of recording your match and practice information with your mobile device. With this App you can break your 20 shot slow-fire segments into either 10- or 20-shot targets, and also opt for sighting shots. All the specific event data can also be recorded, such as location, wind, light etc., along with wind and elevation adjustments.
COMMUNICATIONS Restrictions: In some matches you are not allowed to have electronic communication ability, so you may have to set your iPhone to “Airplane Mode”, or use this only with an iPod (which does not have two-way communication capability).
You may have heard the phrase “blueprinting an action”, but do you know what that really means? Do you know what operations are done to an action during the blueprinting process? To help you understand, gunsmith Bill Marr of RifleShooter.com has created a helpful article showing a Rem 700 blueprinting job start to finish. This article spotlights how the procedures can be done with manual tools. Bill, who runs 782 Custom Gunworks Ltd., can also perform many of these operations with modern automated machinery. In fact, Bill has written a follow-up article on Truing a Rem 700 receiver with a Lathe.
Bill explains: “Blue-printing, or truing a rifle action, ensures the receiver face, threads, lugs, bolt lugs, and bolt face are square to the center line of the receiver.” In Bill’s informative article, Bill shows how he blueprints a Remington 700 short action receiver with .308 Win bolt face. He covers the following procedures step by step:
Action Disassembly
Ream Minor Diameter of Receiver Threads
Square the Receiver Lugs
Square the Face of the Receiver
Lap the Bolt Lugs
Square the Bolt Face
We use the bushings to guide the receiver tap. This chases the threads and ensures they are square.
2. Truing the Receiver Face
Using the receiver facing tool, the front of the receiver is trued. The tool is placed over the tap and turned by hand. We used Do Drill to lubricate it.
3. Lapping the Lugs
The bolt lapping tool screws into the front of the action and applies rearward pressure on the bolt face. A little bit of lapping compound is placed on the front of the receiver lugs. The bolt handle is then raised and lowered repeatedly. Note — it is critical that we do not get any lapping compound on any other surfaces.
4. Truing the Bolt Face
On this bolt, the central part of the bolt face was low. After the truing operation, this Rem 700 bolt face is now completely square to the action.
IMPORTANT: Rifleshooter.com states: “This article highlights our project and is presented for information purposes only. This provides an overview of the process and should not be attempted without the guidance and supervision of an experienced gunsmith“.





 The Risk of Hearing Loss


 Many of our readers have been interested in learning how modern bullets are made. While a “boutique” bullet-maker, supplied with appropriate cores and jackets, can craft bullets using relatively simple hand dies and manual presses, factory production is different. The major bullet-makers, such as


 Tired of carrying old-fashioned paper Score Books? Well now you can go digital —


