Any long range shooter knows that wind is our ultimate nemesis. The best ways of overcoming wind are to measure what we can and use computers to calculate deflection. The Applied Ballistics Kestrel is a great tool for this. As good as our tools may be, we don’t always have them at our fingertips, or they break, batteries go dead, and so on. In these cases, it’s nice to have a simple way of estimating wind based on known variables. There are numerous wind formulas of various complexity.
The Applied Ballistics (AB) Wind Hack is about the simplest way to get a rough wind solution. Here it is: You simply add 2 to the first digit of your G7 BC, and divide your drop by this number to get the 10 mph crosswind deflection. For example, suppose you’re shooting a .308 caliber 175-grain bullet with a G7 BC of 0.260 at 1000 yards, and your drop is 37 MOA. For a G7 BC of 0.260, your “wind number” is 2+2=4. So your 10 mph wind deflection is your drop (37 MOA) divided by your “wind number” (4) = 9.25 MOA. This is really close to the actual 9.37 MOA calculated by the ballistic software.
WIND HACK Formula
10 mph Cross Wind Deflection = Drop (in MOA) divided by (G7 BC 1st Digit + 2)
Give the AB wind hack a try to see how it works with your ballistics!
Some Caveats: Your drop number has to be from a 100-yard zero. This wind hack is most accurate for supersonic flight. Within supersonic range, accuracy is typically better than +/-6″. You can easily scale the 10 mph crosswind deflection by the actual wind speed. Wind direction has to be scaled by the cosine of the angle.
We are often asked “Can I get more velocity by switching primer types?” The answer is “maybe”. The important thing to know is that changing primer types can alter your load’s performance in many ways — velocity average, velocity variance (ES/SD), accuracy, and pressure. Because there are so many variables involved you can’t really predict whether one primer type is going to be better or worse than another. This will depend on your cartridge, your powder, your barrel, and even the mechanics of your firing pin system.
BE SAFE: Be cautious when changing primer types. Glen Zediker recommended decreasing your load ONE FULL GRAIN when changing to a different primer type, one that you haven’t used before.
Interestingly, however, a shooter on another forum did a test with his .308 Win semi-auto. Using Hodgdon Varget powder and Sierra 155gr Palma MatchKing (item 2156) bullets, he found that Wolf Large Rifle primers gave slightly higher velocities than did CCI-BR2s. Interestingly, the amount of extra speed (provided by the Wolfs) increased as charge weight went up, though the middle value had the largest speed variance. The shooter observed: “The Wolf primers seemed to be obviously hotter and they had about the same or possibly better ES average.” See table:
Varget .308 load
45.5 grains
46.0 grains
46.5 grains
CCI BR2 Primers
2751 fps
2761 fps
2783 fps
Wolf LR Primers
2757 fps
2780 fps
2798 fps
Speed Delta
6 fps
19 fps
15 fps
You can’t extrapolate too much from the table above. This describes just one gun, one powder, and one bullet. Your Mileage May Vary (YMMV) as they say. However, this illustration does show that by substituting one component you may see significant changes. Provided it can be repeated in multiple chrono runs, an increase of 19 fps (with the 46.0 grain powder load) is meaningful. An extra 20 fps or so may yield a more optimal accuracy node or “sweet spot” that produces better groups. (Though faster is certainly NOT always better for accuracy — you have to test to find out.)
WARNING: When switching primers, you should exercise caution. More speed may be attractive, but you have to consider that the “speedier” primer choice may also produce more pressure. Therefore, you must carefully monitor pressure signs whenever changing ANY component in a load. In his books, the late Glen Zediker recommended decreasing your load ONE FULL GRAIN when changing to a different primer type, one that you haven’t used before.
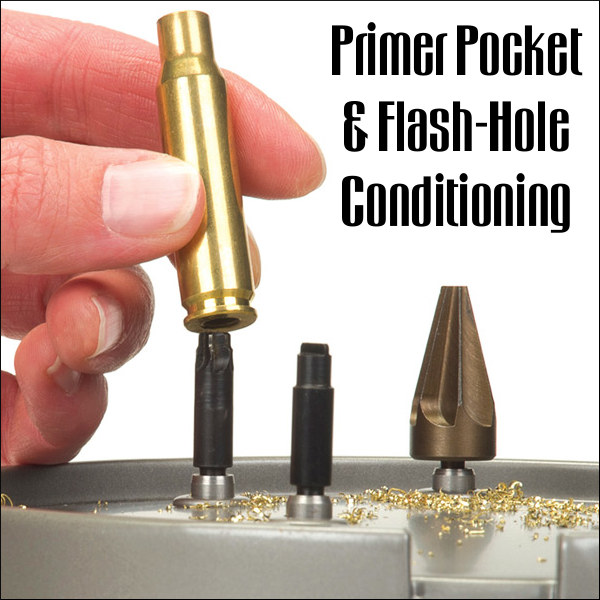
In the past the U.S. Army Marksmanship Unit published a series of reloading “how-to” articles on its USAMU Facebook page. One “Handloading Hump Day” article covered two basic case prep chores — uniforming primer pockets and deburring flash-holes. Visit the USAMU Facebook page for other tips.
Primer Pocket & Flash-Hole Conditioning
This week, we’ll address a question that frequently arises: “Do you uniform primer pockets and deburr flash-holes?” As we tailor our handloading methods to the specific needs of each instance, the answer, not surprisingly, is “Sometimes!” However, don’t flip that dial just yet, as what determines our approach may be helpful in deciding how to address one’s own techniques. Moreover, we have a buried “Easter Egg” morsel that may bring a chuckle, as well as useful safety information!
Generally, the USAMU Handloading Shop does not uniform primer pockets (PP) or deburr flash holes (FH) of our rifle brass. We’re certainly not against it… Rather, this reflects the very high volume of ammunition we load, the fact that very few cases are ever re-loaded for a second firing, and the types of brass we use. However, as a need is perceived, we DO deburr flash holes. Of interest, we have fired many very small, 1000-yard test groups and aggregates using weight-selected, domestic brass that had not had PPs uniformed or FHs deburred.
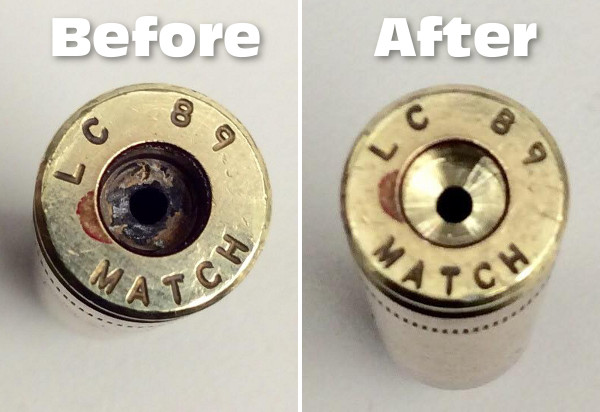
Before and After — On the left is a fired, deprimed 7.62×51 case with primer residue intact. On the right the primer pocket has been uniformed to SAAMI specs. Note the shiny finish at the bottom of the pocket — evidence of the the removal of metal when uniforming the primer pocket.
As to the type cases we use, many thousands of our long-range 5.56mm cases come to us from the arsenal with the primer of our choice pre-installed and staked-in, per usual practice. Obviously, we cannot uniform either FHs or PPs on this live, primed brass. However, after careful sorting, inspection and preparation, we do obtain match-winning results with it.
Shooters who reload their brass several times may decide to uniform PPs and deburr FHs, especially on their “300-yard and beyond” brass. Here, they will use the cases many times, while the uniforming is performed only once. Also, most handloaders only process moderate amounts of brass, compared to our multi-thousand round lots.
Having high quality Long Range (LR) brass helps. Many of the better brass manufacturers [make] their flash holes so that no burrs are created. Still, it does pay to inspect even THESE manufacturer’s products, as occasional slips are inevitable. Very rarely, some of the best makers will have a significant burr in, say, 1 per 1000 or 2000 cases, and it’s worth catching those.
Exceptions can always be found. Recently, we began processing a large lot of match brass from a premier manufacturer. We were startled to find that every case had a significant burr in the FH — something we’d never before seen from this maker. We then broke out the FH deburring tools and went to work.
Some observers have noted that it can be difficult to truly verify the contribution to accuracy of these procedures — particularly when firing from the shoulder, in conditions. Members of this staff, as individual rifle competitors, do often perform these operations on their privately-owned LR rifle brass. One could ascribe this to the old High Power Rifle maxim that “if you think it helps, then it helps.”
However, a World Champion and Olympic Gold/Silver medalist here commented on his own handloading (for International competition, which demands VERY fine accuracy). He noted that he did seem to see a decline in accuracy whenever he did not uniform FHs, deburr FHs and clean primer pockets before each reloading. (One might be tempted to counter that only a truly World Class shooter could reliably detect the difference.) However, with the wisdom of decades experience, our Champion also remarked that “It could have been that I just wasn’t shooting as well that day.”
For those who do opt for these procedures, note that various tool models may have adjustable depth-stops; pay attention to the instructions. Some FH-deburring tools (which enter the case mouth, not the primer pocket) are dependent upon uniform case length for best results.
Above is a flash-hole deburring tool on an RCBS powered case-prep unit. These case prep machines can save a lot of pain and misery, helping one perform various functions quickly and efficiently.
Watch this video to see how a sound suppressor (aka “silencer”, “moderator”, or “can”) is constructed, start to finish. It’s more complicated than you might expect — there are quite a few stages in the process. The video below shows the fabrication of a SilencerCo Octane 45 suppressor:
SilencerCo writes: “What, exactly, goes into making a silencer? It may be more than you’d expect. From cutting metal to chemical baths, to extensive quality control every step of the way, our streamlined process is more than just a few steps. Watch our newest video, HOW IT’S MADE: Octane 45, to catch a glimpse behind SilencerCo’s doors.”
How Loud Are Unsuppressed Rifles?
Firearms Are Loud — 140 dB to 175 dB. ASHA explains: “Almost all firearms create noise that is over the 140-dB level. Exposure to noise greater than 140 dB can permanently damage hearing. A small .22-caliber rifle can produce noise around 140 dB, while big-bore rifles and pistols can produce sound over 175 dB. Firing guns in a place where sounds can reverberate, or bounce off walls and other structures, can make noises louder and increase the risk of hearing loss. Also, adding muzzle brakes or other modifications can make the firearm louder. People who do not wear hearing protection while shooting can suffer a severe hearing loss with as little as one shot[.]” Source: ASHA, Recreational Firearm Noise Exposure.
How Much Does a Good Suppressor Really Reduce Firearm Sound Levels?
That depends on the rifle, the cartridge, and the effectiveness of the suppressor. American Hunter explains: “Suppressors retard the speed of propellant gases from the cartridge that rapidly expand and rush out of the barrel. It’s these gases that produce the loud boom that’s heard for miles. A suppressor’s series of internal baffles slows these gases so they are not all released at once, thereby muffling the sound.” Many good commercial suppressors can achieve 30-35 dB sound suppression. However, Zak Smith of Thunder Beast Arms says: “There are a bunch of manufacturers who publish values that are not reproducible, or use an ad-hoc test instead of a mil-spec test. In many cases we’ve tested the exact same suppressors they’ve advertised with 30-40 dB reductions and found they are actually in the high 20s instead.”
Again, for this reason, we recommend that hunters use ear protection, such as electronic muffs, even when shooting suppressed.
It’s easy to lust for those rare showpiece rifles at high-end auctions, but the author cautions readers to target the best deals, stick to your plan, and honor your monetary limits.
Buying at Gun Auctions — Be Crazy, Crazy Good
By Dave Buffington
“They’re crazy!” — You hear that all the time about live gun auctions. People love to rant about how people pay too much money for too many guns at too many auctions. It’s natural. And wrong.
I’ve been attending live gun auctions regularly for more than a decade — as many as 40 a year. I’ve learned that for every item that sells for a silly price, several sell for fair money and some — more than a few — have turned out to be great buys.
Two years ago, I bought a competition-grade STI 1911 in excellent condition for $670 at a live auction. And at the height of the gun-buying frenzy a while back, I scored a highly desirable, rarely-found Anschütz 54.18 MSR in new-in-box condition for just $1,800. I then flipped that Anschütz for $3,000 just two weeks later. That $1200 gain represents a 66% profit — not bad for a little savvy shopping at an auction.
This beautiful SAKO L461 Vixen was a great auction buy … and it is half-MOA accurate as well.
Sweet SAKO L461 Score at Auction
Can you score an awesome deal at a live auction? Absolutely. Above is a .222 Rem SAKO L461 Vixen I got at auction for $1500.00 including Leupold Vari-X II 3-9x40mm scope. Note the highly-figured stock. My SAKO L461 is the “deluxe” model with rosewood forearm tip and grip cap. A similar .222 Rem SAKO L46 (below) with fairly plain wood (and no scope) is selling for $3995.95 at the Custom Shop, a Montana purveyor of fine firearms.* I got my SAKO for 38% of the Custom Shop price! SAKO fans will note that the L461 has an internal top-loading 5-shot magazine while the older L46 has a 3-round removable clip. And most folks believe that the newer L461 model (like mine) has a better trigger.
Compare the author’s $1500 Auction-purchased SAKO L461 (above) with this $3995.00 Custom Shop Inc. SAKO L46. This is proof that live auctions can deliver some impressive bargains:
Can you make a mistake? Yes, I’ve bought junk and paid too much for it. But I’ve learned that knowledge is the best vaccine against gun buying mistakes. That’s our next topic.
Know The Auctions
Finding live auctions takes a bit of research, especially during the pandemic. But estates still need to be settled, collections still need to be shrunk and so, guns still need to be sold. Read your local newspaper and shoppers guides. Use online auction search services like AuctionZip.com.
And once you’ve found an auction, know the auctioneer’s rules. Some do background checks. Some don’t. Some charge sales tax. Some don’t. Some charge a “buyer’s premium”. Some don’t. If you’re not sure, ask.
Know Your Targets — Stick to Your List and Avoid Impulse Buys
Especially at the all-gun auctions, it’s easy to be entranced by all the handsome-looking hardware, but some of my worst gun buys have been the impulse buys made at auctions.
So start with a list of guns you want — for target shooting, collecting, whatever — and stick to it. Get to know those guns, research them and for goodness sake, know the potential pitfalls. Some Winchester 52s are prone to the “crack of death”. Certain Brownings from the late 60s and early 70s are afflicted with “salt wood”. You need to know which ones.
Know The Bidding Process
Auction newbies tend to worry a lot about how to bid. I know I did. But don’t. Remember, it’s the job of the auctioneer to get your bid, and once a good auctioneer spots you as a bidder, believe me, he won’t lose you.
The key is to get spotted. So don’t be shy. The auctioneer will likely start the bidding at some reasonable number. As a matter of theater, he’ll then start going down until someone actually bids. Then he’ll start going up again. When you’re ready to jump in, raise your hand and make sure the auctioneer spots you. If you’re not sure, shout something. (“Here!” works fine.) After that, don’t fuss about technique. Just nod yes or no the next time the auctioneer looks at you. (Ziegler Auction photo by Nathan Merkel)
Do understand one small but important detail: The price the auctioneer calls is the price he is looking for, not the price he has. For example, if you’ve bid $250, you’ll then hear him calling for the next increment up — such as “$300, $300, do I hear $300?”.
Misunderstanding that process can lead you to bid against yourself. 99% of auctioneers won’t let it happen, but as I can attest, it’s still embarrassing.
Know Your Price Limits
Auction fever is much like buck fever. You’re struggling to be still while you’re heart is doing its best rendition of “Wipe Out”. So you must, absolutely must, agree with yourself on the maximum price you’ll bid for a gun before the bidding starts. And be sure that maximum price reflects the true purchase cost, including sales tax, background check fees, and the buyer’s premium, if any.
Sticking to that limit is critical. First, because you don’t want to end up spending the mortgage money, but also, because there’s always another opportunity around the corner.
For example, on a cold, damp day last fall, I went to a small outdoor auction in hopes of getting a good buy on a Mauser-made, numbers-matching K98k. Ha! Despite the fact there were fewer than 50 bidders braving the drizzle, the gun sold for a whopping $3,200. (I bailed at $1,500.)
Is this the K98k that sold for $1,200? Or $3,200? The Karabiner 98 kurz (German for “carbine 98 short”), often abbreviated Kar98k or K98k, is a bolt-action rifle chambered for the 7.92×57mm Mauser cartridge.
But just two weeks later, I went to a warm, dry indoor auction with more than 200 bidders in the building. Yet I still managed to get a Mauser-made, numbers-matching K98k for just $1,200, a difference of a whopping $2,000. Crazy? Yes… Crazy good.
*Custom Shop, Inc. is featured on the Outdoor Channel’s “The Gunfather” TV Show. Located in Hamilton, Montana, Custom Shop has hundreds of rare and collectible guns — high-end rifles, pistols, and shotguns. In addition to used guns, Custom Shop, Inc., is also an Authorized Colt Dealer.
AR-platform rifles can be maintenance-intensive beasts. They need regular inspection, cleaning, and lubrication. But some AR owners make the situation worse by not regularly cleaning important small parts, or by using too MUCH oily/greasy lubricants in the wrong places. A properly maintained and lubricated AR15 can shoot hundreds of rounds (between cleanings) without a problem. If you learn where (and where not) to apply lubricant, you’ll find that your AR will run more reliably and the task of cleaning the bolt, bolt carrier, and upper receiver internals will be less of a burden.
Here we showcase videos that show how to field-strip an AR-15, inspect the key parts, clean components, and lubricate internal parts as needed. Along with these videos, we recommend you read the comprehensive AR-15 Gun Cleaning Clinic article on the Brownells website. This explains in detail important procedures that the videos might only cover in a few seconds.
If you want to keep your black rifle running smoothly and reliably, you must clean it regularly and follow the correct maintenance procedures. Here are five videos that explain how to properly disassemble and clean AR-platform rifles.
1. How To Clean Your AR-15 | Cleaning and Maintenance Tips
This is a quick 90-second starter video that may help new AR owners. Ricky Lehnhardt of OTIS Technology demonstrates the basics of cleaning and maintaining your AR-15. Lehnhardt does a good job identifying the points that need cleaning on the inside of ARs. However he works very quickly in the video. You may want to pause the video at some points. Also, Lehnhardt employs a cable for pulling patches and brushes through the barrel. Yes this is fast and easy. However, for match AR rifles, we recommend that you instead use a cleaning ROD with fitted bore guide.
2. Take-Down and Full Cleaning of AR-15 by Jerry Miculek
Here ace shooter Jerry Miculek takes down and cleans an AR-platform rifle belonging to his daughter Lena. This is a good video because Lena’s rifle was “run hard and packed up dirty” so you can see where carbon and grease build up. This 35-minute video is very thorough. Jerry is one of the nation’s top action carbine shooters, so listen carefully to his advice on cleaning and lubrication.
3. AR-15 Maintenance: Field-strip, Clean and Lubricate an AR-15
Gunsite Academy instructor and gunsmith Cory Trapp demonstrates the proper way to field-strip, clean, and lubricate an AR-15 carbine. In this 30-minute video, Trapp offers several important technical tips and hints. For example, at 11:05 Trap demonstrates how to determine if your bolt needs new gas rings. Along with cleaning procedures, this video explains how to inspect key components and how to function-test your AR before each shooting session.
4. AR-15 Dissassembly and Cleaning Guide
This video does a good job, with close-ups, showing how to remove the bolt carrier and clean the inside of the upper receiver. Then you can see how to work with various tools to clean the bolt, bolt carrier, and inside of chamber. We also recommend that you inspect the ejector recess and extractor recess. When we’ve inspected ARs that failed to cycle properly, we have often found nasty gunk (mixture of carbon, greasy lube, and brass particles) in these areas.
5. Basic AR-15 Quick and Easy Field Maintenance
In this NSSF-sponsored video, pro shooter Ryan Muller demonstrates basic, quick field maintenance of his AR-15. This would be for a quick cleaning and lubrication of the reciprocating parts. This covers rapid maintenance in the field. For full field-stripping and thorough cleaning, watch the previous videos.
Handy Mat for Cleaning AR Rifles
When working on an AR-15, it’s smart to have a pad that can absorb solvents and cushion your upper and lower. The $22.49 Real Avid Smart Mat is a good choice. This features printed take-down instructions and it has a handy parts tray on the right side. The mat rolls up for convenient storage. Click HERE to learn more.
Vital Inspections You Should Do After Disassembly
Last but not least, here are recommended inspections you should do every time you do a full field-strip and cleaning of your black rifle:
Will you be traveling (with guns) to other states this summer? Are you concerned about the laws that might apply when you are transporting firearms across state lines? Or are you puzzled about the requirements for obtaining a carry permit in your own state? If you have any of these questions, you should definitely get expert guidance on State statutes and regulations controlling firearms. To do that, you can purchase Attorney Scott Kappas’s Traveler’s Guide to the Firearms Laws of the 50 States for just $11.85 on Amazon. The latest 2022 edition includes 100+ updates since last year. In addition, there are multiple new and expanded sections for 2022.
If you don’t want to spend the $12-$16 bucks, there is a FREE alternative. There’s a very helpful set of State Law Summaries on the web, presented by PewPewTactical.com. Despite the silly name, the PewPewTactical website has an abundance of information that is particularly beneficial for pistol shooters and CCW holders.
One of the best features of PewPewTactical.com is the Gun Laws by State online reference guide. We looked through four of these State Law Summaries and were impressed by the depth of the coverage. But we caution — if you have specific legal questions, particularly with recently-enacted statutes, you should consult a licensed attorney for your state (or the state to which you will travel). In addition, many of the State Law Summaries have not been updated for 3-5 YEARS! But they are still a good place to start. Below are links to state law articles from PewPewTactical.com. To access any State summary, simply click the State name below:
August is almost here, so we’re near the peak heat of summer. We are already seeing extremely hot conditions in many areas of the country. You never want your barrels to get too hot, which can happen more quickly in summertime. Accuracy suffers when barrels over-heat, and excessive heat is not good for barrel life. So how do you monitor your barrel’s temperature? You can check if the barrel is “warm to the touch” — but that method is not particularly precise. There is a better way — using temperature-sensitive strips. McMaster.com (an industrial supply house) offers stick-on temp strips with values from 86° F to 140° F. A pack of ten (10) of these horizontal strips (item 59535K13) costs $13.16. That’s a mere $1.32 per barrel for strips — cheap insurance for your precious barrels. For best barrel life, try to stay under 120 degrees F.
NOTE: On the McMaster.com website, you’ll need to scroll down to the multi-use “Temperature Indicating Labels”. Then click on the horizontal label and select item 59535K13, as shown below.
Forum member Nomad47 says: “I have temperature strips (bought at McMaster-Carr) on all my barrels. I try not to shoot when the barrel gets to 122 degrees or higher[.]” Here are photos of the McMaster-Carr temp strips on Nomad47’s customized Savage.
Bad things can happen if your barrel gets too hot. First, with some barrels, the point of impact (POI) will shift or “walk” as the barrel heats up excessively. Second, even if the POI doesn’t change, the groups can open up dramatically when the barrel gets too hot. Third, if the barrel is very hot, the chamber will transfer heat to your loaded cartridge, which can lead to pressure issues. Finally, there’s considerable evidence that hot barrels wear out faster. This is a very real concern, particularly for varmint shooters who may shoot hundreds of rounds in a day. For this reason, many varminters switch among various guns, never letting a particular barrel get too hot.
Neconos.com offers BAR-L Temp Strips that visually display heat readings from 86 to 140 degrees. Think of these strips as compact, unbreakable thermometers that monitor barrel heating.
Put a strip on the side of the barrel and the barrel’s temp will be indicated by a stripe that changes from black to green. There is also a “general purpose” strip that reads to 196 degrees (see bottom row). The Benchrest model strip (86°F to 140°F) is in the middle. These Bar-L temp strips cost $12.70 each, or $25.00 for a 3-pack.
NOTE: These strips can be permanently fixed to the barrel with the heavy-duty clear plastic tape strip provided with the BAR-L Temp strip.
The Modern Advancements series is an ongoing journal of the R&D activities at Applied Ballistics. Theories of ballistics are explored “myth-buster” style with extensive live fire testing. Employing state-of-the-art ballistic instrumentation including Doppler Radar and high-speed (Phantom) video, the Applied Ballistics team has made key insights about ballistics which are then shared through books and the Science of Accuracy Academy.
This 3rd Volume of the series has 13 Chapters. The book features four main parts: Part 1: Precision Testing, Part 2: Advanced Handloading, Part 3: Doppler Radar Testing, and Part 4: Miscellaneous.
Pre-orders for individuals and dealers opened July 26, 2022, and end when the books ship in late August or early September. During the pre-order phase, subscribers of The Science of Accuracy Academy will get a $20 off coupon for the new book. Other ballistics books by Bryan Litz are available through the Science of Accuracy Academy STORE.
About Applied Ballistics
Applied Ballistics’ mission is to be a complete, unbiased source of external ballistics information for long-range shooters. We’re highly active in R&D, constantly testing new claims, products, and ideas for potential merit and dispensing with the marketing hype which can make it so difficult for shooters to master the challenging discipline of long-range shooting.
We believe in the scientific method and promote mastery through an understanding of the fundamentals. Our work serves the shooting community via instructional materials which are easy to understand, and products such as ballistic software which runs on many platforms. If you’re a long-range shooter who’s eager to learn about the science of your craft, we’re here for you.
Tumblers and walnut/corncob media are old school. These days many shooters prefer processing brass rapidly with an ultrasonic cleaning machine. When used with the proper solution, a good ultrasonic cleaning machine can quickly remove remove dust, carbon, oil, and powder residue from your cartridge brass. The ultrasonic process will clean the inside of the cases, and even the primer pockets. Tumbling works well too, but for really dirty brass, ultrasonic cleaning may be a wise choice.
Our friend Gavin Gear has evaluated an RCBS Ultrasonic cleaning machine using RCBS Ultrasonic Case Cleaning Solution (RCBS #87058). To provide a real challenge, Gavin used some very dull and greasy milsurp brass: “I bought a huge lot of military once-fired 7.52x51mm brass (fired in a machine gun) that I’ve been slowly prepping for my DPMS LR-308B AR-10 style rifle. Some of this brass was fully prepped (sized/de-primed, trimmed, case mouths chamfered, primer pockets reamed) but it was gunked up with lube and looking dingy.”
UltimateReloader.com Case Cleaning Video (7.5 minutes):
Gavin describes the cleaning exercise step-by-step on UltimateReloader.com. Read Gavin’s Cartridge Cleaning Article to learn how he mixed the solution, activated the heater, and cycled the machine for 30 minutes. As you can see in the video above, the results were impressive. If you have never cleaned brass with ultrasound before, you should definitely watch Gavin’s 7.5-minute video — it provides many useful tips and shows the cleaning operation in progress from start to finish.
Ultra Dry Necks After Ultrasonic Cleaning — Some Suggestions
The Ultrasonic cleaning process gets cartridge brass so “squeaky clean” that increased force may be required to seat your bullets, or they may “grab” as they go in the necks. To reduce bullet-seating effort, you may benefit from adding a little dry case lube inside the case-neck before loading (use a nylon brush). Another trick is adding a teaspoon of Ballistol lube to the cleaning solution. That provides a trace lubricant inside the necks, but does not interfere with powder ignition in any way.
The latest Gen2 RCBS ultrasonic cleaning machine has a large 6.3-quart capacity. That’s nearly 100% larger than the first generation machine in Gavin’s video. The Gen2 machine, $406.99 on Amazon, features a second ceramic heater and transducer to better clean brass cases and firearm parts. The LED is easily programmable, and the timer can be set for up to 30 minutes of cleaning. The original 3.2 quart-capacity RCBS ultrasonic machine, as shown in Gavin’s video, is still available for $180.72 at Midsouth Shooters.





 Know The Bidding Process
 Know Your Price Limits


