This discussion of rear bag designs and fill levels may offer some new insights for many readers. By “tuning” your rear bag you can reduce hop on shot-firing and help your rifle track better. All that can translate to better scores, particularly with large-caliber rifles.
Tuning Your Rear Sand Bags
Over the years, noted gunsmith and a Benchrest Hall-of-Fame inductee Thomas ‘Speedy’ Gonzalez has learned a few things about “tuning” rear sandbags for best performance. On his Facebook page, Speedy recently discussed how sand bag fill levels (hard vs. soft) can affect accuracy. Speedy says you don’t want to have both your front and rear sandbags filled up ultra-hard. One or the other bag needs to have some “give” to provide a shock-absorbing function (and prevent stock jump). And you want to tune your fill arrangements to match your shooting style. Free recoil shooters may need a different fill levels than bag squeezers (who a softer bag but harder ears).
SAND BAGS & HOW TO FILL THEMby Speedy Gonzalez
I was asked several times by competitors at the S.O.A. Matches and F-Class Nationals as to how I fill my sand bags for benchrest competition. Here is a copy of a reply I gave several years ago:
Back in the old days, Pat McMillan told me: “You can not have two bags filled so hard that you gun bounces on them in the process of firing round at your target, especially if you have a rig with a very flexible stock. The bags must be set up in a manner for them to absorb the initial shock of the firing pin moving forward and igniting the primer.
Then [they must] maintain their shape and absorb the second shock wave as well the rearward thrust and torque of the rifle. What happens to the rifle when this is not done? Well let me tell you. The rifles have a very bad tendency to jump and roll in the bags. This causes many of those wild, lost shots that one can’t explain.”
Here’s some Good General Advice for Bag Set-up:
1. You should not have TWO hard bags [i.e. both front AND rear] in your set-up.
2. Heavy sand magnifies these phenomena.
3. If you are a bag squeezer, pack ears hard and leave bag pliable enough to squeeze for the movement required. You may pack front bag as hard as rules permit.
4. Free recoil shooters pack both bags firm, but not so hard as to allow stock jump. Especially if you have a stock with a very flexible forearm.
5. We use play-ground sand, also know as silica sand. I sift mine to get any large impurities out then mix it with 25% to 50% with Harts parakeet gravel to the desired hardness that I am looking for. The bird gravel keeps the sand from packing itself into that solid as a brick state.
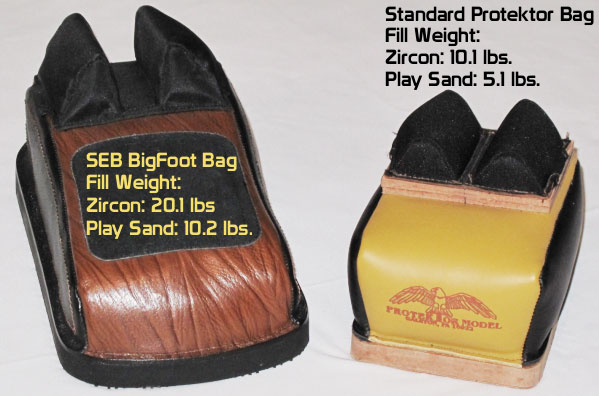
Speaking of bricks — another thing that happens when shooters employ that heavy zircon sand is the ears form a low spot under them from recoil and then tend to rock back and forth with the rifle causing many low shots to crop up. Edgewood makes an Edgewood/Speedy rear bag specially reinforced under the ears to eliminate this scenario.
Show below are the latest SEB Bigfoot Bags. Note that the bags sit perfectly flat — there is no bulge on the bottom even though the bags are “packed to the brim with sand”.
General Thoughts about Bag Construction and Ear Materials
I do not like the solid double-stitched leather bottoms. While this seems like a good idea, I see more shooters have problems because of them. They tend to slide around the bench and or slide with the rifle on recoil. The standard Protektor with Cordura rabbit ears and an Otto ring bag with a Cordura front would be what I would suggest to the new shooter or one of the Edgewood / Speedy rear bags, these mimic the “Donut” and feature a ring of leather around the bottom circumference that keep the bottom from rocking on the bench or ground[.]
One last note –If you use the Cordura bags, keep them sprayed with a good silicon spray or “Rain-Ex”. This keeps them from getting sticky. — Speedy
Here is a Black Friday video bonus for our Daily Bulletin readers. Today we showcase three of the most amazing 3D “cutaway” gun animations ever created. Watch the operations of a pump shotgun, bolt-action rifle, and semi-automatic pistol. The superb cutaway views show details of the firearms’ internal parts, and show how ammunition cycles start to finish. Each of these videos took hundreds of man-hours to create, and each has been watched many millions of times.
Remington 870 Pump-Action Shotgun
This 3D animation shows how a Remington 870 pump-action shotgun works. The animation is superbly done, showing every aspect of the internal operation. Folks, if you have any interest in shotguns you should definitely watch this video start to finish. This shotgun video has received 3.9 million views in just 10 days!
The video’s talented creator, Matt Rittman states: “Cinema 4D was used to create each individual part, as well as animating everything. Substance Painter was used to create the wood stock and fore-end textures. Corona renderer was used for final output of lighting and textures.” See more of Matt’s 3D videos on his popular YouTube Channel.
This 3D animation showing how a Mauser Karabiner 98K (KAR 98K) bolt-action rifle works. The Karabiner 98K is a controlled-feed bolt-action rifle based on the famous Mauser M98 system. Video creator Matt Rittman notes: “Cinema 4D was used to create each individual part, as well as animating everything. Substance Painter was used to create the wood stock texture. Corona renderer was used to render everything. This animation took me over 500 hours to create.” This video has been watched over 21 million times!
Every bolt-action rifle owner should watch this remarkable video. It shows key processes which are common to many actions — Cocking the Bolt, Feeding from magazine, Engagement of Bolt Lugs, Activation of Trigger and Movement of Firing Pin, and Extraction with Ejection. The modeling of the inside of the bolt and fire-control group is excellent. This really is a superb video that will help rifle owners understand what happening inside their guns as the bolt is cycled. See more of Matt’s 3D videos on his popular YouTube Channel.
This 3D animation demonstrates how a modern semi-automatic, double-action-only Glock 19 handgun works. Cinema 4D was used to create each individual part, as well as animating everything. Substance Painter was used to create the main textures. Corona renderer was used to render everything. This animation took me over 500 hours to create. one of the most-watched gun videos ever created, this Glock 19 animation has been viewed over 78.6 MILLION times!
Video Highlights for Glock 19 Pistol
0:00 Intro
0:11 Basic Function
0:39 Case Extraction
0:47 Cartridge Loading
1:02 Trigger Reset
About Matt Rittman, the 3D Animator/Artist These three amazing videos were all created by the gifted computer graphics artist Matt Rittman. On his Matt Rittman YouTube Channel, Matt states: “I’m a 3D Generalist/Motion Designer from Des Moines, Iowa. I have always enjoyed animation and illustrating how things work. I’m especially interested in cars and anything mechanical.
My aim for this channel is to provide easy to understand how-it-works 3D animations. I will occasionally be releasing tutorials centered around Cinema 4D and the different capabilities of the software.”
Today, November 25th, is Thanksgiving. That means a large percentage of Americans will be on the road to visit relatives. We know many of our readers have concealed carry permits or will otherwise be traveling with firearms. When crossing into different states with guns in a vehicle, you need to be mindful of all state and local laws and restrictions.
Five Worst States for Traveling with Firearms
This article appears in the Cheaper Than Dirt Shooter’s Log.
The U.S. is a patchwork of confusing and cumbersome laws that change the rules of what you can carry, where you can carry, and whether you can possess the firearm, ammunition of magazine at without running afoul of the local laws. Now, if every state was like Vermont, law abiding gun owners could freely travel with their firearms with no worries. Unfortunately, many states have a history of being hostile to traveling gun owners.
The federal “Firearms Owner Protection Act” allows travel through any state as long as the firearm is unloaded, in a locked case, and not easily accessible to the passengers. However, that is not to say that certain states that are less friendly to firearms have not created their own laws that would snare unsuspecting otherwise law-abiding firearm owners. This led us to name the Top 5 States to Avoid while traveling with a firearm this holiday season.
CONNECTICUT
Connecticut does not have any gun reciprocity agreements with other states. This means nonresidents are not allowed to carry handguns in Connecticut under a permit issued by another state.
HAWAII
Every person arriving into the state who brings a firearm of any description, usable or not, shall register the firearm within three days of the arrival of the person or the firearm, whichever arrives later, with the chief of police of the county where the person will reside, where their business is, or the person’s place of sojourn. GET Hawaii Firearms INFO HERE.
MASSACHUSETTS
Massachusetts imposes harsh penalties on the mere possession and transport of firearms without a license to carry. Prospective travelers are urged to contact the Massachusetts Firearms Records Bureau at (617) 660-4780 or contact the State Police. GET Massachusetts Firearms INFO HERE.
NEW JERSEY
New Jersey has some of the most restrictive firearms laws in the country. Your firearm must be unloaded, in a locked container, and not accessible in the passenger compartment of the vehicle. The New Jersey Supreme Court ruled that anyone traveling within the state is deemed to be aware of these regulations and will be held strictly accountable for violations. If you’re traveling through New Jersey, the N.J. State Police website provides information regarding transporting firearms within state lines. GET New Jersey Firearms INFO HERE.
NEW YORK
Use extreme caution when traveling through New York state with firearms. New York’s general approach is to make the possession of handguns and so-called “assault weapons” illegal. A number of localities, including Albany, Buffalo, New York City, Rochester, Suffolk County, and Yonkers, impose their own requirements on the possession, registration, and transport of firearms. Possession of a handgun within New York City requires a New York City handgun license or a special permit from the city Police Commissioner. This license validates a state license within the city. Even New York state licenses are generally not valid within New York City unless a specific exemption applies. Possession of a shotgun or rifle within New York City requires a permit, which is available to non-residents, and a certificate of registration.
More Scary States for Gun Owners
Here are six other jurisdictions (five states and DC) where you need to be wary when traveling. California, for example, treats all handguns in vehicles as “loaded” if there is ammunition loaded into an attached magazine. It’s wise, when in California, to have handguns unloaded in a LOCKED case, with all ammunition or magazines in a separate section of the vehicle. These states (and DC) all have laws that can trap unsuspecting gun-owners. Be wary.
California
Delaware
Dist. of Columbia
Illinois
Maryland
Rhode Island
Wind effects are complex. In trying to access wind speeds and angles, you’ll want to watch multiple indicators — mirage, dust, wind-flags, grass movement, and more. You’ll also need to be concerned about wind cycles. In the video below, Bryan Litz talks about variable wind speed along a bullet’s flight path. A respected ballistics guru, Bryan is the founder of Applied Ballistics and a designer of Berger’s Hybrid Match projectiles. He is also a past F-TR National Champion and a High Master Palma ace.
In this video, Bryan discusses how wind effects can vary in intensity at different points along the bullet’s flight path to the target. Sometimes the firing line is sheltered, and the strongest winds come into effect in the middle of the trajectory. Bryan concludes: “Wind matters everywhere … but the best thing you can do is try to get a handle on the wind [velocity and angle] where you are. That may or may not represent the wind down-range — that’s when you have to look downrange and make a judgment[.]”
Litz Competition Tip: Select your wind shooting strategy carefully. For beginners and veterans, most points are typically lost to wind. Successful shooters put a lot of thought into their approach to wind shooting. Sometimes it’s best to shoot fast and minimize the changes you’ll have to navigate. Other times it’s best to wait out a condition which may take several minutes. Develop a comfortable rest position so you have an easier time waiting when you should be waiting.
More Wind Tips from Wind Wizard Emil Praslick
In these two short videos, Emil Praslick III, former coach of the USAMU and USA National long range teams, explains how to find the wind direction and how to confirm your no-wind zero. Praslick is widely considered to be one of the best wind coaches in the USA.
When Winds Are EXTREME — Near Gale Force at Ben Avery
This video shows INSANE winds at NBRSA 100/200 Benchrest Nationals. This was filmed at the Ben Avery Range in Phoenix, AZ during the recent NBRSA 100/200 yard National Championships. Extreme to say the least. Based on what we’re seeing here, there are 20-25 mph crosswinds, with gusts to 35 mph — near Gale Force. Video by Hall-of-Fame Benchrest competitor Gene Bukys, whom we sadly lost to COVID last year. RIP Gene.
Texas gunsmith Mike Bryant reports: “This video shows the Unlimited Class 200 at the Nationals in Phoenix. I had three 10-shot groups in the low 2″ range with a 2.228″ being my big group and was glad they weren’t bigger. Thursday and Friday were the worst of the windy days. Unfortunately those were the days for the UL 200 and it was about as windy through most all of the Sporter 200.”
Excellent Wind Reading Resource
The Wind Book for Rifle Shooters covers techniques and tactics used by expert wind-readers. The authors provide a wind-reading “toolbox” for calculating wind speed, direction, deflection and drift. They explain how to read flags and mirage, record and interpret your observations, and time your shots to compensate for wind. Here are two reviews:
This is a must-have book if you are a long-range sport shooter. I compete in F-Class Open and when read it from cover to cover, it helped me understand wind reading and making accurate scope corrections. Buy this book, read it, put into practice what it tells you, you will not be disappointed. — P. Janzso
If you have one book for wind reading, this should be it. It covers how to get wind speed/direction from flags, mirage, and natural phenomenon. This is the best book for learning to read wind speed and direction. — Muddler
With ammunition in short supply these days, we know ammo production is on people’s minds. Top industry leaders have said the USA will face ammo shortages well into 2021. So ammo-makers big and small are ramping up production to meet demand. If you’re curious how ammunition is created on the assembly by a relatively small, speciality manufacturer, watch the video below to see the entire process, start to finish.
This video from Fog Ammunition reveals how .223 Rem ammo is made. Starting with boxes of bullets and bags of cartridge brass, this video shows how components are bulk-sorted, then .223 Rem ammunition is produced on a modern, linear multi-stage loading machine. In assembly-line fashion, cases are primed, powder is added, bullets are placed, final seating depth is set, and then the case is crimped.
If you’ve never seen an automated loader in action you should definitely watch this video. With this kind of machine, a new round is produced every second or so (see video 1:15 to 1:55). The .223 Remington ammunition featured in this video is loaded with Sierra BlitzKing bullets. Fog offers both rifle and pistol ammo loaded with quality components.
Video Shows Automated Loading Process Start to Finish (Worth Watching):
Remember when primers were plentiful and priced affordably?
“Science tells us that exposure to continuous noise of 85 dB for eight hours is enough to cause permanent hearing loss, and worse, spikes of 130 dB and more can result in permanent hearing damage instantly.” Source: NRA Blog.
The Risk of Hearing Loss
Hearing loss can be progressive and irreversible. If you are a shooter, this is serious business. As the NRA Blog cautions: “You may not even realize you’re harming your hearing. Hearing loss occurs gradually, and can go effectively unnoticed until symptoms become severe. By then, the damage is done.”
Nobody wants to go deaf. But we often see shooters without effective hearing protection when they are walking around a few yards behind the firing line. That’s bad — even if you are away from the firing line, gunshot noises can damage your hearing. You MUST use effective hearing protection every time you go to the range. Good foam earplugs costs mere pennies but they can prevent deafness in your later years. Many folks also wear muffs over plugs.
Sound Levels for Common Noises:
9mm Luger pistol: 160 dB
Jet aircraft engine (near): 140 dB
.22 LR pistol: 134 dB
Normal human pain threshold: 120 dB
Noisy Nightclub: 110 db
Riding Motorcycle at 65 mph: 103 db
Power Lawnmower: 95 dB
Hearing damage possible: 85 dB (sustained for 8+ hours)
Ringing Telephone: 80 dB
Normal conversation: 60 dB
The Myth of the “Quiet” .22 LR
The NRA Blog notes that “many rimfire shooters, particularly those using the beloved .22 Long Rifle cartridge, argue that the small .22 LR caliber doesn’t produce enough sound to damage your hearing”. So, is that really true … or is it a myth?
In fact, a .22 LR can be much louder than you think — a .22 LR pistol can produce sound levels of 134 dB. That’s well above the normal human pain threshhold.
Compact, Low-Profile NRR 27 dB-Rated Ear Muffs
Many hunters and competitive shooters prefer low-profile ear muffs. As these typically have a lower Noise Reduction Rating, perhaps NRR 22-27, we recommend running earplugs under muffs. If you use low-profile electronic muffs, such as Howard Leight Impact Sport Muffs, you should still be able to hear range commands even with plugs underneath.
Another good option for hunters and range visitors are hearing bands, basically earplugs connected with a semi-rigid plastic band. These banded products provide “quick access” hearing protection for hunters. You can keep them handy around the neck while spotting game, and then insert the plugs before shooting.
Howard Leight MAX NRR33 Earplugs, Just $11.50 for 50 Pairs.
20 Pairs
50 Pairs
These Howard Leight NRR33 Max-1 Plugs are your Editor’s favorite foam earplugs. Between shooting, motorcycling and mowing lawns, I probably have Howard Leight foam plugs in my ears 3-4 days a week. They are comfortable and the flared outer edge helps the NRR. There is also a Max-30 corded version, with the same excellent 33 dB Noise Reduction Rating. Get five pairs of Max-30 Corded Plugs for $6.65 on Amazon, or 100 pairs of Max-30s for $27.86.
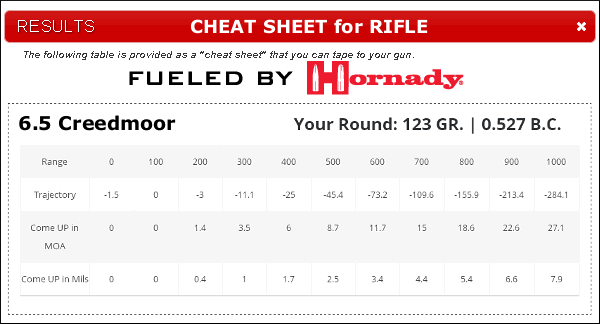
Need a simple, easy-to-use drop chart for your rifle? Something you can tape right to the buttstock? Then check out Hornady’s handy Online Ballistics Calculator. This user-friendly calculator will compute your drops accurately, and output a handy “Cheat Sheet” you can print and attach to your rifle.
Here’s how it works. From the Ballistics Calculator Page, first select 4DOF or Standard. Then simply input G1 or G7 BC values, muzzle velocity, bullet weight, zero range, and a few other variables.
Click “Calculate” to view the full chart (shown below). Then click “View Cheatsheet” and the simpler, 4-line Drop Chart (shown above) appears. Click “Print” and you’re done!
The online ballistics caculator is easy to use. You can select the basic version, or an advanced version with more data fields for environmental variables (altitude, temperature, air pressure, and humidity). You can also get wind drift numbers by inputing wind speed and wind angle.
Conveniently, on the trajectory output, come-ups are listed in both MOA and Mils — so this will work with either MOA clicks or Mil-based clicks. There are more sophisticated ballistics solvers available on the web (such as the outstanding Applied Ballistics Online Calculator), but the Hornady Calculator is very simple and easy to use. If you just want a basic drop chart, you may want to check this out.
Many short-range Benchresters have thought about converting their 6 PPC to shoot a 30BR for score matches, or a Dasher for mid-range (or even 1000-yard) games. That way you have a rifle that does double duty, giving you the most bang for your buck. Though an action with a PPC bolt won’t normally work with 30BR/6BR/Dasher cases with their larger .308-class rim (0.4728″ diameter), there is a pretty easy solution that allows you to cycle these bigger cartridges with a 6PPC-style bolt (designed to fit .220 Russian rims).
“Rebating case rims … lets you shoot a 30BR in score matches using your PPC action. All you need is a new barrel. This saves buying another bolt, receiver, or rifle.” — Butch Lambert
Butch Lambert of ShadeTree Engineering provided this tip. Butch notes that many 6 PPC benchrest group shooters also enjoy shooting in score matches. But to be really competitive in the BR for score game, that means shooting a 30BR, which has a wider, .308-class rim (0.4728″ diameter). Likewise, if you want to compete in 600-yard registered BR events or in varmint matches, you probably want to run a bigger case, such as the 6BR, 6mm Dasher, or 6-6.5×47. Those cartridges also have the larger 0.4728″ rims.
Rebate Your 30 BR Rims
To convert a PPC-boltface action to shoot bigger cases you can spend a ton of money to buy a new bolt. That can cost hundreds of dollars. The simpler solution is to turn down the diameter of the larger cases on a lathe. Butch explains: “We’ve seen plenty of interest in rebating case rims. This lets you shoot a 30BR in score matches using your PPC action. All you need is a new barrel. This saves buying another bolt, receiver, or rifle if you have a PPC boltface. Anyone who has access to a lathe can do this job pretty easily. Yesterday I turned 150 case in about an hour.”
At right is the lathe form tool Butch uses to rebate the case rims.
Cutting Head for Rebating Rims
Editor’s Note: Butch Lambert (and his wife) recently returned from the hospital. We send our best wishes to the Lamberts for a full recovery and happier times in the days ahead.
In the wintertime, it’s common to encounter problems with static electricity when throwing your powder charges. The static can cause powder kernels to cling to the surface of reloading components, and can cause powder clumping. Clumped or sticky powder may make your measure bind or grab in the middle of the cycle, which can throw off your charge weight. Here are a couple simple ways you can minimize the effects of static electricity and improve the consistency of your powder measuring.
Ground Your Powder Measure — If you’re throwing powder charges in the fall or winter and have problems with bridging or sticking powder, use a ground wire. Bullet-smith Victor Johnson (Johnson Precision Bullets) tells us: “I have a 25-foot piece of real small wire with alligator clips on each end. It’s that long so I can run it down the hall to a water pipe. Use the wire tie from a bread bag to hold it in a small roll to put in the range box. When using it at the range use a 6″ nail from the co-op or Lowe’s / Home Depot and just push it into the ground.”
Use Bounce Dryer Sheets — A quick pass with the thin sheets used in dryers will eliminate “static cling” on your plastic reloading parts like powder throwers, powder funnels, and reloading press guides. Thanks to Doc76251 for this tip.
Reduce Electronic Scales’ Drift with Anti-Static Spray
Reloading Tip by GS Arizona from Riflemans Journal
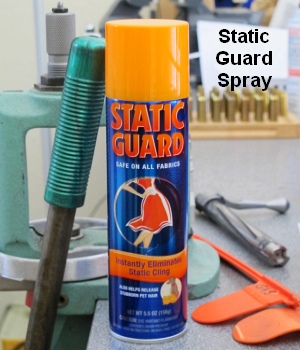
Apparently reducing static charges on and around electronic scales can reduce their propensity to drift, lessening the problem of “wandering zero”. Just how and why static charges interfere with scale performance is unclear, but many shooters have noticed that static electricity can cause electronic scales to behave strangely. So how do you reduce static charges around your digital balance? GS Arizona has found a very simple solution — an anti-static aerosol spray — that, by all indications, actually works. When this “spray-can solution” was suggested by a fellow shooter, GS was skeptical. However, he tried the stuff and he says that it really does help the scale maintain zero over time, with much less observed drift.
GS explains that the use of “Static Guard” spray helped mitigate the problem of a drifting zero on his Ohaus electronic scale: “My electronic scale… suffers from drifting zero (as they all seem to). I’ve read dozens of forum posts about drift and how to minimize its occurrence, so I know this problem isn’t limited to my scale or my workshop. Sometime last year, John Lowther mentioned the use of anti-static spray as a solution to the drift problem. John stated that the spray had virtually eliminated drift for him.”
GS found that the Static Guard actually worked: “The spray works great, just as John said it would. I spray all surfaces that I touch with my hands and arms as well as the pan (top and bottom), the metal tray on which the pan rests and the table under the scale. In six months or so of using the spray I’ve re-applied it about two or three times; it certainly isn’t something that you need to do each time you sit down to load. Before using the spray, it was not uncommon for me to re-zero the scale 10 times in the course of loading 72 rounds; now it might need it once during a session.”
Protect Your Hearing — Wear Protection Whenever You Shoot
Noise induced hearing loss and tinnitus are two of the most common afflictions for recreational shooters and hunters. Everyone knows that gunfire is loud, but very few people understand the repercussions that shooting can have on their hearing until it’s too late.
The better quality suppressors can reduce the noise of a gunshot by 20 to 35 decibels (dB). Good muffs or plugs will reduce sound by 23 to 33 dB. By decreasing the overall sound signature, suppressors help to preserve the hearing of recreational shooters and hunters. Even the most effective suppressors, on the smallest and quietest calibers (.22 LR) reduce the peak sound level of a gunshot to between 110 to 120 dB. To put that in perspective, according to the National Institute for Occupational Safety and Health (NIOSH), that is as loud as a jackhammer (110 dB) or an ambulance siren (120 dB). For normal caliber handguns and rifles, suppressed sound levels routinely exceed 130 dB, just shy of OSHA’s “hearing safe” threshold of 140 dB.
According to Dr. William W. Clark, the current Director of the Washington Univ. School of Medicine’s Audiology/Communication Sciences Program, a “serious threat to hearing comes from recreational hunting or target shooting”. This is in large part due to the fact that many people choose not to use traditional hearing protection devices like earplugs and earmuffs because they want to be able to hear their surroundings. Multiple studies have found that between 70 to 80% of hunters never wear earplugs or earmuffs, and nearly half of all target shooters don’t consistently wear traditional hearing protection. Thus, it should come as no surprise that for every five years of hunting, hunters become seven percent more likely to experience high frequency hearing loss.
This article is based on information from the American Suppressor Association (ASA). Since the ASA’s formation in 2011, three additional states have legalized suppressor ownership and 18 states have legalized suppressor hunting. For more information, visit www.AmericanSuppressorAssociation.com.


 Back in the old days, Pat McMillan told me: “You can not have two bags filled so hard that you gun bounces on them in the process of firing round at your target, especially if you have a rig with a very flexible stock. The bags must be set up in a manner for them to absorb the initial shock of the firing pin moving forward and igniting the primer.


 These three amazing videos were all created by the gifted computer graphics artist Matt Rittman. On his


 The Risk of Hearing Loss


 Apparently reducing static charges on and around electronic scales can reduce their propensity to drift, lessening the problem of “wandering zero”. Just how and why static charges interfere with scale performance is unclear, but many shooters have noticed that static electricity can cause electronic scales to behave strangely. So how do you reduce static charges around your digital balance? GS Arizona has found a very simple solution — an anti-static aerosol spray — that, by all indications, actually works. When this “spray-can solution” was suggested by a fellow shooter, GS was skeptical. However, he tried the stuff and he says that it really does help the scale maintain zero over time, with much less observed drift.


