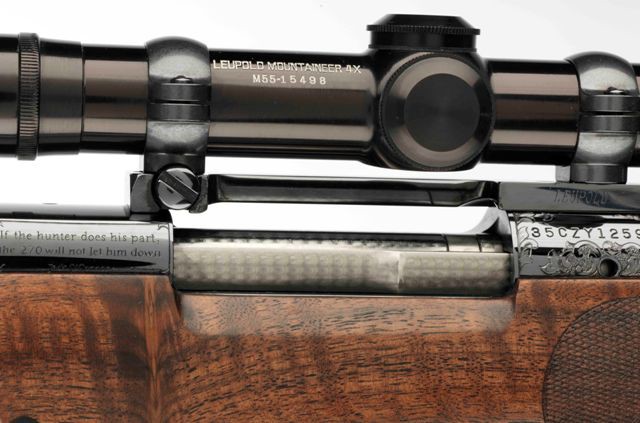
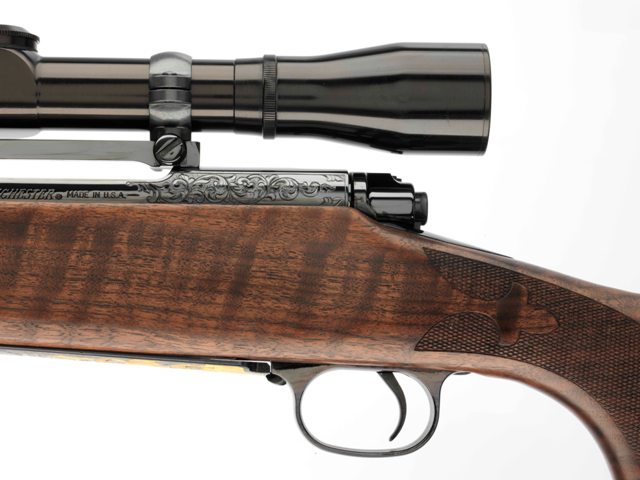
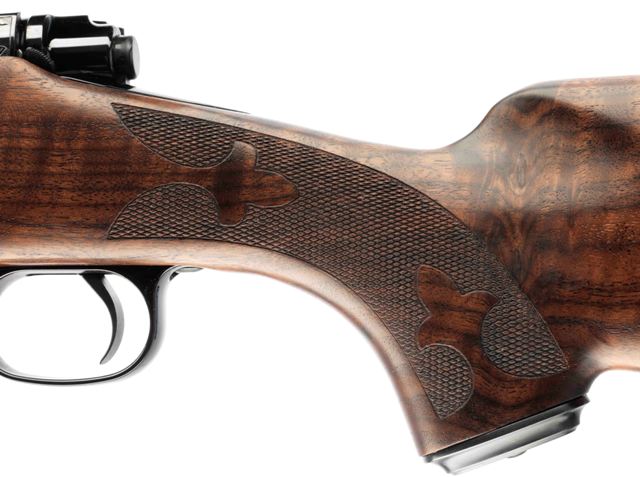
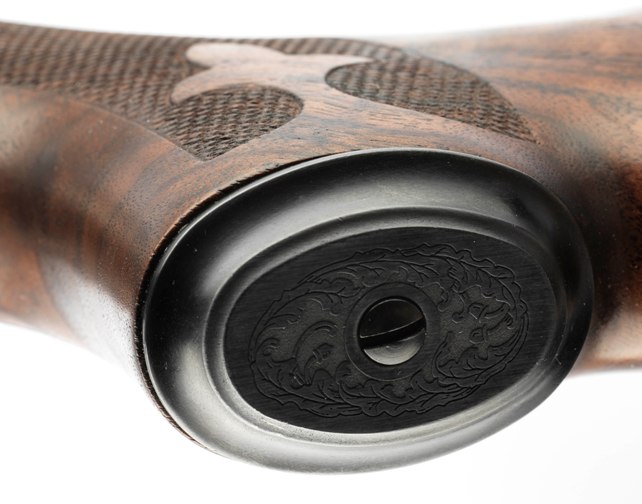
Classic hunting rifles never go out of style. We thought our readers would enjoy some photos of a special Jack O’Connor Tribute rifle in .270 Winchester. This unique Model 70 is a featured SHOT Show 2013 rifle. It is being auctioned on Gunbroker.com, with proceeds to benefit hunting and shooting sports. Bids are currently approaching $7,000.00 with bidding open through January 18, 2013.
Winchester Repeating Arms states that this 2013 SHOT Show Winchester Model 70 will be the last-ever Jack O’Connor Tribute rifle. The stock for this rifle is AAA grade Claro Walnut with Ebony forearm tip and shadowline cheekpiece. The rifle’s metalwork has been hand-engraved by the artisans at Baron Engraving. The rifle features a featherweight contour, free-floating barrel with target crown.
Interestingly, the Leupold 4X Mountaineer riflescope mounted on this rifle is an original 1950s-era Mountaineer from the vaults of Leupold & Stevens.
Sporting Classics offers a collection of great Jack O’Connor stories from the pages of Outdoor Life, Field & Stream, Petersen’s Hunting and other popular magazines of his day. This 440-page book, entitled Classic O’Connor: 45 Worldwide Hunting Stories, is a sequel of sorts to Sporting Classics’ popular compendium, The Lost Classics of Jack O’Connor.
In this collection, Jack O’Connor recounts his worldwide hunting adventures, during which he pursued everything from ducks to grizzlies, pheasants to kudu. Classic O’Connor presents several of the author’s greatest gun stories and a large selection of never-before-published photographs of the celebrated sportsman and his family on hunting adventures around the world. The book is illustrated with 40+ drawings by acclaimed artist Ron Van Gilder. Hardcover with dust jacket, the book lists for $35, but it can be purchased on Amazon.com for just $23.07.
The Hunting Rifle by Jack O’Connor
Another O’Connor title worth reading is The Hunting Rifle, still considered one of the definitive works on selecting a hunting rifle and cartridge. One owner of The Hunting Rifle explains:
“It would benefit every hunter to take the time and read this book. It offers a corrective to the spirit of things that have gripped the hunting scene lately. Today, if one reads a hunting magazine, [one is] offered the view that you need the fastest and loudest cartridges, rifles with special finishes and the most expensive of anything. Ole Jack reminds us that many have killed game with ‘lesser’ guns for a very long time, and that these new gimmicks will not make you a more lethal hunter.”
LuckyGunner.com, a leading online ammo vendor, has conducted a remarkable “torture-test” comparison of brass-cased and steel-cased .223 Rem ammunition. Four different kinds of ammo (one brass-cased, three steel-cased) were fired through four different Bushmaster AR15s — ten thousand (10,000) rounds PER GUN. The idea was to see if brass-cased ammo was better than the cheaper, steel-cased ammunition. During the course of the project, Luckygunner’s testers logged malfunctions and checked for accuracy, chamber pressure, gas port pressure, chamber wear, and overall barrel wear. At the end of the test, the well-worn barrels were sectioned to see the effect of thousands of rounds… and the results weren’t pretty.
Test Findings: For a multitude of reasons, the test crew determined that Federal brass-cased ammo was “healthier” than steel-cased ammo. The brass-cased ammo shot more accurately, had far fewer malufunctions, and produced less barrel wear. The USA-made brass-cased ammo also showed more consistent velocities. CLICK HERE to READ FULL TEST.
Watch the video below for a summary of results:
Torture Test Procedure
Four types of .223 Rem ammo were tested: Federal brass-cased 55gr FMJBT; Wolf steel-cased (polymer coating) 55gr FMJ; Tula steel-cased (polymer coating) 55gr Bi-Metal Jacket; Brown Bear steel-cased (lacquer coating) 55gr Bi-Metal Jacket. Each ammo type was paired with a specific Bushmaster AR-15. Tests were performed at various round-count stages:
At the start: record accuracy, velocity, chamber and gas port pressures, make chamber cast
After 2,000 rounds: record accuracy, velocity
After 4,000 rounds: record accuracy, velocity
After 5,000 rounds: record throat erosion, make chamber cast
After 6,000 rounds: record accuracy, velocity
After 8,000 rounds: record accuracy, velocity
After 10,000 rounds: record accuracy, velocity, chamber and gas port pressures, throat erosion, extractor wear, chamber cast, barrel wear, make chamber cast.
During testing, rifles were cleaned according to a preset schedule and temperatures were monitored. After testing, LuckyGunner sectioned the barrels and made careful inspections.
Click the links below for specific data, test results, and conclusions:
During the testing process, all malfunctions of each rifle-ammo combination were logged. The brass-cased Federal ammo was the clear winner:
Federal: 10,000 rounds, 0 malfunctions. Brown Bear: 10,000 rounds, 9 malfunctions
(5 stuck cases, 1 mag-related failure to feed, 3 failures to cycle.) Wolf: 10,000 rounds, 15 malfunctions (stuck cases) Tula: DNF (6,000 rounds in alternate carbine, 3 malfunctions)
Barrel Wear and Throat Erosion
Some of the barrels didn’t make it to 10,000 rounds: “The steel cased/bimetal jacketed ammunition caused accelerated wear to the inside of their respective bores. While the barrel of the Federal carbine had plenty of life left, even after 10,000 rounds … the Wolf and Brown Bear barrels … were completely shot out by 6,000 rounds. At the end of the test, the chrome lining of the Wolf and Brown Bear barrels was almost gone from the throat forward, and the barrels had effectively become smoothbores[.] A throat erosion gauge could be dropped into the bore from the muzzle end with absolutely no resistance.”
Barrel tuners have been used successfully in rimfire benchrest for many years (see photo below). While there are competing theories as to how and why barrel tuners work on rimfire rifles, there is no question that the accuracy of some rimfire barrels can be improved with the addition of a tuner. By changing the position of weights at the end of the barrel, we’ve seen shooters shrink their average group size as well as adjust the “sweet spot” for different lots of rimfire ammo. On the other hand, tuners can be the source of great frustration; some installations may yield little or no benefit. A shooter may have to experiment with a variety of different tuner designs (and weights) to find the optimal configuration.
Centerfire Tuners–Still a Work in Progress
In centerfire benchrest competition, the vast majority of competitors do not use tuners, though a few short-range shooters such as Gene Bukys and Jackie Schmidt have enjoyed considerable success. Gene has won major championships with tuned rifles. In 2011 Gene won both the Super Shoot and World Benchrest Championship (WBC), and Gene recently set a new NBRSA Sporter Class Grand Agg Record.
Centerfire benchrest guns typically employ shorter barrels with a much fatter contour (larger diameter) than rimfire rifles. Because centerfire rounds produce much higher pressures and velocities that a 22LR, a centerfire barrel also exhibits much different vibration characteristics than a typical rimfire barrel. Nonetheless, there are pioneers working with centerfire tuners who believe that tuning may be the “next leap forward” in centerfire accuracy.
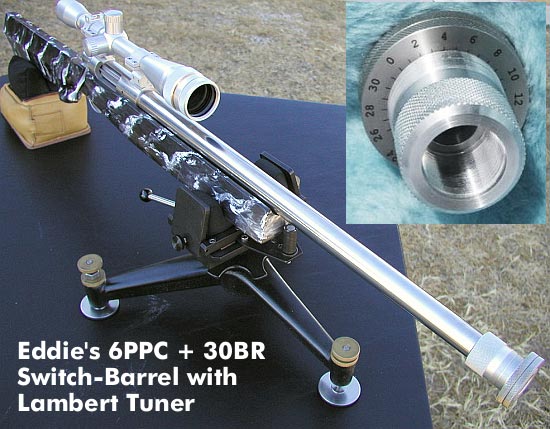
Shown below is a switch-barrel benchrest rifle built by Forum member Eddie W. of Texas. It features a dual-port Hall “M” action with a ShadeTree Engineering Tuner crafted by Butch Lambert. The gun is designed to take both a 6PPC barrel for group shooting and a 30BR barrel for score shooting. The gun was barreled by Wayne Shaw, and Eddie did the stock work himself. Eddie reports: “It is a very accurate rifle.”
Will we see more tuners on centerfire rifles? Only time will tell. Some folks believe that, since one can easily adjust the loads shot by centerfire guns (by tinkering with the powder charge and seating depth), tuners have limited utility. On the other hand, tuner advocates such as Gene Beggs believe tuners can help keep your group sizes small even as conditions (temperature, humidity) change. Gene believes that, with an appropriate tuner, you can spend less time fiddling with the load specs (changing your powder charge) and instead “dial in” your sweet spot using the tuner.
The tool-makers at 21st Century Shooting have come up with a very slick new Precision Hand-Priming Tool. This extremely well-made, benchrest-grade unit raises the bar among single-primer seating tools. Feel is great, changing shell-holders is simple, and nothing else on the market offers better control over primer seating depth. The tool’s precision-adjusting head provides clicks in .0025″ increments for precise seating depth. The tool’s body, internals, and shell-holders are stainless, while the handle is anodized aluminum. Price is $118.00 for the tool itself. Shell-holders (sizes from 17 Remington up to .338 Lapua Magnum) cost $7.99 each.
21st Century Priming Tool Review By Boyd Allen
I have been priming cases, with various hand-priming tools, for about three decades, and in the process have pretty much tried them all, from least to most expensive. When I found out that this new 21st Century tool was adjustable for seating depth, I wondered about that. After all, what do I, who believes in seating by feel, need with adjustable seating depth? Well…..I was wrong. Let me explain.
Why Adjustment for Primer Seating Depth Is Important
Most hand-seating tools do not have an adjustment for how far up the priming punch comes up into the shell holder. As a result, when priming a case with a deep pocket, especially if there has been some wear of the tool’s linkage, the finger/thumb lever may contact the tool’s body before the primer is fully seated. Having a primer seated too high can cause a myriad of problems. Prior to this, the only seater that I had used that had an adjustable linkage was the Sinclair tool, and adjusting its linkage requires disassembly — regular disassembly if you want to keep it perfect. That’s not convenient. The Sinclair is good tool, but a pain in the neck to adjust.
Precision Control Over Seating Depth — With Click Adjustment
The 21st Century Priming Tool offers quick and easy depth adjustment (unlike its rival from Sinclair). The 21st Century unit can be adjusted in precise increments (.0025”) more quickly than you can read this sentence. The knurled head of the tool is threaded onto the body, which has a very sturdy ball and spring detent indexing system that is easy to adjust and precise. Clicks are secure and positive. With this feature, you can set the tool so that the handle is in any position (distance from the tool body) that you find convenient, when the primer is fully seated. Additionally, since leverage increases as the handle approaches the tool body, different stopping points afford differing mechanical advantages (more or less effort required) and sensitivity. By doing a little experimenting, I have found a point of adjustment that give me better feel for when the primer hits the bottom of the pocket, without overshooting the mark, while keeping the force requirement within a range that is comfortable when priming a large number of cases.
Quick and Easy Shell-Holder Changing
Changing shell holders is easily accomplished. No extra hex-wrenches or tools are needed, and there are no tiny set screws to roll of the desk, to be lost forever in the carpet, never to be heard from again until you hear them rattling up the vacuum cleaner hose. To swap shell-holders, simply screw the head off of the body, lift off the one that you one that you are replacing, set the one that you intend to use in place (assuming that it used the same size primer) and screw the head back down to the setting that you want. Changing primer sizes is equally easy. NOTE: The tool requires 21st Century-made shell holders. These may be turned (relative to the handle) so that the loading slot opening faces whatever direction you prefer.
Fit, Finish, and Feel
The body and head of the tool, as well as the internal linkages, are all made from stainless steel. These closely-fitted parts are precisely machined, with an smooth, attractive finish. The handle is black anodized aluminum. Overall, the tool is well-shaped, and built like a stainless/aluminum brick.
Bottom Line: Great Tool That Works Exceptionally Well I can’t imagine anyone, who uses a single-primer tool of this type, not liking this tool. When it comes to hand reloading tools, I can afford to have pretty much whatever I want (within reason). After testing and using this tool, I pulled my Sinclair tool from its case, and replaced it with this one. That should say it all. After using this tool, I will have to give serious consideration to other 21st Century reloading products the next time I need a new tool. One thing is for sure — we have an important new player in the design and manufacture of top end of reloading equipment. 21st Century’s Precision Priming Tool “raises the bar” among single-primer seating tools.
Tool Size Considerations
I wrote the review and then took the pictures, which, upon reflection, make the tool look smaller than it is, because of the size of my hands. I thought about putting a ruler in the pictures, but rejected that as visual clutter, so I will simply tell you that from tip of thumb to that of my little finger, my right hand measures a little over 10 inches, and the palm is 4 inches wide. The size of the tool is just right.
RCBS has a new made-in-USA single-stage reloading press. With its innovative “moving die/static cartridge” design, the new RCBS Summit Press definitely demonstrates “out of the box” thinking. Unlike other presses, the case does not move. Rather, the reloading die comes down to the case. With the press bolted on your reloading bench, all operations of the Summit take place ABOVE the bench-top.
The new Summit Press features a rugged cast-iron frame with all-steel linkages. The press is very strong with minimal flex and slop in use. This allows you to “bump” your case shoulders and seat bullets with great precision and repeatability. The handle can be switched from right to left side (good for southpaws), and the open-front design provides good access, facilitating quick die changes. The 4.5-inch opening allows you to work with tall cases. Beneath the shell-holder is a spent primer catcher.
The new Summit press has a beefy 2-inch diameter ram, with compound linkages for plenty of leverage. A zerk fitting is included for easy lubrication. The press will accept larger bushings for oversize 1-inch dies.
Summit Press for $207.94
The new Summit Press (RCBS item #09290) lists for $269.95. However, Midsouth Shooters Supply offers the Summit Press for $207.94. An optional short handle costs $15.27 at Midsouth ($19.95 MSRP).
RCBS Summit Press Features:
• Bench-top operation
• Massive 2-inch diameter ram
• Ambidextrous handle
• Compound leverage
• 4.50-inch operating window
• Spent primer catcher
• Full frontal access
• Accepts bushings for 1″ die bodies
• Press adapter bushing
• Zerk lubrication fitting
• Made in USA
Product tip by EdLongrange. We welcome reader submissions.
The better, up-to-date ballistics programs let you select either G1 or G7 Ballistic Coefficient (BC) values when calculating a trajectory. The ballistic coefficient (BC) of a body is a measure of its ability to overcome air resistance in flight. You’ve probably seen that G7 values are numerically lower than G1 values for the same bullet (typically). But that doesn’t mean you should select a G1 value simply because it is higher.
Some readers are not quite sure about the difference between G1 and G7 models. One forum member wrote us: “I went on the JBM Ballistics website to use the web-based Trajectory Calculator and when I got to the part that gives you a choice to choose between G1 and G7 BC, I was stumped. What determines how, or which one to use?”
The simple answer to that is the G1 value normally works better for shorter flat-based bullets, while the G7 value should work better for longer, boat-tailed bullets.
G1 vs. G7 Ballistic Coefficients — Which Is Right for You?
G1 and G7 refer both refer to aerodynamic drag models based on particular “standard projectile” shapes. The G1 shape looks like a flat-based bullet. The G7 shape is quite different, and better approximates the geometry of a modern long-range bullet. So, when choosing your drag model, G1 is preferrable for flat-based bullets, while G7 is ordinarily a “better fit” for longer, boat-tailed bullets.
Drag Models — G7 is better than G1 for Long-Range Bullets
Many ballistics programs still offer only the default G1 drag model. Bryan Litz, author of Applied Ballistics for Long Range Shooting, believes the G7 standard is preferrable for long-range, low-drag bullets: “Part of the reason there is so much ‘slop’ in advertised BCs is because they’re referenced to the G1 standard which is very speed sensitive. The G7 standard is more appropriate for long range bullets. Here’s the results of my testing on two low-drag, long-range boat-tail bullets, so you can see how the G1 and G7 Ballistic coefficients compare:
G1 BCs, averaged between 1500 fps and 3000 fps:
Berger 180 VLD: 0.659 lb/in²
JLK 180: 0.645 lb/in²
The reason the BC for the JLK is less is mostly because the meplat was significantly larger on the particular lot that I tested (0.075″ vs 0.059″; see attached drawings).
For bullets like these, it’s much better to use the G7 standard. The following BCs are referenced to the G7 standard, and are constant for all speeds.
Many modern ballistics programs, including the free online JBM Ballistics Program, are able to use BCs referenced to G7 standards. When available, these BCs are more appropriate for long range bullets, according to Bryan.
[Editor’s NOTE: BCs are normally reported simply as an 0.XXX number. The lb/in² tag applies to all BCs, but is commonly left off for simplicity.]
If you’ve never visited SHOT Show, you may not know what a huge operation it represents. Filling the Sands Expo and Convention Center in Las Vegas with 1600 exhibits covering 630,000 square feet is like building a small indoor city from scratch. Starting from bare floors and walls, workers labor furiously to assemble 1600+ booths before Show attendees storm the gates. And then, a few days later, all those exhibits must be torn down, boxed up, and shipped out. It’s a Herculean task. And here, with the aid of time-lapse photography, you can experience the entire SHOT Show in just 96 seconds.
In this short video filmed at SHOT Show 2012, time-lapse photography is used to compress the entire SHOT Show into one 96-second montage. Watch a small section of the Show floor from start to finish (including prep time) at this year’s event. It’s a fun video to watch — you can “experience” an entire Show day in a mere 10 seconds. For example, Tuesday starts at the 0:33 second mark and Wednesday begins just 10 seconds (of video time) later. Appropriately, the soundtrack is “Flight of the Bumblebee” by Nikolai Rimsky-Korsakov.
Nightforce Optics has created quite a stir in the tactical shooting community with the announcement of its new 5-25x56mm First Focal Plane scope, which it calls the “B.E.A.S.T.”. The news is in the numbers — this new scope offers a whopping 120 MOA of elevation travel, and you get a full 60 MOA travel with each rotation of the turret. That’s right — 60 MOA with one turn. With many modern cartridges you can get to 1200 yards (and maybe farther*) with a single revolution — that eliminates all sorts of user-error issues when dialing back-and-forth between yardages.
This is a first-focal-plane design, so the reticle stays constant relative to the target, allowing ranging at any magnification. The scope is offered with four (4) click-value choices: 1/4 MOA, 1/2 MOA, 0.1 Mil, and 0.2 Mil. Whether you chose MOA clicks or Mil-based clicks, you can get an appropriate reticle because Nightforce offers both the MOAR ranging reticle and the Mil-R ranging reticle. The three other reticle options are: MD2.0, TReMoR, and H59.
The new B.E.A.S.T. 5-25x56mm Nightforce has a mounting length of 5.92″ and weighs just 39 ounces. If you need illumination for low-light work, you’ll like the new B.E.A.S.T. scope. It offers external-control digital illumination with Unique i4F™ four-function brightness control. Other features are listed below.
Nice Scope with a Beastly Price
Nightforce says that “B.E.A.S.T.” stands for “Best Example of Advance Scope Technology” — some marketing guy’s bright idea we suppose. Perhaps “B.E.A.S.T.” better signifies “BEAST of a price”. This scope, with either MIL-R or MOAR reticles, costs an astounding $3,298.00! You can build a pretty darn good custom rifle, all premium components, for less than that!
*We used JBM Ballistics to plot the trajectory of a .308-caliber 168gr Berger Match Target BT launched with a 2800 fps muzzle velocity (sea level with 59° temp). Starting with a 100-yard zero, JBM calculates 52.5 MOA drop at 1200 yards and 62.6 MOA drop at 1300 yards.
Forum member Florian from Switzerland (SimplyRight.ch) has created an interesting new grid target for precision practice work.
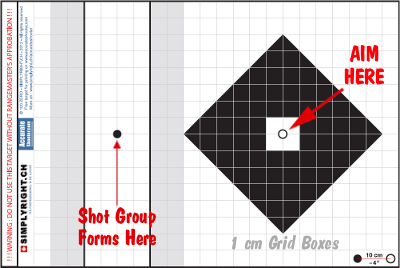
The concept behind the target is to allow a marksman to shoot a string of shots (with the same hold) without obliterating his aiming point. Florian’s Swiss Offset Target does this by separating the point of aim from point of impact (POI). On this target, POI is 10 cm (approx. 4″) over to the left.
We’ve found that Florian’s Offset Target is also very good for precise long-range shooting. At 600 yards and beyond, the big black diamond (12 cm or 4.72″ from point to point) provides a nice big aiming center. You can align your vertical and horizontal crosshairs to intersect the points of the diamonds (with intersection of crosshairs in white center of black diamond). That gives you a very precise sight picture. Then you can see your bullet holes appear “in the white” to the left side of the target. At long range it’s much easier to see holes “in the white”. And the grid lines let you gauge group size from afar.
More Uses for the Swiss Offset Grid Target
We’ve also found that this target lets you do a “quick and easy” Box Test with your scope. The target is designed as a precise grid. Starting at the lower left corner, you can click up X clicks, then right Y clicks, then down X clicks, then back left Y clicks, to see how your scope tracks. Also, since Florian’s target is set up with 1 CM grid boxes, this target is ideal for testing the true click values for metric-based scopes. Thanks to Florian for developing this Swiss Offset Grid Target. You may find new uses for it that we haven’t thought about yet!
How to use the Swiss Offset Target:
1. Print the target as a PDF file. Check if the size is correct by measuring the space between the two little circles’ centers. This should be 10cm (4″). (One square = 1cm).
2. Place the target horizontally at 100 meters for metric scope or 100 yards for inches and MOA scope. (We suggest using a small contractor’s level to ensure the target is mounted straight)
3. With your already-zeroed rifle, put in the amount of clicks needed to shoot 4 inches left at 100 yards (or 10cm on the left at 100 meters). Write down the amount of clicks it takes to move the point of impact the correct amount.
4. Aim at the circle inside the black diamond and shoot. (Your group should cover the small black circle at left (between the two gray columns).
5. Adjust your scope if needed.
6. Confirm your accuracy and click values by clicking back right and shooting (one time) at the virgin circle in the middle of the diamond.
Becigneul Case Turning Motor, by German Salazar
Although there have been a variety of similar devices and ‘case lathes’ offered for sale in the past, they’ve been priced fairly high. Paul’s unit is reasonably priced ($220.00) and built like a tank. The motor turns at about 180 rpm which is just right for neck turning. What’s really nice is that the motor has enough torque to hold its speed throughout the whole operation and a/c power to run all day long!
The unit’s design is fairly straight-forward: a surplus electric motor turns a Forster case-holding collet. Paul makes a nice knurled collar to open and close the collet.Power is controlled by a household type wall switch attached to a long cabe. The whole assembly is mounted on a nice hardwood base.
Video of Paul Becigneul’s Case Turning Motor in Use
In operation, it works very well. The collet has enough clamping power to hold the case after a quick hand-tightening, no wrench is needed (although you can use one if you are so inclined). A quarter turn of the collar opens the collet and a quick turn of the wrist tightens it back up. As with any powered case neck turning device, the case wobbles a bit as it turns. This doesn’t matter a bit as the turning cutter is held in your hand (which is free to move) and the cutter’s arbor is the actual alignment device. The wobble is the same or less than what I had using a power screwdriver with a K&M holder.
For more information, email Paul Becigneul via: pbike4466 [at] directv.net. In 2012, the basic unit cost $220.00 each collet was $10 and shipping is $20 to most U.S. locations.
Editor’s Comment: In the video, Paul uniforms case flash-holes with a Lyman tool (from the inside) and then uniforms primer pockets (from the outside) with a K&M tool. While we do believe that flash-holes should be inspected to ensure there are no obstructions or flakes blocking the hole, we have not found that flash-hole or primer-pocket uniforming produced measurable improvements in accuracy with Lapua 6mmBR brass. In fact, in our tests using a manual K&M flash-hole uniformer, ES/SD actually got worse after the flash-holes were “uniformed”.
Keep in mind also that many deburring tools for 0.059 (PPC-size) flash-holes actually over-cut substantially, reaming the holes to as wide as 0.068″. The Lapua PPC/BR flash hole is spec’d at 1.5mm, which works out to 0.059055″. Most of the PPC/BR flash-hole uniforming tools on the market use a 1/16″ bit which is nominally 0.0625″, but these often run oversize — up to 0.067″. If you like to uniform your primer pockets, be our guest (this can be useful with lesser-quality brass). But before pocket-uniforming dozens of cases, you might do a comparison test (by shooting uniformed vs. un-uniformed ammo) to see whether this operation actually improves accuracy with the brass you are using.


Sporting Classics offers a collection of great Jack O’Connor stories from the pages of Outdoor Life, Field & Stream, Petersen’s Hunting and other popular magazines of his day. This 440-page book, entitled Classic O’Connor: 45 Worldwide Hunting Stories, is a sequel of sorts to Sporting Classics’ popular compendium, The Lost Classics of Jack O’Connor.


 Barrel Wear and Throat Erosion


 Centerfire Tuners–Still a Work in Progress


 The tool-makers at


 I can’t imagine anyone, who uses a single-primer tool of this type, not liking this tool. When it comes to hand reloading tools, I can afford to have pretty much whatever I want (within reason). After testing and using this tool, I pulled my Sinclair tool from its case, and replaced it with this one. That should say it all. After using this tool, I will have to give serious consideration to other 21st Century reloading products the next time I need a new tool. One thing is for sure — we have an important new player in the design and manufacture of top end of reloading equipment. 21st Century’s Precision Priming Tool “raises the bar” among single-primer seating tools.


 RCBS Summit Press Features:
 The better, up-to-date ballistics programs let you select either G1 or G7 Ballistic Coefficient (BC) values when calculating a trajectory. The ballistic coefficient (BC) of a body is a measure of its ability to overcome air resistance in flight. You’ve probably seen that G7 values are numerically lower than G1 values for the same bullet (typically). But that doesn’t mean you should select a G1 value simply because it is higher.

 Drag Models — G7 is better than G1 for Long-Range Bullets
 If you’ve never visited SHOT Show, you may not know what a huge operation it represents. Filling the Sands Expo and Convention Center in Las Vegas with 1600 exhibits covering 630,000 square feet is like building a small indoor city from scratch. Starting from bare floors and walls, workers labor furiously to assemble 1600+ booths before Show attendees storm the gates. And then, a few days later, all those exhibits must be torn down, boxed up, and shipped out. It’s a Herculean task. And here, with the aid of time-lapse photography, you can experience the entire SHOT Show in just 96 seconds.


 Forum member Florian from Switzerland (


