Every shooter should have a good rimfire rifle, both for fun shooting and for training. The .22 LR is very affordable to shoot, and the more potent .17 HMR and .22 WMR rounds also are great for small varmints out to 200 yards or so. Among the rimfire rifle makers, the Czech manufacturer CZ (Česká Zbrojovka) has been a world leader for many decades. In today’s Video round-up we feature a variety of CZ rimfire rifles including the the all-new CZ 457, the versatile CZ 455 VPT, and the classic CZ 452. We also include one semi-auto, the CZ 512 in .22 Winchester Magnum Rimfire (WMR).
New Generation CZ 457 with Upgrades
The CZ 457 may be the most modular precision rimfire on the market. You can swap barrels and magazines easily. The interchangeable barrel feature is by far the best feature of the CZ 457. Want to shoot .22 WMR for varmint hunts then transition to a .22 LR for precision shooting? No problem — five minutes and four screws are all you need. The CZ 457 is also an excellent value — it’s WAY better than a 10/22 but a fraction of the cost of high-end custom rimfire rigs. In the second video below, the CZ 457 goes head to head
In this video, Josh of Pursuit of Accuracy drives nails at 100 yards with his CZ 457:
And here Josh comparison-tests his Lilja-barreled CZ 457 head-to-head with the much more expensive Vudoo V22. The results may surprise you.
CZ 457 MTR Varmint — Product Showcase and Review
We really like the relatively new CZ 457 Varmint MTR .22 LR rifle. Along with other CZ 457 models, the MTR (“Match Target Rifle) Varmint features a completely new action that runs very smoothly with shorter bolt throw. The new 457s also have an American-style, push-to-fire safety. The new-generation actions have been trimmed back nearly one-inch in length, and slab-sided to reduce the footprint and weight of the actions. CZ ditched the 90º bolt rotation of the past in favor of 60º rotation. This change provides more room between bolt handle and scope for easier cycling of rounds. It also allows for the use of scopes with larger ocular bell diameters and lower ring heights.
The well-designed MTR stock has good ergonomics and nice stippling on the grip and fore-end. We were pleased to note that, with the 457 series, CZ is once again offering steel magazines that are interchangeable with older 452/455 magazines.
Here our friends at Area 419 offer a side-by-side comparison between a $2300+ rifle with Vudoo V-22 action in Manners stock and the $752.00 CZ 457. On a bang-for-the-buck basis, the CZ wins hands down. However, the Vudoo V-22 does offer centerfire-style action cycle, which helps with training. It also can run Rem 700-compatible triggers.
CZ 457 Royal Model — Handsome and Very Accurate
Above is a British review of the CZ 457 “Royal” model. This features a premium-grade Turkish walnut stock with contrasting dark fore-end tip. This rimfire rig is offered for $779.99 in the USA. CLICK HERE for a detailed written review on ShootingTimes.com. The Shooting Times’ test rifle showed very impressive accuracy with Lapua and SK Match ammo, with average 5-shot 50-yard groups under one half inch (Lapua Midas+ 0.41″; SK Long-range Match, 0.39″). SEE Full Test Results table.
CZ 455 Varmint Precision Trainer in Manners Stock
Rimfire cross-training allows PRS competitors to build their skill sets without breaking the bank (or burning out barrels). One great .22 LR option for cross-training is the CZ 455. The TFBTV video below spotlights the CZ 455 Varmint Precision Trainer (VPT), a smooth-running .22 LR bolt action. This factory rifle (now superseded by the CZ 457) was designed specifically as a training tool for precision long-range competition. It boasts a Manners composite stock and 20.5 or 24-inch heavy barrel. The 0.866″-diameter tube is threaded and suppressor-ready. The model 455 VPT is mag-fed and comes with a crisp trigger that adjusts to two pounds. If you can find one, expect to pay about $850 but you’re getting a premium Manners stock that originally cost $534 by itself.
Field Testing the CZ 455 Varmint Precision Trainer
CZ 452 — Classic Bolt-Action Rimfire Rifle
The CZ 452 is an affordable classic. It is ultra-reliable, easy to clean and maintain, and you’ll find very good examples on the used market for under $400. This is an excellent first rifle for a young family member. In this video, The TFB TV team tests a CZ 452-2E fitted with a suppressor. As the 452 series is being replaced, if you want to buy a new 2019 CZ 452, you’ll need to spend big bucks on the Grand Finale model: “Produced in limited quantity, the 452 Grand Finale (MSRP $1189.00) is a last hurrah to the venerable CZ 452. Built using the last 452 actions ever produced, on the original manual barrelling equipment and at the Brno workshop, the Grand Finale [features] hand-engraved scroll-work on the action, barrel, bottom metal and scope rings. The upgraded American walnut is trimmed with an ebony fore-end and grip cap.”
Semi-Auto CZ — Model 512 American in .22 Magnum Rimfire
The folks at Varminter.com are avid varmint hunters, who test varmint rigs in the real world, seeing how they perform in the varmint fields. Varminter.com was quite impressed with the CZ Model 512 American semi-auto .22 WMR (Winchester Magnum Rimfire) rifle. The testers found the Model 512 to be accurate, extremely reliable, and fun to shoot. Watch the video to field tests conducted in California. This self-loading rifle performed ultra-effective on California ground squirrels. Erik Mayer, Varminter.com’s publisher says: “The 22 Magnum (.22 WMR) is beginning to see a resurgence of sorts, as the rimfire ammunition becomes more readily available. Because of this, rifles like the CZ Model 512 have also begun to see a rise in interest again”. CLICK HERE for FULL REPORT with accuracy findings for multiple ammo types.
SSG Amanda Elsenboss, now with the Pennsylvania National Guard, wass the 2021 NRA National High Power Champion and 2019 NRA Long Range National Champion. These two major titles place Amanda among the greatest American shooters and one of only three women in U.S. history to win the High Power title. Amanda combines a superb “mental game” with great gun-handling and wind-reading skills.
In the archives of On The Mark magazine, DCM Emeritus Gary Anderson, an Olympic Gold medal-winning shooter in his younger years, offers sage advice for competitive shooters.
In his article Ten Lessons I Wished I Had Learned as a Young Shooter, Anderson provides ten important guidelines for everyone involved in competitive shooting. Here are the Ten Lessons, but you should read the full article. Anderson provides detailed explanations of each topic with examples from his shooting career.
LESSON 1 – NATURAL ABILITY WILL NOT MAKE YOU A SHOOTING CHAMPION.
(You also need hard work, training effort and perseverance.)
LESSON 2 – ANGER IS THE ENEMY OF GOOD SHOOTING.
(The key to recovering from a bad shot is to stay cool, no matter what happens.)
LESSON 3 – BAD SHOTS CAN TEACH YOU MORE THAN GOOD SHOTS.
(Today, error analysis is one of the most powerful tools for improving scores.)
LESSON 4 – NEVER GO WITHOUT A SHOT PLAN.
(A shot plan is a detailed breakdown of each of the steps involved in firing a shot.)
LESSON 5 – PRACTICE IN BAD CONDITIONS AS WELL AS GOOD CONDITIONS.
(Most competitions are fired in windy conditions or where there are plenty of distractions.)
LESSON 6 – CHAMPIONS ARE POSITIVE, OPTIMISTIC PEOPLE.
(Negative shooters expect bad results; positive shooters expect to train hard to change bad results.)
LESSON 7 – IT’S NOT ABOUT WHETHER YOU WIN OR LOSE.
(It’s about how hard you try to win.)
LESSON 8 – YOUR DOG WON’T BITE YOU AFTER SHOOTING A BAD SCORE.
(Hopefully your coach, parents and friends won’t bite you either.)
LESSON 9 – YOUR PRESS CLIPPINGS CAN HURT YOU OR HELP YOU.
(Winning can go to our heads. We start thinking we are so good we don’t have to work hard any more.)
LESSON 10 — YOU NEVER SHOT YOUR BEST SCORE.
(Great champions are always looking for ways to improve.)
USAMU shooters on the firing line at the Wa-Ke’-De outdoor range in Bristol, IN. Photo courtesy USAMU.
About Gary Anderson Gary Anderson served as the Director of the Civilian Marksmanship Program (CMP) from 1999-2009, and is now DCM Emeritus. As a Nebraska farmboy, Gary grew up hunting and shooting. Dreams of winning an Olympic Gold Medal in shooting led Gary to the U.S. Army. In 1959, he joined the elite U.S. Army Marksmanship Unit. Just two years later, he won his first national championship.
At the 1962 World Shooting Championships in Egypt, Anderson stunned the shooting world by winning four individual titles and setting three new world records. At the 1964 Tokyo Olympics, Gary won the 300m free-rifle Gold Medal, setting a new world record in the process. At the 1966 World Shooting Championships in Germany, Anderson won three additional world titles. At the 1968 Olympics, Gary won a second gold medal in the 300m free-rifle event.
After his “retirement” from international competition, Gary competed in the National High Power Championships, winning the President’s National Trophy in 1973, 1975 and 1976. Over his competitive career, Anderson won two Olympic Gold Medals, seven World Championships, and sixteen National Championships. He is unquestionably one of the greatest American marksmen ever.
In the archives of The First Shot (the CMP’s Online Magazine), SGT Walter E. Craig of the USAMU discusses physical conditioning for competitive shooters, particularly High Power competitors. Fitness training is an important subject that, curiously, is rarely featured in the shooting sports media. We seem to focus on hardware, or esoteric details of cartridge reloading. Yet physical fitness also matters, particularly for High Power shooters. In his article, Craig advocates: 1) weight training to strengthen the Skeletal Muscle System; 2) exercises to build endurance and stamina; and 3) cardiovascular conditioning programs to allow the shooter to remain relaxed with a controlled heart beat.
SGT Craig explains: “An individual would not enter a long distance race without first spending many hours conditioning his/her body. One should apply the same conditioning philosophy to [shooting]. Physical conditioning to improve shooting skills will result in better shooting performance[.] The objective of an individual physical training program is to condition the muscles, heart, and lungs thereby increasing the shooter’s capability of controlling the body and rifle for sustained periods.”
In addition to weight training and cardio workouts (which can be done in a gym), SGT Craig advocates “some kind of holding drill… to develop the muscles necessary for holding a rifle for extended periods.”
For those with range access, Craig recommends a blind standing exercise: “This exercise consists of dry-firing one round, then live-firing one round, at a 200-yard standard SR target. For those who have access only to a 100-yard range, reduced targets will work as well. Begin the exercise with a timer set for 50 minutes. Dry-fire one round, then fire one live round and without looking at the actual impact, plot a call in a data book. Continue the dry fire/live fire sequence for 20 rounds, plotting after each round. After firing is complete, compare the data book to the target. If your zero and position are solid, the plots should resemble the target. As the training days add up and your zero is refined, the groups will shrink and move to the center.”
Fitness training and holding drills help position shooters reach their full potential. Here is 6-Time U.S. National Long Range Champion John Whidden.
Training for Older Shooters
Tom Alves has written an excellent article A Suggested Training Approach for Older Shooters. This article discusses appropriate low-impact training methods for older shooters. Tom explains: “Many of the articles you will read in books about position shooting and the one mentioned above are directed more toward the younger generation of shooters in their 20s. If you look down the line at a typical high power match these days you are likely to see quite a few folks who are in their middle 30s and up. Many people in that age range have had broken bones and wear and tear on their joints so a training program needs to take that into account. For instance, while jogging for an extended period for heart and lung conditioning may be the recommended approach for younger folks, it may be totally inappropriate for older people.”
We talked with the experts at Bartlein Barrels. They confirmed that they have seen many, many more barrels harmed by crown damage caused by improper cleaning than by anything else. If you use a bronze brush, Bartlein recommends that you REMOVE the BRUSH after it passes through the muzzle. This is because the bristles take a set (pointing to the breech) during the out-stroke. In other words the bristles angle back as you push towards the muzzle from the breech. If you drag the brush backwards at the muzzle, you force these bristles to reverse direction abruptly right as they cross the delicate crown. In time, that can damage the crown. NOTE: John Krieger of Krieger Barrels also advises his customers not to pull a bronze brush backwards across the crown.
Response to Skeptics
Whenever we’ve published similar advice, given by guys who are producing some of the most accurate barrels in the world, some readers get extremely angry. They say, “You’re crazy! I’ve was pullin’ triggers when you were still in diapers. I’ve got Hall of Fame points and I say there’s no way a phosphor bronze brush can ever do anything to steel. You’re full of it.” Well, these guys are entitled to their opinion. But here’s our response. Number one, we’re just telling you what the barrel-makers are telling US. Don’t kill the messenger. Number two, many of the guys who say bronze brushes can’t affect the crown are the same guys who feel they need to recrown their barrels every 400-500 rounds (Do we see a connection?). Third, if you don’t think a softer material can affect steel, look at the steel ferrules of a well-used fishing rod — there the steel is worn away by plastic. (With time, water will wear away granite.) Lastly, this Editor can tell you I’ve seen the damage myself, first-hand, using a magnifying glass on much-brushed benchrest barrels. Right at the muzzle, the top edge of the lands had sharp, jagged edges that looked like little shark’s teeth, or the edge of a serrated knife. By contrast, a new barrel will have a nice, smooth straight edge along the top of the lands at the muzzle.
Also Be Careful with Jags
Bartlein’s experts also told us to be careful about the jags you use. Dewey-style jags in particular can cause problems. These have a long shaft with multiple rings with diamond-pattern “teeth”. The teeth are designed to grip a patch. The problem is that the lower rings may be exposed below the patch fabric, so the teeth can grind directly on the rifling and/or crown. Bartlein says Dewey-style metal jags can damage a crown very quickly if any of the toothed rings are exposed, metal-on-metal. Tim North of Broughton barrels also advises against using the Dewey-style jags with toothed rings. Interestingly, Dewey uses the same type of diamond-shaped teeth on the bottom of its “Crocogator” primer pocket tool, so you know those knurled teeth can scrape.
Readers often ask “What’s the difference between a Weaver scope rail and a Picatinny Rail?” The answer is not as simple as it seems. The dimensions of a Picatinny Rail should be consistent (from one rail-maker to another), since there IS a government spec. Conversely, there is some variance in “Weaver-style” rails. The width of the groove is the most important difference between Picatinny Rails and Weaver-type rails. “Mil-spec” Picatinny rails will have a grove width of 0.206″ while Weaver rails typically have a narrower, 0.180″ groove width.
Does your rifle have a Weaver Rail or Picatinny Rail? Check the dimensions to be sure.
A while back, Brownells had a helpful GunTech™ Article that discussed the Picatinny Rail vs. Weaver Rail. That article explained:
What are the differences between the ‘Picatinny’ and the ‘Weaver’ systems? The profile of the two systems is virtually identical. Depending on the quality of the machining done by the manufacturer, the two systems should be indistinguishable from the profile. The key difference lies in the placement of the recoil grooves and with width of the grooves. MIL-STD-1913 (Picatinny) grooves are .206″ wide and have a center-to-center width of .394”. The placement of these grooves has to be consistent in order for it to be a true Picatinny MIL-STD system. Weaver systems have a .180” width of recoil groove and are not necessarily consistent in a center-to-center measurement from one groove to the next.
In many instances, a Weaver system has a specific application that it is machined for, so interchangeability is not necessarily an issue. A MIL-STD-1913 system must adhere to the specifications listed above in order for it to be considered MIL-STD, since the military desires uniformity in the recoil grooves to allow for different systems to be mounted on the weapon with no concern for compatibility.
Now, what does this mean? Boiled down, it means that accessories designed for a Weaver system will, in most cases, fit on a Picatinny system. The reverse, however, is probably not the case. Due to the larger recoil groove, Picatinny accessories will not fit a Weaver system. There are, of course, exceptions to every rule, but for a good rule-of-thumb, [full-width] Picatinny won’t fit Weaver, but Weaver accessories WILL fit Picatinny.
For our readers, here’s a selection of FREE printable precision and fun targets. You can download these targets as PDF files and then print them out on 8.5×11″ paper.
AccurateShooter.com offers a cool page with over 50 FREE downloadable targets. You’ll find all types or FREE targets — sight-in targets, varmint targets, rimfire targets, bullseye targets, tactical targets, load development targets and more. CLICK HERE for all our free targets, including our LOAD DEV target.
We created the above target a decade ago. Since then it has been used by tens of thousands of shooters. It has proven very popular as a load development target, since all your load data fits neatly in the boxes under each target. In fact this target is being employed by both rifle-makers and barrel-makers (including Criterion) to test their products. The target was designed for aiming efficiency. The diamonds have 1/2″ sides and you can align your cross-hairs on the horizontal and vertical lines. It is a clean design that is easy to see even at 200 yards with a 20X scope. When we test, we usually crank in a little elevation, setting the point-of-impact higher, so that our shots fall in the gray circles. That way you leave the squares intact for precise aiming.
Versatile Targets with Multiple Aiming Points
We use the two targets below for load development and precision practice. For the left target, use the corners of the diamonds to align your cross-hairs precisely. The circle dot target (on the right) can also be used for informal rimfire competition at 50 yards. Right-Click Each Target to Download Printable PDFs.
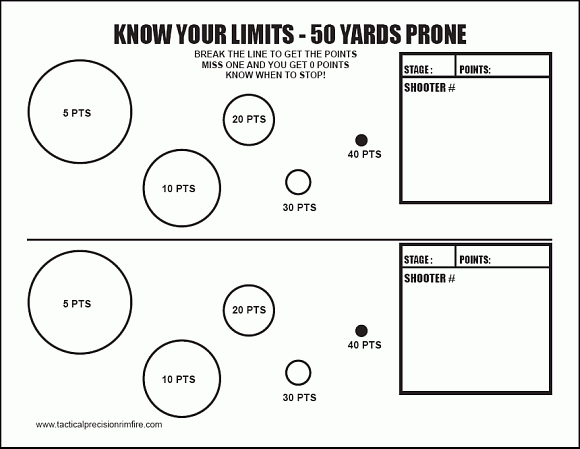
Know-Your-Limits Target for Rimfire Training & Fun Matches
Here’s a rimfire training target with “big to small” target circles. Start with the largest circles, then move to the smaller ones in sequence. This systematic drill provides increasing challenge shot-by-shot. Novices often are quite surprised to see their accuracy improve as they move from bigger to smaller aiming points. That provides positive feedback — always a good thing.
Right Click and “Save as” to download printable PDF versions of target.
FREE NSSF Fun Targets — Dartboard, Golf, Billiards, Bowling Etc.
To help our readers have more fun during National Shooting Sports Month, here are a dozen FREE Targets from the NSSF. Along with Bullseye targets, there are some very cool specialty targets here, including a Golf Course Target, Baseball Diamond Target, Billiards Target, Light Bulb Target, Bowling Pin Target, and even a Windmill Target. Enjoy the myriad possibilities with these 12 fun targets.
Quality Paper Stock Is Important
If you want your self-printed targets to show shots cleanly (and not rip when it gets windy), you should use quality paper stock. We recommend card stock — the kind of thick paper used for business cards. Card stock is available in both 65-lb and 110-lb weights in a variety of colors. We generally print black on white. But you might experiment with bright orange or yellow sheets. Forum Member ShootDots report: “They sell cardstock at Fed-Ex Kinko! I use either Orange or Yellow. That makes it easy to see bullet holes clearly.”
Here are some Target-Printing Tips from our Forum members:
“Staples sells a 67-lb heavy stock that I have settled on. I use the light grey or light blue, either of these are easy on the eyes on bright days. I have used the 110-lb card stock as well and it works fine. It’s just a little easier to print the lighter stuff.” (JBarnwell)
“Cardstock, as mentioned, works great for showing bullet holes as it doesn’t tear or rip like the thin, lightweight 20-lb paper. I’ve never had a problem with cardstock feeding in the printer, just don’t stick too many sheets in there. If I need three targets, I load only three card stock sheets”. (MEMilanuk)
“20-lb bond works pretty well for me if I use a spray adhesive and stick the entire back of the paper’s surface to the backer board.” (Lapua40X)
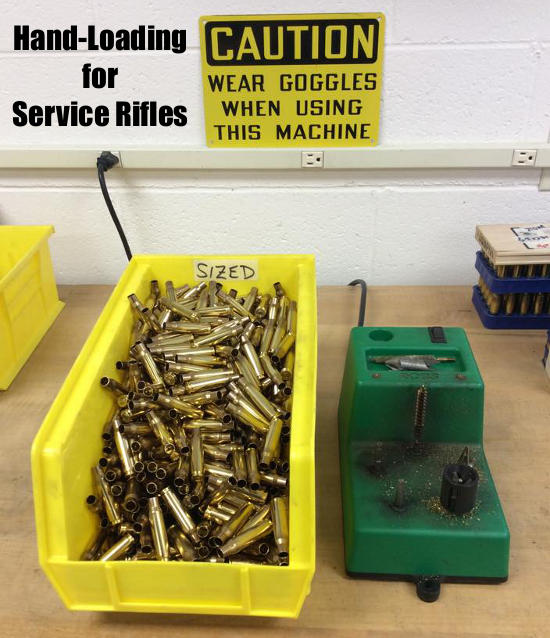
The U.S. Army Marksmanship Unit (USAMU) has published a great series of reloading “how-to” articles on its Facebook Page. This post covers key factors to consider when loading ammunition for Match Rifles and Service Rifles, with a particular focus on self-loading “gas guns”. Visit the USAMU Facebook Page regularly for other, helpful reloading and marksmanship tips.
We offer some “cardinal rules” to help new gas-gun handloaders with safety and efficiency. These address both Match Rifle and Service Rifle versions of the AR15, M1 Garand, M1A, and M110. However, they can also improve safe reloading for many other auto-loaders such as M1 Carbines, FALs, SIGs, etc. The author distilled these principles many years ago to help focus on the essential aspects of these rifles.
RULE ONE: Service Rifles Are Not Benchrest Rifles
Gas-guns require a relatively loose fit between ammunition and chamber (vs. bolt actions) for safe, smooth operation. Many techniques, such as neck sizing and keeping cartridge headspace quite tight, are popular in the extreme bolt gun accuracy realm. However, they are of little value with Service Rifles, and some could even be hazardous. Before adopting a specialized technique, seriously consider whether it is appropriate and beneficial in a gas-gun.
RULE TWO: Never Compromise Safety to Obtain Accuracy
Example: If choosing a brand of great, but ultra-sensitive match primers offers possibly better accuracy at the risk of slam-fires in your design of rifle, don’t do it! You are issued exactly two eyes and ten fingers (best-case scenario). Risking them trying to squeeze 0.25 MOA better accuracy out of an M1A, etc. simply isn’t worth it.
RULE THREE: Tailor the Precision to Your Individual Skill and Your Rifle’s Potential
This has been addressed here before, but bears repeating for newcomers. If you are struggling to break out of the Marksman Class, or using a CMP M1 “As-Issued,” then laboriously turning the necks of your 600-yard brass is a waste of time. Your scores will improve much faster by practicing or dry-firing. On the other hand, if the reigning champions anxiously check your scores each time you fire an event, a little neck-turning might not be so far-fetched.
Verifying Load Improvements — Accuracy hand-loading involves a wide variety of techniques, ranging from basic to rather precise. Carefully select those which offer a good return on investment for your time and labor. In doubt? Do a classic pilot study. Prepare ammo for at least three or four ten-shot groups with your new technique, vs. the same with your standard ammo. Then, pick a calm day and test the ammo as carefully as possible at its full distance (e.g. 200, 300, or 600 yards) to verify a significant improvement. A little testing can save much labor!
This video explains the procedure for ordering an M1 Garand from the CMP.
RULE FOUR: Be Your Own Efficiency Expert
Serious Service Rifle shooters generally think of ammunition in terms of thousands of rounds, not “boxes”, or even “hundreds”. Analyze, and WRITE DOWN each step in your reloading process. Count the number of times each case is handled. Then, see if any operations can be dropped or changed without reducing safety or accuracy. Eliminating just two operations saves 2000 steps per 1000 rounds loaded. Conversely, carefully consider any measurable benefits before adding a step to your routine.
RULE FIVE: In Searching for Greater Accuracy with Efficiency, Look for System Changes
For example, instead of marking your 300-yard rounds individually to differentiate them from your 200-yard ammo, would a simple change in primers work? If accuracy is maintained, using brass-colored primers for 200 and silver for 300 provides an indelible indicator and eliminates a step! Similarly, rather than spending hours selecting GI surplus brass for weight and neck uniformity, consider splurging on some known, high-quality imported match brass for your 600-yard loads. Results should be excellent, time is saved, and given limited shooting at 600 yards, brass life should be long.
RULE SIX: Check All Your Primers Before Packaging Your Loaded Ammo
This seems simple and even intuitive. However, many slam-fires (which were much more common when M1s and M1As were the standard) are due, at least in part, to “high” primers. Primers should be seated below flush with the case head. The USAMU has addressed this at length in a previous column, but each round should be checked for properly-seated primers before they are packaged for use.
The 6mmBR Norma cartridge has spawned many great variants in multiple calibers: 6mm Dasher, 6BRA, 22 BR, 22 Dasher, 30 BR and others. This article is about a handsome 22 BR Rem-action varmint rig.
Richard Franklin (who operated Richard’s Custom Rifles prior to his retirement), has built scores of varmint rifles, in many different calibers. One of Richard’s all-time favorite varmint rifles is a 1:14″-twist, 22 BR built on his Model 11 stock in laminated Black Walnut and fiddleback maple. Richard says the rifle is versatile and deadly accurate out to 400 yards. Richard uses a Leupold 8.5-25x50mm LRT with varmint reticle.
Richard’s 22 BR Varmint Rifle with Lilja Barrel
Richard tells us: “[Shown above] is my light walking varminter. It’s built on a blue-printed Stainless Steel Remington 700 short action and chambered as a no-turn 22 BR for Lapua brass. The bolt handle is a Dave Kiff replacement and I’ve fitted a Jewel BR trigger with bottom safety. The barrel is a Lilja, 1:14″ #6 contour with a muzzle diameter of .750″. I shoot the 40gr V-Max bullets in the rifle at 4000 FPS. It’s tough on hogs if you don’t try them too far. 400 yards is about the max with it.
Accuracy is outstanding and with Roy, Mike, my grandson and myself shooting this rifle I don’t believe it has missed more than three hogs out of over 100 we shot at one summer. This rifle is carried in a ceiling rack in the truck where it’s handy and is used by the first person that grabs it when a hog is sighted if we are moving between setups. The Varmint reticle on the Leupold (shown below) is nice for quick hold-overs as you change distances.”
At right is a another Franklin Model 11 stock in Birdseye maple. That photo shows the details of the thumbhole stock.
Editor’s Note: We have shot a 1:8″-twist 22 BR in varmint matches and it was very accurate with 80gr bullets. It actually shot flatter out to 500 yards than our 6mmBR running 105-grainers. If we were to build a new long-range, bolt-action varmint rifle it would probably be a 22 BRA, essentially a 22 BR with 40° shoulder. That gives you a very stable cartridge with a bit more capacity. The 22 BRA retains a longer neck compared to the 22 Dasher, which is also an excellent cartridge — versatile and accurate.
22 BR Rivals 22-250 Performance
With bullets in the 40gr to 60gr weight range, the 22 BR gives up very little in velocity to a 22-250, despite burning quite a bit less powder (30-32 grains for the 22 BR vs. 35-38 grains for the 22-250). With a match-quality chamber, the 22 BR will probably have an edge in accuracy over a 22-250, and you should experience longer barrel life. Here are some recommended 22 BR loads for 40-60gr bullets:
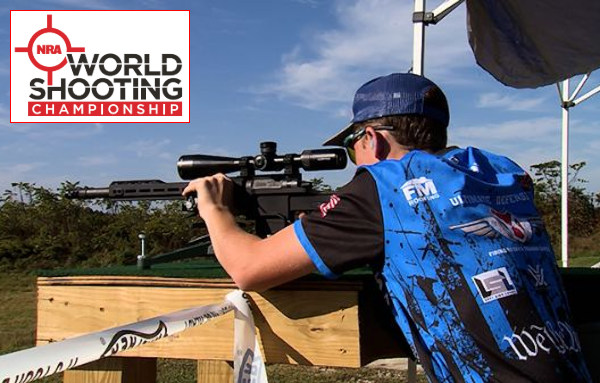
Shooting USA TV will broadcast a great show today, 5/6/2026. Shooting USA’s Wednesday Night episode features the NRA World Shooting Championship (WSC) held last year (2025) at Camp Atterbury. This unique competition featured multiple disciplines shot with firearms supplied by sponsors. All of the guns were provided and when the match finished the stage firearms become prizes. There were also cash prize awards for the top Pro Class competitors. SEE NRA World Championship Program. NOTE: There will be no 2026 WSC “due to unforeseen circumstances”.
Shooting USA SHOW TIMES: This Shooting USA Episode airs Wednesday, May 6, 2026 at 9:00 PM Eastern and Pacific; 8:00 PM Central on the Outdoor Channel. If you miss the regular broadcast, you can stream the show online on Vimeo for $0.99 per episode.
The 2025 NRA World Shooting Championship was held Sept. 30 – Oct. 4, 2025 at Camp Atterbury, Edinburgh, Indiana. Presented by Walther, this challenging event involved rifle, pistol, and shotgun shooting with a dozen disciplines — from short-range action pistol to long-range rifle.
The NRA World Shooting Championship
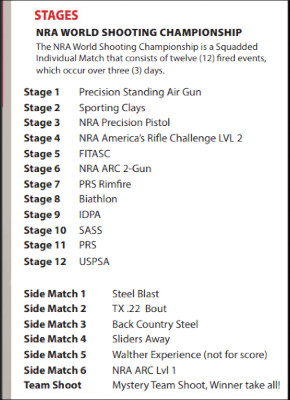
This championship is designed to test individuals through multiple different disciplines over a period of three days of shooting. Competitors compete in Professional and Amateur categories for cash and prizes of over $250,000. Walther and other sponsors supplied ALL firearms equipment and ammunition required for the 12 stages of competition.
To do well, competitors must be highly proficient in all shooting skills — rifle, pistol, shotgun, both rapid fire and precision, at multiple distances.
In 2025, the 12 stages were: Precision Standing Air Gun, Sporting Clays, NRA Precision Pistol, NRA Americas Rifle Challenge, FITASC, NRA ARC 2-Gun, PRS Rimfire, Biathlon, IDPA, SASS, PRS, and USPSA.
There were also six side matches with different disciplines: Steel Blast, TX .22 Bout, Back Country Steel, Sliders Away, Walther Experience, and NRA ARC Lvl 1. Lastly was the Mystery Team Shoot.
There is a good article on gun safes in SHOT Business, a publication for the NSSF SHOT Show audience. Written by Christopher Cogley, this Safe Spaces Article offers some very important things to consider when purchasing a gun safe. Here are key points from that article:
Safe Security — The security of a gun safe comes down to two main factors: the thickness of the steel and the construction of the safe. When it comes to construction, look for a safe that has continuous welded construction instead of bolts or spot-welding, which are easier for trained gun thieves to cut through with torches or high-power saws.
Lock Options — Traditional combination locks are arguably the simplest choice. The downside, though, is they don’t provide quick access to firearms in an emergency. Electronic and biometric keypads provide quicker access — but be sure to replace the batteries every year.
Fireproof Rating — Aside from theft, the biggest threat to your firearms is fire. Unfortunately, the fireproof rating on gun safes can be confusing because there is no single, “standard” fireproof rating. As a general rule, the fireproof rating states how long a safe can be exposed to a fire of a particular temperature and maintain a temperature inside the safe of no more than 350 degrees F. To put this in context, the average house fire creates temperatures between 800 and 1,200 degrees F.
Where to Place a Gun Safe in Your Home
The Safe Spaces article includes advice from Stephen Hall, CEO of Lock It Up Safes. Hall addressed the question: “Where should I put my safe?”
Hall states: “Ease of installation should NOT be the foremost consideration when making this decision. Putting a safe in the garage has both pros and cons. We see some retailers recommend the garage solely because they don’t have the right team on board to install safes in other locations, and wheeling one into the garage is the easy way out.
Putting a safe in the garage is fine if that is the only place you an put it, but most want the safe in the home, where they can get to it quickly. Temperature and humidity are important considerations as well, and both are more easily controlled in a house rather than in the garage.
One advantage to garage installation is the concrete floor provides a solid base for safe installation. Houses built on concrete slabs also offer a solid anchor on the first level. If the safe needs to go to an upper floor, the weight of the safe and its contents need to be factored in.”
Place Safe Against Outside Wall
Hall recommends placing your gun safe against an outside wall: “In case of fire, the safe will typically last longer as there is not a lot that can burn on one side of the safe, thus keeping it cooler.”
Don’t Make the Mistake of Buying an Undersized Safe
The most common mistake people make when buying a gun safe is getting a safe that’s too small. This video explains why you should probably invest in a bigger safe. First, the rated gun capacity is exaggerated — rifles with mounted optics, long barrels, wide forearms and/or pistol grips take up considerably more space than a small rimfire rifle or a lever gun with iron sights. Second, your gun collection will likely grow in years to come. Third, you may want to store other valuables in the safe — such as vital documents, jewelry, watches, and pricey electronics. In this video the host notes: “Get a much larger safe than you think you’ll need at first. This will guarantee that you will have enough room for future purchases and all the guns and equipment you currently have.”
Recommended Safe Features for Long-Gun Storage
Editor’s Recommendation:
Budget $1200-1500 for a safe from a major maker, with external hinges, and an interior at least 58″ high. That gives you room for 30″-barreled rifles with a top shelf for handguns and other valuables. A rotary rack and slide-out drawers are great additions.
Keypad or Dial? We favor rotary dial locks. With minimal maintenance they will function flawlessly for decades. But the digital locks offer quick-access and convenience. If you go digital, get a commercial-grade unit.
Fire-lining is worth getting, but a thin layer of sheet-rock doesn’t make a safe truly “fire-proof”.
Interior at least 58″ High and 30″ wide Overall Weight 750+ Pounds 8 Gauge or Heavier Wall Thickness Double-Wall, Composite Door with Relockers Minimum UL RSC Rated. TL-15 or TL-30 Rating is Desirable External Hinges
Mechanical UL Group II (or better) Lock with Standard Dial Or UL Type 1 Commercial-Grade Electronic Lock
Custom Interior Suitable for Scoped Guns with Long Barrels On-Door Storage System for Non-scoped Long Guns OR Rotary Gun Rack for Scoped Rifles and ARs
Internal (sandwiched) Insulator, Reinforced if Sheet-rock Palusol? Heat-Activated Expanding Door Seals
Slide-out Drawers for Handguns Fire-lined Inner Safe for Paper and Media
Low Gloss, Rust-resistant External Finish Pre-Drilled holes for Lag Bolts and in Rear for Electric Cord Overhead Fluorescent Lamp and/or LED Mini-lights on Strings


 Rimfire cross-training allows PRS competitors to build their skill sets without breaking the bank (or burning out barrels). One great .22 LR option for cross-training is the CZ 455. The TFBTV video below spotlights the CZ 455 Varmint Precision Trainer (VPT), a smooth-running .22 LR bolt action. This factory rifle (now superseded by the CZ 457) was designed specifically as a training tool for precision long-range competition. It boasts a Manners composite stock and 20.5 or 24-inch heavy barrel. The 0.866″-diameter tube is threaded and suppressor-ready. The model 455 VPT is mag-fed and comes with a crisp trigger that adjusts to two pounds. If you can find one, expect to pay about $850 but you’re getting a premium Manners stock that originally cost $534 by itself.

 In the archives of
 Gary Anderson served as the Director of the Civilian Marksmanship Program (CMP) from 1999-2009, and is now DCM Emeritus. As a Nebraska farmboy, Gary grew up hunting and shooting. Dreams of winning an Olympic Gold Medal in shooting led Gary to the U.S. Army. In 1959, he joined the elite U.S. Army Marksmanship Unit. Just two years later, he won his first national championship.
 In the archives of


 The 6mmBR Norma cartridge has spawned many great variants in multiple calibers: 6mm Dasher, 6BRA, 22 BR, 22 Dasher, 30 BR and others. This article is about a handsome 22 BR Rem-action varmint rig.
 Accuracy is outstanding and with Roy, Mike, my grandson and myself shooting this rifle I don’t believe it has missed more than three hogs out of over 100 we shot at one summer. This rifle is carried in a ceiling rack in the truck where it’s handy and is used by the first person that grabs it when a hog is sighted if we are moving between setups. The Varmint reticle on the Leupold (shown below) is nice for quick hold-overs as you change distances.”