|
|
July 14th, 2007
For the past week, we’ve featured a Readers’ Poll on the Home Page. The purpose of the poll is to allow our readers to “speak out” on the most important issues facing the shooting sports in North America. We wanted your views on “hot topics” such as gun legislation and military-style rifles. We also wanted your views on how the sport can continue to grow. (If you haven’t voted yet, Click HERE to participate.) The results are very interesting. We asked readers to select the three most serious challenges facing the shooting sports.
The #1 response was “Anti-gun political activity and regulations”, (19% of all votes).
Interestingly, the second highest response was “Equipment is too expensive” (12%). We have certainly seen this trend–with custom actions approaching $1400.00 delivered, and high-end optics now costing over $2000.00. The cost of reloading components was also a concern. (7% of votes).

Readers were also very concerned about range closures. 11% of responses indicated this was a serious problem. We can certainly concur. Here in Southern California, we have witnessed the closure of many ranges in the past few years. The trend is continuuing, as anti-gun politicians team up with developers who want to convert gun ranges to strip malls or housing complexes.
Readers noted that getting new shooters and juniors involved is a signficant challenge. 8% of responses agree that there are not enough junior shooters. Another 8% say that young shooters are “not interested in marksmanship”. 6% of voters agreed that “we need more programs for new shooters”, while 2% say more female shooters are needed. If you put these together, 24% of all responses are concerned with bringing new shooters and junior shooters into the sport.

While the media spotlights handguns and “evil-looking” military-style rifles (such as the AR15), most of our readers did not think that public concern with these kinds of arms represents a serious challenge to the shooting sports. Only 1% of responses indicated that there was “too much focus on handguns” and only 2% of responses agreed that there was “too much focus on military-style rifles”.
July 14th, 2007
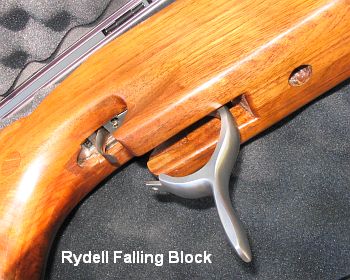
At the recent All-American Smallbore Rifle Championships in Los Angeles, shooter Nick Van Egmond showed off his unique Rydell long-range match rifle in 30 Gibbs (30-06 Improved). Click the video frame to watch Nick describe his Rydell rifle.

This 70s-vintage rifle was one of a handful of guns built in Southern California with the hand-made Rydell Falling Block action. While E.A. Brown and Ruger make falling block hunting rifles, a modern match rifle with a falling block action is very rare. Nick’s gun features a custom “fish-belly” stock for long-range prone shooting. The workmanship on the stainless action is amazing. Though tolerances are very precise, it opens and closes very smoothly, and all the external action surfaces have been expertly radiused and fitted. The Rydell action is a shining example of craftsmanship that harkens back to the great 19th century falling block Schuetzen rifles.


If you’re interested in modern falling block actions, Click Here to read about the Ed Yost Schuetzen Action.
July 13th, 2007
Electronic Scales can be a blessing. They are fast and easy to use (for the most part). But there is a potentially dangerous side as well. Here is a real-world example of problems you can encounter with common reloading scales.
I recently received a new box of Berger 95gr VLD bullets to test. These proved to be exceptionally uniform in base to ogive measurement so I decided to weigh them as well. I fired up my PACT electronic scale, letting it warm up for a full hour. Then I calibrated the unit using the check weights provided by PACT. I had a steady zero, the red cup tared (zeroed) correctly–everything looked good. I then started weighing the 95 VLDs, placing each bullet individually in a loading tray so I could repeat the measurements in order. After about 20 rounds I was interrupted by a phone call. I noted the weight (95.0 grains), wrote that down in my log book, removed the bullet, and took the call.

40 minutes later I returned to the loading room and re-weighed the SAME bullet. This time it registered 95.3 grains. Hmmm, I thought, that doesn’t seem right. Then I re-weighed each of the last five bullets (which were in order in the loading tray). Each one measured 0.3 grains higher than originally. I use the zero reset function to re-tare. Same results–0.3 grains high. Next I removed the red cup, re-zeroed and re-weighed without the cup. The bullets were still reading 0.3 grains high. Somehow the scale had lost its calibration.

Accordingly, I recalibrated the scale twice and re-weighed the bullets a third time. This time, following recalibration, they mostly measured the same as the first time, but a few registered 0.1 grain higher.
It was clear from this exercise that the scale had drifted 0.3 grains in a relatively short period of time. Even after the scale was recalibrated, some of the measurements were slightly different. This is cause for concern, obviously, if you are weighing powders. With small cases such as the 6PPC and 6BR, 0.3 grains will make a big difference in pressure. If you think you are loading 30.5 grains of Varget when in fact you are actually loading 30.8 grains, you’re in trouble.
What can one do to avoid this problem? First, allow a long warm-up time for the scale–3 hours or more. Second, recalibrate the scale before each loading session. Third, keep a check-weight handy and use that frequently to see if your scale is drifting. Fourth, there is some evidence that running the scale off a “line conditioner” that provides regulated voltage can help. This PACT unit did not have a line conditioner in place during our tests. Lastly, the “ultimate solution” is upgrading your scale. A higher-grade scale, such as the $275.00 Denver Instrument MXX-123, shown below, is much less likely to experience the problems of inconsistent read-outs and drifting zeros.
Denver Instrument MXX-123:

July 13th, 2007
Here’s a smart, simple item that will come in handy during hot summer weather. The Solarstop elastic hatband will fit over the crown of any baseball-style cap. (Yep, you’ve probably got dozens of baseball caps, right?). The draped fabric provides 30+ UPF protection for your neck and ears. When things heat up, dunk the soft microfiber fabric in the water for relief–it cools you down fast and dries quickly.

 This smart accessory is sold by Cabelas.com, CampMor.com, and Great Outdoors Depot, for $9 to $12.00. Campmor also offers the similar “Sunday Afternoons Solarweave Cap Curtain”, featuring 50+ UPF quick-drying supplex nylon that blocks 97% of UVA and UVB rays. The Cap Curtain features decorative webbing in the front with a velcro sizing adjuster in the back.
These designs are simple enough that anyone with basic sewing skills could make their own cap-top neck drape in a few minutes. (If the wife has a sewing machine this would be a snap). If you make your own unit, be sure to use sun-blocking fabric. Plain cotton or polyester won’t work as well. UV protection is key.
[Editor’s Note: Why, you may ask, am I recommending this somewhat goofy-looking product, and why have I featured sunhats previously in the Bulletin? Well, the risk of skin cancer is very, very real. I was at the dermatologist yesterday, and my Doctor removed two small “anomalies”. And I had a basel cell carcinoma removed two years ago. Trust me, sunscreen and ear/neck protection is a lot cheaper than going to the doctor. Folks who spend much time in the sun really need to watch this stuff–get yourself examined every year. I have a family member who would be dead right now if a melanoma wasn’t caught very early in the game. Enough said–protect your skin and live longer.]
July 12th, 2007
Thanks to Adam Braverman of Nammo Lapua, Zak Smith had a chance to test out the new Lapua 6.5×47 123gr factory ammo recently in his Accuracy Int’l tactical rifle. Zak reports: “Accuracy was excellent–the ammo shot as tight as I could hold in the windy conditions. This ammo is half-MOA or better, easy. When I did my job, all shots were touching at 100 yards. The ammo fed from my AI magazine perfectly–no problems at all. It seems the ammo is loaded pretty mild. From a 25.3″ barrel, velocity was 2820 fps over my chronograph. This compares with 2790 fps claimed by the factory from a 26″ barrel (see chart below). That 30 fps is easily within barrel to barrel variation (or chrono variation for that matter). So, consider the 123gr 6.5×47 ammo a 2800 fps product. With this 123gr factory load, there were no pressure signs–primer edges were round, there was no significant cratering, and case-head growth was minimal.”

Larger Chart (English Data) | Larger Chart (Metric Data)
Zak added: “Overall, I was very impressed with this ammo. Accuracy, on the test day, was actually a bit better than my handloads–but it was pretty windy. This stuff is definitely ‘good to go’ for someone who doesn’t reload and wants quality 6.5mm ammo for a tactical match. You won’t have the velocity of a ‘max’ handload, but even at 2800 fps, given the .547 BC of the 123gr Scenar, this ammo easily beats a .308 shooting 175s in terms of long-range ballistics. The chart below shows comparative drift in a 10 mph wind at 600 and 1000 yards.”
| Cartridge |
FPS |
BC |
600yd Wind |
1000yd Wind |
| 6.5×47 123gr Scenar |
2800 |
0.547 |
23.53″ |
75.34″ |
| .308 175gr SMK |
2700 |
0.496 |
28.12″ |
90.95″ |

July 12th, 2007
We chatted with German Salazar of Shooters Journal at a rimfire match this weekend (which he won). German reminded us that he had done a comparison review of the Jewell and Kelbly. Here is German’s report:
“I received one of Kelbly’s new triggers and installed it on my 6BR Remington 40X. Installation was normal for any Rem-pattern trigger and it fit perfectly. However, the stock (previously inletted for a Jewell trigger), required a slight amount of material removal at the front of the trigger slot as the Kelbly trigger is a bit longer than a Jewell.

Construction of the Kelbly is very robust. It appears to be machined from a solid bar of steel rather than being two end plates screwed together. Perhaps the trigger’s best feature, however, is very wide range of pull-weight available with no changing of springs or other parts. As delivered it was set for approximately 1.5 oz. and broke very cleanly at that weight. Since my application is 300 Meter prone shooting, I raised it to 6 oz. This required moving a pin under the sear bar to the second of four holes and slightly tweaking the weight of pull screw. Compared to other triggers, it was a joy to work with this arrangement and took just a couple of minutes. All adjustments (weight of pull, over-travel, and sear engagement) are made with set screws and their effect on the internal parts can be seen through windows cut into the trigger body. This makes trigger tuning more precise.
On the downside, the barreled action must be removed from the stock to perform the adjustments (unless you use a trigger hanger), but that’s a small price to pay for the overall quality and ease of adjustment. At my current setting of 6 oz. and no over-travel, the trigger breaks like ice. I couldn’t ask for more. Kudos to the good folks at Kelbly’s–they have another winner here.”
July 11th, 2007
This week, ShootingUSA (hosted by Jim Scoutten) features the 2006 NRA High Power Silhouette Nationals, filmed at the Ridgway Rifle Club in Pennsylvannia. High Power Silhouette is one of the most challenging (yet rewarding) of centerfire disciplines. While standing, silhouette shooters try to hit lunch-box-sized metallic Rams, Turkeys, Pigs and Chickens at distances up to 500 meters. Scoring is simple–the target either falls or it doesn’t. Most competitors use 20- to 36-power scopes. Big scopes make it easier to see the targets, to be sure, but only if you can maintain a super-steady hold. If you think it’s easy… just try holding on a 12″ bullseye at 100 meters with a 30-power scope from a standing position. Chances are your scope picture will be dancing all over the target–and that’s only at 100 meters, not 500.

In High Power Silhouette, competitors alternate shooting and spotting for each other. The spotter calls wind and mirage, while keeping tracking of time during each 2.5-minute, 5-shot relay. Choice of calibers–you need a round with enough energy-on-target to knock down the big rams at 500 meters. At the same time you want to maximize accuracy and minimize recoil. Right now the “sweet spot” seems to be a 130-160 grain bullet moving at least 2650 fps. Favored chamberings include .260 Remington, 7mm-08 and 7mmBR. (A few guys have tried 6BRs, but 100gr 6mm bullets won’t reliably take down the 500m rams).

This Shooting USA episode on the Outdoor Channel features many of the nation’s top centerfire silhouette marksmen. It’s a rare treat to see this kind of precision rifle shooting on television. Broadcast times for Wednesday, 7/11/2007 are: Eastern Time – 5:00 PM, 9:00 PM and 1:00 AM; Central Time – 4:00 PM, 8:00 PM and 12:00 Midnight; Mountain Time – 3:00 PM, 7:00 PM and 11:00 PM; Pacific Time – 2:00 PM, 6:00 PM and 10:00 PM. (Check local listings for repeat showings.)
July 11th, 2007
Shooters who convert factory actions to run 6BRs or 6PPCs should consider having the firing pin bushed. These small-cased cartridges like to run at high pressures. When running stout loads, you can get cratering caused by primer flow around the firing pin hole in the bolt face. The reason is a little complicated, but basically the larger the hole, the less hydraulic pressure is required to crater the primer. A limited amount of cratering is normally not a big issue, but you can reduce the problem significantly by having a smith fit a bushing in the firing pin hole. In addition to reduced cratering, bushing the firing pin often produces more consistent ignition.
This is a highly recommended procedure that our editors have had done to their own rifles. Greg Tannel (Gre-Tan Rifles) is an expert at this procedure, and his turnaround time is fast–usually 1-3 days (shop time). Current price for a bushing job, which includes turning the firing pin to .062″, is $60 including return shipping.

If you have a factory rifle, a bushed firing pin is the way to go if you are shooting the high-pressure cartridges such as 6PPC, 6BR, and 6.5×47. This is one of the most cost-effective and beneficial upgrades you can do to your factory rifle.
July 10th, 2007
Many shooters and hand-loaders lack a clear understanding of certain elements of bullet design. While most serious shooters know that Secant and Tangent Ogive bullets are different, many of us would have trouble explaining the precise nature of the difference. Thankfully, Dan Lilja clarifies this and many other bullet design matters in his excellent article, Calculating Bullet Weights. Here’s the straight scoop on bullet ogive differences, in Dan’s words:
“Spitzer bullets all fall into one of several different design types. A bullet’s geometry can be broken down into symmetrical sections. The body (or shank) of the bullet is that part of the bullet that comes into full contact with the barrel rifling. It is the cylindrical portion of the bullet of nominal groove diameter for that caliber. It is also referred to as the Bearing Surface.
The term “Ogive” is commonly used to describe that specific point where the curving part of the bullet nose begins–i.e. where the bearing surface ends and the curved part begins. When we talk about “bearing surface length”, this is the distance from the top of the boattail to the point where the bullet starts to curve.

However, the terms “ogive” or “ogive profile” are also used to describe the entire forward curved section of the bullet, ahead of the bearing surface. The Ogive Profile, or nose of a bullet, can be one of three varieties, two being common*. The ogive can have a tangent radius; that is, the intersection of the body of the bullet and the radius of the ogive blend together at a tangent point. This is the most common type and is typical of most bullets handloaders use. The other common type is the secant ogive. In this case the intersection of the ogive and bullet body does not flow together smoothly. The point of intersection is not tangent, the ogive radius being a secant of the arc circle of the ogive.
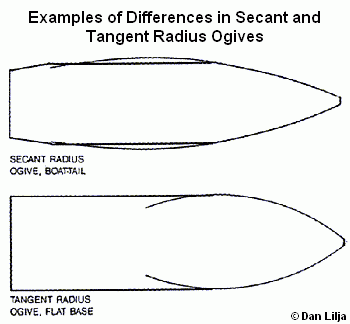
The radius of the ogive is generally given as a multiple of the bullet diameter. For example, a 30-caliber bullet might have a 7-caliber tangent ogive. That is to say that the radius, in inches, is seven times .308 or 2.156 inches. When a bullet is described as “7 Ogive” this is what is meant–the radius of the bullet’s nose section as a multiple of the bullet diameter. (A “7 Ogive” can be any caliber, not just 30 caliber–it is the ratio of the curve radius to diameter that counts).
The point or tip of the ogive is called the Meplat. This can vary in diameter from about .050″ to over 0.125″ for conventional spitzer-type bullets.
The base of the bullet can be either a boattail shape or flat base. If a boattail, its shape is determined by the axial length of the boattail and the angle at which the boattail leaves the body of the bullet.”
*The third bullet nose type is a cone. Cone-shaped bullets are not common with handloaders, but some experimental work is done with them.
July 10th, 2007
RELOADING TIP: Andris Silins has come up with a simple way to measure length to the lands in your rifle:
“Here’s what I did to find length to lands for seating my bullets. I made four cuts into the neck of fire-formed brass. Then I pressed the bullet in lightly and chambered the entire gauge. As the cartridge chambers, the bullet slides back into the case to give you length to lands. It took less than five minutes to get it cut and working. A little light oil in the barrel just past the chamber helps ensure the bullet does not get stuck in the lands. It works great and is very accurate.
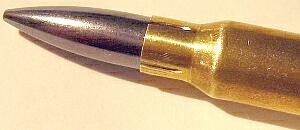
I made the cuts using a Dremel with a cut-off wheel. You can adjust tension two ways. First, you can make the cuts longer or shorter. Longer cuts = less tension. If you used only three cuts insted of four you would get more tension. The trick is to be gentle when you open and close the bolt. If you ram the bolt closed you may wedge the bullet into the lands. When you open the bolt it helps to keep a finger or two near by to guide the case out straight because the ejector wants to push it sideways.”
|


