This week we focus on five classic metal-framed 9mm pistols. These five world-class handguns all shoot the 9mm Luger (9x19mm) cartridge. Most have been used by military and police forces as well as used by civilians for sport-shooting and defense. This Editor has shot all five pistol types and owned three. I can recommend all of them. Metal-framed pistols typically have a lower center of gravity and weigh more than Glocks and other polymer-framed handguns. Consequently, they tend to have less muzzle flip, and less perceived recoil than polymer-framed handguns.
SIG Sauer P226
The SIG Sauer P226 is a high-quality, ultra reliable single-action/double action handgun with a proud Swiss/German heritage. It has a very ergonomic grip that fits most hands very well. Standard P226s do NOT have a manual safety, but the P226 has a decocking lever drops the hammer safely. This Editor has trained new shooters with a Sig P226 and Glock 17. For 80% of my trainees the Sig P226 pointed better due to the superior grip design. This meant that the sight picture was better, and the trainees achieved better results with the P226 vs. the Glock 17. The P226 is also a very reliable firearm. I have over 6000 rounds through my P226 with not one single jam. That’s impressive. The first video, reviewing the SIG P226, has over 1.4 million YouTube views, indicating it is very popular with pistoleros.
HK P7 Series (PSP, P7m8, P7m13)
This Editor has shot a P7m8 extensively. It is superbly accurate. With a very low bore axis, it has much less muzzle flip than most 9mm pistols. And with a fixed barrel, the slide moves straight back during cycling. The HK P7 blowback-operated semi-automatic pistol was designed and manufactured by German gun-maker Heckler & Koch (H&K) from 1978 to 2008. It is thin, superbly accurate, with a precise trigger that shames the Glock. The P7m8 features a unique gas-delayed blowback system, which uses gas from the cartridge to retard the rearward motion of the slide. This works via a barrel port and a piston inside a cylinder under the barrel. The signature feature of the P7 series is the “squeeze cocker” on the front of the grip. Squeezing the cocking lever cocks the firing pin. When the front of the grip is released, the weapon is fully de-cocked, making it safe with a round in the chamber.
Browning Hi-Power
The Browning Hi-Power is a single-action, semi-automatic handgun with a legendary heritage. This handsome all-metal pistol was based on a design by American John Moses Browning, and completed by Dieudonné Saive at Fabrique Nationale (FN) of Herstal, Belgium. J.M. Browning died in 1926, several years before the design was finalized. FN Herstal initially named the design the “High Power”, which alludes to the 13-round magazine capacity, almost twice that of other designs such as the Luger or Colt M1911. The name was later shorted to “Hi-Power”. The Browning Hi-Power has served military forces and police in many countries throughout the world. It is a very well-balanced pistol, with a nice, crisp trigger. After 82 years of continuous production, FN Herstal announced that the Hi-Power would be discontinued in 2018. However, in 2022 FN resumed Hi-Power production, so this classic lives on.
CZ 75
The CZ 75 is the flagship pistol of CZ-USA and has been a staple among 9x19mm fans for over 45 years. Originally introduced in 1975, hence the name, the CZ 75 remains viable as a defensive pistol. CZ claims the CZ 75 is “used by more governments, militaries, police, and security agencies than any other pistol in the world”. The CZ 75 is very reliable and works well for both defense and IDPA competitions. The ergonomics are good, controls are intuitive, and the trigger is very nice. Over the years, CZ has made numerous variations of the CZ 75 pistol, but the original is still an excellent handgun.
Beretta 92FS and Military M9
For Americans, the Beretta 92 series of pistols is best known as the official sidearm of the American military for 30+ years. The United States military replaced the .45 ACP M1911A1 pistol in 1985 with the Beretta 92FS, designated as the “M9″. The M9 and the civilian models 92/92FS have a distinctive, recognizable feature — the cut-away slide which exposes most of the 9mm barrel. The metal frame also has an attractive grip design. The 92FS pistols we’ve shot were accurate and reliability was good. There have been various modifications and upgrades over the years. However the M9 was replaced in 2017 by the new polymer-framed SIG Sauer P320, adopted as the military’s M17/M18 modular pistols.
This Hickok 45 video review of the Beretta 92FS has over 3.1 million views:
Readers who have just recently discovered the Daily Bulletin may not realize that AccurateShooter.com has hundreds of reference articles in our archives. These authoritative articles are divided into multiple categories, so you can easily view stories by topic (such as competition, tactical, rimfire, optics, shooting skills etc.). One of the most popular categories is our Technical Articles Collection. On a handy index page (with thumbnails for every story), you’ll find over 120 articles covering technical and gunsmithing topics. These articles can help you with major projects (such as stock painting), and they can also help you build more accurate ammo. Here are five popular selections from our Technical Articles archive.
Stress-Free Pillar Bedding. Richard Franklin explains how to do a top-quality bedding job, start to finish.
OnTarget Software Review. Our Editors test free software that measures shot groups with great precision. We explain how to use the program and configure advanced features.
Savage Action Tuning. Top F-TR shooter Stan Pate explains how to enhance the performance of your Savage rifle by optimizing the torque settings of the action screws.
Complete Precision Case Prep. Jake Gottfredson covers the complete case prep process, including brass weight sorting, case trimming, primer pocket uniforming, neck-sizing, and, case-neck turning.
Stock Painting Instructions. Step-by-step guide for stock painting by expert Mike Ricklefs. Mike shows both simple coverage and fancy effects.
With hunting season in full swing, many folks will be shooting factory hunting ammunition. In setting scope elevation clicks for various distances, it would seem logical to use the velocity listed on the ammo box with your ballistics App or drop chart. But that could be a problem. You SHOULD still chronograph the ammo to determine its true velocity in your rifle. Read on to understand why.
Why You CANNOT Rely on the Muzzle Velocity
Printed on the Ammo Box!
When figuring out your come-ups with a ballistics solver or drop chart it’s “mission critical” to have an accurate muzzle velocity (MV). When shooting factory ammo, it’s tempting to use the manufacturer-provided MV which may be printed on the package. That’s not such a great idea says Bryan Litz of Applied Ballistics. Don’t rely on the MV on the box, Bryan advises — you should take out your chrono and run your own velocity tests. There are a number of reasons why the MV values on ammo packaging may be inaccurate. Below is a discussion of factory ammo MV from the Applied Ballistics Facebook Page.
Five Reasons You Cannot Trust the Velocity on a Box of Ammo:
1. You have no idea about the rifle used for the MV test.
2. You have no idea what atmospheric conditions were during testing, and yes it matters a lot.
3. You have no idea of the SD for the factory ammo, and how the manufacturer derived the MV from that SD. (Marketing plays a role here).
4. You have no idea of the precision and quality of chronograph(s) used for velocity testing.
5. You have no idea if the manufacturer used the raw velocity, or back-calculated the MV. The BC used to back track that data is also unknown.
1. The factory test rifle and your rifle are not the same. Aside from having a different chamber, and possibly barrel length some other things are important too like the barrel twist rate, and how much wear was in the barrel. Was it just recently cleaned, has it ever been cleaned? You simply don’t know anything about the rifle used in testing.
2. Temperature and Humidity conditions may be quite different (than during testing). Temperature has a physical effect on powder, which changes how it burns. Couple this with the fact that different powders can vary in temp-stability quite a bit. You just don’t know what the conditions at the time of testing were. Also a lot of factory ammunition is loaded with powder that is meter friendly. Meter friendly can often times be ball powder, which is less temperature stable than stick powder often times.
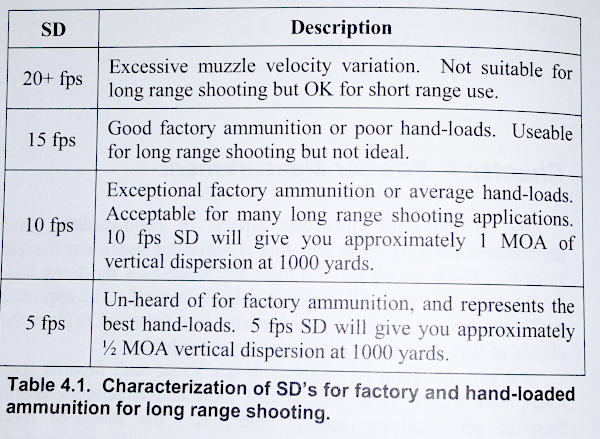
3. The ammo’s Standard Deviation (SD) is unknown. You will often notice that while MV is often listed on ammo packages, Standard Deviation (normally) is not. It is not uncommon for factory ammunition to have an SD of 18 or higher. Sometimes as high as 40+. As such is the nature of metering powder. With marketing in mind, did they pick the high, low, or average end of the SD? We really don’t know. You won’t either until you test it for yourself. For hand-loaded ammo, to be considered around 10 fps or less. Having a high SD is often the nature of metered powder and factory loads. The image below is from Modern Advancements in Long Range Shooting: Volume II.
4. You don’t know how MV was measured. What chronograph system did the manufacturer use, and how did they back track to a muzzle velocity? A chronograph does not measure true velocity at the muzzle; it simply measures velocity at the location it is sitting. So you need to back-calculate the distance from the chrono to the end of the barrel. This calculation requires a semi-accurate BC. So whose BC was used to back track to the muzzle or did the manufacturer even do that? Did they simply print the numbers displayed by the chronograph? What kind of chronograph setup did they use? We know from our Lab Testing that not all chronographs are created equal. Without knowing what chronograph was used, you have no idea the quality of the measurement.
5. The MV data may not be current. Does the manufacturer update that data for every lot? Or is it the same data from years ago? Some manufacturers rarely if ever re-test and update information. Some update it every lot (ABM Ammo is actually tested every single lot for 1% consistency). Without knowing this information, you could be using data for years ago.
CONCLUSION: Never use the printed MV off a box of ammo as anything more than a starting point, there are too many factors to account for. You must always either test for the MV with a chronograph, or use carefully obtained, live fire data. When you are using a Ballistic Solver such as the AB Apps or Devices integrated with AB, you need to know the MV to an accuracy down to 5 fps. The more reliable the MV number, the better your ballistics solutions.
When your cases become hard to extract, or you feel a stiff bolt lift when removing a cartridge, it’s probably time to full-length size your cases, and “bump” the shoulder back. We generally recommend bumping shoulders each time you reload, after the initial fire-forming. Benchrest and F-Class benchrest shooters, running relatively high pressures, typically full-length size every load cycle, bumping the shoulder .001-.003″. High Power shooters with gas guns generally full-length size every time, and may need to bump the shoulders .003″ or more to ensure reliable feeding and extraction.
Use Shims for Precise Control of Shoulder Bump
Some shooters like to set the “default” position for their full-length die to have an “ample” .003″ or .004″ shoulder bump. When they need less bump, a simple way to reduce the amount of shoulder movement is to use precision shims in .001″ (one-thousandth) increments.
Here are reports from Forum members who use the shims:
“Great product. I have my die lock ring(s) adjusted for the shortest headspace length on my multiple chambers 6BRs and 6PPCs. When needing a longer headspace, I just refer to my notes and add the appropriate shim under the lock ring. Keep it simple.” — F.D. Shuster
Mats Johansson writes: “I’ve been using [shims] since Skip Otto (of BR fame) came out with them. I set up my dies with the .006″ shim, giving me the option of bumping the shoulder a bit more when the brass gets old and hardens while still having room to adjust up for zero headspace, should I have missed the original setup by a thou or two. Hunting rounds can easily be bumped an extra .002-.003″ for positive, no-crush feeding. Being a safety-oriented cheapskate, I couldn’t live without them — they let me reload my cases a gazillion times without dangerous web-stretching. Shims are a must-have, as simple as that.” — Mats Johansson
Sinclair Die Shim Kit — Seven Shims for $14.99
Sinclair Int’l (through Brownells) offers a seven-piece set of Sizing Die Shims that let you adjust the height of your die (and thereby the amount of bump and sizing) in precise .001″ increments. Sinclair explains: “Some handloaders will set their die up to achieve maximum sizing and then progressively use Sinclair Die Shims between the lock ring and the press head to move the die away from the shellholder. Doing this allows you to leave the lock ring in the same position. These shims are available in increments of .001″ and work very well.”
Seven Shims from .003″ to .010″
Sinclair’s $14.99 Die Shim Kit (item 22400) includes seven shims in thicknesses of .003, .004, .005, .006, .007, .008, and .010. For ease of use, shim thickness is indicated by the number of notches cut in the outer edge of each shim. Even without looking you can “count” the notches by feel.
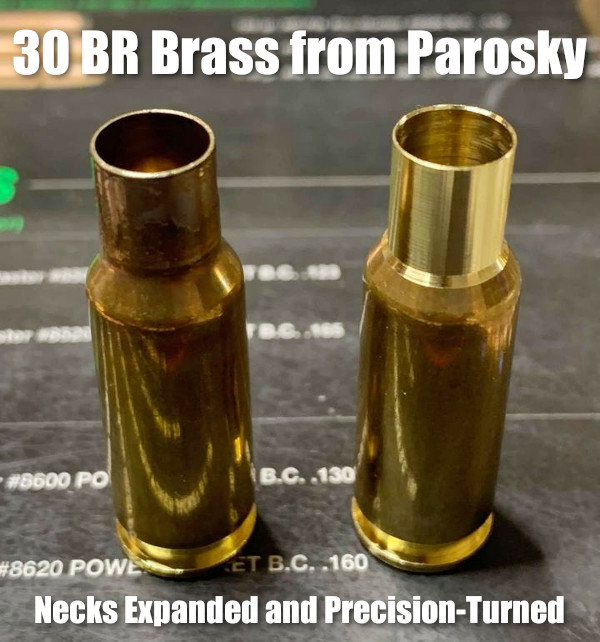
Here’s good news for 30 BR shooters. Paul Parosky, maker of the excellent PRP Custom Bullets, is now offering 30 BR neck-turned brass. This can save you considerable time and effort forming 30 BR cases from Lapua 6mmBR brass. And the neck-turning is superb, again representing time savings (and no tools to buy). You can order this 30 BR brass from PRPbullets.com. If you communicate with the PRP team, Paul may be able to neck-turn to your specific thickness. Paul notes: “Here are necks turned for a 0.330 neck. I’ll try my best to accommodate anyone’s neck dimensions as they wish. Just contact us through our website PRPBullets.com.”
About this Neck-Turning set-up — Paul Parosky notes: “For neck-turning I’m using an old drill press that has been re-worked. The cutter and spindle are all indicated before neck turning to ensure no runout. The RPM is around 520. The lube I use is a mixture of royal and mystery oil.”
Why the 30 BR Dominates 100/200 Benchrest for Score Competition
The 30BR, along with some wildcat variants, remains the dominant cartridge in short-range (100/200) benchrest-for-score competition. The 30BR’s .308″-diameter bullets are larger than the 6mm bullets used by the 6PPC (which rules group BR competition). The bigger 30-Cal diameter has an advantage in touching scoring rings. In addition, the 30 BR is also relatively easy to tune, and barrel life is considerably better than with smaller-caliber benchrest cartridges. For more information, see our AccurateShooter 30 BR Cartridge Guide.
Cases are Expanded, Then Neck-Turned
To produce his 30 BR brass, Parosky first uses a series of expander mandrels. Then he neck-turns with power using a converted drill press. Paul tells us: “This is done the old school way, I use three different tapered expander mandrels, then neck-turn it to the proper neck chamber, then run them up through a FL expander mandrel to ensure necks are straight. Then I clean all the cases.”
Paul Parosky Can Also Neck-Turn 6PPC Brass
Paul Parosky also expands and neck-turns 6PPC cases that are made from parent Lapua .220 Russian cartridge brass. Here, illustrating his 6PPC neck-turning operation, is a Paul Parosky post on the USA Benchrest & Extreme Precision Shooters Facebook page.
Bet you’ve never seen anything like this before — a “double-decker” indoor shooting range. Lotus Gunworks of Jensen Beach, Florida, operates a super-sized twin-level indoor shooting range featuring a two-story-high steel funnel bullet trap. Nicknamed the Lotus 8/11 for the number of steel panels used to create it (eight panels on the bottom slope and 11 panels on the top slope), this version of Action Target’s Total Containment Trap is the first of its kind. “No one has ever seen a range like this before” noted Lotus Gunworks’ Robbie Abell.
Abell came up with the two-story concept when it became clear that the new Lotus building in Jensen Beach was not wide enough for two side-by-side ranges AND a gun store. Necessity was the mother of invention… Lotus wanted at least two ranges, so the only option was to make a double-decker range where both levels shot into the same bullet trap.
Indoor ranges require ventilation to remove potentially hazardous dust and lead particles. The sheer size of the double-decker range presented a unique challenge, but Carey’s Small Arms Range Ventilation installed a system that can completely replace all the range air every 80 seconds.
Other Multi-Level Shooting Ranges
While the Lotus Range may have the first two-story bullet trap, it’s not really the first-ever double-decker indoor shooting range. Other multi-level ranges exist, they just don’t have the giant bullet trap. In fact, some of the multi-level ranges in Europe are bigger and even more sophisticated.
Brünig Indoor facility — Multi-Level Range Underground
Switzerland boats a popular shooting facility built completely underground. The large, deluxe Brünig Indoor facility includes a 300m underground range with multi-level shooting stations.
This video shows centerfire rifle practice on the upper level of one of Brünig Indoor’s shooting tunnels:
Dutch Double-Decker Range
Here’s a Dutch Double-Decker Range. Check out Schietsportvereniging (SSV) Katwijk, a great twin-level range in Holland featuring electronic targets with displays at each shooting station (on both levels):
Here’s a rifle that earned a Presidential medal and a visit to the White House. This rifle has a unique heritage, having been used to shoot 3000 consecutive bulleyes in a single day. The year was 1926 and a high school shooter named Sam Moore hoped to set a record. With his trusty Winchester Model 52 rifle in hand, Moore fired 3,000 rounds downrange, only stopping when his rifle became too hot to hold and daylight was fading fast. But he had fired 3,000 consecutive bullseyes in NRA Junior Rifle competition (target at 50 feet). The event, which set a world record, received national attention.
Moore was summoned to Washington, DC on April 26, 1926 to meet President Calvin Coolidge. At the White House, President Coolidge met the young marksman and presented Moore with a gold medal. The engraving on the back reads: “Presented to L.S. Moore by the President of the United States [on] behalf of the National Rifle Association. Junior Rifle Corps World Record — 3000 — consecutive bullseyes.”
Editor: Consider how times have changed. In 1931 the U.S. President was proud to honor a junior marksman for a great achievement. Today the White House condemns everything gun related. And the State of California has passed legislation imposing $25,000.00 fines for promoting youth marksmanship (AB 2571).
Marksman Moore Went to the U.S. Naval Academy and Served in WW II
After high school, Sam Moore earned admission to the U.S. Naval Academy, and graduated in 1931. Later, Moore helped develop the Fairbairn-Sykes fighting knife, served in WW II as a USMC aviator, and maintained his interest in shooting until his passing in 1982. Moore’s rifle and engraved gold medal were donated to the National Firearms Museum by his son David.
To succeed in long-range shooting matches, given the high level of competition these days, you’ll need solid wind-reading abilities. We’ve found an article by Emil Praslick III, retired USAMU Service Rifle coach and U.S. Palma Team Coach, that can help you make better wind calls in competition.
Emil Praslick, now retired from the U.S. Army, is considered one of the best wind gurus in the United States, if not the world. During his service with the USAMU he authored an excellent two-part article on wind reading that is available on the CMP (Civilian Marksmanship Program) website. Both articles contain helpful illustrations, and are “must-read” resources for any long-range shooter–not just Service Rifle and Highpower competitors.
Part One covers basic principles, tactics, and strategies, with a focus on the 200-yard stages. Emil writes: “There are as many dimensions to ‘wind reading’ as there are stages to High Power competition. Your tactical mindset, or philosophy, must be different for the 200 and 300 yard rapid-fire stages than it would be for the 600 yard slow-fire. In the slow-fire stages you have the ability to adjust windage from shot to shot, utilizing the location of the previous shot as an indicator. Additionally, a change to the existing conditions can be identified and adjusted for prior to shooting the next shot.”
In Part Two, Praslick provides more detailed explanations of the key principles of wind zeros, wind reading, and the Clock System for determining wind values: “The Value of the wind is as important as its speed when deciding the proper windage to place on the rifle. A 10 MPH wind from ’12 o-clock’ has No Value, hence it will not effect the flight of the bullet. A 10 MPH wind from ‘3 o’clock’, however, would be classified as Full Value. Failure to correct for a Full Value wind will surely result in a less than desirable result.”
Praslick also explains how to identify and evaluate MIRAGE:
Determine the accuracy of the mirage. Mirage is the reflection of light through layers of air that have different temperatures than the ground. These layers are blown by the wind and can be monitored to detect wind direction and speed.
Focus your scope midway between yourself and the target, this will make mirage appear more prominent. I must emphasize the importance of experience when using mirage as a wind-reading tool. The best way to become proficient in the use of mirage is to correlate its appearance to a known condition. Using this as a baseline, changes in mirage can be equated to changes in the value of the wind. Above all, you must practice this skill!
Click HERE for more excellent instructional articles by Emil Praslick and other USAMU Coaches and shooters.
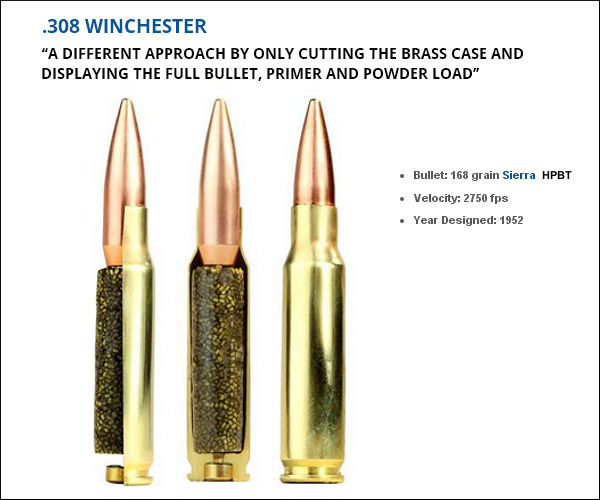
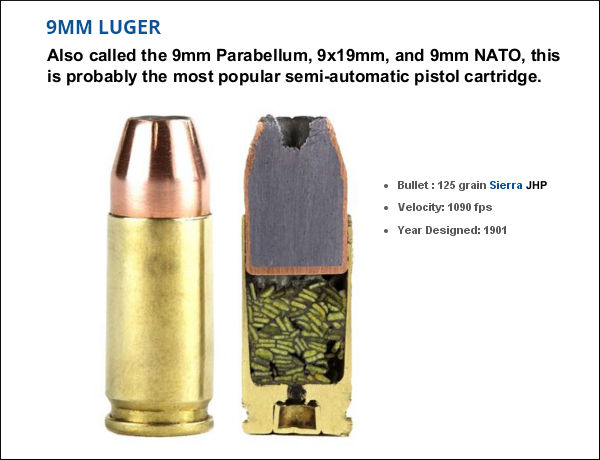
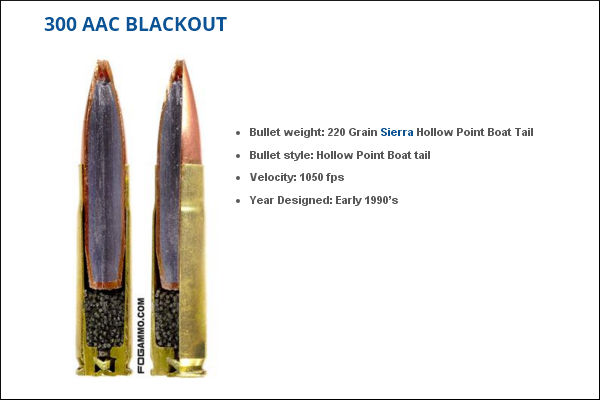
Here’s something you don’t see every day — the inside of loaded cartridges, sliced halfway through. This lets you see how bullet core, jacket, cartridge case, powder, and primer all fit together. Give credit to the folks at FOG Ammunition for creating this interesting series of cut-through ammo images. We show four cartridges here: the .308 Winchester, 9mm Luger, 300 BLK, and .50 BMG. You’ll find two more (the .223 Remington and .45 ACP) on the original FOG Ammo Blog Article.
This .308 Winchester model took on a different approach by only cutting the brass case and displaying the full bullet, primer and powder load. A spec amount of powder was used to create the model powder form. An estimated 10% volume was added during the forming process, along with an undetermined amount of air pockets.
This bisection is a 9mm Luger Jacketed Hollow Point round with flake powder held together with super glue. After this self-defense round was cut by a trained professional the round was polished by hand. This might look like stick powder, but those are in fact flakes stacked up in cross-section. Designed in 1901 by Georg Luger, this popular cartridge is used by civilians, military, and law enforcement.
For this model of the .300 AAC Blackout (aka 300 BLK), a Dremel tool was used to create a pie cut within the bullet and brass case. A measured amount of power, roughly 65% of spec charge, was placed inside the case with super glue. This cartridge was originally optimized for subsonic use with a suppressor, so the amount of powder used is small relative to the nominal case capacity. That leaves more room for the relatively large .30-caliber bullet.
Last but definitely not least is the .50 Caliber BMG round (aka .50 Browning Machine Gun). Famed for its wartime use in the M2 Machine gun, the .50 BMG round is also used in civilian Long Range competitions. A typical .50 BMG cartridge holds over 225 grains of powder. That’s almost ten times the amount in a 5.56×45 NATO Round! To demonstrate the size of the .50 BMG, check out that .223 Rem for comparison.
There is an informative article on the NRA’s American Hunter website regarding suppressor use for hunting. The article, What Hunters Need to Know About Suppressors, answers common questions about licensing, tax stamps, and suppressor types. The article explains the history of the $200 tax stamp which must be paid when acquiring a suppressor:
“Why the Tax? In 1934 … the federal government, while battling gangsters such as Al Capone, heavily restricted silencers with passage of the first National Firearms Act. Hoping to gain an advantage on criminals that often had better weapons than cops, the Feds placed a mandatory ‘sin’ tax on silencers that was so high it would effectively ban their purchase by all but the wealthiest individuals. In 1934, $200 was the equivalent of $3,500 today. The $200 tax still stands despite no evidence that a simple metal tube is capable of causing crime.” — American Hunter
The American Hunter article also discusses how well suppressors actually reduce noise. User should be aware that the sound level of a large, centerfire hunting cartridge will still exceed 130 decibels (dB) on average, even with a typical suppressor (silencer) in place. For that reason, we recommend that hunters continue to wear ear protection even when they shoot suppressed.
For example, Thunder Beast Arms says its latest Ultra 9 Suppressor will reduce the report of a .308 Win to 132-134 dB: “The ULTRA 9 will suppress a typical .308 bolt-action rifle down to approx. 132-134 dB. It also has very little or no ‘first round pop’ (FRP) in most applications.” NOTE: These dB levels are measured in accordance with MIL-STD-1474D using BK 2209 SLM offset one meter from muzzle.
How Loud Are Unsuppressed Rifles?
Firearms Are Loud — 140 dB to 175 dB. Audiology group ASHA explains: “Almost all firearms create noise that is over the 140-dB level. Exposure to noise greater than 140 dB can permanently damage hearing. A small .22-caliber rifle can produce noise around 140 dB, while big-bore rifles and pistols can produce sound over 175 dB. Firing guns in a place where sounds can reverberate, or bounce off walls and other structures, can make noises louder and increase the risk of hearing loss. Also, adding muzzle brakes or other modifications can make the firearm louder. People who do not wear hearing protection while shooting can suffer a severe hearing loss with as little as one shot[.] Audiologists see this often, especially during hunting season when hunters and bystanders may be exposed to rapid fire from big-bore rifles, shotguns, or pistols.” Source: ASHA, Recreational Firearm Noise Exposure.
How Much Does a Good Suppressor Really Reduce Firearm Sound Levels?
That depends on the rifle, the cartridge, and the effectiveness of the suppressor. The American Hunter article explains: “Suppressors retard the speed of propellant gases from the cartridge that rapidly expand and rush out of the barrel. It’s these gases that produce the loud boom that’s heard for miles. A suppressor’s series of internal baffles slows these gases so they are not all released at once, thereby muffling the sound.” Many good commercial suppressors can achieve 30-35 dB sound suppression. However, Zak Smith of Thunder Beast Arms says: “There are a bunch of manufacturers who publish values that are not reproducible, or use an ad-hoc test instead of a mil-spec test. In many cases we’ve tested the exact same suppressors they’ve advertised with 30-40 dB reductions and found they are actually in the high 20s instead.”
Again, for this reason, we recommend that hunters use ear protection, such as electronic muffs, even when shooting suppressed.
Choosing a Suppressor for Hunting Use
The American Hunter article explains that there are many types of suppressors on the market. Bigger suppressors are heavier, but they normally are more effective. You also have a choice in muzzle attachments:
“For most hunting applications, direct thread is the best choice. If you intend to buy only one suppressor yet you have multiple guns, it’s advantageous to buy a model sized and rated for the largest caliber you intend to use. While a suppressor made specifically for a .223 Rem. will reduce the sound of that round slightly better than a model made for .30 caliber, for example, you can use a .30-caliber can for smaller calibers — but not vice-versa. In general, the bigger the can, the more it reduces sound. Smaller suppressors, however, are easier to carry in the woods.” — American Hunter
States Where Suppressor Ownership is Allowed
Currently, the following 42 states allow private ownership of suppressors: AL, AK, AZ, AR, CO, CT, FL, GA, ID, IN, IA, KS, KY, LA, ME, MD, MI, MN, MS, MO, MT, NE, NV, NH, NM, NC, ND, OH, OK, OR, PA, SC, SD, TN, TX, UT, VT, VA, WA, WV, WI, WY. NOTE: Suppressors are legal in Connecticut, but hunting with silencers is not allowed in Connecticut.
How to Apply for a Suppressor
To acquire a quality suppressor, you’ll first need to shop around, comparing verified performance. Unfortunately some manufacturer’s dB claims are exaggerated. Give due consideration to size, weight, and durability. When you’ve selected a brand and model, find a Class 3 dealer authorized by the ATF to sell suppressors. You must fill out ATF Form 4, get fingerprinted, and pass a background check. Along with two completed copies of Form 4, submit your fingerprint card, passport photo and a check for $200 to the ATF. Then you wait for the ATF to process your application. American Hunter says the average ATF suppressor processing wait time is now nine months.
BENEFITS OF SILENCERS
NOISE REDUCTION
According to OSHA, the threshold for a hearing safe impulse noise is 140 dB. Without hearing protection, exposure to any impulse noise over 140 dB causes varying degrees of permanent noise-induced hearing loss, which can also lead to tinnitus. Most well-engineered silencers take the dB level of their host firearm well below 140 dB, making those silencers effective primary hearing safety devices. You should always still wear hearing protection (muffs or plugs) when using suppressors.
RECOIL REDUCTION
By containing the explosion at the muzzle, suppressors significantly reduce perceived recoil energy, reduce the rifle’s rearward movement on recoil, and reduce rifle torquing and muzzle flip. The reduction of recoil (and rifle torquing/hopping) lessens shooter fatigue and helps the shooter get his sight picture back on target rapidly after firing. With smaller calibers, a suppressor may enable the shooter to maintain a nearly-continuous sight picture, following the shot into the target. In addition, by reducing felt recoil (and muzzle blast), a suppressor can help inexperienced shooters avoid flinching.







 Moore was summoned to Washington, DC on April 26, 1926 to meet President Calvin Coolidge. At the White House, President Coolidge met the young marksman and presented Moore with a gold medal. The engraving on the back reads: “Presented to L.S. Moore by the President of the United States [on] behalf of the National Rifle Association. Junior Rifle Corps World Record — 3000 — consecutive bullseyes.”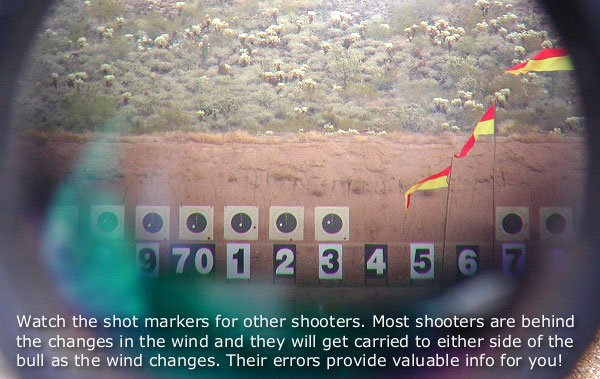

 Part One covers basic principles, tactics, and strategies, with a focus on the 200-yard stages. Emil writes: “There are as many dimensions to ‘wind reading’ as there are stages to High Power competition. Your tactical mindset, or philosophy, must be different for the 200 and 300 yard rapid-fire stages than it would be for the 600 yard slow-fire. In the slow-fire stages you have the ability to adjust windage from shot to shot, utilizing the location of the previous shot as an indicator. Additionally, a change to the existing conditions can be identified and adjusted for prior to shooting the next shot.”