Here’s one of the most popular videos from the Daily Bulletin archives. If you’ve ever wondered how a top-flight, custom rifle is built, watch carefully….
This video, produced for the folks at S&S Precision in Denton, Texas, shows a full custom 6.5×47 bench rifle being crafted from start to finish. It is a fantastic video, one of the best precision rifles video you’ll find on YouTube. It shows every aspect of the job — action bedding, chambering, barrel-fitting, muzzle crowning, and stock finishing.
You’ll be amazed at the paint job on this rig — complete with flames and four playing cards: the 6, 5, 4, and 7 of spades. Everyone should take the time to watch this 13-minute video from start to finish, particularly if you are interested in stock painting or precision gunsmithing. And the video has a “happy ending”. This custom 6.5×47 proves to be a real tack-driver, shooting a 0.274″ three-shot group at 400 yards to win “small group” in its first fun match. NOTE: If you have a fast internet connection, we recommend you watch this video in 720p HD.
We’re told that the founder of S&S Precision, the inimitable “Stick” Starks, is retiring from full-time gunsmithing duties. This video is a nice tribute to Stick’s dedication to his craft for so many decades.
First there were books, then Videos/DVDs, then Ballistic Apps, then Seminars, and now Applied Ballistics is moving into the gun-building business. Founded by Ballistics guru Bryan Litz, Applied Ballistics LLC has been a world leader in the science of ballistics for the shooting sports. Now Applied Ballistics is using its expertise to produce complete rifle systems capable of world-beating Extreme Long Range performance.
Applied Ballistics Weapons Division Will Offer Complete Tactical ELR System
Applied Ballistics Weapons Division (ABWD) states: “We have the capability to build you a custom rifle, with ammo matched for that system. We can test the ammo and rifle combination over Radar in the lab. ABWD [will be] offering a complete system, with a CDM specific to that rifle. The first rifles are purpose built for 2500+ yard engagements.”
Based on the “teaser” video above, ABWD will offer a complete rifle system featuring Nightforce riflescope, ELR optical prism, laser rangefinder, Kestrel wind meter, and ammo that has been tuned for the rifle and trajectory-verified with Doppler Radar. This promises a “turn-key” system with sub-MOA 1000-yard accuracy plus hit capability at ranges out to 2500+ yards.
One Facebook reader asked: “Will you focus your rifle builds to just Extreme Long Range or will you be doing PRS-style type rifles as well?
AB states: “We are starting out with this ELR system, but will be offering more systems in the near future, as well as custom rifle builds. Stay tuned as the ABWD website should be up soon!”
Many Questions about ABWD’s New Products:
Of course, like our readers, we have many questions about this new project:
1. What cartridge types will be available in ABWD Rifles?
2. What companies will supply the rifle actions and chassis systems?
3. Who will supply the barrels and what are length/chambering options?
4. Will ABWD rifle systems be offered to the general public (vs. military/LEO)?
5. When will the first ABWD rifle systems be available?
And last but not least…
6. What will these ABWD ELR Rifles cost, both by themselves and as a complete package (with solvers, LRFs, optics etc.)?
News Tip from EdLongrange. We welcome reader submissions.
Need something for the walls of your “man cave” or reloading room? The creators of the Cartridge Comparison Guide offer a nice poster showing 85 classic varmint and hunting cartridges. Along with cartridges (from 17 Mach2 all the way up to the 517 Nitro Express), this full-color 18″ x 24″ wall poster shows dozens of game animal types, including all the great African species. This unique Game & Ammo Hunting Poster opens reveals the range and breadth of game animals that can be hunted on the world stage, while providing a comprehensive sampling of proven cartridges for hunting these animals. Priced at $14.99, this poster was developed in cooperation with Hunter Education instructors.
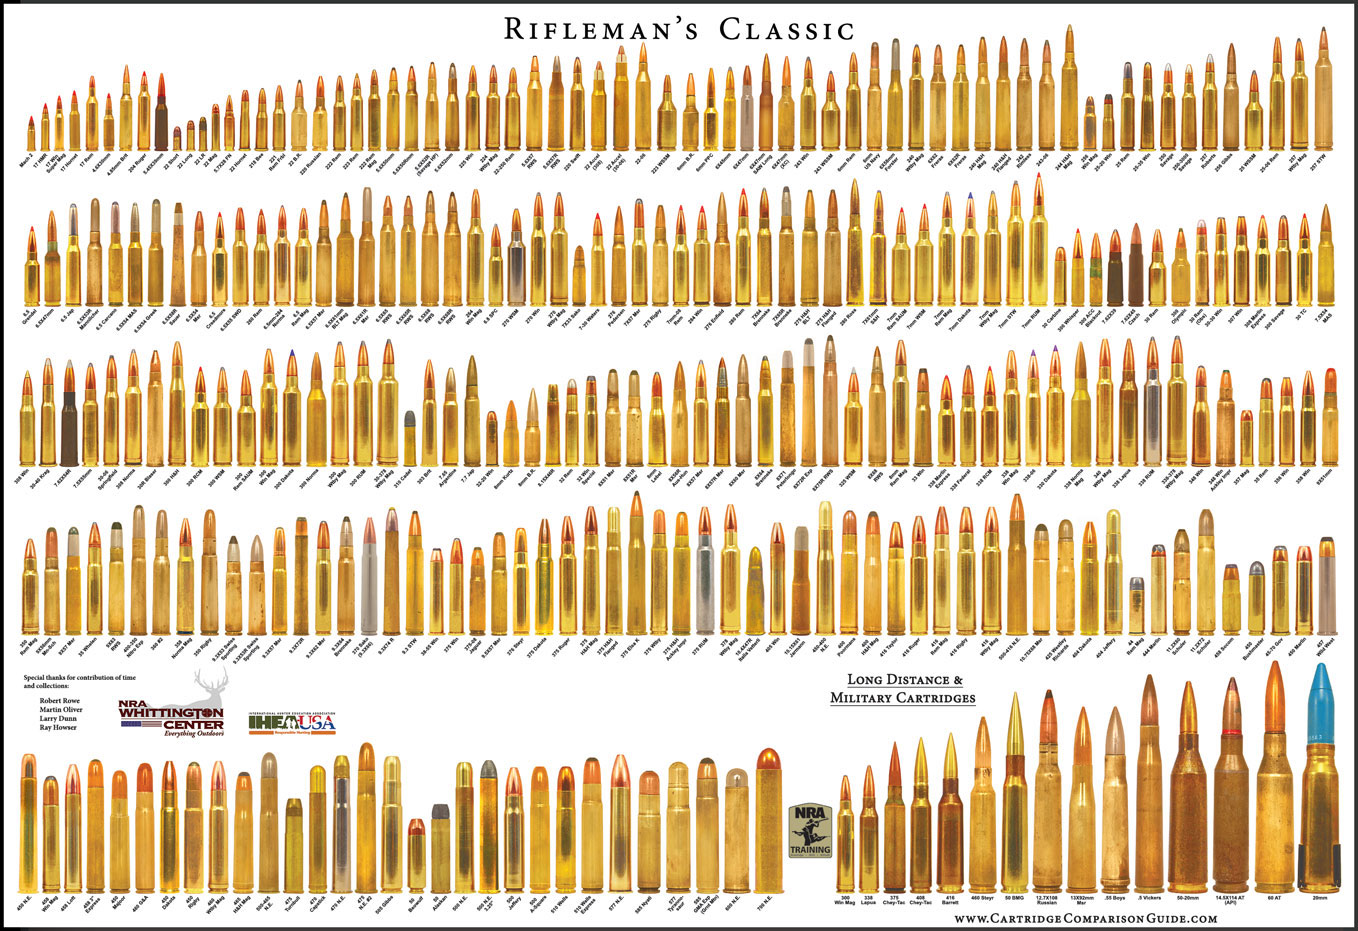
In addition to the Game & Ammo Poster, ChamberIt.com offers 15 other large wall posters that display a variety of cartridge types. For example, the Rifleman’s Classic Poster, a full 38 inches wide and 27 inches tall, is the most comprehensive. This $15.99 poster displays 272 rifle cartridge types at true size (within 4/1000 of an inch). Cartridges shown range from .17 caliber all the way up to the big boomers (including some cannon shells). The Rifleman’s Classic Poster includes all American Standardized Rifle Cartridges (as of 2013) and many European rifle cartridges.
Rifleman’s Classic Poster Click to view large size poster.
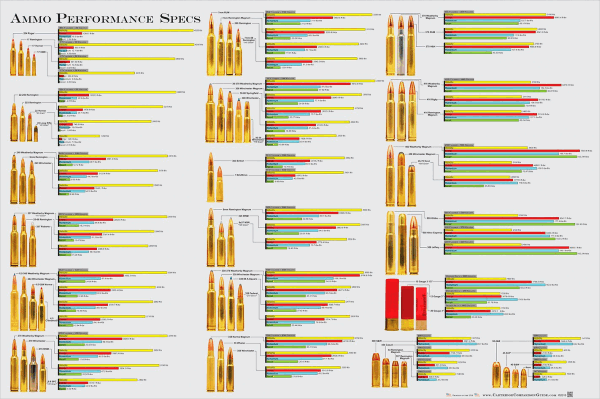
Ammunition Performance Specifications Poster
There is also an interesting Ammo Performance Specs poster. This shows dozens of popular hunting cartridges with the velocity, energy, momentum and recoil for each cartridge displayed in a bar graph.
This shows the actual size of the Ammo Performance Poster as displayed on a wall.
March 48x52mm High Master Scope — Tested in Competition
by Jay Christopherson, AccurateShooter.com Systems Admin
Using a fixed power scope on your F-Class rifle is not only effective, but can save you weight and money — key benefits when it comes to the F-Class game.
I recently tested the March High Master 48x52mm scope on my F-Open rifle in three different matches, including a Long Range Regional match in Montana and the recent 2017 US F-Class National Championships in Lodi, WI. While I’ve long been considering a fixed-power optic, it wasn’t until a recent F-TR build came in over-weight (with a large zoom scope), that I finally decided to give it a fixed-power comp scope a try. The March High Master 48x52mm saved me both weight (10.6 oz. or 300 grams) and money ($800+) compared to a top-end, variable-power March.
Across three matches and multiple conditions (including heavy mirage), I never found myself wishing that I had a variable-power scope on top of my rifle. And I never experienced issues holding rings on the target. A fixed-power scope might not be for everyone. However a serious F-Class shooter who needs to cut some weight, or save a little cash (compared to high-end zoom scope), shouldn’t be worried about being “under-glassed” with a fixed power scope such as the March HM 48x52mm. It can do the job. [Editor: Jay finished second overall in F-Open Division at the 2017 F-Class Nationals.]
The Case for A Fixed Power F-Class Optic
There’s been a thought bouncing around and growing in my head for the past few years while shooting F-Class — Why don’t more guys shoot a fixed power scope in F-Class? Nine out of ten F-Class shooters I’ve polled spend most of their time between 40 power and 50 power, regardless of the conditions. It seemed to me that a fixed power in the 40X – 50X range would be a great option.
I’ll admit, that I’ve long been an advocate of needing a variable-power scope so that I could “dial down to see the rings” on those really heavy mirage relays. There’s even been times when I’ve been successful dialing down to 35X – 25X just for that reason. But still, like most guys, I find that I rarely go above 50X and rarely below 40X – 99% of my time is spent right around 42X – 45X. Having gotten used to shooting high magnification now, it’s been quite a long time since I’ve bothered to dial down below 40X, even in very heavy mirage. But, I held on to that notion that it’s better to have it and not need it, than to need it and not have it.
I recently built an F-TR rifle. I made a slight mistake on the weight. Fully built with my zoom scope, the rig ended up at 8.3kg (8.25kg is the limit for F-TR). That’s not much overweight, but I don’t like to be too close to the limit anyhow. There are lots of ways I could have addressed the issue, but I started thinking again about the scope. I love my current variable-power scopes, but I couldn’t help thinking that a fixed power scope in the 40X – 50X range might solve my issue nicely (and give me a chance to try something new). So I obtained a March High Master 48x52mm fixed-power scope to test. The 48X magnification falls right into my comfort zone. With its 52MM objective, the March HM matched the profile of my existing variable-power scopes nicely. Aesthetics is at least part of the goal and in my opinion, 50MM+ objective scopes look “right” on F-Class rifles. It’s also worth noting that this is the only fixed power scope that I have tried so far and that I have no affiliation with the manufacturer.
There’s the notion out there that fixed power scopes have inherently brighter sight pictures or maybe “clarity” is a better word. This may be due to there being less complex lenses and fewer parts inside. I don’t have any way to quantify that, so I’ll just say that the image clarity is excellent on the 48X March. I also found that the scope weighed 300 grams less than my variable-power scope, which brought me under the F-TR weight limit nicely, as I had hoped.
Fixed-Power Scope at 2017 F-Class Nationals and Other Matches
Because my F-TR rifle was still in load development, I decided to try out the March HM 48x52mm at a couple matches on my F-Open rifle, while I waited on a part for my F-TR rifle. I fitted the 48x52mm scope to my F-Open rifle and used it at three matches: 1) a local 600-yard mid-range match in WA State; 2) the Long Range Regional at Deep Creek in Montana; and 3) the 2017 US F-Class Nationals in Lodi, WI. I ended up using it the entire match at all three matches. With three different matches, all a few weeks apart and in different parts of the country, I got a nice cross-section of light, weather, and mirage conditions to sample. At all three matches, and even in a medium-heavy mirage situation, I never found myself wishing I could dial down the power. In fact, I never thought about variable power at all — the scope was excellent in all of the different conditions. Even with a good deal of mirage present, I never had a problem making out the rings well enough to hold on. For what it’s worth, I used the scope while shooting on two different teams that set (pending) National LR and MR F-Open team records at those matches. If I didn’t have confidence in a fixed-power scope (and the March in particular), I would never have taken a chance shooting it where a team depended on me. [Editor: In individual competition, Jay finished second in F-Open at the Nationals.]
Scope Tracked Great and Click Values Were Right On
In terms of technical details, the scope tracked perfectly on my scope checker (there are several threads on the AccurateShooter forums regarding checking a scope for drift), which meant I felt comfortable using it at the F-Class Nationals. Critically, I spent a good bit of time working on the ocular focus (reticle focus) so that it would be perfectly set-up for my eye. I’ve found that many complaints about parallax and “soft” or “blurry” images can be traced back to the owner never taking this critical step with a new scope. Normally my scopes all have external, tactical-style turrets — the March HM 48×52 has covered turrets. I wondered how this would work for me, but again, I never thought about it while shooting. Once the covers are off, the clicks are extremely tactile and easy to read and it just never became an issue. The parallax adjustment works nicely and the scope tracked well with every adjustment I made, from 600 yards to 1000 yards.
What Could Be Improved
On the con side of things, I find the scale on the elevation turret to be a bit confusing. Most scopes I have used have an incrementing scale on the elevation (and windage) turrets, so that you can count up from zero as you dial up the adjustments. The 48X HM uses a ‘0’ that is centered on the turret travel (see photo above), so that you count down or up on the scale. Here, I would prefer a scale that bottoms out at zero (or that you can adjust to bottom out at zero) and then increments. I think it’s an easier and more consistent way to measure, but your mileage may vary. Other March scopes I’ve used have a color-coded system on the turrets which I also find a little less than useful. Again, I wouldn’t mind at all if March re-thought its system there.
The other con for me is the eye-relief. It’s middle of the road as far as other high-end scopes I’ve used, but for me personally, I still find it a bit on the short side — I would prefer more eye relief.
Save Hundreds Compared to a Premium Zoom Scope
On the plus side (from a cost standpoint), fixed power scopes are generally priced quite a bit lower than equivalent-quality, variable-power optics. The March HM 48x52mm (product # MAR1076) I tested is no exception. Bullets.com sells the HM 48x52mm for $1951.00. That’s $810 less than its variable-power relative, the March HM 10-60x52mm, priced at $2763.00. I consider the 48x52mm’s $1951 price to be very reasonable for such a quality piece of hardware.
Conclusion — High-Quality, Fixed-Power Scopes Are Worth Considering
Overall, if you find that you spend 99% of your time in the 40X – 50X range with your variable-power scope, I’d encourage you to give some thought to a fixed-power scope for F-Class. I’ve only tried one fixed-power optic — the March HM 48x52mm. But having used this excellent, fixed-power scope in several high-level F-Class competitions now, I’d have no qualms about recommending a high-grade, fixed-power optic to anyone shooting F-Class.
At the request of our readers, we provide select “Deals of the Week”. Every Monday morning we offer our Best Bargain selections. Here are some of the best deals on firearms, hardware, reloading components, optics, and shooting accessories. Be aware that sale prices are subject to change, and once clearance inventory is sold, it’s gone for good. You snooze you lose.
1. RCBS — Buy Green Get Green Rebate Program
RCBS just kicked off its best rebate program of the year. The Holiday 2017 Buy Green Get Green promo is simple — buy ANY RCBS product over $49.99 and you qualify. There’s no restricted list of “qualifying” products. The more you spend, the more you get back — up to $175.00 total. If you are considering purchasing a single-stage press, electronic powder dispenser, progressive press, or a full reloading kit, save big with this promotion. It is good for purchases made through the end of the year, December 31, 2017. Download REBATE Form HERE.
2. Brownells — Remington RP9, $199.99 with $100 Rem Rebate
This may be the best pistol deal of the year. Right now Brownells.com is selling the Remington RM9 for just $299.99. NOTE: This item shows out of stock, but you can back-order the Rem RM9 and still get this price. But there’s more! You can get another $100.00 off with Remington’s Pre-Black Friday Rebate Program for pistol purchases made now through November 18, 2017. So you can get this brand new 9x19mm full-size, polymer-framed pistol for just $199.99. Plus if you use Brownell’s Coupon Code “H7L” at check-out, you’ll save another $20.00 and get free shipping. That lowers your actual cost for the RP9 pistol to $179.99, or $189.99 including Brownells $10 FFL processing fee. A new pistol for $189.99 is a heck of a deal. GET Remington Rebate Form.
3. Amazon — Sightron 10-50x60mm SIII LR MOA Scope, $973.06
Match photo courtesy Varide Cicognati, Sightron dealer in Italy.
At the recent IBS 600-yard Nationals, 4 of the Top 10 shooters (including the 2nd-place finisher) used Sightron 10-50X scopes. Though reasonably priced, this 10-50x60mm optic is definitely good enough to win long-range benchrest and F-Class matches. If you’re looking for a high-magnification, variable-power target scope (with 1/8 MOA clicks), the Sightron 10-50x60mm is a smart choice. There is nothing else at the $1000.00 price point that can touch it. The new Nightforce 15-55x52mm Competition Scope is a great product, but it costs $2352.00, more than TWICE the price of the Sightron 10-50x60mm. The money you save (vs. 15-55X NF) could pay for four barrels or a custom action. On a value-for-money basis, then, the Sightron 10-50x60mm makes sense for competitors on a budget. NOTE: Other Sightron 10-50x60mm scopes with FCH, Mil-Dot, or Target Dot reticles run $1000-$1030 on Amazon.
4. Amazon — MTM AC4C Ammo Crate with 4 Ammo Boxes
Here’s a very cool product from MTM at a great price. The versatile MTM AC4C Ammo Carrier features four, lockable polymer ammo cans in a fitted, four-slot 23.5” x 11.3” x 7.5” carry crate. This makes it easy to haul four full ammo cans. Actual purchasers have raved: “Moments after I received this storage box set I ordered another. Very well built and great design. Awesome and a steal at the price.” Right now this is on sale at Amazon for just $29.99 with free prime shipping. The system includes four lockable, O-Ring 11.3″ x 7.2″ x 5″ ammo cans (AC30T) for multi-caliber ammo storage. The crate even includes tie-down points for transport in a cart or ATV. NOTE: Earlier this summer this MTM AC4C system sold for $39.99. The current $29.99 price represents a 25% savings! See price chart below.
5. Natchez — Lowest Prices Ever on Swarovski Z3 Scopes
Swarovski makes superb optics. The riflescope glass is exceptionally clear and sharp, and the controls have a refined feel. No question, Swarovski makes a premium product. And right now you can get Swaro scopes at exceptionally low prices. These are some of the best deals we’ve ever seen on Swarovski Z3 riflescopes. Jason Gebhart, Swarovski Regional Sales Director said, “The Z3 is a proven product… this Z3 Seasonal Savings Event gives people an excellent opportunity to purchase the finest optics in the world and become part of our family at an incredible price.”
The Ruger LCP is the #1-selling pistol in the USA according to Gun Broker. And now you can get this compact carry piece for just $169.00 at Bud’s Gun Shop. Great deal. The Ruger LCP is light (9.6 ounces) and compact (5.16″ OAL), so you’re more likely to carry it regularly. The .380 ACP cartridge is not as powerful as a 9x19mm or 40 S&W to be sure, but when your life is on the line, a small gun is certainly better than no gun. For those looking for a light-weight, easy-to-conceal handgun, this little Ruger is a solid choice. Owner reviews have been positive and the $169.00 price (with free shipping) is hard to beat. That’s for payment via money orders, checks, or echecks; credit card price is $174.07.
7. American Eagle Pistol Ammo, 25% OFF Manufacturer Rebate
Rebate Extended to December 31, 2017!
Here’s a great Rebate offer from Federal Premium Ammunition. Now through December 31st, 2017, you can get 25% OFF the cost of Federal American Eagle brass-cased pistol ammo. We’ve used this ammo in .380 ACP, 9mm Luger, .40 S&W, and .45 ACP and we can say it’s good stuff — very reliable and cleaner that some other less-expensive brands. Midsouth Shooters Supply has qualifying American Eagle Ammo in a variety of calibers: .25 ACP, .380 ACP, 9mm Luger, .38 SPL, .357 SIG, .357 Magnum, 40 S&W, .44 Rem Magnum, .45 ACP. Midsouth’s American Eagle Ammo starts at $11.99 for 50 rounds of 9mm Luger. The 25% OFF Super Savings Rebate reduces the price to just $8.99 per 50-ct box. CLICK HERE for Rebate Form.
8. CDNN — 51-Piece Driver Set (Flat-Head, Phillips, Hex, Torx)
This Outers-brand, 51-piece set contains all the drivers you could ever need: Flat-head, Phillips, Hex (Allen), and Torx. Priced under ten bucks, this driver set offers great value for the money. Even if you already own high-quality Allen and Torx wrenches, you can buy this as a spare set for your gun room. And this also makes a great holiday “stocking stuffer” for gun guys. These drivers work great for installing scope rings or bases, or everyday use around the home.
• Molded Driver with Magnetic Tip
• 15 Flat Head Bits
• 10 Hex Bits (inch)
• 9 Hex Bits (metric)
• 4 Phillips Bits
• 9 Torx Bits
• 2 Extra Long Phillips Bits
• 1 Hex to Square Adapter
We use 1″-diameter Target Spots for sight-in and practice at 100-300 yards. These bright red/orange self-adhesive dots are easy to see. At 100 yards the high-contrast black diamond centers provide precise aiming points. We found this 10-pack of target spots on Amazon at a rock-bottom price. You get 630 total stick-on dots for just $9.65 with FREE Shipping. You can also get 360 Birchwood Casey 1″ dots from Midsouth for just $3.15, but shipping is extra. If you’re already ordering something from Midsouth, you may want to add the dots to your order.
Carbon fiber offers superior stiffness/strength with ultra-light weight. That’s why you see carbon-fiber components in F1 race cars and fighter jets. Carbon fiber composites are widely used in modern aircraft, where the composites’ superior strength-to-weight ratio far exceeds that of metal. While 30% of all carbon fiber is used in the aerospace industry, carbon fiber is also used in high-tech bicycle frames, golf clubs, and archery equipment. Carbon fiber composites are used wherever high strength and low weight are “mission critical”.
Now carbon fiber is being used in rifle optics. Kruger Optical has released the all-new KC6™ carbon fiber riflescope series. We believe this is the first production use of carbon fiber composites in rifle optics main tubes. Two KC6™ models are currently offered, a compact 1-6x24mm weighing 16 ounces, and a 3-18x50mm weighing 26.5 ounces. Both scopes are illuminated, with Second Focal Plane reticles, and “Zero-Stop” turrets. Sorry, we don’t have pricing yet. KC6™ SPEC Sheet.
At 26.5 ounces, Kruger’s 3-18X model, with 34mm main tube, is lighter than many optics in its class. For example the Vortex Razor HD GenII 3-18x50mm weighs 46.5 ounces — twenty ounces more than the Kruger. However, the new Leupold VX6-HD 3-18x50mm weighs only 20.4 ounces, six ounces LESS than the carbon Kruger. Cogitate on that. It seems that an overall compact design may deliver more weight savings than a carbon fiber main tube. But we still like Kruger’s innovative use of carbon composite technology. We envision a time when carbon is more widely used in a variety of key rifle parts, not just optics.
Weight Comparison, Carbon vs. Aluminum
Kruger KC6™ 3-18x50mm (Carbon Main Tube): 26.5 ounces
Leupold VX6-HD 3-18x50mm (Aluminum Main Tube): 20.4 ounces
Vortex Razor HD GenII 3-18x50mm (Aluminum Main Tube): 46.5 ounces
Kruger states: “Using a proprietary and patent-pending process, we’ve created an elite product that’s significantly stronger and lighter than traditional aluminum scopes. Kruger has spent more than five years making the KC6™ Series a reality. Due to the unique strength properties of carbon fiber, our patent-pending KC6™ scopes are notably lighter, stronger and more durable than traditional 6X riflescopes.”
Incorporating carbon fiber technology used in fighter jets and race cars, the Kruger KC6™ scopes offer a distinctive appearance — the visible weave of carbon strands. Kruger claims these U.S.-engineered scopes offer excellent image clarity, plus “exceptional low-light performance”. We’d like to test one of these Kruger scopes to see how it compares to premium optics with conventional aluminum main tubes.
New Product Tip from Boyd Allen. We welcome reader submissions.
Craters may look interesting on the moon, but you don’t want to see them on your primers. Certain mechanical issues that cause primer craters can also cause primer piercing — a serious safety problem that needs to be addressed. If you have a gun that is cratering primers (even at moderate pressure levels), there is a solution that works with many rifles — send your bolt to Greg Tannel to have the firing pin hole bushed. CLICK HERE.
Shooters who convert factory actions to run 6BRs, 6PPCs or other high-pressure cartridges should consider having the firing pin bushed. These modern cartridges like to run at high pressures. When running stout loads, you can get cratering caused by primer flow around the firing pin hole in the bolt face. The reason is a little complicated, but basically the larger the hole, the less hydraulic pressure is required to crater the primer. A limited amount of cratering is normally not a big issue, but you can reduce the problem significantly by having a smith fit a bushing in the firing pin hole. In addition to reduced cratering, bushing the firing pin often produces more consistent ignition.
This is a highly recommended procedure that our editors have had done to their own rifles. Greg Tannel (Gre-Tan Rifles) is an expert at this procedure, and he does excellent work on a wide variety of bolts. Current price for a bushing job, which includes turning the firing pin to .062″, is $80.00, or $88.00 with USPS Priority Mail return shipping.
If you have a factory rifle, a bushed firing pin is the way to go if you are shooting the high-pressure cartridges such as 6PPC, 6BR, 6-6.5×47 and 6.5×47. This is one of the most cost-effective and beneficial upgrades you can do to your factory rifle. For more info on the Firing Pin Bushing process, visit GreTanRifles.com, or email greg [at] gretanrifles.com. (After clicking the link for GreTanRifles.com, Click on “Services” > “Shop Services” > “Bolt Work”, and you’ll see, in the lower left, a listing for “Bush Firing Pin Hole & Turn Pin”. Click on that box.)
Firing Pin Hole Bushing by Greg Tannel
Work Done: Bush firing pin hole and turn pin.
Functions: Fixes your cratering and piercing problems.
Price: $80.00 + $8.00 return shipping Total Price: $88.00
Actions for which Bushing is Offered: Remington, Winchester, Savage multi-piece pin, Sako, Kimber, Nesika, Stiller, BAT Machine, Kelbly, Lawton, Surgeon, Borden, Wichita, Hall, Ruger, Howa, Weatherby, Dakota, Pacific Tool, Phoenix, and Defiant bolt action rifle or pistol.
Actions for which Bushing is NOT Available: Case hardened receivers, ARs, Accuracy International (AI), Barnard, Big Horn, Cooper, Desert Tactical Arms, Kimber, Rosenthal, New Savage single piece pin, Rim fires, Falling block, Break open, Lever, Pump rifles, 1903-A3, CZ, Mauser.
How to send your bolt in to be bushed:
You can send your bolt snail mail, priority mail, or UPS (Please do not use FEDEX as it sometimes has delivery delays). Pack your bolt carefully and ship to: Gre’-Tan Rifles, 24005 Hwy. 13, Rifle CO 81650. Please include your name, phone number, and return shipping address.
Due to the high volume of work, turn around is 5 to 8 weeks on bushing a bolt. Three or more bolts will be sent back to you UPS and we will have to calculate shipping. We can overnight them at your expense. You can pay by check, money order, or credit card. For more information visit GretanRifles.com.
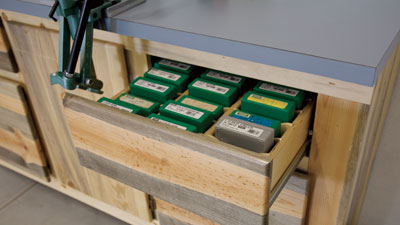
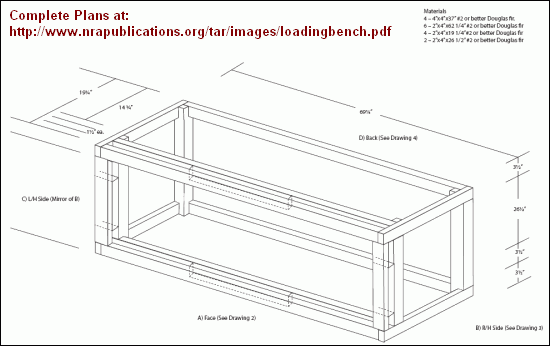
A while back, the American Rifleman magazine published an excellent article showing how to construct a rock-solid Reloading Bench. This bench is very well-designed, with many deluxe features, such as an upper drawer with fitted slots for die boxes, and large lower drawers with 100-lb rated slides to store heavy materials or tools. If you have good wood-working skills this would be an excellent project. You can download a detailed set of Bench Blueprints showing all dimensions and listing all needed materials.
The author, Dave Campbell, offers good advice on building the bench top: “I ripped a sheet of 3/4″ AC plywood into two 24″ wide pieces and cut them to 72″ long. Then I glued them together to form a 72″ long, 1 1/24″ thick top. The trick here is to keep the edges smooth and flat so that the laminate will adhere properly and without voids. I chose a light grey laminate finish for the top because it’s easier to see what I am working on and keep clean. If you have never worked with laminate, remember it’s prudent to glue and rout the edges flush before gluing on the top. The top was attached to the carcass with eight steel L-shaped angle brackets and No. 10×1 1/4″ wood screws.”
Here’s an interesting project — using a second-hand barrel to upgrade an AR15. Our friend Erik Cortina decided to make his AR15, originally chambered in 6.8 SPC, into a 6.5 Grendel. Erik acquired a “pre-owned” 6.5-06 match barrel through our Shooters’ Forum. Erik inspected the barrel with a bore-scope and confirmed it was in good shape after the first few inches (past the chamber).
The 6.5-06 barrel had more than enough length, so he trimmed off the chamber end, then contoured the barrel to fit his AR15. This is a smart way to upgrade a gun without spending $350 or more on a brand new barrel.
In the first video, Erik explains the process of converting his 6.8 SPC AR15 into a 6.5 Grendel: “I take the upper completely apart and pull barrel off which will be used to take dimensions for new barrel. The new barrel will be turned from an old competition heavy barrel. All the barrel reaming will be done using JGS reamers. I will also use JGS reamers to make a seating and F/L sizing die.”
In the second video, Erik contours the “pre-owned” barrel to fit his AR. He uses an old bolt-action 6.5-06 competition barrel and cuts it to 17″ long and contours it to fit his AR-15. The barrel is turned down on a manual lathe to .750″ outside diameter for the majority of its length in order to fit the gas system barrel block that is made for a .750″ barrel. After contouring, the barrel will be threaded and chambered.
Looking to acquire a handgun for personal protection of home and family? There are countless options on the market. Your buying decision may be simplified by seeing what other consumers have chosen, as revealed by nationwide sales trends. You can now check firearms sales figures using “Gun Genius”, a new data-crunching service of Gunbroker.com. On GunGenius.com you can select any type of firearm (handgun, rifle, shotgun) and see the top sellers for that category.
Here are the five (5) top-selling NEW semi-auto handguns for October 2017:
And here are the five (5) top-selling USED semi-auto handguns for October 2017:
Gun Genius — How It Works
With GunGenius.com you can look for top sellers by category: semi-auto pistols, revolvers, semi-auto rifles, bolt-action rifles, lever-action rifles, single-shot rifles, semi-auto shotguns, pump shotguns, and more. Select between new guns and used guns for all categories. You can also filter for guns trending up or trending down in recent sales records. Drill down to see detailed product specifications and current prices.


 This video, produced for the folks at S&S Precision in Denton, Texas, shows a full custom 6.5×47 bench rifle being crafted from start to finish. It is a fantastic video, one of the best precision rifles video you’ll find on YouTube. It shows every aspect of the job — action bedding, chambering, barrel-fitting, muzzle crowning, and stock finishing.


 Craters may look interesting on the moon, but you don’t want to see them on your primers. Certain mechanical issues that cause primer craters can also cause primer piercing — a serious safety problem that needs to be addressed. If you have a gun that is cratering primers (even at moderate pressure levels), there is a solution that works with many rifles — send your bolt to
  Firing Pin Hole Bushing by Greg Tannel